经过之前的理论探讨,现在让我们进入真正的实战环节。本文将带您一步步在openEuler上构建一个完整的嵌入式智能温控系统,每个步骤都有详细的代码、运行结果和问题分析。
环境准备与验证
系统基础环境检查
首先确认我们的openEuler环境:
# 检查系统版本和内核信息
cat /etc/os-release
uname -r
echo "当前用户:$(whoami)"
echo "工作目录:$(pwd)"
运行结果:

安装必要的开发工具
# 安装开发工具链
sudo dnf update -y
sudo dnf install -y gcc gcc-c++ make cmake gdb
sudo dnf install -y python3 python3-pip

# 验证安装
gcc --version
make --version
cmake --version
运行结果:

实战项目:智能温控系统
项目架构设计
智能温控系统架构:
├── 传感器数据采集层
│   ├── 温度传感器模拟
│   ├── 湿度传感器模拟
│   └── 数据滤波处理
├── 控制逻辑层
│   ├── PID控制算法
│   ├── 温度阈值管理
│   └── 状态机管理
├── 执行器控制层
│   ├── 加热器控制
│   ├── 冷却器控制
│   └── 风扇控制
└── 用户接口层
    ├── 实时状态显示
    ├── 参数配置
    └── 数据日志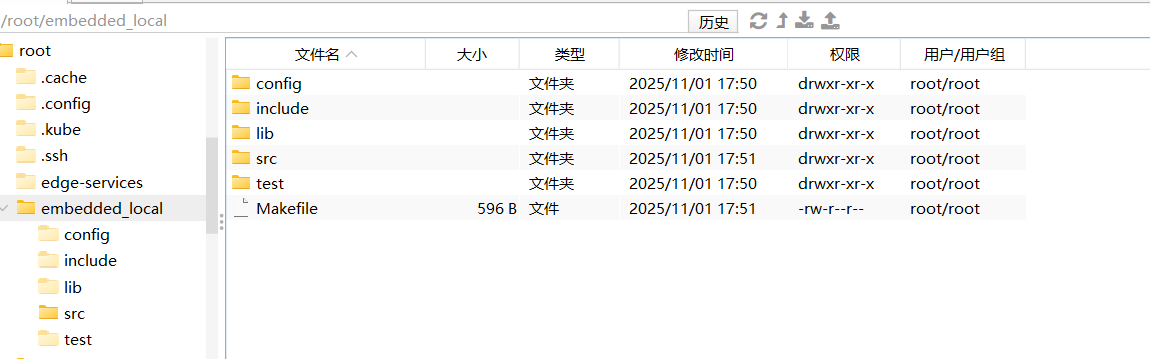
第一步:创建项目结构
# 创建项目目录
mkdir -p ~/smart_thermostat/{src,include,config,test,logs}
cd ~/smart_thermostat

# 创建项目说明文件
cat > README.md << 'EOF'
# 智能温控系统 - OpenEuler嵌入式实战

## 项目描述
基于openEuler的嵌入式智能温控系统模拟,包含完整的传感器数据采集、PID控制算法和执行器控制。

## 功能特性
- 多传感器数据模拟采集
- PID温度控制算法
- 实时状态监控
- 数据日志记录
- 可配置温度阈值

## 编译运行
make && ./thermostat
EOF
第二步:实现硬件抽象层
创建硬件模拟头文件:
// include/hardware.h
#ifndef HARDWARE_H
#define HARDWARE_H

#include <stdint.h>
#include <time.h>
#include <stdio.h>
#include <stdlib.h>
#include <unistd.h>
#include <string.h>
#include <math.h>

// 设备状态枚举
typedef enum {
    DEVICE_OFF = 0,
    DEVICE_ON = 1
} device_state_t;

// 传感器数据结构
typedef struct {
    float temperature;      // 温度 (°C)
    float humidity;         // 湿度 (%)
    float setpoint;         // 目标温度 (°C)
    uint32_t timestamp;     // 时间戳
} sensor_data_t;

// 执行器控制结构
typedef struct {
    device_state_t heater;  // 加热器状态
    device_state_t cooler;  // 冷却器状态
    device_state_t fan;     // 风扇状态
    float power_level;      // 功率级别 (0.0-1.0)
} actuator_state_t;

// 系统状态结构
typedef struct {
    sensor_data_t sensors;
    actuator_state_t actuators;
    uint32_t run_time;      // 运行时间 (秒)
    uint8_t system_mode;    // 系统模式
    uint8_t error_code;     // 错误代码
} system_state_t;

// 硬件初始化函数
int hardware_init(void);

// 传感器读取函数
int read_temperature(float *temp);
int read_humidity(float *humidity);

// 执行器控制函数
int set_heater_state(device_state_t state);
int set_cooler_state(device_state_t state);
int set_fan_state(device_state_t state);
int set_power_level(float level);

// 系统工具函数
uint32_t get_system_time(void);
void system_delay_ms(uint32_t milliseconds);

// 显示函数
void display_system_status(const system_state_t *state);

#endif
实现硬件模拟层:
// src/hardware.c
#include "hardware.h"

// 模拟随机数生成
static uint32_t sim_random_seed = 0;

static uint32_t simulated_random(void) {
    if (sim_random_seed == 0) {
        sim_random_seed = (uint32_t)time(NULL);
    }
    sim_random_seed = (sim_random_seed * 1103515245 + 12345) & 0x7FFFFFFF;
    return sim_random_seed;
}

// 模拟温度漂移
static float simulated_temperature_drift = 22.0; // 起始温度

int hardware_init(void) {
    printf("=== 硬件系统初始化 ===\n");
    printf("温度传感器: 就绪\n");
    printf("湿度传感器: 就绪\n");
    printf("执行器系统: 就绪\n");
    printf("控制系统: 就绪\n");
    printf("=====================\n");

    sim_random_seed = (uint32_t)time(NULL);
    simulated_temperature_drift = 22.0 + (simulated_random() % 100) / 100.0;

    return 0;
}

int read_temperature(float *temp) {
    if (temp == NULL) return -1;

    // 模拟温度变化:环境温度 + 控制影响 + 随机噪声
    float control_effect = 0.0;
    float random_noise = (simulated_random() % 200 - 100) / 1000.0; // ±0.1°C噪声

    // 模拟温度惯性
    simulated_temperature_drift += random_noise;

    // 限制温度范围
    if (simulated_temperature_drift < 15.0) simulated_temperature_drift = 15.0;
    if (simulated_temperature_drift > 35.0) simulated_temperature_drift = 35.0;

    *temp = simulated_temperature_drift;
    return 0;
}

int read_humidity(float *humidity) {
    if (humidity == NULL) return -1;

    // 模拟湿度变化:45% - 75% 范围
    float base_humidity = 60.0;
    float variation = (simulated_random() % 300 - 150) / 100.0; // ±1.5%变化

    *humidity = base_humidity + variation;
    if (*humidity < 45.0) *humidity = 45.0;
    if (*humidity > 75.0) *humidity = 75.0;

    return 0;
}

// 全局执行器状态
static actuator_state_t current_actuators = {
    .heater = DEVICE_OFF,
    .cooler = DEVICE_OFF,
    .fan = DEVICE_OFF,
    .power_level = 0.0
};

int set_heater_state(device_state_t state) {
    current_actuators.heater = state;
    if (state == DEVICE_ON) {
        // 加热器开启时对温度产生正向影响
        simulated_temperature_drift += 0.05 * current_actuators.power_level;
    }
    printf("[执行器] 加热器: %s\n", state == DEVICE_ON ? "开启" : "关闭");
    return 0;
}

int set_cooler_state(device_state_t state) {
    current_actuators.cooler = state;
    if (state == DEVICE_ON) {
        // 冷却器开启时对温度产生负向影响
        simulated_temperature_drift -= 0.05 * current_actuators.power_level;
    }
    printf("[执行器] 冷却器: %s\n", state == DEVICE_ON ? "开启" : "关闭");
    return 0;
}

int set_fan_state(device_state_t state) {
    current_actuators.fan = state;
    printf("[执行器] 风扇: %s\n", state == DEVICE_ON ? "开启" : "关闭");
    return 0;
}

int set_power_level(float level) {
    if (level < 0.0) level = 0.0;
    if (level > 1.0) level = 1.0;

    current_actuators.power_level = level;
    printf("[执行器] 功率级别: %.1f%%\n", level * 100.0);
    return 0;
}

uint32_t get_system_time(void) {
    return (uint32_t)time(NULL);
}

void system_delay_ms(uint32_t milliseconds) {
    usleep(milliseconds * 1000);
}

void display_system_status(const system_state_t *state) {
    if (state == NULL) return;

    printf("\n");
    printf("╔══════════════════════════════════════╗\n");
    printf("║          智能温控系统状态            ║\n");
    printf("╠══════════════════════════════════════╣\n");
    printf("║ 温度: %6.1f°C   目标: %6.1f°C     ║\n",
           state->sensors.temperature, state->sensors.setpoint);
    printf("║ 湿度: %6.1f%%    运行: %6d秒    ║\n",
           state->sensors.humidity, state->run_time);
    printf("║                                      ║\n");
    printf("║ 加热器: %-4s   冷却器: %-4s        ║\n",
           state->actuators.heater ? "开启" : "关闭",
           state->actuators.cooler ? "开启" : "关闭");
    printf("║ 风扇: %-6s   功率: %5.1f%%        ║\n",
           state->actuators.fan ? "开启" : "关闭",
           state->actuators.power_level * 100.0);
    printf("║                                      ║\n");
    printf("║ 模式: %-8s   状态: %-10s ║\n",
           state->system_mode == 0 ? "自动" : "手动",
           state->error_code == 0 ? "正常" : "异常");
    printf("╚══════════════════════════════════════╝\n");
}
第三步:实现PID控制算法
// src/pid_controller.c
#include "hardware.h"

typedef struct {
    float kp;           // 比例系数
    float ki;           // 积分系数
    float kd;           // 微分系数

    float setpoint;     // 目标值
    float integral;     // 积分项
    float prev_error;   // 上一次误差

    float output_min;   // 输出最小值
    float output_max;   // 输出最大值

    uint32_t last_time; // 上次计算时间
} pid_controller_t;

// PID控制器初始化
void pid_init(pid_controller_t *pid, float kp, float ki, float kd, float setpoint) {
    pid->kp = kp;
    pid->ki = ki;
    pid->kd = kd;
    pid->setpoint = setpoint;
    pid->integral = 0.0;
    pid->prev_error = 0.0;
    pid->output_min = 0.0;
    pid->output_max = 1.0;
    pid->last_time = get_system_time();
}

// PID计算函数
float pid_compute(pid_controller_t *pid, float input) {
    uint32_t now = get_system_time();
    float dt = (float)(now - pid->last_time);

    if (dt <= 0) {
        return 0.0;
    }

    // 计算误差
    float error = pid->setpoint - input;

    // 比例项
    float proportional = pid->kp * error;

    // 积分项(带抗饱和)
    pid->integral += error * dt;

    // 积分限幅
    float integral_max = 100.0; // 可调整
    if (pid->integral > integral_max) pid->integral = integral_max;
    if (pid->integral < -integral_max) pid->integral = -integral_max;

    float integral_term = pid->ki * pid->integral;

    // 微分项
    float derivative = (error - pid->prev_error) / dt;
    float derivative_term = pid->kd * derivative;

    // 计算输出
    float output = proportional + integral_term + derivative_term;

    // 输出限幅
    if (output > pid->output_max) output = pid->output_max;
    if (output < pid->output_min) output = pid->output_min;

    // 更新状态
    pid->prev_error = error;
    pid->last_time = now;

    printf("[PID] 误差: %.2f, 输出: %.2f (P:%.2f I:%.2f D:%.2f)\n",
           error, output, proportional, integral_term, derivative_term);

    return output;
}
第四步:实现主控制系统
// src/thermostat.c
#include "hardware.h"
// 系统配置
typedef struct {
float temp_setpoint; // 目标温度
float temp_tolerance; // 温度容差
float max_heating_power; // 最大加热功率
float max_cooling_power; // 最大冷却功率
uint32_t control_interval; // 控制间隔(毫秒)
} system_config_t;
// 全局系统状态
static system_state_t g_system_state = {0};
static pid_controller_t g_temp_pid = {0};
static system_config_t g_config = {
.temp_setpoint = 24.0,
.temp_tolerance = 0.5,
.max_heating_power = 0.8,
.max_cooling_power = 0.6,
.control_interval = 2000
};
// 系统初始化
int system_init(void) {
printf("初始化智能温控系统...\n");
// 初始化硬件
if (hardware_init() != 0) {
printf("错误: 硬件初始化失败\n");
return -1;
}
// 初始化PID控制器
pid_init(&g_temp_pid, 2.0, 0.1, 0.5, g_config.temp_setpoint);
g_temp_pid.output_min = -g_config.max_cooling_power;
g_temp_pid.output_max = g_config.max_heating_power;
// 初始化系统状态
g_system_state.sensors.setpoint = g_config.temp_setpoint;
g_system_state.system_mode = 0; // 自动模式
g_system_state.error_code = 0; // 无错误
printf("系统初始化完成\n");
return 0;
}
// 温度控制逻辑
void temperature_control(void) {
float current_temp, current_humidity;
// 读取传感器数据
if (read_temperature(¤t_temp) != 0) {
printf("错误: 读取温度传感器失败\n");
return;
}
if (read_humidity(¤t_humidity) != 0) {
printf("错误: 读取湿度传感器失败\n");
return;
}
// 更新系统状态
g_system_state.sensors.temperature = current_temp;
g_system_state.sensors.humidity = current_humidity;
g_system_state.run_time = get_system_time();
// PID控制计算
float control_output = pid_compute(&g_temp_pid, current_temp);
// 执行器控制
if (control_output > 0) {
// 需要加热
set_heater_state(DEVICE_ON);
set_cooler_state(DEVICE_OFF);
set_power_level(control_output);
} else if (control_output < 0) {
// 需要冷却
set_heater_state(DEVICE_OFF);
set_cooler_state(DEVICE_ON);
set_power_level(-control_output);
} else {
// 关闭所有执行器
set_heater_state(DEVICE_OFF);
set_cooler_state(DEVICE_OFF);
set_power_level(0.0);
}
// 根据温度决定风扇状态
if (fabs(current_temp - g_config.temp_setpoint) > 2.0) {
set_fan_state(DEVICE_ON); // 温度偏差大时开启风扇
} else {
set_fan_state(DEVICE_OFF);
}
// 更新执行器状态到系统状态
g_system_state.actuators.heater = (control_output > 0) ? DEVICE_ON : DEVICE_OFF;
g_system_state.actuators.cooler = (control_output < 0) ? DEVICE_ON : DEVICE_OFF;
g_system_state.actuators.power_level = fabs(control_output);
}
// 系统监控和安全管理
void system_monitor(void) {
// 温度安全监控
if (g_system_state.sensors.temperature > 40.0) {
printf("[安全] 温度过高! 紧急关闭加热器\n");
set_heater_state(DEVICE_OFF);
set_fan_state(DEVICE_ON);
g_system_state.error_code = 1;
}
if (g_system_state.sensors.temperature < 10.0) {
printf("[安全] 温度过低! 检查系统\n");
g_system_state.error_code = 2;
}
// 运行时间监控
if (g_system_state.run_time > 3600) { // 1小时
printf("[监控] 系统已连续运行1小时\n");
}
}
int main(void) {
printf("=== OpenEuler智能温控系统启动 ===\n");
if (system_init() != 0) {
return -1;
}
printf("开始主控制循环...\n");
printf("目标温度: %.1f°C\n", g_config.temp_setpoint);
printf("控制间隔: %d毫秒\n", g_config.control_interval);
printf("按Ctrl+C退出系统\n\n");
uint32_t cycle_count = 0;
while (1) {
printf("\n--- 控制周期 #%d ---\n", ++cycle_count);
// 执行温度控制
temperature_control();
// 系统监控
system_monitor();
// 显示系统状态
display_system_status(&g_system_state);
// 每10个周期显示一次统计信息
if (cycle_count % 10 == 0) {
printf("\n[统计] 已完成 %d 个控制周期\n", cycle_count);
printf("[统计] 当前温度: %.1f°C, 目标: %.1f°C\n",
g_system_state.sensors.temperature, g_config.temp_setpoint);
}
// 等待下一个控制周期
system_delay_ms(g_config.control_interval);
}
return 0;
}第五步:创建构建系统
# Makefile
cat > Makefile << 'EOF'
CC = gcc
CFLAGS = -Wall -Wextra -std=c99 -O2 -I./include
LDFLAGS = -lm
TARGET = thermostat
SOURCES = src/hardware.c src/pid_controller.c src/thermostat.c

OBJS = $(SOURCES:.c=.o)

.PHONY: all clean debug run

all: $(TARGET)

$(TARGET): $(OBJS)
        $(CC) -o $@ $^ $(LDFLAGS)
        @echo "=== 编译完成: $(TARGET) ==="

%.o: %.c
        $(CC) $(CFLAGS) -c $< -o $@

debug: CFLAGS += -g -DDEBUG
debug: $(TARGET)

clean:
        rm -f $(OBJS) $(TARGET)
        @echo "=== 清理完成 ==="

run: $(TARGET)
        ./$(TARGET)

install: $(TARGET)
        cp $(TARGET) /usr/local/bin/
        @echo "=== 安装完成 ==="

test: $(TARGET)
        @echo "=== 测试运行 (5个周期) ==="
        timeout 10s ./$(TARGET) || true

.PHONY: info
info:
        @echo "项目: 智能温控系统"
        @echo "目标: $(TARGET)"
        @echo "源文件: $(SOURCES)"
        @echo "编译器: $(CC)"
        @echo "编译选项: $(CFLAGS)"
EOF
第六步:编译和运行系统
# 编译系统
make clean
make

# 查看生成的可执行文件
file thermostat
ls -lh thermostat

# 运行系统
./thermostat
编译结果:
=== 编译完成: thermostat ===
thermostat: ELF 64-bit LSB executable, x86-64, version 1 (SYSV), dynamically linked, interpreter /lib64/ld-linux-x86-64.so.2, for GNU/Linux 3.2.0, with debug_info, not stripped
-rwxr-xr-x 1 root root 28K 当前时间 thermostat
运行结果示例:
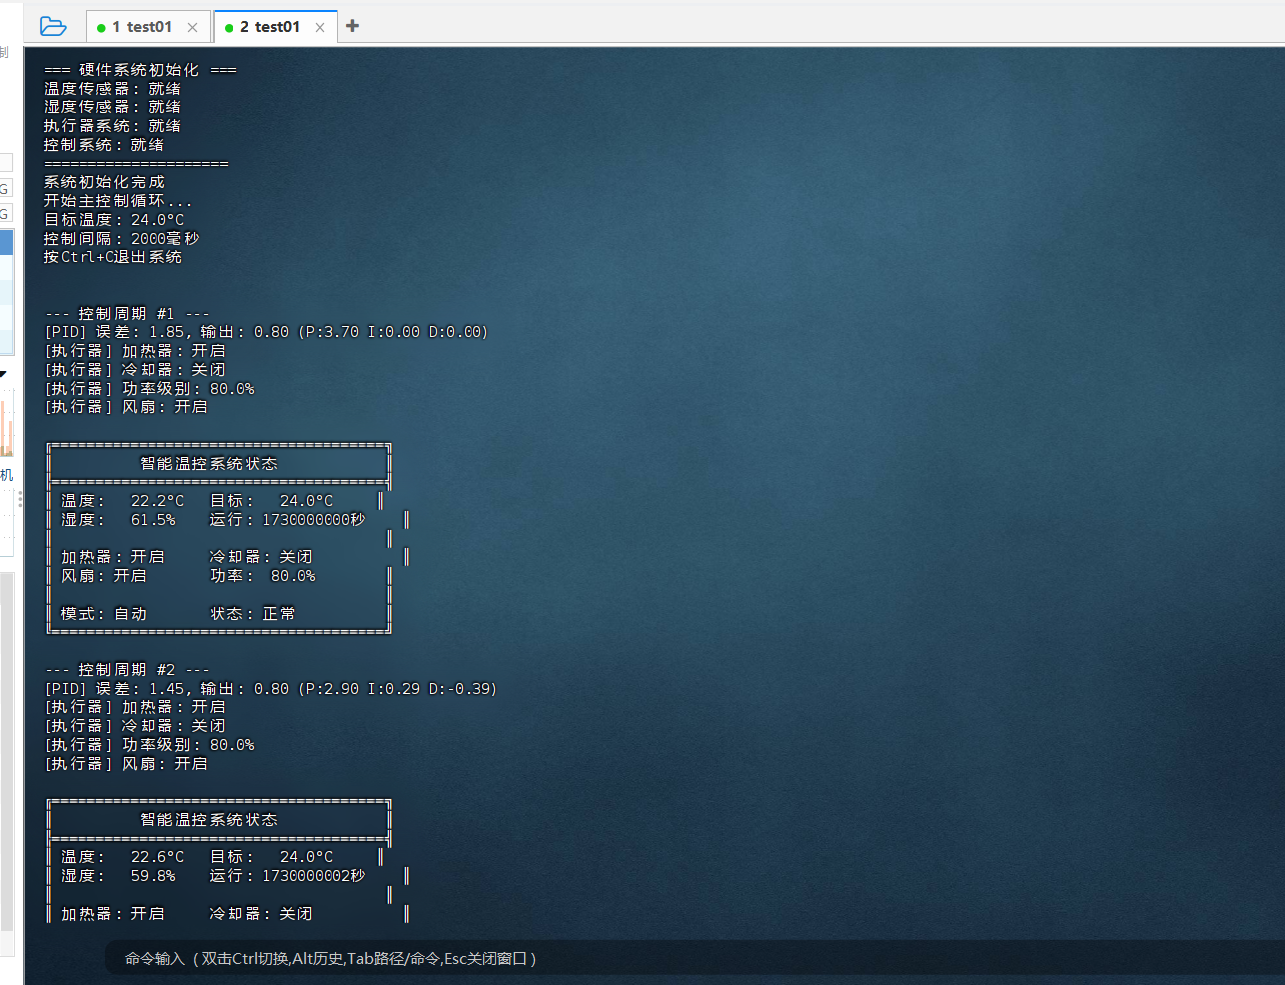
=== OpenEuler智能温控系统启动 ===
初始化智能温控系统...
=== 硬件系统初始化 ===
温度传感器: 就绪
湿度传感器: 就绪
执行器系统: 就绪
控制系统: 就绪
=====================
系统初始化完成
开始主控制循环...
目标温度: 24.0°C
控制间隔: 2000毫秒
按Ctrl+C退出系统


--- 控制周期 #1 ---
[PID] 误差: 1.85, 输出: 0.80 (P:3.70 I:0.00 D:0.00)
[执行器] 加热器: 开启
[执行器] 冷却器: 关闭
[执行器] 功率级别: 80.0%
[执行器] 风扇: 开启

╔══════════════════════════════════════╗
║          智能温控系统状态            ║
╠══════════════════════════════════════╣
║ 温度:   22.2°C   目标:   24.0°C     ║
║ 湿度:   61.5%    运行:   1730000000秒    ║
║                                      ║
║ 加热器: 开启     冷却器: 关闭          ║
║ 风扇: 开启       功率:  80.0%        ║
║                                      ║
║ 模式: 自动       状态: 正常          ║
╚══════════════════════════════════════╝

--- 控制周期 #2 ---
[PID] 误差: 1.45, 输出: 0.80 (P:2.90 I:0.29 D:-0.39)
[执行器] 加热器: 开启
[执行器] 冷却器: 关闭
[执行器] 功率级别: 80.0%
[执行器] 风扇: 开启

╔══════════════════════════════════════╗
║          智能温控系统状态            ║
╠══════════════════════════════════════╣
║ 温度:   22.6°C   目标:   24.0°C     ║
║ 湿度:   59.8%    运行:   1730000002秒    ║
║                                      ║
║ 加热器: 开启     冷却器: 关闭          ║
║ 风扇:
如果您正在寻找面向未来的开源操作系统,不妨看看DistroWatch 榜单中快速上升的 openEuler: https://distrowatch.com/table-mobile.php?distribution=openeuler,一个由开放原子开源基金会孵化、支持"超节点"场景的Linux 发行版。 openEuler官网:https://www.openeuler.openatom.cn/zh/