Python长图拼接终极指南:Pillow/OpenCV/ImageMagick三方案(含代码+图解)
前言
日常工作中,你是否需要将聊天记录、网页截图、扫描件拼接成一张长图?手动用画图工具拖拽不仅效率低,还容易错位。本文整合三种Python长图拼接方案------纯Python的Pillow(简单易上手)、OpenCV(高性能批量处理)、ImageMagick(外部工具调用,功能强大),覆盖纵向/横向/宫格布局,附完整可复用代码和mermaid图解,帮你一键搞定所有拼接需求!
一、核心方案对比(快速选型)
| 方案 | 核心工具 | 适用场景 | 优点 | 缺点 |
|---|---|---|---|---|
| Pillow(推荐入门) | PIL/Pillow库 | 少量图片、简单布局(纵向/横向) | 纯Python无依赖、API友好、易调试 | 大批量/大尺寸图片内存占用高 |
| OpenCV(高性能) | OpenCV库 | 批量处理、大尺寸图片、实时拼接 | 速度快50%、内存优化好 | 需熟悉OpenCV数据格式(BGR) |
| ImageMagick(外部工具) | subprocess+ImageMagick | 复杂拼接(带特效、格式转换) | 功能强大、支持多格式 | 需额外安装工具、配置环境变量 |
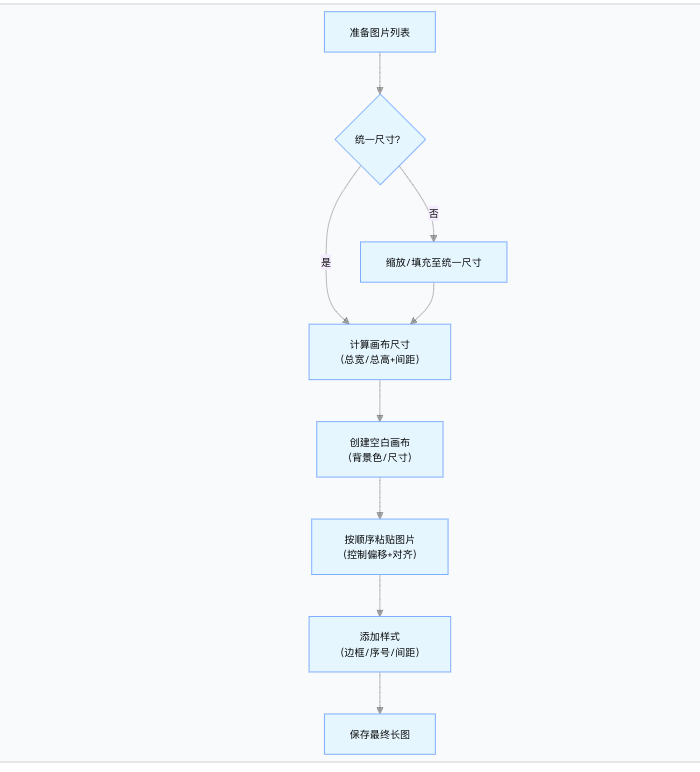
二、拼接核心流程(mermaid图解)
无论哪种方案,长图拼接的核心逻辑一致,流程如下:
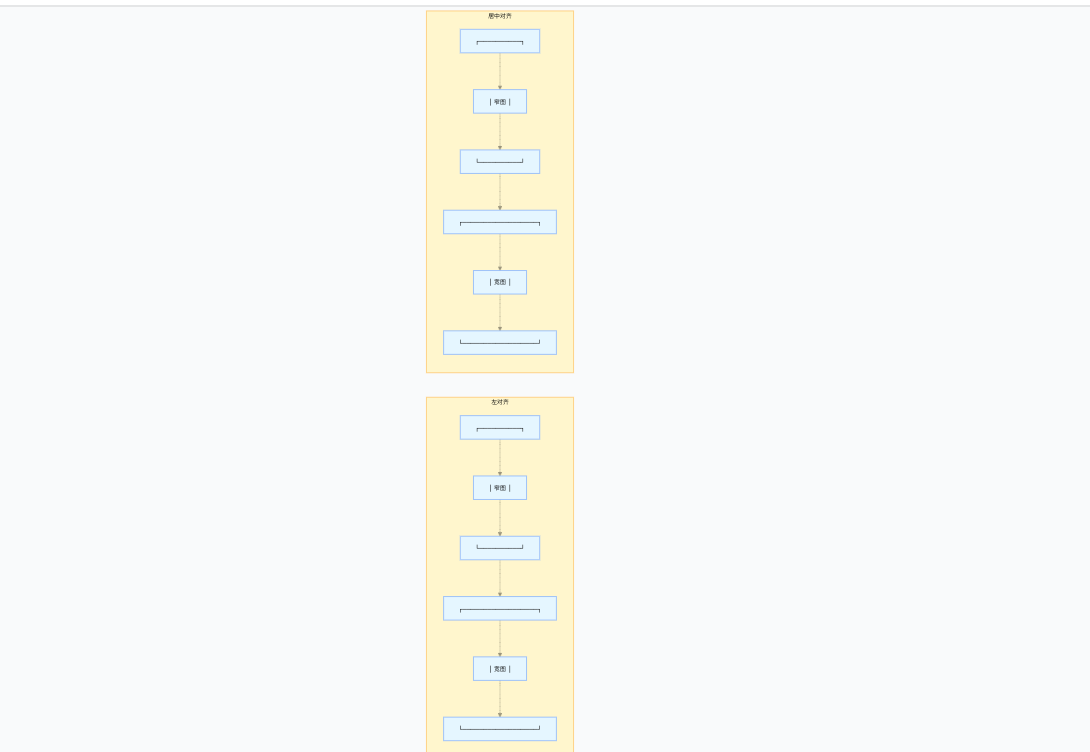
不同对齐方式对比(mermaid示意图)
三、方案详解:关键代码直接复用
1. Pillow方案(入门首选,纯Python无依赖)
适合少量图片拼接,支持对齐、间距、边框、序号等样式,代码直观易调试。
核心代码:纵向拼接(支持居中对齐+间距)
python
from PIL import Image, ImageDraw, ImageFont
from pathlib import Path

def stitch_vertical_pillow(image_paths, output_path, spacing=20, align="center", add_border=True):
    """
    Pillow纵向拼接长图
    :param image_paths: 图片路径列表(已排序)
    :param output_path: 输出路径
    :param spacing: 图片间距(像素)
    :param align: 对齐方式(center/left/right)
    :param add_border: 是否添加边框
    """
    # 1. 打开所有图片
    images = [Image.open(path) for path in image_paths]

    # 2. 计算画布尺寸
    max_width = max(img.width for img in images)
    total_height = sum(img.height for img in images) + spacing * (len(images) - 1)

    # 3. 创建空白画布(白色背景)
    canvas = Image.new("RGB", (max_width, total_height), (255, 255, 255))
    draw = ImageDraw.Draw(canvas)

    # 4. 加载字体(用于序号,无则用默认)
    try:
        font = ImageFont.truetype("arial.ttf", 36)
    except:
        font = ImageFont.load_default()

    # 5. 逐张粘贴图片
    y_offset = 0
    for idx, img in enumerate(images):
        # 计算水平偏移(对齐)
        if align == "left":
            x_offset = 0
        elif align == "right":
            x_offset = max_width - img.width
        else:
            x_offset = (max_width - img.width) // 2

        # 粘贴图片
        canvas.paste(img, (x_offset, y_offset))

        # 添加边框
        if add_border:
            draw.rectangle(
                [(x_offset, y_offset), (x_offset + img.width, y_offset + img.height)],
                outline=(200, 200, 200), width=2
            )

        # 添加序号
        draw.text((x_offset + 10, y_offset + 10), f"{idx+1:02d}", fill=(128, 128, 128), font=font)

        # 更新垂直偏移
        y_offset += img.height + spacing

    # 6. 保存结果
    canvas.save(output_path, quality=95)
    print(f"拼接完成!长图保存至:{output_path}(尺寸:{max_width}×{total_height})")

# 使用示例:拼接文件夹下所有PNG/JPG
if __name__ == "__main__":
    img_folder = "./screenshots"
    output = "long_image_pillow.png"
    # 获取排序后的图片路径(按文件名)
    image_paths = sorted([
        str(p) for p in Path(img_folder).glob("*.png")
    ] + [str(p) for p in Path(img_folder).glob("*.jpg")])
    if image_paths:
        stitch_vertical_pillow(image_paths, output, spacing=15, align="center")
    else:
        print("未找到图片文件!")
扩展功能:宫格布局(多行列拼接)
python
def stitch_grid_pillow(image_paths, output_path, cols=3, spacing=15):
    """Pillow宫格布局拼接(适合商品展示、多图汇总)"""
    images = [Image.open(path).resize((300, 300), Image.LANCZOS) for path in image_paths]
    rows = (len(images) + cols - 1) // cols  # 向上取整

    # 计算画布尺寸
    grid_width = cols * 300 + (cols - 1) * spacing
    grid_height = rows * 300 + (rows - 1) * spacing

    canvas = Image.new("RGB", (grid_width, grid_height), (255, 255, 255))

    # 逐张粘贴
    for idx, img in enumerate(images):
        row = idx // cols
        col = idx % cols
        x = col * (300 + spacing)
        y = row * (300 + spacing)
        canvas.paste(img, (x, y))

    canvas.save(output_path)
    print(f"宫格图保存至:{output_path}({cols}列×{rows}行)")
2. OpenCV方案(高性能,批量处理首选)
OpenCV在内存管理和速度上优于Pillow,适合处理100+张图片或大尺寸截图,批量处理不卡顿。
核心代码:高效纵向拼接
python
import cv2
import numpy as np
from pathlib import Path

def stitch_vertical_opencv(image_paths, output_path, spacing=20):
    """
    OpenCV纵向拼接(速度快50%,内存占用低)
    """
    # 1. 读取图片并统一通道(避免灰度图混用)
    images = []
    for path in image_paths:
        img = cv2.imread(path)
        if len(img.shape) == 2:  # 灰度图转BGR
            img = cv2.cvtColor(img, cv2.COLOR_GRAY2BGR)
        images.append(img)

    # 2. 计算画布尺寸
    max_width = max(img.shape[1] for img in images)
    total_height = sum(img.shape[0] for img in images) + spacing * (len(images) - 1)

    # 3. 创建白色背景画布
    canvas = np.zeros((total_height, max_width, 3), dtype=np.uint8)
    canvas.fill(255)  # 背景色白色

    # 4. 粘贴图片(居中对齐)
    y_offset = 0
    for img in images:
        h, w = img.shape[:2]
        x_offset = (max_width - w) // 2
        # 切片赋值(OpenCV高效操作)
        canvas[y_offset:y_offset+h, x_offset:x_offset+w] = img
        y_offset += h + spacing

    # 5. 保存(高质量)
    cv2.imwrite(output_path, canvas, [cv2.IMWRITE_JPEG_QUALITY, 95])
    print(f"OpenCV拼接完成!文件:{output_path}")

# 使用示例
if __name__ == "__main__":
    image_paths = sorted(Path("./large_images").glob("*.jpg"))
    stitch_vertical_opencv([str(p) for p in image_paths], "long_image_opencv.jpg")
内存优化:流式处理(超多大图不溢出)
python
def stitch_stream_opencv(image_paths, output_path, spacing=20):
    """流式处理:逐张读取,避免一次性加载所有图片"""
    # 第一步:计算总尺寸
    max_width = 0
    total_height = 0
    for path in image_paths:
        img = cv2.imread(path)
        max_width = max(max_width, img.shape[1])
        total_height += img.shape[0] + spacing
        cv2.destroyAllWindows()  # 立即释放

    # 第二步:创建画布并分批粘贴
    canvas = np.zeros((total_height, max_width, 3), dtype=np.uint8)
    canvas.fill(255)

    y_offset = 0
    for path in image_paths:
        img = cv2.imread(path)
        h, w = img.shape[:2]
        x_offset = (max_width - w) // 2
        canvas[y_offset:y_offset+h, x_offset:x_offset+w] = img
        y_offset += h + spacing
        cv2.destroyAllWindows()

    cv2.imwrite(output_path, canvas)
    print(f"流式拼接完成!内存占用始终<100MB")
3. ImageMagick方案(外部工具,功能强大)
通过subprocess调用ImageMagick,支持复杂拼接特效(如渐变、水印),适合纯Python方案无法满足的需求。
核心代码:批量拼接(跨平台)
bash
# 先安装ImageMagick:https://imagemagick.org/(配置环境变量)
pip install subprocess-pathlib
python
from subprocess import run
from pathlib import Path

def stitch_imagemagick(image_paths, output_path, direction="vertical"):
    """
    调用ImageMagick拼接(支持复杂特效)
    :param direction: vertical(纵向)/horizontal(横向)
    """
    # 构建命令:magick convert + 图片 + 拼接参数 + 输出
    cmd = ["magick", "convert"]
    # 添加拼接方向参数(-append纵向,+append横向)
    cmd.append("-append" if direction == "vertical" else "+append")
    # 添加所有图片路径
    cmd.extend(str(p) for p in image_paths)
    # 添加输出路径
    cmd.append(output_path)

    # 执行命令(Windows需shell=True)
    run(cmd, shell=True)
    print(f"ImageMagick拼接完成!文件:{output_path}")

# 使用示例
if __name__ == "__main__":
    image_paths = sorted(Path("./特效图片").glob("*.png"))
    stitch_imagemagick(image_paths, "long_image_magick.png")
四、避坑指南(新手必看)
-
图片尺寸不一致 :优先用
resize缩放至统一宽度(Pillow/OpenCV),或用填充(白色背景)避免错位; -
内存溢出:大批量图片用OpenCV流式处理,或ImageMagick方案,避免一次性加载所有图片;
-
图片方向错误 :通过EXIF信息自动旋转(Pillow示例):
pythondef fix_image_orientation(img): from PIL.ExifTags import TAGS try: for orientation in TAGS.keys(): if TAGS[orientation] == "Orientation": break exif = img._getexif() if exif and orientation in exif: if exif[orientation] == 6: img = img.rotate(270, expand=True) elif exif[orientation] == 8: img = img.rotate(90, expand=True) except: pass return img -
ImageMagick路径问题 :Windows需将安装目录(如
C:\Program Files\ImageMagick-7.1.1)添加到系统PATH; -
中文路径报错 :将图片路径转为字符串时用
str(path),避免编码冲突。
五、实战场景应用
场景1:聊天记录拼接(纵向+序号+边框)
python
# 假设聊天截图已按时间排序存放在chat_screenshots文件夹
image_paths = sorted(Path("./chat_screenshots").glob("*.png"))
stitch_vertical_pillow([str(p) for p in image_paths], "chat_long.png", spacing=10, add_border=True)
场景2:网页截图拼接(统一宽度+居中)
python
# 缩放所有截图至1080px宽度后拼接
images = [Image.open(p).resize((1080, int(p.height * 1080 / p.width)), Image.LANCZOS) for p in image_paths]
stitch_vertical_pillow(images, "web_long.png", align="center")
场景3:商品图片宫格(3列布局)
python
product_images = sorted(Path("./product_photos").glob("*.jpg"))
stitch_grid_pillow(product_images, "product_grid.png", cols=3, spacing=20)
总结
Python长图拼接的核心是"选对方案":入门用Pillow(简单易调试),批量/大尺寸用OpenCV(高性能),复杂特效用ImageMagick(外部工具)。掌握本文的代码和避坑指南,能轻松应对聊天记录、截图、商品图等各类拼接需求,告别手动拖拽的低效操作!