0.官方GitHub网站:
GitHub - QwenLM/Qwen3-VL:Qwen3-VL 是由阿里云 Qwen 团队开发的多模态大语言模型系列。![]() https://github.com/QwenLM/Qwen3-VL
https://github.com/QwenLM/Qwen3-VL
空间感知能力大幅提升:2D grounding 从绝对坐标变为相对坐标,支持判断物体方位、视角变化、遮挡关系,能实现 3D grounding,为复杂场景下的空间推理和具身场景打下基础。
OCR 支持更多语言及复杂场景 :支持的中英外的语言从 10 种扩展到 32 种,覆盖更多国家和地区;在复杂光线、模糊、倾斜等实拍挑战性场景下表现更稳定;对生僻字、古籍字、专业术语的识别准确率也显著提升;超长文档理解和精细结构还原能力进一步提升。
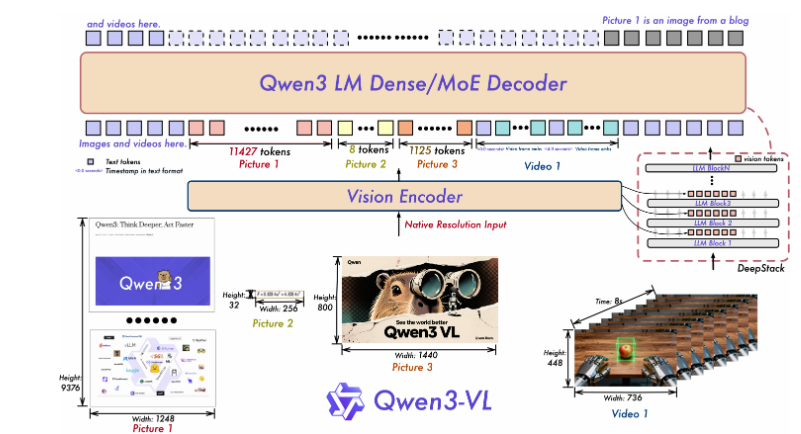
一是采用 MRoPE-Interleave ,原始MRoPE将特征维度按照时间(t)、高度(h)和宽度(w)的顺序分块划分,使得时间信息全部分布在高频维度上。在 Qwen3-VL 中采取了 t,h,w 交错分布的形式,实现对时间,高度和宽度的全频率覆盖,这样更加鲁棒的位置编码能够保证模型在图片理解能力相当的情况下,提升对长视频的理解能力;
二是引入 DeepStack 技术,融合 ViT 多层次特征,提升视觉细节捕捉能力和图文对齐精度 ;我们沿用 DeepStack 的核心思想,将以往多模态大模型(LMM)单层输入视觉tokens的范式,改为在大型语言模型 (LLM) 的多层中进行注入。这种多层注入方式旨在实现更精细化的视觉理解。在此基础上,进一步优化了视觉特征 token 化的策略。具体而言,我们将来自 ViT 不同层的视觉特征进行 token 化,并以此作为视觉输入。这种设计能够有效保留从底层(low-level)到高层(high-level)的丰富视觉信息。实验结果表明,该方法在多种视觉理解任务上均展现出显著的性能提升。
三是将原有的视频时序建模机制 T-RoPE 升级为 文本时间戳对齐机制。该机采用"时间戳-视频帧"交错的输入形式,实现帧级别的时间信息与视觉内容的细粒度对齐。同时,模型原生支持"秒数"与"时:分:秒"(HMS)两种时间输出格式。这一改进显著提升了模型对视频中动作、事件的语义感知与时间定位精度,使其在复杂时序推理任务------如事件定位、动作边界检测、跨模态时间问答等------中表现更稳健、响应更精准。
1.配置环境
conda create Qwen3-vl python=3.10
conda activate Qwen3-vl
pip install accelerate
pip install qwen-vl-utils==0.0.14
# Install the latest version of vLLM 'vllm>=0.11.0'
uv pip install -U vllm
2.下载代码
有科学上网的
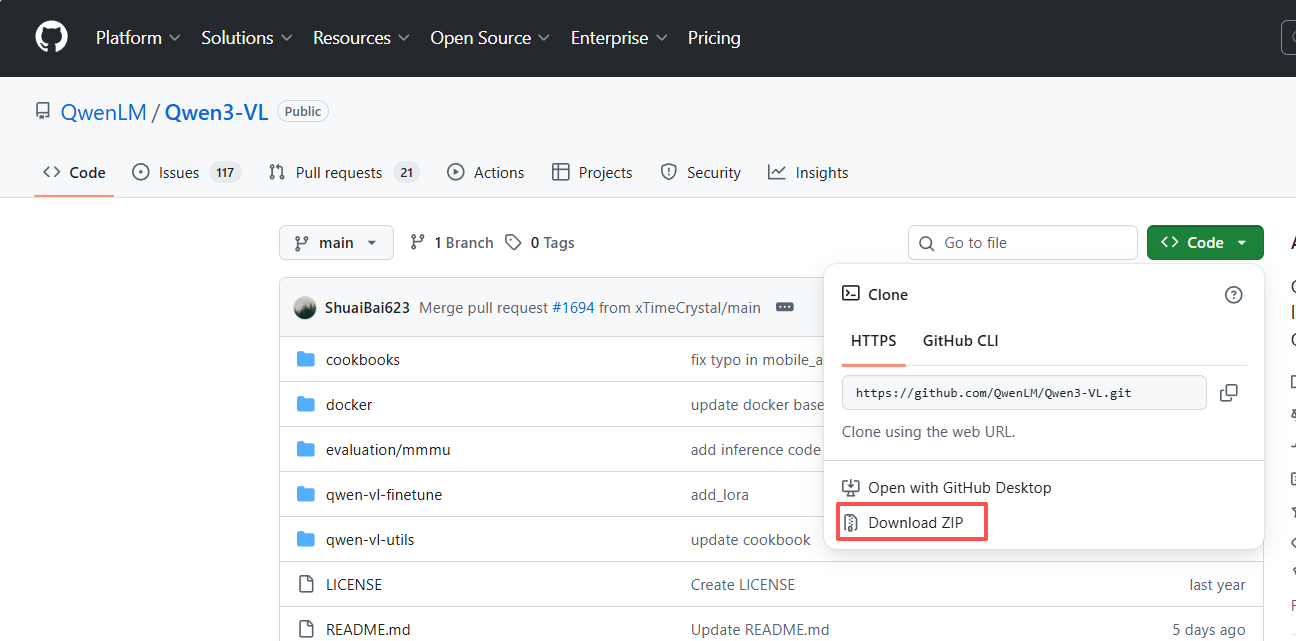
git clone https://github.com/QwenLM/Qwen3-VL没有科学上网的就上github下载压缩包
3.下载权重文件
权重文件挺大的,需要下载一会,我选择用国内阿里的modelscope下
# 在下载前,请先通过如下命令安装ModelScope
pip install modelscope
# 下载完整模型库
modelscope download --model Qwen/Qwen3-VL-2B-Instruct
4.推理代码
修改一下Qwen/Qwen3-VL-4B-Instruct为你下载的参数的地址
还有图片地址
我是本地3080 10GB推理的
from transformers import Qwen3VLForConditionalGeneration, AutoProcessor
import torch
from PIL import Image

def load_qwen3_vl_4b_model():
    """
    加载Qwen3-VL-4B-Instruct模型和处理器
    """
    model = Qwen3VLForConditionalGeneration.from_pretrained(
        "Qwen/Qwen3-VL-4B-Instruct",
        torch_dtype=torch.bfloat16,
        device_map="auto",
        attn_implementation="flash_attention_2"  # 可选,用于加速
    )
    processor = AutoProcessor.from_pretrained("Qwen/Qwen3-VL-4B-Instruct")
    return model, processor

def process_multimodal_query(model, processor, image_path, text_query):
    """
    处理多模态查询(图像+文本)
    """
    # 加载图像
    image = Image.open(image_path).convert('RGB')

    # 构建消息格式
    messages = [
        {
            "role": "user",
            "content": [
                {"type": "image", "image": image},
                {"type": "text", "text": text_query}
            ]
        }
    ]

    # 预处理输入
    inputs = processor.apply_chat_template(
        messages,
        tokenize=True,
        add_generation_prompt=True,
        return_dict=True,
        return_tensors="pt"
    )

    # 生成输出
    generated_ids = model.generate(
        **inputs,
        max_new_tokens=128,
        do_sample=True,
        temperature=0.7,
        top_p=0.8
    )

    # 解码输出
    generated_ids_trimmed = [
        out_ids[len(in_ids):] for in_ids, out_ids in zip(inputs.input_ids, generated_ids)
    ]
    output_text = processor.batch_decode(
        generated_ids_trimmed,
        skip_special_tokens=True,
        clean_up_tokenization_spaces=False
    )

    return output_text[0] if output_text else ""

# 使用示例
if __name__ == "__main__":
    model, processor = load_qwen3_vl_4b_model()
    image_path = "example.jpg"   #改为你的图片路径
    query = "描述这张图片中的场景和主要对象"   #改为你的提示词,想问的问题
    result = process_multimodal_query(model, processor, image_path, query)
    print("模型回复:", result)
5.微调部分
5.1使用LLaMA-Factory项目进行微调:
5.1.1下载项目:
网址是:
或者使用git下载:
git clone https://github.com/hiyouga/LLaMA-Factory5.1.2创建虚拟环境
conda create -n llama-factory python=3.12
conda activate llama-factory
安装环境:
pip install -e ".[torch,metrics]" --no-build-isolation卸载默认的cpu版本的torch:
pip unisntall torch torchvision安装gpu版本的torch,根据你的cuda版本选择;下面是cuda11.8版本的torch安装指令:
pip install torch==2.8.0 torchvision torchaudio --index-url https://download.pytorch.org/whl/cu1185.2准备微调数据集
5.2.1所需数据集格式
下方LLaMA-Factory网站微调所需要的数据格式:
LLaMA-Factory/data/README_zh.md at main · hiyouga/LLaMA-Factory · GitHub
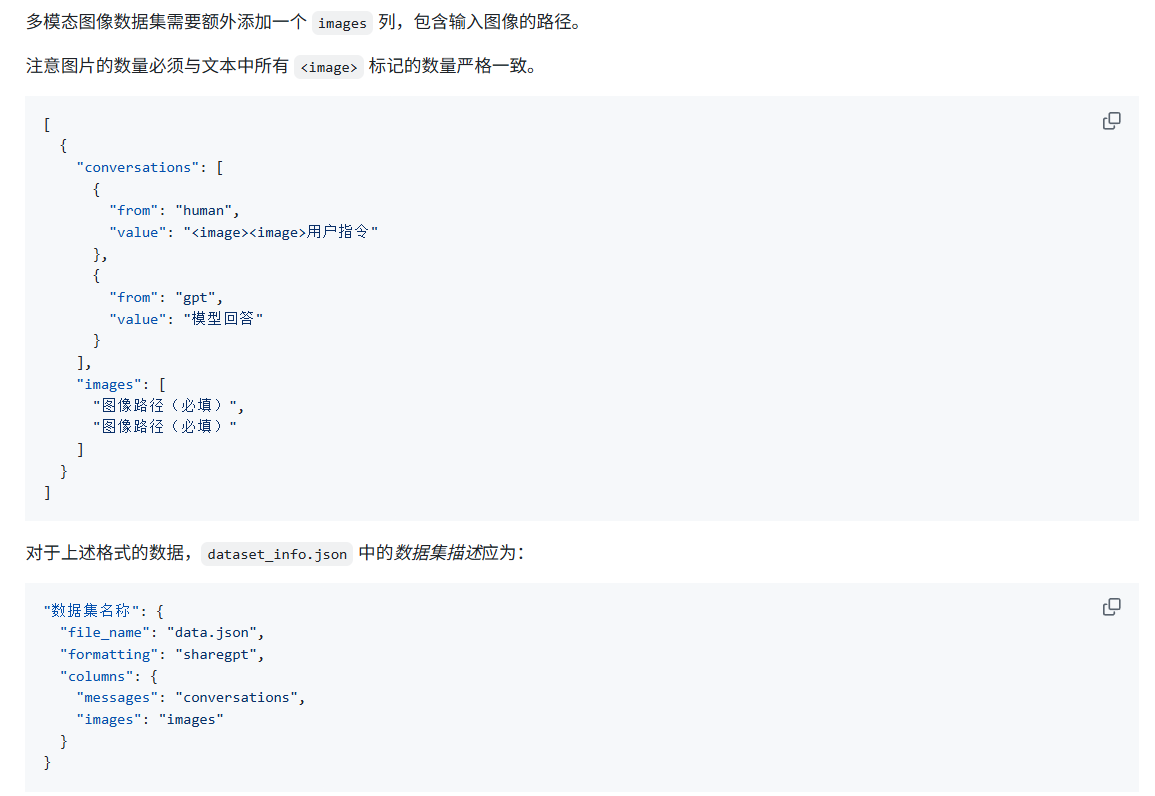
然后需要注意的是Qwen2.5-VL使用的绝对坐标,Qwen3-VL使用的0-1000的相对坐标记得归一化坐标的大小;
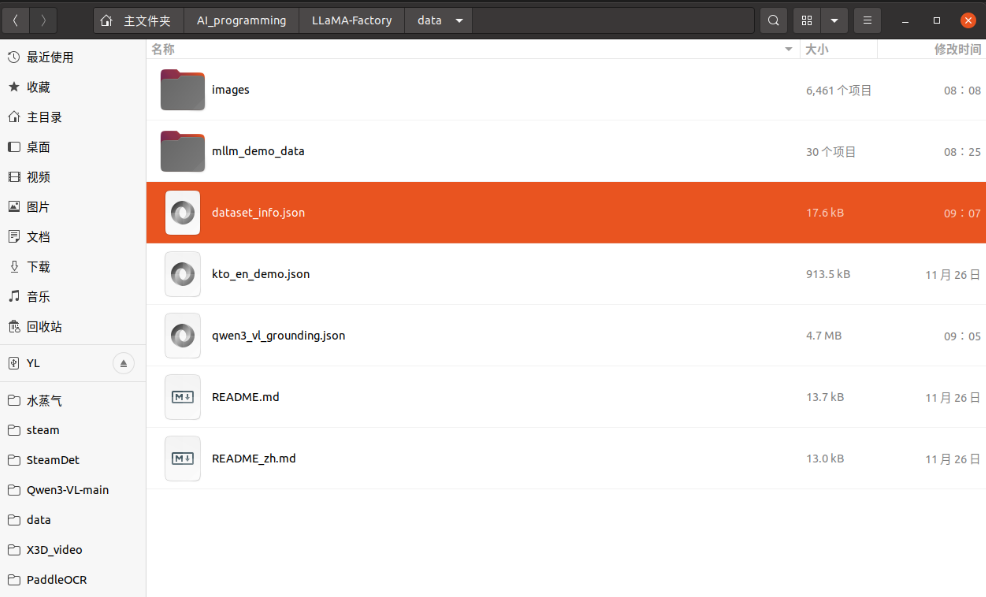
还有需要注意的是我们准备好数据集后还需要进行修改LLaMA-Factory/data/dataset_info.json文件,在里面增加上我们所需的文件夹
5.2.2YOLO格式转换为qwen3-vl-grounding格式
其中,我的数据集来源是YOLO格式转换而来,因为我要做的是Grounding任务,转换代码如下:
可以通过这个代码将YOLO格式转换为Qwen3-VL-Grounding格式
import os
import json
from tqdm import tqdm

# ================== 需要你修改的路径 ==================

# 图片所在目录
IMAGE_DIR = "images"          # 例如: qwen3_vl_grounding_train/images
# YOLO 标签所在目录
LABEL_DIR = "labels"          # 例如: qwen3_vl_grounding_train/labels
# 输出的 JSON 文件
OUTPUT_JSON = "qwen3_vl_grounding_mllm.json"

# 类别 id -> 名称(可选)
CLASS_ID2NAME = {
    0: "house",
    # 1: "car",
    # ...
}

# 只保留哪些类别(可选)
USE_ONLY_CLASS_IDS = None
# 例如只保留房子:
# USE_ONLY_CLASS_IDS = {0}

# 给模型的提示词(你可以改成中文)
USER_PROMPT = (
    "<image>\n"
    "Locate all objects in this image and output the bbox coordinates "
    "in JSON format using relative coordinates in the range [0, 1000]."
)


# ================== 坐标工具函数 ==================

def yolo_to_xyxy_relative(xc, yc, w, h):
    """
    YOLO 归一化坐标 (xc, yc, w, h) ∈ [0,1]
    -> 相对坐标系下的四点 [x_min, y_min, x_max, y_max](仍然是 [0,1])
    """
    x_min = xc - w / 2
    y_min = yc - h / 2
    x_max = xc + w / 2
    y_max = yc + h / 2

    x_min = max(0.0, min(1.0, x_min))
    y_min = max(0.0, min(1.0, y_min))
    x_max = max(0.0, min(1.0, x_max))
    y_max = max(0.0, min(1.0, y_max))

    return [x_min, y_min, x_max, y_max]


def scale_to_qwen_coords(xyxy_rel, scale=1000):
    """
    [0,1] -> [0, scale],Qwen3-VL 默认 scale=1000
    返回整数坐标 [x_min, y_min, x_max, y_max]
    """
    x_min, y_min, x_max, y_max = xyxy_rel
    return [
        int(round(x_min * scale)),
        int(round(y_min * scale)),
        int(round(x_max * scale)),
        int(round(y_max * scale)),
    ]


def collect_image_files(image_dir):
    exts = {".jpg", ".jpeg", ".png", ".bmp", ".webp"}
    files = []
    for fname in os.listdir(image_dir):
        if os.path.splitext(fname)[1].lower() in exts:
            files.append(fname)
    return sorted(files)


# ================== 主逻辑 ==================

def main():
    image_files = collect_image_files(IMAGE_DIR)
    if not image_files:
        print(f"No images found in {IMAGE_DIR}")
        return

    dataset = []
    for img_name in tqdm(image_files, desc="Converting"):
        img_path = os.path.join(IMAGE_DIR, img_name)
        # 可以用绝对路径,也可以在这里 os.path.abspath
        img_rel_or_abs = os.path.abspath(img_path)  # 你也可以改成相对路径

        base, _ = os.path.splitext(img_name)
        label_path = os.path.join(LABEL_DIR, base + ".txt")

        if not os.path.exists(label_path):
            continue

        bboxes_qwen = []
        cls_ids = []

        # 读取 YOLO 标签
        with open(label_path, "r", encoding="utf-8") as f:
            for line in f:
                line = line.strip()
                if not line:
                    continue
                parts = line.split()
                if len(parts) < 5:
                    print(f"Label format error in {label_path}: {line}")
                    continue

                cls_id = int(parts[0])
                if USE_ONLY_CLASS_IDS is not None and cls_id not in USE_ONLY_CLASS_IDS:
                    continue

                xc = float(parts[1])
                yc = float(parts[2])
                w  = float(parts[3])
                h  = float(parts[4])

                xyxy_rel = yolo_to_xyxy_relative(xc, yc, w, h)
                xyxy_qwen = scale_to_qwen_coords(xyxy_rel, scale=1000)

                bboxes_qwen.append(xyxy_qwen)
                cls_ids.append(cls_id)

        if not bboxes_qwen:
            continue

        # 构建 objects 列表
        objects = []
        for cid, box in zip(cls_ids, bboxes_qwen):
            obj = {
                "cls_id": cid,
                "bbox_2d": box
            }
            if cid in CLASS_ID2NAME:
                obj["cls_name"] = CLASS_ID2NAME[cid]
            objects.append(obj)

        answer_obj = {"objects": objects}
        # 序列化为字符串,作为 gpt 的回复文本
        answer_str = json.dumps(answer_obj, ensure_ascii=False)

        sample = {
            "conversations": [
                {
                    "from": "human",
                    "value": USER_PROMPT
                },
                {
                    "from": "gpt",
                    "value": answer_str
                }
            ],
            "images": [
                img_rel_or_abs
            ]
        }

        dataset.append(sample)

    with open(OUTPUT_JSON, "w", encoding="utf-8") as f:
        json.dump(dataset, f, ensure_ascii=False, indent=2)

    print(f"Done. Wrote {len(dataset)} samples to {OUTPUT_JSON}")


if __name__ == "__main__":
    main()
然后将生成的json文件放在LLaMA-Factory/data路径下面
5.3使用LLama-Factory可视化界面进行微调
cd LLaMA-Factory5.3.1启动可视化界面:
llamafactory-cli webui5.3.2修改训练参数
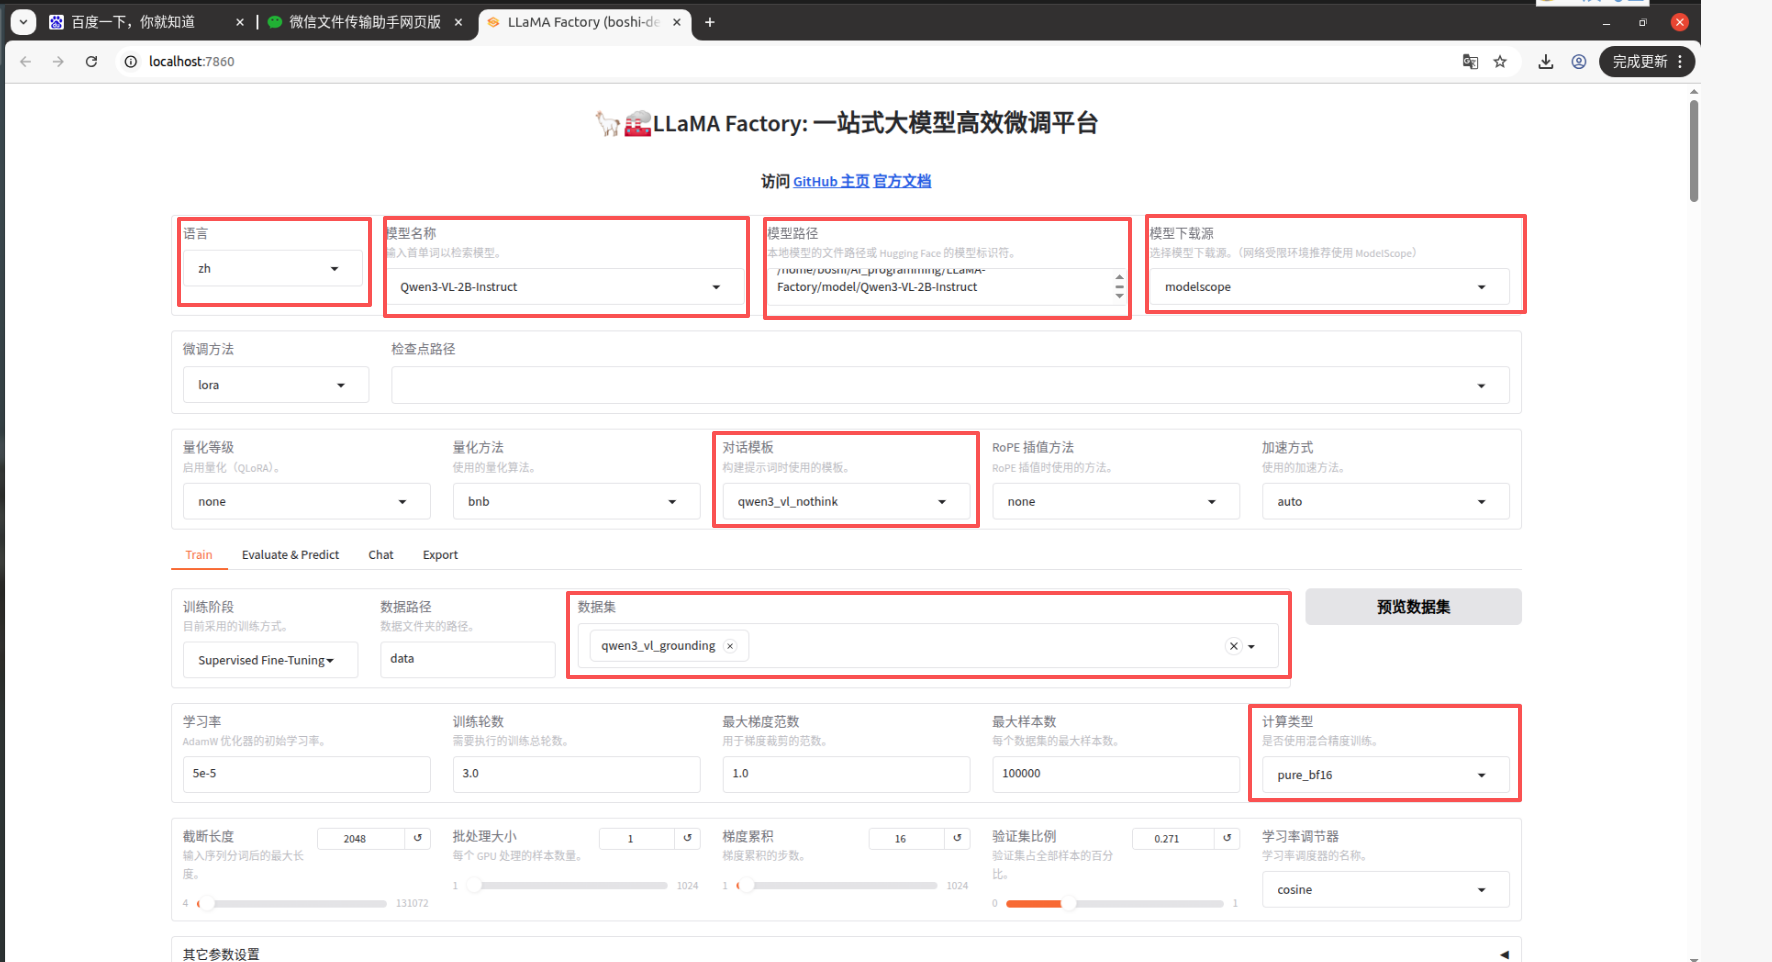
图片中用红框圈起来的是可能需要修改的参数:
语言;模型;模型路径;模型下载源;计算类型等等
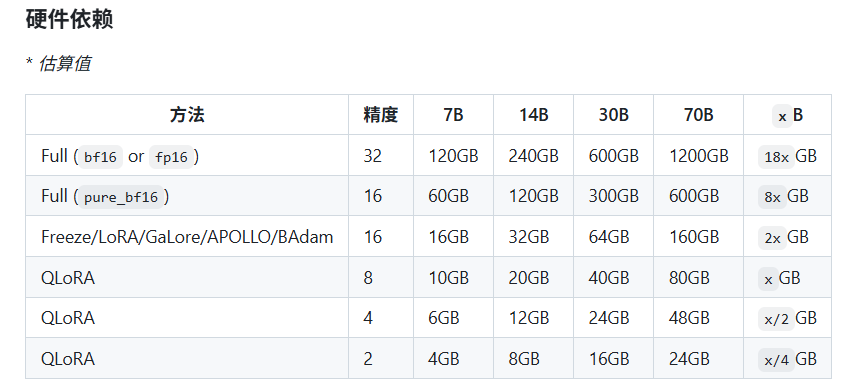
其中计算类型为Pure_bf16更省显存;下面为预估显存需要
修改dataset_info.json
将下面代码夹在文件的最前面;然后可视化界面的数据集那栏 就能找到自己的数据集了;
"qwen3_vl_grounding_mllm": {
  "file_name": "qwen3_vl_grounding_mllm.json",
  "formatting": "sharegpt",
  "columns": {
    "messages": "conversations",
    "images": "images"
  }
}
然后一次点击 保存训练参数、载入训练参数、开始 就可以开始训练了

5.3.3对话测试模型
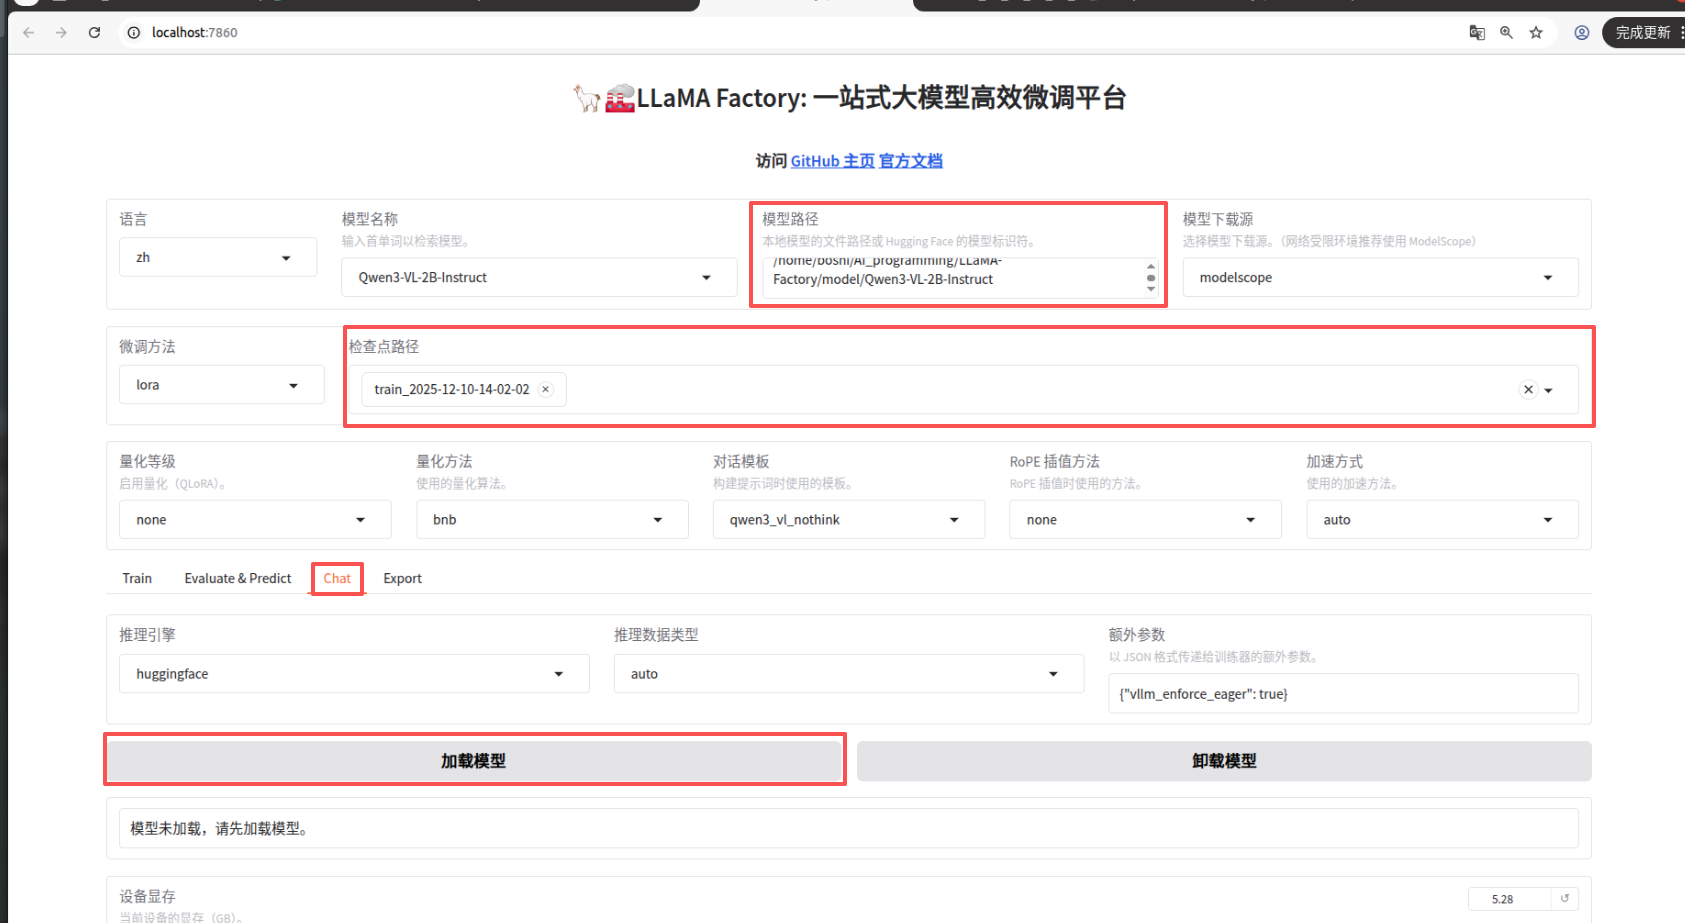
点击chat、选择训练好模型路径、点击加载模型、进行问答
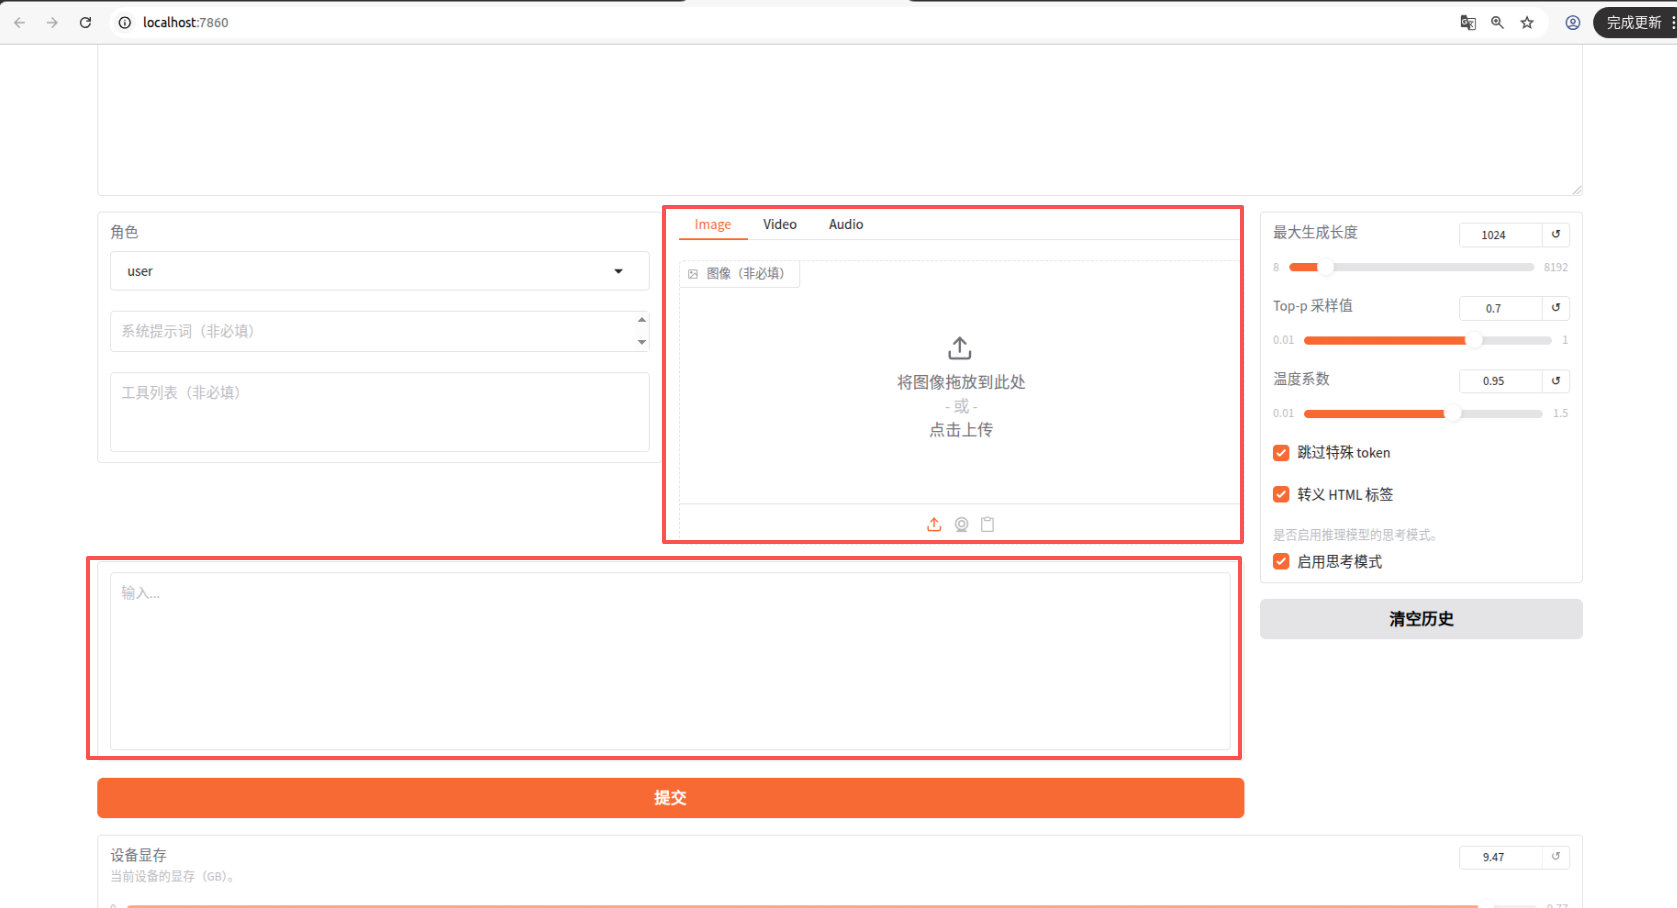
输入图片和提示词进行问答
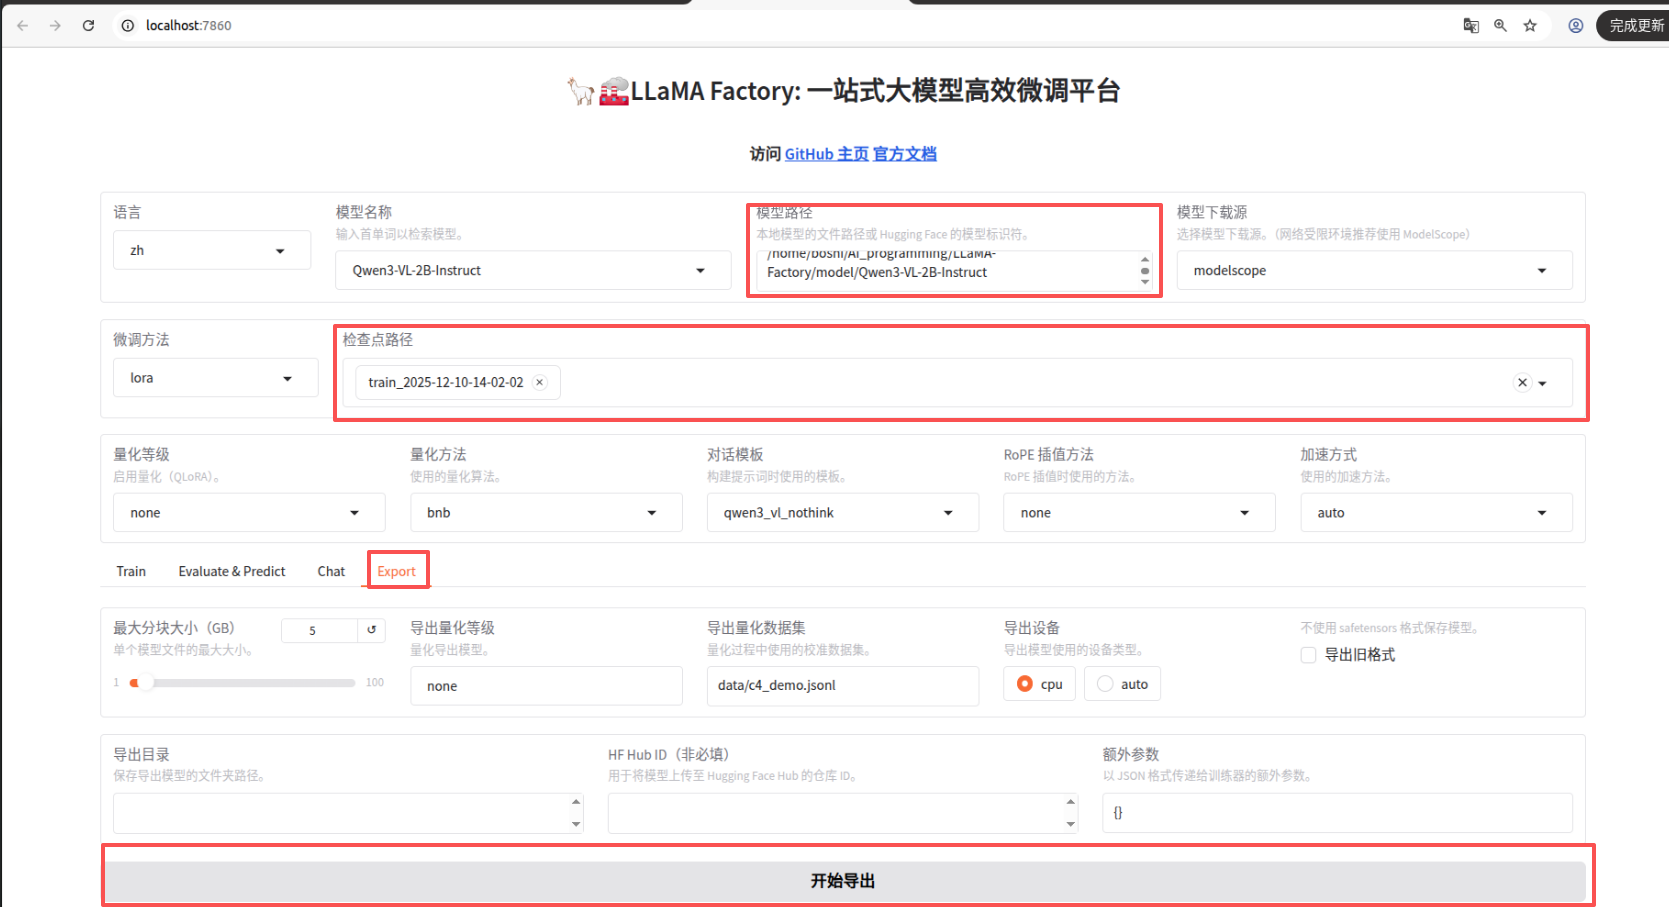
导出模型