文章目录
zabbix
zabbix介绍
zabbix官网:Zabbix:企业级开源监控解决方案
部署手册:下载Zabbix
产品手册:产品手册
以下企业都在用:

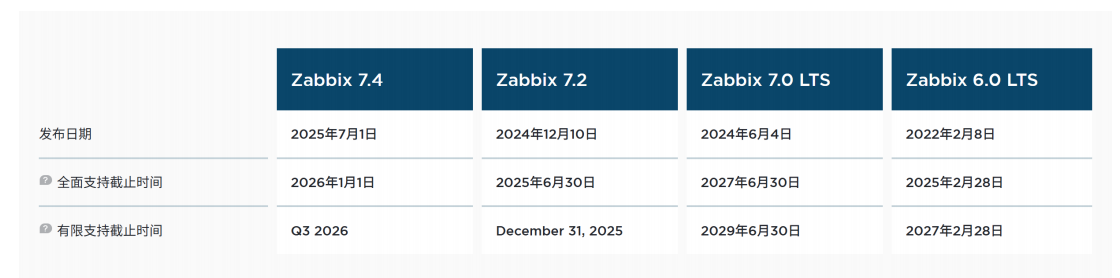
当前支持版本
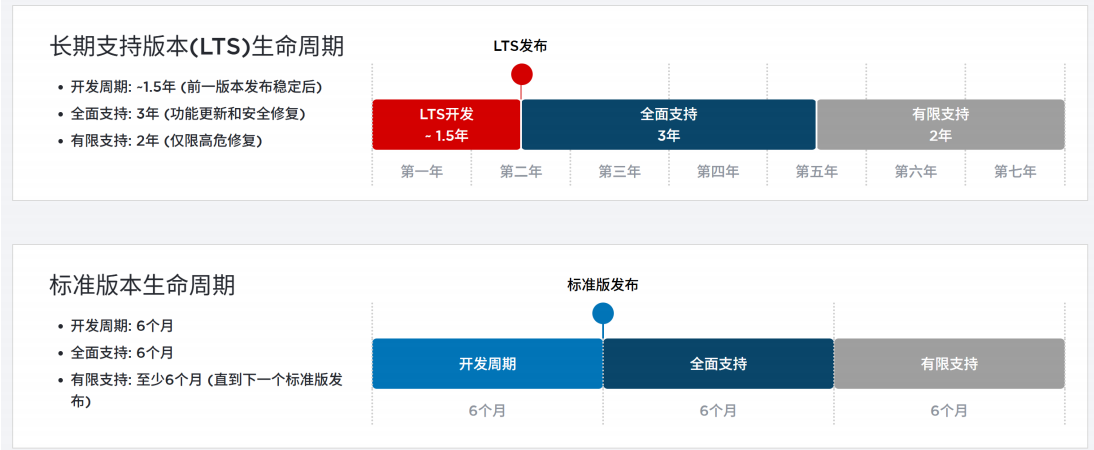
生命周期
Zabbix概述
Zabbix 由 Alexei Vladishev 创建,目前由 Zabbix SIA 积极开发和维护。Zabbix 是一款企业级开源分布式监控解决方案。
Zabbix 是一款用于监控网络众多参数、服务器/虚拟机/应用程序/服务/数据库/网站/云平台等健康状态和完整性的软件。 Zabbix 提供灵活的告警机制,允许用户为几乎任何事件配置基于邮件的告警,从而实现对服务器问题的快速响应。基于存储数据, Zabbix 提供出色的报表和数据可视化功能,使其成为容量规划的理想选择。
Zabbix 同时支持轮询和捕获两种方式。所有 Zabbix 报表、统计信息及配置参数均可通过基于 Web 的前端界面访问。该 Web 前端确保您可以从任何位置评估网络状态和服务器健康状况。经过适当配置,Zabbix 可在 IT基础设施监控中发挥重要作用,无论是对拥有少量服务器的小型组织,还是对拥有众多服务器的大型企业都同样适用。
Zabbix 完全免费。 Zabbix 基于 GNU 通用公共许可证 version 第 2 版编写和分发,这意味着其源代码可自由分发并面向公众开放。
zabbix架构
Zabbix由多个主要软件组件构成。各组件职责概述如下。
服务器
Zabbixserver是核心组件,agents向其报告可用性、完整性信息及统计指标。服务器作为中央存储库,保存所有配置数据、统计数据和运行数据。数据库存储所有配置信息以及Zabbix收集的数据均存储在数据库中。
Web 界面
为了从任何地方和任何平台轻松访问Zabbix,系统提供了基于Web的界面。该界面是Zabbix server的一部分,通常(但不一定)运行在与服务器相同的物理机器上。
Proxy
Zabbix proxy可以代表Zabbix server 收集性能和可用性数据。proxy是Zabbix 部署中的可选组件,但它能有效分担单个Zabbix server的负载。
Agent
Zabbixagents被部署在监控目标上,用于主动监控本地资源和应用程序,并将收集到的数据报告给Zabbix服务器。自Zabbix4.4起,有两种类型的agents可用:Zabbix agent(轻量级,支持多种平台,使用C语言编写)和Zabbix agent2 (高度灵活,易于通过插件扩展,使用Go 语言编写)。
数据流
此外,退一步审视Zabbix内部整体数据流非常重要。为了create一个收集数据的监控项,你必须先create一个主机。转到Zabbix体系的另一端,你必须先有一个监控项才能create触发器。你必须有一个触发器才能create动作。因此,如果你想收到服务器XCPU负载过高的警报,你必须先为服务器Xcreate一个主机条目,接着创建一个监控其CPU的监控项,然后设置一个在CPU过高时激活的触发器,最后配置一个发送邮件给你的动作。虽然这看起来步骤很多,但通过使用模板功能其实并不复杂。然而,正是这种设计使得create非常灵活的配置成为可能。
搭建LNMP架构
Zabbix基于LNMP架构部署
zabbix-server通过Centos-7-template模板克隆产生
mysql001通过mysql01克隆产生
| 主机名 | IP | 功能 |
|---|---|---|
| zabbix-server | 192.168.108.50/24 | 安装zabbix |
| mysql001 | 192.168.108.51/24 | 被监控 |
安装nginx
bash
#创建nginx的yum源
[root@zabbix-server ~]# rm -rf /etc/yum.repos.d/*
[root@zabbix-server ~]# wget -O /etc/yum.repos.d/CentOS-Base.repo  https://mirrors.huaweicloud.com/artifactory/os-conf/centos/centos-7.repo
--2025-12-11 10:20:54--  https://mirrors.huaweicloud.com/artifactory/os-conf/centos/centos-7.repo
Resolving mirrors.huaweicloud.com (mirrors.huaweicloud.com)... 124.70.61.162, 1.92.76.132, 120.46.2.67, ...
Connecting to mirrors.huaweicloud.com (mirrors.huaweicloud.com)|124.70.61.162|:443... connected.
HTTP request sent, awaiting response... 200
Length: 1811 (1.8K) [application/octet-stream]
Saving to: '/etc/yum.repos.d/CentOS-Base.repo'

100%[===============================================>] 1,811       --.-K/s   in 0s

2025-12-11 10:20:54 (878 MB/s) - '/etc/yum.repos.d/CentOS-Base.repo' saved [1811/1811]


[root@zabbix-server ~]# vim /etc/yum.repos.d/nginx.repo
[root@zabbix-server ~]# cat /etc/yum.repos.d/nginx.repo
[nginx]
name=nginxrepo
baseurl=http://nginx.org/packages/centos/7/$basearch/
enabled=1
gpgcheck=0

#安装nginx
[root@zabbix-server ~]# yum install -y nginx

#开启服务
[root@zabbix-server ~]# systemctl start nginx
[root@zabbix-server ~]# systemctl enable nginx
Created symlink from /etc/systemd/system/multi-user.target.wants/nginx.service to /usr/lib/systemd/system/nginx.service.

#防火墙添加通过http
[root@zabbix-server ~]#
[root@zabbix-server ~]# firewall-cmd --add-service=http --zone=public
success
[root@zabbix-server ~]# firewall-cmd --add-service=http --zone=public --permanent
success
[root@zabbix-server ~]# firewall-cmd --reload
success
先测试nginx环境

安装mariad
配置yum源
bash
#配置Mariadb10.5yum源(zabbix6.0必须使用该版本,低版本不支持)
[root@zabbix-server ~]# vim /etc/yum.repos.d/mariadb.repo
[root@zabbix-server ~]# cat /etc/yum.repos.d/mariadb.repo
[mariadb]
name=MariaDB
baseurl=https://mirrors.aliyun.com/mariadb/yum/10.6/centos7-amd64/
enabled=1
gpgcheck=0

#下载mariadb
[root@zabbix-server ~]# yum install -y mariadb-server mariadb

#开启服务
[root@zabbix-server ~]# systemctl enable mariadb --now
Created symlink from /etc/systemd/system/multi-user.target.wants/mariadb.service to /usr/lib/systemd/system/mariadb.service.

#设置root密码
[root@zabbix-server ~]# mysql
Welcome to the MariaDB monitor.  Commands end with ; or \g.
Your MariaDB connection id is 3
Server version: 10.6.19-MariaDB MariaDB Server

Copyright (c) 2000, 2018, Oracle, MariaDB Corporation Ab and others.

Type 'help;' or '\h' for help. Type '\c' to clear the current input statement.

MariaDB [(none)]> select host,user from mysql.user;
+---------------+-------------+
| Host          | User        |
+---------------+-------------+
| localhost     |             |
| localhost     | mariadb.sys |
| localhost     | mysql       |
| localhost     | root        |
| zabbix-server |             |
+---------------+-------------+
5 rows in set (0.001 sec)

MariaDB [(none)]> delete from mysql.user where User='';
Query OK, 2 rows affected (0.001 sec)

MariaDB [(none)]> select host,user from mysql.user;
+-----------+-------------+
| Host      | User        |
+-----------+-------------+
| localhost | mariadb.sys |
| localhost | mysql       |
| localhost | root        |
+-----------+-------------+
3 rows in set (0.001 sec)

MariaDB [(none)]> alter user root@localhost identified by 'root123';
Query OK, 0 rows affected (0.001 sec)

MariaDB [(none)]> quit
Bye
连接数据库测试
bash
[root@zabbix-server ~]# mysql -uroot -proot123
Welcome to the MariaDB monitor.  Commands end with ; or \g.
Your MariaDB connection id is 4
Server version: 10.6.19-MariaDB MariaDB Server

Copyright (c) 2000, 2018, Oracle, MariaDB Corporation Ab and others.

Type 'help;' or '\h' for help. Type '\c' to clear the current input statement.

MariaDB [(none)]>
安装php
bash
[root@zabbix-server ~]# yum install -y epel-release
[root@zabbix-server ~]# sed -i "s/#baseurl/baseurl/g" /etc/yum.repos.d/epel.repo
[root@zabbix-server ~]# sed -i "s/metalink/#metalink/g" /etc/yum.repos.d/epel.repo
[root@zabbix-server ~]# sed -i "s@https\?://download.[a-z]*\.\?[a-z]*/pub@https://repo.huaweicloud.com@g" /etc/yum.repos.d/epel.repo

[root@zabbix-server ~]# rpm -Uvh https://mirror.webtatic.com/yum/el7/webtatic-release.rpm
Retrieving https://mirror.webtatic.com/yum/el7/webtatic-release.rpm
warning: /var/tmp/rpm-tmp.HIhdb2: Header V4 RSA/SHA1 Signature, key ID 62e74ca5: NOKEY
Preparing...                          ################################# [100%]
Updating / installing...
   1:webtatic-release-7-3             ################################# [100%]

[root@zabbix-server ~]# yum -y install php72w php72w-cli php72w-common php72w-devel php72w-embedded php72w-gd php72w-mbstring php72w-pdo php72w-xml php72w-fpm php72w-mysqlnd php72w-opcache php72w-ldap php72w-bcmath
配置nginx支持php
bash
#修改php-fpm配置文件,把apache改为nginx
[root@zabbix-server ~]# vim /etc/php-fpm.d/www.conf
8 user=nginx
10 group=nginx

#配置location,在index中添加index.php。以支持index.php的首页
[root@zabbix-server ~]# vim /etc/nginx/conf.d/default.conf
9    indexindex.phpindex.htmlindex.htm;

#配置php请求被传送到后端的php-fpm模块,默认情况下php配置块是被注释的,此时去掉注释并修改#把fastcgi_param中的/scripts改为$document_root。root是配置php程序放置的根目录。
29  location~\.php${
30    root     /usr/share/nginx/html;31    fastcgi_pass 127.0.0.1:9000;
32    fastcgi_index index.php;
33    fastcgi_param SCRIPT_FILENAME $document_root$fastcgi_script_name;
34    include   fastcgi_params;
35  }
配置php
bash
#修改PHP配置文件
[root@zabbix-server ~]# vim /etc/php.ini
#支持php短标签
202 short_open_tag = On
#隐藏php版本
359 expose_php = Off

#以下为zabbix优化配置要求
368 max_execution_time = 300 #执行时间
378 max_input_time = 300 #接收数据等待时间
389 memory_limit = 128M #每个脚本占用内存
656 post_max_size = 16M #POST数据大小
799 upload_max_filesize = 2M #上传文件大小
800 always_populate_raw_post_data = -1 #原来空的,需要添加
877 date.timezone = Asia/Shanghai #时区

#启动php-fpm服务
[root@zabbix-server ~]# systemctl enable php-fpm --now
Created symlink from /etc/systemd/system/multi-user.target.wants/php-fpm.service to /usr/lib/systemd/system/php-fpm.service.

#重启nginx
[root@zabbix-server ~]# systemctl restart nginx
测试
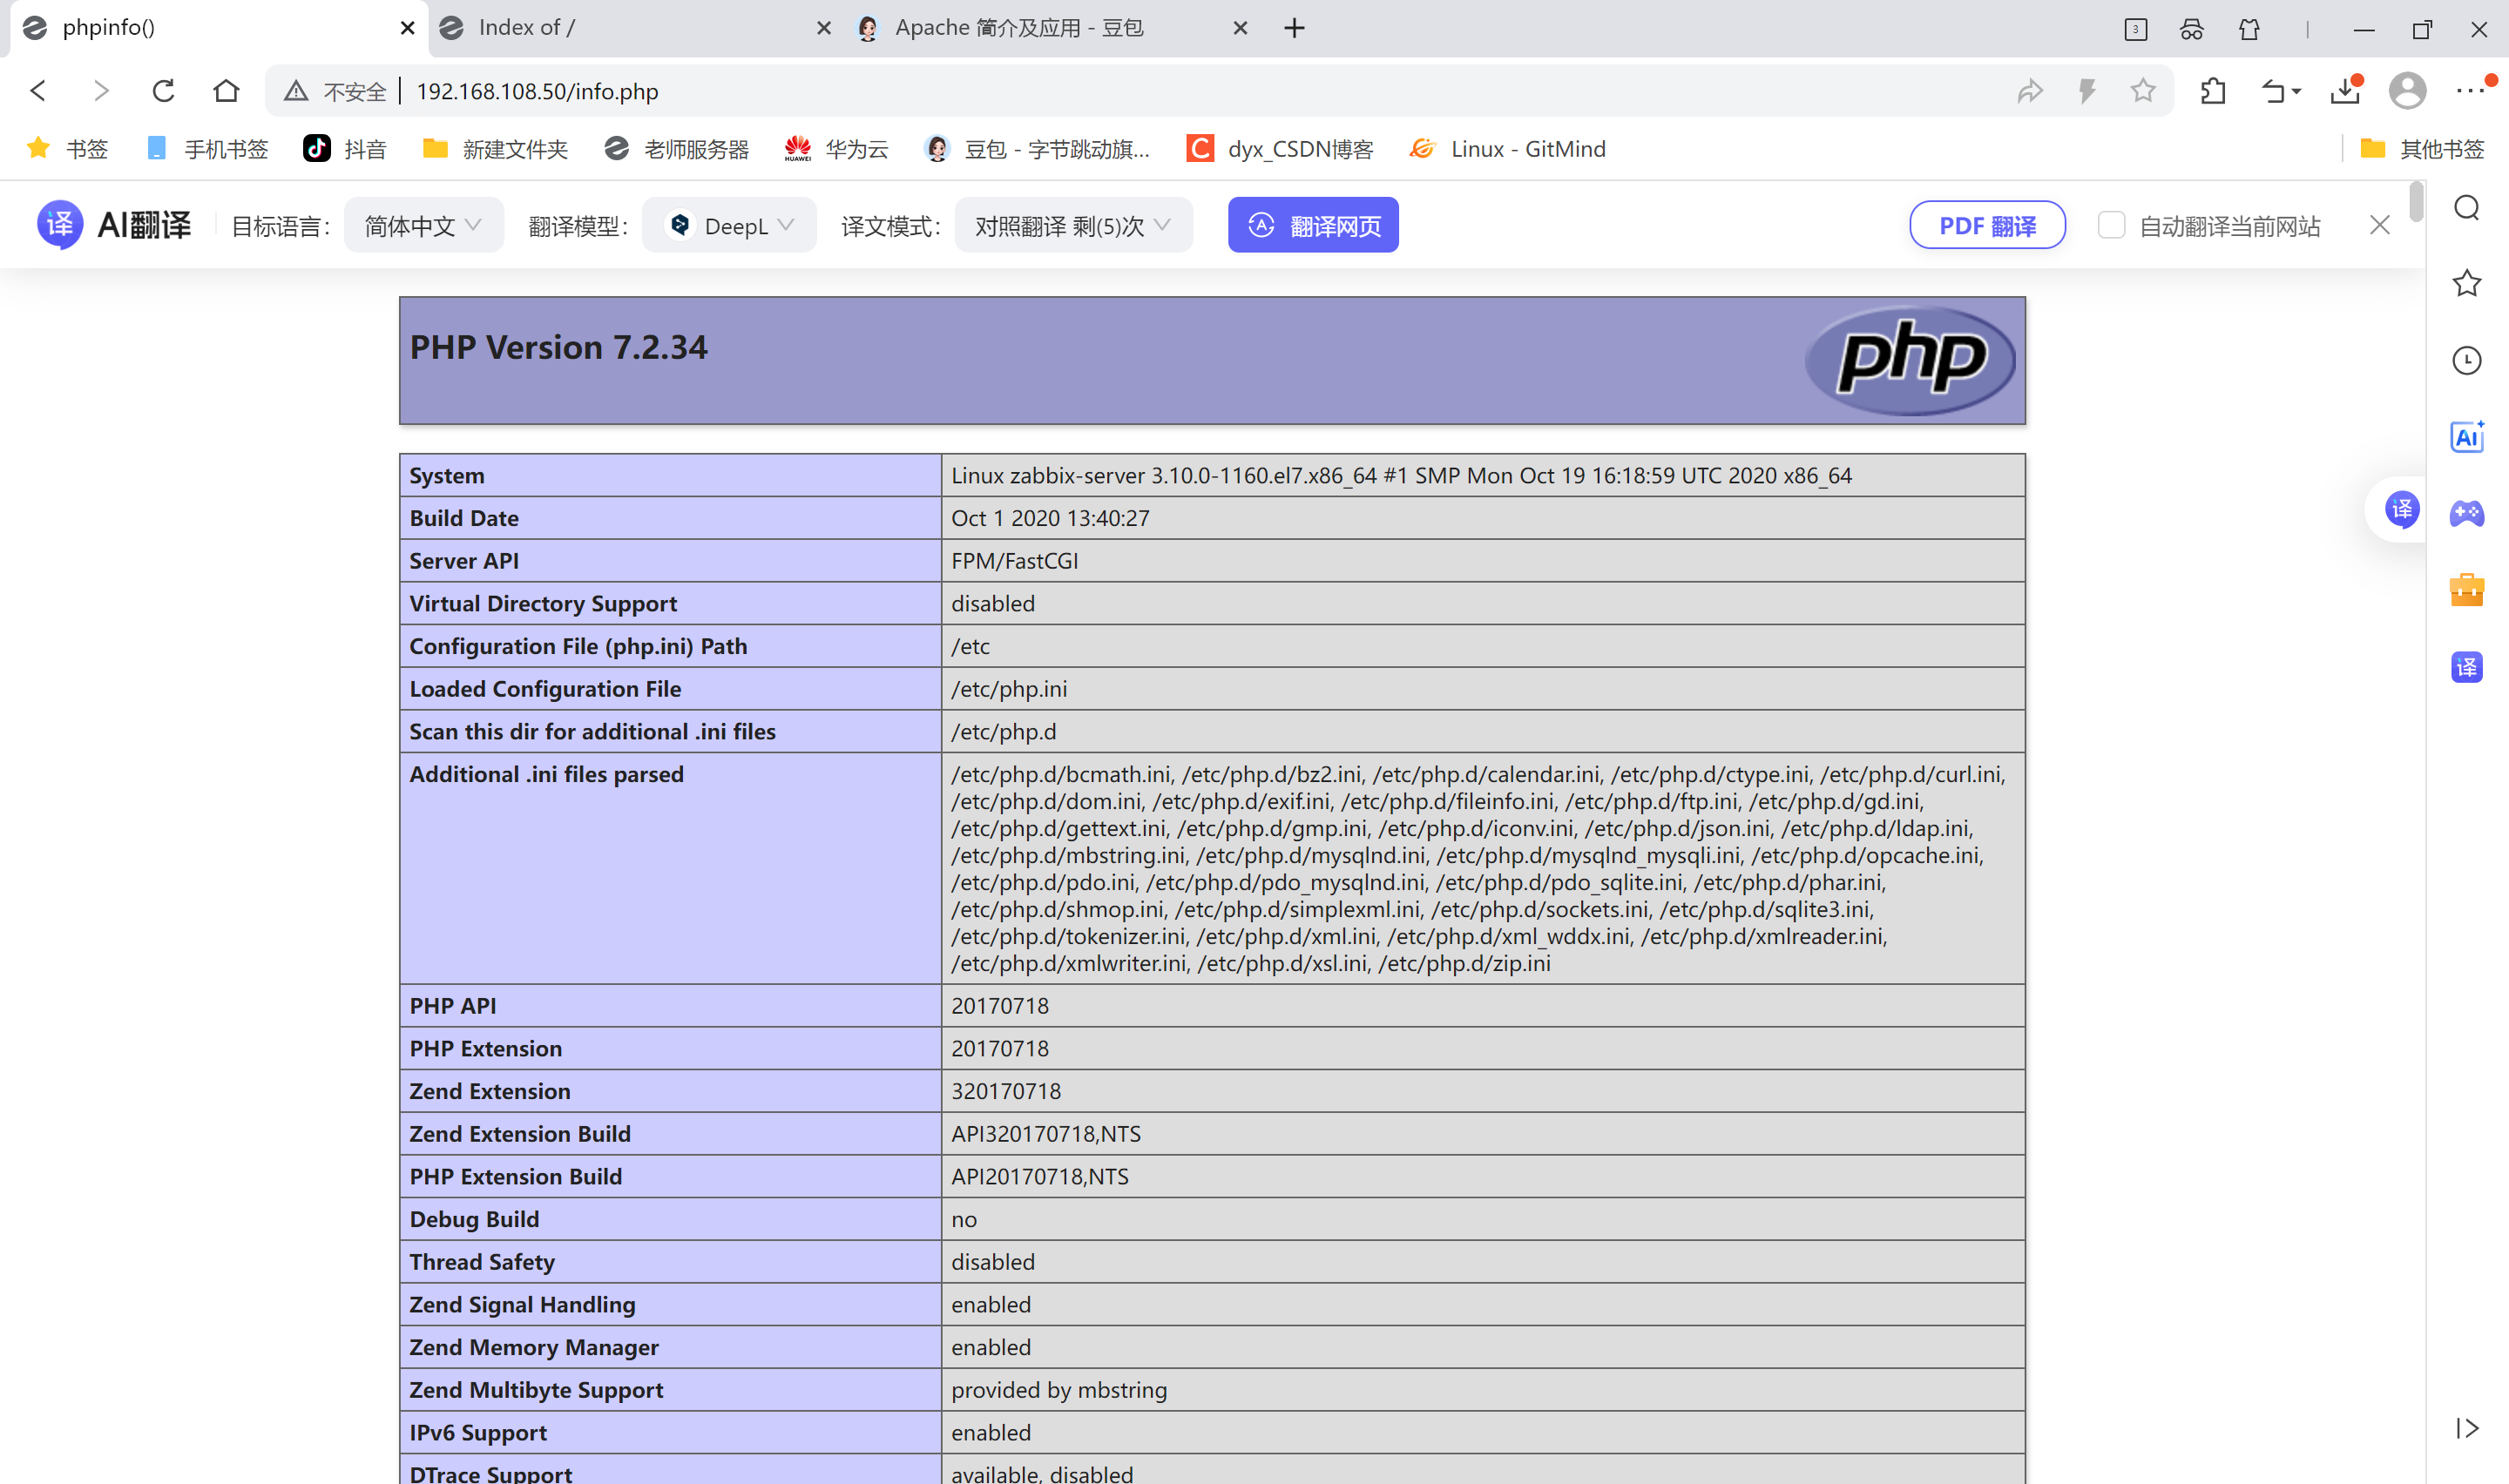
测试php首页
bash
[root@zabbix-server ~]# vim /usr/share/nginx/html/info.php
[root@zabbix-server html]# cat info.php
<?php
 phpinfo();
?>
测试连接数据库
bash
[root@zabbix-server html]# cat info.php
<?php
 $link=mysqli_connect('127.0.0.1','root','root123');
 if ($link) echo "success";
 else echo "fail";
?>

# $link=mysqli_connect('127.0.0.1','root','root123'); 设置变量$link,连接数据库
# if ($link) echo "success"; 如果连接上输出success
# else echo "fail"; 连接不上输出fail
mysql
# 创建zabbix用的数据库及账号
[root@zabbix-server ~]# mysql -uroot -proot123
Welcome to the MariaDB monitor.  Commands end with ; or \g.
Your MariaDB connection id is 6
Server version: 10.6.19-MariaDB MariaDB Server

Copyright (c) 2000, 2018, Oracle, MariaDB Corporation Ab and others.

Type 'help;' or '\h' for help. Type '\c' to clear the current input statement.

MariaDB [(none)]> grant all privileges on *.* to 'zabbix'@'%' identified by 'zabbix123';^C
MariaDB [(none)]> create database zabbix character set utf8 collate ust8_bin;
ERROR 1273 (HY000): Unknown collation: 'ust8_bin'
MariaDB [(none)]> create database zabbix character set utf8 collate utf8_bin;
Query OK, 1 row affected (0.000 sec)

MariaDB [(none)]> show databses;
ERROR 1064 (42000): You have an error in your SQL syntax; check the manual that corresponds to your MariaDB server version for the right syntax to use near 'databses' at line 1
MariaDB [(none)]> show databases;
+--------------------+
| Database           |
+--------------------+
| information_schema |
| mysql              |
| performance_schema |
| sys                |
| test               |
| zabbix             |
+--------------------+
6 rows in set (0.000 sec)

MariaDB [(none)]> grant all privileges on *.* to 'zabbix'@'%' identified by 'zabbix123';
Query OK, 0 rows affected (0.001 sec)

MariaDB [(none)]> grant all privileges on *.* to 'zabbix'@'localhost' identified by 'zabbix123';
Query OK, 0 rows affected (0.001 sec)

MariaDB [(none)]> flush privileges;
Query OK, 0 rows affected (0.000 sec)

MariaDB [(none)]> quit
Bye
collate的作用
对于mysql中那些字符类型的列,如VARCHAR,CHAR,TEXT类型的列,都需要有一个COLLATE类型来告知mysql如何对该列进行排序和比较。COLLATE会影响到ORDER BY语句的顺序,会影响到WHERE条件中大于小于号筛选出来的结果,会影响DISTINCT 、GROUP BY 、HAVING语句的查询结果。另外,mysql建索引的时候,如果索引列是字符类型,也会影响索引创建,只不过这种影响我们感知不到。凡是涉及到字符类型比较或排序的地方,都会和COLLATE有关。
测试连接zaabix数据库
bash
[root@zabbix-server ~]# vim /usr/share/nginx/html/info.php
[root@zabbix-server ~]# cat /usr/share/nginx/html/info.php
<?php
 $link=mysqli_connect('127.0.0.1','zabbix','zabbix123');
 if ($link) echo "zabbix数据库连接成功";
 else echo "zabbix数据库连接失败";
?>
测试

zabbix-server
导入数据库
bash
#解压
[root@zabbix-server ~]# ls
anaconda-ks.cfg  initial-setup-ks.cfg                         Public
Desktop          Music                                        Templates
Documents        nginx-release-centos-7-0.el7.ngx.noarch.rpm  Videos
Downloads        Pictures                                     zabbix-6.0.6.tar.gz
[root@zabbix-server ~]# tar zxvf zabbix-6.0.6.tar.gz

#导入数据库#将该目录的数据库导入zabbix数据库
[root@zabbix-server ~]# cd /root/zabbix-6.0.6/database/mysql/
[root@zabbix-server mysql]# ls
data.sql    history_pk_prepare.sql  Makefile.am  schema.sql
double.sql  images.sql              Makefile.in
[root@zabbix-server mysql]# mysql -uroot -proot123 zabbix < schema.sql
[root@zabbix-server mysql]# mysql -uroot -proot123 zabbix < images.sql
[root@zabbix-server mysql]# mysql -uroot -proot123 zabbix < data.sql
[root@zabbix-server mysql]# mysql -uroot -proot123 zabbix < double.sql
[root@zabbix-server mysql]# mysql -uroot -proot123 zabbix < history_pk_prepare.sql

#进入zabbix数据库查看
[root@zabbix-server mysql]# mysql -uroot -proot123
Welcome to the MariaDB monitor.  Commands end with ; or \g.
Your MariaDB connection id is 16
Server version: 10.6.19-MariaDB MariaDB Server

Copyright (c) 2000, 2018, Oracle, MariaDB Corporation Ab and others.

Type 'help;' or '\h' for help. Type '\c' to clear the current input statement.

MariaDB [(none)]> use zabbix;
Reading table information for completion of table and column names
You can turn off this feature to get a quicker startup with -A

Database changed
MariaDB [zabbix]> show tables;
+----------------------------+
| Tables_in_zabbix           |
+----------------------------+
| acknowledges               |
| actions                    |
| alerts                     |
| auditlog                   |
| autoreg_host               |
| conditions                 |
| config                     |
| config_autoreg_tls         |
| corr_condition             |
| corr_condition_group       |
| corr_condition_tag         |
| corr_condition_tagpair     |
| corr_condition_tagvalue    |
| corr_operation             |
| correlation                |
| dashboard                  |
| dashboard_page             |
| dashboard_user             |
| dashboard_usrgrp           |
| dbversion                  |
| dchecks                    |
| dhosts                     |
| drules                     |
| dservices                  |
| escalations                |
| event_recovery             |
| event_suppress             |
| event_tag                  |
| events                     |
| expressions                |
| functions                  |
| globalmacro                |
| globalvars                 |
| graph_discovery            |
| graph_theme                |
| graphs                     |
| graphs_items               |
| group_discovery            |
| group_prototype            |
| ha_node                    |
| history                    |
| history_log                |
| history_log_old            |
| history_old                |
| history_str                |
| history_str_old            |
| history_text               |
| history_text_old           |
| history_uint               |
| history_uint_old           |
| host_discovery             |
| host_inventory             |
| host_tag                   |
| hostmacro                  |
| hosts                      |
| hosts_groups               |
| hosts_templates            |
| housekeeper                |
| hstgrp                     |
| httpstep                   |
| httpstep_field             |
| httpstepitem               |
| httptest                   |
| httptest_field             |
| httptest_tag               |
| httptestitem               |
| icon_map                   |
| icon_mapping               |
| ids                        |
| images                     |
| interface                  |
| interface_discovery        |
| interface_snmp             |
| item_condition             |
| item_discovery             |
| item_parameter             |
| item_preproc               |
| item_rtdata                |
| item_tag                   |
| items                      |
| lld_macro_path             |
| lld_override               |
| lld_override_condition     |
| lld_override_opdiscover    |
| lld_override_operation     |
| lld_override_ophistory     |
| lld_override_opinventory   |
| lld_override_opperiod      |
| lld_override_opseverity    |
| lld_override_opstatus      |
| lld_override_optag         |
| lld_override_optemplate    |
| lld_override_optrends      |
| maintenance_tag            |
| maintenances               |
| maintenances_groups        |
| maintenances_hosts         |
| maintenances_windows       |
| media                      |
| media_type                 |
| media_type_message         |
| media_type_param           |
| module                     |
| opcommand                  |
| opcommand_grp              |
| opcommand_hst              |
| opconditions               |
| operations                 |
| opgroup                    |
| opinventory                |
| opmessage                  |
| opmessage_grp              |
| opmessage_usr              |
| optemplate                 |
| problem                    |
| problem_tag                |
| profiles                   |
| proxy_autoreg_host         |
| proxy_dhistory             |
| proxy_history              |
| regexps                    |
| report                     |
| report_param               |
| report_user                |
| report_usrgrp              |
| rights                     |
| role                       |
| role_rule                  |
| script_param               |
| scripts                    |
| service_alarms             |
| service_problem            |
| service_problem_tag        |
| service_status_rule        |
| service_tag                |
| services                   |
| services_links             |
| sessions                   |
| sla                        |
| sla_excluded_downtime      |
| sla_schedule               |
| sla_service_tag            |
| sysmap_element_trigger     |
| sysmap_element_url         |
| sysmap_shape               |
| sysmap_url                 |
| sysmap_user                |
| sysmap_usrgrp              |
| sysmaps                    |
| sysmaps_element_tag        |
| sysmaps_elements           |
| sysmaps_link_triggers      |
| sysmaps_links              |
| tag_filter                 |
| task                       |
| task_acknowledge           |
| task_check_now             |
| task_close_problem         |
| task_data                  |
| task_remote_command        |
| task_remote_command_result |
| task_result                |
| timeperiods                |
| token                      |
| trends                     |
| trends_uint                |
| trigger_depends            |
| trigger_discovery          |
| trigger_queue              |
| trigger_tag                |
| triggers                   |
| users                      |
| users_groups               |
| usrgrp                     |
| valuemap                   |
| valuemap_mapping           |
| widget                     |
| widget_field               |
+----------------------------+
`178 rows` in set (0.001 sec)
#是178条
MariaDB [zabbix]> quit
Bye
安装软件包
bash
#安装zabbix环境包
[root@zabbix-server mysql]# yum install -y mysql-devel pcre-devel openssl-devel zlib-devel libxml2-devel net-snmp-devel net-snmp libssh2-devel OpenIPMI-devel libevent-devel openldap-devel libcurl-devel fping gcc gcc-c++ make

# 创建zabbix用户
[root@zabbix-server mysql]# useradd -s /sbin/nologin -M zabbix

#使得编译器在编译 C 代码时使用 GNU C99 标准
[root@zabbix-server mysql]# export CFLAGS="-std=gnu99"

#执行configure脚本
[root@zabbix-server mysql]# cd
[root@zabbix-server ~]# cd zabbix-6.0.6/
[root@zabbix-server zabbix-6.0.6]# ./configure --sysconfdir=/etc/zabbix/ --enable-server --with-mysql --with-net-snmp --with-libxml2 --with-ssh2 --with-openipmi --with-zlib --with-libpthread --with-libevent --with-openssl --with-ldap --with-libcurl --with-libpcre

#安装
[root@zabbix-server ~]# make install

#检查版本
[root@zabbix-server ~]# zabbix_server --version
zabbix_server (Zabbix) 6.0.6
Revision 3f7597e3ea3 27 June 2022, compilation time: Dec 11 2025 14:01:17

Copyright (C) 2022 Zabbix SIA
License GPLv2+: GNU GPL version 2 or later <http://gnu.org/licenses/gpl.html>.
This is free software: you are free to change and redistribute it according to
the license. There is NO WARRANTY, to the extent permitted by law.

This product includes software developed by the OpenSSL Project
for use in the OpenSSL Toolkit (http://www.openssl.org/).

Compiled with OpenSSL 1.0.2k-fips  26 Jan 2017
Running with OpenSSL 1.0.2k-fips  26 Jan 2017
修改zabbix-server配置文件
bash
[root@zabbix-server ~]# vim /etc/zabbix/zabbix_server.conf
38 LogFile=/var/log/zabbix_server.log
123 DBPassword=zabbix123

#创建日志文件并修改属组和属主
[root@zabbix-server ~]# touch /var/log/zabbix_server.log
[root@zabbix-server ~]# chown zabbix.zabbix /var/log/zabbix_server.log

#创建并添加systemctl服务管理zabbix-server
[root@zabbix-server ~]# vim /usr/lib/systemd/system/zabbix-server.service
[root@zabbix-server ~]# cat /usr/lib/systemd/system/zabbix-server.service
#添加下面这段话,直接复制
[Unit]
Description=Zabbix Server with MySQL DB
After=syslog.target network.target mysqld.service

[Service]
Type=simple
ExecStart=/usr/local/sbin/zabbix_server -f
User=zabbix

[Install]
WantedBy=multi-user.target

#启动zabbix
[root@zabbix-server ~]# systemctl start zabbix-server.service
[root@zabbix-server ~]# netstat -ntap |grep 10051
tcp        0      0 0.0.0.0:10051           0.0.0.0:*               LISTEN      65150/zabbix_server
前端页面复制到站点
bash
[root@zabbix-server ~]# cp -r /root/zabbix-6.0.6/ui/* /usr/share/nginx/html/

#提供网站前面
[root@zabbix-server ~]# chown -R nginx:nginx /usr/share/nginx/html/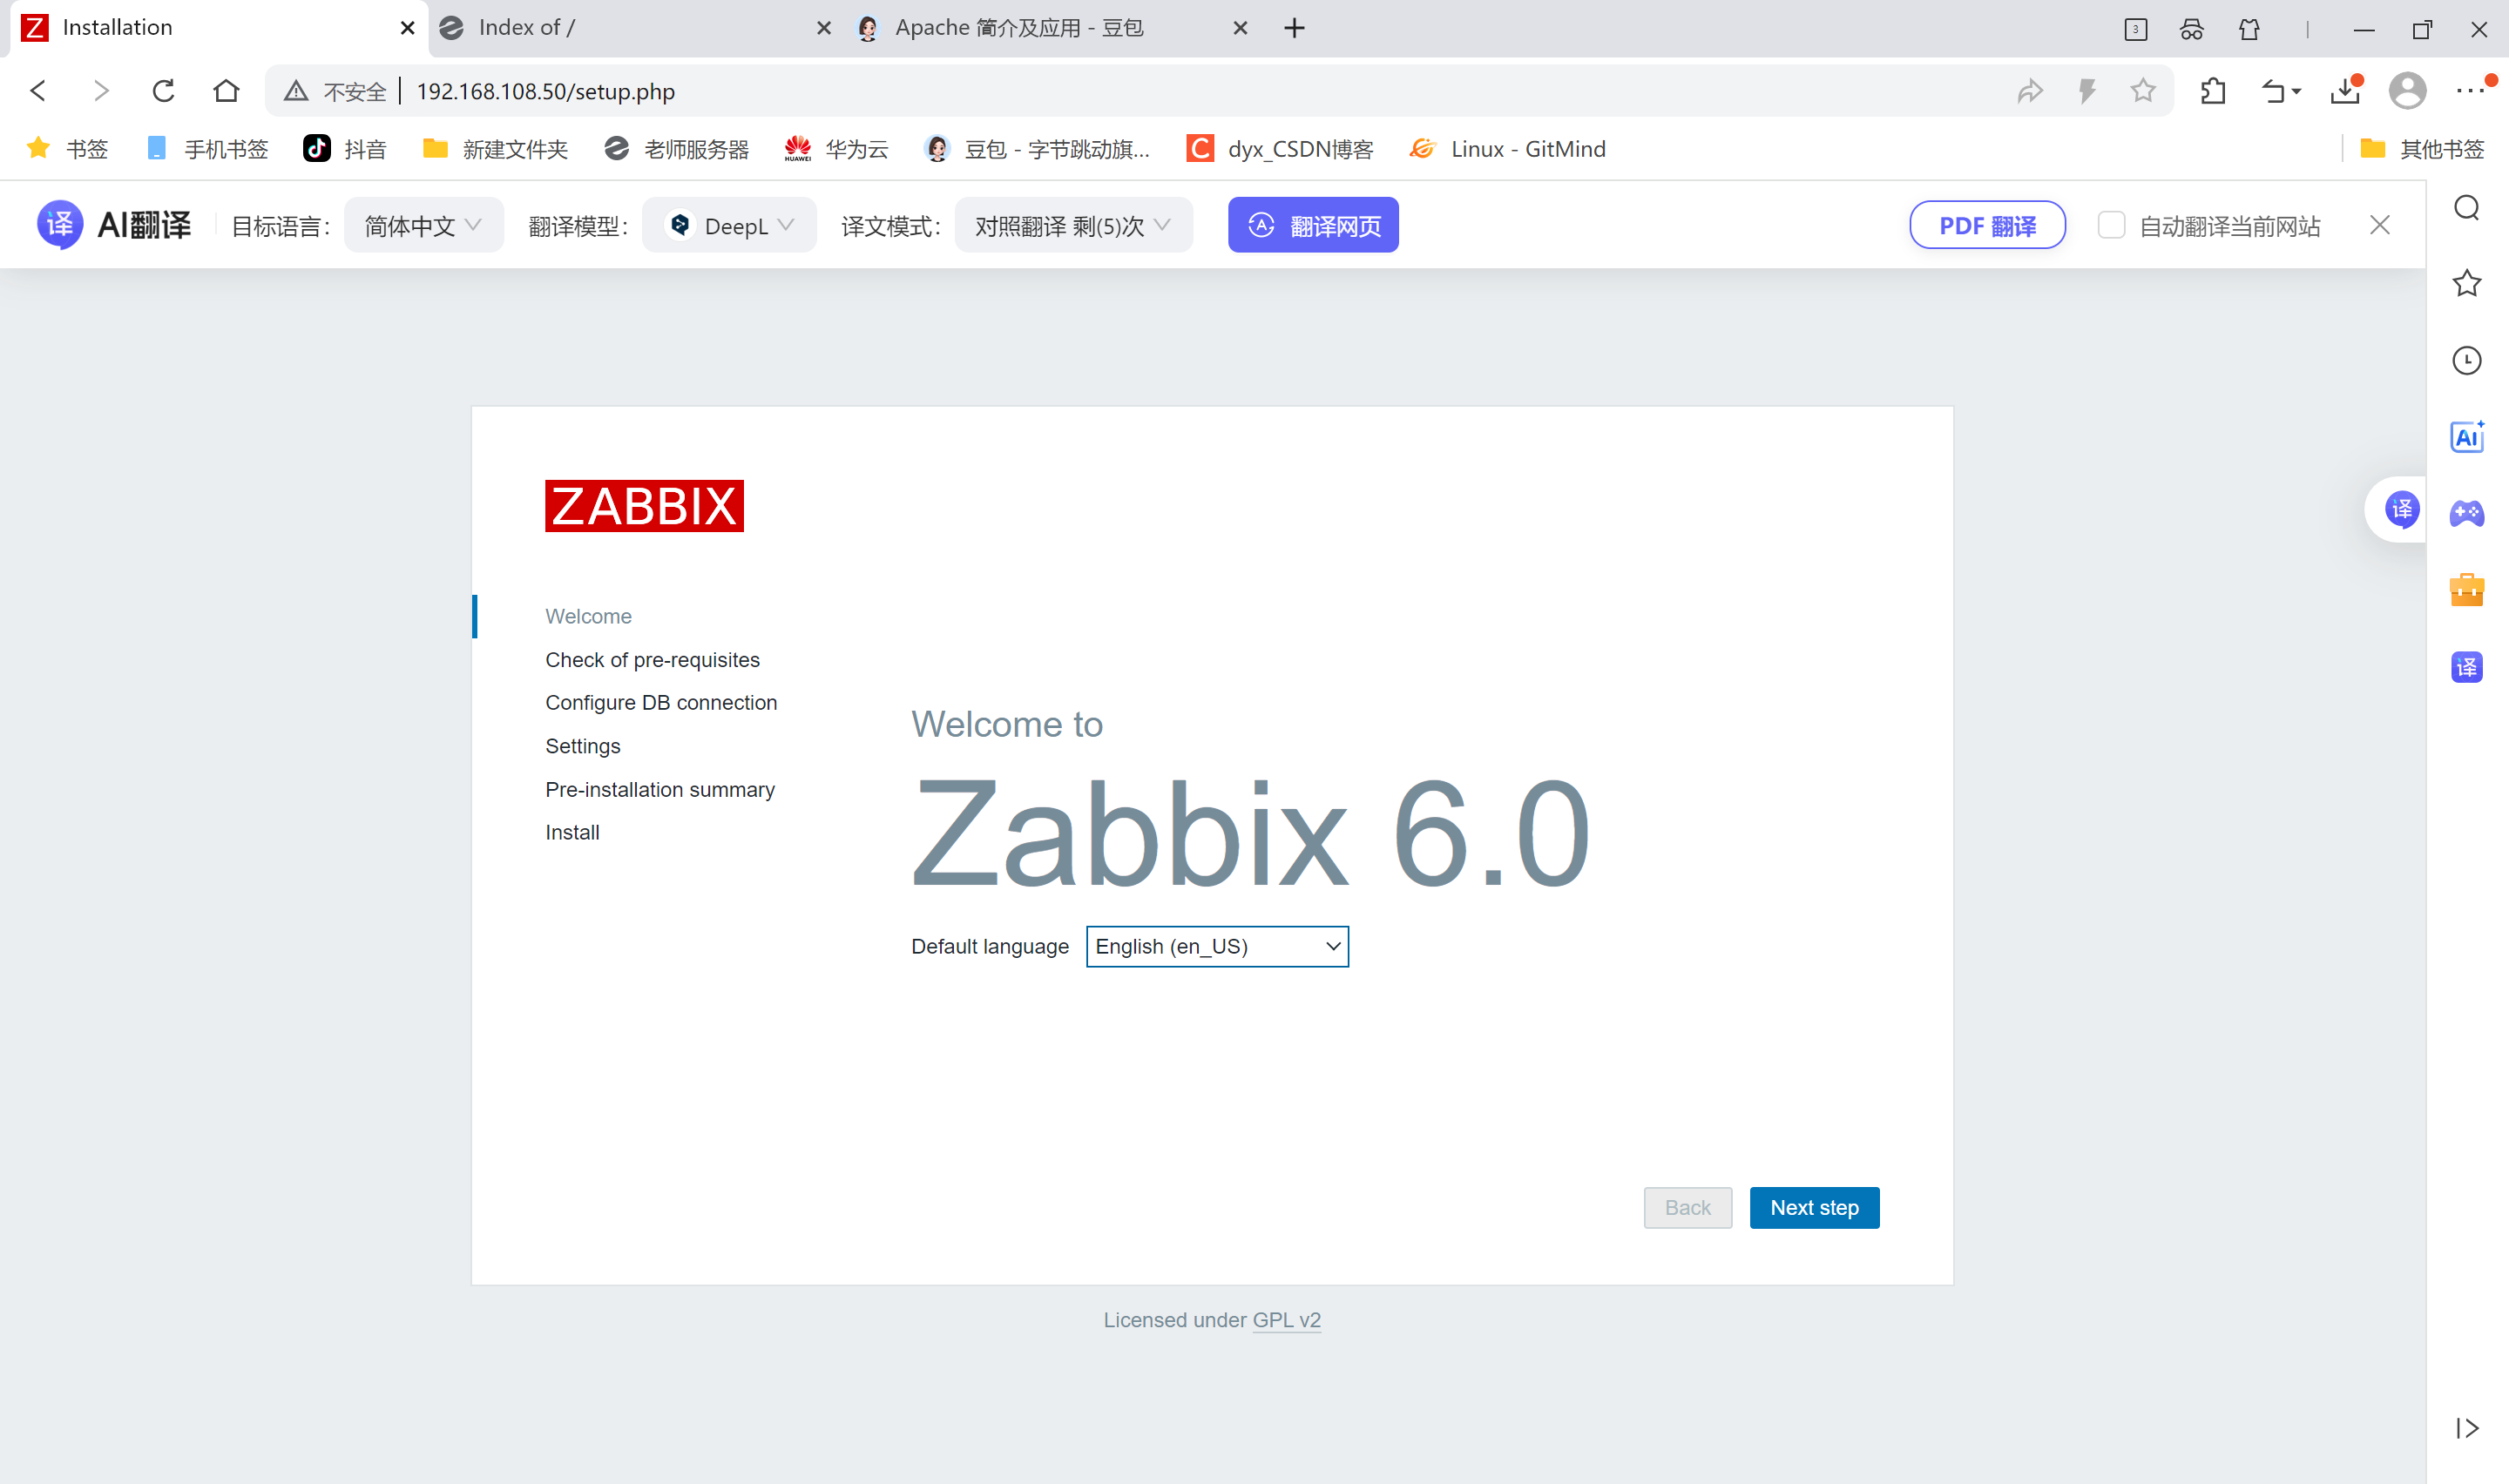
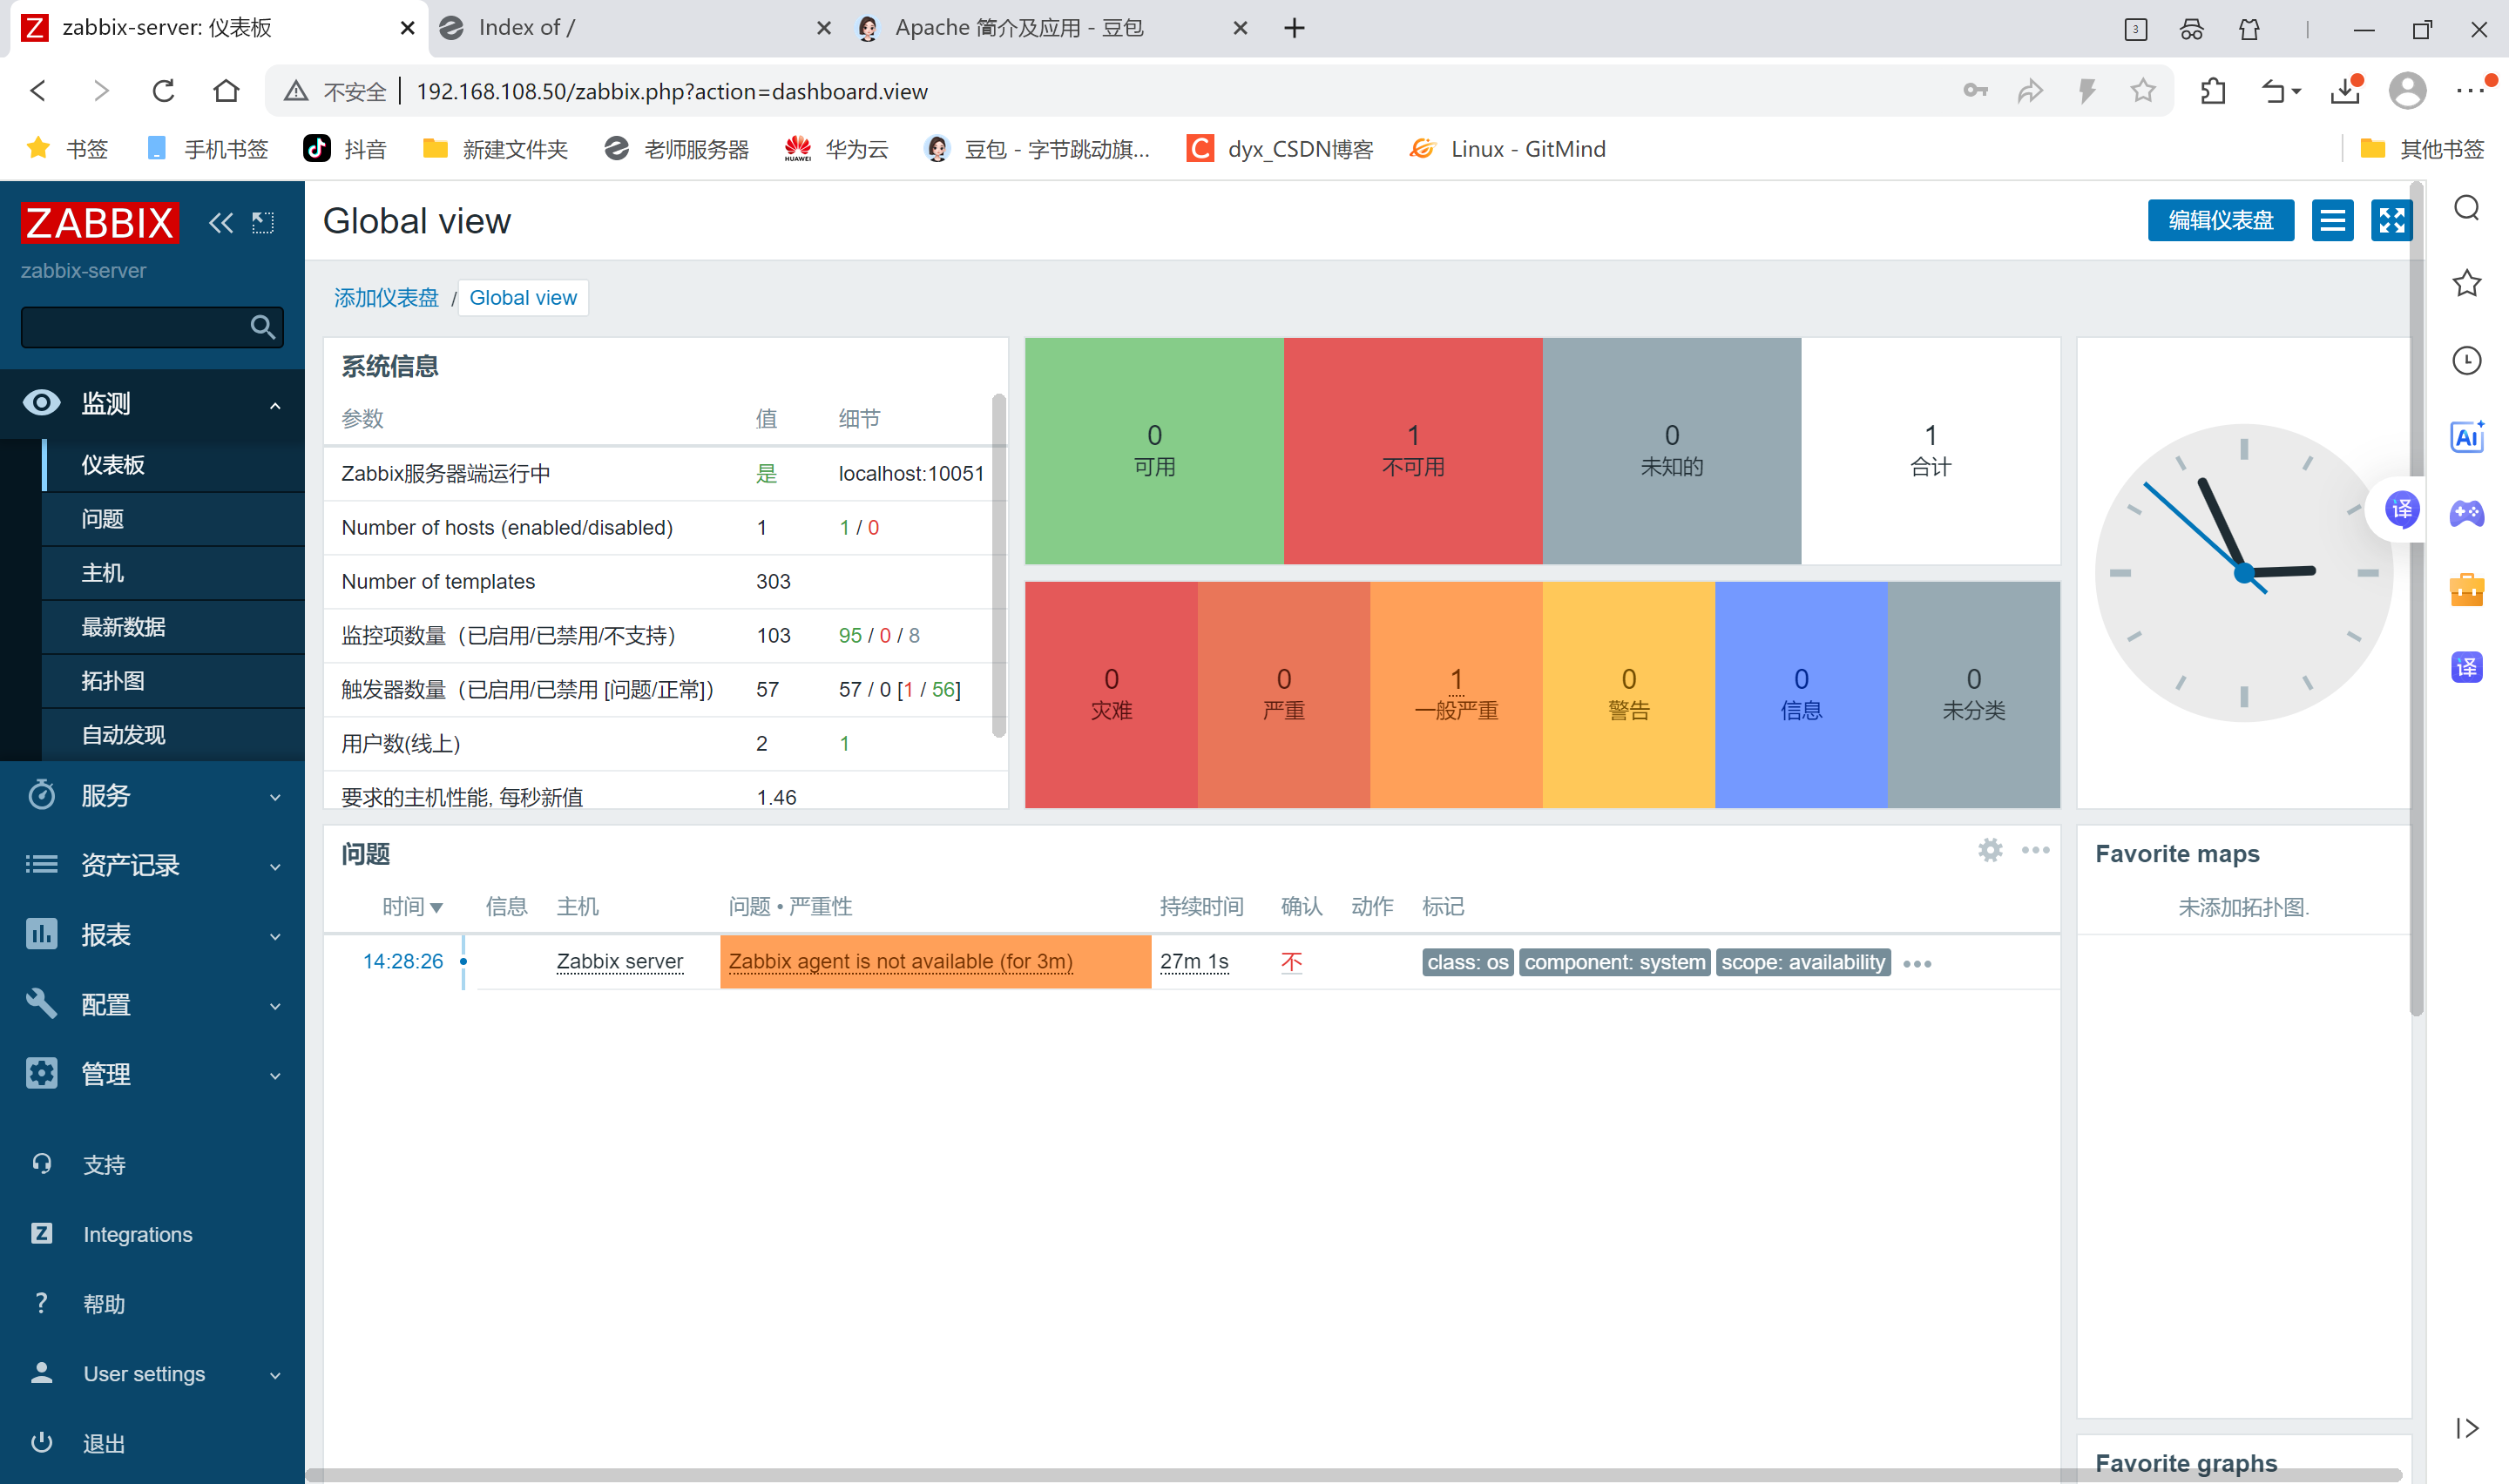
默认登陆用户名:Admin
默认登陆密码:zabbix
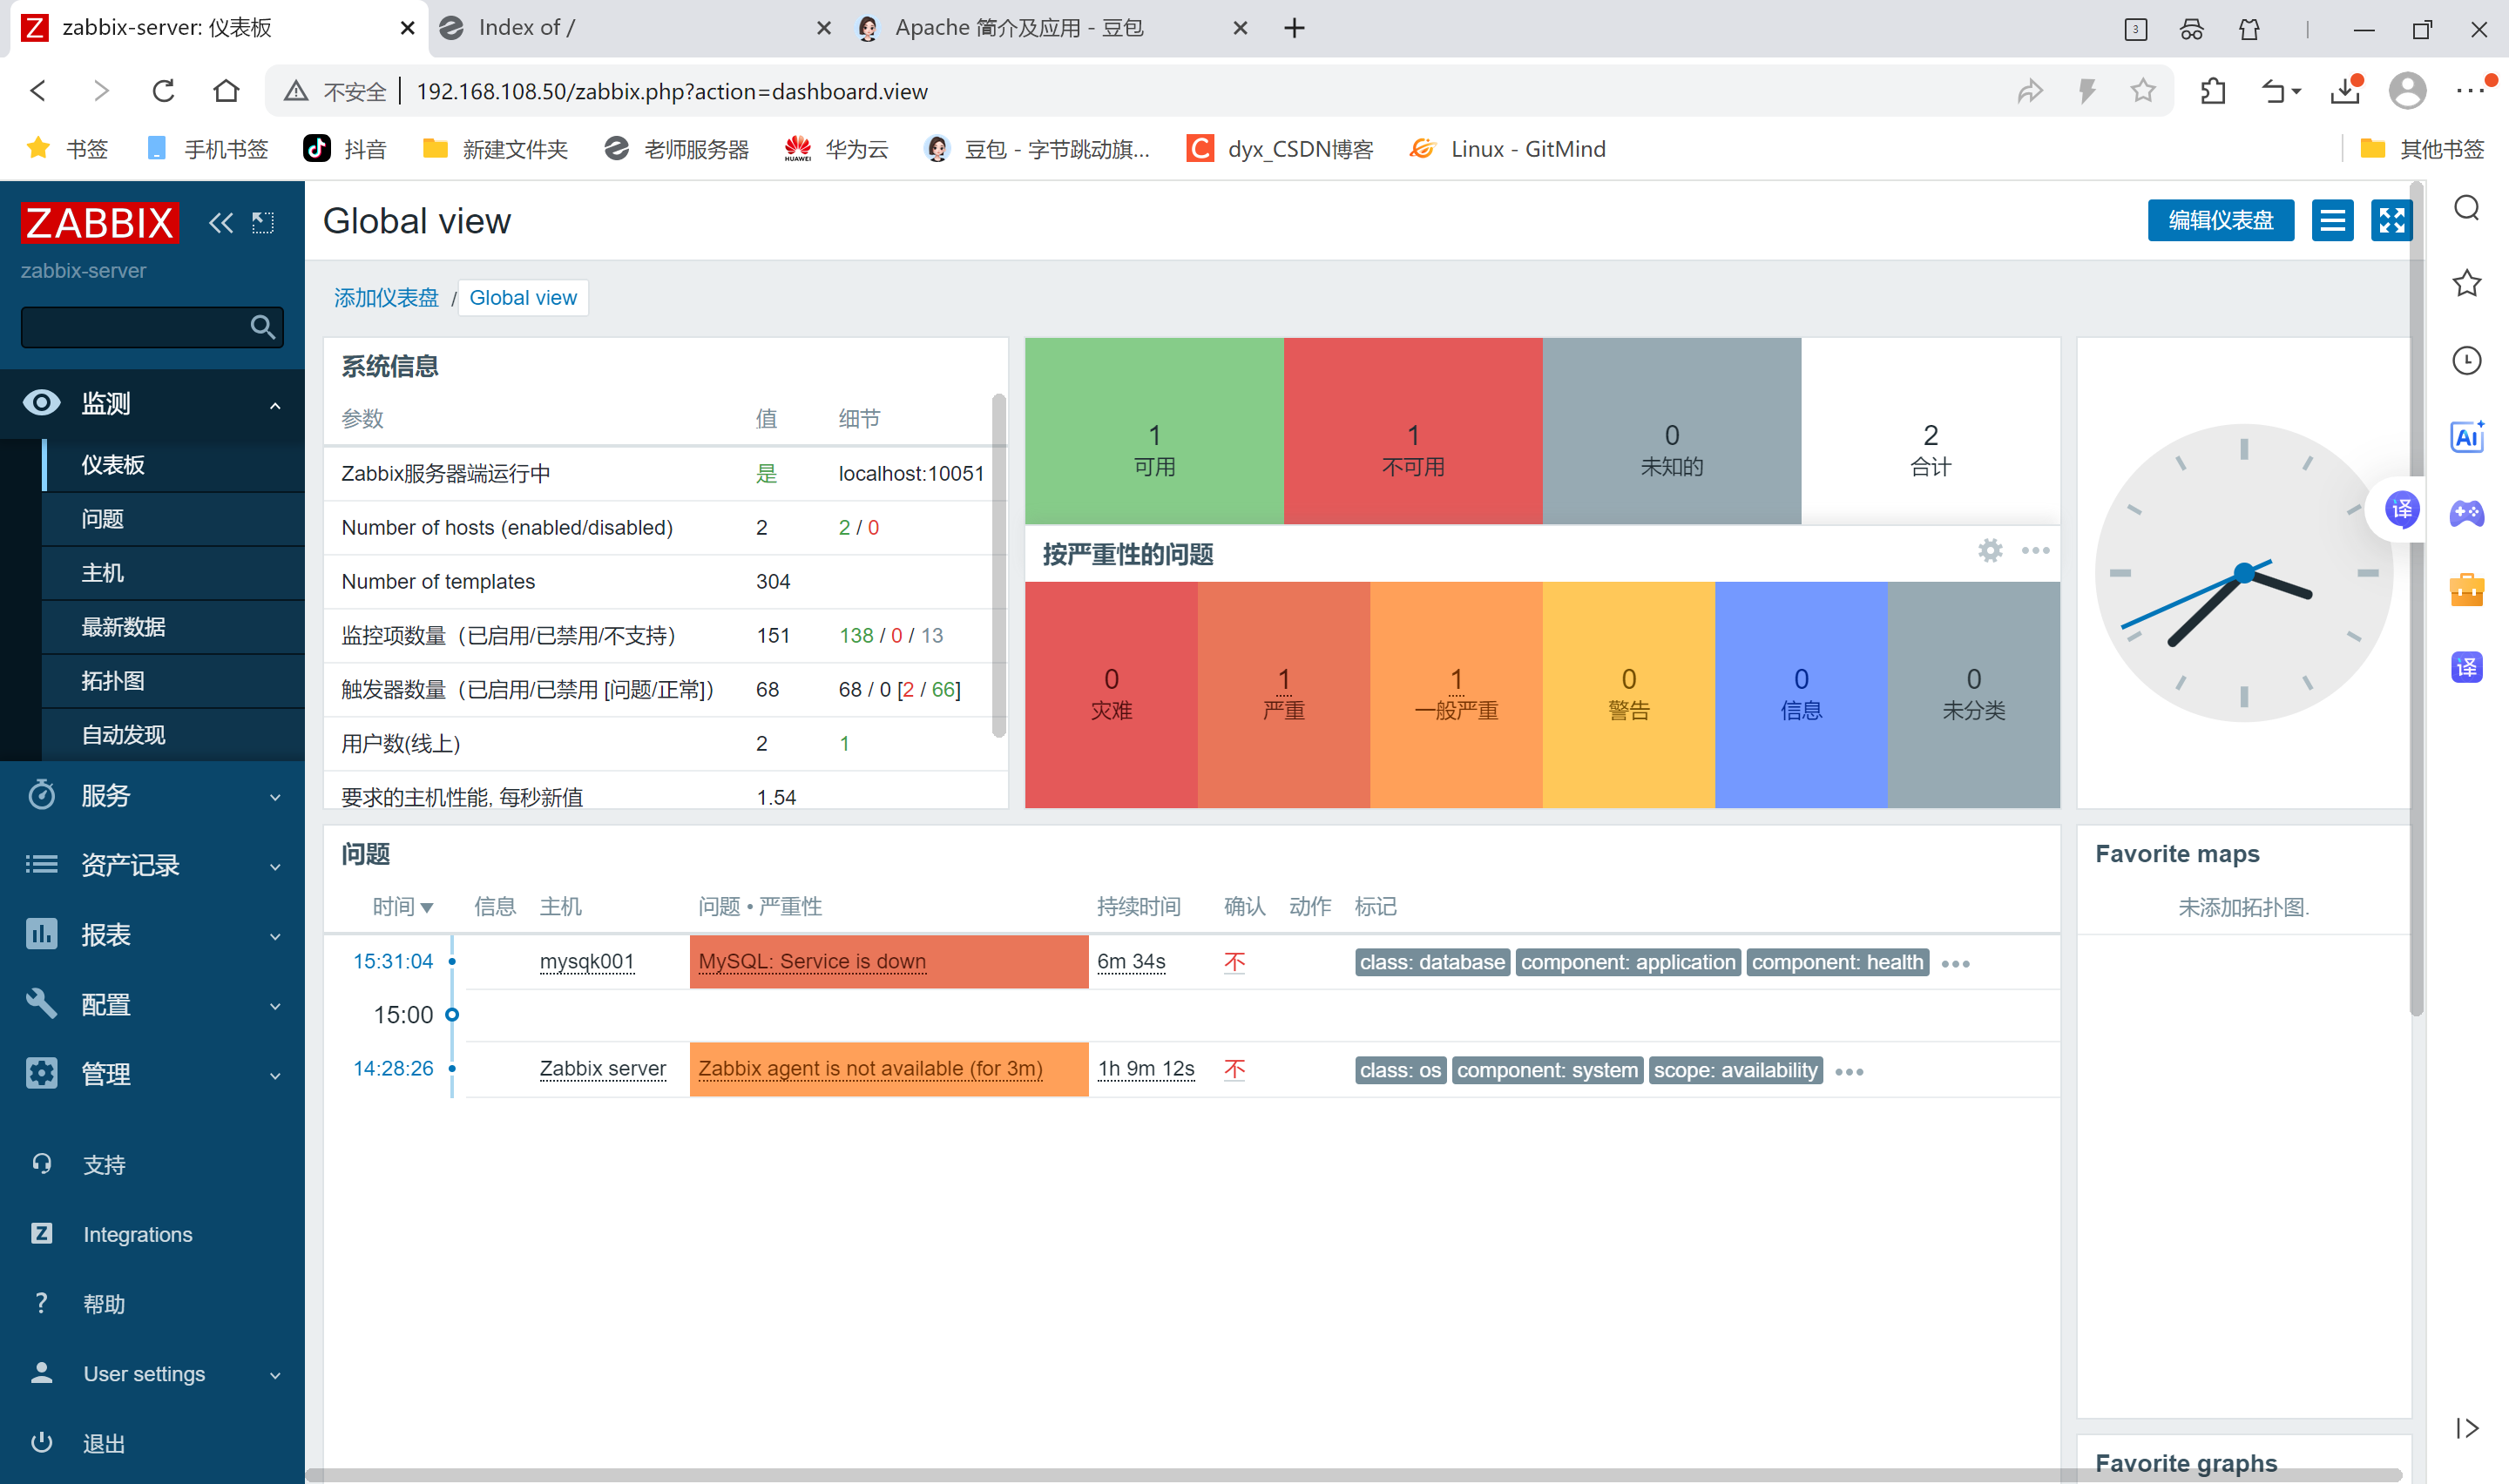
被监控端
安装agent
通过前面mysql章节的mysql01克隆mysql001
bash
[root@mysql001 ~]# systemctl status firewalld.service
● firewalld.service - firewalld - dynamic firewall daemon
   Loaded: loaded (/usr/lib/systemd/system/firewalld.service; disabled; vendor preset: enabled)
   Active: inactive (dead)
     Docs: man:firewalld(1)
[root@mysql001 ~]# systemctl stop firewalld.service
[root@mysql001 ~]# setenforce 0
setenforce: SELinux is disabled
[root@mysql001 ~]# rm -rf /etc/yum.repos.d/*.repo
[root@mysql001 ~]# wget -O /etc/yum.repos.d/CentOS-Base.repo   https://mirrors.huaweicloud.com/artifactory/os-conf/centos/centos-7.repo
--2025-12-11 14:55:24--  https://mirrors.huaweicloud.com/artifactory/os-conf/centos/centos-7.repo
Resolving mirrors.huaweicloud.com (mirrors.huaweicloud.com)... 123.249.118.101, 124.70.61.162, 1.92.76.132, ...
Connecting to mirrors.huaweicloud.com (mirrors.huaweicloud.com)|123.249.118.101|:443... connected.
HTTP request sent, awaiting response... 200
Length: 1811 (1.8K) [application/octet-stream]
Saving to: '/etc/yum.repos.d/CentOS-Base.repo'

100%[===============================================>] 1,811       --.-K/s   in 0s

2025-12-11 14:55:26 (190 MB/s) - '/etc/yum.repos.d/CentOS-Base.repo' saved [1811/1811]

#更新CA
[root@mysql001 ~]# yum update ca-certificates -y

#安装软件包
[root@mysql001 ~]# rpm -ivh https://repo.zabbix.com/zabbix/6.0/rhel/7/x86_64/zabbix-release-6.0-4.el7.noarch.rpm
Retrieving https://repo.zabbix.com/zabbix/6.0/rhel/7/x86_64/zabbix-release-6.0-4.el7.noarch.rpm
warning: /var/tmp/rpm-tmp.sAb6Z7: Header V4 RSA/SHA512 Signature, key ID a14fe591: NOKEY
Preparing...                          ################################# [100%]
Updating / installing...
   1:zabbix-release-6.0-4.el7         ################################# [100%]

[root@mysql001 ~]# yum install zabbix-agent2 -y

#启动服务
[root@mysql001 ~]# systemctl enable zabbix-agent2.service --now
Created symlink from /etc/systemd/system/multi-user.target.wants/zabbix-agent2.service to /usr/lib/systemd/system/zabbix-agent2.service.

#修改配置文件
[root@mysql001 ~]# vim /etc/zabbix/zabbix_agent2.conf
13 PidFile=/var/run/zabbix/zabbix_agent2.pid
32 LogFile=/var/log/zabbix/zabbix_agent2.log
43 LogFileSize=0
82 Server=192.168.108.50 #指向监控服务器
135 ServerActive=192.168.108.50 #指向监控服务器
146 Hostname=mysql001 #名称
283 Include=/etc/zabbix/zabbix_agent2.d/*.conf

#重启服务(先不重启看看配置生效不)
[root@mysql001 zabbix_agent2.d]# systemctl restart zabbix-agent2.service
zabbix管理
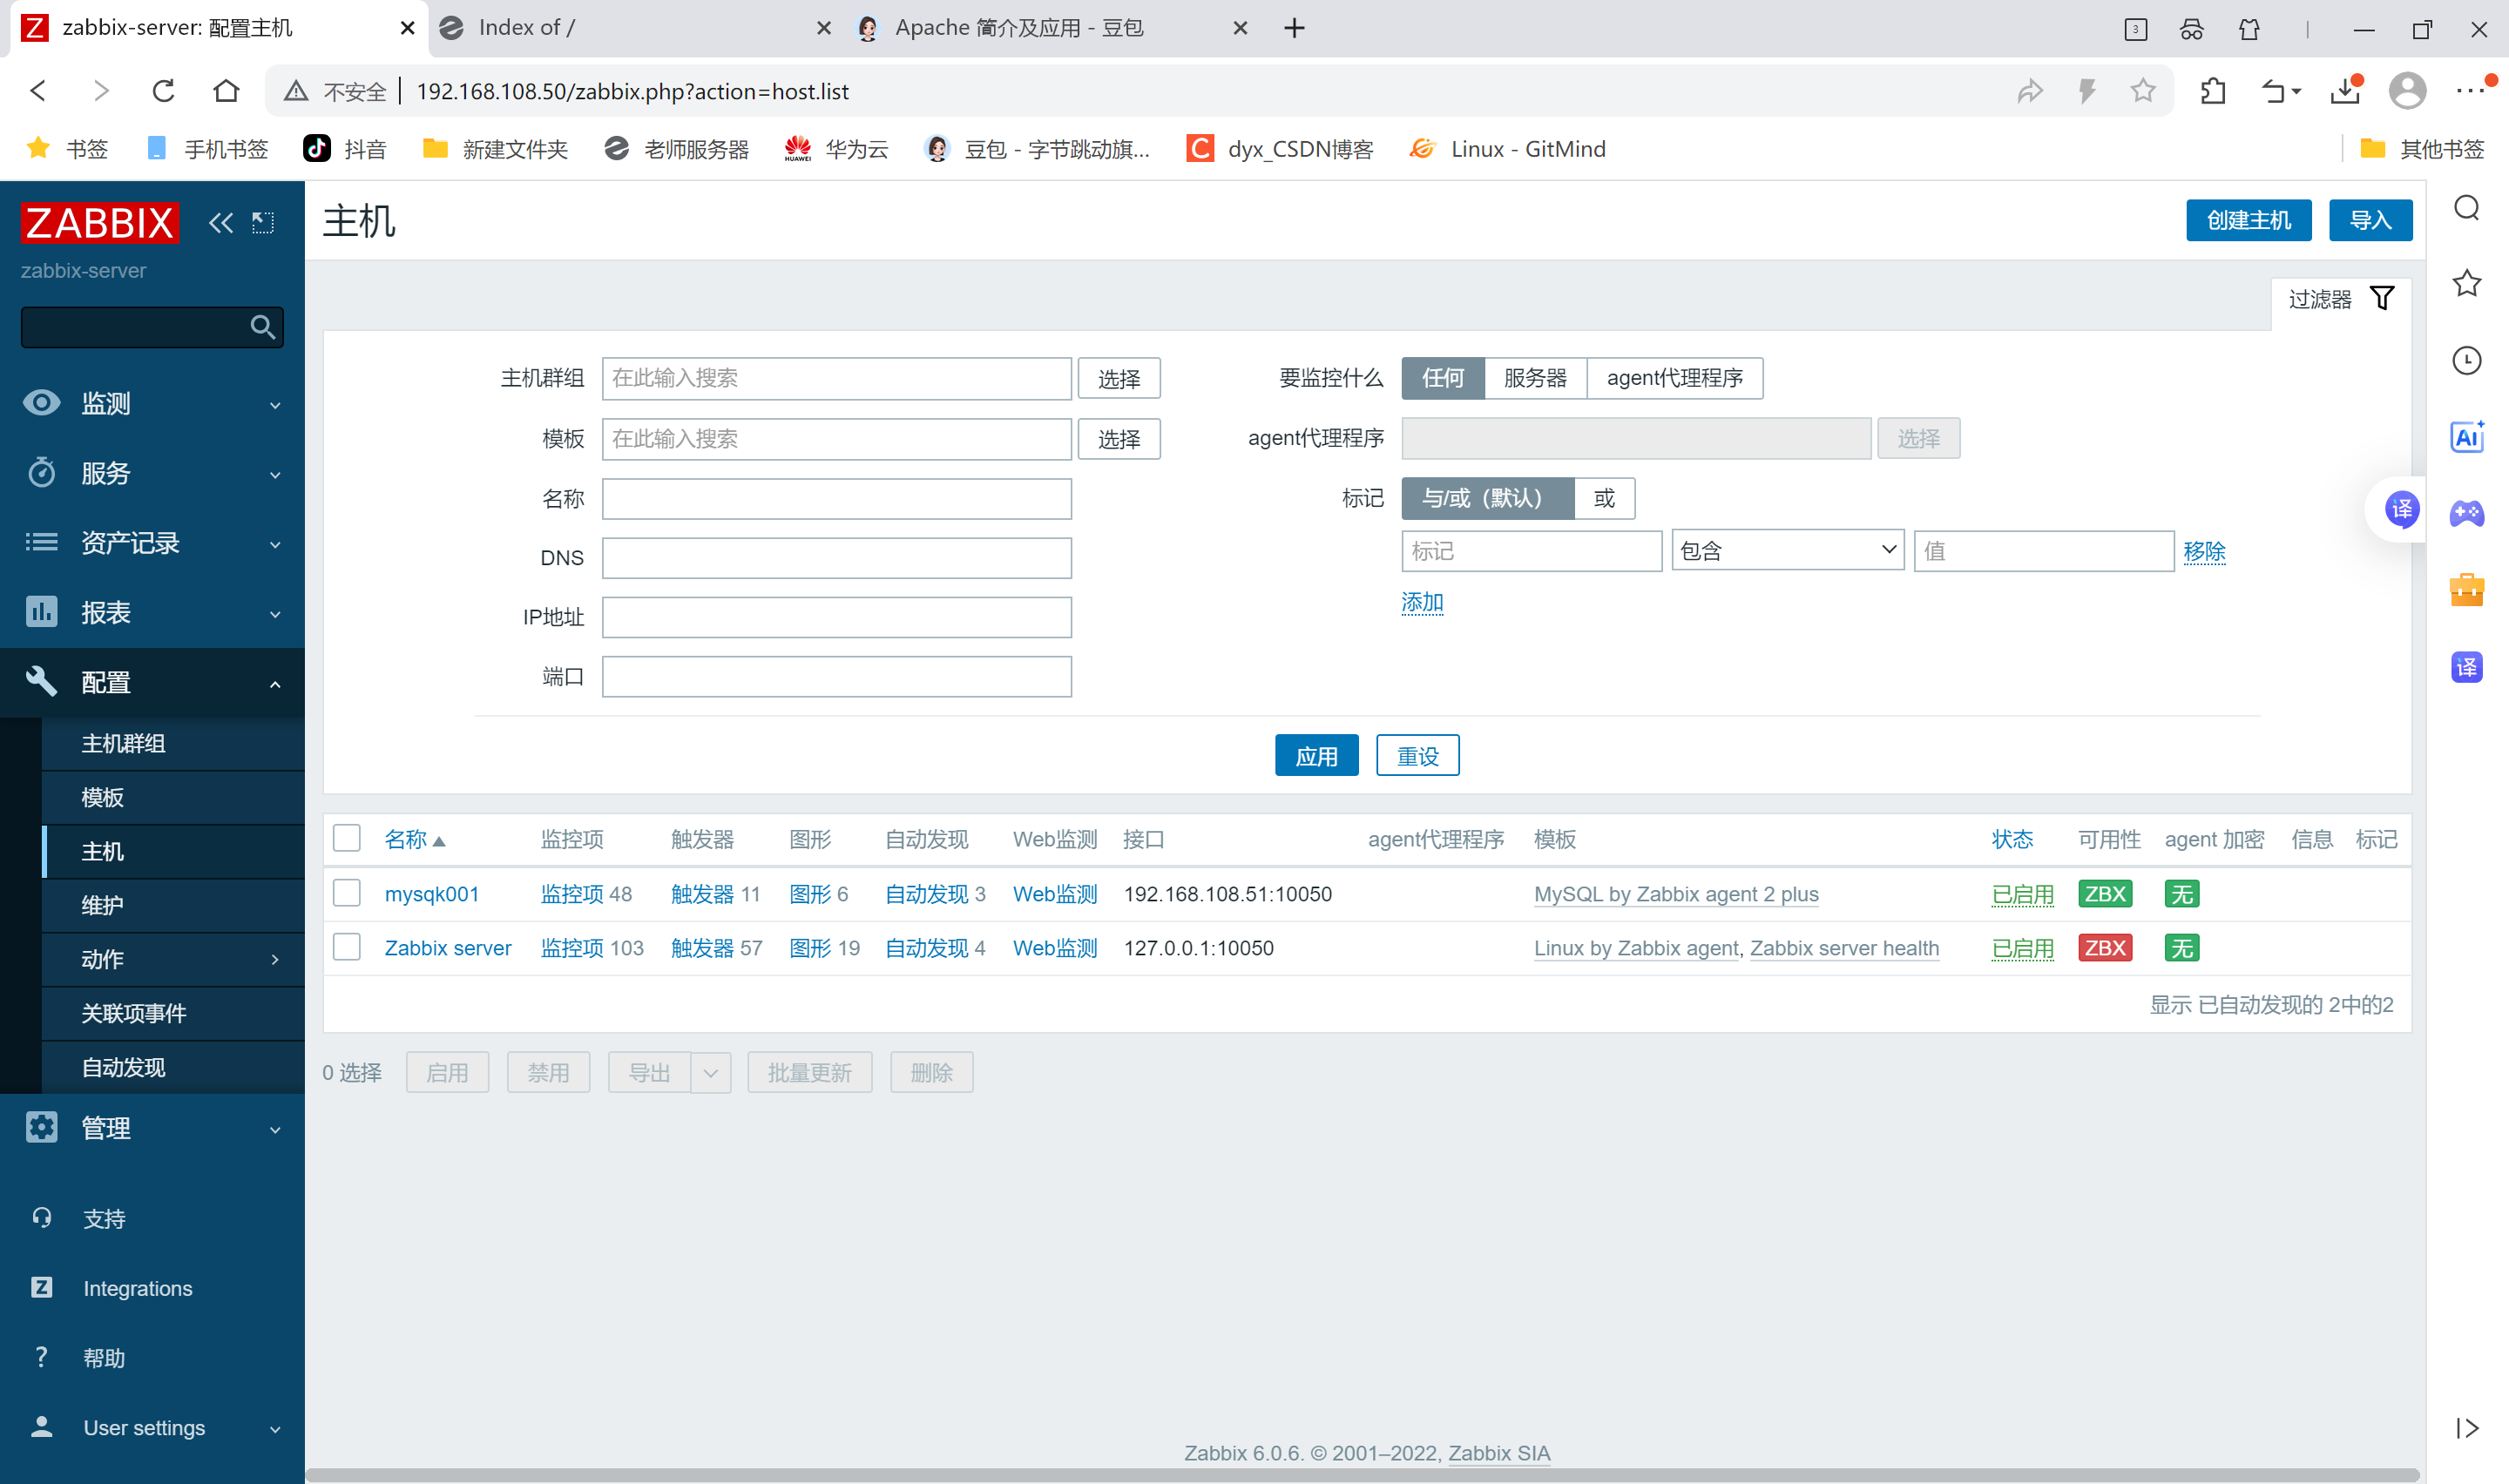
监控主机
zabbix首页登录后
邮件服务

记下
在zabbix-server服务器上安装邮箱服务
bash
[root@zabbix-server ~]# yum install -y mailx
Loaded plugins: fastestmirror, langpacks
Loading mirror speeds from cached hostfile
Package mailx-12.5-19.el7.x86_64 already installed and latest version
Nothing to do
配置邮箱服务
bash
[root@zabbix-server ~]# vim /etc/mail.rc
[root@zabbix-server ~]# tail -n 10 /etc/mail.rc
----文件末尾新增---
set from=3186973288@qq.com
set smtp=smtps://smtp.qq.com:465
set smtp-auth-user=3186973288@qq.com
set smtp-auth-password=#qq授权码
set smtp-auth=login
#set smtp-use-starttls 这里是不需要配置的,很多地方没说明,配置了反而会验证失败,所以我注释掉;
set ssl-verify=ignore
set nss-config-dir=/root/.certs #制定的存放QQ邮箱SSL证书的位置。
set nss-config-dir=/etc/pki/nssdb/

[root@zabbix-server ~]# chmod -R 755 /etc/pki/nssdb/
因为需要QQ邮箱的SSL证书,所以我们还需要手动的获取QQ邮箱的证书保存到本地指定的目录里以备调用和验证,具体命令如下:
bash
[root@zabbix-server ~]# mkdir -p /root/.certs/
[root@zabbix-server ~]# echo -n | openssl s_client -connect smtp.qq.com:465 | sed -ne '/-BEGINCERTIFICATE-/,/-END CERTIFICATE-/p' > ~/.certs/qq.crt
depth=2 C = US, O = DigiCert Inc, OU = www.digicert.com, CN = DigiCert Global Root G2
verify return:1
depth=1 C = US, O = "DigiCert, Inc.", CN = DigiCert Secure Site OV G2 TLS CN RSA4096 SHA256 2022 CA1
verify return:1
depth=0 C = CN, ST = Guangdong Province, L = Shenzhen, O = Shenzhen Tencent Computer Systems Company Limited, CN = *.mail.qq.com
verify return:1
DONE
[root@zabbix-server ~]# certutil -A -n "GeoTrust SSL CA" -t "C,," -d ~/.certs -i ~/.certs/qq.crt
certutil: could not decode certificate: SEC_ERROR_INVALID_ARGS: security library: invalid arguments.
[root@zabbix-server ~]# certutil -A -n "GeoTrust Global CA" -t "C,," -d ~/.certs -i ~/.certs/qq.crt
certutil: could not decode certificate: SEC_ERROR_INVALID_ARGS: security library: invalid arguments.
[root@zabbix-server ~]# certutil -L -d /root/.certs

Certificate Nickname                                         Trust Attributes
                                                             SSL,S/MIME,JAR/XPI
为了防止出现前文所说的发送邮件警告提示,还需要进入邮箱SSL证书存放目录 /root/.certs 里执行如下命令:
bash
[root@zabbix-server ~]# cd /root/.certs/
[root@zabbix-server .certs]# certutil -A -n "GeoTrust SSL CA - G3" -t "Pu,Pu,Pu" -d ./ -i qq.crt
Notice: Trust flag u is set automatically if the private key is present.
certutil: could not decode certificate: SEC_ERROR_INVALID_ARGS: security library: invalid arguments.
这是为了信任证书的标记操作。
至此,已经完成了mailx结合QQ邮箱发送系统邮件的部署了,通过命令行发送测试邮件试试吧:
bash
# 执行命令后,进入交互式编辑,输入正文后按 Ctrl+D 结束并发送\
[root@zabbix-server .certs]# mailx -s "test" 3186973288@qq.com
hhh
123
DEOT
[root@zabbix-server .certs]# Error in certificate: Peer's certificate issuer is not recognized.
smtp-server: "/root/dead.letter" 0/0
. . . message not sent.
前往QQ邮箱查收测试邮件
创建脚本目录,并重启zabbix服务
bash
[root@zabbix-server .certs]# vim /etc/zabbix/zabbix_server.conf
548 AlertScriptsPath=/usr/lib/zabbix/alertscripts

[root@zabbix-server .certs]# mkdir -p /usr/lib/zabbix/alertscripts
[root@zabbix-server .certs]# chown -R zabbix:zabbix /usr/lib/zabbix/alertscripts
[root@zabbix-server .certs]# systemctl restart zabbix-server.service
编写邮件发送脚本
bash
[root@zabbix-server .certs]# vim /usr/lib/zabbix/alertscripts/mailx.sh
[root@zabbix-server .certs]# cat /usr/lib/zabbix/alertscripts/mailx.sh
#!/bin/bash
#send mail
messages=`echo $3 | tr '\r\n' '\n'`
subject=`echo $2 | tr '\r\n' '\n'`
echo "${messages}" | mail -s "${subject}" $1 >>/tmp/mailx.log 2>&1
权限设置
bash
[root@zabbix-server .certs]# touch /tmp/mailx.log

[root@zabbix-server .certs]# chown -R zabbix.zabbix /tmp/mailx.log
[root@zabbix-server .certs]# cd
[root@zabbix-server ~]# chmod +x /usr/lib/zabbix/alertscripts/mailx.sh
测试脚本发送邮件
bash
[root@zabbix-server ~]# cd /usr/lib/zabbix/alertscripts/
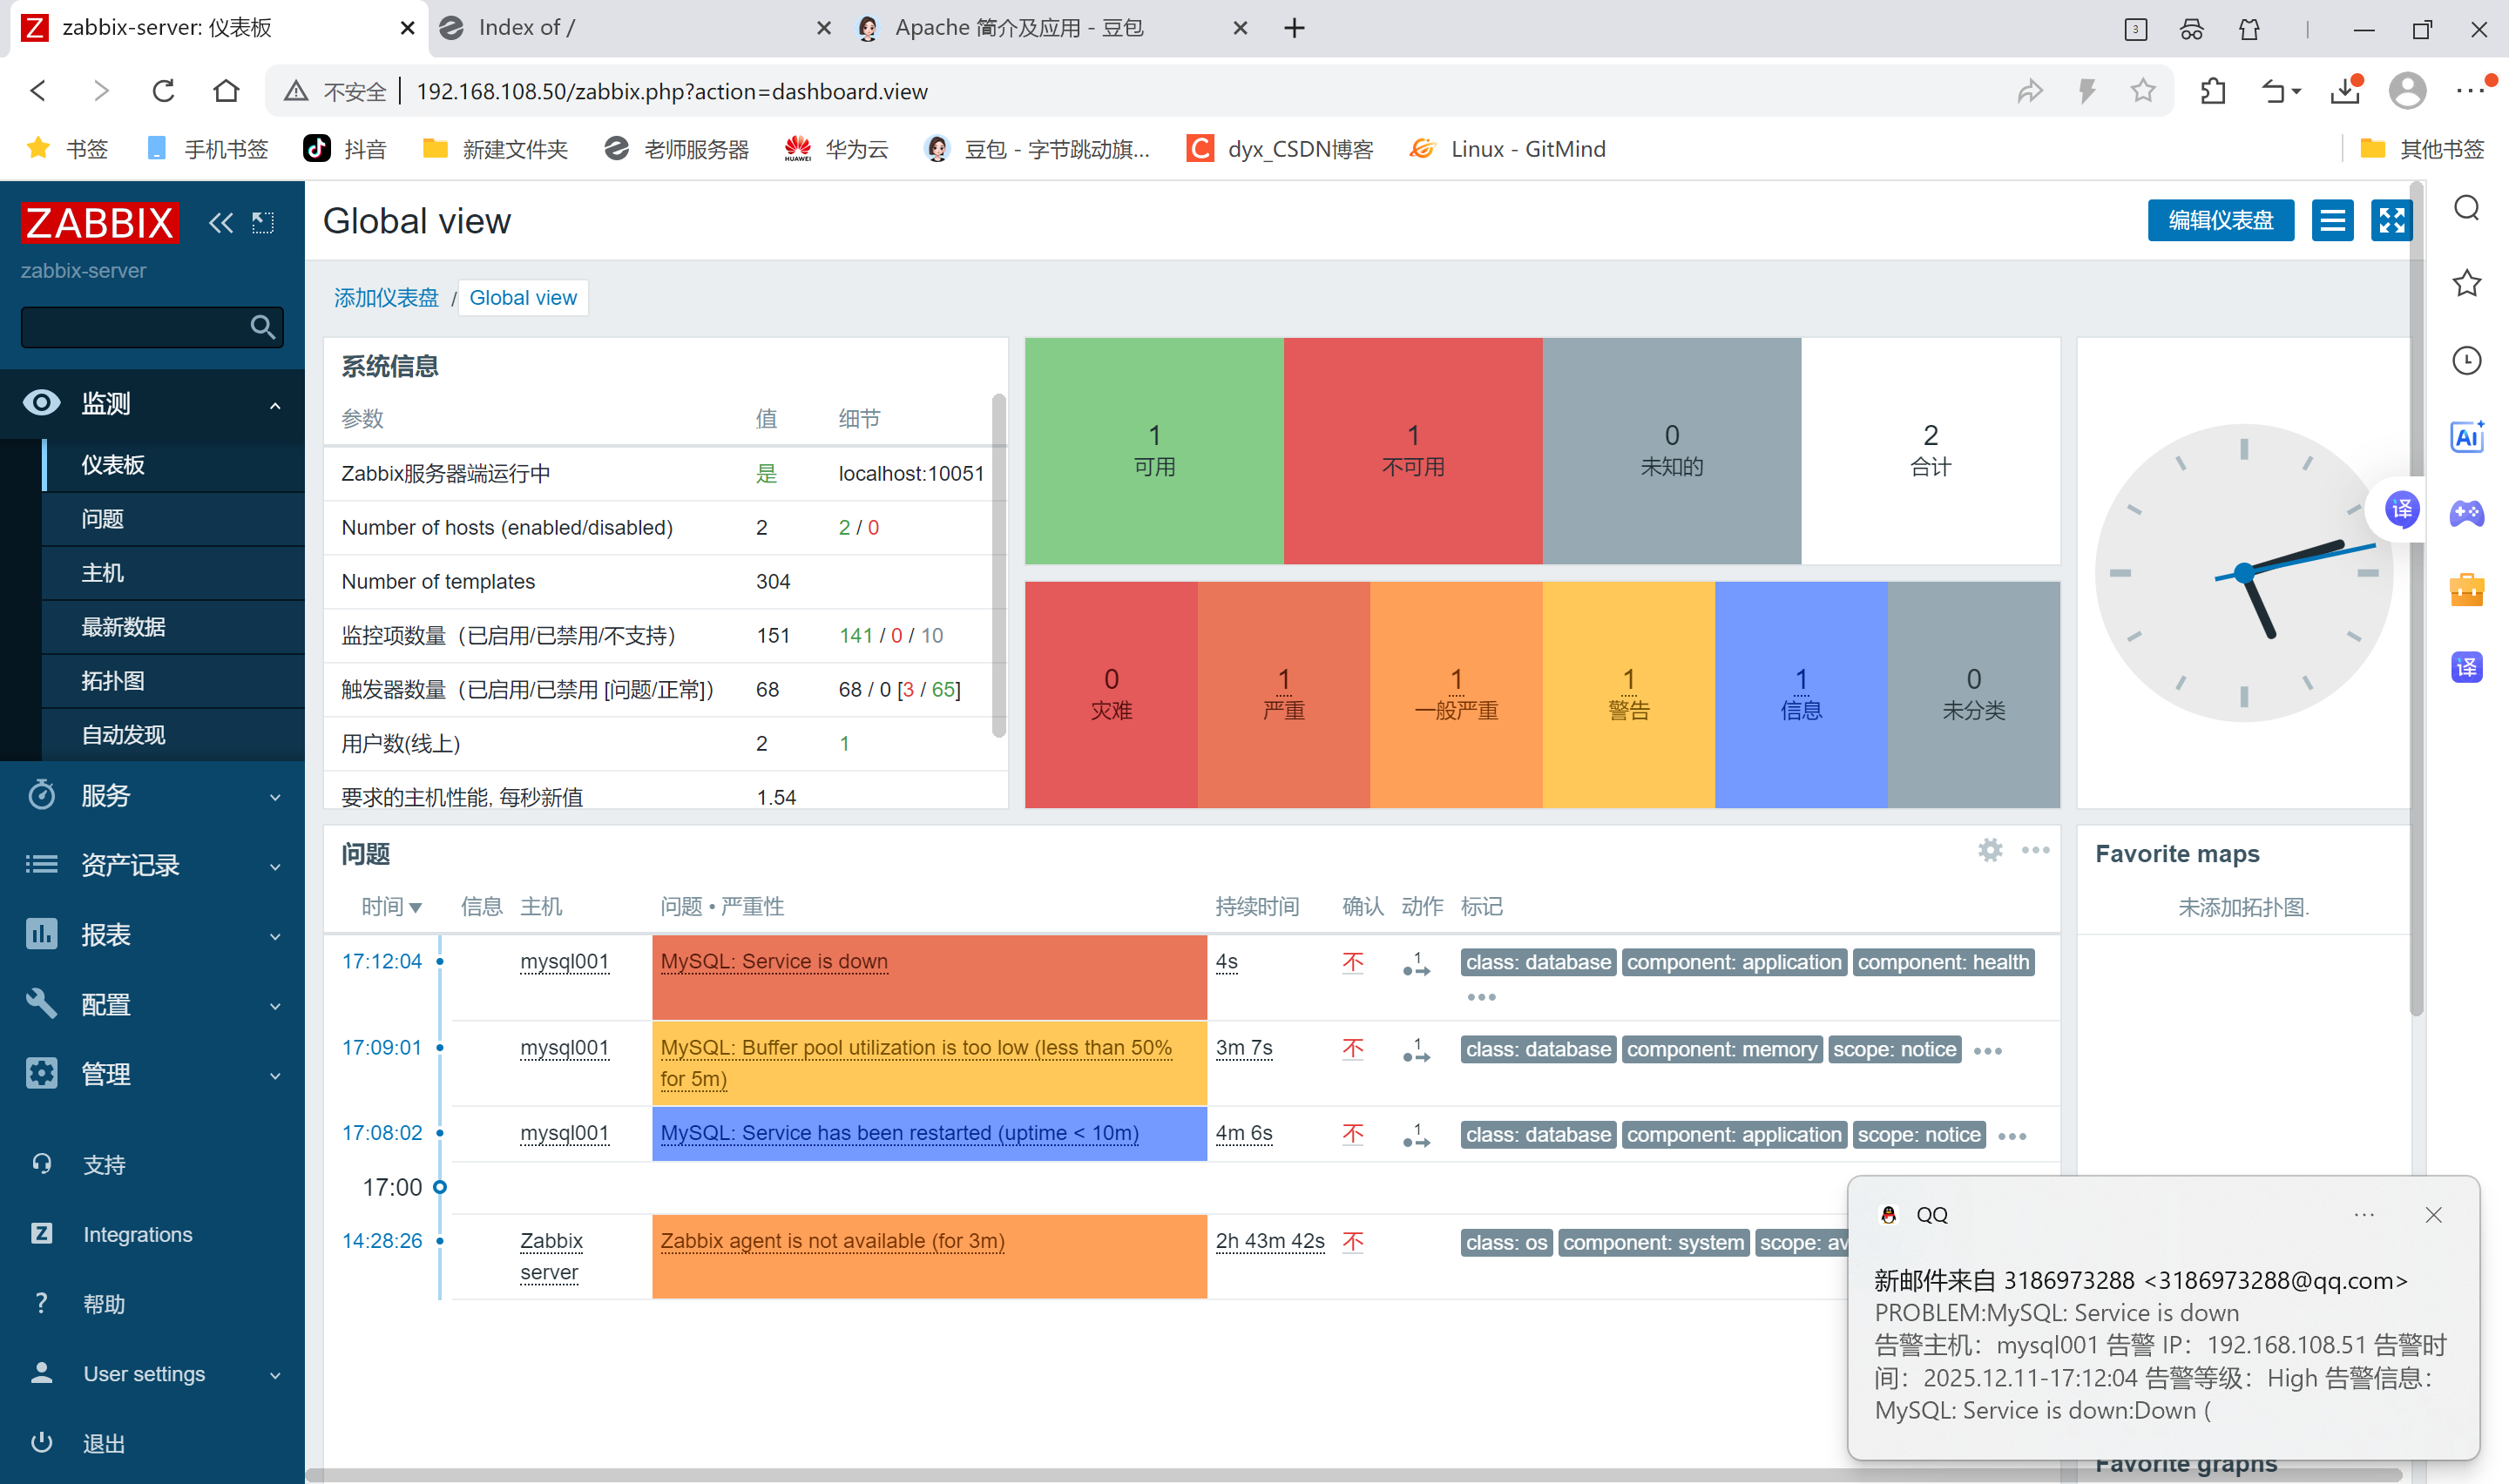
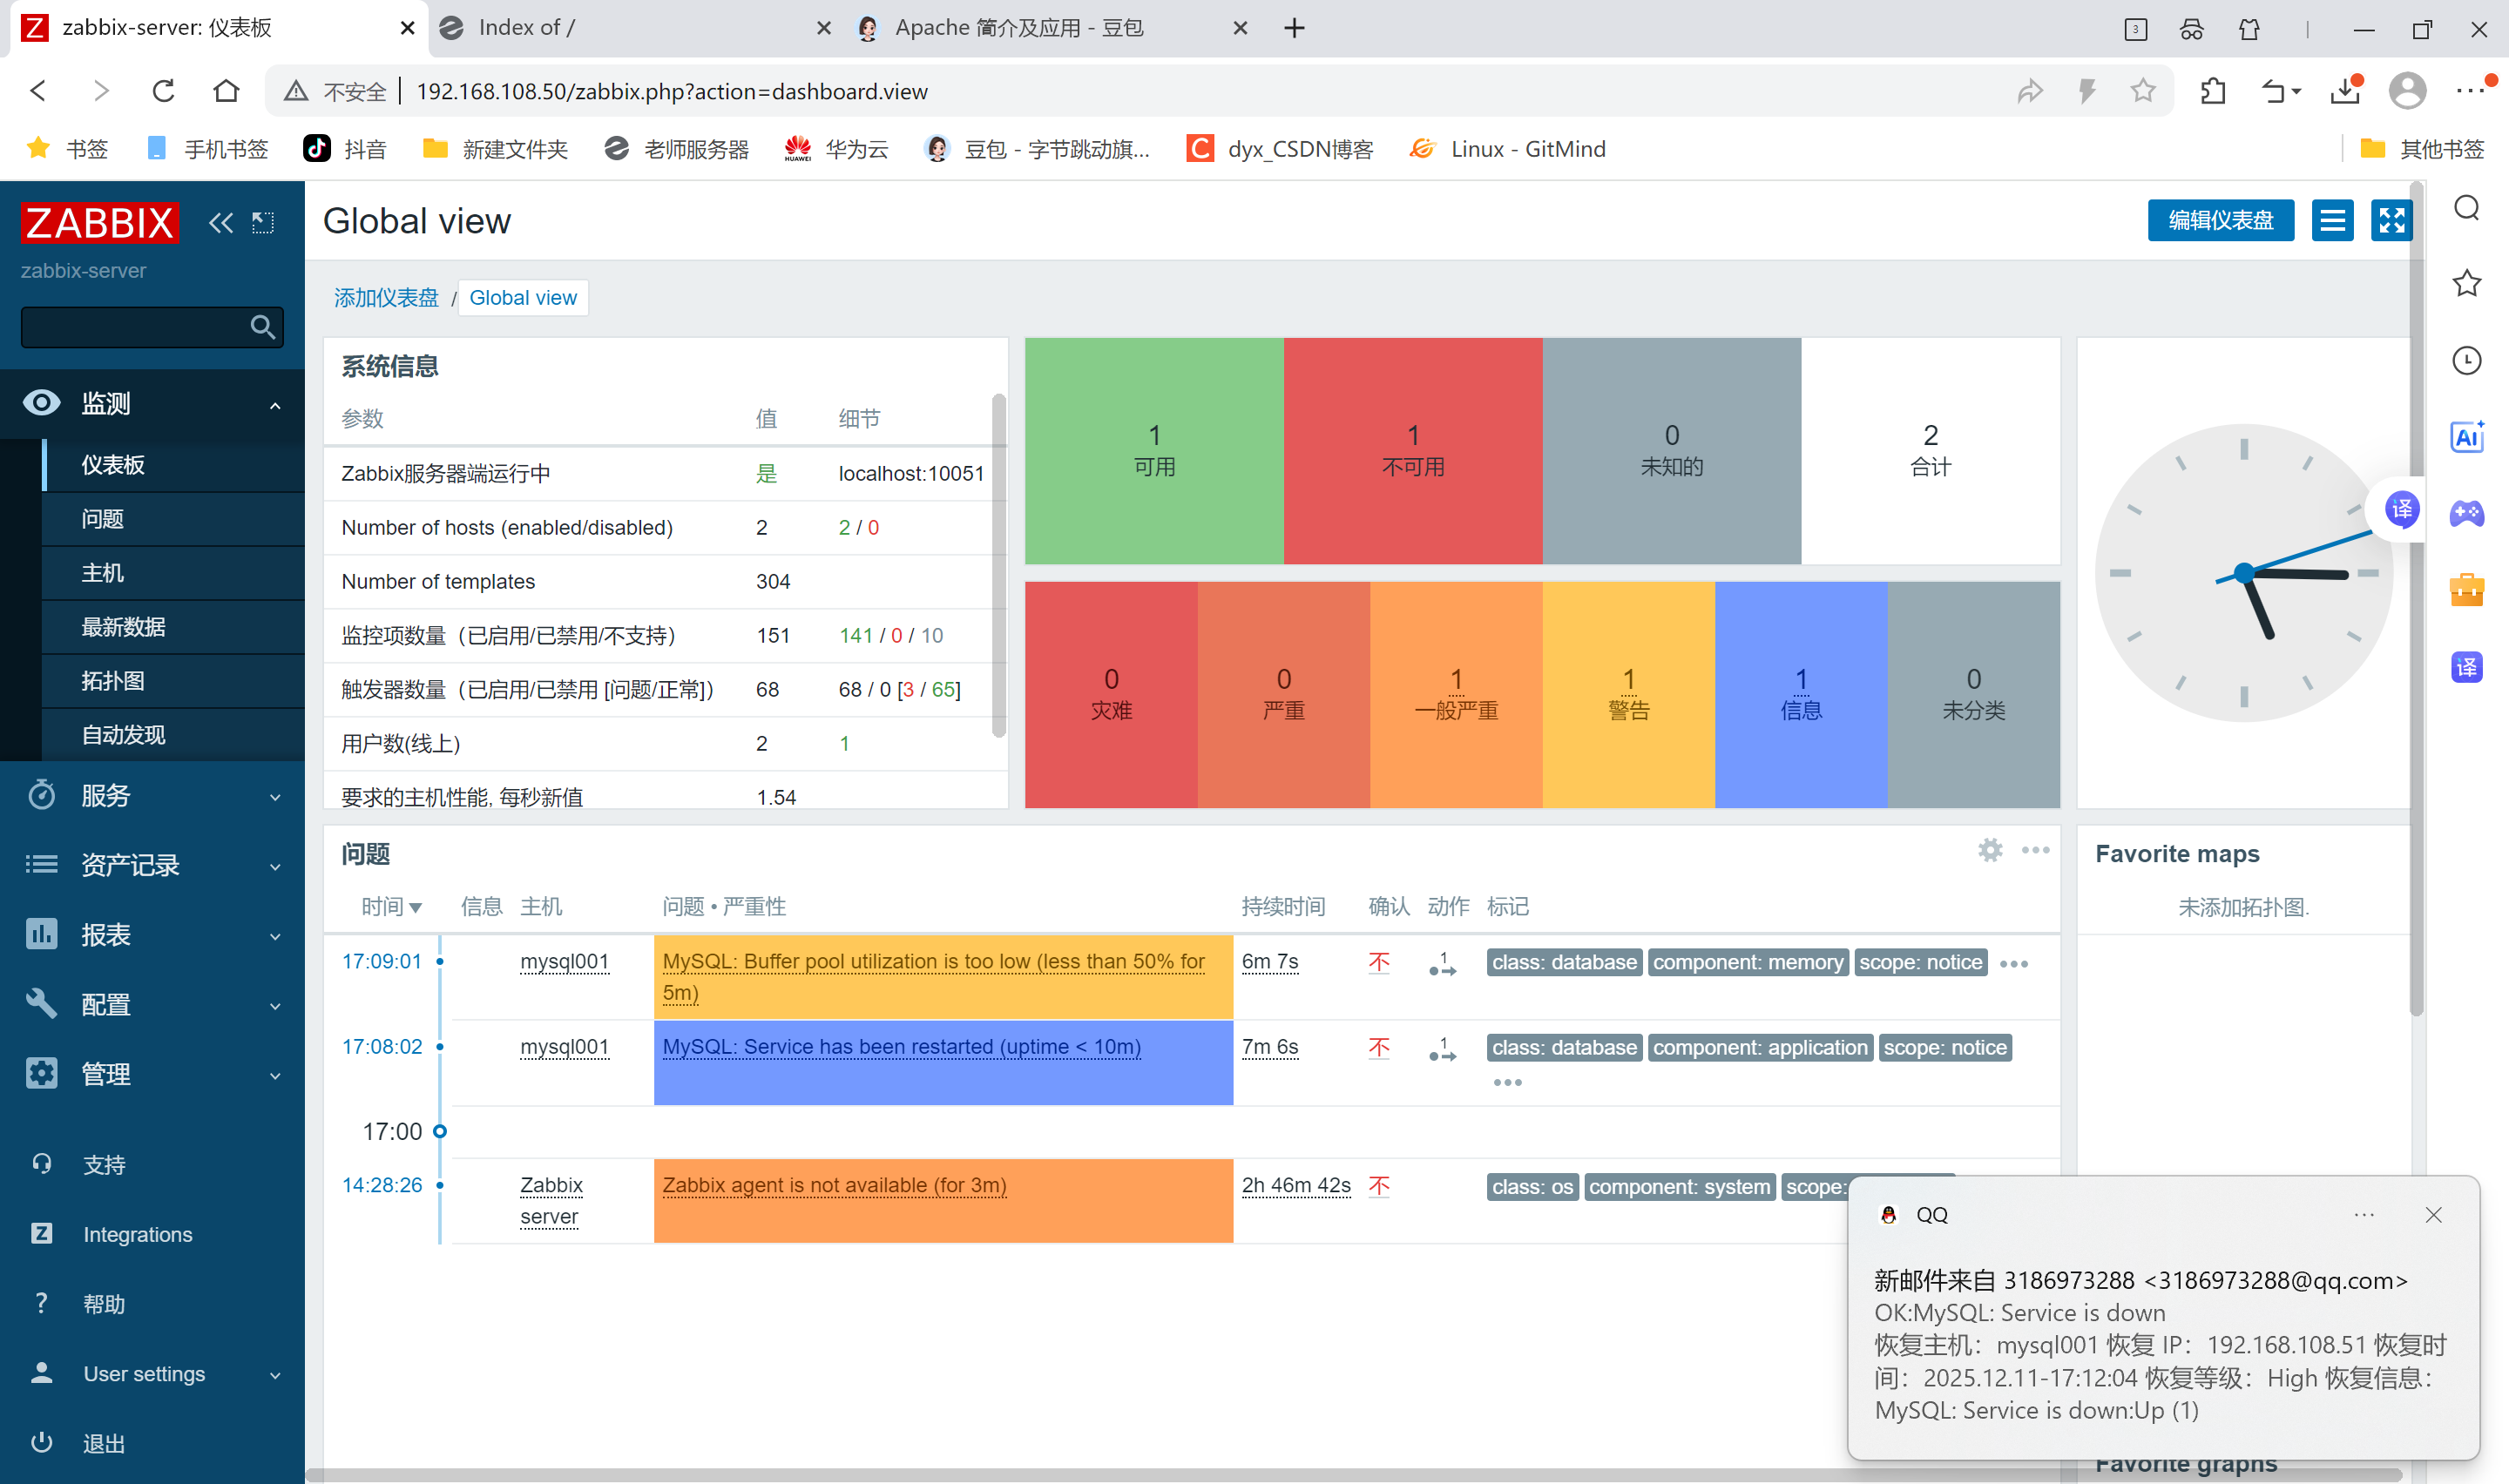
[root@zabbix-server alertscripts]# ./mailx.sh 3186973288@qq.com "hello mailx.sh" "This is test"已收到邮件

告警服务
管理->报警媒介类型>创建媒体类型