文章目录
摘要
通过 Nginx 实现三大核心功能:修改重定向响应中的 IP 地址、替换响应内容中的目标 IP、改写页面资源引用的 IP 地址,解决内外网 IP 映射场景下的访问异常问题。
环境
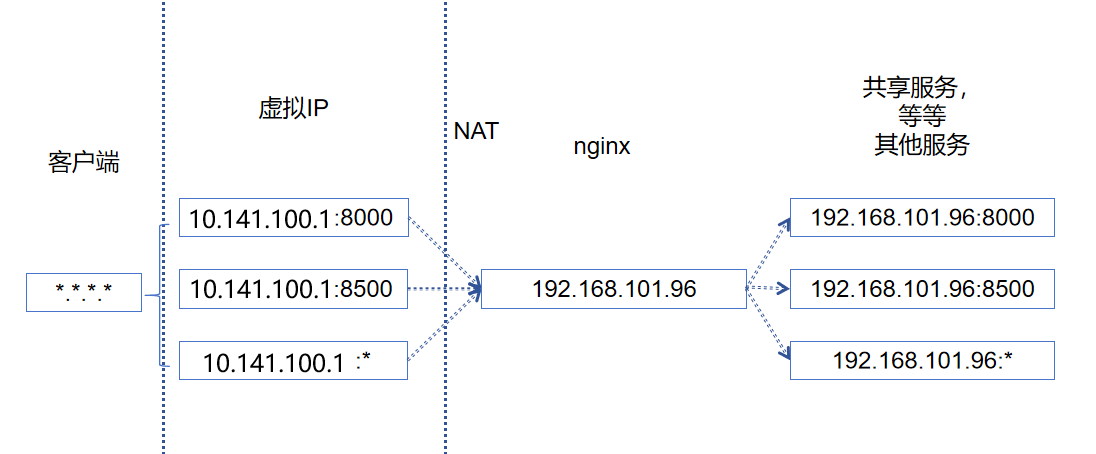
采用内外网 IP 映射架构:
应用服务部署于 192.168 私有网段;
业务侧通过 10.141 公网网段访问服务,由 NAT 网关将 10.141 网段的不同端口映射至 192.168 私网对应服务端口。
问题
业务侧直接访问 10.141.100.1 时,后端服务会返回指向 192.168.101.96 的重定向响应,由于私网 IP 无法被外网直接访问,导致业务请求失败。
重定向
常见的登录,当点击登录后会重定向到私有地址。
响应内容
部分菜单url返回私有地址。
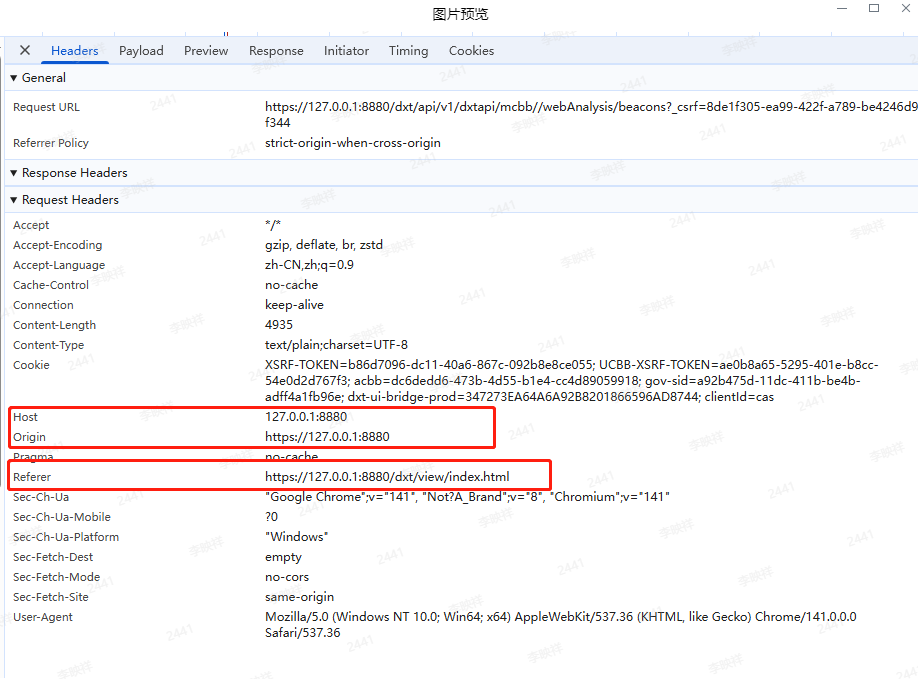
cas 校验
cas 会校验Host, Origin, Referer 等信息
主要修改点:
ssl # https 用到, 证书自己生成
proxy_set_header Accept-Encoding "";  # 这个看情况,有些是压缩后的,为 "" 禁用压缩,才能使用 sub_filter 替换。
proxy_set_header Host  # cas
proxy_set_header Origin  # 跨域
proxy_set_header Referer # 解决404

sub_filter # 修改响应的内容
nginx 脚本如下
events { worker_connections 1024; }

http {
# 上游后端服务器
upstream backend_8443 {
  server 10.100.144.1:8443;
}
upstream backend_8880 {
  server 10.100.144.1:8880;
}
upstream backend_cas {
  server 10.100.144.1:28443;
}
upstream backend_20009 {
  server 10.100.144.1:20009;
}
upstream backend_20026 {
  server 10.100.144.1:20026;
}
server {
    # 监听浏览器可访问的 IP 和端口
    listen 8445 ssl;

    # SSL 配置
	ssl_certificate      D://liyingxiang/keystore/liyx.pem;
	ssl_certificate_key  D://liyingxiang/keystore/uat2.key;
    # 强制使用安全协议
    ssl_protocols       TLSv1.2;
    ssl_ciphers         HIGH:!aNULL:!MD5;

    # Nginx 对外展示的 Server Name(可选)

    # 主代理规则
    location / {
		proxy_pass https://backend_8443;
		proxy_cookie_domain 192.168.101.97 127.0.0.1;

		proxy_set_header Host 192.168.101.97:8443;
		proxy_set_header X-Real-IP $remote_addr;
		proxy_set_header X-Forwarded-For $proxy_add_x_forwarded_for;
		proxy_set_header X-Forwarded-Port 8443;
		proxy_set_header X-Forwarded-Proto $scheme;
		# 核心正则:匹配 https://192.168.101.97:8443 (含普通和URL编码格式)
		# 正则分组说明:
		# $1 = https://  ;  $2 = 192.168.101.97  ;  $3 = 8443  ;  $4 = 剩余路径/参数
		proxy_redirect ~*(https://)(192.168.101.97):(8443)(?!/.well)(.*) $1127.0.0.1:8445$4;

		# 额外处理 URL 编码的 IP 和端口(%3A = : ,%2F = /)
		# proxy_redirect ~*(https%3A%2F%2F)(192%2E168%2E101%2E97)%3A(8443)(.*) $1127%2E0%2E0%2E1%3A8445$4;

		# 替换返回内容中的192.168.101.97为127.0.0.1
		sub_filter_types application/json; # 增加application/json
	    sub_filter 'https://192.168.101.97:8443/' 'https://127.0.0.1:8445/';
	    sub_filter_once off; # 替换所有匹配内容
		# WebSocket 支持(可选)
		proxy_http_version 1.1;
		proxy_set_header Upgrade $http_upgrade;
		proxy_set_header Connection "upgrade";

		# 如果后端是自签名证书(测试环境)
		proxy_ssl_verify off;
	}

}
server {
    # 监听浏览器可访问的 IP 和端口
    listen 8880 ssl;

    # SSL 配置
	ssl_certificate      D://liyingxiang/keystore/liyx.pem;
	ssl_certificate_key  D://liyingxiang/keystore/uat2.key;
    # 强制使用安全协议
    ssl_protocols       TLSv1.2;
    ssl_ciphers         HIGH:!aNULL:!MD5;

    # Nginx 对外展示的 Server Name(可选)

    # 主代理规则
    location / {
		proxy_pass https://backend_8880;

		proxy_set_header Host 192.168.101.97:8880;
		proxy_set_header X-Real-IP $remote_addr;
		proxy_set_header X-Forwarded-For $proxy_add_x_forwarded_for;
		proxy_set_header X-Forwarded-Proto $scheme;

		# WebSocket 支持(可选)
		proxy_http_version 1.1;
		proxy_set_header Upgrade $http_upgrade;
		proxy_set_header Connection "upgrade";
		# 替换返回内容中的192.168.101.97为127.0.0.1
		sub_filter_types application/json; # 增加application/json
	    sub_filter 'https://192.168.101.97:8443/' 'https://127.0.0.1:8445/';
		sub_filter 'https://192.168.101.97:8880/' 'https://127.0.0.1:8880/';
	    sub_filter_once off; # 替换所有匹配内容
		# 如果后端是自签名证书(测试环境)
		proxy_ssl_verify off;
	}

}

server {
    # 监听浏览器可访问的 IP 和端口
    listen 28443 ssl;

    # SSL 配置
	ssl_certificate      D://liyingxiang/keystore/liyx.pem;
	ssl_certificate_key  D://liyingxiang/keystore/uat2.key;
    # 强制使用安全协议
    ssl_protocols       TLSv1.2;
    ssl_ciphers         HIGH:!aNULL:!MD5;

    # 主代理规则
    location / {
	# 第二步:在需要记录日志的server块内启用该日志格式
		proxy_pass https://backend_cas;
		proxy_set_header X-Real-IP $remote_addr;
		proxy_set_header X-Forwarded-For $proxy_add_x_forwarded_for;
		proxy_set_header X-Forwarded-Proto $scheme;
		proxy_set_header Host 192.168.101.51:28443;
		proxy_set_header Origin https://192.168.101.51:28443; # 匹配CAS信任源
		proxy_set_header Referer https://192.168.101.51:28443;
		proxy_redirect https://192.168.101.51 https://127.0.0.1;

		# 如果后端是自签名证书(测试环境)
		proxy_ssl_verify off;
	}
}
server {
    # 监听浏览器可访问的 IP 和端口
    listen 20009 ssl;

    # SSL 配置
	ssl_certificate      D://liyingxiang/keystore/liyx.pem;
	ssl_certificate_key  D://liyingxiang/keystore/uat2.key;
    # 强制使用安全协议
    ssl_protocols       TLSv1.2;
    ssl_ciphers         HIGH:!aNULL:!MD5;

    # 主代理规则

    location / {
		proxy_pass https://backend_20009;


		proxy_set_header X-Real-IP $remote_addr;
		proxy_set_header X-Forwarded-For $proxy_add_x_forwarded_for;
		proxy_set_header X-Forwarded-Proto $scheme;
		proxy_redirect https://192.168.101.51 https://127.0.0.1;
		proxy_set_header Host 192.168.101.51:20009;
		proxy_set_header Origin https://192.168.101.51:20009; # 匹配CAS信任源
		proxy_set_header Referer https://192.168.101.51:20009;
		# 如果后端是自签名证书(测试环境)
		proxy_ssl_verify off;
	}
}
server {
    # 监听浏览器可访问的 IP 和端口
    listen 20026 ssl;

    # SSL 配置
	ssl_certificate      D://liyingxiang/keystore/liyx.pem;
	ssl_certificate_key  D://liyingxiang/keystore/uat2.key;
    # 强制使用安全协议
    ssl_protocols       TLSv1.2;
    ssl_ciphers         HIGH:!aNULL:!MD5;

    # KAFKA UI
	location /kafka-ui/session/token {
		# 新增:关键!禁止后端返回 gzip 压缩内容
		proxy_set_header Accept-Encoding "";
		# 第二步:在需要记录日志的server块内启用该日志格式

		proxy_pass https://backend_20026;
		proxy_set_header X-Real-IP $remote_addr;
		proxy_set_header X-Forwarded-For $proxy_add_x_forwarded_for;
		proxy_set_header X-Forwarded-Proto $scheme;
		proxy_set_header Host 192.168.101.51:20026;
		proxy_set_header Origin https://192.168.101.51:20026; # 匹配CAS信任源
		proxy_set_header Referer https://192.168.101.51:20026/Kafka/KafkaUI/267/kafka-ui/static/index.html;
		proxy_redirect https://192.168.101.51 https://127.0.0.1;
		# expires -1;
		# proxy_cache off;
		# add_header Cache-Control "no-store, no-cache, must-revalidate";
		sub_filter_types text/html; # 增加application/json
	    sub_filter '192.168.101.51' '127.0.0.1';
		sub_filter '192.168.101.51:20026' '127.0.0.1:20026';
	    sub_filter_once off; # 替换所有匹配内容
		# 如果后端是自签名证书(测试环境)
		proxy_ssl_verify off;

	}

	# Flink
    location ~ /flink {
		# 新增:关键!禁止后端返回 gzip 压缩内容
		proxy_set_header Accept-Encoding "";
	# 第二步:在需要记录日志的server块内启用该日志格式

		proxy_pass https://backend_20026;
		proxy_set_header X-Real-IP $remote_addr;
		proxy_set_header X-Forwarded-For $proxy_add_x_forwarded_for;
		proxy_set_header X-Forwarded-Proto $scheme;
		proxy_set_header Host 192.168.101.51:20026;
		proxy_set_header Origin https://192.168.101.51:20026; # 匹配CAS信任源
		proxy_set_header Referer https://192.168.101.51:20026/Flink/FlinkServer/Ha/flink/;
		proxy_redirect https://192.168.101.51 https://127.0.0.1;
		# expires -1;
		# proxy_cache off;
		# add_header Cache-Control "no-store, no-cache, must-revalidate";
		sub_filter_types text/html; # 增加application/json
	    sub_filter '192.168.101.51' '127.0.0.1';
		sub_filter '192.168.101.51:20026' '127.0.0.1:20026';
	    sub_filter_once off; # 替换所有匹配内容
		# 如果后端是自签名证书(测试环境)
		proxy_ssl_verify off;

	}
    # 主代理规则
    location / {
		# 新增:关键!禁止后端返回 gzip 压缩内容
		proxy_set_header Accept-Encoding "";
	# 第二步:在需要记录日志的server块内启用该日志格式

		proxy_pass https://backend_20026;
		proxy_set_header X-Real-IP $remote_addr;
		proxy_set_header X-Forwarded-For $proxy_add_x_forwarded_for;
		proxy_set_header X-Forwarded-Proto $scheme;
		proxy_set_header Host 192.168.101.51:20026;
		proxy_set_header Origin https://192.168.101.51:20026; # 匹配CAS信任源
		# proxy_set_header Referer https://192.168.101.51:20026;
		proxy_set_header Referer https://192.168.101.51:20026/Kafka/KafkaUI/268/kafka-ui/static/index.html;
		proxy_redirect https://192.168.101.51 https://127.0.0.1;
		# expires -1;
		# proxy_cache off;
		# add_header Cache-Control "no-store, no-cache, must-revalidate";
		sub_filter_types text/html; # 增加application/json
	    sub_filter '192.168.101.51' '127.0.0.1';
		sub_filter '192.168.101.51:20026' '127.0.0.1:20026';
	    sub_filter_once off; # 替换所有匹配内容
		# 如果后端是自签名证书(测试环境)
		proxy_ssl_verify off;

	}
}
}
调试过程
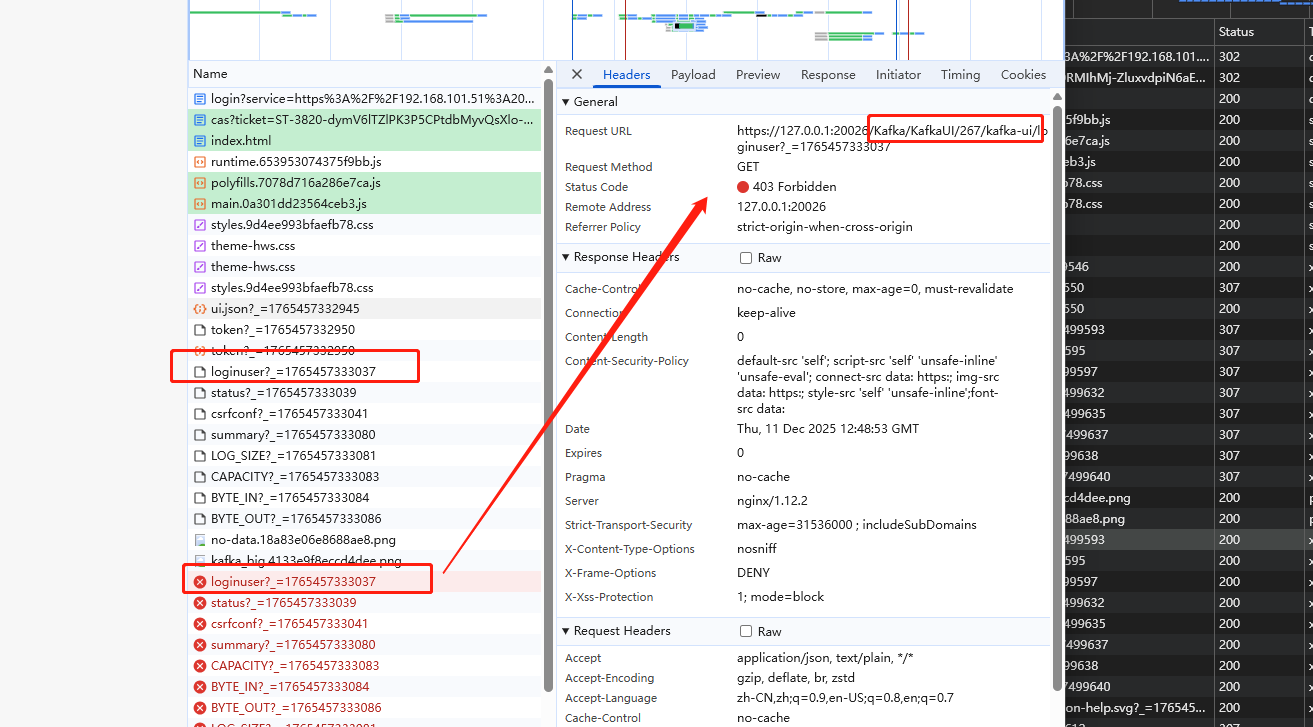
浏览器 F12
查看 network , 对照正常的请求,分析请求头 返回的 status, location。
点击 Initiator 列,会自动跳到前面发起源。
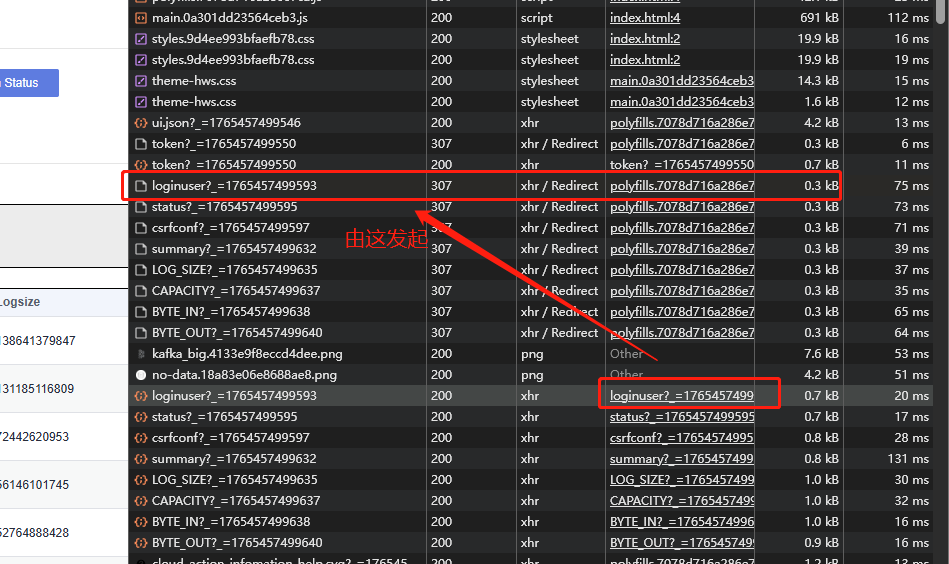
点击前面发起源,307 重定向,看到location
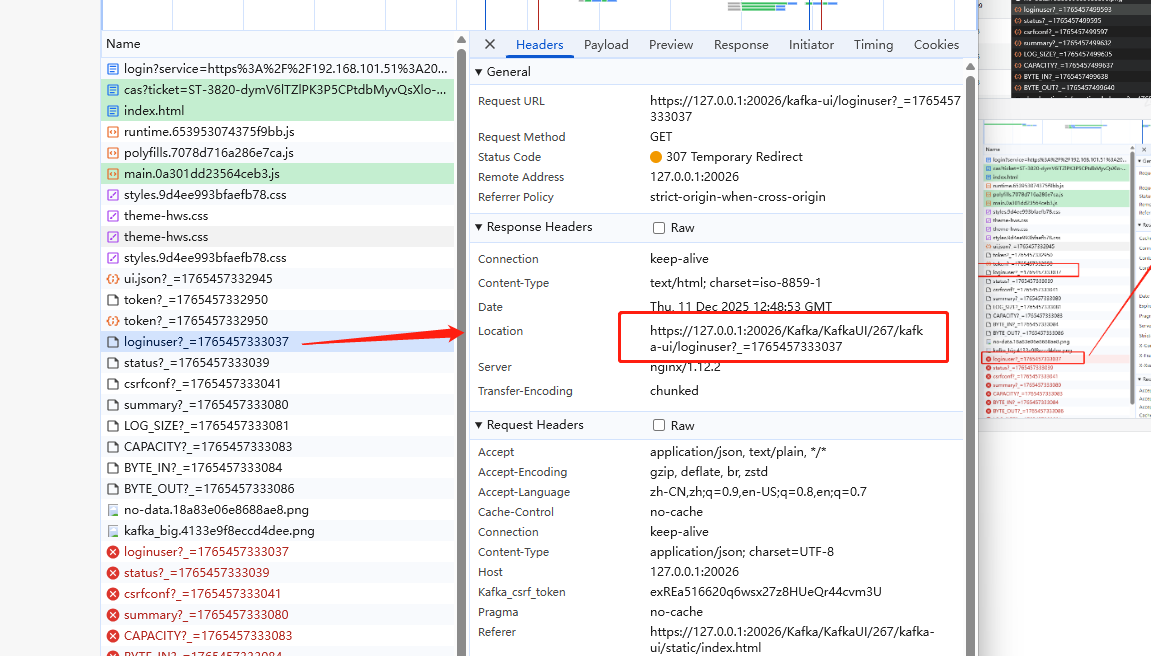
后面就通过location ip去访问
chrome 插件
有些用Nginx 修改不全的地方,配合插件会有奇效。
主要代码如下
manifest.json
{
  "manifest_version": 3,
  "name": "ip转发",
  "version": "1.0",
  "description": "将访问 a 的请求重定向到 b",
  "permissions": [
    "declarativeNetRequest",
    "declarativeNetRequestWithHostAccess",
	"declarativeNetRequestFeedback",
    "webRequest",
    "tabs"
  ],
  "host_permissions": ["<all_urls>"],
  "declarative_net_request": {
    "rule_resources": [
      { "id": "ip_redirect", "enabled": true, "path": "rules.json" }
    ]
  },
  "background": {
    "service_worker": "background.js"
  }
}
规则配置,把访问私网192.168的都转到nginx
rules.json
[
  {
    "id": 102,
    "priority": 1,
    "action": {
      "type": "redirect",
      "redirect": {
        "transform": {
          "host": "127.0.0.1",
          "port": "8445"
        }
      }
    },
    "condition": {
      "urlFilter": "||192.168.101.97:8443",
      "resourceTypes": ["main_frame", "sub_frame", "xmlhttprequest", "script", "image", "other"]
    }
  },
  {
    "id": 103,
    "priority": 1,
    "action": {
      "type": "redirect",
      "redirect": {
        "transform": {
          "host": "127.0.0.1",
		  "port": "8880"
        }
      }
    },
    "condition": {
      "urlFilter": "||192.168.101.97:8880",
      "resourceTypes": ["main_frame", "sub_frame", "xmlhttprequest", "script", "image", "other"]
    }
  },
  {
    "id": 104,
    "priority": 1,
    "action": {
      "type": "redirect",
      "redirect": {
        "transform": {
          "host": "127.0.0.1",
		  "port": "8445"
        }
      }
    },
    "condition": {
      "urlFilter": "||127.0.0.1:8443",
      "resourceTypes": ["main_frame", "sub_frame", "xmlhttprequest", "script", "image", "other"]
    }
  },
  {
    "id": 105,
    "priority": 1,
    "action": {
      "type": "redirect",
      "redirect": {
        "transform": {
          "host": "127.0.0.1"
        }
      }
    },
    "condition": {
      "urlFilter": "||192.168.101.51",
      "resourceTypes": ["main_frame", "sub_frame", "xmlhttprequest", "script", "image", "other"]
    }
  }
]
总结
本次主要是 nginx 和 chrome 插件配合,完成https 请求信息修改。
------------------ 但行好事莫问前程,你若盛开蝴蝶自来