csharp
using System;
using System.Collections.Generic;
using System.ComponentModel;
using System.Data;
using System.Drawing;
using System.IO;
using System.Linq;
using System.Text;
using System.Threading.Tasks;
using System.Windows.Forms;
using WinBookKeeping.Utility;
namespace WinBookKeeping
{
public partial class FormItemManage : Form
{
public FormItemManage()
{
InitializeComponent();
}
private void label2_Click(object sender, EventArgs e)
{
}
string filePath = CommonHelper.itemPath;
int actType = 1;
string[] currentItem=new string[3];
int selIndex = 1;
string wSpace = " ";
Dictionary<int,string>itemList=new Dictionary<int,string>();
private void FormItemManage_Load(object sender, EventArgs e)
{
// 先确保 ComboBox 有项目
if (comboBoxTypes.Items.Count > 0)
{
comboBoxTypes.SelectedIndex = 0;
}
else
{
// 如果没有项目,可以设置为 -1(表示没有选中任何项)
comboBoxTypes.SelectedIndex = -1;
// 或者也可以添加一个默认项
// comboBoxTypes.Items.Add("请选择类型");
// comboBoxTypes.SelectedIndex = 0;
}
butDel.Enabled = true; // 添加这行!
actType = 1;
listBoxItemList.Items.Clear();
if (string.IsNullOrEmpty(filePath)) {
MessageHelper.Error("名目加载", "命名文件没配置");
foreach (Control c in this.Controls) {
c.Enabled=false;
}
return;
}
LoadItemList(); }
private void LoadItemList()
{
List<string> lines = TextHelper.ReadTextAllLines(filePath);
if (lines.Count > 1)
{
for (int i = 1; i < lines.Count; i++)
{
string[] arr = lines[i].Split(';');
listBoxItemList.Items.Add(arr[0] + wSpace + arr[1] + wSpace + arr[2]);
itemList.Add(int.Parse(arr[0]), lines[i]);
}
}
}
private void butClear_Click(object sender, EventArgs e)
{
ClearInfo();
}
private void ClearInfo()
{
textBoxItemId.Text = "";
if (comboBoxTypes.Items.Count > 0)
{
comboBoxTypes.SelectedIndex = 0;
}
else
{
comboBoxTypes.SelectedIndex = -1; // 设置为-1表示没有选中任何项
}
textBoxItemName.Text = "";
// comboBoxTypes.SelectedIndex = 0;
currentItem = new string[3];
textBoxItemId.Enabled = true;
butOk.Text = "新增";
actType = 1;
}
private void butOk_Click(object sender, EventArgs e)
{
int id = 0;
if (!string.IsNullOrEmpty(textBoxItemId.Text))
{
id = Convert.ToInt32(textBoxItemId.Text);
}
string type = comboBoxTypes.Text.Trim();
string itemName = textBoxItemName.Text.Trim();
if (id == 0)
{
MessageHelper.Error("名目提交", "名目编号不能为空");
textBoxItemId.Focus();
return;
}
else if (actType == 1 && itemList.ContainsKey(id))
{
MessageHelper.Error("名目提交", "名目编号已存在");
textBoxItemId.Focus();
return;
}
if (string.IsNullOrEmpty(itemName))
{
MessageHelper.Error("名目提交", "名目名称不能为空");
textBoxItemName.Focus();
return;
}
else if (actType == 1 && ExistItemName(itemName))
{
MessageHelper.Error("名目提交", "名目名称已存在!");
textBoxItemName.Focus();
return;
}
if (actType == 1)
{
if (!File.Exists(filePath))
{
TextHelper.WriteMsg("编号;类型;名称", filePath, false);
}//这段代码先检查数据文件是否存在。
//如果不存在(比如第一次使用程序),
//就调用TextHelper.WriteMsg方法创建文件。
//这里的第二个参数是false,意味着覆盖写入。所以这行代码会写入标题行编号; 类型; 名称,为后续的数据记录建立格式
TextHelper.WriteMsg(id + ";" + type + ";" + itemName, filePath, true);
//紧接着,将新名目的信息(编号、类型、名称)用分号;
//拼接成一行(例如 "1;支出;早餐"),然后再次调用TextHelper.WriteMsg。
// 注意这里的第二个参数是true,这代表追加模式。新数据会被添加到文件末尾,不会影响已有的内容
listBoxItemList.Items.Add(id + wSpace + type + wSpace + itemName);
//这行代码将新名目以更易读的格式(例如用空格连接:"1 支出 早餐")
//添加到窗体的ListBox控件中
//Items.Add方法会在列表的末尾添加一个新项。
itemList.Add(id, id + ";" + type + ";" + itemName);
//为了程序运行时能快速查询和操作数据,需要在内存中也保存一份名目信息。
//简单来说,当你新增一个名目时,这段代码像一位细心的管家,会同时完成三件事:
// 记入账本:把新项目追加到硬盘上的数据文件里,永久保存。
//更新清单:在窗口的列表里立刻显示出新项目,让你能看到。
//更新备忘录:在程序的内存里也存一份,方便后续快速处理。
}
else
{
itemList[id]=id+";"+type+";"+itemName;//更新内存数据
//itemList是一个在内存中存储所有名目信息的字典(Dictionary)。
//这行代码直接通过名目编号(id)找到对应的条目,
//并将其值更新为修改后的新信息(用分号拼接的字符串)。这确保了内存中的数据是最新的
listBoxItemList.Items.Insert(selIndex, id + wSpace + type +
wSpace + itemName);
//在列表框中插入新项
//selIndex是当前选中项在列表框中的原始位置索引。
//Items.Insert方法用于在列表的指定位置插入一个新项。
//这里是在原位置(selIndex)插入修改后名目的新字符串(用空格连接,便于显示)
listBoxItemList.Items.RemoveAt(selIndex + 1);
//从列表框中移除旧项
//由于上一步操作是在原位置插入了一项,原来选中的那个旧项并没有被删除,而是被挤到了下一位(位置变成了 selIndex + 1)。
//因此,这行代码的作用就是移除这个已经过时的旧项。通过 Items.RemoveAt方法,根据索引精确删除指定项
}
//这种"先插入,后删除"的操作方式,其核心目的是为了保持修改后的名目在列表中的位置不变。如果直接修改原位置的项内容,在某些控件中可能不够直接或会触发不必要的刷新问题。
//而先插入新内容再删除旧内容,是一种常见且可靠的实现原地更新效果的方法。
}
private bool ExistItemName(string name) {
foreach (int key in itemList.Keys)
{
string val = itemList[key];
string iName = val.Split(';')[2];
if (iName == name)
{
return true;
}
}
return false;
}
private void listBoxItemList_SelectedIndexChanged(object sender, EventArgs e)
{//事件处理方法。它的作用就像一个小助手,每当你在列表里点击选择一个不同的名目时,
//这个小助手就会自动跳出来工作
if (listBoxItemList.SelectedItems.Count > 0)
{//小助手首先会确认你是不是真的点中了一个名目。
//这是为了防止在列表为空时发生错误。
string selitem=listBoxItemList.SelectedItems[0].ToString();
//接着,它把你选中的那一行文字(比如 "1 支出 买菜")整个拿出来
//int id = int.Parse(selitem.Substring(0, 3));
string[] parts = selitem.Split(' ');
if (parts.Length > 0 && int.TryParse(parts[0], out int id))
{//然后,它把这串文字用空格分开,并尝试把第一个部分(就是编号)转换成数字。
//这一步很关键,因为编号是找到对应名目详细资料的"钥匙"
if (itemList.ContainsKey(id))
{//拿到"钥匙"(编号)后,小助手会去一个叫 itemList的大资料库(字典)里,
//找出这个名目最详细的原始记录(是用分号分隔的完整字符串,如 "1;支出;买菜")
string strItem = itemList[id];
//if (itemList.ContainsKey(id)) { }
//int id = int.Parse(parts[0]);
//string strItem = itemList[id];
currentItem = strItem.Split(';');
textBoxItemId.Text = currentItem[0];
textBoxItemName.Text = currentItem[2];
comboBoxTypes.Text = currentItem[1];
//找到后,它就把这条详细记录拆开,分别填到右边的各个输入框里:
// 编号填到 textBoxItemId
//名称填到 textBoxItemName
//类型填到 comboBoxTypes
textBoxItemId.Enabled = false;
//把编号输入框锁住 (textBoxItemId.Enabled = false),防止你误修改关键的编号。
actType = 2;
//把 actType变量设置为 2,告诉程序:"现在是修改模式哦!"
butOk.Text = "修改";
//
selIndex = listBoxItemList.SelectedIndex;
//把"新增"按钮的文字改成"修改"(butOk.Text = "修改"),让你清楚接下来要做什么操作。
//记录下当前选中的是列表中的第几项(selIndex),方便之后修改时准确定位。
}
}//,这个方法的核心逻辑是:通过界面选中的显示文本解析出唯一标识(ID),
//再利用此ID从数据源中获取完整信息,最后用这些信息更新编辑表单
// 实现交互:让用户能够通过简单的点击操作来选择和查看现有名目的详细信息。
//准备编辑:在填充表单的同时,将整个界面的状态从"准备新增"切换到"准备修改",为后续的保存操作做好准备。
//保持一致性:确保界面显示(listBoxItemList)、内存中的数据模型(itemList) 和编辑表单上的信息是同步的。
else
{
MessageHelper.Error("错误", "无法解析编号");
}
}
}
// 它的核心价值在于,它让程序能够即时响应你的选择动作 。想象一下,如果你点击一个名目后,右边的输入框没有任何变化,那这个程序用起来就会非常不方便。
// 而这个事件处理程序正是实现了这种"点击即显示"的流畅交互体验。
//listBoxItemList_SelectedIndexChanged 是 响应选择,负责 "开始编辑" ,它的工作是准备。
//butOk_Click 是 响应点击,负责 "确认更改" ,它的工作是执行。
private void butDel_Click(object sender, EventArgs e)
{
// 超级详细的调试版本
if (listBoxItemList.SelectedItems.Count == 0)//第一步:检查小手
//
{
MessageBox.Show("请先点击选择一个列表项!", "提示",
MessageBoxButtons.OK, MessageBoxIcon.Information);
return;//机器人先看看你的小手是不是空的(有没有选中任何项目)。
//如果什么都没选,它就会跳出来说:"请先点击选择一个列表项!"
}
// 显示将要删除的内容
////第二步:给你看"购物清单"
//机器人很细心,它会把所有你选中的东西列一个清单给你看,并问你:"确定要删除它们吗?"
//只有当你回答"是的"(DialogResult.Yes),它才会继续工作
//如果妈妈说"是的,扔掉吧"(点击"是"按钮)→ 代码就会继续删除玩具
//如果妈妈说"不,别扔!"(点击"否"按钮)→ 代码就停止,玩具都不会被扔
StringBuilder debugInfo = new StringBuilder();//🧾 第一步:拿出小本子(StringBuilder debugInfo)
debugInfo.AppendLine($"选中项数: {listBoxItemList.SelectedItems.Count}");//🔢 第二步:写下总共多少玩具
for (int i = 0; i < listBoxItemList.SelectedItems.Count; i++)//📝 第三步:一个一个写下玩具名字
{
debugInfo.AppendLine($"第{i + 1}项: {listBoxItemList.SelectedItems[i]}");//❓ 第四步:拿着清单问妈妈
}
// 确认删除
DialogResult result = MessageBox.Show(
$"确定要删除以下项吗?\n\n{debugInfo.ToString()}",//debugInfo.ToString()就是把前面写好的清单拿出来
"确认删除",//就像在窗口最上面写:"确认删除"四个大字
MessageBoxButtons.YesNo,//给你几个选择? 就像妈妈问:"你真的要扔掉吗?"然后你只能回答"要"或者"不要"
MessageBoxIcon.Question);//窗口有什么图标?意思是:"在窗口旁边画一个问号❓"
if (result == DialogResult.Yes)
{
try
{
// 方法1:逐个删除(最可靠)
while (listBoxItemList.SelectedItems.Count > 0)//第三步:开始扔玩具(两种方法)
{
listBoxItemList.Items.Remove(listBoxItemList.SelectedItems[0]);
//它不停地扔掉你手里最上面的那个玩具(SelectedItems[0]),直到你手里一个玩具都不剩为止
}
// 方法2:或者使用反向循环
/*
for (int i = listBoxItemList.SelectedIndices.Count - 1; i >= 0; i--)
{
int index = listBoxItemList.SelectedIndices[i];
listBoxItemList.Items.RemoveAt(index);
}
*/
// 多重刷新确保界面更新
listBoxItemList.BeginUpdate();//第四步:整理箱子并告诉你"完成啦!"
listBoxItemList.EndUpdate();
listBoxItemList.Refresh();
Application.DoEvents(); // 处理所有挂起的消息
// 成功提示
MessageBox.Show("✅ 删除成功!\n列表已更新。",
"操作成功",
MessageBoxButtons.OK,
MessageBoxIcon.Information);
// 可选:播放系统提示音
System.Media.SystemSounds.Asterisk.Play();
}
catch (Exception ex)
{
MessageBox.Show($"删除时出错:\n{ex.Message}",
"错误",
MessageBoxButtons.OK,
MessageBoxIcon.Error);
}
}
}
//listBoxItemList.SelectedItems:这是你所有选中的玩具的集合。.Count可以知道你一共选了几个
//listBoxItemList.Items:这是整个玩具箱里所有的玩具。机器人是从这里把玩具移除的
//debugInfo:这是一个临时的小本子,用来帮你写下要删除的所有玩具的名字,让你确认
//ex:这是一个小警报器。如果扔玩具的过程中不小心出了错(比如玩具卡住了),它就会拉响警报,告诉你哪里出了问题
private void butSave_Click(object sender, EventArgs e)
//当你点击这个按钮时,它会帮你把程序里一个叫 itemList的"大盒子"(里面装了很多东西)里的所有内容,
//整整齐齐地抄写到一个文本文件里保存起来,防止丢失。
{
if (actType != 1 && itemList.Count > 0)//第一步:检查"玩具盒"
//小管家先看看:现在是不是需要保存的模式(actType != 1)
//,并且"玩具盒"itemList里面是不是真的有玩具(.Count > 0)。
//如果不需要保存或者盒子是空的,小管家就什么都不做,直接休息了。
{
List<string> msglist = new List<string>();//第二步:准备"记事本"并写下标题
//小管家准备了一个临时的小篮子 msglist,用来一趟搬运所有玩具。
TextHelper.WriteMsg("编号;类型;名称", filePath, false);
//然后它拿出一本叫 filePath的"新记事本",
//在第一行工工整整地写下了列标题:"编号;类型;名称"。
//这就像给表格画上表头,这样以后看的时候就知道每一列是什么了
//TextHelper.WriteMsg是写字用的小工具,参数 false表示这是全新开始写一本新记事本,而不是在旧本子上接着写。
foreach (var key in itemList.Keys)//第三步:把"玩具"放进小篮子
{
string val = itemList[key];//小管家开始遍历"玩具盒"itemList。它找到一个玩具,就看看它的名字(key),
//然后根据名字把玩具本身(val)拿出来,
msglist.Add(val);//放进临时的小篮子 msglist里
//这样一趟下来,小篮子里就装好了所有要保存的玩具。
}
TextHelper.WriteMsgList(msglist, filePath, true);//第四步:把小篮子里的所有玩具抄到记事本上
//小管家现在使用另一个叫 TextHelper.WriteMsgList的工具,它特别能干,可以一下子把小篮子 msglist里的所有玩具(也就是每一行数据),哗啦啦地全部整齐地抄写到刚才那本已经写好标题的记事本上。
// 参数 true表示这次是接着之前写的内容后面继续写,所以标题不会被打乱
MessageHelper.Info("保存名目", "名目信息保存成功");//第五步:开心地告诉你"任务完成啦!"
//itemList:这是你的主玩具盒,一个字典(Dictionary),里面存放了所有需要保存的条目。
•
//msglist:这是一个临时的小篮子(List<string>),用来一趟性搬运所有要保存的数据,这样效率更高。
//filePath:这是记事本的文件路径,告诉小管家应该把内容保存到电脑的哪个地方。
//TextHelper:这是一个神奇的写字工具类,它封装了如何把文字写入文件的具体细节,让小管家的工作变得更简单、更专
// }//这个保存按钮的代码是一个有条不紊的小管家。
// 它的工作流程非常清晰:检查条件 → 准备文件并写入标题 → 收集数据 → 批量写入数据 → 提示操作成功。
}
}
}
//


csharp
  private void LoadIncomeList()
        {
            List<IncomeInfo> incomeData = CommonHelper.GetIncomList();
            if (incomeData.Count > 0)
            {
                int id = 0;
                foreach (IncomeInfo item in incomeData)
                {
                    if (item == null) { continue; }
                    id += 1;
                    ListViewItem li = new ListViewItem();
                    li.Text = item.IncomeId.ToString();
                    li.SubItems.Add(item.ItemName);
                    li.SubItems.Add(item.IncomeDesp);
                    li.SubItems.Add("¥" + item.Money.ToString("0.00"));
                    li.SubItems.Add(item.IncomeTime);
                    listViewIncomeList.Items.Add(li);
                    if (id == incomeData.Count)
                    {
                        lastId = item.IncomeId;
                    }
                }
            }
            textBoxRecord.Text = (lastId + 1).ToString();
        }
csharp
  private void LoadCboIncomeItems()
        {
            comboBoxItems.Items.Clear();
            comboBoxFItems.Items.Clear();
            List<string> items = CommonHelper.GetItems(1);
            if (items.Count > 0)
            {
                foreach (string item in items)
                {
                    comboBoxItems.Items.Add(item);
                    comboBoxFItems.Items.Add(item);
                }
                comboBoxFItems.Items.Insert(0, "请选择");
                comboBoxFItems.SelectedIndex = 0;
                comboBoxItems.SelectedIndex = 0;
            }
        }
csharp
    if (lines.Count > 1)
    {
        string typeName = itemType == 1 ? "收入" : "支出";
        for (int i = 1; i < lines.Count; i++)
        {
            string[] arr = lines[i].Split(';');//
            //筛选分类:对于每一行数据,用分号(;)分割。
            //代码 arr[1] == typeName是在判断第二列(类型)是否与传入的类型匹配
            //(itemType为1时,typeName是"收入")。
            if (arr[1] == typeName)
            {
                items.Add(arr[2]);//收集结果:将匹配的分类名称(arr[2],即第三列)
                                  //加入到返回的列表中。
            }

        }
    }
} return items;
csharp
using System;
using System.Collections.Generic;
using System.ComponentModel;
using System.Data;
using System.Drawing;
using System.IO;
using System.Linq;
using System.Text;
using System.Threading.Tasks;
using System.Windows.Forms;
using WinBookKeeping.Models;
using WinBookKeeping.Utility;
namespace WinBookKeeping
{
public partial class FormIncomeManage : Form
{
public FormIncomeManage()
{
InitializeComponent();
}
//文件管家
string itemPath = CommonHelper.itemPath;//收入名目:工资、奖金、兼职的路径
string filePath = CommonHelper.incomePath;//收入记录的路径
//工作状态
int actType = 1;
int lastId = 0;//最后一条收入编号
//数据管家
ListViewItem curItem;//当前选中的那一行输入
int selIndex = -1;//当前选中行的位置
List<IncomeInfo> incomeList = new List<IncomeInfo>();//存储所有收入的"大宝箱
//打开软件时
//收入管理窗口的 "启动向导"或 "开机自检程序"
private void FormIncomeManage_Load(object sender, EventArgs e)
{
if (string.IsNullOrEmpty(itemPath) || string.IsNullOrEmpty(filePath))
{
MessageHelper.Error("收入加载", "文件路径并没有配置");
foreach (Control c in this.Controls)
{//this.Controls:指的是当前这个收入管理窗口上所有的"小零件",
//比如按钮、输入框、下拉列表等。
c.Enabled = false;
//这行代码的作用是让每一个"小零件"都暂时失效、不能点击或输入
}
return;
}//当程序发现必要的文件路径没有配置时,它就遍历窗口上所有的控件,并让它们全部"变灰"禁用。
//这样你就只能看到问题,而无法进行任何可能出错的操作了
LoadCboIncomeItems();
//这个自定义方法负责把不同的收入类型(例如"零花钱"、"压岁钱"、"劳动奖励"等)
//加载到名称为 comboBoxItems和 comboBoxFItems的下拉框中
listViewIncomeList.Items.Clear();
//先把显示收入记录的列表清空,相当于擦干净黑板,准备写新的内容。
LoadIncomeList();
//读取所有已经保存的收入记录,
//然后一条一条地、整齐地显示在列表(listViewIncomeList)里,
}//首先,检查最重要的"工具箱"(文件路径)在不在。
//如果工具箱丢了,就立刻"拉响警报"(显示错误),并把所有"工具"(控件)锁起来防止乱动,然后停止启动。
//如果工具箱没问题,它就继续工作:
//准备好收入类型选项,清空显示区域,最后把以往记录的收入信息整整齐齐地展示出来。
//这个方法的核心是一个循环过程(foreach),
//为每一条收入数据创建并配置一个显示行(ListViewItem),
//然后添加到列表控件中显示出来。
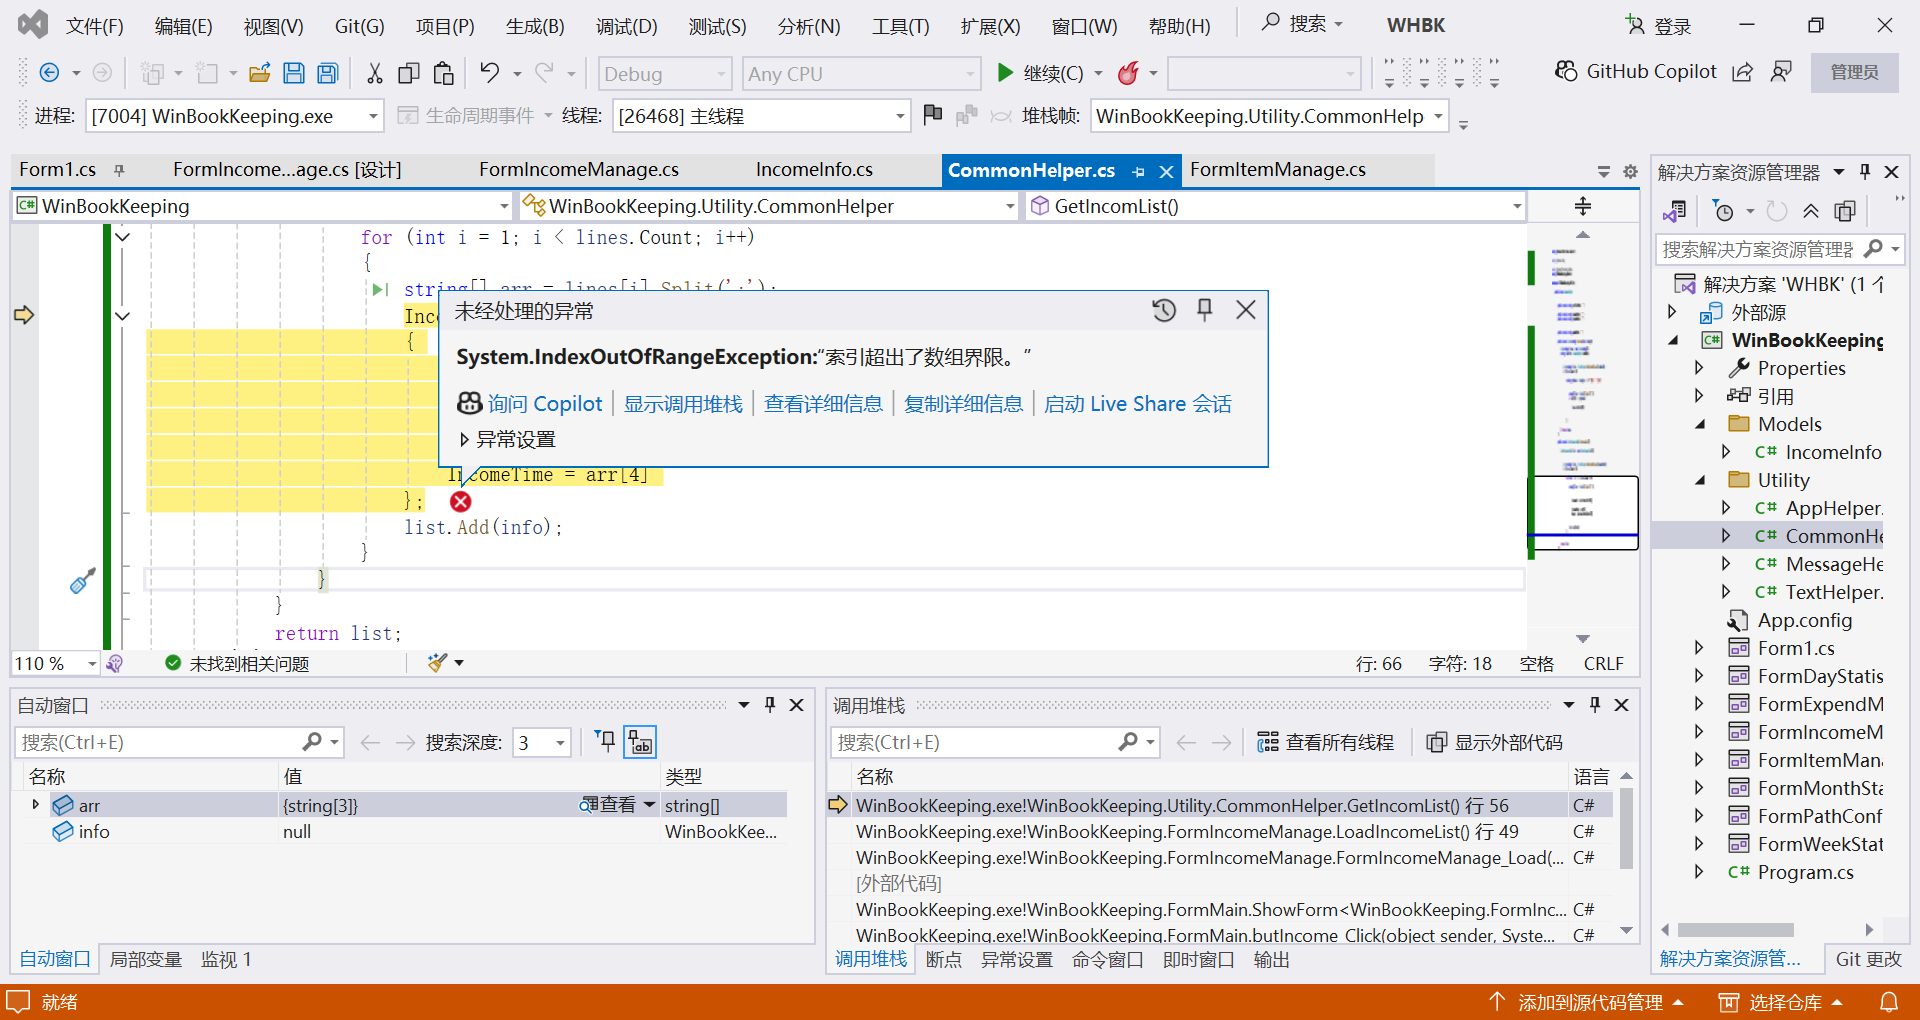
private void LoadIncomeList()
{
List<IncomeInfo> incomeData = CommonHelper.GetIncomList();
//准备数据:首先,它通过 CommonHelper.GetIncomList()获取所有收入数据,
//这是一个 IncomeInfo对象的列表
if (incomeData.Count > 0)//只要数据不为空,代码就会遍历每一笔收入
{
int id = 0;
foreach (IncomeInfo item in incomeData)
{
if (item == null) { continue; }
id += 1;
ListViewItem li = new ListViewItem();
//对于每一笔有效的收入(item != null),
//它创建一个新的 ListViewItem对象 li作为列表中的一行
//填充信息:接着,它将收入对象的各个属性(如 IncomeId, ItemName等)
//赋值给这一行(li)的不同列
li.Text = item.IncomeId.ToString();
//li.Text对应列表第一列,通常是编号。
li.SubItems.Add(item.ItemName);
li.SubItems.Add(item.IncomeDesp);
li.SubItems.Add("¥" + item.Money.ToString("0.00"));
li.SubItems.Add(item.IncomeTime);
//通过 li.SubItems.Add()添加后续列,包括收入名目、描述、金额和记录时间。
//注意金额被格式化为带人民币符号的两位小数
listViewIncomeList.Items.Add(li);
//这行代码将准备好的每一行数据添加到界面的列表控件中,使其可见
if (id == incomeData.Count)//当前处理的是否是最后一条数据(if (id == incomeData.Count))
{
lastId = item.IncomeId;
//如果是,就将这条数据的 IncomeId记录下来,赋值给 lastId变量。
}
}
}
textBoxRecord.Text = (lastId + 1).ToString();
//这个变量的唯一目的,就是在循环结束后,
//用于计算下一条新记录的预设编号:textBoxRecord.Text = (lastId + 1).ToString()。
//这样当你新增记录时,编号框会自动显示一个正确的、连续的号码。
}
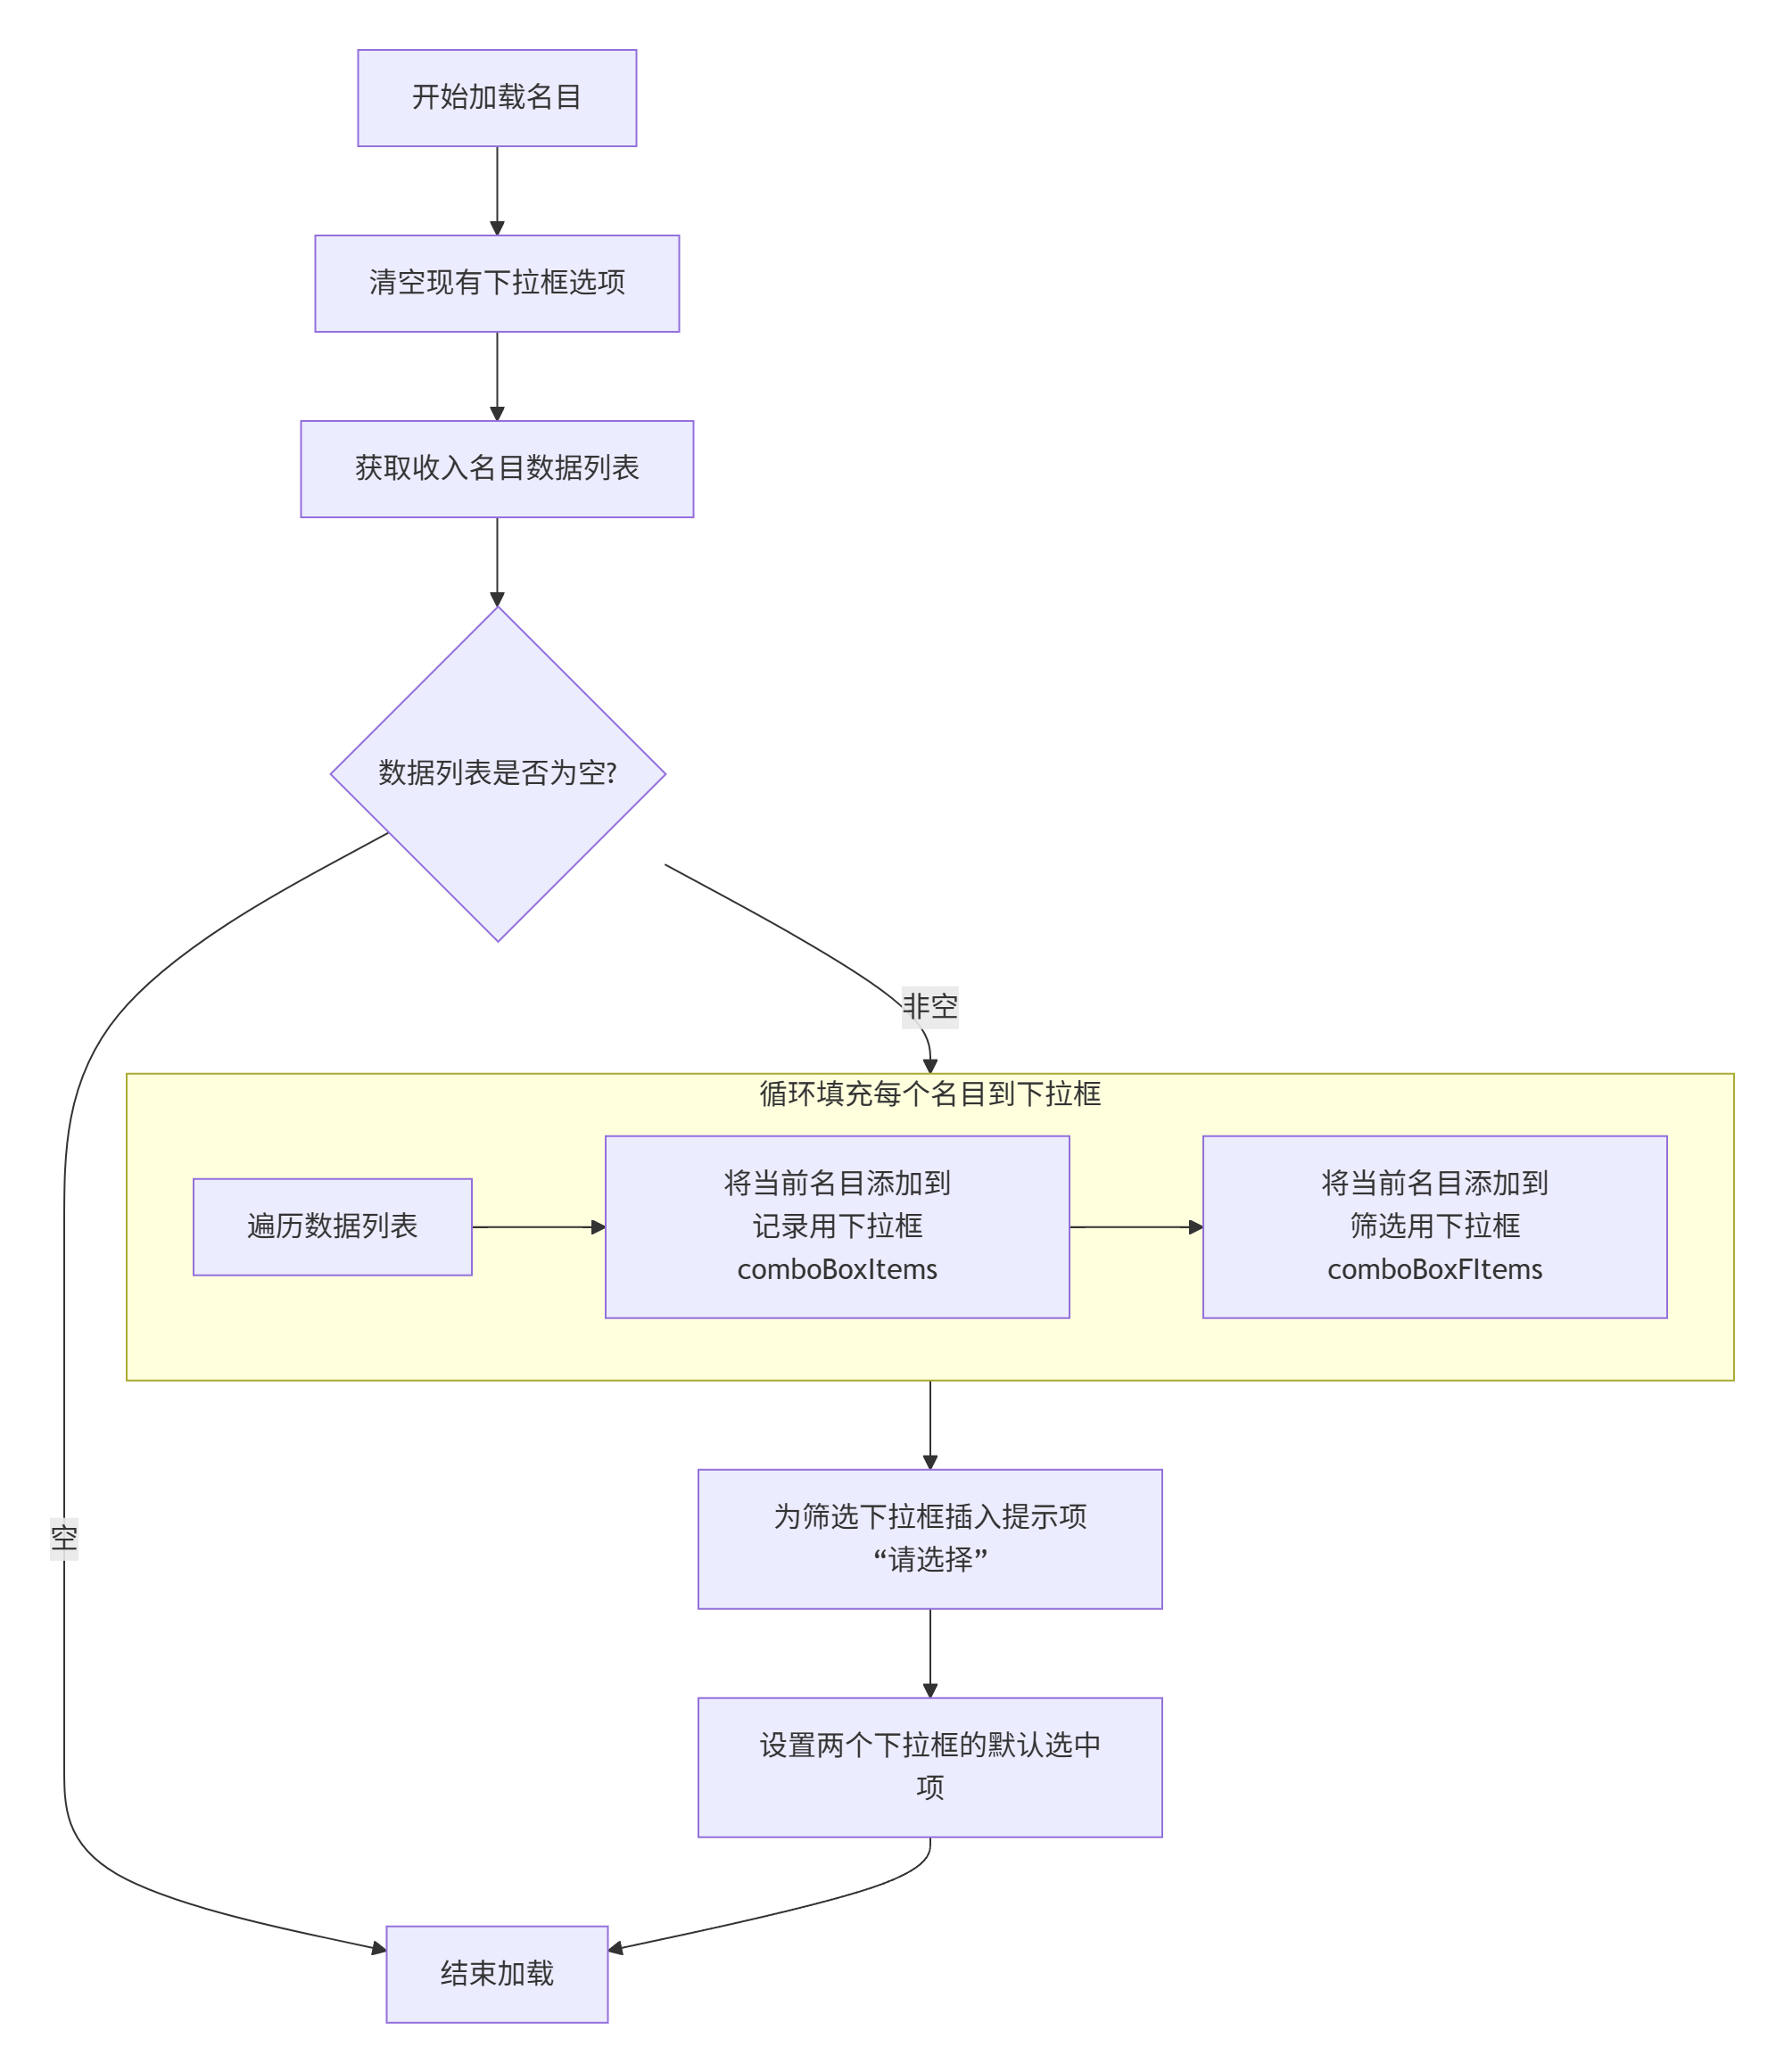
//你在研究的 LoadCboIncomeItems方法,是负责为界面上的下拉框(ComboBox)准备可选内容的。下面这张流程图直观展示了它的工作步骤:
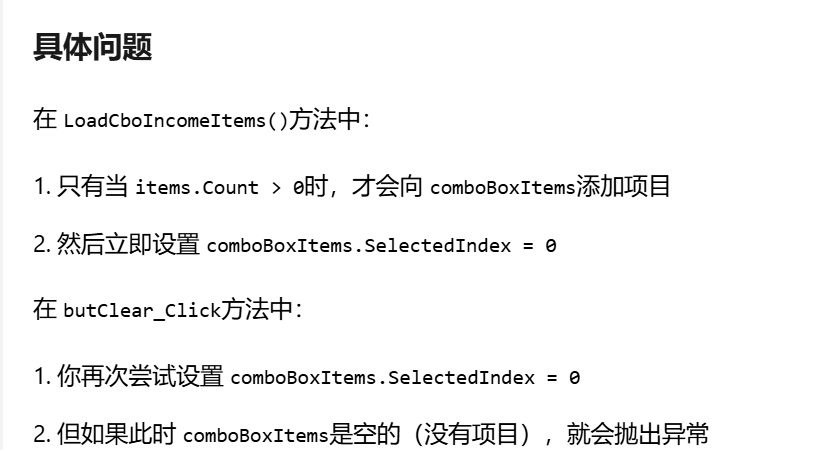
private void LoadCboIncomeItems()
{
comboBoxItems.Items.Clear();
comboBoxFItems.Items.Clear();//清空玩具箱:代码一开始先把两个玩具箱(comboBoxItems和comboBoxFItems)里旧的东西都清空,
//保证里面是干净的,准备放新玩具。
List<string> items = CommonHelper.GetItems(1);
//从一个公共的帮助类中获取收入名目的数据列表。
//这里的参数 1很可能用于标识获取的是"收入"类型的名目,而不是"支出"或其他类型。
if (items.Count > 0)
{
foreach (string item in items)
{
comboBoxItems.Items.Add(item);
comboBoxFItems.Items.Add(item);
}
comboBoxFItems.Items.Insert(0, "请选择");
comboBoxFItems.SelectedIndex = 0;
comboBoxItems.SelectedIndex = 0;
}
}
//当你选中箱子里的某一个玩具(某条收入记录)时,
//这个小助手会立刻帮你把这个玩具的详细信息拿出来,方便你查看或者修改。
private void listViewIncomeList_SelectedIndexChanged(object sender, EventArgs e)
{
if (listViewIncomeList.SelectedItems.Count > 0)//先检查一下
{
//记住你选的是哪个玩具
// 把选中的那个玩具暂时拿在手里记住它。
var selItem = listViewIncomeList.SelectedItems[0];
actType = 2;//举起"修改"小旗子
curItem = selItem;//把玩具的各个部分摆出来
textBoxRecord.Text = curItem.Text;
comboBoxItems.Text = curItem.SubItems[1].Text;
textBoxDes.Text = curItem.SubItems[2].Text;
textBoxMoney.Text = curItem.SubItems[3].Text.Substring(1);
butOk.Text = "修改";
selIndex = listViewIncomeList.SelectedIndices[0];//记下玩具在箱子的位置
}
}
//把你在各个输入框里填写好的收入信息(比如名目、描述、金额)收集起来
//,检查一下有没有问题,然后好好地保存起来。
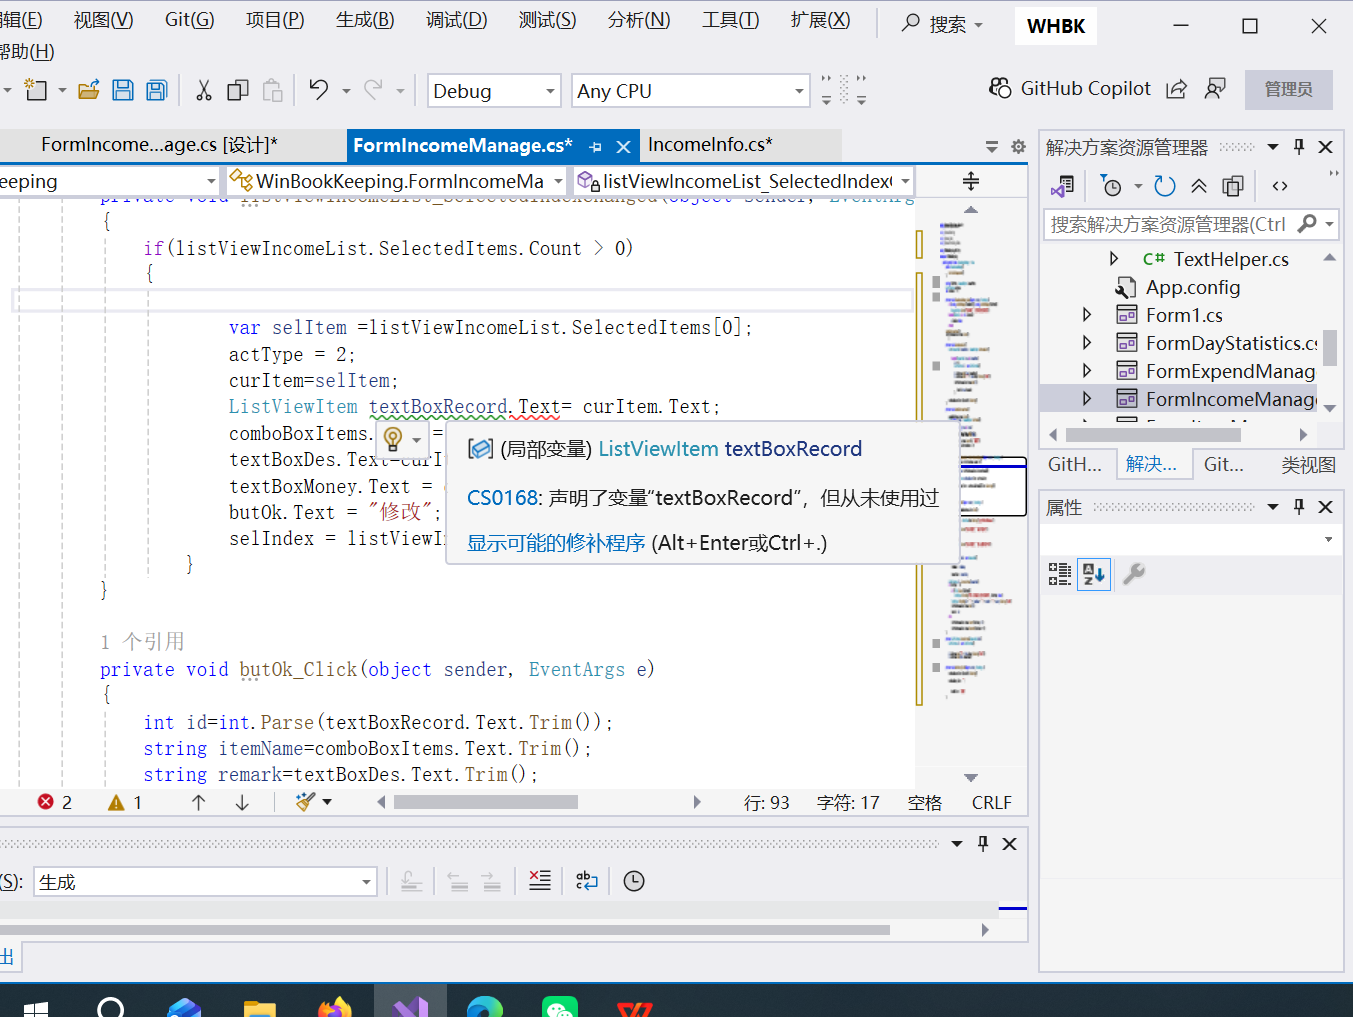
private void butOk_Click(object sender, EventArgs e)
{//收集信息
// 把散落的乐高积木块捡起来
int id = int.Parse(textBoxRecord.Text.Trim());
string itemName = comboBoxItems.Text.Trim();
string remark = textBoxDes.Text.Trim();
decimal money = 0.0M;
decimal.TryParse(textBoxMoney.Text.Trim(), out money);
string incomeTime = DateTime.Now.ToString("yyyy-MM-dd HH:mm:ss");
//2. 检查信息
//检查积木块是否齐全和合格
// 它会检查"描述"不能为空,"金额"必须大于0。
// 如果不符合要求,就会弹出错误提示并停止后续操作
if (string.IsNullOrEmpty(remark))
{
MessageHelper.Error("收入记录提交", "描述不能为空");
textBoxDes.Focus();
return;
}
if (money <= 0)
{
MessageHelper.Error("收入记录提交", "收入金额不能小于0");
textBoxMoney.Focus();
return;
}
//打包信息
//把积木块装进一个小盒子
//代码将收集到的所有信息打包成一个 IncomeInfo对象(incomeInfo),这样便于管理和传递
IncomeInfo incomeInfo = new IncomeInfo()
{
IncomeId = id,
ItemName = itemName,
IncomeDesp = remark,
Money = money,
IncomeTime = incomeTime,
};
ListViewItem li = CreateLvItem(incomeInfo);
if (actType == 1)
{
if (!File.Exists(filePath))
{
TextHelper.WriteMsg("编号;名目;描述;金额;记录时间", filePath, false);
}
TextHelper.WriteMsg(id + ";" + itemName + ";" + remark + ";" + money.ToString("0.00")
+ ";" + incomeTime, filePath, true);
listViewIncomeList.Items.Add(li);
incomeList.Add(incomeInfo);
lastId = id;
}
else
{
listViewIncomeList.Items.Insert(selIndex, li);
incomeList[selIndex] = incomeInfo;
listViewIncomeList.Items.RemoveAt(selIndex + 1);
}
}
//它的工作是把一份包含收入信息的"数据包裹"(IncomeInfo对象),
//打包成能在屏幕上列表里 显示一行数据 所需要的格式(ListViewItem对象
private ListViewItem CreateLvItem(IncomeInfo Info)
{
ListViewItem li = new ListViewItem();//准备一个空白的表格行
//填写第一列的内容
// 将收入记录的ID转换为字符串,并设置为这一行第一列显示的内容
li.Text = Info.IncomeId.ToString();
//依次填写后面各列的内容
li.SubItems.Add(Info.ItemName);
li.SubItems.Add(Info.IncomeDesp);
li.SubItems.Add("¥" + Info.Money.ToString("0.00"));
li.SubItems.Add(Info.IncomeTime);
return li;
}
//与之前代码的协作:在你之前看到的 butOk_Click方法里,在需要更新界面列表时,
//就会调用这个 CreateLvItem方法。butOk_Click负责业务逻辑(如判断是新增还是修改),
//而 CreateLvItem则专注于准备显示内容,它们各司其职,协同工作
//这个方法的根本目的是初始化界面,使其回到一个干净、可用的初始状态,
//特别是为了新增一条记录做准备
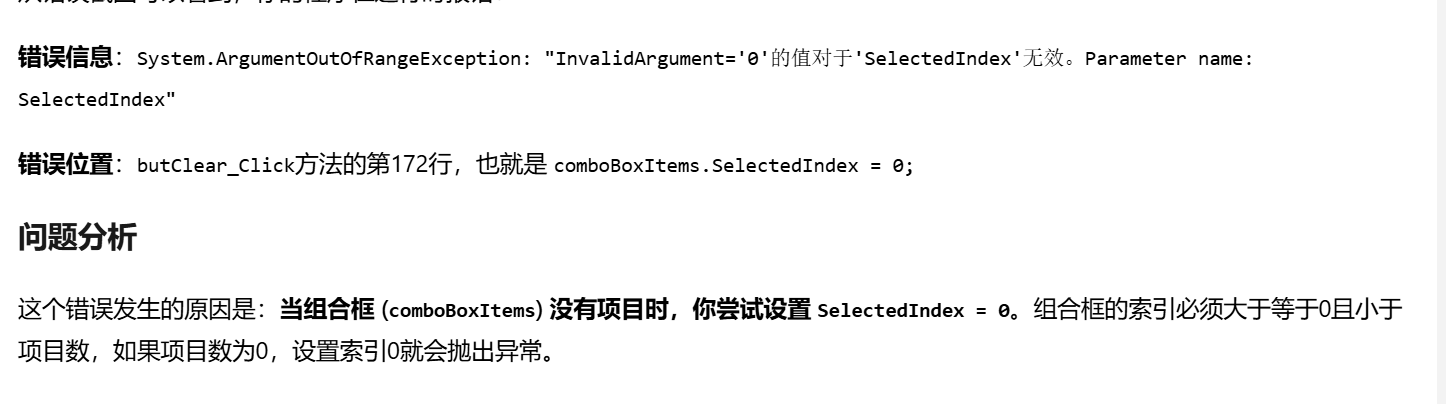
private void butClear_Click(object sender, EventArgs e)
{
textBoxRecord.Text = (lastId + 1).ToString();
if (comboBoxItems.Items.Count > 0)
{
comboBoxItems.SelectedIndex = 0;
}
else
{
comboBoxItems.Text = "";
}
//comboBoxItems.SelectedIndex = 0;
textBoxDes.Text = "";
textBoxMoney.Text = "";
if (actType != 1)
{
actType = 1;
butOk.Text = "新增";
}
}
private void butDel_Click(object sender, EventArgs e)
{
//首先获取所有选中的记录,然后弹出一个确认对话框,防止误删
var selList = listViewIncomeList.SelectedItems;
if (selList.Count > 0)
{
DialogResult dr = MessageHelper.Confirm("删除收入记录", "确定吗");
//
if (dr == DialogResult.Yes)
{
//将选中的项复制到一个临时列表中。
//这是为了避免在直接遍历和删除 ListView.SelectedItems集合时因索引变动可能引发的错误
List<ListViewItem> selItems = new List<ListViewItem>();
foreach (ListViewItem item in selList)
{
selItems.Add(item);
}
int i = 0;
//循环处理每一个需要删除的项。
while (i < selItems.Count)
{
int index = listViewIncomeList.Items.IndexOf(selItems[i]);
//从列表视图控件中移除当前项,使其从界面消失
listViewIncomeList.Items.Remove(selItems[i]);//removeat 和 remove区别
//Remove和 RemoveAt的区别:
//你代码中使用的 Items.Remove(selItems[i])是通过对象本身来删除,
//而注释中提到的 RemoveAt是通过项的索引位置来删除
//根据索引从程序内部维护的数据集合 (incomeList) 中移除对应的数据对象,确保数据同步
incomeList.RemoveAt(index);
//特殊处理:如果当前正在编辑的项(curItem)恰好是被删除的项,
//则清空所有输入框,并将操作模式重置为"新增"
if (curItem == selItems[i])
{
textBoxRecord.Text = "";
if (comboBoxItems.Items.Count > 0) {
comboBoxItems.SelectedIndex = 0;
}
else
{
comboBoxItems.Text = "";
}
textBoxDes.Text = "";
textBoxMoney.Text = "";
if (actType != 1)
{
actType = 1;
butOk.Text = "新增";
}
curItem = null;
}
i++;
}
//删除完成后,更新最后一条记录的ID (lastId)。
//如果列表已空,则重置ID为0,并将记录编号框设为"1",为新增第一条记录做准备。
if (incomeList.Count > 0)
{
actType = 3;
lastId = incomeList[incomeList.Count - 1].IncomeId;
}
else {
lastId = 0;
textBoxRecord.Text = "1";
}
MessageHelper.Info("删除收入记录", "删除成功");
}
}
}
//与之前代码的协作:这个删除方法和你之前看到的 butOk_Click(保存)、listViewIncomeList_SelectedIndexChanged(选择项变化)等方法紧密配合。
//它们通过共享变量如 curItem, actType, incomeList和 lastId来协同工作,共同维护着程序数据与界面状态的一致性和正确性。
//把当前"玩具箱"(incomeList)里所有的"玩具"(收入记录)重新整理一遍,
//确保它们的编号是连续的,然后更新到显示列表(listViewIncomeList)中,并最终把所有信息整齐地保存到一个文件里。
private void butSave_Click(object sender, EventArgs e)
{
if (actType != 1 && incomeList.Count > 0)
{ //这是一个安全卫士。它确保只有在不是新增模式(比如可能是修改后)且收入列表中存在数据时,
//才执行保存操作,避免不必要的操作
List<string> msgList=new List<string>();
TextHelper.WriteMsg("编号;命名;描述;金额;记录时间",filePath,false);
int id = 0;
listViewIncomeList.Items.Clear();
foreach(IncomeInfo info in incomeList)//开始循环处理数据列表中的每一项收入记录。
{
id += 1;
info.IncomeId= id;//为每一条记录重新分配一个连续的编号(从1开始递增)。
//这确保了即使你删除过中间的某些记录,保存后的编号依然是整齐连续的。
string val=id+";"+info.ItemName+";"+info.IncomeDesp+";"+info.Money.ToString("0.00")+";"
+info.IncomeTime;
msgList.Add(val);
listViewIncomeList.Items.Add(CreateLvItem(info));//将格式化好的字符串加入临时"清单",
//同时调用你熟悉的 CreateLvItem方法将这条记录重新添加到列表视图控件中显示出来。
}
TextHelper.WriteMsgList(msgList,filePath,true);
MessageHelper.Info("保存", "保存成功");//循环结束后,将临时"清单"(msgList)里的所有数据追加写入到文件中
//(true参数的作用),并弹出提示框告诉用户"保存成功"。
}
}
private void buttonFind_Click(object sender, EventArgs e)
{
string kRemark = textBoxKRemark.Text.Trim();
string fItemName=comboBoxFItems.Text.Trim();
if (fItemName == "请选择")
fItemName = "";
decimal stMoney = 0, etMoney = 0;
if (!string.IsNullOrEmpty(textBoxStMoney.Text))
{
decimal.TryParse(textBoxStMoney.Text, out stMoney);
}
if (!string.IsNullOrEmpty(textBoxEtMoney.Text))
{
decimal.TryParse(textBoxEtMoney.Text, out etMoney);
}
if(etMoney>0&&etMoney<stMoney)
{
MessageHelper.Error("查询", "结束范围金额需大于开始范围金额");
textBoxEtMoney.Focus();
return;
}//这是核心步骤。它以全部数据(incomeList)为基础,
//根据你输入的条件,像组装流水线一样,依次叠加筛选条件。
//这里使用了LINQ的 Where方法进行条件筛选
IEnumerable<IncomeInfo> findList = incomeList;
if (!string.IsNullOrEmpty(kRemark))
{
findList=findList.Where(r=>r.IncomeDesp.Contains(kRemark));
}
if (!string.IsNullOrEmpty(fItemName))
{
findList=findList.Where(r=>r.ItemName==fItemName);
}
if (stMoney > 0)
{
findList = findList.Where(r => r.Money >= stMoney);
}
if (etMoney > 0)
{//就像给你的"找玩具"游戏加上一个"最高价格"限制
findList = findList.Where(r => r.Money <= etMoney);
//只保留那些"金额 ≤ 结束金额"的记录
}
//检查筛选后是否有结果。如果有,先清空列表,然后遍历查询结果,
//为每一条记录调用 CreateLvItem方法创建列表项并添加到界面列表中;
//如果没有结果,则直接清空列表。
if (findList.Count() > 0)
{
listViewIncomeList.Items.Clear();
foreach(IncomeInfo item in findList)
{
ListViewItem li=CreateLvItem(item);
listViewIncomeList.Items.Add(li);
}
}
else
{
listViewIncomeList.Items.Clear ();
}
}
//与之前代码的协作:这个查询方法和你之前看到的其他方法(如 butOk_Click保存、butDel_Click删除)都操作同一个核心数据源 incomeList。
//它确保了查询操作是基于最新、最完整的数据进行的。同时,它再次使用了 CreateLvItem这个"数据转换小助手"来将数据对象转换为可以在界面上显示的列表项。
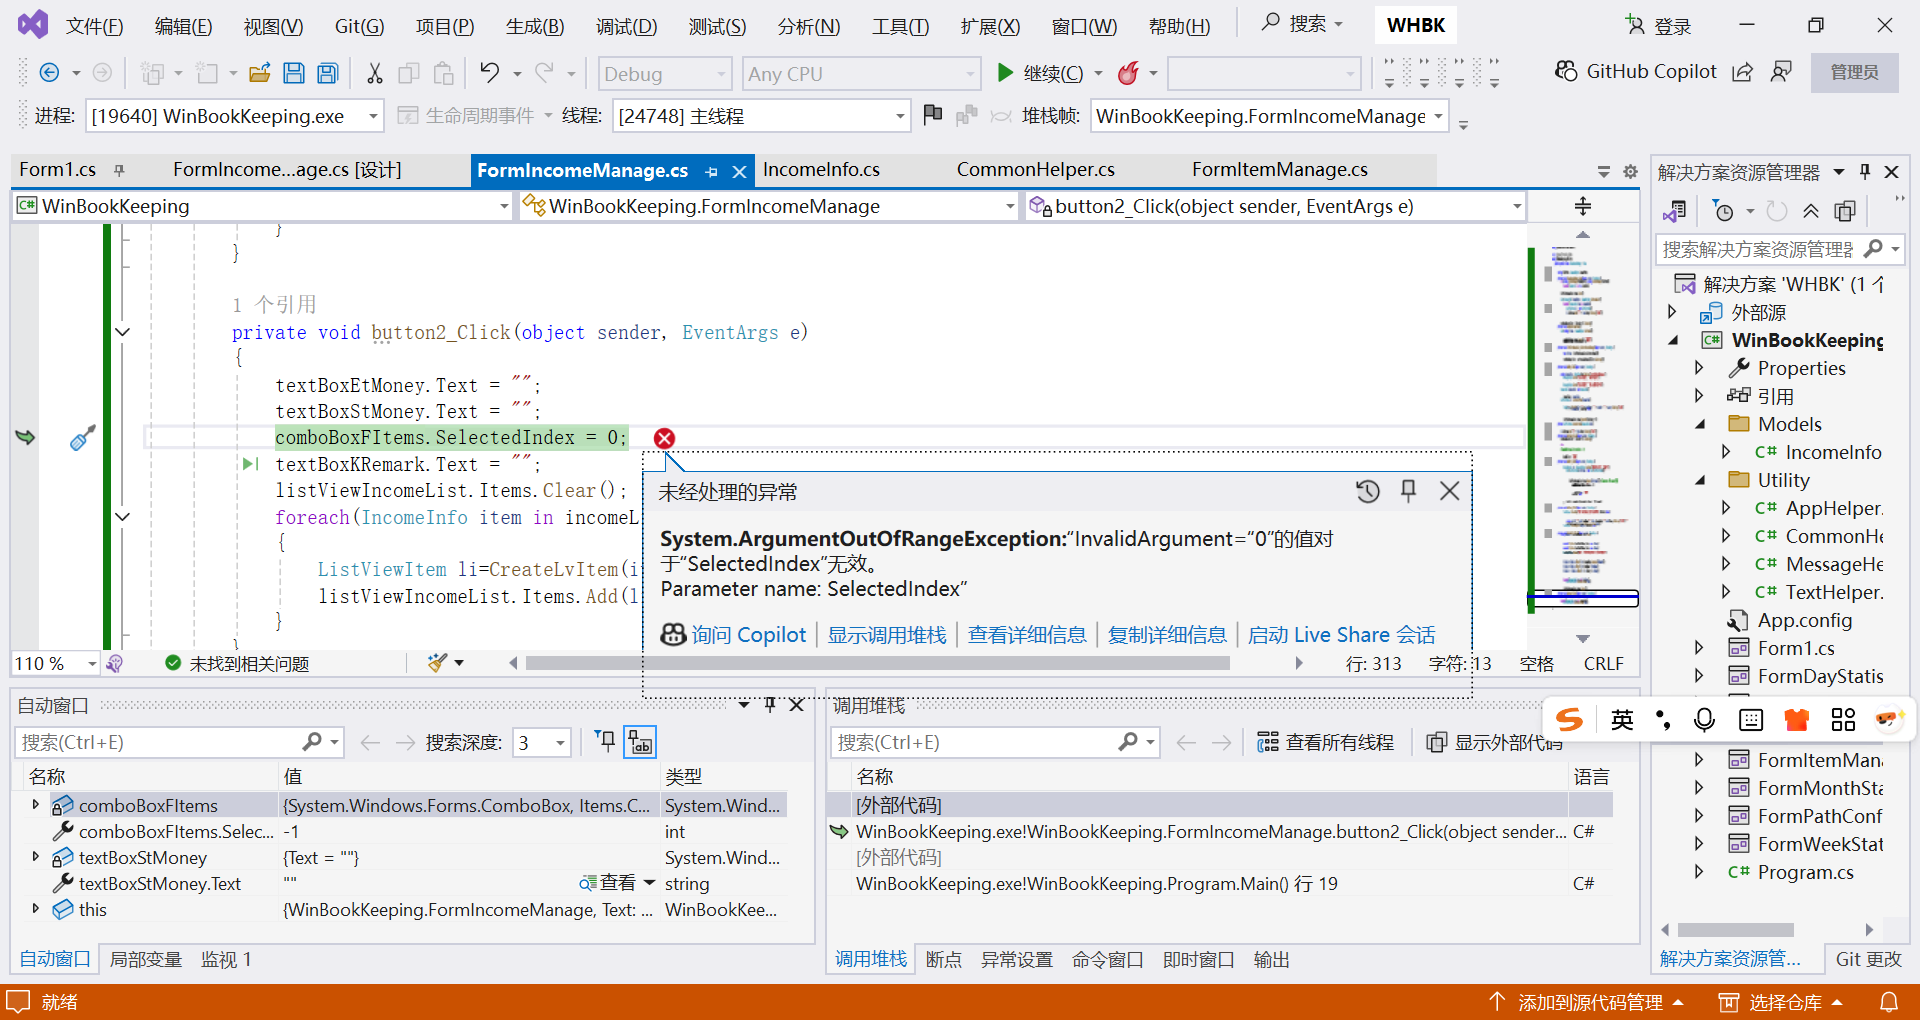
private void button2_Click(object sender, EventArgs e)
{
textBoxEtMoney.Text = "";
textBoxStMoney.Text = "";
if (comboBoxFItems.Items.Count > 0)
{
comboBoxFItems.SelectedIndex = 0;
}
else
{
comboBoxFItems.Text = "";
}
// comboBoxFItems.SelectedIndex = 0;
textBoxKRemark.Text = "";
listViewIncomeList.Items.Clear();
//检查程序内部的数据列表(incomeList)是否有数据。
//如果有,就遍历每一条记录,通过 CreateLvItem方法创建列表项,并重新添加到列表视图中。
//这样,列表就会显示所有的收入记录,而不是查询筛选后的结果。
if (incomeList != null && incomeList.Count > 0)
{
foreach (IncomeInfo item in incomeList)
{
ListViewItem li = CreateLvItem(item);
listViewIncomeList.Items.Add(li);
}
}
}
}
}