文章目录
-
- RabbitMQ
-
- 1.安装
- 2.RabbitMQ管理界面
- [3.Spring AMQP](#3.Spring AMQP)
-
- 3.1初步入门:
-
- 3.1.1*消息发送:*
- [3.1.2 消息接收:](#3.1.2 消息接收:)
- [3.1.3 测试](#3.1.3 测试)
- 3.2WorkQueues模型
- 3.3prefetch属性设置让能者多劳
- 3.4交换机
-
- [3.4.1 Fanout广播交换机](#3.4.1 Fanout广播交换机)
- 3.4.2Direct订阅交换机
-
- 3.4.2.1消息发送
- 3.4.2.2消息接收
- [3.4.2.3 测试](#3.4.2.3 测试)
- 3.4.3Topic交换机
-
- 3.4.3.1信息发送
- [3.4.3.2 信息接收](#3.4.3.2 信息接收)
- [3.4.3.3 测试](#3.4.3.3 测试)
- --------目前存在的问题---------
- [4.Spring AMQP中使用Java代码声明队列和交换机](#4.Spring AMQP中使用Java代码声明队列和交换机)
- 5.消息转换器
- 6.案例------以异步支付通知为例
RabbitMQ
1.安装
安装参考:
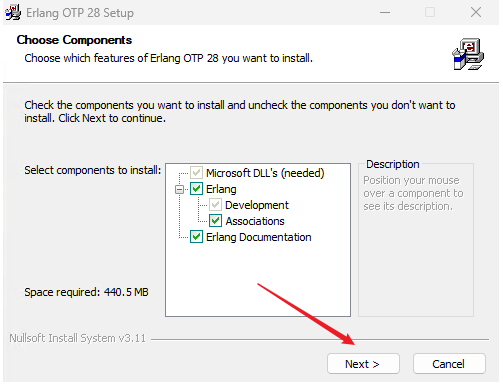
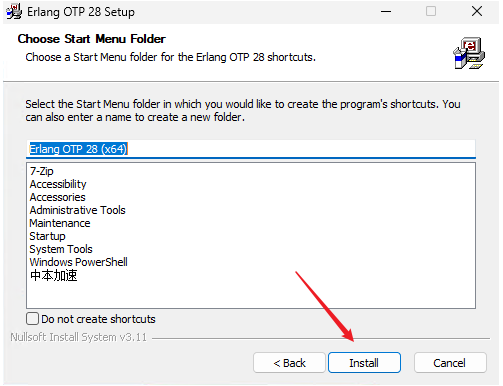
1.1安装Erlang

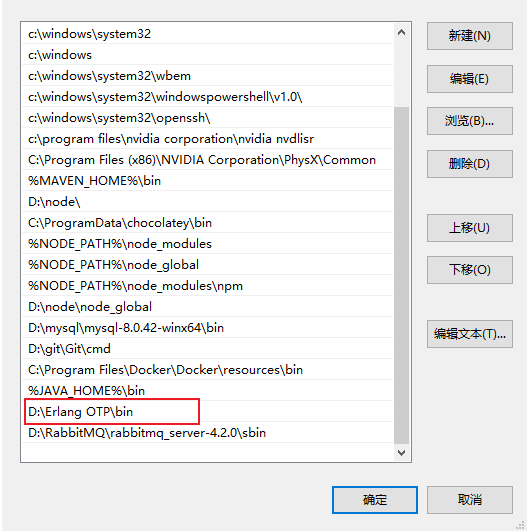
配置环境变量
可以通过以下命令验证是否配置成功Erlang环境
erl -version1.2下载RabbitMQ
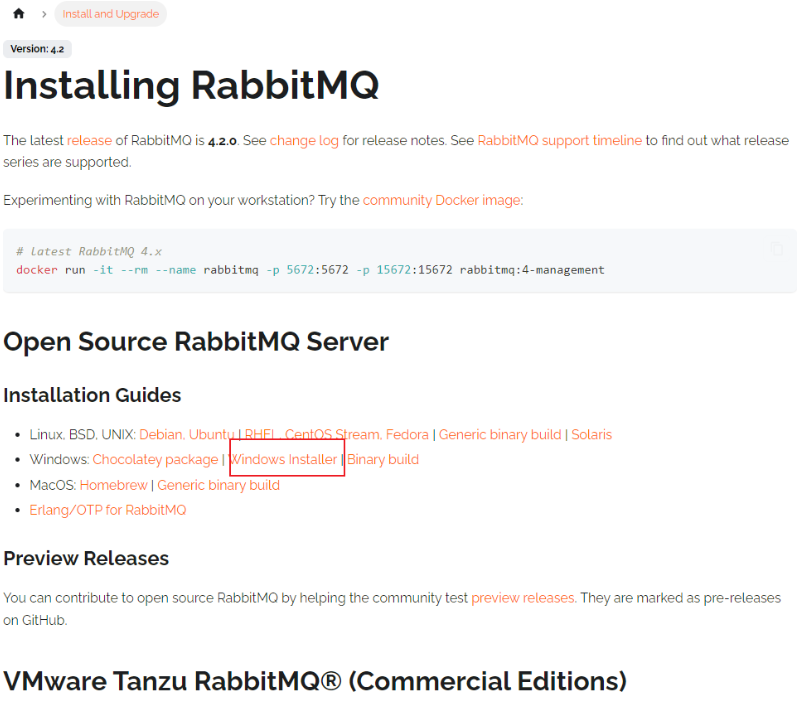
打开浏览器,访问:https://www.rabbitmq.com/download.html
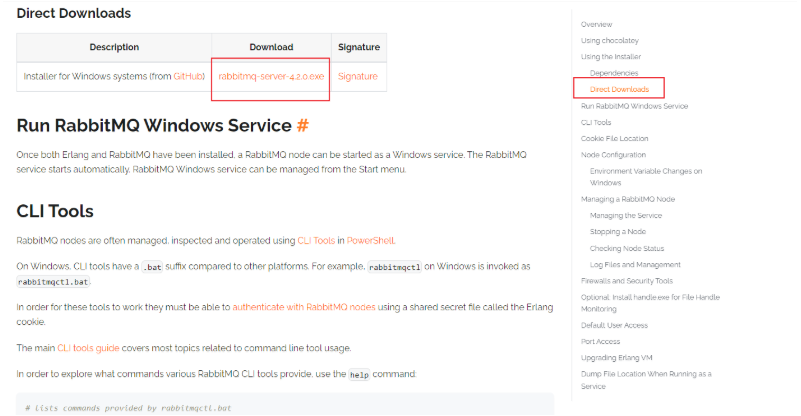
下载安装后同样的办法配置环境变量
之后通过命令行验证:
rabbitmq-plugins1.3启动管理界面
以管理员身份进入
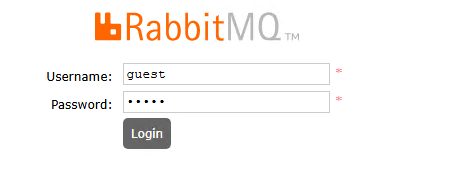
rabbitmq-plugins enable rabbitmq_management打开浏览器访问:http://localhost:15672
默认用户名和密码都是:guest
附:
启动RabbitMQ服务
RabbitMQ安装完成后,默认服务不会自动启动,可以通过以下命令手动启动:
rabbitmq-service start可以在命令行检查服务是否在运行:
rabbitmqctl status配置RabbitMQ管理插件,也就是1.3提到的命令
RabbitMQ提供了一个Web管理页面,可以方便地管理消息队列,要启用管理插件,请执行以下命令:
rabbitmq-plugins enable rabbitmq_management插件启用后,重启RabbitMQ服务:
rabbitmq-service restart2.RabbitMQ管理界面
2.1交换机
2.2Queue队列
2.3Admin
3.Spring AMQP
3.1初步入门:
3.1.1消息发送:
使用SpringAMQP收发消息,在RabbitMQ控制台添加一个队列

首先配置MQ地址,在publisher服务的application.yml中添加配置:
yaml
spring:
  rabbitmq:
    host: 192.168.1.6 # 你的虚拟机IP
    port: 5672 # 端口
    virtual-host: /yinshunyu # 虚拟主机
    username: yinshunyu # 用户名
    password: 123456 # 密码
然后在publisher服务中编写测试类SpringAmqpTest,并利用RabbitTemplate实现消息发送:
java
package com.itheima.publisher.amqp;
import org.junit.jupiter.api.Test;
import org.springframework.amqp.rabbit.core.RabbitTemplate;
import org.springframework.beans.factory.annotation.Autowired;
import org.springframework.boot.test.context.SpringBootTest;
@SpringBootTest
public class SpringAmqpTest {
@Autowired
private RabbitTemplate rabbitTemplate;
@Test
public void testSimpleQueue() {
// 队列名称
String queueName = "simple.queue";
// 消息
String message = "hello, spring amqp!";
// 发送消息
rabbitTemplate.convertAndSend(queueName, message);
}
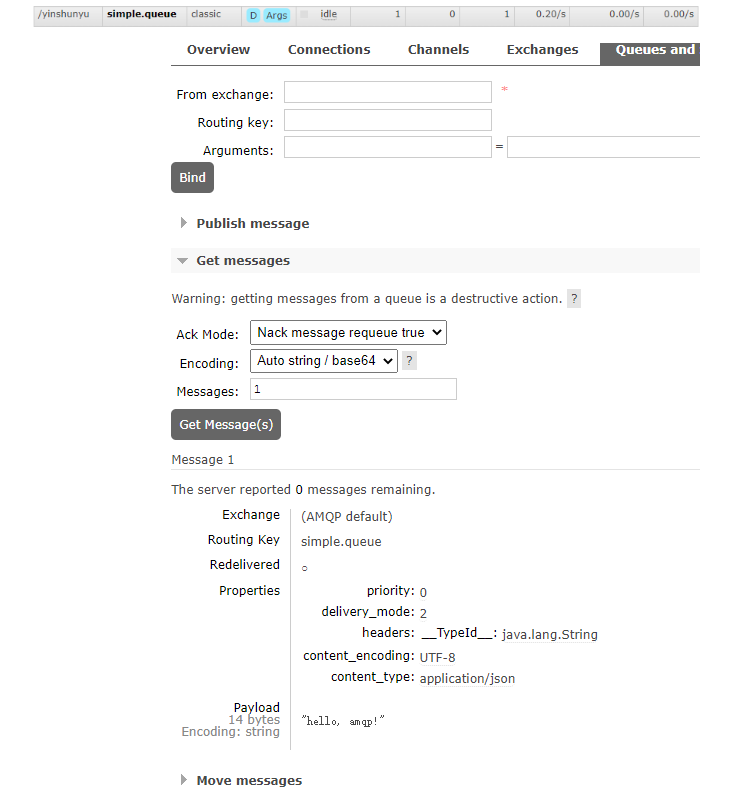
}打开控制台,可以看到消息已经发送到队列中:
3.1.2 消息接收:
首先配置MQ地址,在consumer服务的application.yml中添加配置:
yaml
spring:
  rabbitmq:
    host: 192.168.1.6 # 你的虚拟机IP
    port: 5672 # 端口
    virtual-host: /yinshunyu # 虚拟主机
    username: yinshunyu # 用户名
password: 123456 # 密码然后在consumer服务的com.itheima.consumer.listener包中新建一个类SpringRabbitListener,代码如下:
java
package com.itheima.consumer.listener;
import org.springframework.amqp.rabbit.annotation.RabbitListener ;
import org.springframework.stereotype.Component;
@Component
public class MqListener {
// 利用RabbitListener来声明要监听的队列信息
// 将来一旦监听的队列中有了消息,就会推送给当前服务,调用当前方法,处理消息。
// 可以看到方法体中接收的就是消息体的内容
@RabbitListener(queues = "simple.queue")
public void listenSimpleQueue(String msg){
System.out.println("消费者收到了simple.queue的消息:【" + msg +"】");
}
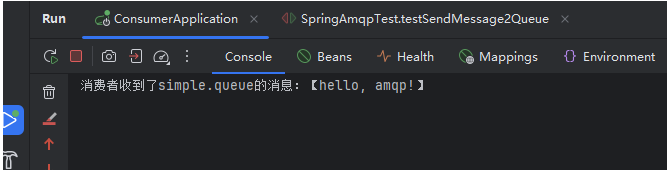
}3.1.3 测试
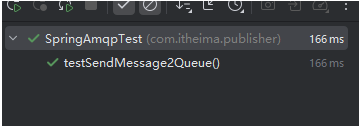
启动consumer服务,然后在publisher服务中运行测试代码,发送MQ消息。最终consumer收到消息:

3.2WorkQueues模型
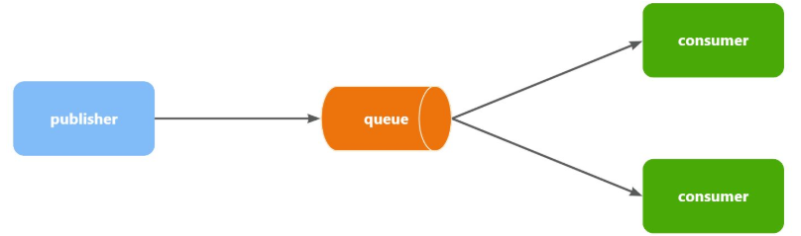
当消息处理比较耗时的时候,可能生产消息的速度会远远大于消息的消费速度。长此以往,消息就会堆积越来越多,无法及时处理。
此时就可以使用work 模型,多个消费者共同处理消息处理,消息处理的速度就能大大提高了。
首先,我们在控制台创建一个新的队列,命名为work.queue:

3.2.1消息发送
我们循环发送,模拟大量消息堆积现象。
在publisher服务中的SpringAmqpTest类中添加一个测试方法:
java
/**
     * workQueue
     * 向队列中不停发送消息,模拟消息堆积。
     */
@Test
public void testWorkQueue() throws InterruptedException {
    // 队列名称
    String queueName = "simple.queue";
    // 消息
    String message = "hello, message_";
    for (int i = 0; i < 50; i++) {
        // 发送消息,每20毫秒发送一次,相当于每秒发送50条消息
        rabbitTemplate.convertAndSend(queueName, message + i);
        Thread.sleep(20);
    }
}
3.2.2.消息接收
要模拟多个消费者绑定同一个队列,我们在consumer服务的SpringRabbitListener中添加2个新的方法:
java
@RabbitListener(queues = "work.queue")
public void listenWorkQueue1(String msg) throws InterruptedException {
    System.out.println("消费者1接收到消息:【" + msg + "】" + LocalTime.now());
    Thread.sleep(20);
}

@RabbitListener(queues = "work.queue")
public void listenWorkQueue2(String msg) throws InterruptedException {
    System.err.println("消费者2........接收到消息:【" + msg + "】" + LocalTime.now());
    Thread.sleep(200);
}注意到这两消费者,都设置了Thead.sleep,模拟任务耗时:
- 消费者1 sleep了20毫秒,相当于每秒钟处理50个消息
- 消费者2 sleep了200毫秒,相当于每秒处理5个消息
3.2.3测试
启动ConsumerApplication后,在执行publisher服务中刚刚编写的发送测试方法testWorkQueue。
运行结果如下:
消费者1 收到了 work.queue的消息:【hello, worker, message_1】
消费者2 收到了 work.queue的消息...... :【hello, worker, message_2】
消费者1 收到了 work.queue的消息:【hello, worker, message_3】
消费者1 收到了 work.queue的消息:【hello, worker, message_5】
消费者1 收到了 work.queue的消息:【hello, worker, message_7】
消费者2 收到了 work.queue的消息...... :【hello, worker, message_4】
消费者1 收到了 work.queue的消息:【hello, worker, message_9】
消费者1 收到了 work.queue的消息:【hello, worker, message_11】
消费者1 收到了 work.queue的消息:【hello, worker, message_13】
消费者2 收到了 work.queue的消息...... :【hello, worker, message_6】
消费者1 收到了 work.queue的消息:【hello, worker, message_15】
消费者1 收到了 work.queue的消息:【hello, worker, message_17】
消费者1 收到了 work.queue的消息:【hello, worker, message_19】
消费者1 收到了 work.queue的消息:【hello, worker, message_21】
消费者2 收到了 work.queue的消息...... :【hello, worker, message_8】
消费者1 收到了 work.queue的消息:【hello, worker, message_23】
消费者1 收到了 work.queue的消息:【hello, worker, message_25】
消费者1 收到了 work.queue的消息:【hello, worker, message_27】
消费者2 收到了 work.queue的消息...... :【hello, worker, message_10】
消费者1 收到了 work.queue的消息:【hello, worker, message_29】
消费者1 收到了 work.queue的消息:【hello, worker, message_31】
消费者1 收到了 work.queue的消息:【hello, worker, message_33】
消费者2 收到了 work.queue的消息...... :【hello, worker, message_12】
消费者1 收到了 work.queue的消息:【hello, worker, message_35】
消费者1 收到了 work.queue的消息:【hello, worker, message_37】
消费者1 收到了 work.queue的消息:【hello, worker, message_39】
消费者2 收到了 work.queue的消息...... :【hello, worker, message_14】
消费者1 收到了 work.queue的消息:【hello, worker, message_41】
消费者1 收到了 work.queue的消息:【hello, worker, message_43】
消费者1 收到了 work.queue的消息:【hello, worker, message_45】
消费者1 收到了 work.queue的消息:【hello, worker, message_47】
消费者2 收到了 work.queue的消息...... :【hello, worker, message_16】
消费者1 收到了 work.queue的消息:【hello, worker, message_49】
消费者2 收到了 work.queue的消息...... :【hello, worker, message_18】
消费者2 收到了 work.queue的消息...... :【hello, worker, message_20】
消费者2 收到了 work.queue的消息...... :【hello, worker, message_22】
消费者2 收到了 work.queue的消息...... :【hello, worker, message_24】
消费者2 收到了 work.queue的消息...... :【hello, worker, message_26】
消费者2 收到了 work.queue的消息...... :【hello, worker, message_28】
消费者2 收到了 work.queue的消息...... :【hello, worker, message_30】
消费者2 收到了 work.queue的消息...... :【hello, worker, message_32】
消费者2 收到了 work.queue的消息...... :【hello, worker, message_34】
消费者2 收到了 work.queue的消息...... :【hello, worker, message_36】
消费者2 收到了 work.queue的消息...... :【hello, worker, message_38】
消费者2 收到了 work.queue的消息...... :【hello, worker, message_40】
消费者2 收到了 work.queue的消息...... :【hello, worker, message_42】
消费者2 收到了 work.queue的消息...... :【hello, worker, message_44】
消费者2 收到了 work.queue的消息...... :【hello, worker, message_46】
消费者2 收到了 work.queue的消息...... :【hello, worker, message_48】
消费者2 收到了 work.queue的消息...... :【hello, worker, message_50】
可以看到消费者1和消费者2每人消费了25条消息:
但是:
- 消费者1很快完成了自己的25条消息
- 消费者2却在缓慢的处理自己的25条消息。
这就是说在不经过其他处理的情况下,消息是平均分配给每个消费者,并没有考虑到消费者的处理能力。导致1个消费者空闲,另一个消费者忙的不可开交。没有充分利用每一个消费者的能力,最终消息处理的耗时远远超过了1秒。
因此:
3.3prefetch属性设置让能者多劳
在spring中有一个简单的配置,可以解决这个问题。我们修改consumer服务的application.yml文件,添加配置:
yaml
spring:
  rabbitmq:
    listener:
      simple:
        prefetch: 1 # 消费者每次只能获取一条消息,处理完成才能获取下一个消息
再次测试,发现结果如下:
消费者2 收到了 work.queue的消息...... :【hello, worker, message_1】
消费者1 收到了 work.queue的消息:【hello, worker, message_2】
消费者1 收到了 work.queue的消息:【hello, worker, message_3】
消费者1 收到了 work.queue的消息:【hello, worker, message_4】
消费者1 收到了 work.queue的消息:【hello, worker, message_5】
消费者1 收到了 work.queue的消息:【hello, worker, message_6】
消费者1 收到了 work.queue的消息:【hello, worker, message_7】
消费者1 收到了 work.queue的消息:【hello, worker, message_8】
消费者2 收到了 work.queue的消息...... :【hello, worker, message_9】
消费者1 收到了 work.queue的消息:【hello, worker, message_10】
消费者1 收到了 work.queue的消息:【hello, worker, message_11】
消费者1 收到了 work.queue的消息:【hello, worker, message_12】
消费者1 收到了 work.queue的消息:【hello, worker, message_13】
消费者1 收到了 work.queue的消息:【hello, worker, message_14】
消费者1 收到了 work.queue的消息:【hello, worker, message_15】
消费者1 收到了 work.queue的消息:【hello, worker, message_16】
消费者2 收到了 work.queue的消息...... :【hello, worker, message_17】
消费者1 收到了 work.queue的消息:【hello, worker, message_18】
消费者1 收到了 work.queue的消息:【hello, worker, message_19】
消费者1 收到了 work.queue的消息:【hello, worker, message_20】
消费者1 收到了 work.queue的消息:【hello, worker, message_21】
消费者1 收到了 work.queue的消息:【hello, worker, message_22】
消费者1 收到了 work.queue的消息:【hello, worker, message_23】
消费者1 收到了 work.queue的消息:【hello, worker, message_24】
消费者2 收到了 work.queue的消息...... :【hello, worker, message_25】
消费者1 收到了 work.queue的消息:【hello, worker, message_26】
消费者1 收到了 work.queue的消息:【hello, worker, message_27】
消费者1 收到了 work.queue的消息:【hello, worker, message_28】
消费者1 收到了 work.queue的消息:【hello, worker, message_29】
消费者1 收到了 work.queue的消息:【hello, worker, message_30】
消费者1 收到了 work.queue的消息:【hello, worker, message_31】
消费者1 收到了 work.queue的消息:【hello, worker, message_32】
消费者2 收到了 work.queue的消息...... :【hello, worker, message_33】
消费者1 收到了 work.queue的消息:【hello, worker, message_34】
消费者1 收到了 work.queue的消息:【hello, worker, message_35】
消费者1 收到了 work.queue的消息:【hello, worker, message_36】
消费者1 收到了 work.queue的消息:【hello, worker, message_37】
消费者1 收到了 work.queue的消息:【hello, worker, message_38】
消费者1 收到了 work.queue的消息:【hello, worker, message_39】
消费者1 收到了 work.queue的消息:【hello, worker, message_40】
消费者2 收到了 work.queue的消息...... :【hello, worker, message_41】
消费者1 收到了 work.queue的消息:【hello, worker, message_42】
消费者1 收到了 work.queue的消息:【hello, worker, message_43】
消费者1 收到了 work.queue的消息:【hello, worker, message_44】
消费者1 收到了 work.queue的消息:【hello, worker, message_45】
消费者1 收到了 work.queue的消息:【hello, worker, message_46】
消费者1 收到了 work.queue的消息:【hello, worker, message_47】
消费者1 收到了 work.queue的消息:【hello, worker, message_48】
消费者2 收到了 work.queue的消息...... :【hello, worker, message_49】
消费者1 收到了 work.queue的消息:【hello, worker, message_50】
由此,由于消费者1处理速度较快,所以处理了更多的消息;消费者2处理速度较慢,只处理了6条消息。而最终总的执行耗时也在1秒左右,大大提升。
3.4交换机
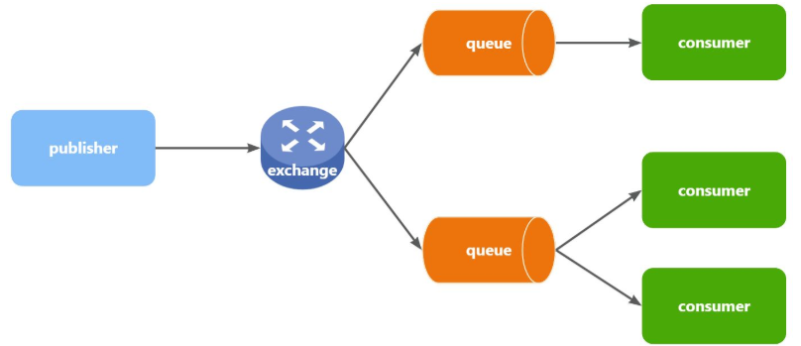
Exchange(交换机)只负责转发消息,不具备存储消息的能力,因此如果没有任何队列与Exchange绑定,或者没有符合路由规则的队列,那么消息会丢失!
交换机的类型有四种:
- Fanout:广播,将消息交给所有绑定到交换机的队列。我们最早在控制台使用的正是Fanout交换机
- Direct:订阅,基于RoutingKey(路由key)发送给订阅了消息的队列
- Topic:通配符订阅,与Direct类似,只不过RoutingKey可以使用通配符
- Headers:头匹配,基于MQ的消息头匹配,用的较少。
3.4.1 Fanout广播交换机
- 1) 可以有多个队列
- 2) 每个队列都要绑定到Exchange(交换机)
- 3) 生产者发送的消息,只能发送到交换机
- 4) 交换机把消息发送给绑定过的所有队列
- 5) 订阅队列的消费者都能拿到消息
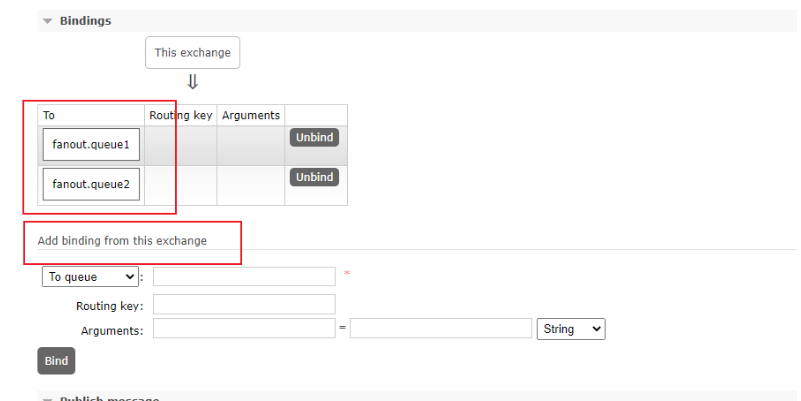
创建一个yinshunyu.fanout的交换机,类型是Fanout

创建两个队列fanout.queue1和fanout.queue2,绑定到交换机yinshunyu.fanout

3.4.1.1消息发送
在publisher服务的SpringAmqpTest类中添加测试方法:
java
@Test
void testSendFanout() {
    String exchangeName = "yinshunyu.fanout";
    String msg = "hello, everyone!";
    rabbitTemplate.convertAndSend(exchangeName, null, msg);
}
3.4.1.2消息接收
在consumer服务的SpringRabbitListener中添加两个方法,作为消费者:
@RabbitListener(queues = "fanout.queue1")
public void listenFanoutQueue1(String msg) throws InterruptedException {
    System.out.println("消费者1 收到了 fanout.queue1的消息:【" + msg +"】");
}

@RabbitListener(queues = "fanout.queue2")
public void listenFanoutQueue2(String msg) throws InterruptedException {
    System.out.println("消费者2 收到了 fanout.queue2的消息:【" + msg +"】");
}
3.4.1.3测试
与yinshunyu.fanout绑定的两个队列都都消费生产者发送给交换机的消息

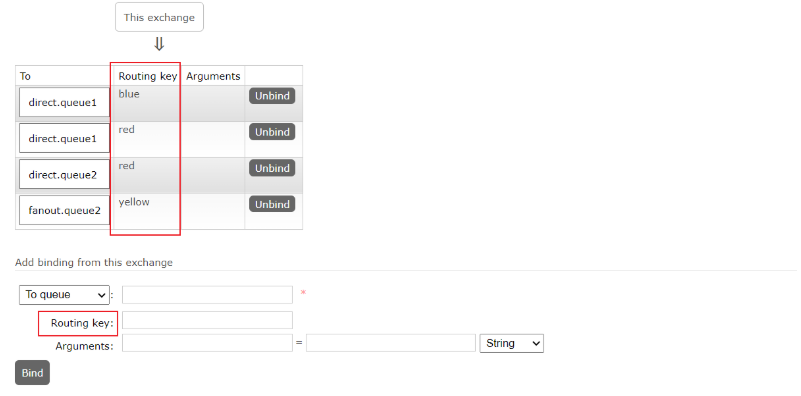
3.4.2Direct订阅交换机
创建direct类型的交换机

创建两个队列
direct.queue1,绑定yinshunyu.direct,bindingKey为blud和red
direct.queue1,绑定yinshunyu.direct,bindingKey为yellow和red

3.4.2.1消息发送
java
    @Test
    void testSendDirect() {
        String exchangeName = "yinshunyu.direct";
        String msg = "蓝色通知,警报,警报,警报";
        rabbitTemplate.convertAndSend(exchangeName, "blue", msg);
    }
3.4.2.2消息接收
java
@RabbitListener(queues = "direct.queue1")
public void listenDirectQueue1(String msg) throws InterruptedException {
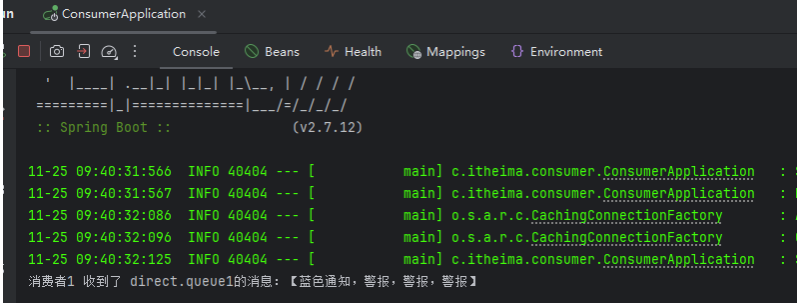
System.out.println("消费者1 收到了 direct.queue1的消息:【" + msg +"】");
}
@RabbitListener(queues = "direct.queue2")
public void listenDirectQueue2(String msg) throws InterruptedException {
System.out.println("消费者2 收到了 direct.queue2的消息:【" + msg +"】");
}3.4.2.3 测试
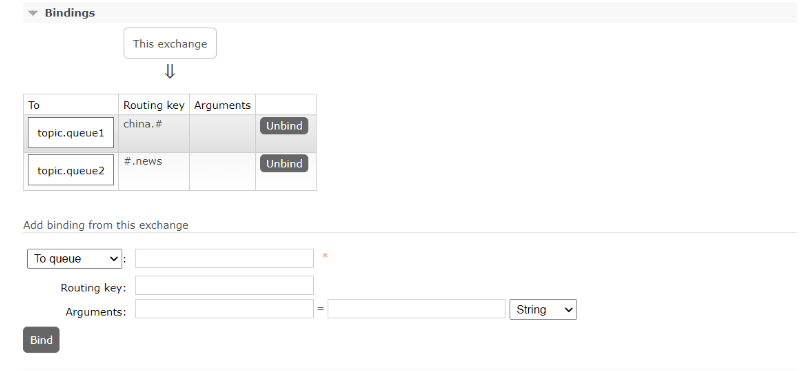
3.4.3Topic交换机
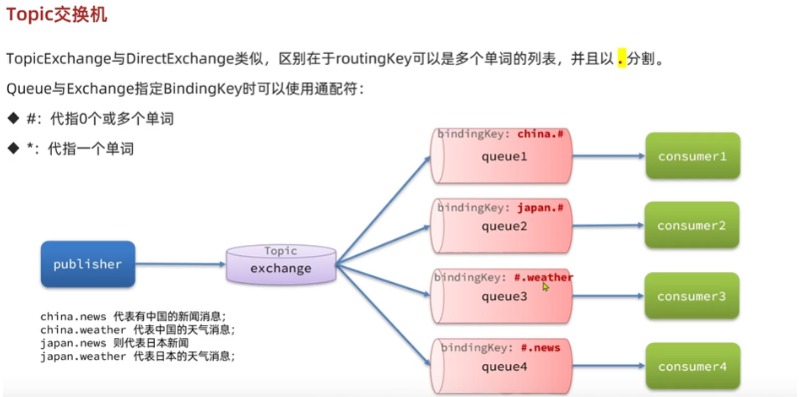
创建两个队列

创建交换机

两个队列以不同的key绑定交换机
3.4.3.1信息发送
java
    @Test
    void testSendTopic() {
        String exchangeName = "yinshunyu.topic";
        String msg = "今天天气挺不错(topic)";
        rabbitTemplate.convertAndSend(exchangeName, "japan.news", msg);
    }
3.4.3.2 信息接收
java
  @RabbitListener(queues = "topic.queue1")
    public void listenTopicQueue1(String msg) throws InterruptedException {
        System.out.println("消费者1 收到了 topic.queue1的消息:【" + msg +"】");
    }

    @RabbitListener(queues = "topic.queue2")
    public void listenTopicQueue2(String msg) throws InterruptedException {
        System.out.println("消费者2 收到了 topic.queue2的消息:【" + msg +"】");
    }
3.4.3.3 测试

--------目前存在的问题---------
在RabbitMQ网页控制台声明创建队列和交换机极易出现错误
在之前我们都是基于RabbitMQ控制台来创建队列、交换机。但是在实际开发时,队列和交换机是程序员定义的,将来项目上线,又要交给运维去创建。那么程序员就需要把程序中运行的所有队列和交换机都写下来,交给运维。在这个过程中是很容易出现错误的。
因此推荐的做法是由程序启动时检查队列和交换机是否存在,如果不存在自动创建。
4.Spring AMQP中使用Java代码声明队列和交换机
4.1基于Bean的声明方式
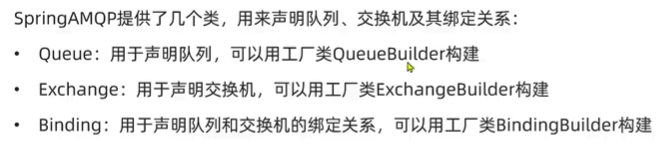
Queue类:SpringAMQP提供,用来创建队列

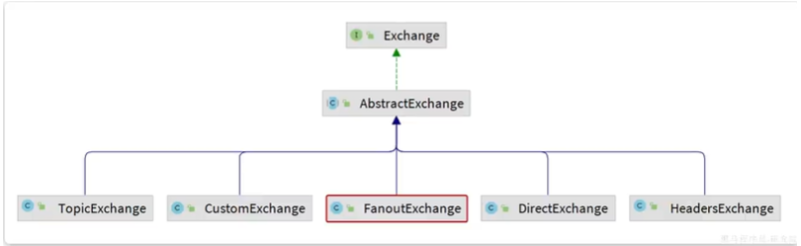
Exchange接口:SpringAMQP提供,来表示所有不同类型的交换机:
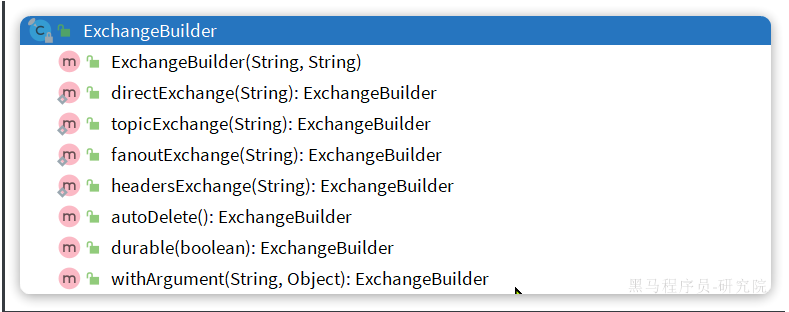
基于以上,我们可以自己创建队列和交换机,不过SpringAMQP还提供了ExchangeBuilder来简化这个过程:
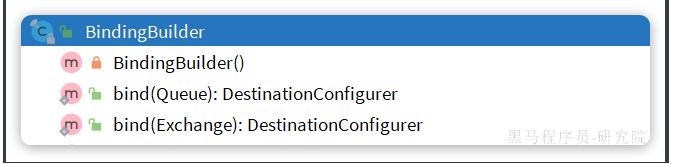
在绑定队列和交换机时,可以使用BindingBuilder来创建Binding对象

Fanout类型交换机完整示例:
java
@Configuration
public class FanoutConfiguration {
//创建交换机
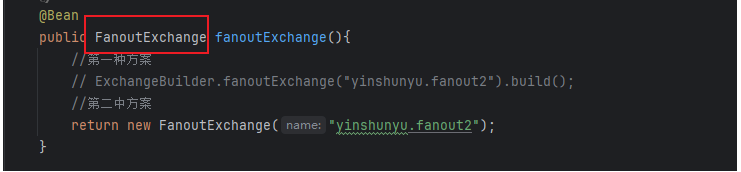
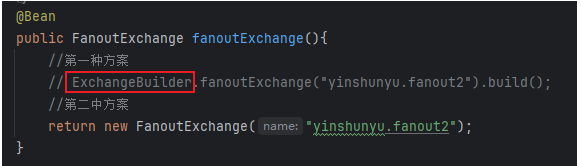
@Bean
public FanoutExchange fanoutExchange(){
//第一种方案
// ExchangeBuilder.fanoutExchange("yinshunyu.fanout2").build();
//第二中方案
return new FanoutExchange("yinshunyu.fanout2");
}
//创建队列
@Bean
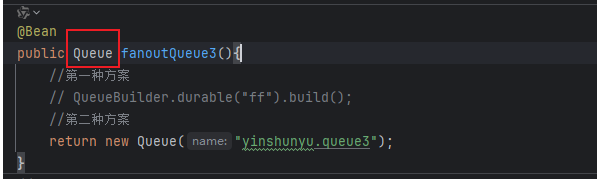
public Queue fanoutQueue3(){
//第一种方案
// QueueBuilder.durable("ff").build();
//第二种方案
return new Queue("yinshunyu.queue3");
}
//参数注入式绑定
@Bean
public Binding fanoutBinding3(Queue fanoutQueue3, FanoutExchange fanoutExchange){
return BindingBuilder.bind(fanoutQueue3).to(fanoutExchange);
}
@Bean
public Queue fanoutQueue4(){
return new Queue("yinshunyu.queue4");
}
//无参直接调用式绑定
//fanoutQueue4()不是从本类中获取,而是从Spring容器中获取
@Bean
public Binding fanoutBinding4(){
return BindingBuilder.bind(fanoutQueue4()).to(fanoutExchange());
}
}Direct类型交换机完整示例:
java
// @Configuration
public class DirectConfiguration {
    //创建交换机
    @Bean
    public DirectExchange directExchange(){
        return new DirectExchange("yinshunyu.direct");
    }
    //创建队列
    @Bean
    public Queue directQueue1(){
        return new Queue("direct.queue1");
    }
    //创建绑定关系
    @Bean
    public Binding directQueue1BindingRed(Queue directQueue1, DirectExchange directExchange){
        return BindingBuilder.bind(directQueue1).to(directExchange).with("red");
    }
    //创建绑定关系
    @Bean
    public Binding directQueue1BindingBlue(Queue directQueue1, DirectExchange directExchange){
        return BindingBuilder.bind(directQueue1).to(directExchange).with("blue");
    }
    //创建队列
    @Bean
    public Queue directQueue2(){
        return new Queue("direct.queue2");
    }
    //创建绑定关系
    @Bean
    public Binding directQueue2BindingRed(Queue directQueue2, DirectExchange directExchange){
        return BindingBuilder.bind(directQueue2).to(directExchange).with("red");
    }
    //创建绑定关系
    @Bean
    public Binding directQueue2BindingBlue(Queue directQueue2, DirectExchange directExchange){
        return BindingBuilder.bind(directQueue2).to(directExchange).with("yellow");
    }

}
4.2基于注解的声明方式
在消费者监听器类中
Direct模式:
java
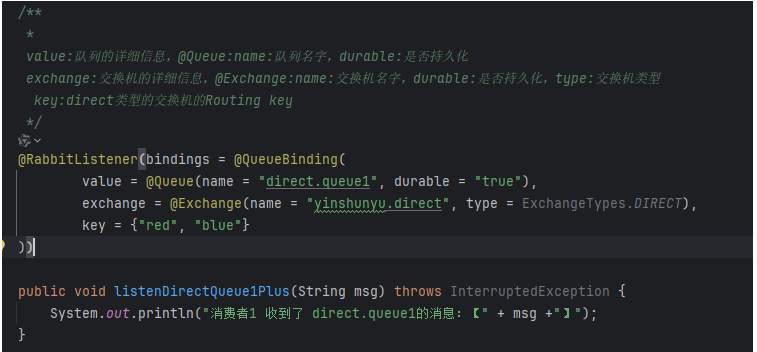
  /**
     *
     value:队列的详细信息,@Queue:name:队列名字,durable:是否持久化
     exchange:交换机的详细信息,@Exchange:name:交换机名字,durable:是否持久化,type:交换机类型
      key:direct类型的交换机的Routing key
     */
    @RabbitListener(bindings = @QueueBinding(
            value = @Queue(name = "direct.queue1", durable = "true"),
            exchange = @Exchange(name = "yinshunyu.direct", type = ExchangeTypes.DIRECT),
            key = {"red", "blue"}
    ))
Topic模式:
java
@RabbitListener(bindings = @QueueBinding(
    value = @Queue(name = "topic.queue1"),
    exchange = @Exchange(name = "yinshunyu.topic", type = ExchangeTypes.TOPIC),
    key = "china.#"
))
public void listenTopicQueue1(String msg){
    System.out.println("消费者1接收到topic.queue1的消息:【" + msg + "】");
}

@RabbitListener(bindings = @QueueBinding(
    value = @Queue(name = "topic.queue2"),
    exchange = @Exchange(name = "yinshunyu.topic", type = ExchangeTypes.TOPIC),
    key = "#.news"
))
public void listenTopicQueue2(String msg){
    System.out.println("消费者2接收到topic.queue2的消息:【" + msg + "】");
}
5.消息转换器
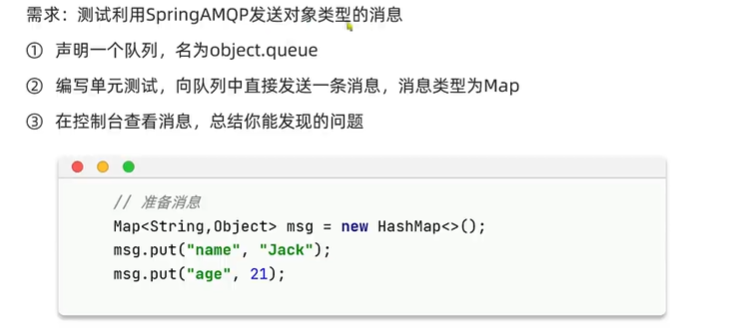
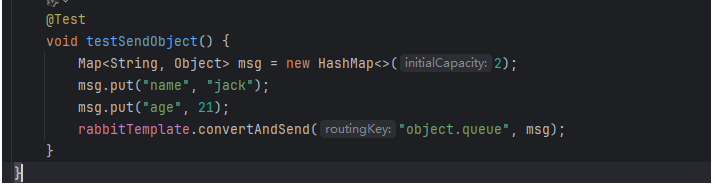
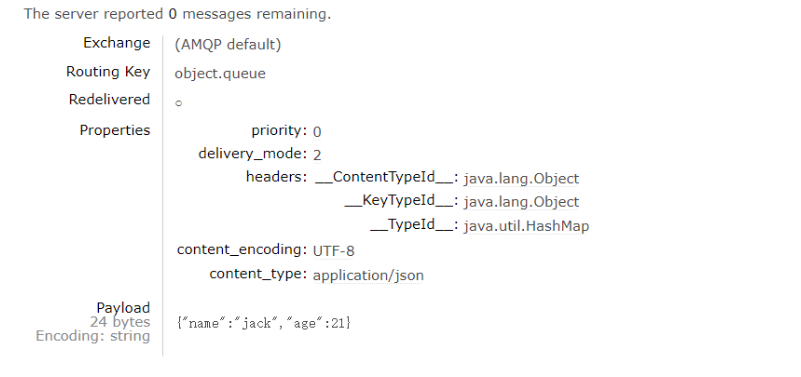
当发送对象:
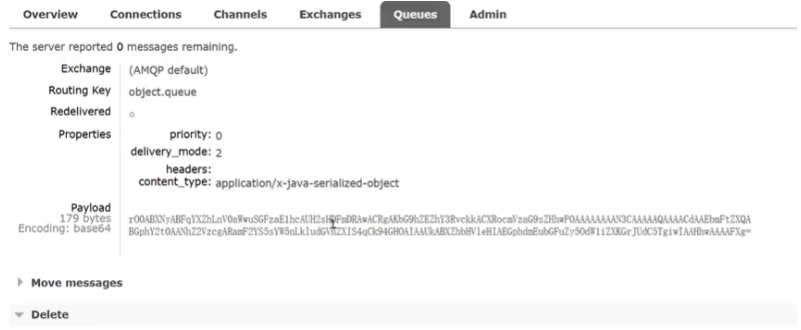
发送后出现乱码:
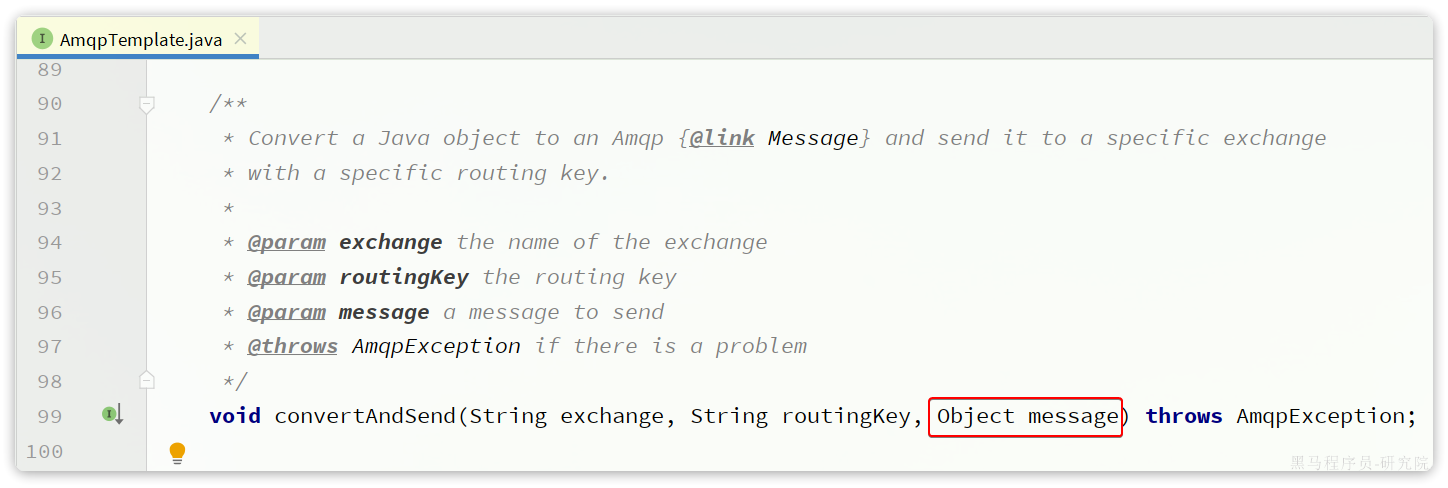
Spring的消息发送代码接收的消息体是一个Object:

而在数据传输时,它会把你发送的消息序列化为字节发送给MQ,接收消息的时候,还会把字节反序列化为Java对象。
只不过,默认情况下Spring采用的序列化方式是JDK序列化。众所周知,JDK序列化存在下列问题:
- 数据体积过大
- 有安全漏洞
- 可读性差
改变默认的消息处理器 ,改为Json序列化代替默认的JDK序列化
在publisher和consumer两个服务中都引入依赖:
xml
<dependency>
    <groupId>com.fasterxml.jackson.dataformat</groupId>
    <artifactId>jackson-dataformat-xml</artifactId>
    <version>2.9.10</version>
</dependency>注意,如果项目中引入了spring-boot-starter-web依赖,则无需再次引入Jackson依赖。
分别在生产者和消费者中注入
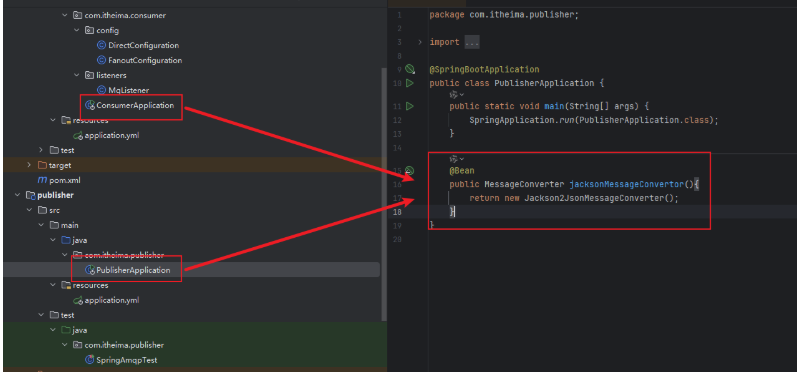
实现:
6.案例------以异步支付通知为例
外链图片转存失败,源站可能有防盗链机制,建议将图片保存下来直接上传
逻辑总结:
1.引入依赖
2.配置mq地址
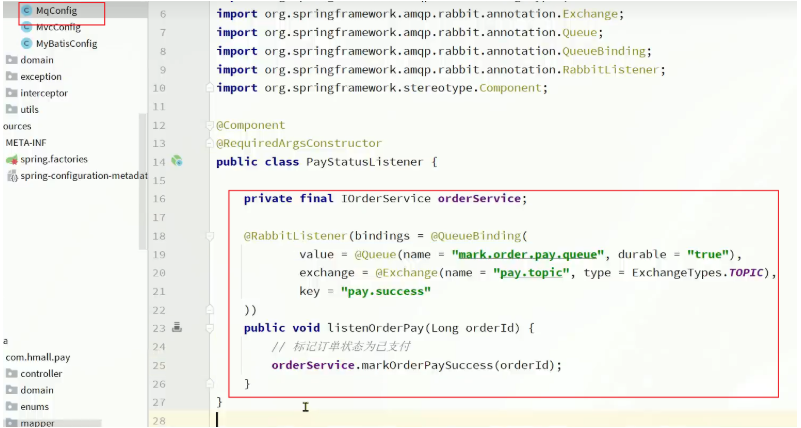
3.编写消息监听器和处理消息的业务逻辑
4.改造业务发送消息