本文参考了 RTX5080显卡CUDA12.8环境下安装mmdetection3d_5080 cuda-CSDN博客 针对linux环境进行了补充验证
1. 创建虚拟环境
conda create --name mmdet3d python=3.9

conda activate mmdet3d

pip install torch torchvision torchaudio --index-url https://download.pytorch.org/whl/cu128  -i https://pypi.tuna.tsinghua.edu.cn/simple
2. 硬件计算能力查看:
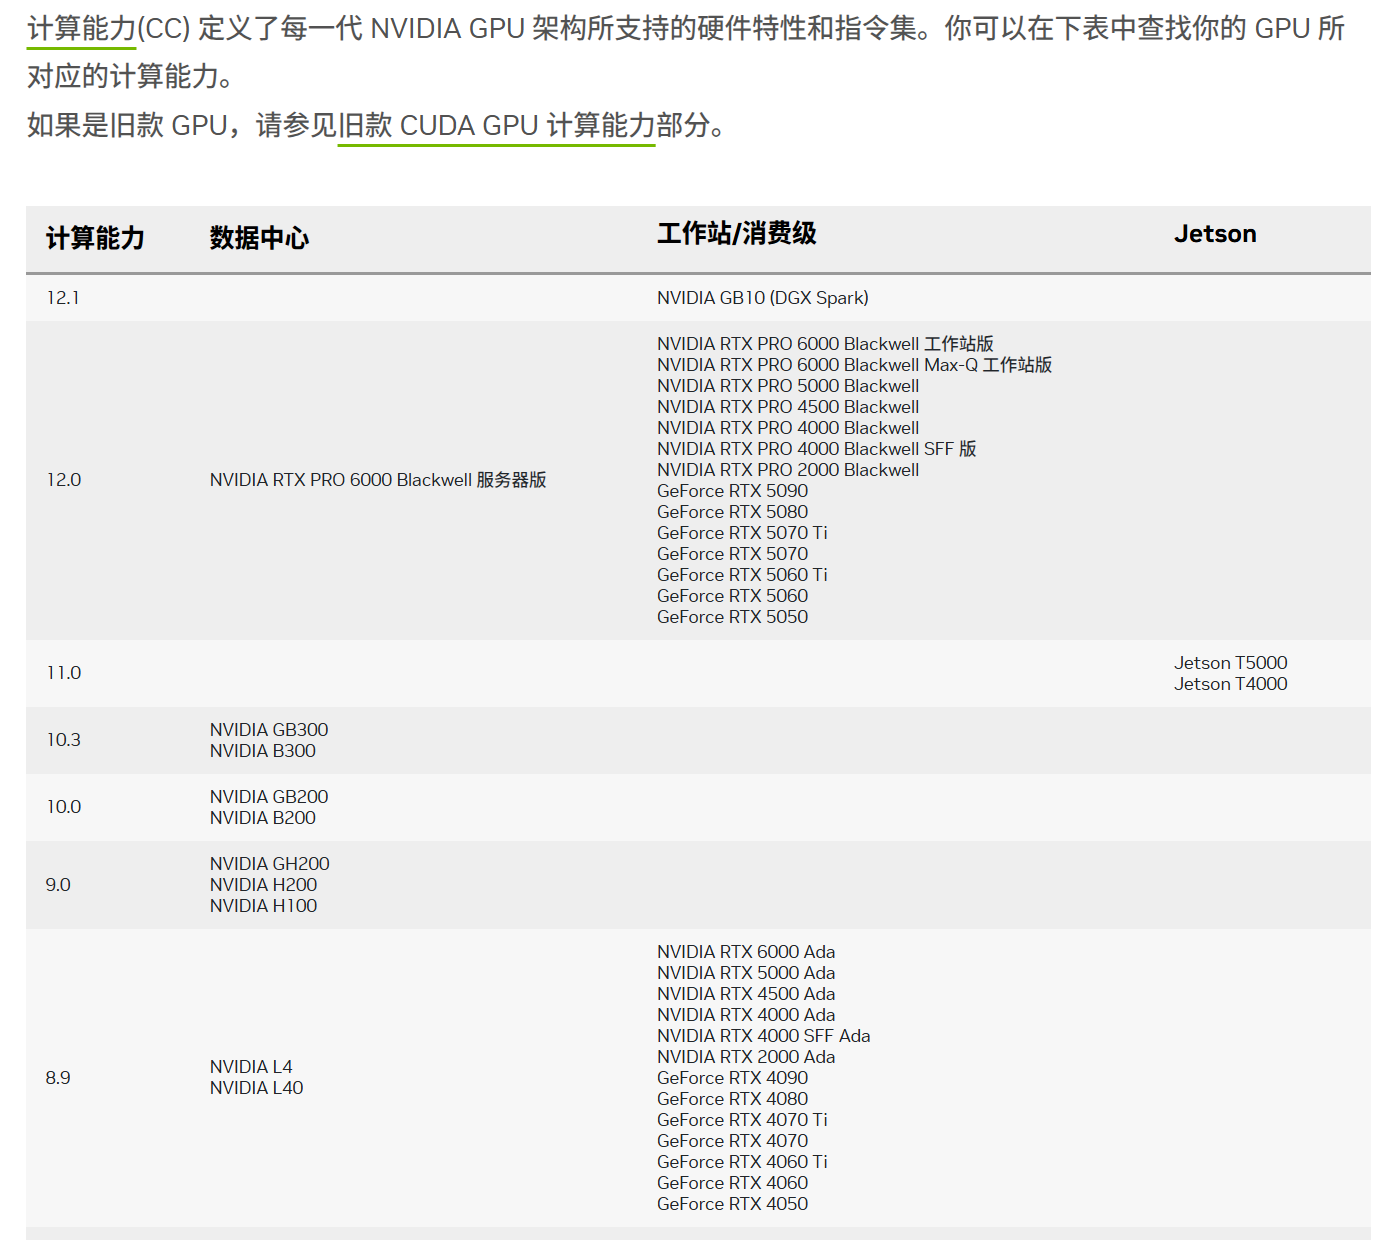
https://developer.nvidia.cn/cuda-gpus ,GeForce RTX 5080 CUDA Capability:12.0
设置计算能力和查看:
python
%% windows
set TORCH_CUDA_ARCH_LIST=12.0
echo %TORCH_CUDA_ARCH_LIST%
set MMCV_WITH_OPS=1
echo %MMCV_WITH_OPS%
set MAX_JOBS=8
echo %MAX_JOBS%

%% linux
export TORCH_CUDA_ARCH_LIST="12.0"
export MAX_JOBS=4
3.mmcv 源码编译
mmcv==2.2.0 版本存在numpy版本问题,因此使用mmcv==2.1.0
对应版本:
mmcv 2.1.0
mmdet 3.2.0
mmdet3d 1.3.0
python
unzip mmcv-2.1.0.zip
cd mmcv-2.1.0/

# windows 安装
# setup.py build_ext  # 如果成功, cl 将被启动用于编译算子 windows 需要
# python setup.py install

# linux安装
export CC=gcc
export CXX=g++
python setup.py build_ext --inplace  # linux 安装


python .dev_scripts/check_installation.py  # 验证是否安装成功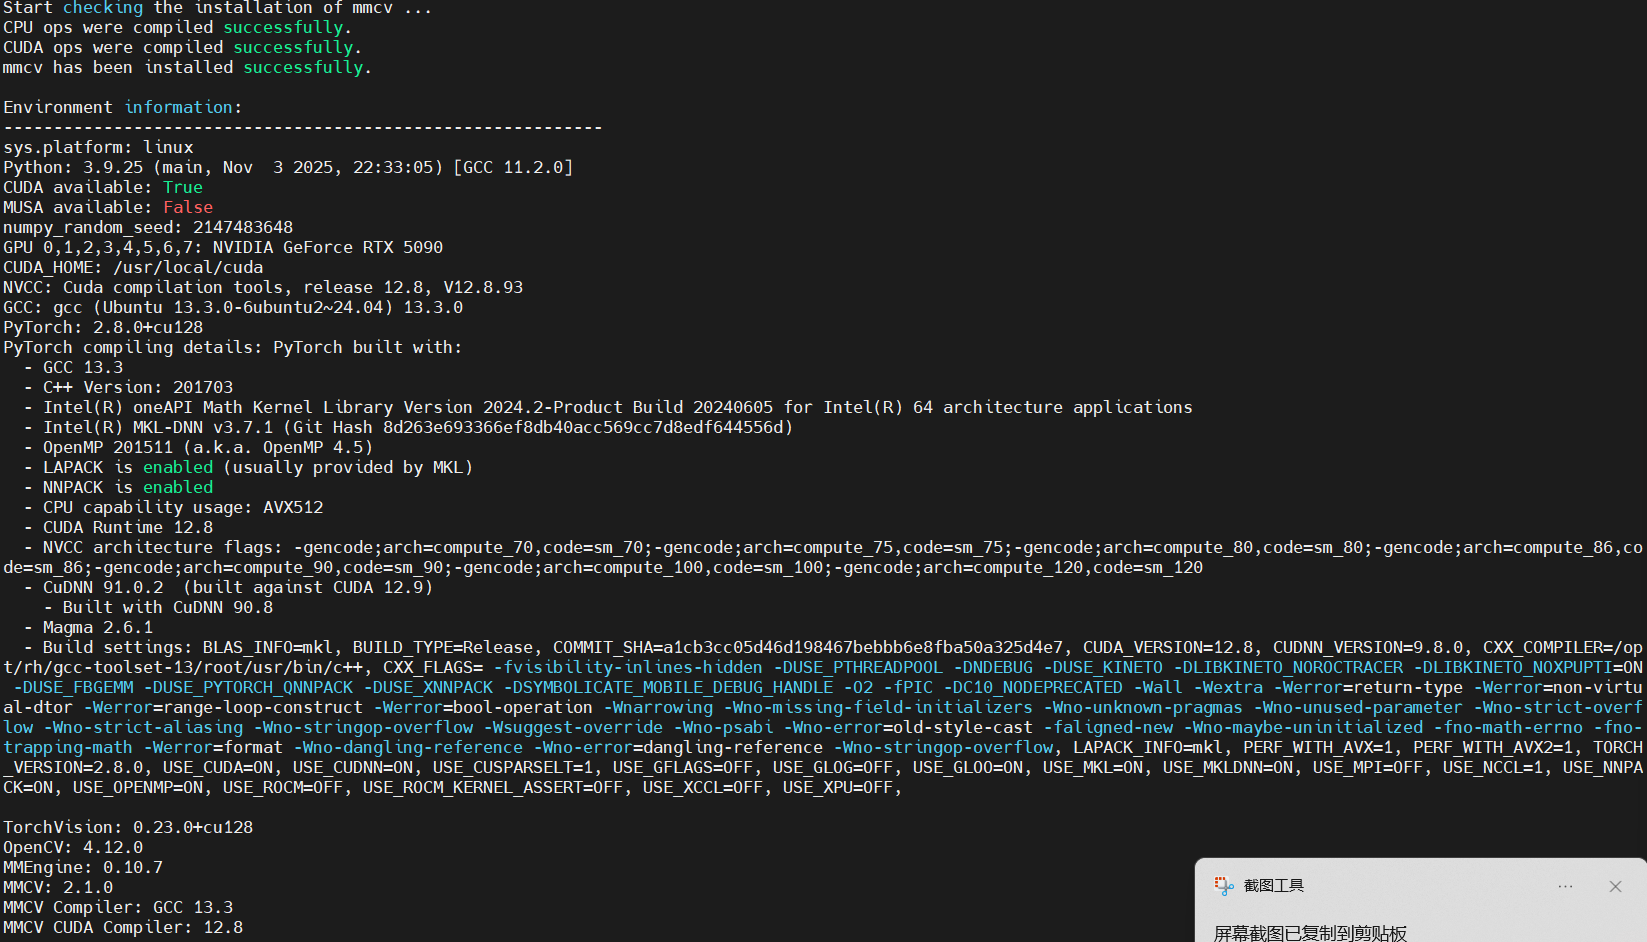
4. 安装mmdetection3d
python
pip install openmim

#下载v1.3.0的mmdet3d
# git clone https://github.com/open-mmlab/mmdetection3d.git -b v1.3.0 目前没有该分支,只有dev-1.x
wget https://github.com/open-mmlab/mmdetection3d/archive/refs/tags/v1.2.0.zip
wget https://github.com/open-mmlab/mmdetection3d/archive/refs/tags/v1.3.0.zip
wget https://github.com/open-mmlab/mmdetection3d/archive/refs/tags/v1.4.0.zip
unzip v1.2.0.zip
cd mmdetection3d-1.2.0


#安装 cumm-cuxxx spconv-cuxxx
pip install cumm-cu128 -i https://pypi.tuna.tsinghua.edu.cn/simple
pip install spconv-cu120 -i https://pypi.tuna.tsinghua.edu.cn/simple

# 使用 --no-build-isolation 禁用构建隔离,使用当前环境的包
pip install -e . --no-build-isolation

# 如果失败 安装对应版本的包
pip install scikit-image==0.21.0 -i https://pypi.tuna.tsinghua.edu.cn/simple
pip install open3d==0.16.0 -i https://pypi.tuna.tsinghua.edu.cn/simple
pip install numba==0.60.0 -i https://pypi.tuna.tsinghua.edu.cn/simple
pip install lyft_dataset_sdk -i https://pypi.tuna.tsinghua.edu.cn/simple
pip install nuscenes-devkit -i https://pypi.tuna.tsinghua.edu.cn/simple
pip install plyfile -i https://pypi.tuna.tsinghua.edu.cn/simple
# 使用 --no-build-isolation 禁用构建隔离,使用当前环境的包
pip install -e . --no-build-isolation


# 设置环境变量,强制使用当前环境
export PIP_NO_BUILD_ISOLATION=1
export PIP_NO_INDEX=0

#配置 mmdet3d中的BEVFusion(所在位置不要改变,./mmdetection3d/)
cd  projects/BEVFusion
# 使用 --no-build-isolation 禁用构建隔离,使用当前环境的包
pip install -e . --no-build-isolation
5.安装其他依赖
python
pip install mmengine -i https://pypi.tuna.tsinghua.edu.cn/simple
pip install mmdet==3.2.0 -i https://pypi.tuna.tsinghua.edu.cn/simple
6. 环境测试
python
# 下载配置文件和模型权重文件。
mim download mmdet3d --config pointpillars_hv_secfpn_8xb6-160e_kitti-3d-car --dest .
# 下载将需要几秒钟或更长时间,这取决于您的网络环境。完成后,您会在当前文件夹中发现两个文件 pointpillars_hv_secfpn_8xb6-160e_kitti-3d-car.py 和 hv_pointpillars_secfpn_6x8_160e_kitti-3d-car_20220331_134606-d42d15ed.pth。

# 推理验证。
# 如果从源码安装 MMDetection3D,那么直接运行以下命令进行验证:
python demo/pcd_demo.py demo/data/kitti/000008.bin pointpillars_hv_secfpn_8xb6-160e_kitti-3d-car.py hv_pointpillars_secfpn_6x8_160e_kitti-3d-car_20220331_134606-d42d15ed.pth --show

# 您会看到一个带有点云的可视化界面,其中包含有在汽车上绘制的检测框。如果你在没有显示设备的服务器上安装 MMDetection3D ,你可以忽略 --show 参数。Demo 仍会将预测结果保存到 outputs/pred/000008.json 文件中。

# 测试时如果出现显示警告:mmengine - WARNING - Display device not found. --show is forced to False
set DISPLAY=127.0.0.1:0


# 测试BEVFusion
# 使用 BEVFusion model进行测试: https://drive.google.com/file/d/1QkvbYDk4G2d6SZoeJqish13qSyXA4lp3/view?usp=share_link
# 安装BEVFusion
python projects/BEVFusion/setup.py develop 7.将 NumPy 降级到兼容的 1.x 版本。
出现A module that was compiled using NumPy 1.x cannot be run in NumPy 2.0.2 as it may crash. To support both 1.x and 2.x versions of NumPy, modules must be compiled with NumPy 2.0. Some module may need to rebuild instead e.g. with 'pybind11>=2.12'. If you are a user of the module, the easiest solution will be to downgrade to 'numpy<2' or try to upgrade the affected module. We expect that some modules will need time to support NumPy 2.
python
# 使用 --no-deps 选项防止降级numpy时误卸载其他关键包(如torch)
pip install "numpy<2" --no-deps --force-reinstall -i https://pypi.tuna.tsinghua.edu.cn/simple

# 为了确保 matplotlib 等库与新版本numpy协调,最好也重装一下
pip install --upgrade matplotlib -i https://pypi.tuna.tsinghua.edu.cn/simple