前言
截止到目前,目标检测的功能还是yolo模型落地性更强。但大模型也已经全面开花,所以也尝试下使用大模型来完成目标检测的训练,看看其效果如何,看看它在目标检测上有怎样的优势。
本次选用qwen2.5-VL,一开始使用github上阅读性强的工程训练,总觉得差些意思。
于是决定自己手搓个大模型训练推理工程,emm...,预测效果也是差强人意。
兜兜转转还是使用个高star的工程,先跑通得到想要的效果。后面再阅读核心代码掌握大模型训练过程吧一 llama factory的部署
【大模型】LLaMA-Factory的环境配置、微调模型与测试 的第二章节,已经介绍了工程安装步骤,整个过程比较流畅。(其余章节介绍了在文本上的大模型微调的过程)
二 llama factory的配置文件介绍
github上给出的训练命令:
bashllamafactory-cli train examples/train_lora/qwen2_5vl_lora_sft.yaml以此为切入点,来看看训练自己模型时需要关注的内容,这里先陈列出
- examples/qwen2_5vl_lora_sft.yaml
- data/mllm_demo.jsonl
2.1 配置文件 qwen2_5vl_lora_sft.yaml
该文件中配置了大模型训练过程中所有的参数,包括:
- model 模型的选择与配置、
- method 训练方式、
- dataset 数据集、
- output 训练时输出信息、
- train 训练参数。
现阶段要跑通工程需要关注的有:
model、dataset
2.2 model 模型的设置
【examples/qwen2_5vl_lora_sft.yaml】 中的
model_name_or_path
- 设置为自己微调的大模型名称,工程会自动从huggingface中拉取模型。但这种方式不建议,网络限制和不稳定等原因,会让下载过程很不稳定。
- 设置为已经下载到本地大模型的绝对路径。该方式需要提前将大模型下载下来
2.3 数据集的关联
【examples/qwen2_5vl_lora_sft.yaml】 中的
dataset: mllm_demo
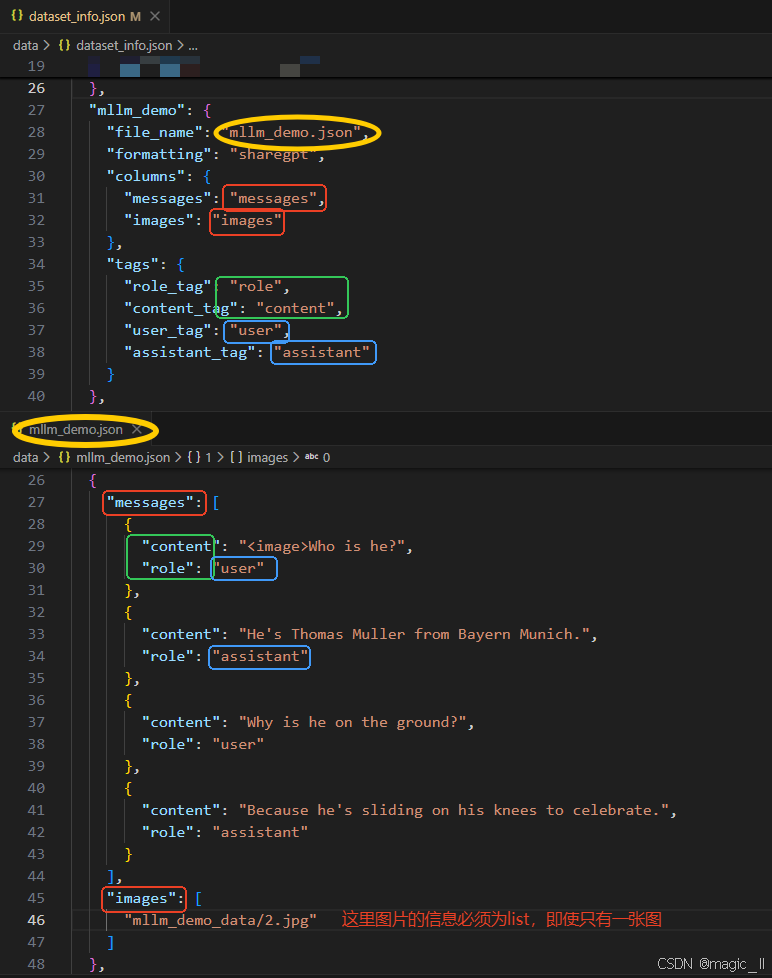
对应文件【data/dataset_info.json】的 mllm_demo,内容如下:
json... { "mllm_demo": { "file_name": "mllm_demo.json", # 数据文件 "formatting": "sharegpt", # 数据格式 "columns": { "messages": "messages", "images": "images" }, "tags": { "role_tag": "role", "content_tag": "content", "user_tag": "user", "assistant_tag": "assistant" } }, }数据文件 【data/mllm_demo.json】
最小单元内容
json{ "messages": [ { "content": "<image>Who is he?", "role": "user" }, { "content": "He's Thomas Muller from Bayern Munich.", "role": "assistant" }, { "content": "Why is he on the ground?", "role": "user" }, { "content": "Because he's sliding on his knees to celebrate.", "role": "assistant" } ], "images": [ "mllm_demo_data/2.jpg" ] },
这两个文件中,变量的命名是有对应性的。对应效果如图所示:图片上半部分为dataset_info.json 的内容,下半部分为 mllm_demo.json的内容。相同颜色的框内的变量命名一定是要一致的。三 使用llamafacotry训练目标检测
3.1 qwen2.5-VL-3B 的下载
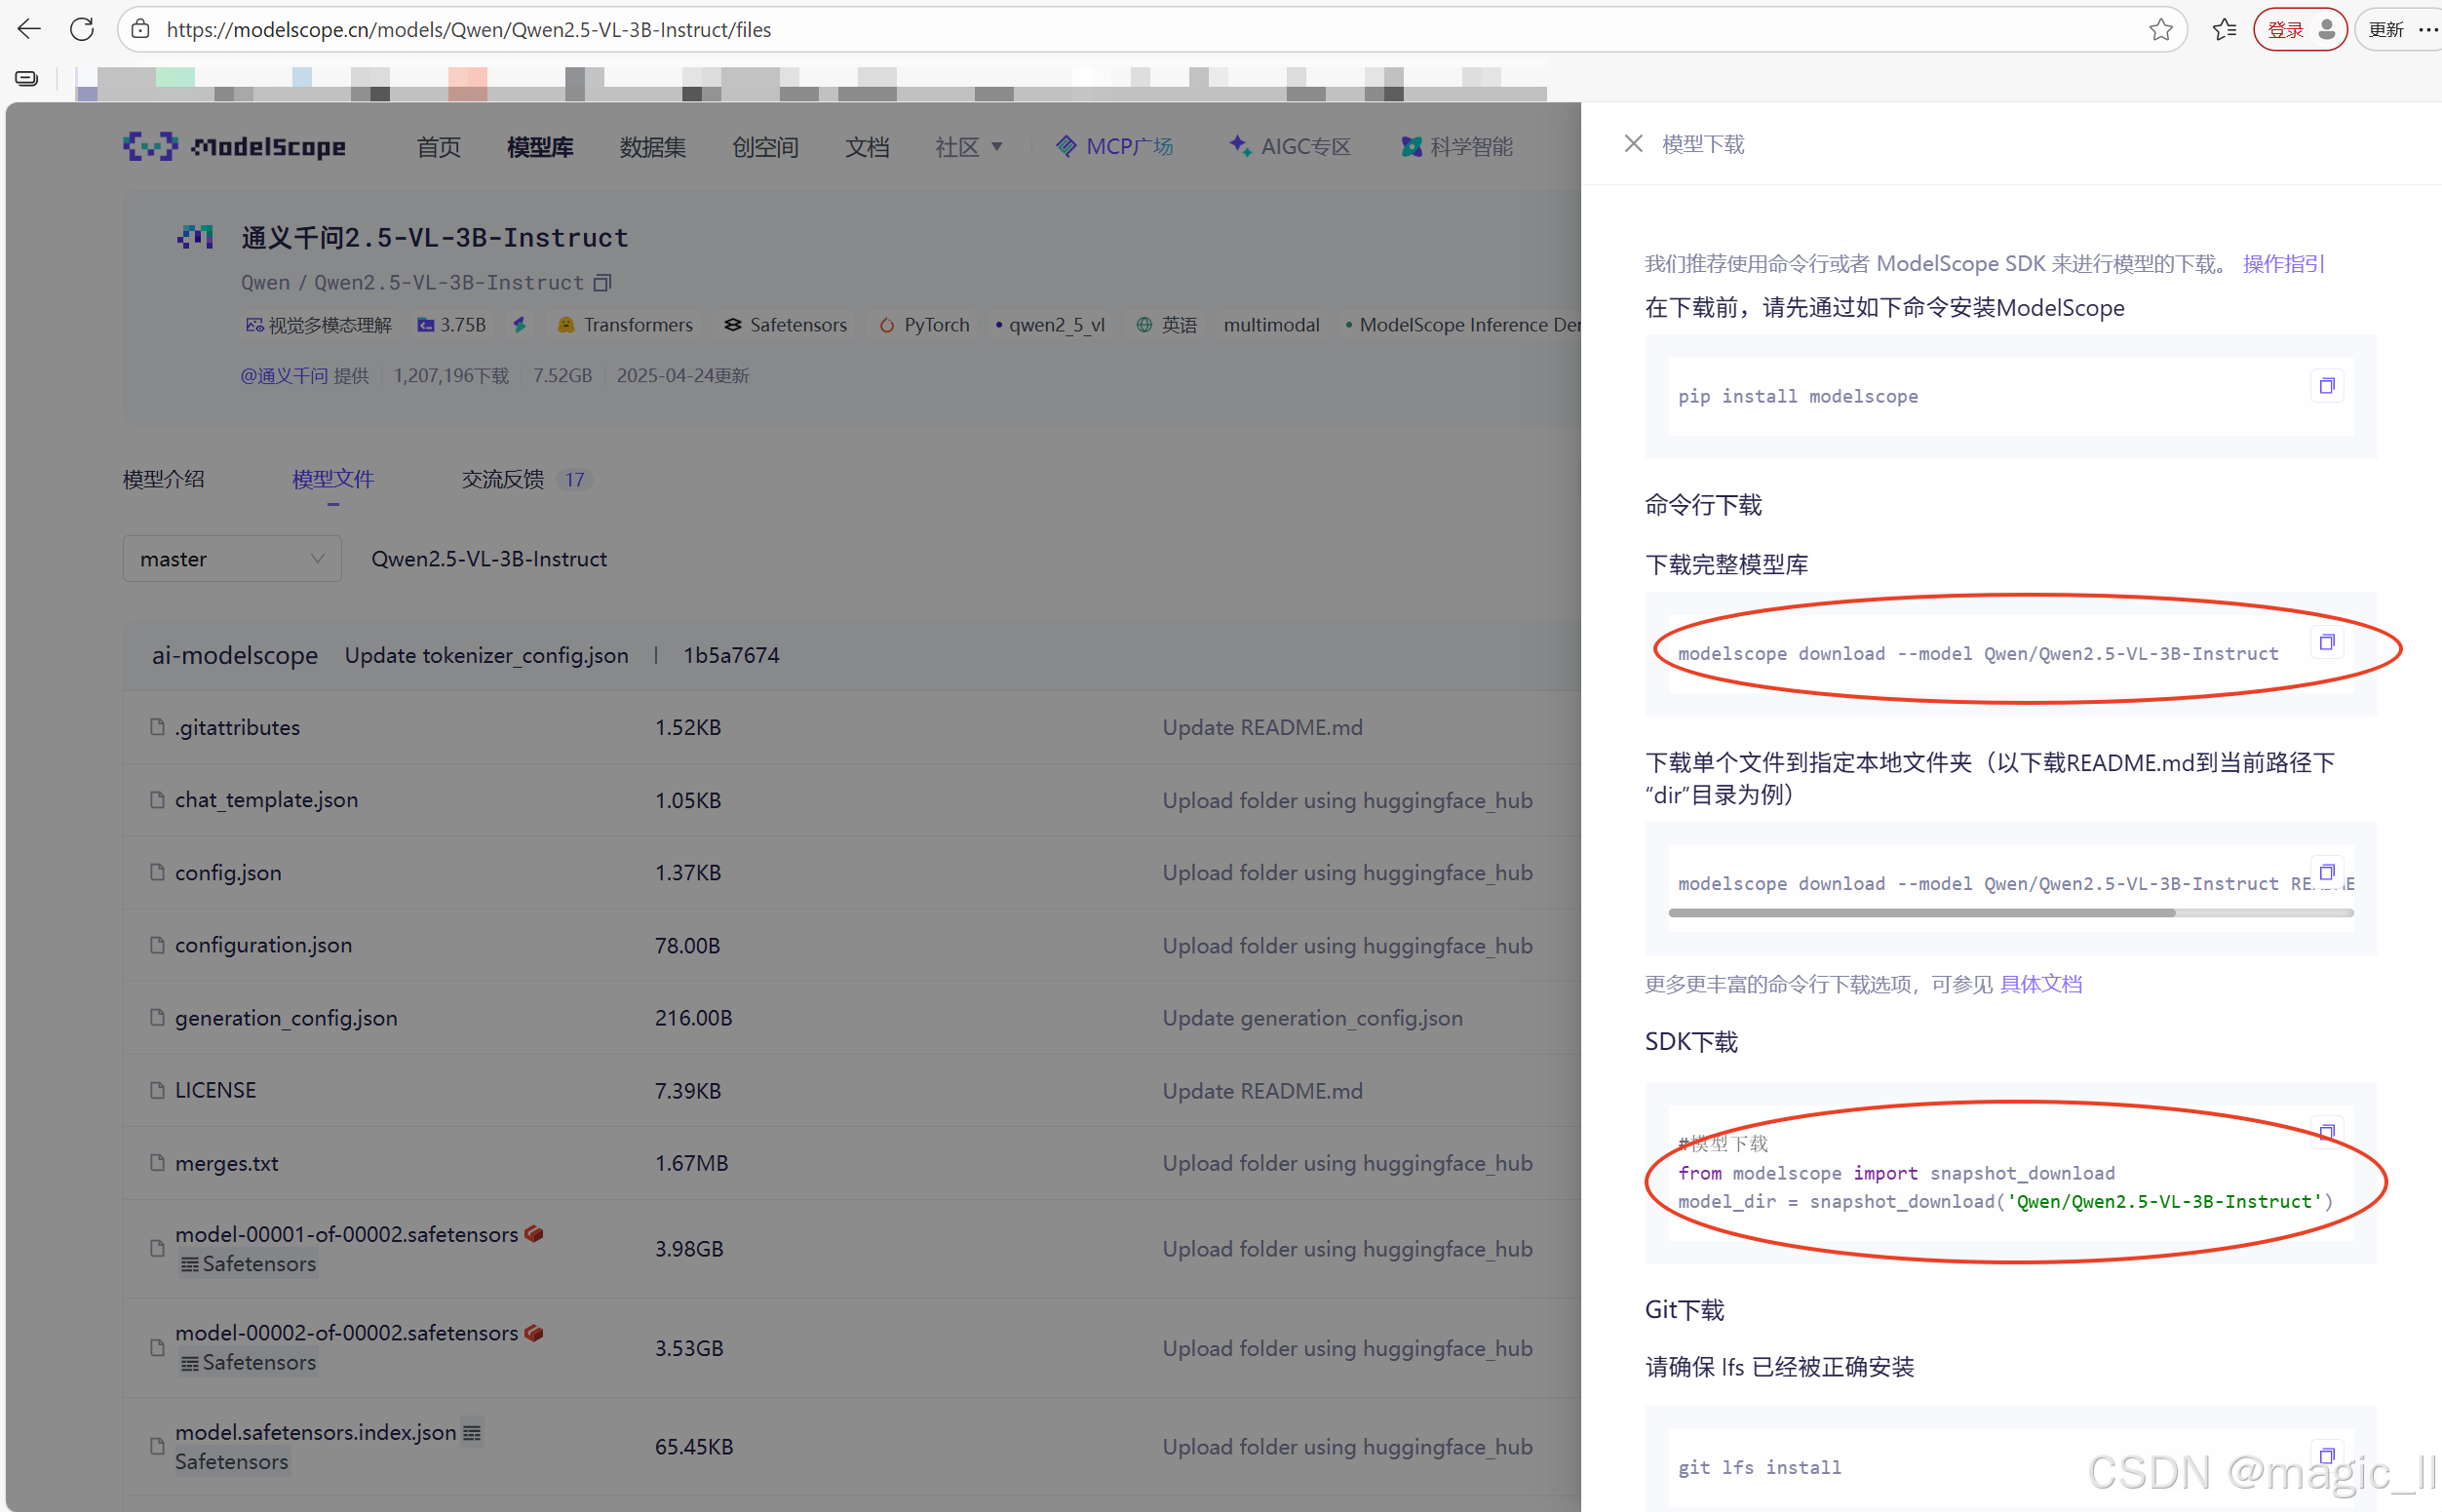
使用modelscope 下载qwen2.5-VL-3B模型
- 首先确定虚拟环境中安装了modelscope
- modelscope官网 搜索qwen2.5-VL,最终找到界面如下。
本人尝试用的下载方式为图中圈出的两种
方式一:
bashmodelscope download --model Qwen/Qwen2.5-VL-3B-Instruct --local_dir [本地下载路径]方式二:
pythonfrom modelscope.hub.snapshot_download import snapshot_download # 定义模型ID和本地目标路径 model_id = 'qwen/Qwen2.5-VL-3B-Instruct' local_dir = '~/llm_models/Qwen2.5-VL' # 下载模型 model_dir = snapshot_download(model_id, cache_dir=local_dir, revision='master') print(f"模型已下载至: {model_dir}")
3.2 训练数据的格式转换
已有的目标检测框保存的格式为labelme的json格式。现在需要将该种标签,转换成与mllm_demo一致的数据格式。
一般的数据处理,仅在生成训练时需要的jsonl 时,使用官方提供的smart_resize 获取图片resize后应该有的尺寸,使用该尺寸处理检测框,无需resize图片。图片的resize操作,放在工程的图像预处理中。
但这里为了尽可能减少出错的可能性,同时处理了图片和标签,将训练的图片和标签一开始就对齐,保存到新的路径下。
【图像与边界框的协同处理】
原始图片: 640×428 像素
经过smart_resize处理后: 644×420 像素
模型输入要求
- Qwen2.5-VL使用Vision Transformer架构
- 需要将图片分割成28×28的patch
- 输入尺寸必须是28的倍数
python# 约束1: 能被factor整除。调整后的尺寸必须是28的倍数 # 这是因为Vision Transformer使用28×28的patch # new_height % 28 == 0、new_width % 28 == 0 round(640/28)×28 = 23×28 = 644(宽度) round(428/28)×28 = 15×28 = 420(高度)计算效率考虑
- 固定尺寸便于批处理
- 避免内存溢出(通过max_pixels限制)
- 避免太小影响效果(通过min_pixels保证)
python# 约束2: 像素总数在指定范围内 min_pixels = 56×56 = 3,136 像素 max_pixels = 14×14×4×1280 = 1,003,520 像素 # 14×14是patch网格,4是某种设计参数,1280是模型维度 检查像素数:644×420 = 270,480 像素,在 3136 和 1003520之间 最终尺寸:644×420 像素保持空间关系
相对位置不变:如果原始框在图片中心,缩放后仍在中心
相对大小不变:框与图片的比例关系保持不变
纵横比不变:不会发生形变
注意 :由于需要同时满足"能被28整除"和"保持宽高比"这两个要求,在实际操作中存在内在矛盾。当原始图片尺寸不是28的倍数时,完美保持宽高比在数学上是不可能的。因此,
smart_resize函数采取了一种近似保持 的策略:
- 分别调整 :将高度和宽度分别四舍五入到最接近的28的倍数
- 轻微形变 :接受由此产生的轻微纵横比变化(通常在1-3%范围内)
- 权衡选择:相较于填充法(增加无效像素)或裁剪法(丢失图像信息),这种轻微形变是更好的权衡
这种处理在保持图像主要内容不变的同时,确保了模型输入要求
关键注意事项
- a 坐标系统:始终是绝对像素坐标,不是相对坐标(百分比)
- b 舍入处理 :使用
round()四舍五入,可能引入1像素误差- c 边界保护:防止坐标超出图像边界
- d 保持有效性 :确保转换后仍然是有效的矩形(x2≥x1, y2≥y1)
为了工程的可观整洁,在根目录创建文件夹【LL_own】。
创建数据处理脚本【LL_own/data_deal.py】,在实验阶段,尽可能的保持问题可控性,我将图片resize到固定的、模型可接受的尺寸,同时将标签同等映射处理。具体实现如下:
pythonimport json, glob, os, math, cv2 from pathlib import Path from typing import List, Tuple, Dict, Optional class Qwen2_5VLProcessor: """ 封装 Qwen2.5-VL 训练数据前置处理: 1. 按官方规则 smart-resize 图片 2. 同步映射 bbox 3. 保存 resize 后图片 4. 生成官方格式的 jsonl 样本 """ def __init__( self, factor: int = 28, min_pixels: int = 56 * 56, max_pixels: int = 14 * 14 * 4 * 1280, long_edge_range: Tuple[int, int] = (642, 644), target_label: str = "甲下损坏", ): self.factor = factor self.min_pixels = min_pixels self.max_pixels = max_pixels self.long_edge_range = long_edge_range self.target_label = target_label # ------------- private ------------- def _smart_resize(self, h: int, w: int) -> Tuple[int, int]: lo, hi = self.long_edge_range long = max(h, w) if long < lo: scale = lo / long elif long > hi: scale = hi / long else: scale = 1.0 h, w = int(h * scale), int(w * scale) if h < self.factor or w < self.factor: raise ValueError(f"height:{h} or width:{w} must be larger than factor:{self.factor}") if max(h, w) / min(h, w) > 200: raise ValueError("absolute aspect ratio must be smaller than 200") h_bar = round(h / self.factor) * self.factor w_bar = round(w / self.factor) * self.factor if h_bar * w_bar > self.max_pixels: beta = math.sqrt((h * w) / self.max_pixels) h_bar = math.floor(h / beta / self.factor) * self.factor w_bar = math.floor(w / beta / self.factor) * self.factor elif h_bar * w_bar < self.min_pixels: beta = math.sqrt(self.min_pixels / (h * w)) h_bar = math.ceil(h * beta / self.factor) * self.factor w_bar = math.ceil(w * beta / self.factor) * self.factor return h_bar, w_bar @staticmethod def _shape2xyxy(points: List[List[float]]) -> List[int]: xs, ys = zip(*points) return [round(min(xs)), round(min(ys)), round(max(xs)), round(max(ys))] def _map_bbox(self, bbox: List[int], oh: int, ow: int, nh: int, nw: int) -> List[int]: x1, y1, x2, y2 = bbox scale_x, scale_y = nw / ow, nh / oh x1 = max(0, min(round(x1 * scale_x), nw - 1)) y1 = max(0, min(round(y1 * scale_y), nh - 1)) x2 = max(0, min(round(x2 * scale_x), nw - 1)) y2 = max(0, min(round(y2 * scale_y), nh - 1)) return [x1, y1, x2, y2] # ------------- public ------------- def process_one(self, json_path: str, img_path: str, save_img_dir: Optional[str] = None) -> Optional[Dict]: """ 单张图+labelme json -> 返回官方格式 dict(含新图片保存路径) """ json_path, img_path = Path(json_path), Path(img_path) ann = json.loads(json_path.read_text(encoding="utf-8")) orig_h, orig_w = ann["imageHeight"], ann["imageWidth"] # 1. smart resize 尺寸 new_h, new_w = self._smart_resize(orig_h, orig_w) # 2. 处理 bbox 与 label boxes, labels = [], [] for shape in ann["shapes"]: if shape["shape_type"] != "rectangle": continue if self.target_label not in shape["label"]: continue bbox = self._shape2xyxy(shape["points"]) bbox = self._map_bbox(bbox, orig_h, orig_w, new_h, new_w) boxes.append(bbox) labels.append(shape["label"]) if not boxes: return None # 3. 读取并 resize 图片 img = cv2.imread(str(img_path)) if img is None: raise ValueError(f"cannot read image: {img_path}") img_res = cv2.resize(img, (new_w, new_h), interpolation=cv2.INTER_LINEAR) # 4. 保存图片 if save_img_dir: save_path = Path(save_img_dir) / img_path.name cv2.imwrite(str(save_path), img_res) else: save_path = img_path # 不保存时仍返回原路径 return { "id": img_path.stem, "images": [str(save_path)], "messages": [ {"role": "user", "content": "<image>\n找出图中所有目标,给出类别和检测框。"}, {"role": "assistant", "content": json.dumps({"boxes": boxes, "labels": labels}, ensure_ascii=False)}, ], } def process_batch(self, json_dir: str, out_jsonl: str, save_img_dir: str = None, img_dir_replace: Tuple[str, str] = ("Annotations", "JPEGImages")): """ 批量把目录下所有 labelme json 转成 jsonl json_dir: labelme json 目录 out_jsonl: 输出 jsonl 路径 img_dir_replace: 把 json 路径中的字符串替换成图片目录,用于自动找图 """ json_files = sorted(glob.glob(os.path.join(json_dir, "*.json"))) if not json_files: raise ValueError(f"no json found in {json_dir}") Path(out_jsonl).parent.mkdir(parents=True, exist_ok=True) if save_img_dir: Path(save_img_dir).mkdir(parents=True, exist_ok=True) written = 0 with open(out_jsonl, "w", encoding="utf-8") as fw: for jf in json_files: # 自动找图:把 Annotations → JPEGImages,并匹配任意后缀 img_dir = jf.replace(img_dir_replace[0], img_dir_replace[1]) img_files = glob.glob(img_dir.replace(".json", ".*")) if not img_files: print(f"[WARN] skip {jf}: image not found") continue sample = self.process_one(jf, img_files[0], save_img_dir) if sample: fw.write(json.dumps(sample, ensure_ascii=False) + "\n") written += 1 print(f"✅ 完成!共转换 {written}/{len(json_files)} 条样本 -> {out_jsonl}") # -------------------------------- usage -------------------------------- if __name__ == "__main__": proc = Qwen2_5VLProcessor( target_label="损坏", # 只保留该标签的框 ) # 批量转换 proc.process_batch( json_dir="/opt/ai-platform/lldataset/DATASET/detect/traindataset/*/Annotations", out_jsonl="qwen_det2/train_part.jsonl", save_img_dir="/home/LL/workfile_2026/12-QwenVL/LLaMA-Factory/LL_own/qwen_det2/resized_imgs", # resize 后图片保存目录,None 则不保存 )生成文件【LL_own/qwen_det2/train.jsonl】【LL_own/qwen_det2/resized_imgs/*】 jsonl 文件可用于模型训练。
【生成的数据结束后,进行可视化】代码如下
python""" 可视化 jsonl 样本(Qwen2.5-VL 格式) 用法: python visualize_jsonl.py \ --jsonl qwen_det2/train_part.jsonl \ --vis_dir qwen_det2/vis_jsonl \ --max 50 """ import json, random, cv2, os from pathlib import Path import argparse def draw_boxes(img_path: str, boxes: list, labels: list, out_path: str, thickness=2): """把框画到图上并保存""" img = cv2.imread(img_path) if img is None: raise FileNotFoundError(img_path) # 固定颜色表 color_map = {} for bbox, label in zip(boxes, labels): if label not in color_map: color_map[label] = tuple(random.randint(0, 255) for _ in range(3)) color = color_map[label] x1, y1, x2, y2 = map(int, bbox) cv2.rectangle(img, (x1, y1), (x2, y2), color, thickness) cv2.putText(img, label, (x1, y1 - 5), cv2.FONT_HERSHEY_SIMPLEX, 0.7, color, thickness) cv2.imwrite(out_path, img) return color_map def main(jsonl: str, vis_dir: str, max_samples: int): vis_dir = Path(vis_dir) vis_dir.mkdir(parents=True, exist_ok=True) lines = Path(jsonl).read_text(encoding='utf-8').strip().splitlines() if not lines: print('jsonl 为空') return # 随机抽查 if 0 < max_samples < len(lines): lines = random.sample(lines, max_samples) for idx, line in enumerate(lines, 1): data = json.loads(line) img_file = data['images'][0] # 第一张图 assistant = json.loads(data['messages'][1]['content']) boxes, labels = assistant['boxes'], assistant['labels'] out_file = vis_dir / f"{Path(img_file).stem}_vis.jpg" draw_boxes(img_file, boxes, labels, str(out_file)) print(f'[{idx:>3}/{len(lines)}] 已画框 -> {out_file}') input() print(f'✅ 全部完成,共输出 {len(lines)} 张到 {vis_dir}') if __name__ == '__main__': parser = argparse.ArgumentParser(description='可视化 Qwen2.5-VL 格式的 jsonl') parser.add_argument('--jsonl', help='输入 jsonl 路径') parser.add_argument('--vis_dir', help='可视化结果保存目录') parser.add_argument('--max', type=int, default=0, help='最多画多少张(0=全部)', ) args = parser.parse_args() args.jsonl = "qwen_det2/train_part.jsonl" args.vis_dir = "vis/" main(args.jsonl, args.vis_dir, args.max)
3.3 配置文件的修改
如第二章节介绍,
我们需要修改两个文件内的配置。
【examples/train_lora/qwen2_5vl_lora_sft.yaml】
复制文件:
bashcp examples/train_lora/qwen2_5vl_lora_sft.yaml examples/train_lora/qwen2_5vl_own.yaml修改文件:
yaml### model model_name_or_path: /home/LL/llm_models/Qwen2.5-VL/Qwen/Qwen2___5-VL-3B-Instruct image_max_pixels: 262144 video_max_pixels: 16384 trust_remote_code: true ### method stage: sft do_train: true finetuning_type: lora lora_rank: 8 lora_target: all ### dataset dataset: train_det template: qwen2_vl cutoff_len: 2048 max_samples: 20000 # 注意:该参数会限制训练样本数量 overwrite_cache: true preprocessing_num_workers: 16 dataloader_num_workers: 4 ### output output_dir: ./LL_own/save/train_detect_3B # 注意:根据自己实际情况修改 logging_steps: 10 save_steps: 500 plot_loss: true overwrite_output_dir: true save_only_model: false report_to: none # choices: [none, wandb, tensorboard, swanlab, mlflow] ### train per_device_train_batch_size: 8 # 注意:符合自己的显存大小 gradient_accumulation_steps: 8 learning_rate: 1.0e-5 # 注意:学习率根据自己实际情况修改 num_train_epochs: 6.0 lr_scheduler_type: cosine warmup_ratio: 0.1 bf16: true ddp_timeout: 180000000 resume_from_checkpoint: null ### eval # val_size: 0.1 # per_device_eval_batch_size: 1 # eval_strategy: steps # eval_steps: 500【data/dataset_info.json】
json..., "train_det":{ "file_name": "/home/LL/workfile_2026/12-QwenVL/LLaMA-Factory/LL_own/qwen_det2/train.jsonl", "formatting": "sharegpt", "columns": { "messages": "messages", "images": "images" }, "tags": { "role_tag": "role", "content_tag": "content", "user_tag": "user", "assistant_tag": "assistant" } } }
3.4 开启微调训练
bashllamafactory-cli train examples/train_lora/qwen2_5vl_own.yaml
四 训练好的模型的推理
训练结束后,得到lora模型,为了方便后续的使用,所以实现了脱离llamafactory的推理。
- 图片的resize
- 送进大模型推理
- 预测结果解析
- 检测框的反向映射
python# qwen25vl_detector.py import json import re import math from pathlib import Path from typing import List, Dict, Tuple, Optional import cv2 import torch import numpy as np from PIL import Image from transformers import Qwen2_5_VLForConditionalGeneration, AutoProcessor from qwen_vl_utils import process_vision_info from peft import PeftModel class Qwen25VLDetector: def __init__( self, base_model: str, lora_path: str, device_map: str = "auto", factor: int = 28, min_pixels: int = 56 * 56, max_pixels: int = 14 * 14 * 4 * 1280, long_edge_range: Tuple[int, int] = (642, 644), prompt: str = "找出图中所有目标,给出类别和检测框。", ): self.base_model = base_model self.lora_path = lora_path self.device_map = device_map self.factor = factor self.prompt = prompt self.min_pixels = min_pixels self.max_pixels = max_pixels self.long_edge_range = long_edge_range # 编译正则 self._box_pat = re.compile(r'"boxes":\s*(\[\[.*?\]\])') self._lab_pat = re.compile(r'"labels":\s*(\[.*?\])') self._load_model() self.warmup() # 可选:提前跑一次,减少首次延迟 # ---------- 公有接口 ---------- def detect(self, image: Image.Image) -> List[Dict]: """返回原图坐标系下的检测框""" return self._run(image, visualize=False) def detect_visualize( self, image: Image.Image, save_path: Optional[str] = None ) -> List[Dict]: """带框可视化,默认保存为 vis.jpg""" results = self._run(image, visualize=True, save_path=save_path) return results def warmup(self): """空图热身,让 CUDA graph 编译""" dummy = Image.new("RGB", (224, 224), (114, 114, 114)) _ = self.detect(dummy) print("[Warmup] Done.") # ---------- 内部逻辑 ---------- def _load_model(self): print("[Model] Loading base model...") model = Qwen2_5_VLForConditionalGeneration.from_pretrained( self.base_model, torch_dtype=torch.bfloat16, device_map=self.device_map, trust_remote_code=True, ) print("[Model] Loading LoRA...") model = PeftModel.from_pretrained(model, self.lora_path) model = model.merge_and_unload() model.eval() processor = AutoProcessor.from_pretrained( self.base_model, trust_remote_code=True ) self.model = model self.processor = processor def _smart_resize(self, h: int, w: int) -> Tuple[int, int]: lo, hi = self.long_edge_range long = max(h, w) if long < lo: scale = lo / long elif long > hi: scale = hi / long else: scale = 1.0 h, w = int(h * scale), int(w * scale) if h < self.factor or w < self.factor: raise ValueError(f"height:{h} or width:{w} must be larger than factor:{self.factor}") if max(h, w) / min(h, w) > 200: raise ValueError("absolute aspect ratio must be smaller than 200") h_bar = round(h / self.factor) * self.factor w_bar = round(w / self.factor) * self.factor if h_bar * w_bar > self.max_pixels: beta = math.sqrt((h * w) / self.max_pixels) h_bar = math.floor(h / beta / self.factor) * self.factor w_bar = math.floor(w / beta / self.factor) * self.factor elif h_bar * w_bar < self.min_pixels: beta = math.sqrt(self.min_pixels / (h * w)) h_bar = math.ceil(h * beta / self.factor) * self.factor w_bar = math.ceil(w * beta / self.factor) * self.factor return h_bar, w_bar def _preprocess(self, img: Image.Image) -> Tuple[Image.Image, float, float]: w, h = img.size new_h, new_w = self._smart_resize(h, w) # 返回 (h, w) scaled = img.resize((new_w, new_h), Image.LANCZOS) sx, sy = w / new_w, h / new_h return scaled, sx, sy def _run( self, image: Image.Image, visualize: bool = False, save_path: Optional[str] = None, ) -> List[Dict]: # 1. 预处理 scaled, sx, sy = self._preprocess(image) # 2. 构造对话 messages = [ { "role": "user", "content": [ {"type": "image", "image": scaled}, {"type": "text", "text": self.prompt}, ], } ] text = self.processor.apply_chat_template( messages, tokenize=False, add_generation_prompt=True ) image_inputs, video_inputs = process_vision_info(messages) inputs = self.processor( text=[text], images=image_inputs, videos=video_inputs, padding=True, return_tensors="pt", ).to(self.model.device) # 3. 推理 with torch.no_grad(): generated_ids = self.model.generate( **inputs, max_new_tokens=512, do_sample=False ) generated_ids_trimmed = [ out_ids[len(in_ids) :] for in_ids, out_ids in zip(inputs.input_ids, generated_ids) ] result = self.processor.batch_decode( generated_ids_trimmed, skip_special_tokens=True, clean_up_tokenization_spaces=False, )[0] # 4. 解析 JSON boxes, labels = self._parse_result(result) # 坐标还原到原图 boxes = [[x1 * sx, y1 * sy, x2 * sx, y2 * sy] for x1, y1, x2, y2 in boxes] # 5. 可视化 if visualize: self._visualize(image, boxes, labels, save_path) return [{"label": lab, "box": box} for lab, box in zip(labels, boxes)] def _parse_result(self, text: str) -> Tuple[List, List]: box_match = self._box_pat.search(text) lab_match = self._lab_pat.search(text) boxes = json.loads(box_match.group(1)) if box_match else [] labels = json.loads(lab_match.group(1)) if lab_match else [] return boxes, labels def _visualize( self, image: Image.Image, boxes: List[List[float]], labels: List[str], save_path: Optional[str] = None, ): img_cv = cv2.cvtColor(np.array(image), cv2.COLOR_RGB2BGR) for (x1, y1, x2, y2), lab in zip(boxes, labels): x1, y1, x2, y2 = int(x1), int(y1), int(x2), int(y2) cv2.rectangle(img_cv, (x1, y1), (x2, y2), (0, 255, 0), 2) cv2.putText( img_cv, lab, (x1, y1 - 5), cv2.FONT_HERSHEY_SIMPLEX, 0.8, (0, 255, 0), 2, ) if save_path is None: save_path = "vis.jpg" cv2.imwrite(save_path, img_cv) print(f"[Vis] Saved -> {save_path}") # ---------------- 简易 CLI 测试 ---------------- if __name__ == "__main__": det = Qwen25VLDetector( base_model="/home/LL/llm_models/Qwen2.5-VL/Qwen/Qwen2___5-VL-3B-Instruct", lora_path="/home/LL/workfile_2026/12-QwenVL/LLaMA-Factory/LL_own/save/train_detect_3B", ) img_path = "test.jpg" results = det.detect_visualize(Image.open(img_path)) print("检测结果:", results)可得到正确的检测结果。
五 其他
模型合并、合并后的推理,都比较简单,就不记录了。
【大模型】使用llamafactory 训练 qwen2.5-VL 的目标检测任务
magic_ll2025-12-28 8:45
相关推荐
IT_陈寒21 小时前
Redis的持久化配置把我坑惨了:你以为数据安全了?miaowu35721 小时前
AI智能体推动数字化转型:从流程自动化到决策辅助的完整路线图阿里云大数据AI技术21 小时前
阿里云 Elasticsearch 日志采集与加工服务:让日志链路少一串组件,多一份稳定ksueh21 小时前
AI写小说长篇创作中的上下文局限与外部记忆系统实践互联网江湖21 小时前
珞石机器人:向左科技股,向右零部件制造商?阿里云大数据AI技术1 天前
从数据湖到多模态湖仓-基于阿里云EMR Serverless StarRocks与DLF Paimon构建AI时代的统一分析检索架构前端的阶梯1 天前
浅谈Workflow和Agent的区别正在走向自律1 天前
Deepseek V4 Flash 高效应用实战指南Xzaveir1 天前
别把所有“认证”都塞进 AuthService:实名、一键登录与号码身份的领域拆分BerrySen1781 天前
KMP全栈开发:从Android到AI Agent的技术演进与实践