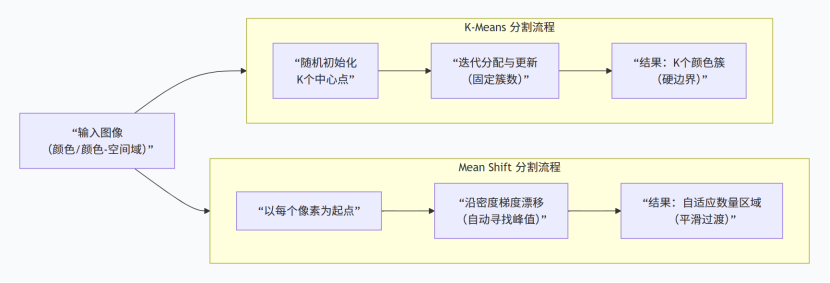
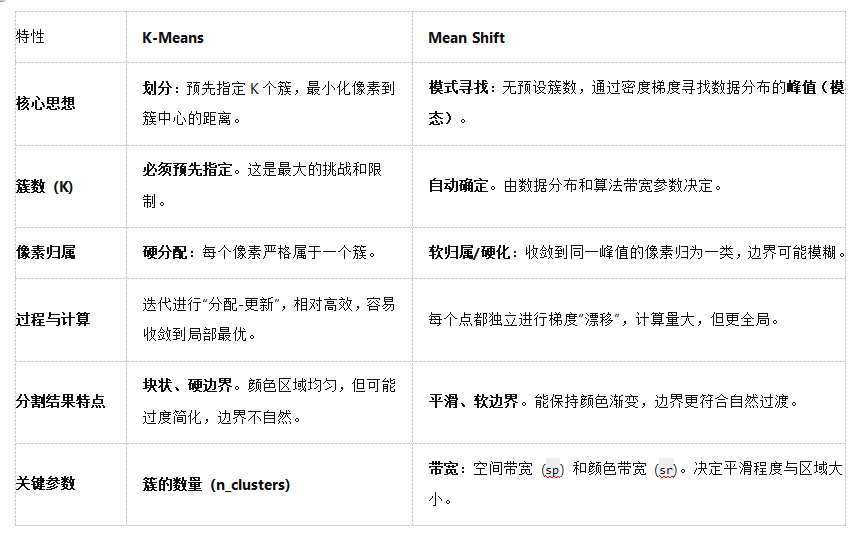
聚类常用的是meanshift(均值漂移)与kmeans
具体计算流程不详细写了,有很多大佬都提供了不错的学习做资料(个人的十大算法系列有kmeans,印象中有,读研的时候写的了)。这里为自己对比梳理与代码整理。
python
def kmeans_segmentation_gray(img_path, n=5):
    '''
    :param img_path:
    :param n:  类中心的个数
    :return:
    '''
    image = cv2.imread(img_path)
    (h1, w1) = image.shape[:2]

    image_gray = cv2.cvtColor(image, cv2.COLOR_BGR2GRAY)
    image_gray = image_gray.reshape((image_gray.shape[0] * image_gray.shape[1], 1))

    # 创建K-Means聚类器,设定要聚为n类(即分割成n个主色区域)
    clt = KMeans(n_clusters = n)

    labels = clt.fit_predict(image_gray)  # fit_predict返回每个像素所属的聚类标签(0-(n-1))
    quant = clt.cluster_centers_.astype("uint8")[labels]   # 聚类中心代表每个分区的代表颜色,用聚类中心的颜色值替换每个像素的原始颜色,实现颜色量化
    quant = quant.reshape((h1, w1, 1))

    # cv2.imshow('image', image)
    # cv2.imshow('generated', quant)
    # cv2.waitKey(0)
    # cv2.destroyAllWindows()
    return quant

def kmeans_segmentation_rgb(img_path, n=5):
    image = cv2.imread(img_path)
    (h1, w1) = image.shape[:2]

    # 将3D图像数组(高度, 宽度, 通道)转为2D数组(像素数, 通道)
    image_rgb = image.reshape((image.shape[0] * image.shape[1], 3))

    clt = KMeans(n_clusters = n)

    labels = clt.fit_predict(image_rgb)
    quant = clt.cluster_centers_.astype("uint8")[labels]
    quant = quant.reshape((h1, w1, 3))

    # cv2.imshow('image', image)
    # cv2.imshow('generated', quant)
    # cv2.waitKey(0)
    # cv2.destroyAllWindows()
    return quant

if __name__ == '__main__':
    img_path = './test/test_img.jpg'
    res_gray = kmeans_segmentation_gray(img_path, n=3)
    res_rgb = kmeans_segmentation_rgb(img_path, n=3)
    cv2.imshow('image', cv2.imread(img_path))
    cv2.imshow('res_gray', res_gray)
    cv2.imshow('res_rgb', res_rgb)
    cv2.waitKey(0)
    cv2.destroyAllWindows()
python
import cv2
import numpy as np

def mean_shift_segmentation_cv2(image_path, spatial_radius=20, color_radius=20, min_size=100):
    """
    使用Mean Shift算法进行图像分割 (OpenCV版本)
    参数:
        image_path: 输入图像路径
        spatial_radius: 空间窗口半径
        color_radius: 颜色窗口半径
        min_size: 最小区域大小
    """
    # 1. 读取图像
    image = cv2.imread(image_path)
    if image is None:
        print(f"错误:无法读取图像 {image_path}")
        return

    original = image.copy()
    original_h, original_w = image.shape[:2]

    # 2. 应用Mean Shift滤波
    shifted = cv2.pyrMeanShiftFiltering(
        image,
        sp=spatial_radius,
        sr=color_radius,
        maxLevel=2
    )

    # 3. 后处理:移除过小的区域
    gray = cv2.cvtColor(shifted, cv2.COLOR_BGR2GRAY)
    _, binary = cv2.threshold(gray, 0, 255, cv2.THRESH_BINARY | cv2.THRESH_OTSU)

    # 查找轮廓并过滤小区域
    contours, _ = cv2.findContours(binary, cv2.RETR_EXTERNAL, cv2.CHAIN_APPROX_SIMPLE)
    mask = np.zeros((original_h, original_w), dtype=np.uint8)

    for contour in contours:
        area = cv2.contourArea(contour)
        if area > min_size:
            cv2.drawContours(mask, [contour], -1, 255, -1)

    # 应用掩码得到最终分割结果
    segmented = cv2.bitwise_and(shifted, shifted, mask=mask)

    # 4. 计算分割区域数量
    num_labels, labels_im = cv2.connectedComponents(mask)
    num_regions = num_labels - 1 if num_labels > 1 else 0

    # 5. 创建边界叠加图
    boundaries = cv2.Canny(mask, 30, 100)
    overlay = original.copy()
    overlay[boundaries > 0] = [0, 0, 255]  # 红色边界 (BGR格式)

    # 6. 创建网格显示 (2行3列)
    # 第一行:原始图像,Mean Shift结果,二值掩码
    row1 = np.hstack([original, shifted, cv2.cvtColor(mask, cv2.COLOR_GRAY2BGR)])

    # 第二行:最终分割结果,边界叠加,区域统计文本图
    # 创建文本信息图
    text_img = np.zeros((original_h, original_w, 3), dtype=np.uint8)
    text_img[:] = [240, 240, 240]  # 浅灰色背景

    # 添加文本信息
    font = cv2.FONT_HERSHEY_SIMPLEX
    line_height = 30
    start_y = 40

    info_lines = [
        f"Mean Shift report",
        f"original_w_h: {original_w} x {original_h}",
        f"spatial_radius(sp): {spatial_radius}",
        f"color_radius(sr): {color_radius}",
        f"num_regions: {num_regions}",
        f"min_size: {min_size}",
        "",
        "press any key to continue..."
    ]

    for i, line in enumerate(info_lines):
        y_pos = start_y + i * line_height
        cv2.putText(text_img, line, (20, y_pos), font, 0.5, (0, 0, 0), 1, cv2.LINE_AA)

    row2 = np.hstack([segmented, overlay, text_img])

    # 7. 垂直拼接两行
    display = np.vstack([row1, row2])

    # 8. 显示结果
    cv2.imshow(f"Mean Shift (sp={spatial_radius}, sr={color_radius})", display)

    # 9. 打印控制台信息
    print("=" * 50)
    print("Mean Shift 图像分割报告")
    print("=" * 50)
    print(f"图像尺寸: {original_w} x {original_h}")
    print(f"参数设置: sp={spatial_radius}, sr={color_radius}")
    print(f"分割区域数量: {num_regions}")
    print(f"最小区域大小: {min_size} 像素")
    print("\n显示说明:")
    print("第一行: [原始图像] | [Mean Shift滤波] | [区域掩码]")
    print("第二行: [最终结果] | [边界叠加] | [参数信息]")
    print("=" * 50)

    cv2.waitKey(0)
    cv2.destroyAllWindows()

    # cv2.imshow("original", original)
    # cv2.imshow("shifted result", shifted)
    # cv2.imshow("mask", mask)
    # cv2.imshow("segmented result", segmented)
    # cv2.imshow("overlay", overlay)

    print("\n按 's' 键保存结果,其他任意键退出...")
    key = cv2.waitKey(0)

    if key == ord('s') or key == ord('S'):
        # 保存结果
        cv2.imwrite("mean_shift_original.jpg", original)
        cv2.imwrite("mean_shift_filtered.jpg", shifted)
        cv2.imwrite("mean_shift_mask.jpg", mask)
        cv2.imwrite("mean_shift_segmented.jpg", segmented)
        cv2.imwrite("mean_shift_overlay.jpg", overlay)
        cv2.imwrite("mean_shift_display.jpg", display)
        print("结果已保存为JPG文件")

    cv2.destroyAllWindows()

    return {
        'original': original,
        'shifted': shifted,
        'mask': mask,
        'segmented': segmented,
        'num_regions': num_regions
    }

# 使用示例
if __name__ == "__main__":
    # 示例1:使用默认参数
    result = mean_shift_segmentation_cv2(
        image_path='./test/test_img.jpg',
        spatial_radius=15,  # 调整空间平滑度
        color_radius=20,  # 调整颜色敏感度
        min_size=100  # 最小区域大小
    )

    # result2 = mean_shift_segmentation_cv2(
    #     image_path='./test/test_img.jpg',
    #     spatial_radius=10,   # 更小的空间半径 -> 更多细节
    #     color_radius=15,     # 更小的颜色半径 -> 更多颜色区分
    #     min_size=50          # 更小的最小区域
    # )
效果对比暂时不放辣,后续更新。