目录
编写一个简单的天气预报app。
功能需求及技术可行性
搜索国内各个城市的的数据
查看国内大多数城市的天气信息
获取天气数据的api
kotlin
https://pan.baidu.com/s/1wMjVpsiigYZ46ErDJm-W6A 提取码: 17a4城市数据选用adcode.csv文件中的数据
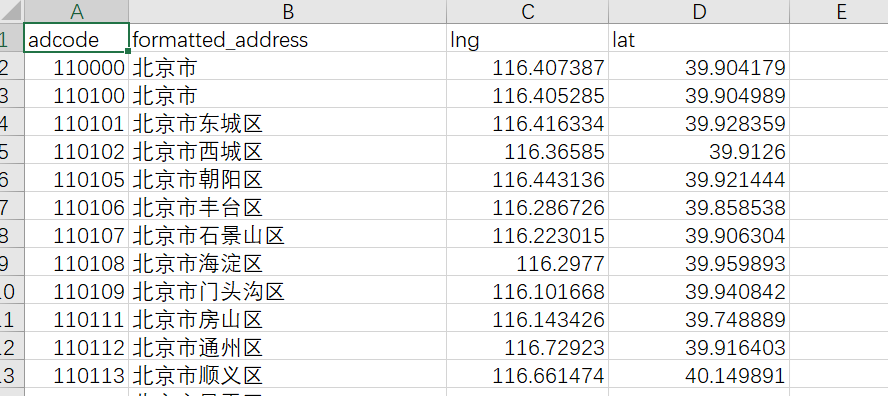
接口使用彩云天气,token是注册后得到的,接口地址的经纬度,从adcode.csv红获取。
天气实况
https://api.caiyunapp.com/v2.6/{token}/101.6656,39.2072/realtime
kotlin
{
  "status": "ok",             // 返回状态
  "api_version": "v2.6",    // API 版本
  "api_status": "active",     // API 服务状态
  "lang": "zh_CN",          // 返回语言
  "unit": "metric",        // 单位
  "tzshift": 28800,       // 时区偏移
  "timezone": "Asia/Shanghai",  // 时区
  "server_time": 1640745758,
  "location": [39.2072, 101.6656],
  "result": {
    "realtime": {
      "status": "ok",
      "temperature": -7,  // 地表 2 米气温
      "humidity": 0.58,  // 地表 2 米湿度相对湿度(%)
      "cloudrate": 0,  // 总云量(0.0-1.0)
      "skycon": "CLEAR_DAY",  // 天气现象
      "visibility": 7.8,  // 地表水平能见度
      "dswrf": 47.7,  // 向下短波辐射通量(W/M2)
      "wind": {
        "speed": 1.8,  // 地表 10 米风速
        "direction": 22  // 地表 10 米风向
      },
      "pressure": 85583.47,  // 地面气压
      "apparent_temperature": -9.9,  // 体感温度
      "precipitation": {
        "local": {
          "status": "ok",
          "datasource": "radar",
          "intensity": 0  // 本地降水强度
        },
        "nearest": {
          "status": "ok",
          "distance": 10000,  // 最近降水带与本地的距离
          "intensity": 0  // 最近降水处的降水强度
        }
      },
      "air_quality": {
        "pm25": 45,  // PM25 浓度(μg/m3)
        "pm10": 49,  // PM10 浓度(μg/m3)
        "o3": 6,  // 臭氧浓度(μg/m3)
        "so2": 8,  // 二氧化硫浓度(μg/m3)
        "no2": 42,  // 二氧化氮浓度(μg/m3)
        "co": 1.1,  // 一氧化碳浓度(mg/m3)
        "aqi": {
          "chn": 63,  // 国标 AQI
          "usa": 124
        },
        "description": {
          "chn": "良",
          "usa": "轻度污染"
        }
      },
      "life_index": {
        "ultraviolet": {
          "index": 3,
          "desc": "弱"  // 参见 [生活指数](tables/lifeindex)
        },
        "comfort": {
          "index": 12,
          "desc": "湿冷"  // 参见 [生活指数](tables/lifeindex)
        }
      }
    },
    "primary": 0
  }
}
未来三天天气预报
https://api.caiyunapp.com/v2.6/{token}/101.6656,39.2072/daily?dailysteps=3
kotlin
{
"status": "ok", // 返回状态
"api_version": "v2.6", // API 版本
"api_status": "alpha", // API 状态
"lang": "zh_CN", // 语言
"unit": "metric", // 单位
"tzshift": 28800, // 时区偏移
"timezone": "Asia/Shanghai", // 时区
"server_time": 1653552787, // 服务器时间
"location": [
39.2072, // 纬度
101.6656 // 经度
],
"result": {
"daily": {
"status": "ok",
"astro": [ // 日出日落时间
{
"date": "2022-05-26T00:00+08:00",
"sunrise": {
"time": "05:51" // 日出时间
},
"sunset": {
"time": "20:28" // 日落时间
}
}
],
"precipitation_08h_20h": [ // 白天降水数据
{
"date": "2022-05-26T00:00+08:00",
"max": 0, // 白天最大降水量
"min": 0, // 白天最小降水量
"avg": 0, // 白天平均降水量
"probability": 0 // 白天降水概率
}
],
"precipitation_20h_32h": [ // 夜晚降水数据
{
"date": "2022-05-26T00:00+08:00",
"max": 0, // 夜晚最大降水量
"min": 0, // 夜晚最小降水量
"avg": 0, // 夜晚平均降水量
"probability": 0 // 夜晚降水概率
}
],
"precipitation": [ // 降水数据
{
"date": "2022-05-26T00:00+08:00",
"max": 0, // 全天最大降水量
"min": 0, // 全天最小降水量
"avg": 0, // 全天平均降水量
"probability": 0 // 全天降水概率
}
],
"temperature": [ // 全天地表 2 米气温
{
"date": "2022-05-26T00:00+08:00",
"max": 27, // 全天最高气温
"min": 18, // 全天最低气温
"avg": 23.75 // 全天平均气温
}
],
"temperature_08h_20h": [ // 白天地表 2 米气温
{
"date": "2022-05-26T00:00+08:00",
"max": 27, // 白天最高气温
"min": 18, // 白天最低气温
"avg": 24.57 // 白天平均气温
}
],
"temperature_20h_32h": [ // 夜晚地表 2 米气温
{
"date": "2022-05-26T00:00+08:00",
"max": 24.8, // 夜晚最高气温
"min": 18, // 夜晚最低气温
"avg": 20.02 // 夜晚平均气温
}
],
"wind": [ // 全天地表 10 米风速
{
"date": "2022-05-26T00:00+08:00",
"max": {
"speed": 28.24,
"direction": 122.62
},
"min": {
"speed": 9,
"direction": 104
},
"avg": {
"speed": 21.61,
"direction": 118.02
}
}
],
"wind_08h_20h": [ // 白天地表 10 米风速
{
"date": "2022-05-26T00:00+08:00",
"max": {
"speed": 28.24,
"direction": 122.62
},
"min": {
"speed": 9,
"direction": 104
},
"avg": {
"speed": 22.74,
"direction": 115.78
}
}
],
"wind_20h_32h": [ // 夜晚地表 10 米风速
{
"date": "2022-05-26T00:00+08:00",
"max": {
"speed": 22.39,
"direction": 97.46
},
"min": {
"speed": 9.73,
"direction": 125.93
},
"avg": {
"speed": 16,
"direction": 121.62
}
}
],
"humidity": [ // 地表 2 米相对湿度(%)
{
"date": "2022-05-26T00:00+08:00",
"max": 0.18,
"min": 0.08,
"avg": 0.09
}
],
"cloudrate": [ // 云量(0.0-1.0)
{
"date": "2022-05-26T00:00+08:00",
"max": 1,
"min": 0,
"avg": 0.75
}
],
"pressure": [ // 地面气压
{
"date": "2022-05-26T00:00+08:00",
"max": 84500.84,
"min": 83940.84,
"avg": 83991.97
}
],
"visibility": [ // 地表水平能见度
{
"date": "2022-05-26T00:00+08:00",
"max": 25, // 最大能见度
"min": 24.13, // 最小能见度
"avg": 25 // 平均能见度
}
],
"dswrf": [ // 向下短波辐射通量(W/M2)
{
"date": "2022-05-26T00:00+08:00",
"max": 741.9, // 最大辐射通量
"min": 0, // 最小辐射通量
"avg": 368.6 // 平均辐射通量
}
],
"air_quality": {
"aqi": [
{
"date": "2022-05-26T00:00+08:00",
"max": {
"chn": 183, // 中国国标 AQI 最大值
"usa": 160 // 美国国标 AQI 最大值
},
"avg": {
"chn": 29, // 中国国标 AQI 平均值
"usa": 57 // 美国国标 AQI 平均值
},
"min": {
"chn": 20, // 中国国标 AQI 最小值
"usa": 42 // 美国国标 AQI 最小值
}
}
],
"pm25": [
{
"date": "2022-05-26T00:00+08:00",
"max": 74, // PM2.5 浓度最大值
"avg": 15, // PM2.5 浓度平均值
"min": 10 // PM2.5 浓度最小值
}
]
},
"skycon": [
{
"date": "2022-05-26T00:00+08:00",
"value": "PARTLY_CLOUDY_DAY" // 全天主要天气现象
}
],
"skycon_08h_20h": [
{
"date": "2022-05-26T00:00+08:00",
"value": "PARTLY_CLOUDY_DAY" // 白天主要天气现象
}
],
"skycon_20h_32h": [
{
"date": "2022-05-26T00:00+08:00",
"value": "CLOUDY" // 夜晚主要天气现象
}
],
"life_index": {
"ultraviolet": [
{
"date": "2022-05-26T00:00+08:00",
"index": "1",
"desc": "最弱" // 紫外线指数自然语言
}
],
"carWashing": [
{
"date": "2022-05-26T00:00+08:00",
"index": "1",
"desc": "适宜" // 洗车指数自然语言
}
],
"dressing": [
{
"date": "2022-05-26T00:00+08:00",
"index": "4",
"desc": "温暖" // 穿衣指数自然语言
}
],
"comfort": [
{
"date": "2022-05-26T00:00+08:00",
"index": "4",
"desc": "温暖" // 舒适度指数自然语言
}
],
"coldRisk": [
{
"date": "2022-05-26T00:00+08:00",
"index": "4",
"desc": "极易发" // 感冒指数自然语言
}
]
}
},
"primary": 0
}
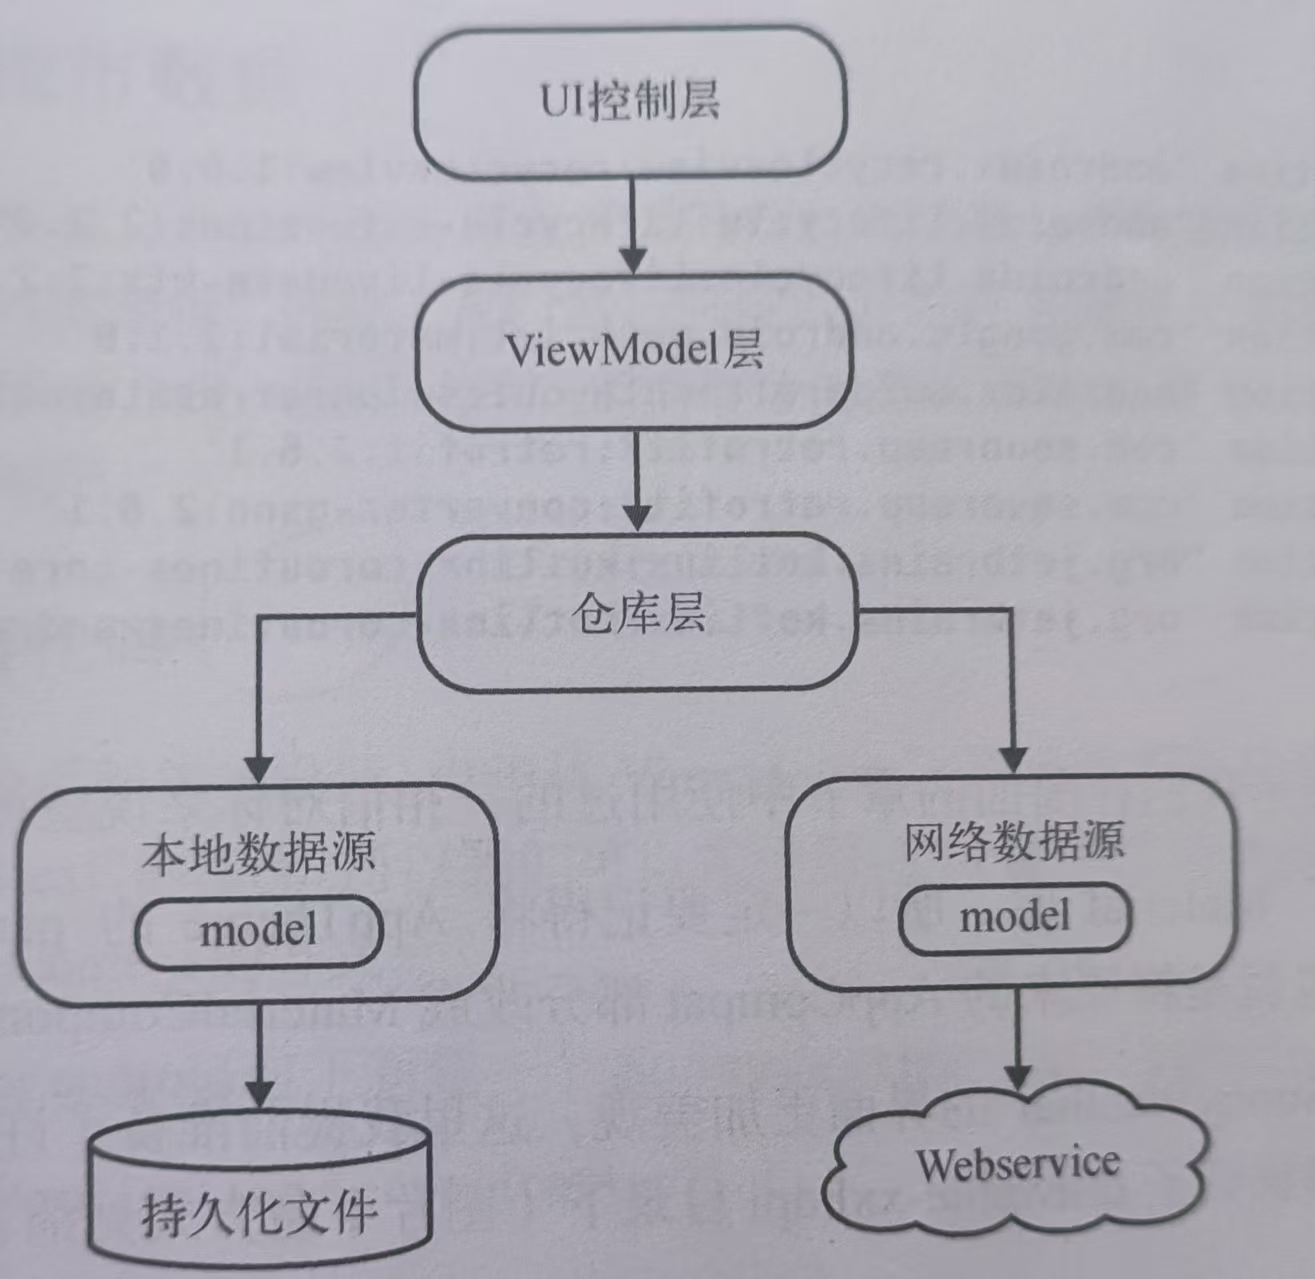
}mvvm项目架构
依赖库
kotlin
dependencies {
	...........
    //数据库
    val room_version = "2.8.4"

    implementation("androidx.room:room-runtime:$room_version")
    ksp("androidx.room:room-compiler:$room_version")
    //协程
    implementation("org.jetbrains.kotlinx:kotlinx-coroutines-core:1.10.2")


    implementation("com.squareup.retrofit2:retrofit:3.0.0")
    implementation("com.squareup.retrofit2:converter-gson:3.0.0")

    //livedata
    implementation("androidx.lifecycle:lifecycle-livedata-ktx:2.8.3")

    //fragment
    val fragment_version = "1.8.9"
    implementation("androidx.fragment:fragment-ktx:${fragment_version}")

    implementation("androidx.recyclerview:recyclerview:1.4.0")

    implementation("androidx.cardview:cardview:1.0.0")
}
开启viewBinding
kotlin
android {
    ............
    buildFeatures {
        compose = true
        viewBinding = true
    }
}
图片素材自行下载
https://www.alipan.com/s/qHdnmYXkxCX
提取码: 2cqi
获取全国城市数据
创建一个全局获取Context的方式,创建WeatherApplication
kotlin
class WeatherApplication : Application() {

    companion object {

        @SuppressLint("StaticFieldLeak")
        lateinit var context: Context
		//申请的token
        const val token = "***************"
    }

    override fun onCreate() {
        super.onCreate()
        context = applicationContext
    }

}
在mainfests中指定WeatherApplication
xml
<?xml version="1.0" encoding="utf-8"?>
<manifest xmlns:android="http://schemas.android.com/apk/res/android"
    xmlns:tools="http://schemas.android.com/tools">
    <application
        android:name=".WeatherApplication"
        android:allowBackup="false"
        android:dataExtractionRules="@xml/data_extraction_rules"
        android:fullBackupContent="@xml/backup_rules"
        android:icon="@mipmap/ic_launcher"
        android:label="@string/app_name"
        android:networkSecurityConfig="@xml/network_security_config"
        android:roundIcon="@mipmap/ic_launcher_round"
        android:supportsRtl="true"
        android:theme="@style/Theme.Lichengweather">
    </application>

</manifest>
使用
kotlin
WeatherApplication.context将csv的数据导入包数据库中,从本地数据库获取相关数据。
先将csv中的数据导入到sqlite数据库中,导出lc.db文件,准备预存数据。

定义城市数据模型,添加@Entity注解,成为数据库的实体类
kotlin
@Entity
data class Place(
    @PrimaryKey
    val adcode: Int,
    val address: String,
    val lng: String,
    val lat: String
)
定义Dao
kotlin
@Dao
interface PlaceDao {

    @Insert
    fun insertPlace(place: Place)


    /**
     * 通过adcode来获取Place
     */
    @Query("select * from place where adcode = :adcode")
    fun findPlaceByCode(adcode: Int): Place


    /**
     * 通过关键字进行模糊查询
     */
    @Query("select * from place where address like '%'||:name||'%'")
    fun findPlaceByAddress(name: String): List<Place>

}
定义数据库
将上面的导出db文件复制到assets/db,通过createFromAsset()方法就可以预存数据了。
kotlin
@Database(version = 1, entities = [Place::class])
abstract class AppDataBase : RoomDatabase() {

    abstract fun placeDao(): PlaceDao

    companion object {

        private var instant: AppDataBase? = null

        fun getDataBase(context: Context): AppDataBase {

            instant?.let {
                return it
            }
            return Room.databaseBuilder(
                context.applicationContext,
                AppDataBase::class.java,
                "licheng.db"
            ) .createFromAsset("db/lc.db").build().apply {
                instant = this
            }
        }
    }

}
仓库层,创建Repository类
kotlin
object Repository {
    /**
     * 获取地址
     */
    fun getPlace(content: String) = liveData(Dispatchers.IO) {

        val result = try {

            val appDataBase = AppDataBase.getDataBase(WeatherApplication.context)
            val placeDao = appDataBase.placeDao()

            val placeList = placeDao.findPlaceByAddress(content)
            Result.success(placeList)

        } catch (e: Exception) {

            Result.failure(e)
        }
        emit(result)
    }
}
上面liveData()可以自动构建并返回一个LiveData对象,并在它的代码块中提供一个挂起函数的上下文。如果获取到城市列表数据, 用Result.success()来包装获取的数据;如果出现异常则用 Result.failure(e)来包装一个异常信息。最后用 emit(result)将结果发射出去。
定义viewmodel
kotlin
class PlaceVM : ViewModel() {

    private val contentData = MutableLiveData<String>()

    val placeList = ArrayList<Place>()

    val getPlaceData = contentData.switchMap { content ->

        Repository.getPlace(content)
    }


    fun getContent( content: String) {

        contentData.value = content
    }

}
这里没有直接调用仓库中的getPlace(),将值赋值给了contentData,使用switchMap()方法来观察这个对象。
ui层
fragment_place.xml
xml
<?xml version="1.0" encoding="utf-8"?>
<LinearLayout xmlns:android="http://schemas.android.com/apk/res/android"
    android:layout_width="match_parent"
    android:layout_height="match_parent"
    android:fitsSystemWindows="true"
    android:orientation="vertical">


    <EditText
        android:id="@+id/place_et_content"
        android:layout_width="match_parent"
        android:layout_height="wrap_content"
        android:layout_marginStart="10dp"
        android:layout_marginEnd="10dp"
        android:hint="请输入文字"
        android:paddingTop="8dp"
        android:paddingBottom="8dp" />


    <androidx.recyclerview.widget.RecyclerView
        android:id="@+id/place_rv_address"
        android:layout_width="match_parent"
        android:layout_height="match_parent" />

</LinearLayout>
这个布局有了两个部分,EditTexty用于给用户提供一个搜索框来进行搜索,RecyclerView则用于对搜索出来的结构进行展示。
RecyclerView的item_place.xml
xml
<?xml version="1.0" encoding="utf-8"?>
<androidx.cardview.widget.CardView xmlns:android="http://schemas.android.com/apk/res/android"
    android:layout_width="match_parent"
    android:layout_height="wrap_content"
    android:layout_marginStart="10dp"
    android:layout_marginTop="8dp"
    android:layout_marginEnd="10dp"
    android:layout_marginBottom="8dp">

    <LinearLayout
        android:layout_width="match_parent"
        android:layout_height="wrap_content"
        android:orientation="vertical"
        android:paddingStart="10dp"
        android:paddingTop="8dp"
        android:paddingBottom="8dp">

        <TextView
            android:id="@+id/place_tv_adcode"
            android:layout_width="match_parent"
            android:layout_height="wrap_content"
            android:text="123456" />

        <TextView
            android:id="@+id/place_tv_address"
            android:layout_width="match_parent"
            android:layout_height="wrap_content"
            android:text="济南" />

        <LinearLayout
            android:layout_width="match_parent"
            android:layout_height="wrap_content"
            android:orientation="horizontal">

            <TextView
                android:id="@+id/place_tv_lng"
                android:layout_width="0dp"
                android:layout_height="wrap_content"
                android:layout_weight="1"
                android:text="lng:127.0" />

            <TextView
                android:id="@+id/place_tv_lat"
                android:layout_width="0dp"
                android:layout_height="wrap_content"
                android:layout_weight="1"
                android:text="lat:56.2" />
        </LinearLayout>

    </LinearLayout>

</androidx.cardview.widget.CardView>
创建城市适配器PlaceAdapter
kotlin
class PlaceAdapter(private val fragment: Fragment, private val placeList: List<Place>) :
    RecyclerView.Adapter<PlaceAdapter.PlaceViewHolder>() {

    override fun onCreateViewHolder(parent: ViewGroup, viewType: Int): PlaceViewHolder {

        val view = LayoutInflater.from(parent.context).inflate(R.layout.item_place, parent, false)
        return PlaceViewHolder(view)
    }

    override fun onBindViewHolder(holder: PlaceViewHolder, position: Int) {

        val place = placeList[position]
        holder.setData(place)
    }

    override fun getItemCount(): Int {

        return placeList.size
    }


    inner class PlaceViewHolder(view: View) : RecyclerView.ViewHolder(view) {

        val place_tv_adcode = view.findViewById<TextView>(R.id.place_tv_adcode)
        val place_tv_address = view.findViewById<TextView>(R.id.place_tv_address)
        val place_tv_lng = view.findViewById<TextView>(R.id.place_tv_lng)
        val place_tv_lat = view.findViewById<TextView>(R.id.place_tv_lat)

        lateinit var place: Place

        fun setData(place: Place) {

            this.place = place

            place_tv_adcode.text = place.adcode.toString()
            place_tv_address.text = place.address
            place_tv_lng.text = "lng:" + place.lng.toString()
            place_tv_lat.text = "lat:" + place.lat.toString()
            itemView.setOnClickListener {

                val intent = Intent(itemView.context, MainActivity::class.java).apply {

                    putExtra("location_lng", place.lng)
                    putExtra("location_lat", place.lat)
                    putExtra("place_name", place.address)
                }
                fragment.startActivity(intent)
                fragment.activity?.finish()
            }
        }
    }
}
创建城市fragment
kotlin
class PlaceFragment : Fragment() {

    val viewModel by lazy {

        ViewModelProvider(this)[PlaceVM::class.java]
    }

    private lateinit var placeAdapter: PlaceAdapter

    private lateinit var fragmentPlaceBinding: FragmentPlaceBinding

    override fun onCreate(savedInstanceState: Bundle?) {
        super.onCreate(savedInstanceState)
    }

    override fun onCreateView(
        inflater: LayoutInflater,
        container: ViewGroup?,
        savedInstanceState: Bundle?
    ): View? {

        fragmentPlaceBinding = FragmentPlaceBinding.inflate(inflater, container, false)
        return fragmentPlaceBinding.root
    }

    override fun onViewCreated(view: View, savedInstanceState: Bundle?) {
        super.onViewCreated(view, savedInstanceState)

        val layoutManager = LinearLayoutManager(view.context)
        fragmentPlaceBinding.placeRvAddress.layoutManager = layoutManager
        placeAdapter = PlaceAdapter(this, viewModel.placeList)
        fragmentPlaceBinding.placeRvAddress.adapter = placeAdapter
        fragmentPlaceBinding.placeEtContent.addTextChangedListener { editable ->

            val content = editable.toString()
            if (content.isNotEmpty()) {

                //获取城市
                viewModel.getContent(content)
            } else {

                fragmentPlaceBinding.placeRvAddress.visibility = View.GONE
                viewModel.placeList.clear()
                placeAdapter.notifyDataSetChanged()
            }
        }

        viewModel.getPlaceData.observe(viewLifecycleOwner) { result ->

            val places = result.getOrNull()
            if (places != null) {

                fragmentPlaceBinding.placeRvAddress.visibility = View.VISIBLE
                viewModel.placeList.clear()
                viewModel.placeList.addAll(places)
                placeAdapter.notifyDataSetChanged()
            } else {

                Toast.makeText(WeatherApplication.context, "没有数据", Toast.LENGTH_SHORT).show()
                result.exceptionOrNull()?.printStackTrace()
            }
        }

    }
}
lazy ()函数懒加载获取PlaceVMd额实例。onCreateView加载布局。onViewCreated给RecyclerViews设置layoutmanager和adapter,监听输入框的内容变化来从数据库中获取数据,订阅getPlaceDatal来监听数据变化进行显示。
将fragment添加到activity
kotlin
class PlaceActivity : AppCompatActivity() {


    private lateinit var activityPlaceBinding: ActivityPlaceBinding

    override fun onCreate(savedInstanceState: Bundle?) {
        super.onCreate(savedInstanceState)
        enableEdgeToEdge()

        activityPlaceBinding = ActivityPlaceBinding.inflate(layoutInflater)
        setContentView(activityPlaceBinding.getRoot())

        supportFragmentManager
            .beginTransaction()
            .add(R.id.place_ll_f, PlaceFragment())
            .commit()
    }
}
xml
<?xml version="1.0" encoding="utf-8"?>
<LinearLayout xmlns:android="http://schemas.android.com/apk/res/android"
android:id="@+id/place_ll_f"
android:layout_width="match_parent"
android:layout_height="match_parent"
android:orientation="vertical">
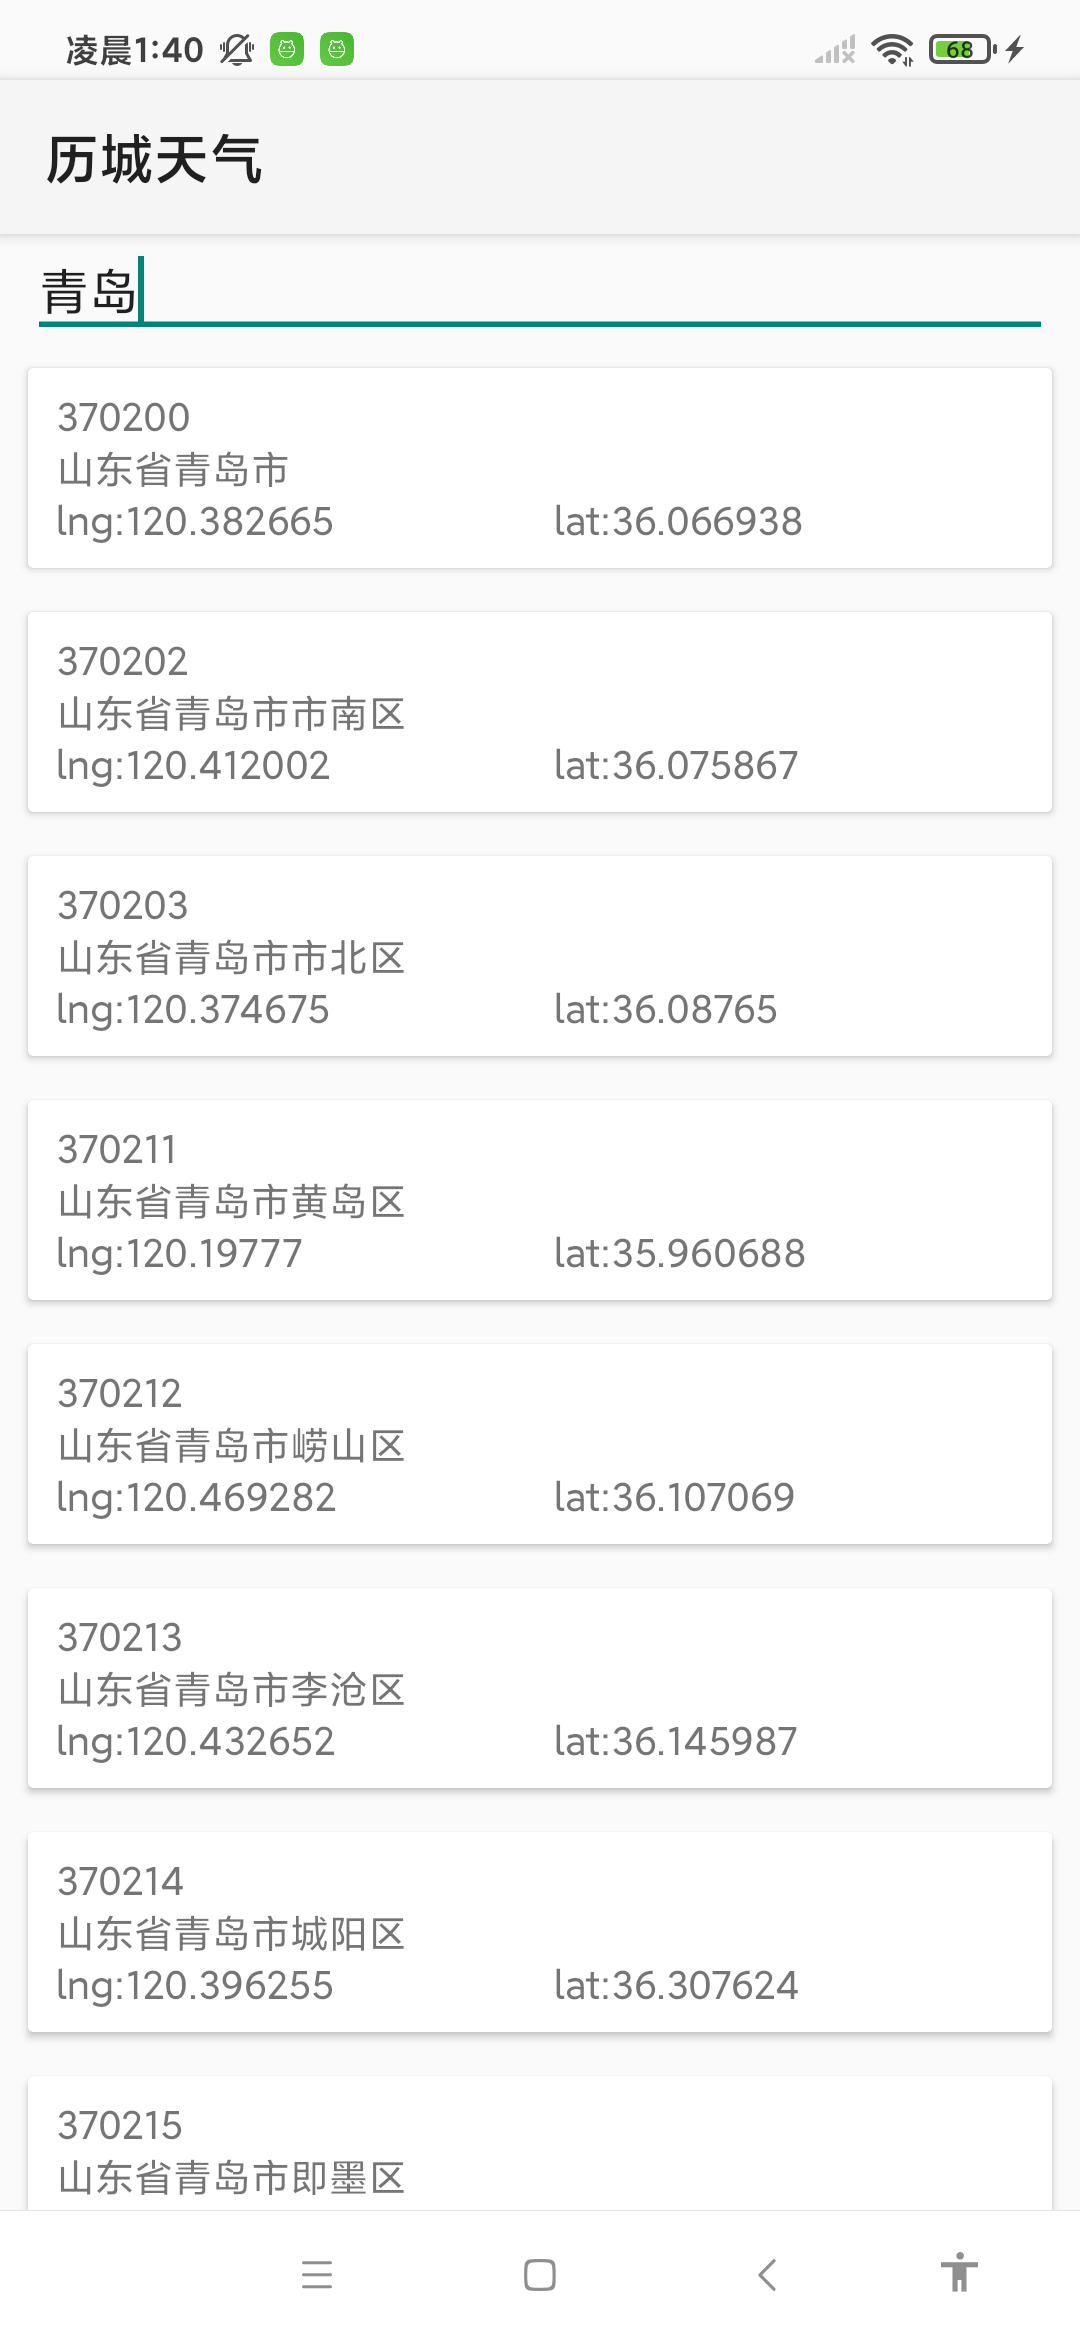
</LinearLayout>效果图
显示天气信息
实时天气数据模型
Realtime.kt
kotlin
package com.bz.yh.xd.lichengweather.model

/**
 * 天气实况类
 */
data class Realtime(
    val api_status: String,
    val api_version: String,
    val lang: String,
    val location: List<Double>,
    val result: RealResult,
    val server_time: Int,
    val status: String,
    val timezone: String,
    val tzshift: Int,
    val unit: String
)

data class RealResult(
    val primary: Int,
    val realtime: RealtimeX,
)

data class RealtimeX(
    val air_quality: AirQuality,
    val apparent_temperature: Double,
    val cloudrate: Float,
    val dswrf: Double,
    val humidity: Double,
    val life_index: LifeIndex,
    val precipitation: Precipitation,
    val pressure: Double,
    val skycon: String,
    val status: String,
    val temperature: Float,
    val visibility: Double,
    val wind: Wind
)

data class AirQuality(
    val aqi: Aqi,
    val co: Double,
    val description: Description,
    val no2: Int,
    val o3: Int,
    val pm10: Int,
    val pm25: Int,
    val so2: Int
)

data class LifeIndex(
    val comfort: Comfort,
    val ultraviolet: Ultraviolet
)

data class Precipitation(
    val local: Local,
    val nearest: Nearest
)

data class Wind(
    val direction: Float,
    val speed: Float
)

data class Aqi(
    val chn: Int,
    val usa: Int
)

data class Description(
    val chn: String,
    val usa: String
)

data class Comfort(
    val desc: String,
    val index: Int
)

data class Ultraviolet(
    val desc: String,
    val index: Int
)

data class Local(
    val datasource: String,
    val intensity: Int,
    val status: String
)

data class Nearest(
    val distance: Int,
    val intensity: Int,
    val status: String
)
未来几天天气信息数据格式
DailyWeather.kt
kotlin
package com.bz.yh.xd.lichengweather.model

data class DailyWeather(
    val api_status: String,
    val api_version: String,
    val lang: String,
    val location: List<Double>,
    val result: DailyResult,
    val server_time: Int,
    val status: String,
    val timezone: String,
    val tzshift: Int,
    val unit: String
)

data class DailyResult(
    val daily: Daily,
    val primary: Int
)

data class Daily(
    val air_quality: DailyAirQuality,
    val astro: List<Astro>,
    val cloudrate: List<Cloudrate>,
    val dswrf: List<Dswrf>,
    val humidity: List<Humidity>,
    val life_index: DailyLifeIndex,
    val precipitation: List<DailyPrecipitation>,
    val precipitation_08h_20h: List<Precipitation08h20h>,
    val precipitation_20h_32h: List<Precipitation08h20h>,
    val pressure: List<Pressure>,
    val skycon: List<Skycon>,
    val skycon_08h_20h: List<Skycon08h20h>,
    val skycon_20h_32h: List<Skycon08h20h>,
    val status: String,
    val temperature: List<Temperature>,
    val temperature_08h_20h: List<Temperature08h20h>,
    val temperature_20h_32h: List<Temperature08h20h>,
    val visibility: List<Visibility>,
    val wind: List<DailyWind>,
    val wind_08h_20h: List<Wind08h20h>,
    val wind_20h_32h: List<Wind08h20h>
)

data class DailyAirQuality(
    val aqi: List<DailyAqi>,
    val pm25: List<Pm25>
)

data class Astro(
    val date: String,
    val sunrise: Sunrise,
    val sunset: Sunset
)

data class Cloudrate(
    val avg: Double,
    val date: String,
    val max: Double,
    val min: Double
)

data class Dswrf(
    val avg: Double,
    val date: String,
    val max: Double,
    val min: Double
)

data class Humidity(
    val avg: Double,
    val date: String,
    val max: Double,
    val min: Double
)

data class DailyLifeIndex(
    val carWashing: List<CarWashing>,
    val coldRisk: List<ColdRisk>,
    val comfort: List<DailyComfort>,
    val dressing: List<Dressing>,
    val ultraviolet: List<DailyUltraviolet>
)

data class DailyPrecipitation(
    val avg: Double,
    val date: String,
    val max: Double,
    val min: Double,
    val probability: Int
)

data class Precipitation08h20h(
    val avg: Double,
    val date: String,
    val max: Double,
    val min: Double,
    val probability: Int
)

data class Pressure(
    val avg: Double,
    val date: String,
    val max: Double,
    val min: Double
)

data class Skycon(
    val date: String,
    val value: String
)

data class Skycon08h20h(
    val date: String,
    val value: String
)

data class Temperature(
    val avg: Double,
    val date: String,
    val max: Double,
    val min: Double
)

data class Temperature08h20h(
    val avg: Double,
    val date: String,
    val max: Double,
    val min: Double
)

data class Visibility(
    val avg: Double,
    val date: String,
    val max: Double,
    val min: Double
)

data class DailyWind(
    val avg: AvgX,
    val date: String,
    val max: MaxX,
    val min: MinX
)

data class Wind08h20h(
    val avg: AvgX,
    val date: String,
    val max: MaxX,
    val min: MinX
)

data class DailyAqi(
    val avg: Avg,
    val date: String,
    val max: Max,
    val min: Min
)

data class Pm25(
    val avg: Int,
    val date: String,
    val max: Int,
    val min: Int
)

data class Avg(
    val chn: Int,
    val usa: Int
)

data class Max(
    val chn: Int,
    val usa: Int
)

data class Min(
    val chn: Int,
    val usa: Int
)

data class Sunrise(
    val time: String
)

data class Sunset(
    val time: String
)

data class CarWashing(
    val date: String,
    val desc: String,
    val index: String
)

data class ColdRisk(
    val date: String,
    val desc: String,
    val index: String
)

data class DailyComfort(
    val date: String,
    val desc: String,
    val index: String
)

data class Dressing(
    val date: String,
    val desc: String,
    val index: String
)

data class DailyUltraviolet(
    val date: String,
    val desc: String,
    val index: String
)

data class AvgX(
    val direction: Double,
    val speed: Double
)

data class MaxX(
    val direction: Double,
    val speed: Double
)

data class MinX(
    val direction: Double,
    val speed: Double
)
创建Weatherl类,合并数据
kotlin
data class Weather(val realtime: RealtimeX, val daily: Daily)网路层,
创建retrofit
kotlin
object ServiceCreator {


    private const val BASE_URL = "http://api.caiyunapp.com"

    private val retrofit = Retrofit.Builder()
        .baseUrl(BASE_URL)
        .addConverterFactory(GsonConverterFactory.create())
        .build()

    fun <T> create(serviceClass: Class<T>): T = retrofit.create<T>(serviceClass)

    inline fun <reified T> create(): T = create(T::class.java)
}
添加网络接口,新建WeatherService接口
kotlin
interface WeatherService {

    /**
     * 根据经纬度获取天气实况
     */
    @GET("/v2.6/{token}/{lng},{lat}/realtime")
    fun realtime(
        @Path("token") token: String,
        @Path("lng") lng: Float,
        @Path("lat") lat: Float
    ): Call<Realtime>


    //获取未来三天的天气
    @GET("/v2.6/{token}/{lng},{lat}/daily?dailysteps=3")
    fun daily(
        @Path("token") token: String,
        @Path("lng") lng: Float,
        @Path("lat") lat: Float
    ): Call<DailyWeather>
}
realtime()方法用来获取实时天气信息,daily()获取未来的天气信息。
在网络数据源WeatherNetwork中对接口进行封装
kotlin
object WeatherNetwork {

    private val weatherService = ServiceCreator.create<WeatherService>()

    suspend fun realtime(token: String, lng: Float, lat: Float) =
        weatherService.realtime(token, lng, lat).await()

    suspend fun daily(token: String, lng: Float, lat: Float) =
        weatherService.daily(token, lng, lat).await()

    private suspend fun <T> Call<T>.await(): T {

        return suspendCoroutine { continuation ->

            enqueue(object : Callback<T> {
                override fun onResponse(call: Call<T?>, response: Response<T?>) {

                    val body = response.body()
                    if (body != null) {

                        continuation.resume(body)
                    } else {

                        continuation.resumeWithException(RuntimeException("response body is null"))
                    }
                }

                override fun onFailure(call: Call<T?>, t: Throwable) {

                    continuation.resumeWithException(t)
                }

            })
        }
    }
}
WeatherNetwork创建了一个WeatherServicej接口的动态代理对象。await()使用协程简化retrofit的回调,将realtime()和daily()声明成挂起函数。
仓库层,添加获取天气数据的代码
kotlin
object Repository {


    fun refreshWeather(lng: Float, lat: Float) = liveData(Dispatchers.IO) {

        val result = try {

            coroutineScope {

                val realtime = async {

                    WeatherNetwork.realtime(WeatherApplication.token, lng, lat)
                }
                val daily3 = async {
                  	delay(1500)//防止请求太频繁,获取数据失败
                    WeatherNetwork.daily(WeatherApplication.token, lng, lat)
                }
                val realtimeResponse = realtime.await()
                val daily3Response = daily3.await()
                if (realtimeResponse.status == "OK" && daily3Response.status == "OK") {

                    val weather =
                        Weather(realtimeResponse.result.realtime, daily3Response.result.daily)
                    Result.success(weather)
                } else {

                    Result.failure(
                        RuntimeException(
                            "realtimeException response status is ${realtimeResponse.status}" +
                                    "daily response status is ${daily3Response.status}"
                        )
                    )
                }

            }

        } catch (e: Exception) {

            Result.failure(e)
        }

        emit(result)
    }

    /**
     * 获取地址
     */
    fun getPlace(content: String) = liveData(Dispatchers.IO) {

      .....
    }

}
refreshWeather()使用async()、await()函数,保证两个请求都成功响应后再执行下一步。两个请求成功获取数据后,拼装成一个Weather对象,通过emit()将结果发送出去。
简化仓库层try catch,在某个统一的入口函数中进行封装,使得只要一次try catch处理就行了。
kotlin
object Repository {


    fun refreshWeather(lng: Float, lat: Float) = liveData(Dispatchers.IO) {
        .......
        emit(result)
    }


    /**
     * 处理try-catch
     */
    fun refreshWeather2(lng: Float, lat: Float) = fire(Dispatchers.IO) {

        coroutineScope {

            val realtime = async {

                WeatherNetwork.realtime(WeatherApplication.token, lng, lat)
            }

            val daily3 = async {
                delay(1500)
                WeatherNetwork.daily(WeatherApplication.token, lng, lat)
            }
            val realtimeResponse = realtime.await()
            val daily3Response = daily3.await()
            if (realtimeResponse.status.equals("ok",true) && daily3Response.status.equals("ok",true)) {

                val weather =
                    Weather(realtimeResponse.result.realtime, daily3Response.result.daily)
                Result.success(weather)
            } else {

                Result.failure(
                    RuntimeException(
                        "realtimeException response status is ${realtimeResponse.status}" +
                                "daily response status is ${daily3Response.status}"
                    )
                )
            }

        }
    }

    private fun <T> fire(context: CoroutineContext, block: suspend () -> Result<T>) =
        liveData<Result<T>>(context) {

            val result = try {

                block()
            } catch (e: Exception) {

                Result.failure<T>(e)
            }
            emit(result)
        }
}
新增fire()函数,在函数的内部会先调用一下liveData()函数,在liveData()函数的代码块中统一进行了try catch处理。
在liveData()函数的代码块中,是拥有挂起函数上下文的,lambda表达式中的代码是在挂起函数中运行的。我们需要再函数类型前声明一个suspend关键字,表示所有传入的lambda表达式中的代码也是拥有挂起函数上下文的。
定义viewmodel
kotlin
class WeatherViewModel : ViewModel() {

    private val locatioinLiveData = MutableLiveData<Location>()

    var locationLng = ""

    var locationLat = ""

    var placeName = ""

    val weatherLiveData = locatioinLiveData.switchMap { location ->

        Repository.refreshWeather2(location.lng, location.lat)
    }

    fun refreshWeather(lng: Float, lat: Float) {

        locatioinLiveData.value = Location(lng, lat)
    }
}
这里定义了refreshWeather()方法来获取天气信息,将传入的lng和lat参数封装成一个Location对象,赋值给locatioinLiveData对象,使用locatioinLiveData的switchMap方法来观察这个对象,当值有变化的时候,调用仓库层中的refreshWeather2()方法。
ui实现
创建MainActivity来显示天气信息
将页面分成多个xml布局,然后再拼接起来。
天气实况
now.xml 当前天气信息的布局
kotlin
<?xml version="1.0" encoding="utf-8"?>
<RelativeLayout xmlns:android="http://schemas.android.com/apk/res/android"
    android:id="@+id/nowLayout"
    android:layout_width="match_parent"
    android:fitsSystemWindows="true"
    android:layout_height="530dp">

    <FrameLayout
        android:id="@+id/titleLayout"
        android:layout_width="match_parent"
        android:layout_height="70dp">

        <TextView
            android:id="@+id/placeName"
            android:layout_width="wrap_content"
            android:layout_height="wrap_content"
            android:layout_gravity="center"
            android:ellipsize="middle"
            android:maxLines="1"
            android:textColor="#fff"
            android:textSize="22sp" />
    </FrameLayout>

    <LinearLayout
        android:layout_width="match_parent"
        android:layout_height="wrap_content"
        android:layout_centerInParent="true"
        android:orientation="vertical">

        <TextView
            android:id="@+id/currentTemp"
            android:layout_width="wrap_content"
            android:layout_height="wrap_content"
            android:layout_gravity="center_horizontal"
            android:textColor="#fff"
            android:textSize="70sp" />

        <LinearLayout
            android:layout_width="wrap_content"
            android:layout_height="wrap_content"
            android:layout_gravity="center_horizontal"
            android:layout_marginTop="20dp">

            <TextView
                android:id="@+id/currentSky"
                android:layout_width="wrap_content"
                android:layout_height="wrap_content"
                android:textColor="#fff"
                android:textSize="18sp" />

            <TextView
                android:layout_width="wrap_content"
                android:layout_height="wrap_content"
                android:layout_marginStart="13dp"
                android:text="|"
                android:textColor="#fff"
                android:textSize="18sp" />

            <TextView
                android:id="@+id/currentAQI"
                android:layout_width="wrap_content"
                android:layout_height="wrap_content"
                android:layout_marginStart="13dp"
                android:textColor="#fff"
                android:textSize="18sp" />

        </LinearLayout>

    </LinearLayout>


</RelativeLayout>
未来几天天气预报

xml
<?xml version="1.0" encoding="utf-8"?>
<androidx.cardview.widget.CardView xmlns:android="http://schemas.android.com/apk/res/android"
    xmlns:app="http://schemas.android.com/apk/res-auto"
    android:layout_width="match_parent"
    android:layout_height="wrap_content"
    android:layout_marginLeft="15dp"
    android:layout_marginTop="15dp"
    android:layout_marginRight="15dp"
    app:cardCornerRadius="4dp">

    <LinearLayout
        android:layout_width="match_parent"
        android:layout_height="wrap_content"
        android:orientation="vertical">

        <TextView
            android:layout_width="wrap_content"
            android:layout_height="wrap_content"
            android:layout_marginStart="15dp"
            android:layout_marginTop="20dp"
            android:layout_marginBottom="20dp"
            android:text="预报"
            android:textColor="?android:textColorPrimary"
            android:textSize="20sp" />

        <LinearLayout
            android:id="@+id/forecastLayout"
            android:layout_width="match_parent"
            android:layout_height="wrap_content"
            android:orientation="vertical">


        </LinearLayout>
    </LinearLayout>


</androidx.cardview.widget.CardView>
上面的代码并没有未来天气信息的子项布局,创建forecast_item.xml
xml
<?xml version="1.0" encoding="utf-8"?>
<androidx.cardview.widget.CardView xmlns:android="http://schemas.android.com/apk/res/android"
    xmlns:app="http://schemas.android.com/apk/res-auto"
    android:layout_width="match_parent"
    android:layout_height="wrap_content"
    android:layout_marginLeft="15dp"
    android:layout_marginTop="15dp"
    android:layout_marginRight="15dp"
    app:cardCornerRadius="4dp">

    <LinearLayout
        android:layout_width="match_parent"
        android:layout_height="wrap_content"
        android:orientation="vertical">

        <TextView
            android:layout_width="wrap_content"
            android:layout_height="wrap_content"
            android:layout_marginStart="15dp"
            android:layout_marginTop="20dp"
            android:layout_marginBottom="20dp"
            android:text="预报"
            android:textColor="?android:textColorPrimary"
            android:textSize="20sp" />

        <LinearLayout
            android:id="@+id/forecastLayout"
            android:layout_width="match_parent"
            android:layout_height="wrap_content"
            android:orientation="vertical">


        </LinearLayout>
    </LinearLayout>


</androidx.cardview.widget.CardView>
生活指数 life_index.xml
xml
<?xml version="1.0" encoding="utf-8"?>
<androidx.cardview.widget.CardView xmlns:android="http://schemas.android.com/apk/res/android"
    xmlns:app="http://schemas.android.com/apk/res-auto"
    android:layout_width="match_parent"
    android:layout_height="wrap_content"
    android:layout_margin="15dp"
    app:cardCornerRadius="4dp">

    <LinearLayout
        android:layout_width="match_parent"
        android:layout_height="wrap_content"
        android:orientation="vertical">

        <TextView
            android:layout_width="wrap_content"
            android:layout_height="wrap_content"
            android:layout_marginStart="15dp"
            android:layout_marginTop="20dp"
            android:text="生活指数"
            android:textColor="?android:textColorPrimary"
            android:textSize="20sp" />

        <LinearLayout
            android:layout_width="match_parent"
            android:layout_height="wrap_content"
            android:layout_marginTop="20dp">

            <RelativeLayout
                android:layout_width="0dp"
                android:layout_height="60dp"
                android:layout_weight="1">

                <ImageView
                    android:id="@+id/coldRiskImg"
                    android:layout_width="wrap_content"
                    android:layout_height="wrap_content"
                    android:layout_centerVertical="true"
                    android:layout_marginStart="20dp"
                    android:src="@mipmap/ic_coldrisk" />

                <LinearLayout
                    android:layout_width="wrap_content"
                    android:layout_height="wrap_content"
                    android:layout_centerVertical="true"
                    android:layout_marginStart="20dp"
                    android:layout_toEndOf="@id/coldRiskImg"
                    android:orientation="vertical">

                    <TextView
                        android:layout_width="wrap_content"
                        android:layout_height="wrap_content"
                        android:text="感冒"
                        android:textSize="12sp" />

                    <TextView
                        android:id="@+id/coldRiskText"
                        android:layout_width="wrap_content"
                        android:layout_height="wrap_content"
                        android:layout_marginTop="4dp"
                        android:textColor="?android:textColorPrimary"
                        android:textSize="16sp" />
                </LinearLayout>

            </RelativeLayout>

            <RelativeLayout
                android:layout_width="0dp"
                android:layout_height="60dp"
                android:layout_weight="1">

                <ImageView
                    android:id="@+id/dressingImg"
                    android:layout_width="wrap_content"
                    android:layout_height="wrap_content"
                    android:layout_centerVertical="true"
                    android:layout_marginStart="20dp"
                    android:src="@mipmap/ic_dressing" />

                <LinearLayout
                    android:layout_width="wrap_content"
                    android:layout_height="wrap_content"
                    android:layout_centerVertical="true"
                    android:layout_marginStart="20dp"
                    android:layout_toEndOf="@id/dressingImg"
                    android:orientation="vertical">

                    <TextView
                        android:layout_width="wrap_content"
                        android:layout_height="wrap_content"
                        android:text="穿衣"
                        android:textSize="12sp" />

                    <TextView
                        android:id="@+id/dressingText"
                        android:layout_width="wrap_content"
                        android:layout_height="wrap_content"
                        android:layout_marginTop="4dp"
                        android:textColor="?android:textColorPrimary"
                        android:textSize="16sp" />
                </LinearLayout>
            </RelativeLayout>

        </LinearLayout>
        <!--第二行-->

        <LinearLayout
            android:layout_width="match_parent"
            android:layout_height="wrap_content"
            android:layout_marginTop="20dp">

            <!--实时紫外线-->
            <RelativeLayout
                android:layout_width="0dp"
                android:layout_height="60dp"
                android:layout_weight="1">

                <ImageView
                    android:id="@+id/ultravioletImg"
                    android:layout_width="wrap_content"
                    android:layout_height="wrap_content"
                    android:layout_centerVertical="true"
                    android:layout_marginStart="20dp"
                    android:src="@mipmap/ic_ultraviolet" />

                <LinearLayout
                    android:layout_width="wrap_content"
                    android:layout_height="wrap_content"
                    android:layout_centerVertical="true"
                    android:layout_marginStart="20dp"
                    android:layout_toEndOf="@id/ultravioletImg"
                    android:orientation="vertical">

                    <TextView
                        android:layout_width="wrap_content"
                        android:layout_height="wrap_content"
                        android:text="实时紫外线"
                        android:textSize="12sp" />

                    <TextView
                        android:id="@+id/ultravioletText"
                        android:layout_width="wrap_content"
                        android:layout_height="wrap_content"
                        android:layout_marginTop="4dp"
                        android:textColor="?android:textColorPrimary"
                        android:textSize="16sp" />
                </LinearLayout>

            </RelativeLayout>

            <!--洗车-->
            <RelativeLayout
                android:layout_width="0dp"
                android:layout_height="60dp"
                android:layout_weight="1">

                <ImageView
                    android:id="@+id/carWashingImg"
                    android:layout_width="wrap_content"
                    android:layout_height="wrap_content"
                    android:layout_centerVertical="true"
                    android:layout_marginStart="20dp"
                    android:src="@mipmap/ic_dressing" />

                <LinearLayout
                    android:layout_width="wrap_content"
                    android:layout_height="wrap_content"
                    android:layout_centerVertical="true"
                    android:layout_marginStart="20dp"
                    android:layout_toEndOf="@id/carWashingImg"
                    android:orientation="vertical">

                    <TextView
                        android:layout_width="wrap_content"
                        android:layout_height="wrap_content"
                        android:text="洗车"
                        android:textSize="12sp" />

                    <TextView
                        android:id="@+id/carWashingText"
                        android:layout_width="wrap_content"
                        android:layout_height="wrap_content"
                        android:layout_marginTop="4dp"
                        android:textColor="?android:textColorPrimary"
                        android:textSize="16sp" />
                </LinearLayout>
            </RelativeLayout>

        </LinearLayout>


    </LinearLayout>

</androidx.cardview.widget.CardView>
将每个部分的布局引入activity_main.xml
xml
<?xml version="1.0" encoding="utf-8"?>
<ScrollView xmlns:android="http://schemas.android.com/apk/res/android"
    android:id="@+id/weatherLayout"
    android:layout_width="match_parent"
    android:layout_height="match_parent">

    <LinearLayout
        android:layout_width="match_parent"
        android:layout_height="wrap_content"
        android:orientation="vertical">

        <include
            android:id="@+id/now"
            layout="@layout/now" />

        <include
            android:id="@+id/forecast"
            layout="@layout/forecast" />

        <include
            android:id="@+id/life_index"
            layout="@layout/life_index" />

    </LinearLayout>
</ScrollView>
布局完成。编写一个将天气代码转换成Sky对象的函数。
kotlin
class Sky(val info: String, val icon: Int, val bg: Int)


private val sky = mapOf(
    "CLEAR_DAY" to Sky("晴", R.mipmap.ic_clear_day, R.mipmap.bg_clear_day),
    "CLEAR_NIGHT" to Sky("晴", R.mipmap.ic_clear_night, R.mipmap.bg_clear_night),
    "PARTLY_CLOUDY_DAY" to Sky("多云", R.mipmap.ic_partly_cloud_day, R.mipmap.bg_partly_cloudy_day),
    "PARTLY_CLOUDY_NIGHT" to Sky(
        "多云",
        R.mipmap.ic_partly_cloud_night,
        R.mipmap.bg_partly_cloudy_night
    ),
    "CLOUDY" to Sky("阴", R.mipmap.ic_cloudy, R.mipmap.bg_cloudy),
    "LIGHT_HAZE" to Sky("轻度雾霾", R.mipmap.ic_light_haze, R.mipmap.bg_fog),
    "MODERATE_HAZE" to Sky("中度雾霾", R.mipmap.ic_moderate_haze, R.mipmap.bg_fog),
    "HEAVY_HAZE" to Sky("重度雾霾", R.mipmap.ic_heavy_haze, R.mipmap.bg_fog),
    "LIGHT_RAIN" to Sky("小雨", R.mipmap.ic_light_rain, R.mipmap.bg_rain),
    "MODERATE_RAIN" to Sky("中雨", R.mipmap.ic_moderate_rain, R.mipmap.bg_rain),
    "HEAVY_RAIN" to Sky("大雨", R.mipmap.ic_heavy_rain, R.mipmap.bg_rain),
    "STORM_RAIN" to Sky("暴雨", R.mipmap.ic_storm_rain, R.mipmap.bg_rain),
    "FOG" to Sky("雾", R.mipmap.ic_fog, R.mipmap.bg_fog),
    "LIGHT_SNOW" to Sky("小雪", R.mipmap.ic_light_snow, R.mipmap.bg_snow),
    "MODERATE_SNOW" to Sky("中雪", R.mipmap.ic_moderate_snow, R.mipmap.bg_snow),
    "HEAVY_SNOW" to Sky("大雪", R.mipmap.ic_heavy_snow, R.mipmap.bg_snow),
    "STORM_SNOW" to Sky("暴雪", R.mipmap.ic_heavy_snow, R.mipmap.bg_snow),
    "DUST" to Sky("浮尘", R.mipmap.ic_fog, R.mipmap.bg_fog),
    "SAND" to Sky("沙尘", R.mipmap.ic_fog, R.mipmap.bg_fog),
    "WIND" to Sky("大风", R.mipmap.ic_cloudy, R.mipmap.bg_wind)
)

fun getSky(skycon: String): Sky {

    return sky[skycon] ?: sky["CLEAR_DAY"]!!
}
Sky包含info,icon,bg。对应文字、图标和背景。getSky()根据天气代码获取对应的Sky对象。
下面在MainActivity中请求天气数据,并将数据展示到界面上。
kotlin
class MainActivity : FragmentActivity() {

    val viewModel by lazy {

        ViewModelProvider(this).get(WeatherViewModel::class)
    }

    private lateinit var activityMainBinding: ActivityMainBinding

    override fun onCreate(savedInstanceState: Bundle?) {
        super.onCreate(savedInstanceState)

        activityMainBinding = ActivityMainBinding.inflate(layoutInflater)
        setContentView(activityMainBinding.root)

        if (viewModel.locationLng.isEmpty()) {

            viewModel.locationLng = intent.getStringExtra("location_lng") ?: ""
        }

        if (viewModel.locationLat.isEmpty()) {

            viewModel.locationLat = intent.getStringExtra("location_lat") ?: ""
        }

        if (viewModel.placeName.isEmpty()) {

            viewModel.placeName = intent.getStringExtra("place_name") ?: ""
        }
        viewModel.weatherLiveData.observe(this) { result ->

            val weather = result.getOrNull()
            if (weather != null) {

                showWeatherInfo(weather)
            } else {

                Toast.makeText(this, "无法成功获取天气情况", Toast.LENGTH_SHORT).show()
                result.exceptionOrNull()?.printStackTrace()
            }
        }

        viewModel.refreshWeather(viewModel.locationLng.toFloat(), viewModel.locationLat.toFloat())
    }


    private fun showWeatherInfo(weather: Weather) {

        //城市的名字
        activityMainBinding.now.placeName.text = viewModel.placeName
        val realtime = weather.realtime
        val daily = weather.daily

        //now
        val currentTempText = "${realtime.temperature.toInt()} ℃"
        activityMainBinding.now.currentTemp.text = currentTempText
        activityMainBinding.now.currentSky.text = getSky(realtime.skycon).info
        val currentPM25Text = "空气指数 ${realtime.air_quality.aqi.chn.toInt()}"
        activityMainBinding.now.currentAQI.text = currentPM25Text
        activityMainBinding.now.nowLayout.setBackgroundResource(getSky(realtime.skycon).bg)
        //forecast
        activityMainBinding.forecast.forecastLayout.removeAllViews()
        val days = daily.skycon.size
        for (i in 0 until days) {

            val skycon = daily.skycon[i]
            val temperature = daily.temperature[i]
            val view = LayoutInflater.from(this)
                .inflate(R.layout.forecast_item, activityMainBinding.forecast.forecastLayout, false)
            val dateInfo = view.findViewById<TextView>(R.id.dateInfo)
            val skyIcon = view.findViewById<ImageView>(R.id.skyIcon)
            val skyInfo = view.findViewById<TextView>(R.id.skyInfo)
            val temperatureInfo = view.findViewById<TextView>(R.id.temperatureInfo)
            val simpleDateFormat = SimpleDateFormat("yyyy-MM-dd", java.util.Locale.getDefault())


            val date = simpleDateFormat.parse(skycon.date)
            date?.let {
                dateInfo.text = simpleDateFormat.format(date)
            }
            val sky = getSky(skycon.value)
            skyIcon.setImageResource(sky.icon)
            skyInfo.text = sky.info
            val tempText = "${temperature.min.toInt()} ~ ${temperature.max.toInt()}"
            temperatureInfo.text = tempText
            activityMainBinding.forecast.forecastLayout.addView(view)
        }
        //life_inex
        val lifeIndex = daily.life_index
        activityMainBinding.lifeIndex.coldRiskText.text = lifeIndex.coldRisk[0].desc
        activityMainBinding.lifeIndex.dressingText.text = lifeIndex.dressing[0].desc
        activityMainBinding.lifeIndex.ultravioletText.text = lifeIndex.ultraviolet[0].desc
        activityMainBinding.lifeIndex.carWashingText.text = lifeIndex.carWashing[0].desc
        activityMainBinding.weatherLayout.visibility = View.VISIBLE
    }

}
上面代码简要说明,从intent获取经纬度和城市名称,赋值到viewmodel的变量中,对weatherLiveData对象进行观察,当获取到数据,调用showWeatherInfo()来展示数据。viewModel.refreshWeather()来获取天气数据。
接下来,将搜索城市页面与天气页面关联起来。
在PlaceViewHolder中添加点击事件的处理。
kotlin
inner class PlaceViewHolder(view: View) : RecyclerView.ViewHolder(view) {
val place_tv_adcode = view.findViewById<TextView>(R.id.place_tv_adcode)
val place_tv_address = view.findViewById<TextView>(R.id.place_tv_address)
val place_tv_lng = view.findViewById<TextView>(R.id.place_tv_lng)
val place_tv_lat = view.findViewById<TextView>(R.id.place_tv_lat)
lateinit var place: Place
fun setData(place: Place) {
this.place = place
place_tv_adcode.text = place.adcode.toString()
place_tv_address.text = place.address
place_tv_lng.text = "lng:" + place.lng.toString()
place_tv_lat.text = "lat:" + place.lat.toString()
itemView.setOnClickListener {
val intent = Intent(itemView.context, MainActivity::class.java).apply {
putExtra("location_lng", place.lng)
putExtra("location_lat", place.lat)
putExtra("place_name", place.address)
}
fragment.startActivity(intent)
fragment.activity?.finish()
}
}
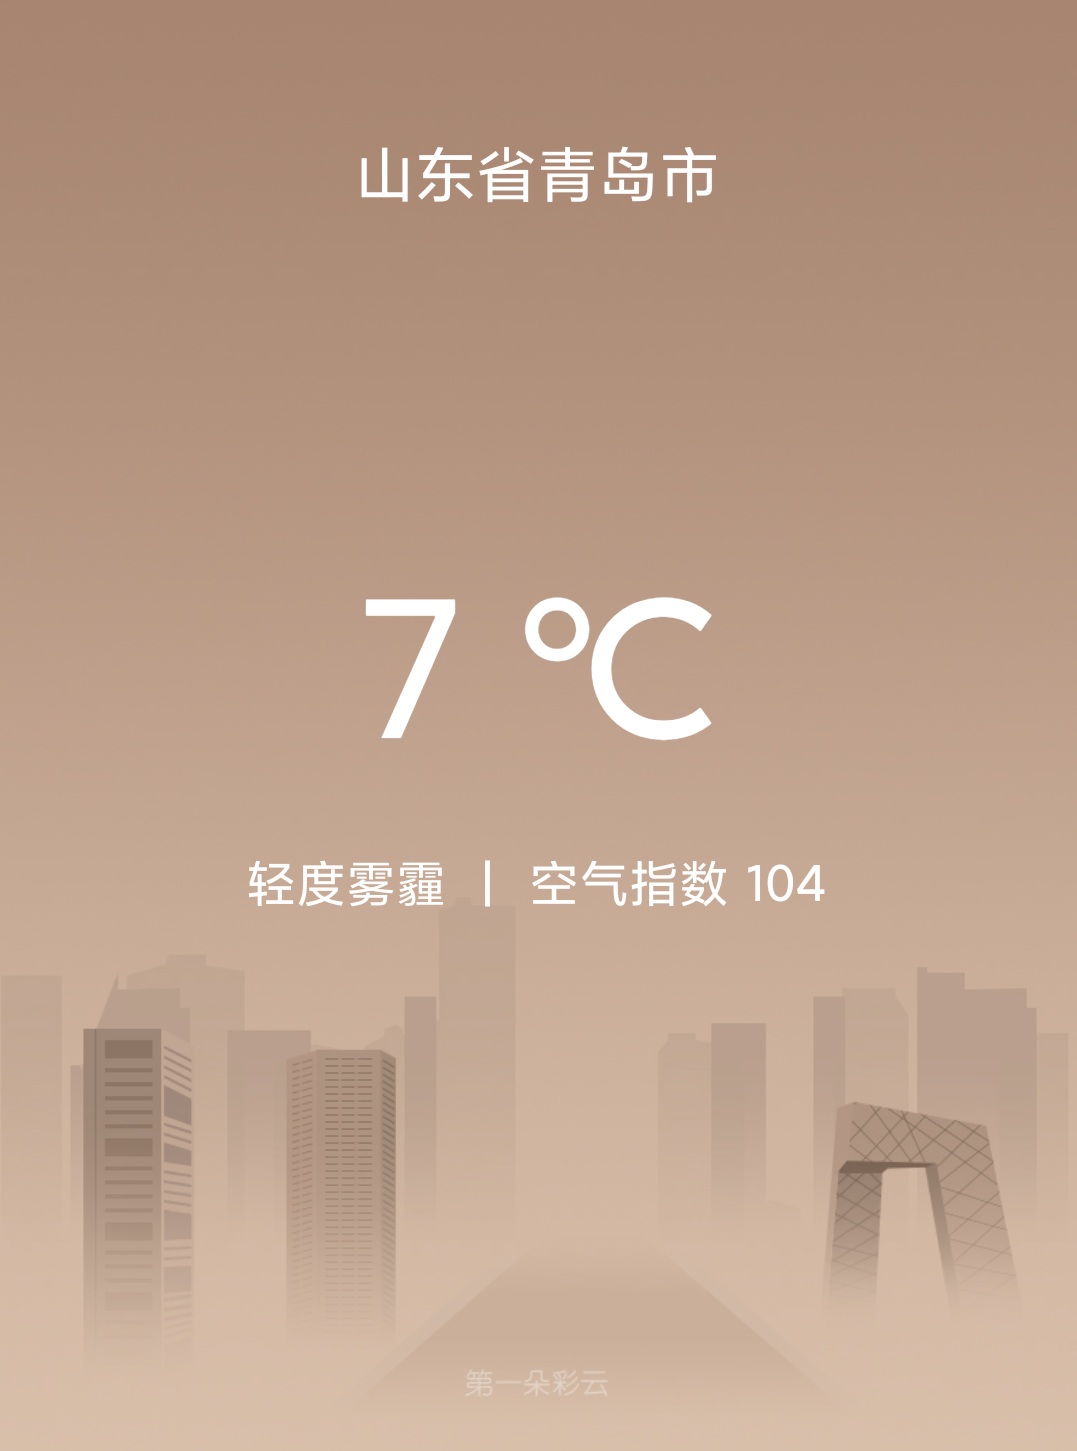
}效果图
观察效果图,背景图没有和状态栏融合在一起,添加代码进行处理。在mainactivity的onCreate()中添加代码。
kotlin
  val windowInsetsController =
            WindowCompat.getInsetsController(window, window.decorView)

        windowInsetsController.systemBarsBehavior =
            WindowInsetsControllerCompat.BEHAVIOR_SHOW_TRANSIENT_BARS_BY_SWIPE

        windowInsetsController.hide(WindowInsetsCompat.Type.statusBars())
        windowInsetsController.hide(WindowInsetsCompat.Type.navigationBars())

        WindowCompat.setDecorFitsSystemWindows(window, false)//页面布局是否在状态栏下方,false:侵入状态栏
效果图
