- 系统环境
Ubuntu22.04
Cuda12.1
- 环境配置
bash
git clone https://github.com/facebookresearch/sam2.git && cd sam2

pip install -e .

cd checkpoints && \
./download_ckpts.sh && \
cd ..- 测试
bash
import torch
from sam2.build_sam import build_sam2
from sam2.sam2_image_predictor import SAM2ImagePredictor
from PIL import Image
import numpy as np
import matplotlib.pyplot as plt
import cv2
# 设置设备
device = torch.device("cuda" if torch.cuda.is_available() else "cpu")
print(f"Using device: {device}")
# 加载模型
checkpoint = "./checkpoints/sam2.1_hiera_large.pt"
model_cfg = "configs/sam2.1/sam2.1_hiera_l.yaml"
predictor = SAM2ImagePredictor(build_sam2(model_cfg, checkpoint))
predictor.model.to(device)
# 加载图像
image_path = 'hehua.jpeg'
image = Image.open(image_path).convert('RGB')
image_array = np.array(image)
# 预测
with torch.inference_mode(), torch.autocast("cuda", dtype=torch.bfloat16):
predictor.set_image(image_array)
masks, scores, logits = predictor.predict()
print(f"预测到 {len(masks)} 个掩码")
print(f"分数: {scores}")
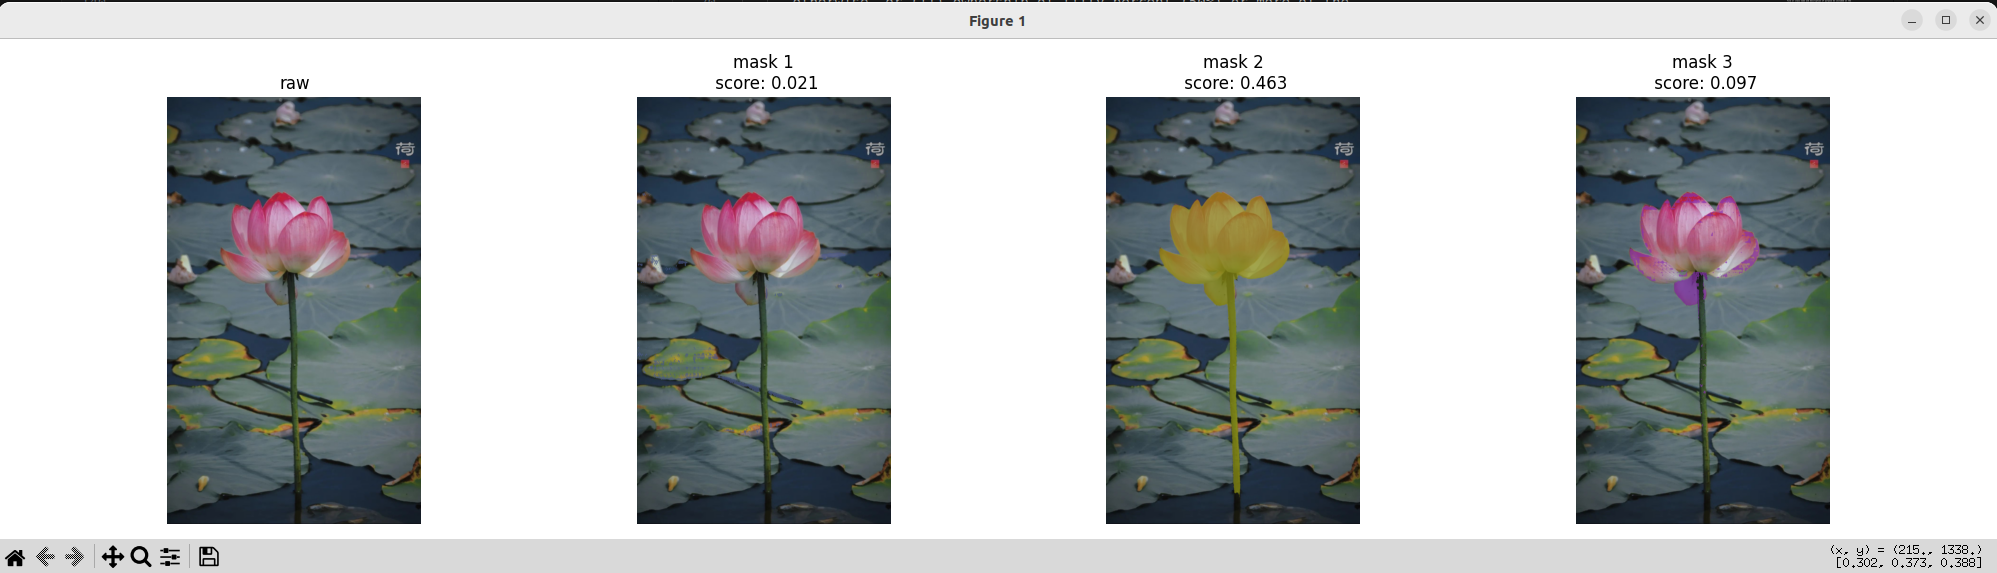
# 可视化函数
def show_masks(image, masks, scores, alpha=0.7):
"""
可视化掩码
"""
if len(masks) == 0:
print("没有检测到掩码")
return
# 创建一个子图
fig, axes = plt.subplots(1, min(4, len(masks)) + 1, figsize=(20, 5))
# 显示原始图像
axes[0].imshow(image)
axes[0].set_title('raw')
axes[0].axis('off')
# 为每个掩码生成随机颜色
colors = np.random.rand(len(masks), 3)
# 创建所有掩码的叠加图像
all_masks_overlay = image.copy().astype(np.float32) / 255.0
for idx, (mask, score, color) in enumerate(zip(masks, scores, colors)):
if idx >= len(axes) - 1:
break
# 二值化掩码
binary_mask = mask.astype(np.uint8) * 255
# 创建彩色掩码
colored_mask = np.zeros_like(image, dtype=np.float32)
for c in range(3):
colored_mask[:, :, c] = color[c]
# 叠加掩码到原始图像
mask_overlay = image.copy().astype(np.float32) / 255.0
mask_indices = mask > 0
for c in range(3):
channel = mask_overlay[:, :, c]
channel[mask_indices] = channel[mask_indices] * (1 - alpha) + color[c] * alpha
mask_overlay[:, :, c] = channel
# 显示单个掩码
axes[idx + 1].imshow(mask_overlay)
axes[idx + 1].set_title(f'mask {idx+1}\n score: {score:.3f}')
axes[idx + 1].axis('off')
# 叠加到总掩码图像
for c in range(3):
all_masks_overlay[:, :, c][mask_indices] = all_masks_overlay[:, :, c][mask_indices] * (1 - alpha) + color[c] * alpha
plt.tight_layout()
plt.show()
# 显示所有掩码叠加图
plt.figure(figsize=(10, 8))
plt.imshow(all_masks_overlay)
plt.title('mask++')
plt.axis('off')
plt.show()
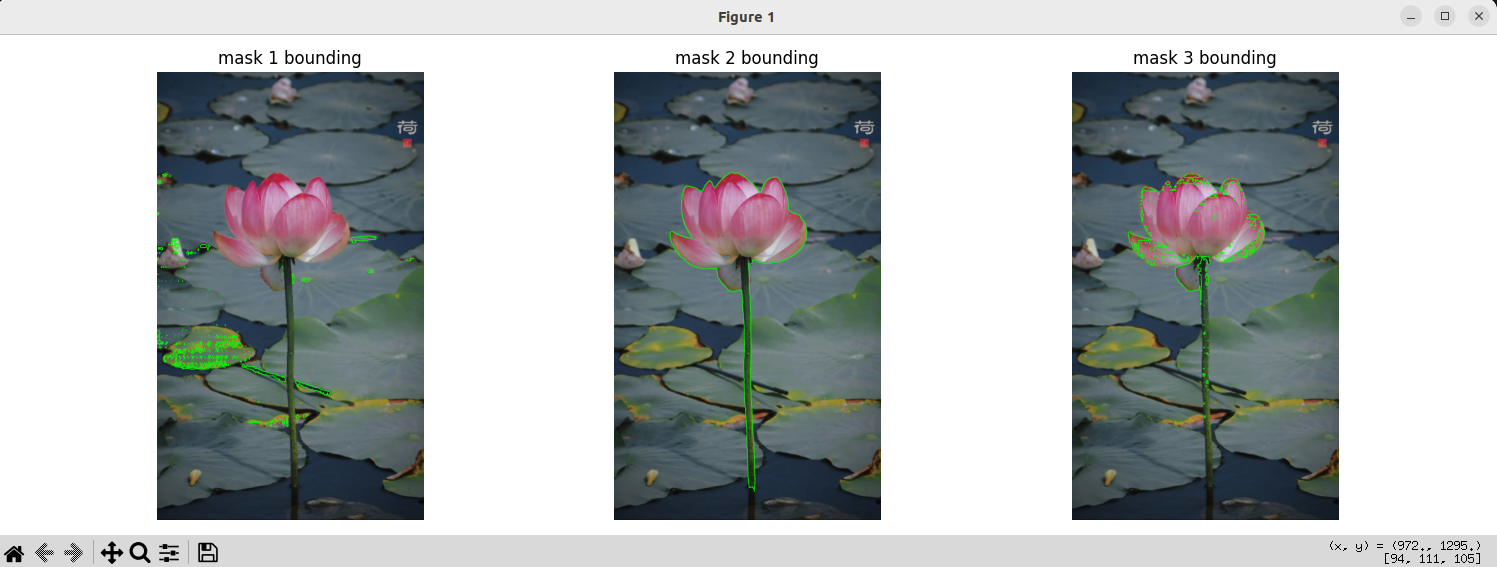
# 显示掩码边界
fig, axes = plt.subplots(1, min(4, len(masks)), figsize=(15, 5))
for idx, mask in enumerate(masks[:len(axes)]):
# 找到轮廓
contours, _ = cv2.findContours(mask.astype(np.uint8),
cv2.RETR_EXTERNAL,
cv2.CHAIN_APPROX_SIMPLE)
# 在原始图像上绘制轮廓
contour_image = image.copy()
cv2.drawContours(contour_image, contours, -1, (0, 255, 0), 2)
axes[idx].imshow(contour_image)
axes[idx].set_title(f'mask {idx+1} bounding')
axes[idx].axis('off')
plt.tight_layout()
plt.show()
# 可视化结果
show_masks(image_array, masks, scores)
# 可选:保存掩码
def save_masks(masks, scores, output_dir="./output_masks"):
import os
os.makedirs(output_dir, exist_ok=True)
for i, (mask, score) in enumerate(zip(masks, scores)):
# 保存为二值图像
mask_img = Image.fromarray((mask * 255).astype(np.uint8))
mask_img.save(os.path.join(output_dir, f"mask_{i+1}_score_{score:.3f}.png"))
# 保存为透明PNG
rgba = np.zeros((mask.shape[0], mask.shape[1], 4), dtype=np.uint8)
rgba[:, :, :3] = image_array
rgba[:, :, 3] = mask * 255
rgba_img = Image.fromarray(rgba, 'RGBA')
rgba_img.save(os.path.join(output_dir, f"mask_overlay_{i+1}.png"))
print(f"掩码已保存到 {output_dir}")
# 保存掩码(可选)
save_masks(masks, scores)