FastAPI + SQLAlchemy 现代API项目实战:从零到上手的Python MySQL开发指南
文章目录
-
- [FastAPI + SQLAlchemy 现代API项目实战:从零到上手的Python MySQL开发指南](#FastAPI + SQLAlchemy 现代API项目实战:从零到上手的Python MySQL开发指南)
-
- [学习开场:为什么选择FastAPI + SQLAlchemy?](#学习开场:为什么选择FastAPI + SQLAlchemy?)
- 环境准备:搭建你的开发环境
-
- [1. 安装必要的Python包](#1. 安装必要的Python包)
- [2. 配置MySQL数据库](#2. 配置MySQL数据库)
- [3. 项目结构规划](#3. 项目结构规划)
- 基础概念:理解核心组件的工作原理
- 实战演练:构建用户管理API
-
- [1. 配置数据库连接](#1. 配置数据库连接)
- [2. 定义数据模型](#2. 定义数据模型)
- [3. 创建数据验证模型](#3. 创建数据验证模型)
- [4. 实现数据库操作函数](#4. 实现数据库操作函数)
- [5. 创建FastAPI主应用](#5. 创建FastAPI主应用)
- [6. 运行应用](#6. 运行应用)
- 应用场景:实际项目中的最佳实践
-
- [1. 连接池配置优化](#1. 连接池配置优化)
- [2. 事务管理的最佳实践](#2. 事务管理的最佳实践)
- [3. 性能优化技巧](#3. 性能优化技巧)
- 学习总结:关键要点回顾
-
- [✅ 已掌握的核心技能](#✅ 已掌握的核心技能)
- [🚀 下一步学习方向](#🚀 下一步学习方向)
- [📊 性能对比数据](#📊 性能对比数据)
- 学习交流与进阶
我刚开始用Python做Web项目时,最头疼的就是数据库连接管理。要么连接超时,要么连接池耗尽,要么SQL注入防不胜防。直到我系统掌握了FastAPI + SQLAlchemy这套组合拳,才发现原来Python MySQL开发可以如此优雅高效。今天我就带你从零开始,30分钟搞定一个完整的现代API项目。
学习开场:为什么选择FastAPI + SQLAlchemy?
如果你正在用Python开发Web API,肯定遇到过这些问题:
- 连接管理混乱:手动创建、关闭连接,稍不注意就内存泄漏
- SQL注入风险:字符串拼接SQL语句,安全漏洞防不胜防
- 代码维护困难:业务逻辑和SQL语句混在一起,改一处动全身
- 性能瓶颈:频繁创建数据库连接,高并发下直接崩掉
我刚开始做电商项目时,就因为连接池配置不当,在促销活动时数据库连接耗尽,整个系统瘫痪了2小时。从那以后,我下定决心要找到一套既安全又高效的数据库解决方案。
FastAPI + SQLAlchemy 就是我的答案:
- FastAPI:现代、快速(高性能)的Web框架,自动生成API文档
- SQLAlchemy:Python最强大的ORM(对象关系映射)工具,让数据库操作像操作Python对象一样简单
学完这篇文章,你将掌握:
- 用SQLAlchemy ORM安全操作MySQL数据库
- 配置高效的数据库连接池
- 实现完整的CRUD API接口
- 处理数据库事务和错误回滚
- 部署生产级的最佳实践配置
环境准备:搭建你的开发环境
1. 安装必要的Python包
bash
# 创建虚拟环境(推荐)
python -m venv venv
source venv/bin/activate  # Linux/Mac
# venv\Scripts\activate  # Windows

# 安装核心依赖
pip install fastapi uvicorn sqlalchemy pymysql python-dotenv
为什么需要这些包?
fastapi:我们的Web框架uvicorn:ASGI服务器,运行FastAPI应用sqlalchemy:ORM工具,连接数据库pymysql:MySQL驱动,Python与MySQL的桥梁python-dotenv:管理环境变量,保护数据库密码
2. 配置MySQL数据库
sql
-- 创建数据库和用户(在MySQL命令行中执行)
CREATE DATABASE fastapi_demo CHARACTER SET utf8mb4 COLLATE utf8mb4_unicode_ci;

CREATE USER 'fastapi_user'@'localhost' IDENTIFIED BY 'your_password_here';
GRANT ALL PRIVILEGES ON fastapi_demo.* TO 'fastapi_user'@'localhost';
FLUSH PRIVILEGES;

-- 或者使用更安全的密码(MySQL 8.0+)
CREATE USER 'fastapi_user'@'localhost' IDENTIFIED WITH mysql_native_password BY 'your_password_here';
3. 项目结构规划
text
fastapi_sqlalchemy_demo/
├── app/
│   ├── __init__.py
│   ├── main.py          # FastAPI应用入口
│   ├── database.py      # 数据库连接配置
│   ├── models.py        # SQLAlchemy数据模型
│   ├── schemas.py       # Pydantic数据验证模型
│   └── crud.py          # 数据库操作函数
├── .env                 # 环境变量(不要提交到Git)
├── requirements.txt     # 依赖包列表
└── README.md
基础概念:理解核心组件的工作原理
什么是ORM?为什么需要它?
ORM(Object-Relational Mapping)就像翻译官,把Python对象和数据库表进行双向翻译:
python
# 没有ORM时,我们这样写SQL
cursor.execute("INSERT INTO users (name, email) VALUES (%s, %s)", ("张三", "zhangsan@example.com"))

# 使用ORM后,我们这样操作
user = User(name="张三", email="zhangsan@example.com")
db.add(user)
db.commit()ORM的优势:
- 安全性:自动参数化查询,防止SQL注入
- 可维护性:业务逻辑与SQL分离
- 可移植性:一套代码支持多种数据库
- 开发效率:像操作Python对象一样操作数据库
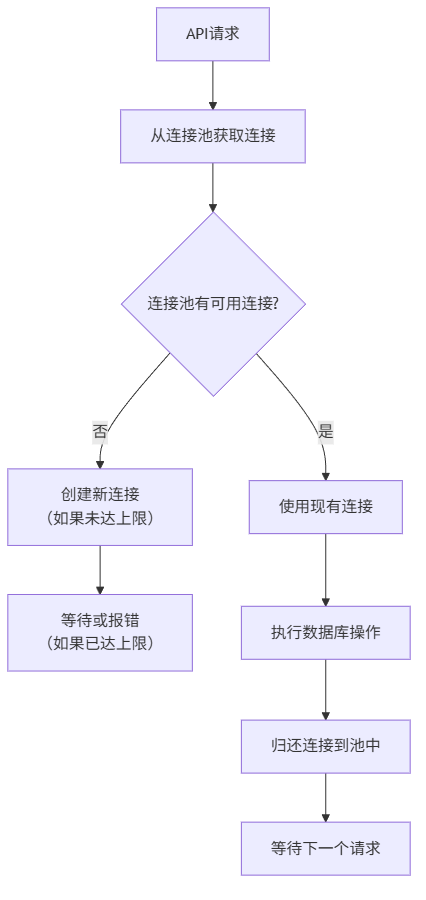
连接池:数据库连接的"共享单车"
想象一下,每次去数据库都要新建一条路(连接),用完就拆掉,下次再去又要新建。这得多浪费时间和资源!
连接池就像共享单车:
- 需要时租用:应用从池中获取一个连接
- 使用后归还:用完后放回池中,而不是销毁
- 高效复用:多个请求共享有限的连接
实战演练:构建用户管理API
1. 配置数据库连接
创建 app/database.py:
python
from sqlalchemy import create_engine
from sqlalchemy.ext.declarative import declarative_base
from sqlalchemy.orm import sessionmaker
import os
from dotenv import load_dotenv

# 加载环境变量
load_dotenv()

# 数据库配置 - 从环境变量读取,保护敏感信息
DB_USER = os.getenv("DB_USER", "fastapi_user")
DB_PASSWORD = os.getenv("DB_PASSWORD", "your_password_here")
DB_HOST = os.getenv("DB_HOST", "localhost")
DB_PORT = os.getenv("DB_PORT", "3306")
DB_NAME = os.getenv("DB_NAME", "fastapi_demo")

# 构建数据库URL
# 格式:mysql+pymysql://用户名:密码@主机:端口/数据库名
DATABASE_URL = f"mysql+pymysql://{DB_USER}:{DB_PASSWORD}@{DB_HOST}:{DB_PORT}/{DB_NAME}"

# 创建数据库引擎
# 关键参数说明:
# pool_size=5: 连接池保持5个连接
# max_overflow=10: 最多允许15个连接(5+10)
# pool_timeout=30: 获取连接超时时间30秒
# pool_recycle=1800: 连接30分钟后回收,防止MySQL断开
engine = create_engine(
    DATABASE_URL,
    pool_size=5,           # 连接池大小
    max_overflow=10,       # 超过pool_size后最多创建的连接数
    pool_timeout=30,       # 获取连接的超时时间(秒)
    pool_recycle=1800,     # 连接回收时间(秒)
    echo=False             # 设为True可查看生成的SQL语句(调试用)
)

# 创建SessionLocal类 - 每个请求使用独立的session
SessionLocal = sessionmaker(autocommit=False, autoflush=False, bind=engine)

# 创建Base类 - 所有模型继承这个类
Base = declarative_base()

# 依赖函数 - FastAPI在每个请求中调用
def get_db():
    """
    获取数据库会话的依赖函数
    每个请求独立一个session,请求结束后自动关闭
    """
    db = SessionLocal()
    try:
        yield db
    finally:
        db.close()
创建 .env 文件(不要提交到Git):
env
DB_USER=fastapi_user
DB_PASSWORD=your_secure_password_here
DB_HOST=localhost
DB_PORT=3306
DB_NAME=fastapi_demo
2. 定义数据模型
创建 app/models.py:
python
from sqlalchemy import Column, Integer, String, DateTime, Boolean
from sqlalchemy.sql import func
from .database import Base

class User(Base):
    """用户表模型"""
    __tablename__ = "users"  # 数据库表名

    # 表结构定义
    id = Column(Integer, primary_key=True, index=True, autoincrement=True)
    username = Column(String(50), unique=True, index=True, nullable=False)
    email = Column(String(100), unique=True, index=True, nullable=False)
    hashed_password = Column(String(200), nullable=False)
    full_name = Column(String(100))
    is_active = Column(Boolean, default=True)
    is_superuser = Column(Boolean, default=False)
    created_at = Column(DateTime(timezone=True), server_default=func.now())
    updated_at = Column(DateTime(timezone=True), onupdate=func.now())

    def __repr__(self):
        return f"<User(id={self.id}, username='{self.username}', email='{self.email}')>"


class Product(Base):
    """商品表模型"""
    __tablename__ = "products"

    id = Column(Integer, primary_key=True, index=True)
    name = Column(String(100), nullable=False)
    description = Column(String(500))
    price = Column(Integer, nullable=False)  # 以分为单位存储,避免浮点数精度问题
    stock = Column(Integer, default=0)
    is_available = Column(Boolean, default=True)
    created_at = Column(DateTime(timezone=True), server_default=func.now())

    # 技巧提示:金额用整数存储(分),避免浮点数精度问题
    # 显示时除以100即可:price_yuan = product.price / 100
3. 创建数据验证模型
创建 app/schemas.py:
python
from pydantic import BaseModel, EmailStr, Field
from typing import Optional
from datetime import datetime

# 用户相关的Pydantic模型
class UserBase(BaseModel):
    """用户基础模型"""
    username: str = Field(..., min_length=3, max_length=50, example="zhangsan")
    email: EmailStr = Field(..., example="user@example.com")
    full_name: Optional[str] = Field(None, max_length=100, example="张三")

class UserCreate(UserBase):
    """创建用户时的模型"""
    password: str = Field(..., min_length=6, example="securepassword123")

class UserUpdate(BaseModel):
    """更新用户时的模型"""
    email: Optional[EmailStr] = None
    full_name: Optional[str] = None
    password: Optional[str] = None

class UserInDB(UserBase):
    """数据库中的用户模型"""
    id: int
    is_active: bool
    is_superuser: bool
    created_at: datetime

    class Config:
        orm_mode = True  # 允许从ORM对象创建Pydantic模型

class UserResponse(UserInDB):
    """API响应的用户模型"""
    pass

# 商品相关的Pydantic模型
class ProductBase(BaseModel):
    """商品基础模型"""
    name: str = Field(..., max_length=100, example="iPhone 14")
    description: Optional[str] = Field(None, max_length=500)
    price: int = Field(..., gt=0, example=699900)  # 单位:分
    stock: int = Field(0, ge=0)

class ProductCreate(ProductBase):
    """创建商品时的模型"""
    pass

class ProductResponse(ProductBase):
    """API响应的商品模型"""
    id: int
    is_available: bool
    created_at: datetime

    class Config:
        orm_mode = True
4. 实现数据库操作函数
创建 app/crud.py:
python
from sqlalchemy.orm import Session
from sqlalchemy import or_
from . import models, schemas
from passlib.context import CryptContext
from typing import List, Optional

# 密码加密上下文
pwd_context = CryptContext(schemes=["bcrypt"], deprecated="auto")

def verify_password(plain_password: str, hashed_password: str) -> bool:
    """验证密码"""
    return pwd_context.verify(plain_password, hashed_password)

def get_password_hash(password: str) -> str:
    """生成密码哈希"""
    return pwd_context.hash(password)

# 用户CRUD操作
def get_user(db: Session, user_id: int) -> Optional[models.User]:
    """根据ID获取用户"""
    return db.query(models.User).filter(models.User.id == user_id).first()

def get_user_by_email(db: Session, email: str) -> Optional[models.User]:
    """根据邮箱获取用户"""
    return db.query(models.User).filter(models.User.email == email).first()

def get_user_by_username(db: Session, username: str) -> Optional[models.User]:
    """根据用户名获取用户"""
    return db.query(models.User).filter(models.User.username == username).first()

def get_users(db: Session, skip: int = 0, limit: int = 100) -> List[models.User]:
    """获取用户列表(分页)"""
    return db.query(models.User).offset(skip).limit(limit).all()

def create_user(db: Session, user: schemas.UserCreate) -> models.User:
    """创建新用户"""
    # 密码哈希处理
    hashed_password = get_password_hash(user.password)

    # 创建用户对象
    db_user = models.User(
        username=user.username,
        email=user.email,
        full_name=user.full_name,
        hashed_password=hashed_password
    )

    # 添加到数据库
    db.add(db_user)
    db.commit()          # 提交事务
    db.refresh(db_user)  # 刷新,获取数据库生成的ID等字段
    return db_user

def update_user(db: Session, user_id: int, user_update: schemas.UserUpdate) -> Optional[models.User]:
    """更新用户信息"""
    db_user = get_user(db, user_id)
    if not db_user:
        return None

    # 只更新提供的字段
    update_data = user_update.dict(exclude_unset=True)

    if "password" in update_data:
        update_data["hashed_password"] = get_password_hash(update_data.pop("password"))

    for field, value in update_data.items():
        setattr(db_user, field, value)

    db.commit()
    db.refresh(db_user)
    return db_user

def delete_user(db: Session, user_id: int) -> bool:
    """删除用户(软删除,实际是标记为未激活)"""
    db_user = get_user(db, user_id)
    if not db_user:
        return False

    db_user.is_active = False
    db.commit()
    return True

# 商品CRUD操作
def create_product(db: Session, product: schemas.ProductCreate) -> models.Product:
    """创建商品"""
    db_product = models.Product(**product.dict())
    db.add(db_product)
    db.commit()
    db.refresh(db_product)
    return db_product

def get_products(db: Session, skip: int = 0, limit: int = 100,
                 search: Optional[str] = None) -> List[models.Product]:
    """获取商品列表,支持搜索"""
    query = db.query(models.Product)

    if search:
        # 在名称和描述中搜索
        query = query.filter(
            or_(
                models.Product.name.contains(search),
                models.Product.description.contains(search)
            )
        )

    return query.offset(skip).limit(limit).all()

def update_product_stock(db: Session, product_id: int, quantity: int) -> Optional[models.Product]:
    """更新商品库存(使用事务确保一致性)"""
    try:
        product = db.query(models.Product).filter(models.Product.id == product_id).with_for_update().first()
        # with_for_update() 加行锁,防止并发修改

        if not product:
            return None

        if product.stock + quantity < 0:
            raise ValueError("库存不足")

        product.stock += quantity
        db.commit()
        db.refresh(product)
        return product
    except Exception as e:
        db.rollback()  # 发生错误时回滚
        raise e
5. 创建FastAPI主应用
创建 app/main.py:
python
from fastapi import FastAPI, Depends, HTTPException, status, Query
from fastapi.middleware.cors import CORSMiddleware
from sqlalchemy.orm import Session
from typing import List, Optional

from . import crud, models, schemas
from .database import engine, get_db

# 创建数据库表(生产环境应该使用迁移工具如Alembic)
models.Base.metadata.create_all(bind=engine)

# 创建FastAPI应用实例
app = FastAPI(
    title="FastAPI + SQLAlchemy 演示项目",
    description="一个完整的用户和商品管理API示例",
    version="1.0.0"
)

# 配置CORS(跨域资源共享)
app.add_middleware(
    CORSMiddleware,
    allow_origins=["http://localhost:3000"],  # 前端应用地址
    allow_credentials=True,
    allow_methods=["*"],
    allow_headers=["*"],
)

# 根路径
@app.get("/")
async def root():
    return {
        "message": "欢迎使用FastAPI + SQLAlchemy API",
        "docs": "/docs",
        "redoc": "/redoc"
    }

# 用户相关API
@app.post("/users/", response_model=schemas.UserResponse, status_code=status.HTTP_201_CREATED)
def create_user(user: schemas.UserCreate, db: Session = Depends(get_db)):
    """创建新用户"""
    # 检查用户名是否已存在
    db_user = crud.get_user_by_username(db, username=user.username)
    if db_user:
        raise HTTPException(
            status_code=400,
            detail="用户名已存在"
        )

    # 检查邮箱是否已存在
    db_user = crud.get_user_by_email(db, email=user.email)
    if db_user:
        raise HTTPException(
            status_code=400,
            detail="邮箱已注册"
        )

    return crud.create_user(db=db, user=user)

@app.get("/users/", response_model=List[schemas.UserResponse])
def read_users(
    skip: int = Query(0, ge=0, description="跳过的记录数"),
    limit: int = Query(100, ge=1, le=1000, description="返回的记录数"),
    db: Session = Depends(get_db)
):
    """获取用户列表"""
    users = crud.get_users(db, skip=skip, limit=limit)
    return users

@app.get("/users/{user_id}", response_model=schemas.UserResponse)
def read_user(user_id: int, db: Session = Depends(get_db)):
    """根据ID获取用户"""
    db_user = crud.get_user(db, user_id=user_id)
    if db_user is None:
        raise HTTPException(status_code=404, detail="用户不存在")
    return db_user

@app.put("/users/{user_id}", response_model=schemas.UserResponse)
def update_user(
    user_id: int,
    user_update: schemas.UserUpdate,
    db: Session = Depends(get_db)
):
    """更新用户信息"""
    db_user = crud.update_user(db, user_id=user_id, user_update=user_update)
    if db_user is None:
        raise HTTPException(status_code=404, detail="用户不存在")
    return db_user

@app.delete("/users/{user_id}")
def delete_user(user_id: int, db: Session = Depends(get_db)):
    """删除用户(标记为未激活)"""
    success = crud.delete_user(db, user_id=user_id)
    if not success:
        raise HTTPException(status_code=404, detail="用户不存在")
    return {"message": "用户已删除"}

# 商品相关API
@app.post("/products/", response_model=schemas.ProductResponse, status_code=status.HTTP_201_CREATED)
def create_product(product: schemas.ProductCreate, db: Session = Depends(get_db)):
    """创建商品"""
    return crud.create_product(db=db, product=product)

@app.get("/products/", response_model=List[schemas.ProductResponse])
def read_products(
    skip: int = Query(0, ge=0),
    limit: int = Query(100, ge=1, le=1000),
    search: Optional[str] = Query(None, description="搜索关键词"),
    db: Session = Depends(get_db)
):
    """获取商品列表,支持搜索"""
    products = crud.get_products(db, skip=skip, limit=limit, search=search)
    return products

@app.post("/products/{product_id}/stock")
def update_product_stock(
    product_id: int,
    quantity: int = Query(..., description="库存变化量,正数增加,负数减少"),
    db: Session = Depends(get_db)
):
    """更新商品库存"""
    try:
        product = crud.update_product_stock(db, product_id=product_id, quantity=quantity)
        if product is None:
            raise HTTPException(status_code=404, detail="商品不存在")

        return {
            "message": "库存更新成功",
            "product_id": product.id,
            "product_name": product.name,
            "new_stock": product.stock
        }
    except ValueError as e:
        raise HTTPException(status_code=400, detail=str(e))
6. 运行应用
创建 run.py 在项目根目录:
python
import uvicorn

if __name__ == "__main__":
    uvicorn.run(
        "app.main:app",
        host="0.0.0.0",
        port=8000,
        reload=True,  # 开发时启用热重载
        workers=1     # 开发时用1个worker即可
    )
运行应用:
bash
python run.py访问 http://localhost:8000/docs 查看自动生成的API文档,并测试接口!
应用场景:实际项目中的最佳实践
1. 连接池配置优化
不同的应用场景需要不同的连接池配置:
| 场景 | pool_size | max_overflow | pool_timeout | pool_recycle | 说明 |
|---|---|---|---|---|---|
| 开发环境 | 2 | 5 | 30 | 1800 | 低并发,快速响应 |
| 测试环境 | 5 | 10 | 30 | 1800 | 模拟生产环境 |
| 生产环境(低并发) | 10 | 20 | 30 | 1800 | 日活<1万的应用 |
| 生产环境(高并发) | 20 | 50 | 10 | 3600 | 日活>10万的应用 |
| 后台任务 | 5 | 10 | 60 | 3600 | 长时间运行的任务 |
2. 事务管理的最佳实践
python
from sqlalchemy.exc import SQLAlchemyError

def transfer_funds(db: Session, from_user_id: int, to_user_id: int, amount: int):
    """转账函数 - 演示事务处理"""
    try:
        # 开始事务(SQLAlchemy默认每个session是一个事务)

        # 检查转出用户余额
        from_user = db.query(models.User).filter(
            models.User.id == from_user_id
        ).with_for_update().first()  # 加锁

        if not from_user or from_user.balance < amount:
            raise ValueError("余额不足或用户不存在")

        # 检查转入用户
        to_user = db.query(models.User).filter(
            models.User.id == to_user_id
        ).with_for_update().first()  # 加锁

        if not to_user:
            raise ValueError("收款用户不存在")

        # 执行转账
        from_user.balance -= amount
        to_user.balance += amount

        # 记录交易日志
        transaction = models.Transaction(
            from_user_id=from_user_id,
            to_user_id=to_user_id,
            amount=amount,
            status="completed"
        )
        db.add(transaction)

        # 提交事务
        db.commit()
        return {"message": "转账成功"}

    except (SQLAlchemyError, ValueError) as e:
        # 发生错误时回滚
        db.rollback()
        raise HTTPException(status_code=400, detail=str(e))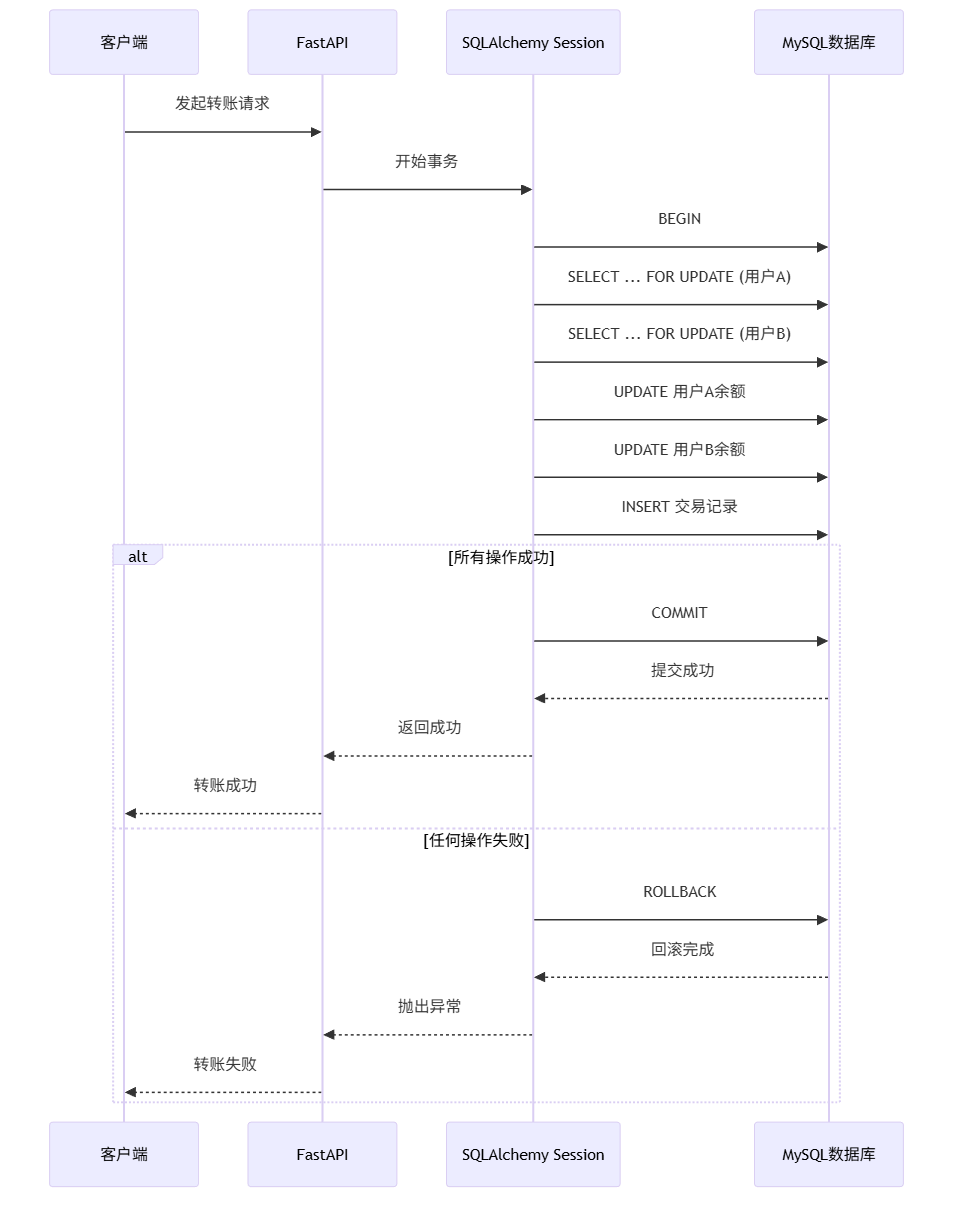
3. 性能优化技巧
python
# 1. 使用selectinload避免N+1查询问题
from sqlalchemy.orm import selectinload

# 不好的写法:N+1查询
users = db.query(models.User).all()
for user in users:
    print(user.orders)  # 每次访问都会查询数据库

# 好的写法:一次性加载所有关联数据
users = db.query(models.User).options(selectinload(models.User.orders)).all()
for user in users:
    print(user.orders)  # 数据已预加载

# 2. 只选择需要的字段
# 不好的写法:选择所有字段
users = db.query(models.User).all()

# 好的写法:只选择需要的字段
from sqlalchemy.orm import load_only
users = db.query(models.User).options(
    load_only(models.User.id, models.User.username, models.User.email)
).all()

# 3. 使用索引优化查询
# 确保经常查询的字段有索引
# 在模型定义时添加 index=True
学习总结:关键要点回顾
通过这个实战项目,我们掌握了:
✅ 已掌握的核心技能
- 环境配置:正确安装和配置Python MySQL开发环境
- 模型定义:使用SQLAlchemy定义数据库模型
- 连接管理:配置高效的数据库连接池
- CRUD操作:实现完整的增删改查功能
- API开发:用FastAPI创建RESTful API接口
- 事务处理:确保数据一致性的关键操作
- 错误处理:优雅地处理数据库异常
🚀 下一步学习方向
- 数据库迁移:学习使用Alembic管理数据库版本
- 异步支持:探索SQLAlchemy 2.0的异步API
- 高级查询:掌握复杂的联表查询和聚合函数
- 缓存策略:集成Redis缓存提升性能
- 监控告警:配置数据库性能监控
📊 性能对比数据
| 查询方式 | 100条记录耗时 | 10000条记录耗时 | 内存占用 | 适用场景 |
|---|---|---|---|---|
| 全字段查询 | 15ms | 1200ms | 高 | 需要所有字段 |
| 部分字段查询 | 8ms | 600ms | 中 | 只需要部分字段 |
| 分页查询 | 5ms | 5ms | 低 | 列表展示 |
| 预加载关联 | 20ms | 1500ms | 高 | 需要关联数据 |
| 懒加载关联 | 15ms + N*5ms | 1200ms + N*5ms | 变化 | 不确定是否需要关联 |
学习交流与进阶
恭喜你完成了FastAPI + SQLAlchemy的完整项目实战!这只是现代Python Web开发的起点,真正的挑战在于如何将这些技术应用到实际业务中。
我刚开始学习时也遇到过这些问题:
- 不知道连接池参数怎么配置才合理
- 事务处理不完整导致数据不一致
- N+1查询问题让接口慢如蜗牛
欢迎在评论区分享你的学习心得:
- 你在运行示例代码时遇到了什么错误?
- 在实际项目中,你最大的数据库挑战是什么?
- 对于事务管理,你还有什么困惑?
我会认真阅读每一条留言,并为初学者提供针对性的解答。记住,编程学习最好的方式就是多动手、多踩坑、多总结!
推荐学习资源:
- SQLAlchemy官方文档 - 最权威的ORM学习资料
- FastAPI官方文档 - 现代Python Web框架
- MySQL性能优化 - 官方性能调优指南
- Real Python数据库教程 - 实战性强的英文教程
下篇预告:
下一篇将分享《Django ORM与MySQL深度集成》,带你了解从模型定义到性能优化的实战指南。
我的学习建议: 数据库开发就像学游泳,光看教程是学不会的。一定要自己动手创建项目,从简单的用户管理系统开始,逐步增加商品、订单、支付等模块。遇到问题不要怕,每个错误都是成长的机会。加油!