安装go必要环境
- 下载go
bash
https://go.dev/dl/

# inter版本
https://go.dev/dl/go1.25.5.windows-amd64.msi- 配置GOROOT
- 配置代理

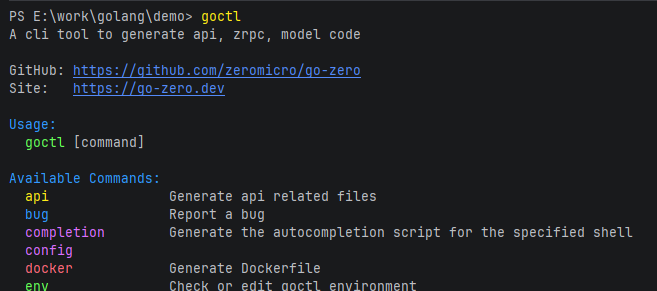
安装goctl工具
bash
 go install github.com/zeromicro/go-zero/tools/goctl@latest

goctl --version
出现下面的信息说明go-zero安装成功

创建第一个项目
初始化api项目
bash
goctl api new user
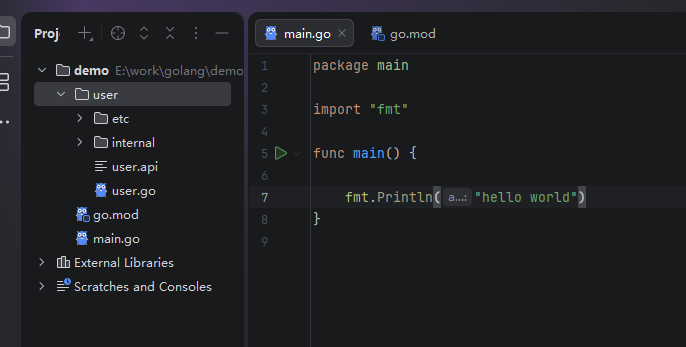
查看生成的项目
下载依赖
切换到user目录,下载依赖
 cd user
 go mod tidy
结果
 cd user
PS E:\work\golang\demo\user> go mod tidy
go: finding module for package github.com/zeromicro/go-zero/core/logx
go: finding module for package github.com/zeromicro/go-zero/rest
go: finding module for package github.com/zeromicro/go-zero/core/conf
go: finding module for package github.com/zeromicro/go-zero/rest/httpx
go: found github.com/zeromicro/go-zero/core/conf in github.com/zeromicro/go-zero v1.9.4
go: found github.com/zeromicro/go-zero/rest in github.com/zeromicro/go-zero v1.9.4
go: found github.com/zeromicro/go-zero/rest/httpx in github.com/zeromicro/go-zero v1.9.4
go: found github.com/zeromicro/go-zero/core/logx in github.com/zeromicro/go-zero v1.9.4
go: downloading github.com/stretchr/testify v1.11.1
go: downloading github.com/google/uuid v1.6.0
go: downloading k8s.io/utils v0.0.0-20240711033017-18e509b52bc8
go: downloading github.com/golang-jwt/jwt/v4 v4.5.2
go: downloading gopkg.in/h2non/gock.v1 v1.1.2
go: downloading github.com/google/go-cmp v0.6.0
go: downloading google.golang.org/genproto/googleapis/rpc v0.0.0-20240701130421-f6361c86f094
go: downloading github.com/kylelemons/godebug v1.1.0
go: downloading github.com/prometheus/procfs v0.15.1
go: downloading go.uber.org/goleak v1.3.0
go: downloading github.com/stretchr/objx v0.5.2
go: downloading github.com/davecgh/go-spew v1.1.1
go: downloading github.com/pmezard/go-difflib v1.0.0
go: downloading github.com/h2non/parth v0.0.0-20190131123155-b4df798d6542
go: downloading gopkg.in/check.v1 v1.0.0-20201130134442-10cb98267c6c
go: downloading github.com/kr/pretty v0.3.1
go: downloading github.com/prashantv/gostub v1.1.0
go: downloading github.com/rogpeppe/go-internal v1.10.0
go: downloading github.com/kr/text v0.2.0
运行user模块
运行启动user模块
go run user.go
Starting server at 0.0.0.0:8888...
生成文件详细解释

- 配置文件
user/etc/user-api.yaml
yml
Name: user-api # 服务名
Host: 0.0.0.0 # 主机
Port: 8888 #端口- 定义协议
user/user.api
yml
syntax = "v1" # 版本

# 请求 `type`  对于生成的Request  在`user/internal/types/types.go` 的 	`Request`
type Request {
	Name string `path:"name,options=you|me"`
}

# 响应  `type` 对于生成的Response 在`user/internal/types/types.go` 的 	`Response`
type Response {
	Message string `json:"message"`
}

# 方法, UserHandler在`user/internal/handler/userhandler.go`里
service user-api {
	@handler UserHandler
	get /from/:name (Request) returns (Response)
}- 类型type
user/internal/types/types.go
go
package types

type Request struct {
	Name string `path:"name,options=you|me"`
}

type Response struct {
	Message string `json:"message"`
}- svc 上下文
go
// Code scaffolded by goctl. Safe to edit.
// goctl 1.9.2

package svc

import (
	"demo/user/internal/config"
)

type ServiceContext struct {
	Config config.Config
}

func NewServiceContext(c config.Config) *ServiceContext {
	return &ServiceContext{
		Config: c,
	}
}- 逻辑logic
go
// Code scaffolded by goctl. Safe to edit.
// goctl 1.9.2

package logic

import (
	"context"
	"demo/user/internal/svc"
	"demo/user/internal/types"
	"github.com/zeromicro/go-zero/core/logx"
)

type UserLogic struct {
	logx.Logger
	ctx    context.Context
	svcCtx *svc.ServiceContext
}

func NewUserLogic(ctx context.Context, svcCtx *svc.ServiceContext) *UserLogic {
	return &UserLogic{
		Logger: logx.WithContext(ctx),
		ctx:    ctx,
		svcCtx: svcCtx,
	}
}

func (l *UserLogic) User(req *types.Request) (resp *types.Response, err error) {
	// todo: add your logic here and delete this line
	return &types.Response{
		Message: "===========Hello World==========",
	}, nil
}- 路由
go
// Code generated by goctl. DO NOT EDIT.
// goctl 1.9.2

package handler

import (
	"net/http"

	"demo/user/internal/svc"

	"github.com/zeromicro/go-zero/rest"
)

func RegisterHandlers(server *rest.Server, serverCtx *svc.ServiceContext) {
	server.AddRoutes(
		[]rest.Route{
			{
				Method:  http.MethodGet,
				Path:    "/from/:name",
				Handler: UserHandler(serverCtx),
			},
		},
	)
}
浏览器查看
bash
http://127.0.0.1:8888/from/you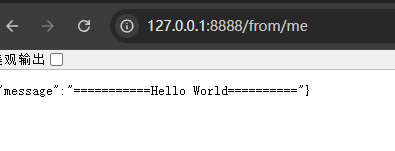
bash
http://127.0.0.1:8888/from/wo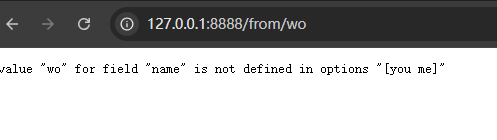
知识总结
热加载
下载air
方便开发,
go install github.com/air-verse/air@latest

air -v
运行
不再运行 go run user
air 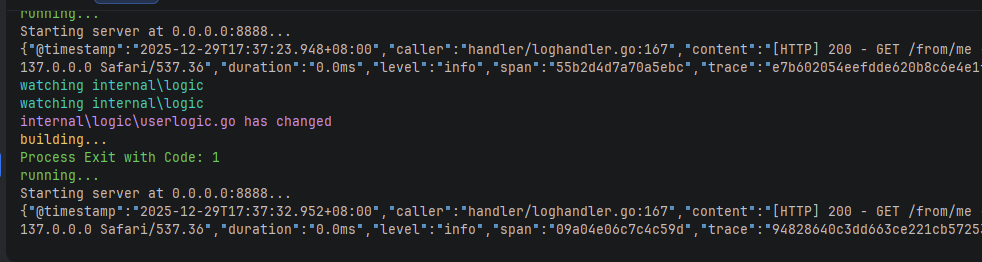
Thunder Client 测试
vscode 安装插件
go-zero项目解析


GRPC demo代码生成
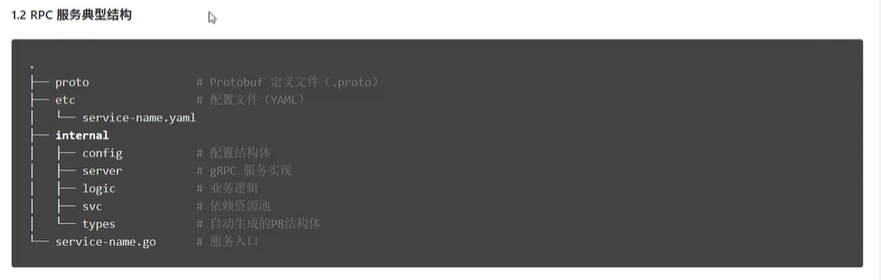
grpc服务是和http服务分开的,不可以混为一谈
例如:同为user模块,既可以提供http服务,也可以提供rpc服务
如果提供http服务,命令行如下:
go
cd /user
go run user.go
如果提供rpc服务,相应的配置,proto文件等需要生成。这里只讲启动
go
cd /user/rpc
go run user.go
以car项目为例
bash
goctl rpc new car- 创建过程
bash
goctl rpc new car
go: downloading google.golang.org/protobuf v1.36.11
go: downloading google.golang.org/grpc v1.78.0
go: downloading google.golang.org/grpc/cmd/protoc-gen-go-grpc v1.6.0
go: downloading google.golang.org/protobuf v1.36.10
Done.- 切换到car目录下拉去依赖,
bash
go mod tidy- 运行
会报错
go run car
编辑该文件
internal/logic/pinglogic.go
商城微服务 shop
0.规划
| 服务 | http端口 |
|---|---|
| user-api | 8881 |
| user-rpc | 8882 |
| order-api | 8883 |
| order-rpc | 8884 |
| product-api | 8885 |
| product-rpc | 8886 |
| cart-api | 8887 |
| cart-rpc | 8888 |
| product-api | 8887 |
| product-rpc | 8888 |
| gateway-api | 8889 |
| gateway-rpc | 8890 |
1.创建项目
mkdir -p shop/api
cd shop
2.初始化init mod
go mod init finejade/shop-mall3. 定义 API 文件
网关服务 api/gateway.api
go
// api/gateway.api
info (
	title:   "Shop Mall Gateway API"
	desc:    "API Gateway for the distributed shop mall system."
	author:  "Your Name"
	email:   "your.email@example.com"
	version: "1.0.0"
)

// 1. 定义所有路由所需的具体请求和响应结构体
//    这些结构体必须与各自微服务 .api 文件中的定义保持一致!
type (
	// --- 用户服务 (user.api) ---
	UserRegisterReq {
		Username string `json:"username"`
		Password string `json:"password"`
		Email    string `json:"email"`
	}
	UserRegisterResp {
		Id int64 `json:"id"`
	}
	UserLoginReq {
		Username string `json:"username"`
		Password string `json:"password"`
	}
	UserLoginResp {
		Token string `json:"token"`
	}
	GetUserInfoReq {
		// 实际项目中,用户ID通常从JWT Token解析,这里仅为演示
		UserId int64 `json:"userId"`
	}
	UserInfo {
		Id       int64  `json:"id"`
		Username string `json:"username"`
		Email    string `json:"email"`
	}
	GetUserInfoResp {
		User UserInfo `json:"user"`
	}
	// --- 商品服务 (product.api) ---
	GetProductListReq {
		Page     int `form:"page,default=1"`
		PageSize int `form:"pageSize,default=10"`
	}
	ProductItem {
		Id       int64   `json:"id"`
		Name     string  `json:"name"`
		Price    float64 `json:"price"`
		ImageUrl string  `json:"imageUrl"`
	}
	GetProductListResp {
		List  []ProductItem `json:"list"`
		Total int64         `json:"total"`
	}
	GetProductDetailReq {
		Id int64 `path:"id"`
	}
	GetProductDetailResp {
		Product ProductItem `json:"product"`
	}
	// --- 购物车服务 (cart.api) ---
	AddToCartReq {
		UserId    int64 `json:"userId"`
		ProductId int64 `json:"productId"`
		Quantity  int   `json:"quantity"`
	}
	GetCartListReq {
		UserId int64 `json:"userId"`
	}
	CartItem {
		ProductId   int64   `json:"productId"`
		ProductName string  `json:"productName"`
		Price       float64 `json:"price"`
		Quantity    int     `json:"quantity"`
	}
	GetCartListResp {
		Items []CartItem `json:"items"`
	}
	UpdateCartItemReq {
		UserId    int64 `json:"userId"`
		ProductId int64 `json:"productId"`
		Quantity  int   `json:"quantity"`
	}
	DeleteCartItemReq {
		UserId    int64 `json:"userId"`
		ProductId int64 `json:"productId"`
	}
	// --- 订单服务 (order.api) ---
	CreateOrderReq {
		UserId  int64  `json:"userId"`
		Address string `json:"address"`
	}
	CreateOrderResp {
		OrderId int64 `json:"orderId"`
	}
	GetOrderListReq {
		UserId int64 `json:"userId"`
	}
	OrderInfo {
		Id         int64   `json:"id"`
		TotalPrice float64 `json:"totalPrice"`
		Status     string  `json:"status"`
		CreateTime string  `json:"createTime"`
	}
	GetOrderListResp {
		Orders []OrderInfo `json:"orders"`
	}
	GetOrderDetailReq {
		Id int64 `path:"id"`
	}
	GetOrderDetailResp {
		Order OrderInfo `json:"order"`
	}
	// --- 支付服务 (payment.api) ---
	CreatePaymentReq {
		OrderId int64  `json:"orderId"`
		Method  string `json:"method"`
	}
	CreatePaymentResp {
		PaymentUrl string `json:"paymentUrl"`
	}
	PaymentNotifyReq {
		OutTradeNo  string `json:"out_trade_no"`
		TradeStatus string `json:"trade_status"`
	}
	PaymentNotifyResp {
		Code string `json:"code"`
		Msg  string `json:"msg"`
	}
	// 2. 定义网关统一的、最终的对外响应格式
	GatewayResponse {
		Code int         `json:"code"` // 业务状态码, 0 代表成功
		Msg  string      `json:"msg"` // 提示信息
		Data interface{} `json:"data"` // 响应数据,这里可以是任意类型
	}
)

// 3. 在 service 块中,为每个路由指定其具体的请求和响应类型
service gateway-api {
	// --- 用户服务路由 ---
	@doc "用户注册"
	@handler userRegisterHandler
	post /api/user/register (UserRegisterReq) returns (GatewayResponse)

	@doc "用户登录"
	@handler userLoginHandler
	post /api/user/login (UserLoginReq) returns (GatewayResponse)

	@doc "获取用户信息"
	@handler getUserInfoHandler
	get /api/user/info (GetUserInfoReq) returns (GatewayResponse)

	// --- 商品服务路由 ---
	@doc "获取商品列表"
	@handler getProductListHandler
	get /api/product/list (GetProductListReq) returns (GatewayResponse)

	@doc "获取商品详情"
	@handler getProductDetailHandler
	get /api/product/:id (GetProductDetailReq) returns (GatewayResponse)

	// --- 购物车服务路由 ---
	@doc "添加商品到购物车"
	@handler addToCartHandler
	post /api/cart/add (AddToCartReq) returns (GatewayResponse)

	@doc "获取购物车列表"
	@handler getCartListHandler
	get /api/cart/list (GetCartListReq) returns (GatewayResponse)

	@doc "更新购物车商品数量"
	@handler updateCartItemHandler
	post /api/cart/update (UpdateCartItemReq) returns (GatewayResponse)

	@doc "删除购物车商品"
	@handler deleteCartItemHandler
	post /api/cart/delete (DeleteCartItemReq) returns (GatewayResponse)

	// --- 订单服务路由 ---
	@doc "创建订单"
	@handler createOrderHandler
	post /api/order/create (CreateOrderReq) returns (GatewayResponse)

	@doc "获取订单列表"
	@handler getOrderListHandler
	get /api/order/list (GetOrderListReq) returns (GatewayResponse)

	@doc "获取订单详情"
	@handler getOrderDetailHandler
	get /api/order/:id (GetOrderDetailReq) returns (GatewayResponse)

	// --- 支付服务路由 ---
	@doc "创建支付"
	@handler createPaymentHandler
	post /api/payment/create (CreatePaymentReq) returns (GatewayResponse)

	@doc "支付回调通知"
	@handler paymentNotifyHandler
	post /api/payment/notify (PaymentNotifyReq) returns (PaymentNotifyResp)
}


}
用户服务 api/user.api
go
info(
    title: "User Service API"
    desc: "Provides user registration, login, and profile management."
    author: "Your Name"
    email: "your.email@example.com"
    version: "1.0.0"
)

type (
    // --- 请求结构体 ---
    RegisterReq {
        Username string `json:"username"`
        Password string `json:"password"`
        Email    string `json:"email"`
    }

    LoginReq {
        Username string `json:"username"`
        Password string `json:"password"`
    }

    GetUserInfoReq {
        // 实际项目中,用户ID通常从JWT Token中解析,这里仅作示例
        UserId int64 `json:"userId"`
    }

    // --- 响应结构体 ---
    RegisterResp {
        Id int64 `json:"id"`
    }

    LoginResp {
        Token string `json:"token"`
    }

    UserInfo {
        Id       int64  `json:"id"`
        Username string `json:"username"`
        Email    string `json:"email"`
        Nickname string `json:"nickname"`
        Avatar   string `json:"avatar"`
    }

    GetUserInfoResp {
        User UserInfo `json:"user"`
    }

    // 统一响应
    UserResponse {
        Code int         `json:"code"`
        Msg  string      `json:"msg"`
        Data interface{} `json:"data"`
    }
)

service user-api {
    @handler registerHandler
    post /user/register (RegisterReq) returns (UserResponse)

    @handler loginHandler
    post /user/login (LoginReq) returns (UserResponse)

    @handler getUserInfoHandler
    get /user/info (GetUserInfoReq) returns (UserResponse)
}
商品服务 (api/product.api)
go
info(
    title: "Product Service API"
    desc: "Provides product listing and detail information."
    author: "Your Name"
    email: "your.email@example.com"
    version: "1.0.0"
)

type (
    // --- 请求结构体 ---
    GetProductListReq {
        Page     int `form:"page,default=1"`
        PageSize int `form:"pageSize,default=10"`
    }

    GetProductDetailReq {
        Id int64 `path:"id"`
    }

    // --- 响应结构体 ---
    ProductItem {
        Id          int64   `json:"id"`
        Name        string  `json:"name"`
        Price       float64 `json:"price"`
        Description string  `json:"description"`
        Stock       int     `json:"stock"`
        ImageUrl    string  `json:"imageUrl"`
    }

    GetProductListResp {
        List  []ProductItem `json:"list"`
        Total int64         `json:"total"`
    }

    GetProductDetailResp {
        Product ProductItem `json:"product"`
    }

    // 统一响应
    ProductResponse {
        Code int         `json:"code"`
        Msg  string      `json:"msg"`
        Data interface{} `json:"data"`
    }
)

service product-api {
    @handler getProductListHandler
    get /product/list (GetProductListReq) returns (ProductResponse)

    @handler getProductDetailHandler
    get /product/:id (GetProductDetailReq) returns (ProductResponse)
}
购物车服务 (cart.api)
go
info(
    title: "Cart Service API"
    desc: "Manages user shopping cart items."
    author: "Your Name"
    email: "your.email@example.com"
    version: "1.0.0"
)

type (
    // --- 请求结构体 ---
    AddToCartReq {
        UserId    int64 `json:"userId"`
        ProductId int64 `json:"productId"`
        Quantity  int   `json:"quantity"`
    }

    GetCartListReq {
        UserId int64 `json:"userId"`
    }

    UpdateCartItemReq {
        UserId    int64 `json:"userId"`
        ProductId int64 `json:"productId"`
        Quantity  int   `json:"quantity"`
    }

    DeleteCartItemReq {
        UserId    int64 `json:"userId"`
        ProductId int64 `json:"productId"`
    }

    // --- 响应结构体 ---
    CartItem {
        ProductId   int64   `json:"productId"`
        ProductName string  `json:"productName"`
        Price       float64 `json:"price"`
        Quantity    int     `json:"quantity"`
        ImageUrl    string  `json:"imageUrl"`
    }

    GetCartListResp {
        Items []CartItem `json:"items"`
    }

    // 统一响应
    CartResponse {
        Code int         `json:"code"`
        Msg  string      `json:"msg"`
        Data interface{} `json:"data"`
    }
)

service cart-api {
    @handler addToCartHandler
    post /cart/add (AddToCartReq) returns (CartResponse)

    @handler getCartListHandler
    get /cart/list (GetCartListReq) returns (CartResponse)

    @handler updateCartItemHandler
    post /cart/update (UpdateCartItemReq) returns (CartResponse)

    @handler deleteCartItemHandler
    post /cart/delete (DeleteCartItemReq) returns (CartResponse)
}
订单服务 (order.api)
go
info(
    title: "Order Service API"
    desc: "Manages the entire order lifecycle, from creation to fulfillment."
    author: "Your Name"
    email: "your.email@example.com"
    version: "1.0.0"
)

type (
    // --- 请求结构体 ---
    CreateOrderReq {
        UserId  int64 `json:"userId"`
        // 实际项目中,地址信息会更复杂,这里简化
        Address string `json:"address"`
    }

    GetOrderListReq {
        UserId int64 `json:"userId"`
    }

    GetOrderDetailReq {
        OrderId int64 `path:"id"`
    }

    // --- 响应结构体 ---
    OrderItem {
        ProductId   int64   `json:"productId"`
        ProductName string  `json:"productName"`
        Price       float64 `json:"price"`
        Quantity    int     `json:"quantity"`
    }

    OrderInfo {
        Id         int64       `json:"id"`
        UserId     int64       `json:"userId"`
        TotalPrice float64     `json:"totalPrice"`
        Status     string      `json:"status"` // e.g., "pending_payment", "paid", "shipped"
        Items      []OrderItem `json:"items"`
        CreateTime string      `json:"createTime"`
    }

    CreateOrderResp {
        OrderId int64 `json:"orderId"`
    }

    GetOrderListResp {
        Orders []OrderInfo `json:"orders"`
    }

    GetOrderDetailResp {
        Order OrderInfo `json:"order"`
    }

    // 统一响应
    OrderResponse {
        Code int         `json:"code"`
        Msg  string      `json:"msg"`
        Data interface{} `json:"data"`
    }
)

service order-api {
    @handler createOrderHandler
    post /order/create (CreateOrderReq) returns (OrderResponse)

    @handler getOrderListHandler
    get /order/list (GetOrderListReq) returns (OrderResponse)

    @handler getOrderDetailHandler
    get /order/:id (GetOrderDetailReq) returns (OrderResponse)
}
支付服务 (payment.api)
go
info(
    title: "Payment Service API"
    desc: "Handles payment processing and payment notifications."
    author: "Your Name"
    email: "your.email@example.com"
    version: "1.0.0"
)

type (
    // --- 请求结构体 ---
    CreatePaymentReq {
        OrderId int64 `json:"orderId"`
        // 支付方式, e.g., "alipay", "wechat"
        Method  string `json:"method"`
    }

    // 支付回调的请求体通常由第三方支付平台定义,这里简化
    PaymentNotifyReq {
        OutTradeNo  string `json:"out_trade_no"`
        TradeStatus string `json:"trade_status"`
        // ... 其他回调参数
    }

    // --- 响应结构体 ---
    CreatePaymentResp {
        // 支付链接或参数,前端需要用它来唤起支付
        PaymentUrl string `json:"paymentUrl"`
    }

    // 支付回调的响应体也需要符合第三方平台的要求,通常是 "success"
    PaymentNotifyResp {
        Code string `json:"code"`
        Msg  string `json:"msg"`
    }

    // 统一响应
    PaymentResponse {
        Code int         `json:"code"`
        Msg  string      `json:"msg"`
        Data interface{} `json:"data"`
    }
)

service payment-api {
    @handler createPaymentHandler
    post /payment/create (CreatePaymentReq) returns (PaymentResponse)

    // 注意:支付回调接口通常是 POST,并且可能需要特殊的签名验证
    @handler paymentNotifyHandler
    post /payment/notify (PaymentNotifyReq) returns (PaymentNotifyResp)
}
库存 api/stock.api
go
info(
    title: "Stock Service API"
    desc: "Provides stock deduction and management for products."
    author: "Your Name"
    email: "your.email@example.com"
    version: "1.0.0"
)

type (
    // --- 请求结构体 ---
    DeductStockReq {
        ProductId int64  `json:"productId"`
        Quantity  int    `json:"quantity"`
        OrderId   string `json:"orderId"`
    }

    RollbackStockReq {
        ProductId int64  `json:"productId"`
        Quantity  int    `json:"quantity"`
        OrderId   string `json:"orderId"`
    }

    GetStockReq {
        ProductId int64 `path:"productId"`
    }

    // --- 响应结构体 ---
    StockResponse {
        Code int         `json:"code"`
        Msg  string      `json:"msg"`
        Data interface{} `json:"data"`
    }

    GetStockData {
        TotalStock     int `json:"totalStock"`
        AvailableStock int `json:"availableStock"`
    }
)

service stock-api {
    @doc "扣减库存"
    @handler deductStockHandler
    post /stock/deduct (DeductStockReq) returns (StockResponse)

    @doc "回滚库存"
    @handler rollbackStockHandler
    post /stock/rollback (RollbackStockReq) returns (StockResponse)

    @doc "获取库存信息"
    @handler getStockHandler
    get /stock/:productId (GetStockReq) returns (StockResponse)
}
4.生成各http服务代码
bash
# --- 网关服务 ---
# 网关通常是一个 API Gateway 类型的服务
goctl api go -api api/gateway.api -dir gateway

# --- 用户服务 ---
goctl api go -api api/user.api -dir user

# --- 商品服务 ---
goctl api go -api api/product.api -dir product

# --- 订单服务 ---
goctl api go -api api/order.api -dir order

# --- 购物车服务 ---
goctl api go -api api/cart.api -dir cart

# --- 支付服务 ---
goctl api go -api api/payment.api -dir payment


# --- 库存服务 ---
# 库存服务通常是一个 RPC 服务,用于内部服务间调用
# 假设你已经定义了 stock.proto
# goctl rpc protoc api/stock.proto --go_out=stock --go-grpc_out=stock --zrpc_out=stock
# 如果先用 API 风格开发,命令如下:

goctl api go -api api/stock.api -dir stock
ETCD
下载
go
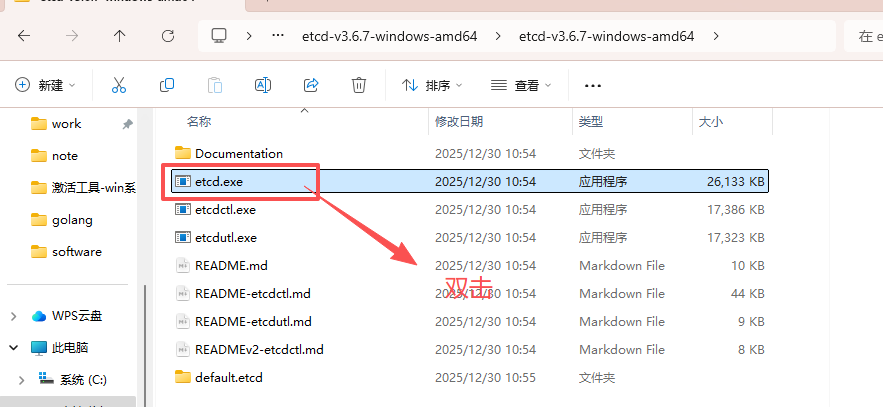
https://github.com/etcd-io/etcd/tree/v3.6.7运行
启动 Etcd: 解压后,在本地启动一个单节点的 Etcd 服务。
图形界面
下载
go
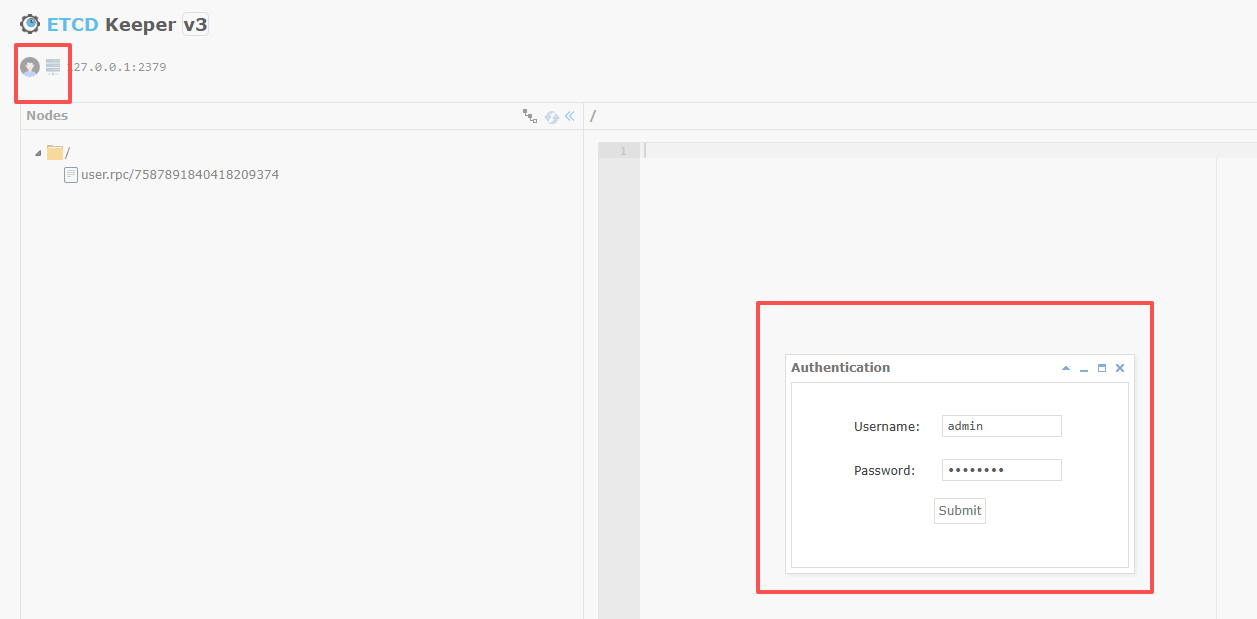
https://github.com/evildecay/etcdkeeper/releases特点
etcdkeeper 目前最流行、最简单易用的 Etcd 可视化工具。它是一个单文件的二进制应用,无需任何依赖,开箱即用
特点:
- 单文件部署:下载一个二进制文件,直接运行即可,非常方便。
- 界面简洁直观:左侧是目录树,右侧是键值对,操作简单。
- 功能全面:支持增、删、改、查,以及树形结构的展示。
- 跨平台:提供 Windows, macOS, Linux 版本。
运行
解压进入目录
go
etcdkeeper.exe -p 9999
2025/12/30 15:04:22 main.go:103: listening on 0.0.0.0:9999
2025/12/30 15:04:51 main.go:638: POST v3 connect success.
2025/12/30 15:04:51 main.go:701: GET v3 /
2025/12/30 15:04:53 main.go:701: GET v3 user.rpc/7587891840418209374
浏览器打开
go
http://127.0.0.1:9999/etcdkeeper/
进入左上角设置用户名和密码
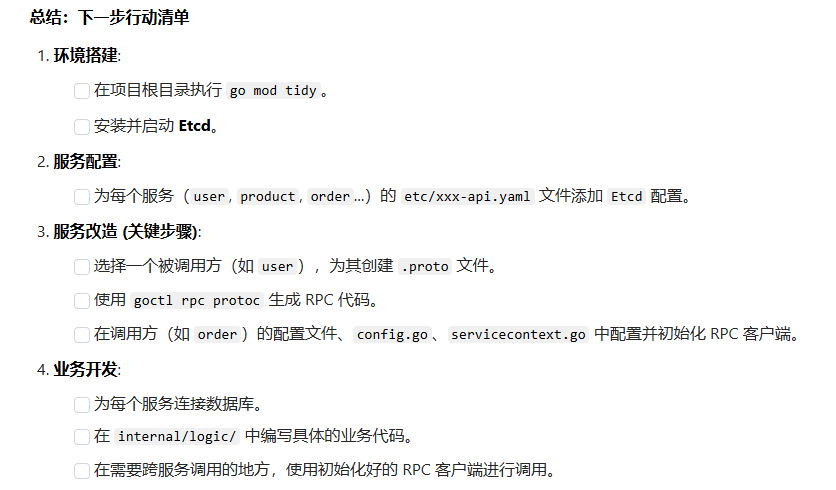
RPC文件生成,配置
在每个服务的配置文件中添加 Etcd 配置
你需要修改每个服务的 etc/xxx-api.yaml 文件,告诉它们如何连接到 Etcd。
以 user/etc/user-api.yaml 为例
go
Name: user-api
Host: 0.0.0.0
Port: 8888
# ... 其他配置 ...

# 新增 Etcd 配置
Etcd:
  Hosts:
  - 127.0.0.1:2379
  Key: user.api # 这个 Key 是服务在 Etcd 中的唯一标识
服务间通信 (Inter-Service Communication)
这是微服务架构的核心。我们将以 "订单服务调用用户服务获取用户信息" 为例,演示如何实现服务间调用。
1.将被调用方改造为 RPC 服务 (以 user 服务为例)
HTTP API 服务主要用于对外(给前端或网关)提供服务。服务间的高效通信应该使用 RPC。
创建 user.proto: 在 api 目录下创建一个 user.proto 文件,定义 user 服务提供的 RPC 接口。
api/user.proto
protobuf
syntax = "proto3";

package user;

option go_package = "./user";

message IdRequest {
  int64 id = 1;
}

message UserResponse {
  int64 id = 1;
  string username = 2;
  string email = 3;
}

service User {
  rpc GetUserById(IdRequest) returns (UserResponse);
}
生成 RPC 代码: 使用 goctl 生成 user 的 RPC 服务代码
bash
# 在项目根目录下执行
goctl rpc protoc api/user.proto --go_out=user/rpc --go-grpc_out=user/rpc --zrpc_out=user/rpc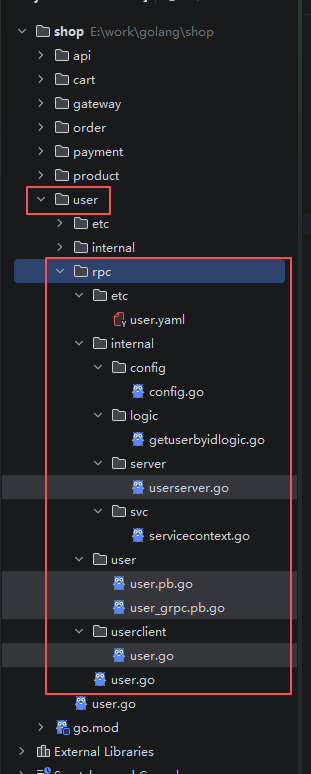
整合 RPC 和 HTTP 服务
现在 user 目录下既有 HTTP API 代码,也有了 RPC 代码。
你需要在 user.go 中同时启动这两个服务。
** 1. 在 order 的配置文件中添加 user 服务的 RPC 配置:**
order/etc/order-api.yaml
yaml
Name: order-api
Host: 0.0.0.0
Port: 8889
# ... 其他配置 ...

# 新增要调用的 user 服务的 RPC 配置
UserRpc:
  Etcd:
    Hosts:
    - 127.0.0.1:2379
    Key: user.rpc # 这个 Key 必须和 user 服务在 Etcd 中注册的 Key 一致
** 2.新增:在调用的user服务的RPC配置 **
RpcClientConf:order/internal/config/config.go
go
package config

import (
    "github.com/zeromicro/go-zero/rest"
    "github.com/zeromicro/go-zero/zrpc"
)

type Config struct {
    rest.RestConf
    UserRpc zrpc.RpcClientConf // 新增这一行
}
3.在 order 的服务上下文中初始化 RPC 客户端:
order/internal/svc/servicecontext.go
go
package svc

import (
	"finejade/shop-mall/order/internal/config"
	// 1. 导入生成的 user rpc 客户端包
	//    这个路径是根据你的项目结构和 user.proto 中的 go_package 生成的
	"finejade/shop-mall/user/rpc/userclient"

	"github.com/zeromicro/go-zero/zrpc"
)

type ServiceContext struct {
	Config config.Config
	// 2. 在这里声明一个 UserRpc 客户端实例
	//    它的类型是 userclient.User
	UserRpc userclient.User
}

func NewServiceContext(c config.Config) *ServiceContext {
	return &ServiceContext{
		Config: c,
		// 3. 在这里初始化 UserRpc 客户端
		//    zrpc.MustNewClient 会根据配置自动从 Etcd 发现服务并创建连接
		UserRpc: userclient.NewUser(zrpc.MustNewClient(c.UserRpc)),
	}
}
阶段四:实现业务逻辑
- 现在,基础设施已经搭建完毕,你可以开始填充每个服务 internal/logic/ 目录下的业务逻辑代码了。例如:
- 在 user 服务中连接数据库,实现用户的增删改查。
- 在 product 服务中实现商品列表和详情的查询。
- 在 order 服务中,实现创建订单的完整流程:
- 调用 user RPC 验证用户信息。
- 调用 product RPC 获取商品价格。
- 调用 stock RPC 预扣减库存。
- 在本地数据库创建订单记录。
- 返回订单 ID。
5. 启动
以user为例,启动user-rpc服务,如果需要,也可以启动user http服务
- 1、启动rpc服务
bash
cd shop/user/rpc
go run user.go
Starting server at 0.0.0.0:8885...- 2、启动http服务
bash
cd shop/user
go run user.go
Starting server at 0.0.0.0:8885...
6.测试
访问order服务,通过rpc查询user服务数据
go
http://127.0.0.1:8881/order/list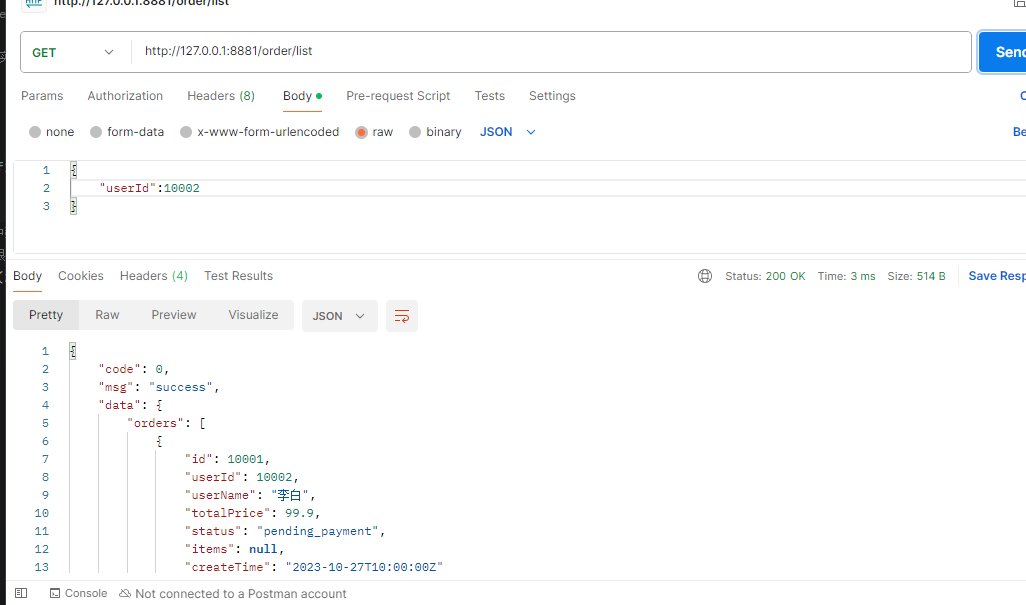
改造product模块为rpc
1. 生成proto3文件
go
syntax = "proto3";

package product;
option go_package = "./product";
message IdRequest {
  int64 id = 1;
}

message ProductResponse {
  int64 id = 1;
  string name = 2;
  string description = 3;
  float price = 4;
}

service Product {
  rpc GetProductById(IdRequest) returns (ProductResponse);
}
2. 命令生成product rpc
go
goctl rpc protoc api/product.proto --go_out=product/rpc --go-grpc_out=product/rpc --zrpc_out=product/rpc3. order调用添加配置文件
order/etc/order-api.yaml
go
ProductRpc:
Etcd:
Hosts:
- 127.0.0.1:2379
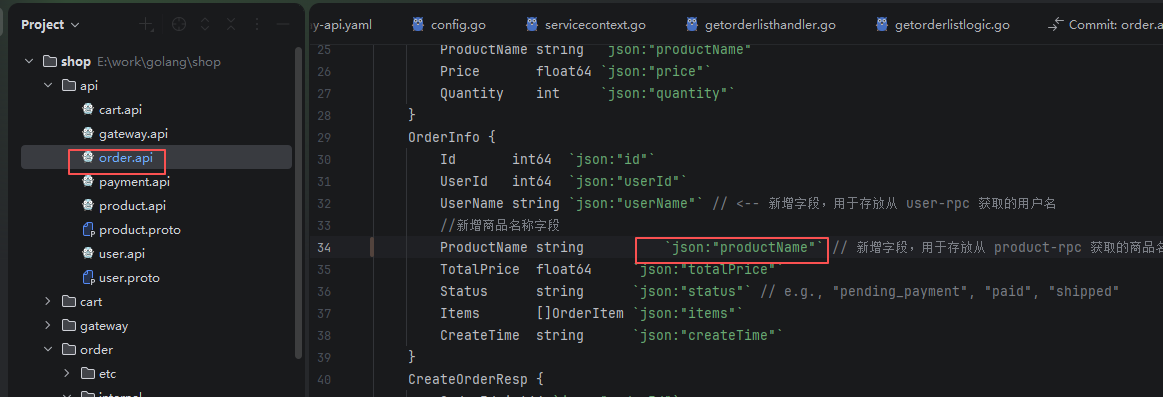
Key: product.rpc # 这个 Key 必须和 product 服务注册的 Key 一致4. 给order.api新增商品名称字段
api/order.api
并且重新生成 order服务模块代码 命令行:goctl api go -api api/order.api -dir order
go
	OrderInfo {
		Id       int64  `json:"id"`
		UserId   int64  `json:"userId"`
		UserName string `json:"userName"` // <-- 新增字段,用于存放从 user-rpc 获取的用户名
		//新增商品名称字段
		ProductName string      `json:"productName"`  // 新增字段,用于存放从 product-rpc 获取的商品名称
		TotalPrice  float64     `json:"totalPrice"`
		Status      string      `json:"status"` // e.g., "pending_payment", "paid", "shipped"
		Items       []OrderItem `json:"items"`
		CreateTime  string      `json:"createTime"`
	}
5. config文件新增product rpc配置
路径:order/internal/config/config.go
ProductRpc zrpc.RpcClientConf
go
// Code scaffolded by goctl. Safe to edit.
// goctl 1.9.2

package config

import (
	"github.com/zeromicro/go-zero/rest"
	"github.com/zeromicro/go-zero/zrpc"
)

type Config struct {
	rest.RestConf
	// 新增:要调用的user服务的RPC配置
	UserRpc zrpc.RpcClientConf
	// 新增:要调用的product服务的RPC配置
	ProductRpc zrpc.RpcClientConf
}
6. 声明product rpc服务客户端
order/internal/svc/servicecontext.go
go
package svc

import (
	"finejade/shop-mall/order/internal/config"
	"finejade/shop-mall/product/rpc/productclient"

	// 1. 导入生成的 user rpc 客户端包
	//    这个路径是根据你的项目结构和 user.proto 中的 go_package 生成的
	"finejade/shop-mall/user/rpc/userclient"

	"github.com/zeromicro/go-zero/zrpc"
)

type ServiceContext struct {
	Config config.Config
	// 2. 在这里声明一个 UserRpc 客户端实例
	//    它的类型是 userclient.User
	UserRpc    userclient.User
	ProductRpc productclient.Product
}

func NewServiceContext(c config.Config) *ServiceContext {
	return &ServiceContext{
		Config: c,
		// 3. 在这里初始化 UserRpc 客户端
		//    zrpc.MustNewClient 会根据配置自动从 Etcd 发现服务并创建连接
		UserRpc:    userclient.NewUser(zrpc.MustNewClient(c.UserRpc)),
		ProductRpc: productclient.NewProduct(zrpc.MustNewClient(c.ProductRpc)),
	}
}
测试
go
http://127.0.0.1:8883/order/list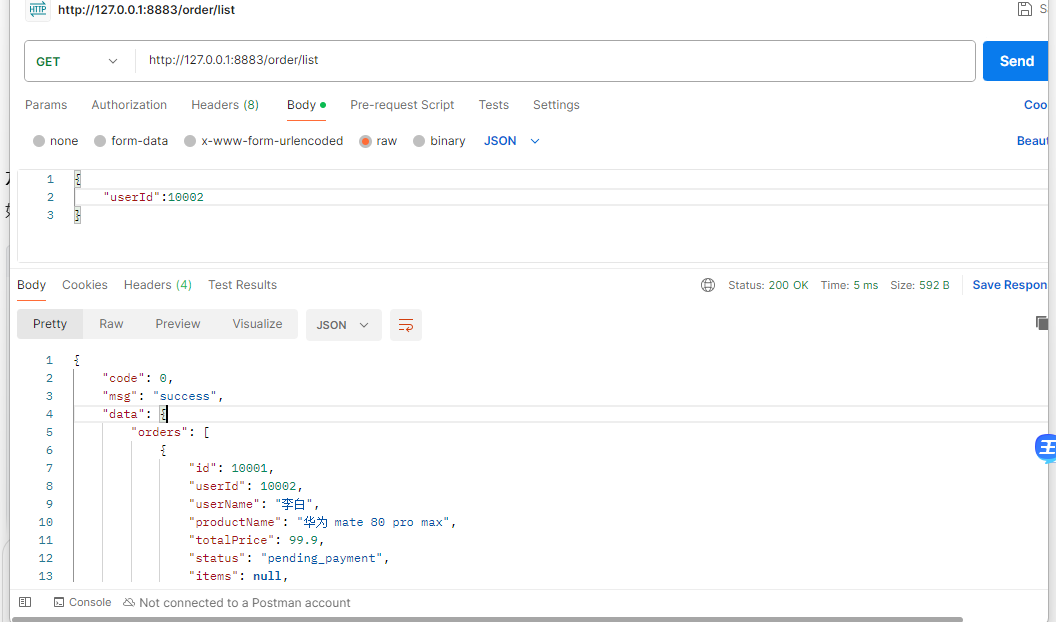
常用命令
部分命令可能因为版本问题有变动
| 命令 | 主要功能 | 实例 |
|---|---|---|
| goctl api new | 快速创建新项目骨架 | goctl api new user-api |
| goctl api go | 核心:根据 .api 生成 Go 项目代码 | goctl api go -api user.api -dir . |
| goctl api format | 格式化 .api 文件 | goctl api format api/user.api --dir api |
| goctl api validate | 校验 .api 文件语法 | goctl api validate --api api/user.api |
| goctl api -o | 快速创建 *.api 文件,存在提示已存在,不存在则直接创建 | goctl api -o example.api |
| goctl api doc | 生成静态 HTML 文档 | goctl api doc -api user.api -dir ./docs |
| goctl api swagger | 生成 Swagger (OpenAPI) JSON 文件 | goctl api swagger -api user.api -dir . |
| goctl api dart | 为 Flutter 生成 API 调用代码 | goctl api dart -api user.api -dir ./dart-api |
goctl api format api/user.api --dir api
格式化前
格式化后(对齐了)

检测api语法
bash
goctl api validate --api api/user.api错误版本
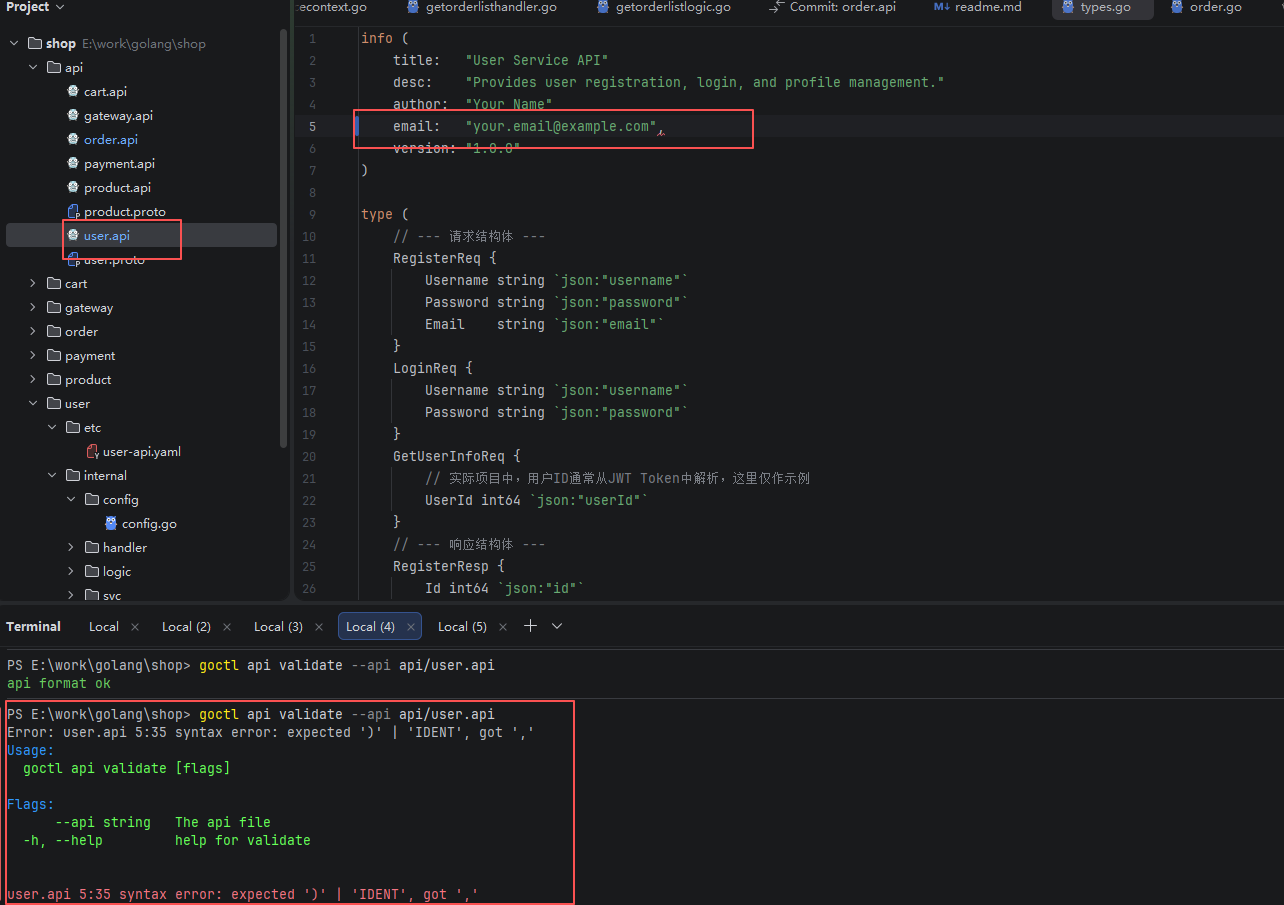
正确版本

快速创建api
go
goctl api -o xxx.api- 已存在的文件

- 不存在的文件


swagger文档生成
bash
goctl api swagger -api  api/user.api -dir ./docs
goctl api swagger -api  api/order.api -dir ./docs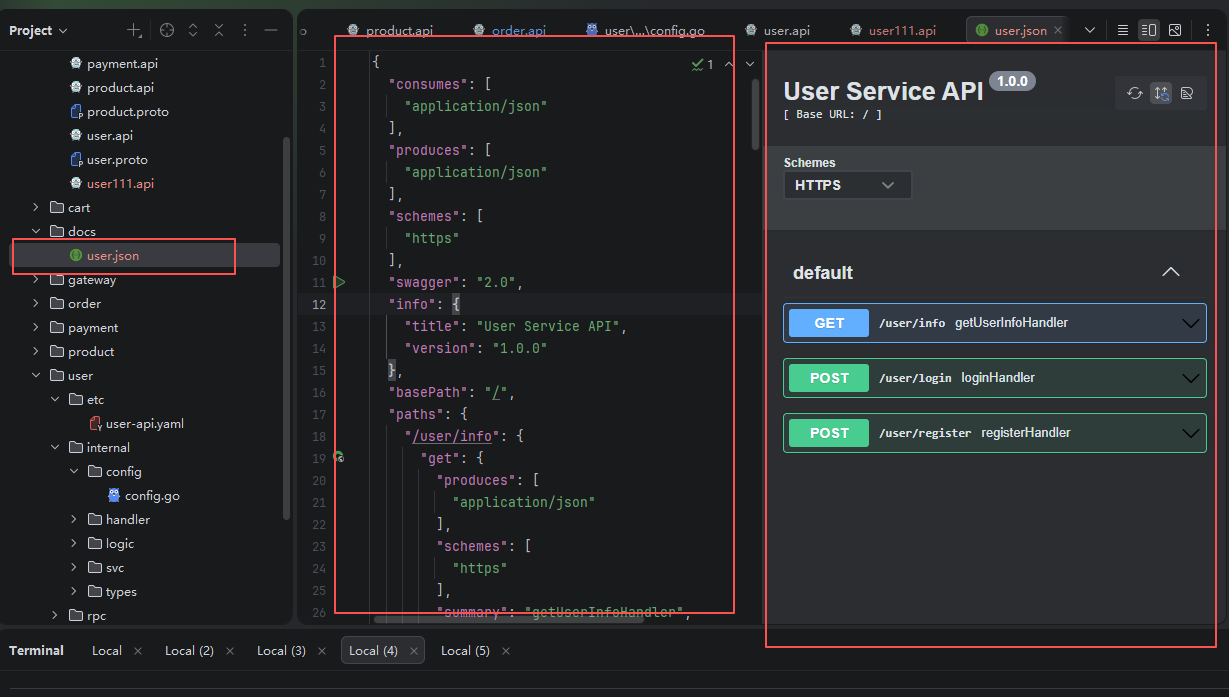
生成静态html文档
bash
goctl api doc -api api/user.api -dir ./docs为 TypeScript 生成 API 调用代码
go
goctl api ts -api api/user.api -dir ./ts-apiswagger接口文档使用
安装
bash
go install github.com/swaggo/swag/cmd/swag@latest参数说明
go-zero支持通过注解丰富Swagger文档内容,主要注解包括:
| 注解 | 作用 | 示例 |
|---|---|---|
| @summary | 接口简短描述 | @summary 用户注册接口 |
| @description | 接口详细说明 | @description 用于新用户注册账号,返回用户ID |
| @tags | 接口分类标签 | @tags 用户管理 |
| @accept | 请求数据格式 | @accept application/json |
| @produce | 响应数据格式 | @produce application/json |
| @param | 自定义请求参数 | @param Authorization header string true "Bearer token" |
| @success | 成功响应描述 | @success 200 {object} RegisterResponse "注册成功" |
| @failure | 错误响应描述 | @failure 400 {object} ErrorResponse "参数错误" |
带注解的API示例
go
service user-api {
  @handler RegisterHandler
  @summary 用户注册接口
  @description 用于新用户注册账号,用户名需3-20个字符,密码需6-32个字符
  @tags 用户管理
  @accept application/json
  @produce application/json
  @param Authorization header string false "Bearer token"
  @success 200 {object} RegisterResponse "注册成功"
  @failure 400 {object} ErrorResponse "参数错误"
  @failure 500 {object} ErrorResponse "服务器内部错误"
  post /api/user/register (RegisterRequest) returns (RegisterResponse)
}
搭建swagger ui
下载
bash
https://github.com/swagger-api/swagger-ui/releases

# 或者csdn下载

https://download.csdn.net/download/xxpxxpoo8/92520157
部署
解压后把文件复制到项目根目录下swagger-ui文件夹里
修改接口地址
js
window.onload = function() {
  //<editor-fold desc="Changeable Configuration Block">

  // the following lines will be replaced by docker/configurator, when it runs in a docker-container
  window.ui = SwaggerUIBundle({
    url: "http://localhost:8080/docs/user.json",
    dom_id: '#swagger-ui',
    deepLinking: true,
    presets: [
      SwaggerUIBundle.presets.apis,
      SwaggerUIStandalonePreset
    ],
    plugins: [
      SwaggerUIBundle.plugins.DownloadUrl
    ],
    layout: "StandaloneLayout"
  });

  //</editor-fold>
};在根目录下新建serve_swagger.go启动文件
go
// serve_swagger.go
package main

import (
	"log"
	"net/http"
)

func main() {
	// 创建一个文件服务器,用于提供当前目录下的所有文件
	fs := http.FileServer(http.Dir("."))
	http.Handle("/", fs)

	log.Println("Serving Swagger UI at http://localhost:8080/swagger-ui/dist/index.html")
	log.Fatal(http.ListenAndServe(":8080", nil))
}
运行
go
go run serve_swagger打开浏览器查看
go
http://localhost:8080/swagger-ui/dist/#/default/getUserInfoHandler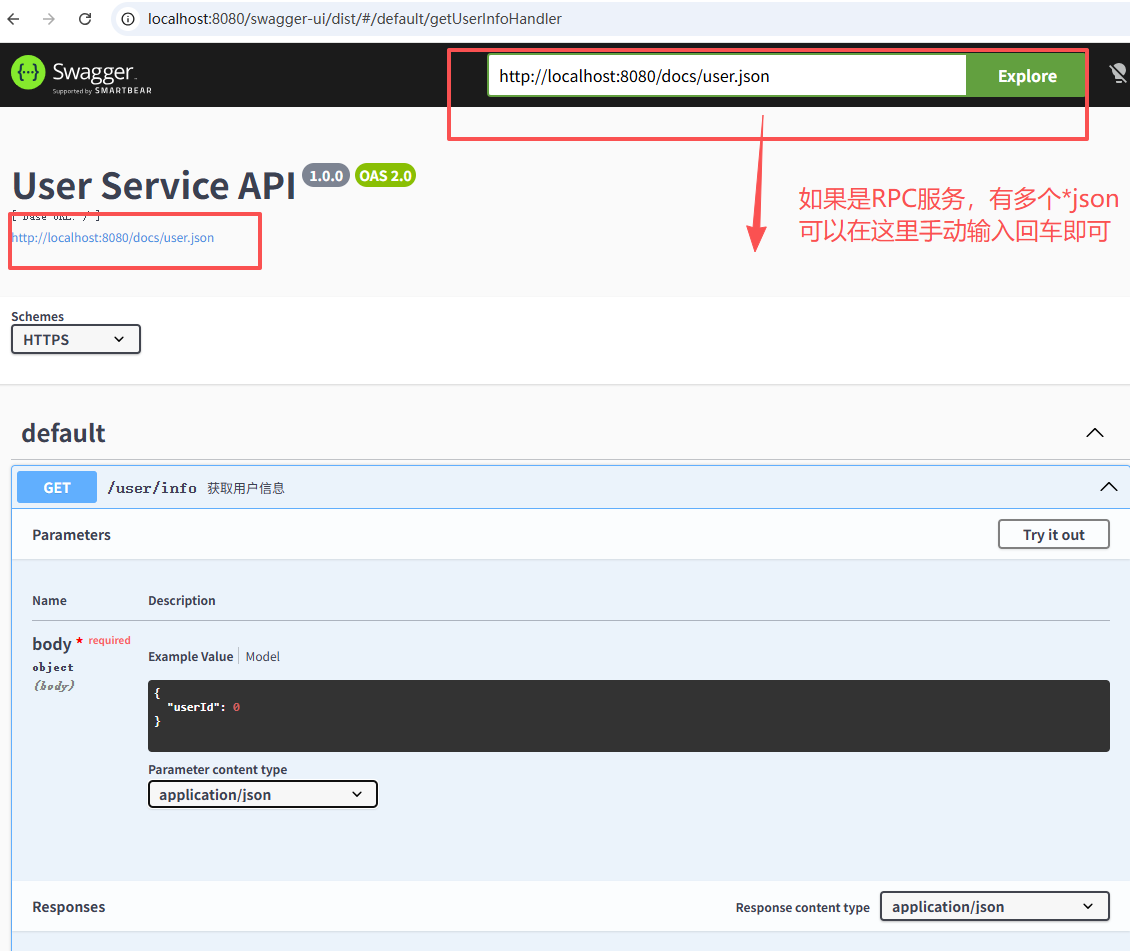
docker打包部署
切换到shop/user下运行
go-zero 和goctl是独立分开的
如果 goctl命令未找到请安装goctl
go install github.com/zeromicro/go-zero/tools/goctl@latest
1.构建dockerfile文件
在根目录下构建dockerfile文件
bash
goctl docker --go user/user.go --exe user2.设置国内镜像加速器(大部分没法用了)
如果国外镜像超时,可以使用国内代理
bash
sudo mkdir -p /etc/docker
sudo nano /etc/docker/daemon.json
daemon.json
目前国内我找到能用的镜像就只有https://docker.1ms.run了
bash
{
  "registry-mirrors": [
	"https://docker.1ms.run"
  ]
}
3.构建镜像
bash
# 确保在 /root/shop 目录
cd /root/shop

# 重新构建镜像
docker build -t user-api:v1 -f ./user/Dockerfile .
bash
FROM golang:alpine AS builder

LABEL stage=gobuilder

ENV CGO_ENABLED 0


RUN apk update --no-cache && apk add --no-cache tzdata

WORKDIR /build
# 在这里添加国内代理
ENV GOPROXY=https://goproxy.cn,direct
ADD go.mod .
ADD go.sum .
RUN go mod download
COPY . .

RUN go build -ldflags="-s -w" -o /app/user ./user


FROM scratch

COPY --from=builder /etc/ssl/certs/ca-certificates.crt /etc/ssl/certs/ca-certificates.crt
COPY --from=builder /usr/share/zoneinfo/Asia/Shanghai /usr/share/zoneinfo/Asia/Shanghai
ENV TZ Asia/Shanghai

WORKDIR /app
COPY --from=builder /app/user /app/user
COPY user/etc /app/etc

CMD ["./user", "-f", "etc/user-api.yaml"]
4. 启动docker服务
go
docker run --rm -it -p 8881:8881 user:v1