前言
因为项目的原因,数据集的数量只有几百张,训练的效果很差,所以想对数据集进行数据扩充,因此本文会系统的讲解一下符合yolo格式的数据扩充方式。
数据读取加载方式
这里统一定义一下数据需要读取的方式,以免出现问题
python
import cv2
import os
import glob
from tqdm import tqdm

def get_label_path_from_image_path(image_path, label_dir_name='labels'):
    """
    根据图像路径推断对应的标签路径

    YOLO常见的目录结构:
    1. images/train/xxx.jpg -> labels/train/xxx.txt
    2. train/images/xxx.jpg -> train/labels/xxx.txt
    3. dataset/images/xxx.jpg -> dataset/labels/xxx.txt

    Args:
        image_path: 图像文件路径
        label_dir_name: 标签目录名称(默认为'labels')

    Returns:
        str: 推断的标签路径
    """
    img_dir = os.path.dirname(image_path)
    img_name = os.path.splitext(os.path.basename(image_path))[0]
    # 尝试几种常见的目录结构
    possible_paths = []
    # 方案1: 替换images为labels(最常见)
    if 'images' in img_dir:
        label_dir = img_dir.replace('images', label_dir_name)
        possible_paths.append(os.path.join(label_dir, img_name + '.txt'))
    # 方案2: 在父目录下找labels子目录
    parent_dir = os.path.dirname(img_dir)
    possible_paths.append(os.path.join(parent_dir, label_dir_name, img_name + '.txt'))
    # 方案3: 在同级目录下找labels目录
    possible_paths.append(os.path.join(img_dir, '..', label_dir_name, img_name + '.txt'))
    possible_paths.append(os.path.join(img_dir, '../labels', img_name + '.txt'))
    # 方案4: 在当前目录的labels子目录下
    possible_paths.append(os.path.join(img_dir, label_dir_name, img_name + '.txt'))
    # 方案5: 直接在图像所在目录(相同文件名不同扩展名)
    possible_paths.append(os.path.join(img_dir, img_name + '.txt'))

    # 检查哪个路径存在
    for path in possible_paths:
        path = os.path.normpath(path)
        if os.path.exists(path):
            return path
    return None

def load_yolo_data(image_path, label_path=None, convert_to_pixel=True):
    image = cv2.imread(image_path)
    image_rgb = cv2.cvtColor(image, cv2.COLOR_BGR2RGB)
    img_height, img_width = image_rgb.shape[:2]
    bboxes = []
    if label_path is None:
        # 从图像路径推断标签路径
        label_path = get_label_path_from_image_path(image_path)
    with open(label_path, 'r') as f:
        lines = f.readlines()
    for line in lines:
        line = line.strip()
        if not line:
            continue

        parts = line.split()
        if len(parts) < 5:
            continue

        try:
            class_id, x_center, y_center, width, height = \
                int(parts[0]), float(parts[1]), float(parts[2]), float(parts[3]), float(parts[4])
            if convert_to_pixel:
                # 将YOLO格式转换为像素坐标
                x_min = int((x_center - width / 2) * img_width)
                y_min = int((y_center - height / 2) * img_height)
                x_max = int((x_center + width / 2) * img_width)
                y_max = int((y_center + height / 2) * img_height)
                # 确保坐标在图像范围内
                x_min = max(0, min(x_min, img_width - 1))
                y_min = max(0, min(y_min, img_height - 1))
                x_max = max(0, min(x_max, img_width - 1))
                y_max = max(0, min(y_max, img_height - 1))
                # 确保边界框有效
                if x_max > x_min and y_max > y_min:
                    bboxes.append([class_id, x_min, y_min, x_max, y_max])
            else:
                bboxes.append([class_id, x_center, y_center, width, height])
        except (ValueError, IndexError) as e:
            print(f"解析标签行出错: {line}, 错误: {e}")
            continue
    return image_rgb, bboxes


def draw_yolo_bboxes(image, bboxes, class_names=None, colors=None,
                     thickness=2, font_scale=0.5, show_class_id=True,
                     convert_to_bgr=True):
    """
    在图像上绘制YOLO格式的边界框

    Args:
        image: 输入图像 (RGB格式)
        bboxes: 边界框列表,可以是以下两种格式之一:
                1. 归一化坐标:每个元素为 [class_id, x_center, y_center, width, height](值在0-1之间)
                2. 像素坐标:每个元素为 [class_id, x_min, y_min, x_max, y_max](像素值)
        class_names: 类别名称列表,如 ['person', 'car', 'dog']
        colors: 每个类别的颜色列表,如 [(255,0,0), (0,255,0), (0,0,255)]
        thickness: 边界框线宽
        font_scale: 字体大小
        show_class_id: 是否显示类别ID

    Returns:
        numpy array: 绘制了边界框的图像
    """
    img_with_boxes = image.copy()
    if convert_to_bgr:
        img_with_boxes = cv2.cvtColor(img_with_boxes, cv2.COLOR_RGB2BGR)
    img_height, img_width = image.shape[:2]

    # 预定义颜色(BGR格式)
    if colors is None:
        colors = [
            (255, 0, 0),  # 红色
            (0, 255, 0),  # 绿色
            (0, 0, 255),  # 蓝色
            (255, 255, 0),  # 青色
            (255, 0, 255),  # 洋红
            (0, 255, 255),  # 黄色
            (128, 0, 0),  # 深红
            (0, 128, 0),  # 深绿
            (0, 0, 128),  # 深蓝
            (128, 128, 0),  # 橄榄色
        ]

    # 统计每个类别的数量
    class_counts = {}

    for bbox in bboxes:
        if len(bbox) < 5:
            continue

        class_id = int(bbox[0])

        # 检测边界框格式并转换为像素坐标
        if len(bbox) == 5:
            # 可能是两种格式之一:
            # 格式1: [class_id, x_center, y_center, width, height] (归一化)
            # 格式2: [class_id, x_min, y_min, x_max, y_max] (像素坐标)

            # 检查第二个值是否小于1(假设是归一化坐标)
            if bbox[1] <= 1.0 and bbox[2] <= 1.0 and bbox[3] <= 1.0 and bbox[4] <= 1.0:
                # 归一化坐标 -> 转换为像素坐标
                x_center, y_center, width, height = bbox[1], bbox[2], bbox[3], bbox[4]
                x_min = int((x_center - width / 2) * img_width)
                y_min = int((y_center - height / 2) * img_height)
                x_max = int((x_center + width / 2) * img_width)
                y_max = int((y_center + height / 2) * img_height)
            else:
                # 像素坐标,直接使用
                x_min, y_min, x_max, y_max = map(int, bbox[1:5])

        elif len(bbox) == 4:
            # 假设是 [x_min, y_min, x_max, y_max] 格式(没有class_id的情况)
            x_min, y_min, x_max, y_max = map(int, bbox)
            class_id = 0  # 默认类别
        else:
            print(f"警告:跳过格式不正确的边界框: {bbox}")
            continue

        # 确保坐标在图像范围内
        x_min = max(0, min(x_min, img_width - 1))
        y_min = max(0, min(y_min, img_height - 1))
        x_max = max(0, min(x_max, img_width - 1))
        y_max = max(0, min(y_max, img_height - 1))

        # 检查边界框是否有效
        if x_max <= x_min or y_max <= y_min:
            print(f"警告:跳过无效边界框: x:[{x_min},{x_max}], y:[{y_min},{y_max}]")
            continue

        # 统计类别
        class_counts[class_id] = class_counts.get(class_id, 0) + 1

        # 获取颜色
        color_idx = class_id % len(colors)
        color = colors[color_idx]

        # 绘制矩形框
        cv2.rectangle(img_with_boxes,
                      (x_min, y_min),
                      (x_max, y_max),
                      color,
                      thickness)

        # 准备标签文本
        if class_names and class_id < len(class_names):
            label = class_names[class_id]
        else:
            label = f'Class {class_id}'

        if show_class_id:
            label = f'{label}({class_id})'

        # 计算文本大小
        (text_width, text_height), baseline = cv2.getTextSize(
            label, cv2.FONT_HERSHEY_SIMPLEX, font_scale, thickness)

        # 确保文本背景在图像范围内
        text_bg_y1 = max(0, y_min - text_height - 5)
        text_bg_y2 = y_min

        # 绘制标签背景
        cv2.rectangle(img_with_boxes,
                      (x_min, text_bg_y1),
                      (x_min + text_width, text_bg_y2),
                      color,
                      -1)  # -1 表示填充

        # 绘制标签文本
        text_y = max(5, y_min - 5)  # 确保文本位置合适
        cv2.putText(img_with_boxes,
                    label,
                    (x_min, text_y),
                    cv2.FONT_HERSHEY_SIMPLEX,
                    font_scale,
                    (255, 255, 255),  # 白色文字
                    thickness,
                    cv2.LINE_AA)
    return img_with_boxes

def batch_draw_and_save(
    image_dir,
    save_dir,
    class_names=None,
    recursive=True,
    suffix="_vis",
    image_exts=(".jpg", ".jpeg", ".png", ".bmp")
):
    """
    批量读取图像 + YOLO标签 → 绘制bbox → 保存

    Args:
        image_dir: 图像根目录
        save_dir: 保存目录
        class_names: 类别名列表(可选)
        recursive: 是否递归遍历子目录
        suffix: 输出文件名后缀
        image_exts: 支持的图像扩展名
    """
    os.makedirs(save_dir, exist_ok=True)

    # 收集所有图像路径
    pattern = "**/*" if recursive else "*"
    image_paths = []
    for ext in image_exts:
        image_paths.extend(
            glob.glob(os.path.join(image_dir, f"{pattern}{ext}"), recursive=recursive)
        )

    print(f"发现 {len(image_paths)} 张图像")

    for img_path in tqdm(image_paths, desc="Processing"):
        try:
            # 1. 读取图像和标签
            image, bboxes = load_yolo_data(
                img_path,
                label_path=None,           # 自动推断
                convert_to_pixel=False     # 用 YOLO 归一化
            )

            # 2. 绘制 bbox
            image_vis = draw_yolo_bboxes(
                image,
                bboxes,
                class_names=class_names,
                convert_to_bgr=True
            )

            # 3. 构造保存路径
            name = os.path.splitext(os.path.basename(img_path))[0]
            save_name = name + suffix + ".jpg"
            save_path = os.path.join(save_dir, save_name)

            # 4. 保存
            cv2.imwrite(save_path, image_vis)

        except Exception as e:
            print(f"[ERROR] 处理失败: {img_path}")
            print(e)

if __name__ == "__main__":
    # image, bbox = load_yolo_data(r'E:\PythonProject\image_process\test_data\yolo_dataset_test\images\DJI_20251029153338_0004_Z.JPG',
    #                              convert_to_pixel=False)
    # image_with_bbox = draw_yolo_bboxes(image, bbox, class_names=['0', '1'])
    # cv2.imwrite("sss.jpg", image_with_bbox)
    # cv2.imshow("testsss", image)
    # cv2.waitKey(0)
    batch_draw_and_save(
        image_dir=r"E:\PythonProject\image_process\test_data\test_coco8\Augumentation\images",
        save_dir=r"E:\PythonProject\image_process\test_data\test_coco8\Augumentation\vis",
        class_names=None,
        recursive=True,
        suffix="_bbox"
    )
这里提供了一个读取图像路径和标签路径,并可进行绘制的脚本。我们会在此基础上进行测试,因为有些扩充方式会影响标签坐标的位置。
形态学处理
翻转类
对图像进行水平翻转,图像处理方式是img = img:, ::-1, :,而标签处理方式是x_center = 1.0 - x_center。
python
def hflip(image, bboxes):
    """
    image: HWC
    bboxes: [[cls, x, y, w, h], ...]
    """
    image = np.flip(image, axis=1)

    new_bboxes = []
    for box in bboxes:
        cls, x, y, w, h = box
        x = 1.0 - x
        new_bboxes.append([cls, x, y, w, h])

    return image, new_bboxes
这是我们一般想到的思路,但是我们可看见这种方式会进行循环,一种比较好的方法是将bboxes看作是一个矩阵,我们对矩阵进行处理。
\[cls, x, y, w, h\], \[cls, x, y, w, h\], ...
python
def hflip(image, bboxes):
    """
    水平翻转
    """
    image = np.flip(image, axis=1)
    bboxes = np.asarray(bboxes, dtype=np.float32)
    bboxes[:, 1] = 1.0 - bboxes[:, 1]   # x_center
    return image, bboxes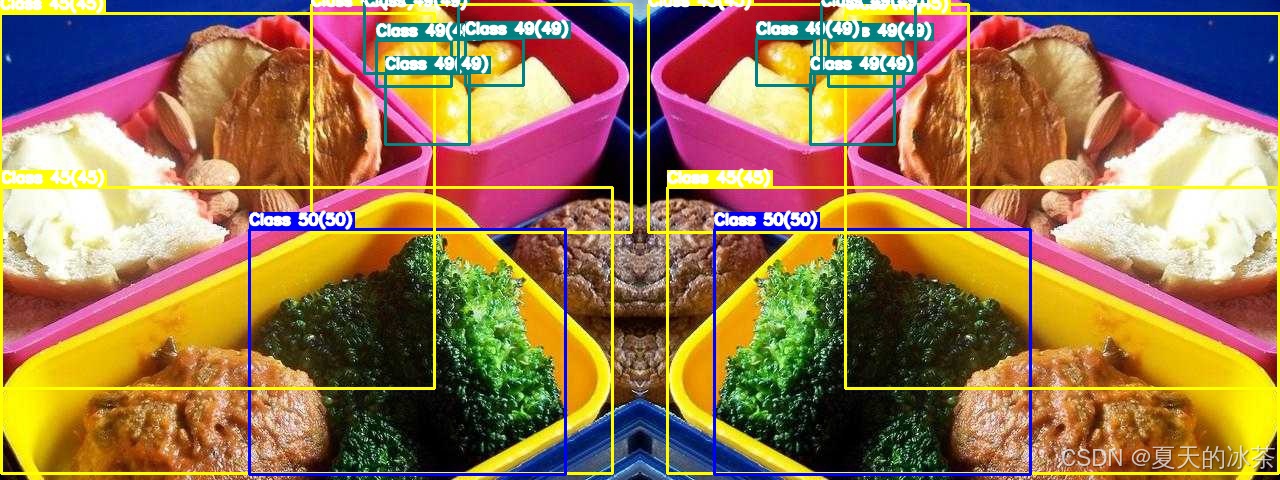
同理,进行垂直翻转,图像的处理方式是img = img::-1, :, :,标签的处理方式是y_center = 1.0 - y_center
python
def vflip(image, bboxes):
    """
    垂直翻转
    """
    image = np.flip(image, axis=0)
    bboxes = np.asarray(bboxes, dtype=np.float32)
    bboxes[:, 2] = 1.0 - bboxes[:, 2]   # y_center
    return image, bboxes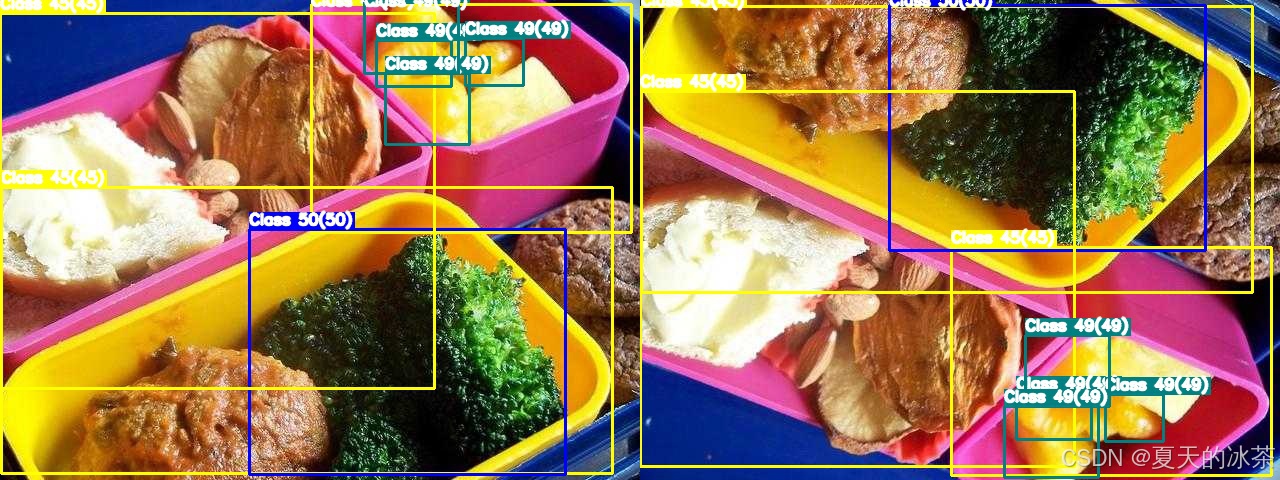
对于对角翻转,其实是前面二者的组合,代码实现的话就是下面这样:
python
def dflip(image, bboxes):
    image = np.flip(image, axis=(0, 1))
    bboxes = np.asarray(bboxes, dtype=np.float32)
    bboxes[:, 1:3] = 1.0 - bboxes[:, 1:3]  # x, y
    return image, bboxes
但是在进行数据扩充的过程中可以采取是否进行垂直翻转和是否进行水平翻转来实现,当都采取的时候就是对角翻转了。因此这个函数可以不用单独添加到数据扩充方式里面来。
旋转类
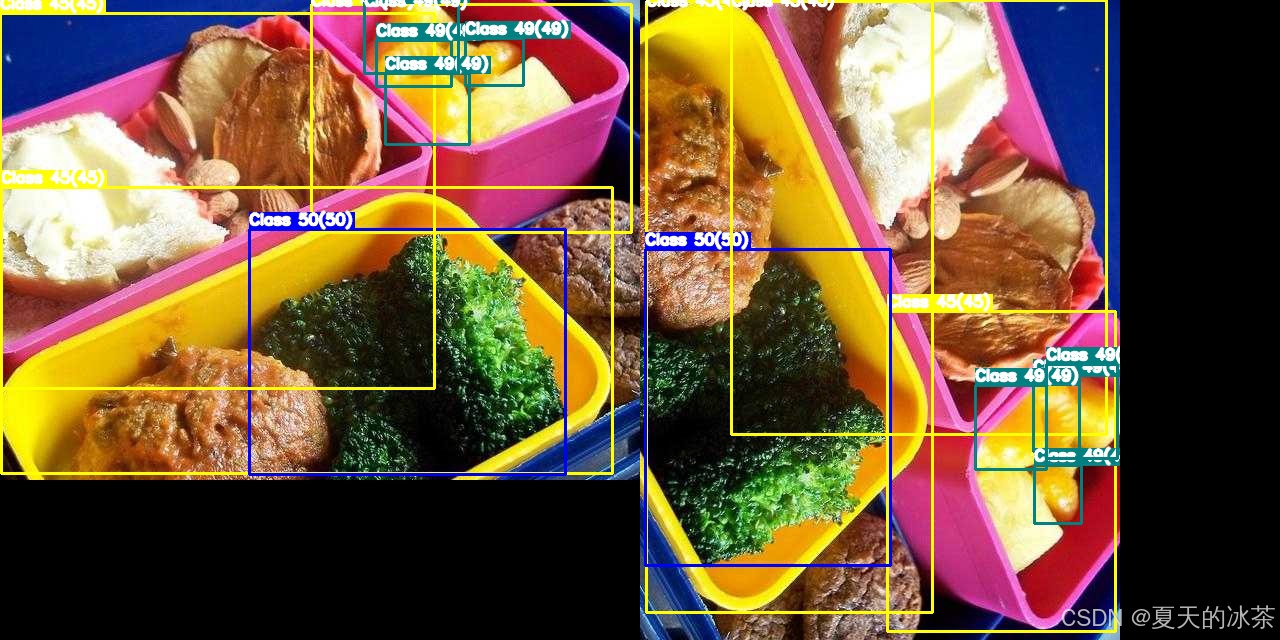
90度倍数旋转是较为容易实现的,当进行90度旋转时交换宽高:(x,y)-> (1-y,x);当进行180度旋转时:(x,y)->(1-x,1-y);当进行270度旋转时:(x,y)->(x);
python
def rotate90(image, bboxes, k):
    """
    image: HWC
    bboxes: (N, 5) -> [cls, x, y, w, h] (YOLO normalized)
    k: 1=90°, 2=180°, 3=270° (CCW)
    """
    assert k in [1, 2, 3]

    H, W = image.shape[:2]
    image_rot = np.rot90(image, k)

    bboxes = np.asarray(bboxes, dtype=np.float32).copy()
    cls = bboxes[:, 0:1]

    # 1. YOLO → pixel
    x = bboxes[:, 1] * W
    y = bboxes[:, 2] * H
    w = bboxes[:, 3] * W
    h = bboxes[:, 4] * H

    # 2. 中心点旋转
    if k == 1:  # 90° CCW
        x_new = y
        y_new = W - x
        w_new = h
        h_new = w
        H_new, W_new = W, H

    elif k == 2:  # 180°
        x_new = W - x
        y_new = H - y
        w_new = w
        h_new = h
        H_new, W_new = H, W

    elif k == 3:  # 270° CCW
        x_new = H - y
        y_new = x
        w_new = h
        h_new = w
        H_new, W_new = W, H

    # 3. pixel → YOLO
    x_new /= W_new
    y_new /= H_new
    w_new /= W_new
    h_new /= H_new

    new_bboxes = np.concatenate(
        [cls, x_new[:, None], y_new[:, None], w_new[:, None], h_new[:, None]],
        axis=1
    )

    return image_rot, new_bboxes
90度逆时针旋转的情况:
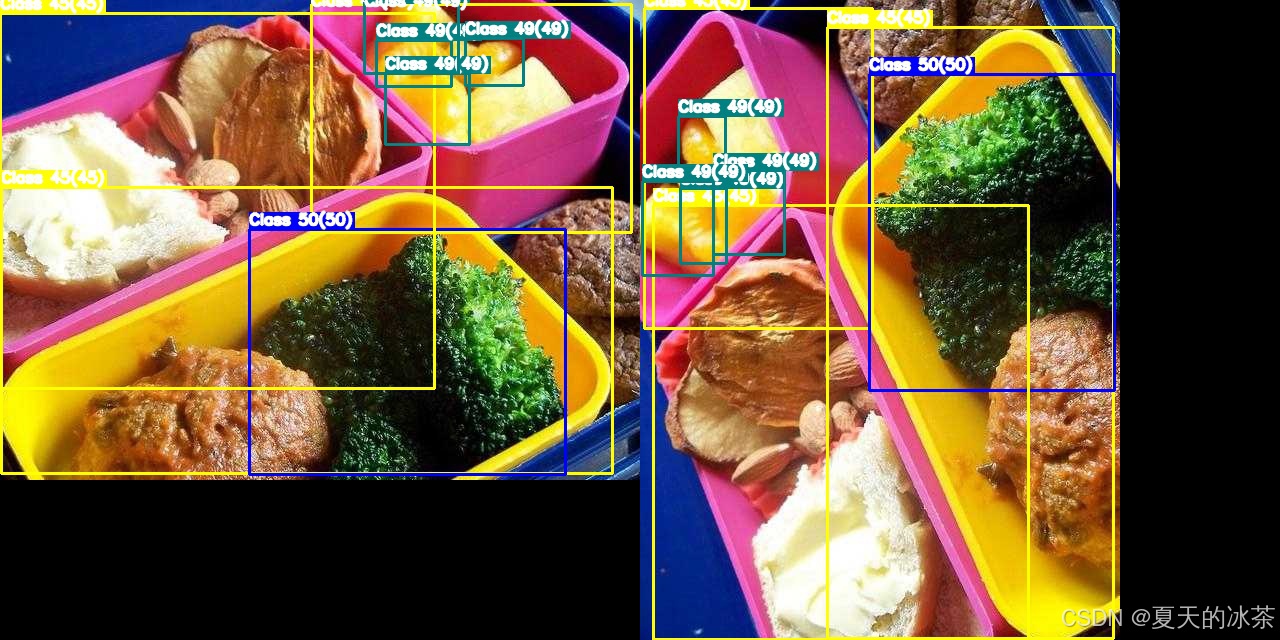
180度旋转的情况:
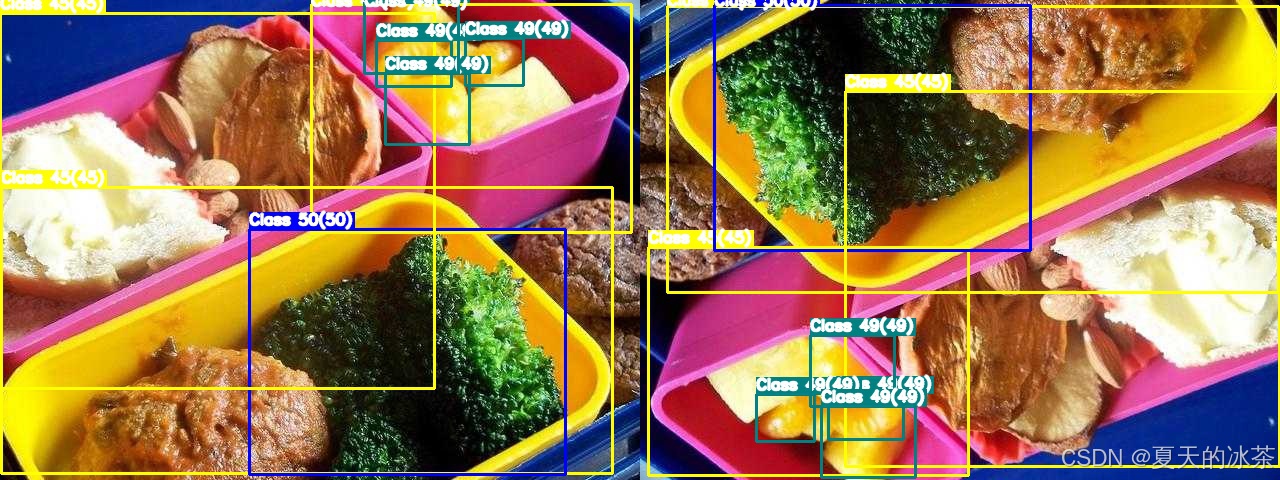
270度旋转情况:
而关于任意角度的旋转,这个就需要考虑的更多了,因为我需要计算旋转后的新边界框(外接矩形) 防止边界框过度增大或出界,要考虑当前的图像大小,这部分仅进行90度倍数旋转就足够了。
裁剪类
这里采用随机裁剪,先选择裁剪区域,过滤掉在裁剪区域外的框,调整部分在区域内框的坐标,然后重新归一化坐标。还有一些其他的方法比如中心裁剪,随机擦除/Cutout等等。
python
def random_crop(
    image,
    bboxes,
    crop_ratio=(0.5, 0.9),
    min_box_ratio=0.2
):
    """
    image: HWC
    bboxes: (N, 5) -> [cls, x, y, w, h] (YOLO normalized)
    crop_ratio: 裁剪尺寸占原图比例范围
    min_box_ratio: 裁剪后 bbox 保留的最小面积比例
    """
    H, W = image.shape[:2]
    bboxes = np.asarray(bboxes, dtype=np.float32)
    if len(bboxes) == 0:
        return image, bboxes
    # 1. YOLO → pixel (xyxy)
    cls = bboxes[:, 0:1]
    xc = bboxes[:, 1] * W
    yc = bboxes[:, 2] * H
    bw = bboxes[:, 3] * W
    bh = bboxes[:, 4] * H
    x1 = xc - bw / 2
    y1 = yc - bh / 2
    x2 = xc + bw / 2
    y2 = yc + bh / 2

    boxes = np.stack([x1, y1, x2, y2], axis=1)
    # 2. 选择裁剪区域
    crop_w = np.random.uniform(*crop_ratio) * W
    crop_h = np.random.uniform(*crop_ratio) * H
    idx = np.random.randint(len(boxes))
    cx = (boxes[idx, 0] + boxes[idx, 2]) / 2
    cy = (boxes[idx, 1] + boxes[idx, 3]) / 2
    x0 = np.clip(cx - crop_w / 2, 0, W - crop_w)
    y0 = np.clip(cy - crop_h / 2, 0, H - crop_h)
    x0, y0 = int(x0), int(y0)
    x1c, y1c = x0 + int(crop_w), y0 + int(crop_h)
    # 3. 裁剪图像
    cropped_img = image[y0:y1c, x0:x1c]
    # 4. 裁剪 & 过滤 bbox
    boxes[:, [0, 2]] -= x0
    boxes[:, [1, 3]] -= y0
    boxes[:, 0] = np.clip(boxes[:, 0], 0, crop_w)
    boxes[:, 1] = np.clip(boxes[:, 1], 0, crop_h)
    boxes[:, 2] = np.clip(boxes[:, 2], 0, crop_w)
    boxes[:, 3] = np.clip(boxes[:, 3], 0, crop_h)
    bw_new = boxes[:, 2] - boxes[:, 0]
    bh_new = boxes[:, 3] - boxes[:, 1]
    keep = (bw_new > 0) & (bh_new > 0)
    # 面积过滤(防止剩一条细线)
    area_ratio = (bw_new * bh_new) / (bw * bh + 1e-6)
    keep &= area_ratio > min_box_ratio
    boxes = boxes[keep]
    cls = cls[keep]
    if len(boxes) == 0:
        return image, bboxes  # fallback
    # 5. pixel → YOLO
    xc_new = (boxes[:, 0] + boxes[:, 2]) / 2 / crop_w
    yc_new = (boxes[:, 1] + boxes[:, 3]) / 2 / crop_h
    bw_new = (boxes[:, 2] - boxes[:, 0]) / crop_w
    bh_new = (boxes[:, 3] - boxes[:, 1]) / crop_h
    new_bboxes = np.concatenate(
        [cls, xc_new[:, None], yc_new[:, None], bw_new[:, None], bh_new[:, None]],
        axis=1
    )
    return cropped_img, new_bboxes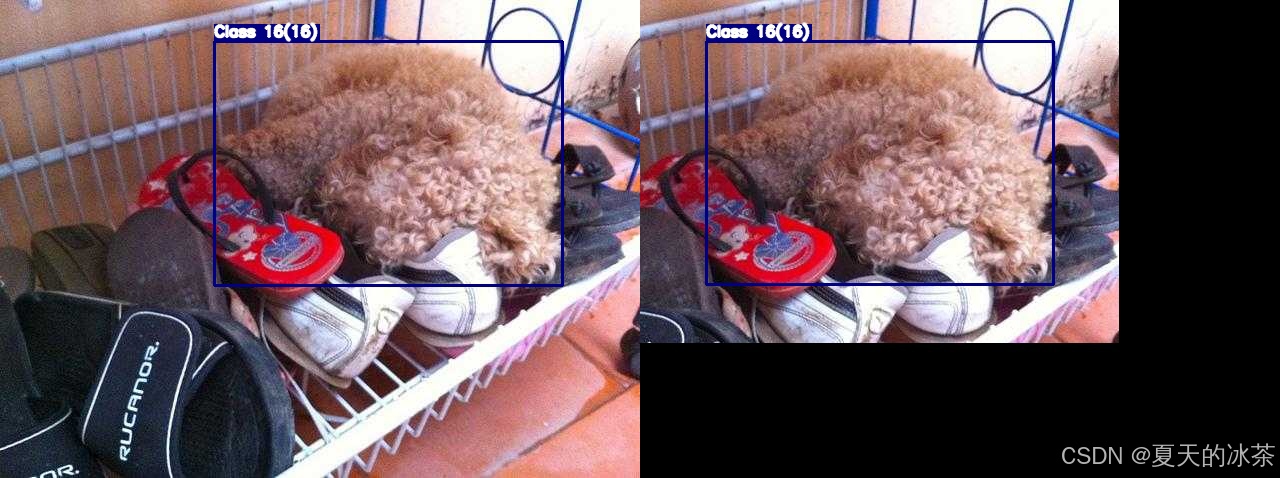
缩放类
等比例缩放是进行高和宽保持等比例的缩放方式,这种方式对于 YOLO 归一化坐标是保持不变的,此外长宽比扭曲是非等比缩放,会造成目标物体拉伸或压缩。
python
def resize_keep(
    image,
    bboxes,
    scale_range=(0.8, 1.2)
):
    """
    纯等比例缩放
    """
    H, W = image.shape[:2]
    bboxes = np.asarray(bboxes, dtype=np.float32)
    scale = np.random.uniform(*scale_range)
    new_W = int(W * scale)
    new_H = int(H * scale)
    # 图像等比例 resize
    scaled_img = cv2.resize(image, (new_W, new_H), interpolation=cv2.INTER_LINEAR)
    return scaled_img, bboxes.copy()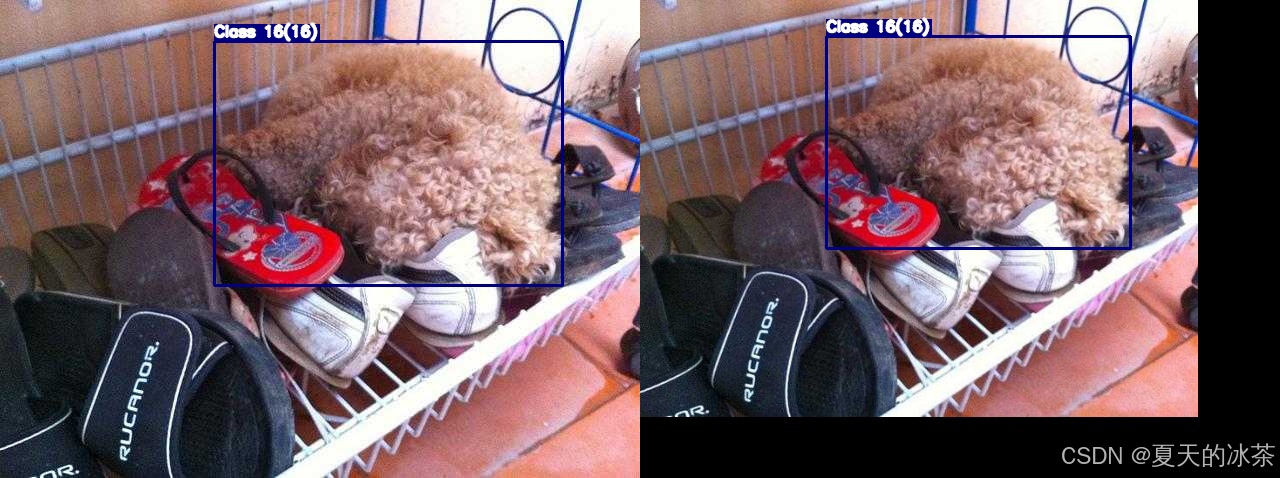
光度/颜色变换
亮度调整,factor小于1表示降低亮度,大于1表示提高亮度。
python
def adjust_brightness(image, brightness_factor=0.5):
    return cv2.convertScaleAbs(image, alpha=brightness_factor, beta=0)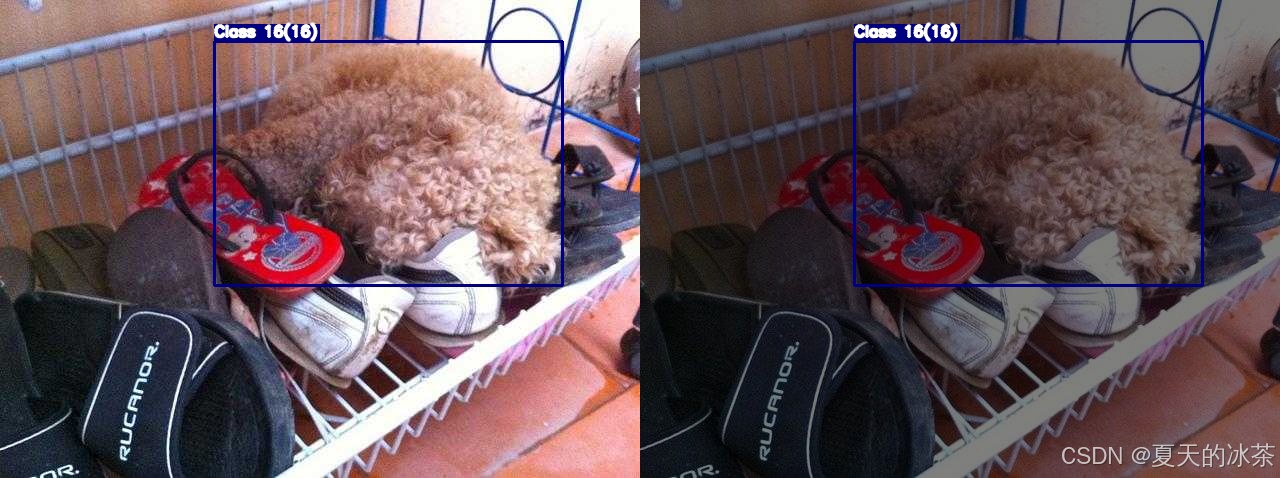
随机HSV(色调、饱和度、亮度)颜色空间增强。HSV有三个通道分别对应Hue色调,范围0-179,Saturation饱和度即颜色鲜艳程度,范围0-255,Value亮度,范围0-255。
python
def random_hsv(image):
    hsv_image = cv2.cvtColor(image, cv2.COLOR_BGR2HSV).astype(np.float32)
    h_channel, s_channel, v_channel = cv2.split(hsv_image)
    delta_h = random.randint(-15, 15)
    h_channel = (h_channel + delta_h) % 180
    s_scale = np.random.uniform(0.5, 1.5)
    v_scale = random.uniform(0.5, 1.5)
    s_channel = np.clip(s_channel * s_scale, 0, 255).astype(np.uint8)
    v_channel = np.clip(v_channel * v_scale, 0, 255).astype(np.uint8)
    hsv_image[..., 0] = h_channel.astype(np.uint8)
    hsv_image[..., 1] = s_channel
    hsv_image[..., 2] = v_channel
    new_image = cv2.cvtColor(hsv_image.astype(np.uint8), cv2.COLOR_HSV2BGR)
    return new_image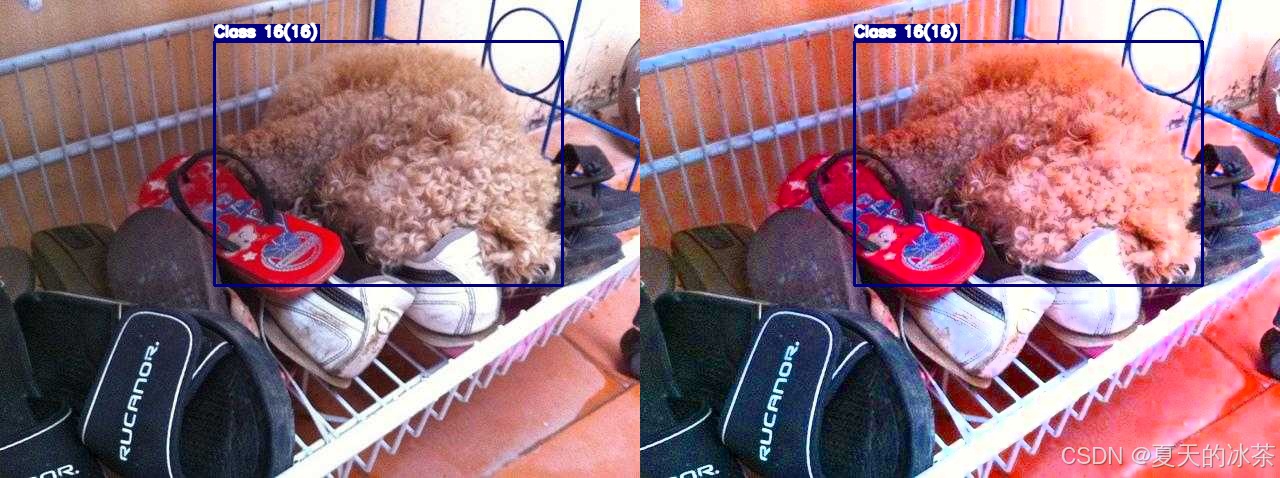
噪声
高斯噪声给图片添加随机噪点,可通过sigma控制噪声强度
python
def gaussian_noise(image, mean=0.1, sigma=10):
    img = image.astype(np.float32)
    noise = np.random.normal(mean, sigma, image.shape)
    img += noise
    noisy_image = np.clip(img, 0, 255).astype(np.uint8)
    return noisy_image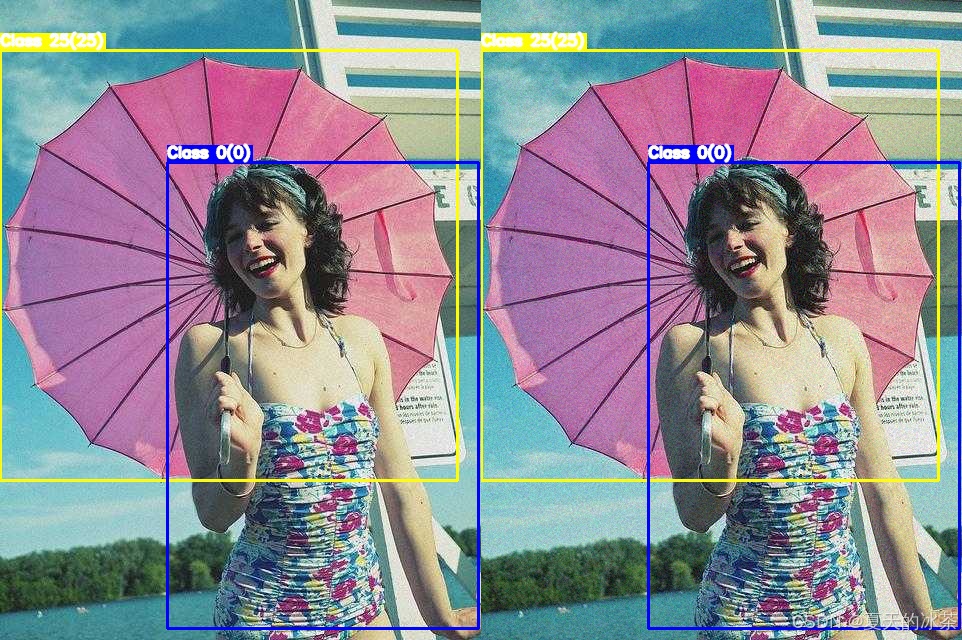
模糊与锐化
高斯模糊,让图片变模糊/柔化,kernel_size指模糊核大小,必须是奇数,sigma是标准差,控制模糊程度,不用管,给0表示根据核大小自动计算。
python
def gaussian_blur(image, kernel_size=3, sigma=0):
    if kernel_size % 2 == 0 or kernel_size <= 1:
        raise ValueError("kernel_size must be odd and greater than 1")
    return cv2.GaussianBlur(image, (kernel_size, kernel_size), sigmaX=sigma, sigmaY=sigma)
此外,如果还有移动拍摄等情况,可用加入运动模糊
python
def motion_blur(image, kernel_size=10, angle=0):
    kernel = np.zeros((kernel_size, kernel_size))
    kernel[kernel_size//2, :] = 1.0
    kernel = cv2.warpAffine(kernel,
                            cv2.getRotationMatrix2D((kernel_size/2-0.5, kernel_size/2-0.5), angle, 1.0),
                            (kernel_size, kernel_size))
    kernel /= kernel.sum()
    return cv2.filter2D(image, -1, kernel)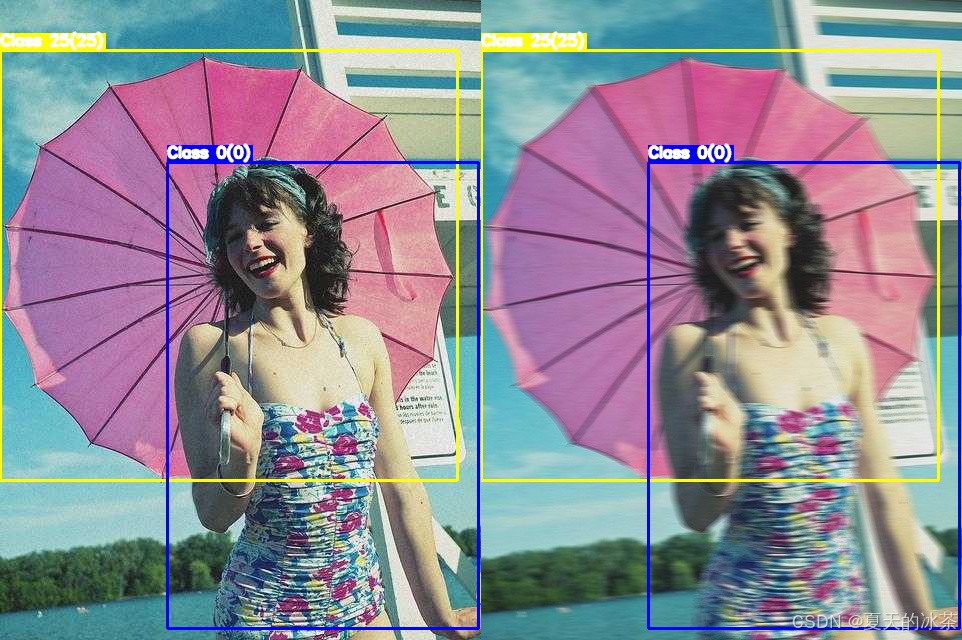
锐化方法使用的是非锐化掩模进行图像锐化(USM)
python
def unsharp_mask(image, kernel_size=5, sigma=1.0, amount=1.0):
    blurred = cv2.GaussianBlur(image, (kernel_size, kernel_size), sigma)
    sharpened = cv2.addWeighted(image, 1 + amount, blurred, -amount, 0)
    return np.clip(sharpened, 0, 255).astype(np.uint8)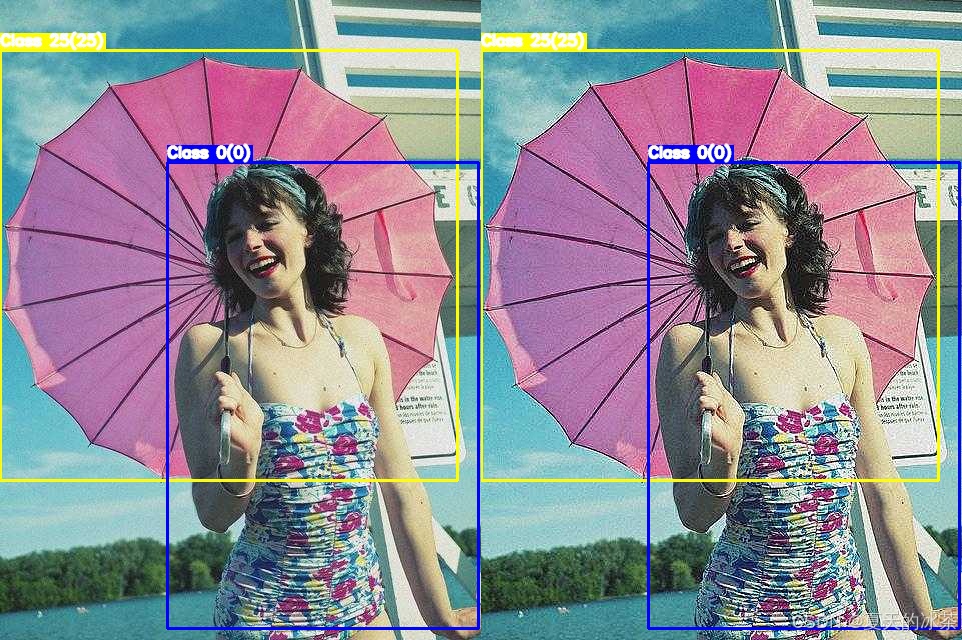
其他
混合与合成
MixUp:两张图像线性混合
CutMix:将一张图像的部分区域粘贴到另一张
Mosaic:四张图像拼接
CutOut:随机遮挡
Random Erasing:随机擦除
天气
在albumentations库中有实现的,但效果都很假,下面仅作为一些示例:
python
import albumentations as A

# 随机雨滴
transform_rain = A.Compose([
    A.RandomRain(
        slant_lower=-10,     # 雨滴倾斜角度下限
        slant_upper=10,      # 雨滴倾斜角度上限
        drop_length=20,      # 雨滴长度
        drop_width=1,        # 雨滴宽度
        drop_color=(200, 200, 200),  # 雨滴颜色(灰色)
        blur_value=5,        # 模糊值
        brightness_coefficient=0.9,  # 亮度系数
        rain_type='drizzle'  # 雨类型:'drizzle'毛毛雨,'heavy'大雨
    )
])

# 随机雾化
transform_fog = A.Compose([
    A.RandomFog(
        fog_coef_lower=0.3,      # 雾浓度下限
        fog_coef_upper=0.8,      # 雾浓度上限
        alpha_coef=0.08          # 透明度系数
    )
])

# 随机阳光光斑
transform_sunflare = A.Compose([
    A.RandomSunFlare(
        flare_roi=(0, 0, 1, 1),      # 光斑区域(整个图像)
        angle_lower=0.5,             # 角度下限
        angle_upper=0.5,             # 角度上限
        num_flare_circles_lower=6,   # 光斑圈数量下限
        num_flare_circles_upper=10,  # 光斑圈数量上限
        src_radius=400,              # 光源半径
        src_color=(255, 255, 255)    # 光源颜色(白色)
    )
])

transform_shadow = A.Compose([
    A.RandomShadow(
        shadow_roi=(0, 0.5, 1, 1),   # 阴影区域
        num_shadows_lower=1,         # 阴影数量下限
        num_shadows_upper=2,         # 阴影数量上限
        shadow_dimension=5           # 阴影维度
    )
])

# 随机雪景
transform_snow = A.Compose([
    A.RandomSnow(
        snow_point_lower=0.1,      # 雪点密度下限 (0-1)
        snow_point_upper=0.3,      # 雪点密度上限 (0-1)
        brightness_coeff=2.5,      # 亮度系数
        p=0.5                      # 应用概率
    )
])
可用通过下面的方式应用到图像上面:
python
    image = transform_snow(image=image)
    image = image['image']
以上都通过下面的代码进行测试的:
python
def pad_to_size(image, target_h, target_w, pad_value=0):
    """
    image: HWC
    pad to (target_h, target_w)
    """
    h, w = image.shape[:2]

    pad_bottom = target_h - h
    pad_right = target_w - w

    assert pad_bottom >= 0 and pad_right >= 0

    padded = cv2.copyMakeBorder(
        image,
        top=0,
        bottom=pad_bottom,
        left=0,
        right=pad_right,
        borderType=cv2.BORDER_CONSTANT,
        value=pad_value
    )
    return padded

if __name__ == '__main__':
    # 图像和标签文件夹
    image_path = r"E:\PythonProject\image_process\test_data\test_coco8\images\000000000036.jpg"
    # label_path = r"E:\PythonProject\image_process\test_data\test_coco8\labels\000000000009.txt"
    save_path = r"E:\PythonProject\image_process\test_data\yolo_dataset_test\Augumentation"
    from load_yolo import load_yolo_data, draw_yolo_bboxes
    image, bboxes = load_yolo_data(image_path, None, convert_to_pixel=False)
    image_with_bbox1 = draw_yolo_bboxes(image, bboxes)
    # image, bboxes = resize_keep(image, bboxes)
    image = unsharp_mask(image)
    image_with_bbox2 = draw_yolo_bboxes(image, bboxes)
    # pad 到统一尺寸
    h1, w1 = image_with_bbox1.shape[:2]
    h2, w2 = image_with_bbox2.shape[:2]

    target_h = max(h1, h2)
    target_w = max(w1, w2)

    image_with_bbox1 = pad_to_size(image_with_bbox1, target_h, target_w)
    image_with_bbox2 = pad_to_size(image_with_bbox2, target_h, target_w)

    image_with_bbox = np.hstack([image_with_bbox1, image_with_bbox2])
    cv2.imwrite("image_with_bbox.jpg", image_with_bbox)
    cv2.imshow("data augmentation", image_with_bbox)
    cv2.waitKey(0)
可使用的脚本
为了将前面的函数进行组合,我这里设计了一些增强的方案:
python
def morphological_augmentations(image, bboxes):
    if random.random() < 0.5:
        image, bboxes = hflip(image, bboxes)

    if random.random() < 0.5:
        image, bboxes = vflip(image, bboxes)

    if random.random() < 0.5:
        k = random.choice([1, 2, 3])
        image, bboxes = rotate90(image, bboxes, k)

    if random.random() < 0.4:
        image, bboxes = resize_keep(image, bboxes, (1.1, 1.2))
        image, bboxes = random_crop(image, bboxes)

    if random.random() < 0.3:
        image, bboxes = resize_keep(image, bboxes, (0.5, 1))

    return image, bboxes

def color_augmentations(image):
    if random.random() < 0.6:
        image = random_hsv(image)

    if random.random() < 0.4:
        image = adjust_brightness(
            image,
            brightness_factor=random.uniform(0.6, 1.4)
        )
    return image

def blur_augmentations(image):
    if random.random() < 0.2:
        image = gaussian_noise(image)

    if random.random() < 0.1:
        image = gaussian_blur(
            image,
            kernel_size=random.choice([3, 5])
        )

    if random.random() < 0.3:
        image = motion_blur(
            image,
            kernel_size=random.choice([3, 5]),
        )

    if random.random() < 0.3:
        image = unsharp_mask(image)

    return image

def enhanced_strategy(image, bboxes, strategy):
    if strategy==1:
        image, bboxes = morphological_augmentations(image, bboxes)
    if strategy==2:
        image, bboxes = morphological_augmentations(image, bboxes)
        image = color_augmentations(image)
    if strategy==3:
        image, bboxes = morphological_augmentations(image, bboxes)
        image = blur_augmentations(image)
    if strategy==4:
        image, bboxes = morphological_augmentations(image, bboxes)
        image = color_augmentations(image)
        image = blur_augmentations(image)
    if strategy==5:
        image = color_augmentations(image)
        image = blur_augmentations(image)
    return image, bboxes
现在想要的是一个脚本,完成:
- 遍历所有图像文件
- 读取 image + YOLO label
- 原图原标签保存一份
- 对每张图:
- 应用 5 种 strategy
- 每种 strategy 生成 1 张新图
- 保存到指定目录
- 文件名规则:
xxx.jpg → 原图
xxx_s1.jpg → strategy 1
xxx_s2.jpg
...
xxx_s5.jpg
标签同名 .txt
这里给出可使用的脚本:
python
"""
# YOLO格式数据增强完整思路

YOLO标签格式:(class_id, x_center, y_center, width, height),所有值都是归一化的(0-1)
关键原则:任何图像变换后,必须同步更新对应的边界框坐标

形态的处理(会改变标签位置)
1. 翻转类
水平翻转:
    图像:img = img[:, ::-1, :]
    标签:x_center = 1.0 - x_center
垂直翻转:
    图像:img = img[::-1, :, :]
    标签:y_center = 1.0 - y_center
对角翻转:
    水平和垂直翻转的组合(可根据前二者进行实现)

2. 旋转类
90°倍数的旋转:
    90°交换宽高,(x,y) → (1-y, x)
    180°旋转:(x,y) → (1-x, 1-y)
    270°旋转:(x,y) → (y, 1-x)
任意角度旋转:
    需要计算旋转后的新边界框(外接矩形)
    防止边界框过度增大或出界

3. 裁剪类
随机裁剪:
    1)随机选择裁剪区域
    2)过滤完全在裁剪区域外的框
    3)调整部分在区域内框的坐标
    4)重新归一化坐标
中心裁剪:
    保持目标在中心区域
随机擦除/Cutout:
    随机遮挡部分区域

4. 缩放
随机缩放
    缩放后需要调整边界框坐标
    new_width = width * scale
    new_height = height * scale
    边界框坐标按比例缩放
长宽比扭曲:
    非等比缩放,需谨慎处理(未加入)

颜色/光度变换(不会改变标签位置)
1. 颜色空间变换
    亮度调整:img = img * brightness_factor
    对比度调整:现成可用
    饱和度调整:在HSV空间调整S通道
    色调调整:在HSV空间调整H通道
2. 噪声添加(建议在数据增强中使用随机添加,不建议在扩充数据中使用)
    高斯噪声:img = img + np.random.normal(0, sigma, img.shape)
    椒盐噪声:随机像素点变为黑或白
    色彩噪声:在不同通道添加不同噪声
3. 模糊/清晰化
    高斯模糊:模拟失焦或运动模糊
    中值滤波:减少噪声
    锐化:增强边缘
    运动模糊:模拟无人机等拍摄造成的模糊现象
4. 颜色调整
    随机灰度化:部分图像转为灰度(建议不使用,因为网络输入要求是三通道)
    颜色抖动:轻微随机调整RGB各通道
    直方图均衡化:增强对比度

混合/复杂增强(补充的一些增强方法)
1. 混合图像
    MixUp:两张图像按比例混合
    CutMix:将一张图像的部分区域粘贴到另一张
    Mosaic:4张图像拼接为1张
2. 风格变换
    色彩空间转换:RGB↔HSV↔LAB
    Gamma校正:调整图像整体亮度
    CLAHE:限制对比度的自适应直方图均衡
"""
import cv2
import os
import glob
import random
import numpy as np

def hflip(image, bboxes):
    """
    水平翻转
    image: HWC
    bboxes: [[cls, x, y, w, h], ...]
    """
    image = np.flip(image, axis=1)
    bboxes = np.asarray(bboxes, dtype=np.float32)
    bboxes[:, 1] = 1.0 - bboxes[:, 1]   # x_center
    return image, bboxes

def vflip(image, bboxes):
    """
    垂直翻转
    """
    image = np.flip(image, axis=0)
    bboxes = np.asarray(bboxes, dtype=np.float32)
    bboxes[:, 2] = 1.0 - bboxes[:, 2]   # y_center
    return image, bboxes


def rotate90(image, bboxes, k):
    """
    image: HWC
    bboxes: (N, 5) -> [cls, x, y, w, h] (YOLO normalized)
    k: 1=90°, 2=180°, 3=270° (CCW)
    """
    assert k in [1, 2, 3]

    H, W = image.shape[:2]
    image_rot = np.rot90(image, k)

    bboxes = np.asarray(bboxes, dtype=np.float32).copy()
    cls = bboxes[:, 0:1]

    # 1. YOLO → pixel
    x = bboxes[:, 1] * W
    y = bboxes[:, 2] * H
    w = bboxes[:, 3] * W
    h = bboxes[:, 4] * H

    # 2. 中心点旋转
    if k == 1:  # 90° CCW
        x_new = y
        y_new = W - x
        w_new = h
        h_new = w
        H_new, W_new = W, H

    elif k == 2:  # 180°
        x_new = W - x
        y_new = H - y
        w_new = w
        h_new = h
        H_new, W_new = H, W

    elif k == 3:  # 270° CCW
        x_new = H - y
        y_new = x
        w_new = h
        h_new = w
        H_new, W_new = W, H

    # 3. pixel → YOLO
    x_new /= W_new
    y_new /= H_new
    w_new /= W_new
    h_new /= H_new

    new_bboxes = np.concatenate(
        [cls, x_new[:, None], y_new[:, None], w_new[:, None], h_new[:, None]],
        axis=1
    )

    return image_rot, new_bboxes

def random_crop(
    image,
    bboxes,
    crop_ratio=(0.55, 0.95),
    min_box_ratio=0.2
):
    """
    image: HWC
    bboxes: (N, 5) -> [cls, x, y, w, h] (YOLO normalized)
    crop_ratio: 裁剪尺寸占原图比例范围
    min_box_ratio: 裁剪后 bbox 保留的最小面积比例
    """
    H, W = image.shape[:2]
    bboxes = np.asarray(bboxes, dtype=np.float32)
    if len(bboxes) == 0:
        return image, bboxes
    # 1. YOLO → pixel (xyxy)
    cls = bboxes[:, 0:1]
    xc = bboxes[:, 1] * W
    yc = bboxes[:, 2] * H
    bw = bboxes[:, 3] * W
    bh = bboxes[:, 4] * H
    x1 = xc - bw / 2
    y1 = yc - bh / 2
    x2 = xc + bw / 2
    y2 = yc + bh / 2

    boxes = np.stack([x1, y1, x2, y2], axis=1)
    # 2. 选择裁剪区域
    crop_w = np.random.uniform(*crop_ratio) * W
    crop_h = np.random.uniform(*crop_ratio) * H
    idx = np.random.randint(len(boxes))
    cx = (boxes[idx, 0] + boxes[idx, 2]) / 2
    cy = (boxes[idx, 1] + boxes[idx, 3]) / 2
    x0 = np.clip(cx - crop_w / 2, 0, W - crop_w)
    y0 = np.clip(cy - crop_h / 2, 0, H - crop_h)
    x0, y0 = int(x0), int(y0)
    x1c, y1c = x0 + int(crop_w), y0 + int(crop_h)
    # 3. 裁剪图像
    cropped_img = image[y0:y1c, x0:x1c]
    # 4. 裁剪 & 过滤 bbox
    boxes[:, [0, 2]] -= x0
    boxes[:, [1, 3]] -= y0
    boxes[:, 0] = np.clip(boxes[:, 0], 0, crop_w)
    boxes[:, 1] = np.clip(boxes[:, 1], 0, crop_h)
    boxes[:, 2] = np.clip(boxes[:, 2], 0, crop_w)
    boxes[:, 3] = np.clip(boxes[:, 3], 0, crop_h)
    bw_new = boxes[:, 2] - boxes[:, 0]
    bh_new = boxes[:, 3] - boxes[:, 1]
    keep = (bw_new > 0) & (bh_new > 0)
    # 面积过滤(防止剩一条细线)
    area_ratio = (bw_new * bh_new) / (bw * bh + 1e-6)
    keep &= area_ratio > min_box_ratio
    boxes = boxes[keep]
    cls = cls[keep]
    if len(boxes) == 0:
        return image, bboxes  # fallback
    # 5. pixel → YOLO
    xc_new = (boxes[:, 0] + boxes[:, 2]) / 2 / crop_w
    yc_new = (boxes[:, 1] + boxes[:, 3]) / 2 / crop_h
    bw_new = (boxes[:, 2] - boxes[:, 0]) / crop_w
    bh_new = (boxes[:, 3] - boxes[:, 1]) / crop_h
    new_bboxes = np.concatenate(
        [cls, xc_new[:, None], yc_new[:, None], bw_new[:, None], bh_new[:, None]],
        axis=1
    )
    return cropped_img, new_bboxes

def resize_keep(
    image,
    bboxes,
    scale_range=(0.8, 1.2)
):
    """
    纯等比例缩放
    """
    H, W = image.shape[:2]
    bboxes = np.asarray(bboxes, dtype=np.float32)
    scale = np.random.uniform(*scale_range)
    new_W = int(W * scale)
    new_H = int(H * scale)
    # 图像等比例 resize
    scaled_img = cv2.resize(image, (new_W, new_H), interpolation=cv2.INTER_LINEAR)
    return scaled_img, bboxes.copy()


def pad_to_size(image, target_h, target_w, pad_value=0):
    """
    image: HWC
    pad to (target_h, target_w)
    """
    h, w = image.shape[:2]

    pad_bottom = target_h - h
    pad_right = target_w - w

    assert pad_bottom >= 0 and pad_right >= 0

    padded = cv2.copyMakeBorder(
        image,
        top=0,
        bottom=pad_bottom,
        left=0,
        right=pad_right,
        borderType=cv2.BORDER_CONSTANT,
        value=pad_value
    )
    return padded

def adjust_brightness(image, brightness_factor=0.5):
    return cv2.convertScaleAbs(image, alpha=brightness_factor, beta=0)

def random_hsv(image):
    hsv_image = cv2.cvtColor(image, cv2.COLOR_BGR2HSV).astype(np.float32)
    h_channel, s_channel, v_channel = cv2.split(hsv_image)
    delta_h = random.randint(-25, 25)
    h_channel = (h_channel + delta_h) % 180
    s_scale = np.random.uniform(0.5, 1.5)
    v_scale = random.uniform(0.5, 1.5)
    s_channel = np.clip(s_channel * s_scale, 0, 255).astype(np.uint8)
    v_channel = np.clip(v_channel * v_scale, 0, 255).astype(np.uint8)
    hsv_image[..., 0] = h_channel.astype(np.uint8)
    hsv_image[..., 1] = s_channel
    hsv_image[..., 2] = v_channel
    new_image = cv2.cvtColor(hsv_image.astype(np.uint8), cv2.COLOR_HSV2BGR)
    return new_image

def gaussian_noise(image, mean=0.1, sigma=15):
    img = image.astype(np.float32)
    noise = np.random.normal(mean, sigma, image.shape)
    img += noise
    noisy_image = np.clip(img, 0, 255).astype(np.uint8)
    return noisy_image

def gaussian_blur(image, kernel_size=3, sigma=0):
    if kernel_size % 2 == 0 or kernel_size <= 1:
        raise ValueError("kernel_size must be odd and greater than 1")
    return cv2.GaussianBlur(image, (kernel_size, kernel_size), sigmaX=sigma, sigmaY=sigma)

def motion_blur(image, kernel_size=10, angle=0):
    kernel = np.zeros((kernel_size, kernel_size))
    kernel[kernel_size//2, :] = 1.0
    kernel = cv2.warpAffine(kernel,
                            cv2.getRotationMatrix2D((kernel_size/2-0.5, kernel_size/2-0.5), angle, 1.0),
                            (kernel_size, kernel_size))
    kernel /= kernel.sum()
    return cv2.filter2D(image, -1, kernel)


def unsharp_mask(image, kernel_size=5, sigma=1.0, amount=1.0):
    blurred = cv2.GaussianBlur(image, (kernel_size, kernel_size), sigma)
    sharpened = cv2.addWeighted(image, 1 + amount, blurred, -amount, 0)
    return np.clip(sharpened, 0, 255).astype(np.uint8)

def morphological_augmentations(image, bboxes):
    if random.random() < 0.5:
        image, bboxes = hflip(image, bboxes)

    if random.random() < 0.5:
        image, bboxes = vflip(image, bboxes)

    if random.random() < 0.5:
        k = random.choice([1, 2, 3])
        image, bboxes = rotate90(image, bboxes, k)

    if random.random() > 0.4:
        image, bboxes = resize_keep(image, bboxes, (1.1, 1.2))
        image, bboxes = random_crop(image, bboxes)
    else:
        image, bboxes = resize_keep(image, bboxes, (0.7, 1))

    return image, bboxes

def color_augmentations(image):
    if random.random() > 0.3:
        image = random_hsv(image)

    if random.random() < 0.4:
        image = adjust_brightness(
            image,
            brightness_factor=random.uniform(0.6, 1.4)
        )
    return image

def blur_augmentations(image):
    if random.random() < 0.2:
        image = gaussian_noise(image)

    if random.random() < 0.1:
        image = gaussian_blur(
            image,
            kernel_size=random.choice([3, 5])
        )

    if random.random() < 0.3:
        image = motion_blur(
            image,
            kernel_size=random.choice([3, 5]),
        )

    if random.random() < 0.3:
        image = unsharp_mask(image)

    return image

def enhanced_strategy(image, bboxes, strategy):
    if strategy==1:
        image, bboxes = morphological_augmentations(image, bboxes)
    if strategy==2:
        image, bboxes = morphological_augmentations(image, bboxes)
        image = color_augmentations(image)
    if strategy==3:
        image, bboxes = morphological_augmentations(image, bboxes)
        image = blur_augmentations(image)
    if strategy==4:
        image, bboxes = morphological_augmentations(image, bboxes)
        image = color_augmentations(image)
        image = blur_augmentations(image)
    if strategy==5:
        image = color_augmentations(image)
        image = blur_augmentations(image)
    return image, bboxes

def save_yolo_label(path, bboxes):
    """
    bboxes: (N, 5) [cls, x, y, w, h]
    """
    with open(path, 'w') as f:
        for box in bboxes:
            cls, x, y, w, h = box
            f.write(f"{int(cls)} {x:.6f} {y:.6f} {w:.6f} {h:.6f}\n")

def augment_yolo_dataset(
    image_dir,
    label_dir,
    save_dir,
    strategies=(1, 2, 3, 4, 5)
):
    save_image_dir = os.path.join(save_dir, "images")
    save_label_dir = os.path.join(save_dir, "labels")
    os.makedirs(save_image_dir, exist_ok=True)
    os.makedirs(save_label_dir, exist_ok=True)

    image_paths = sorted(
        glob.glob(os.path.join(image_dir, "*.jpg")) +
        glob.glob(os.path.join(image_dir, "*.png"))
    )

    for i, img_path in enumerate(image_paths):
        name = os.path.splitext(os.path.basename(img_path))[0]
        label_path = os.path.join(label_dir, name + ".txt")
        image = cv2.imread(img_path)
        if image is None:
            continue
        if os.path.exists(label_path):
            bboxes = []
            with open(label_path) as f:
                for line in f:
                    bboxes.append(list(map(float, line.strip().split())))
            bboxes = np.array(bboxes, dtype=np.float32)
        else:
            bboxes = np.zeros((0, 5), dtype=np.float32)
        cv2.imwrite(
            os.path.join(save_image_dir, name + ".jpg"),
            image
        )
        save_yolo_label(
            os.path.join(save_label_dir, name + ".txt"),
            bboxes
        )
        print(f"处理第{i}张:{img_path}")
        for s in strategies:
            img_aug, box_aug = enhanced_strategy(
                image.copy(),
                bboxes.copy(),
                strategy=s
            )
            new_name = f"{name}_s{s}"
            cv2.imwrite(
                os.path.join(save_image_dir, new_name + ".jpg"),
                img_aug
            )
            save_yolo_label(
                os.path.join(save_label_dir, new_name + ".txt"),
                box_aug
            )
            print(f"    进行策略{s}增强")

if __name__ == '__main__':
    # 图像和标签文件夹
    image_path = r"E:\PythonProject\image_process\test_data\test_coco8\images"
    label_path = r"E:\PythonProject\image_process\test_data\test_coco8\labels"
    save_path = r"E:\PythonProject\image_process\test_data\test_coco8\Augumentation"
    augment_yolo_dataset(
        image_path, label_path, save_path
    )