〇、前言
前文已经介绍过什么是 Serilog,以及其核心特点,详见:https://www.cnblogs.com/hnzhengfy/p/19167414/Serilog_basic。
本文继续对各种类型的 Sink 进行简单的实践,主题是消息队列 Sinks,供参考。
在现代分布式系统中,将日志事件通过消息队列 Sinks 发布出去是一种实现系统解耦、异步处理和流量削峰的高效方式。
消息队列 Sinks 常见的有以下三种:
| 排名 | 消息队列 | 主要优势领域 | 适用人群 |
|---|---|---|---|
| 1 | Kafka | 高吞吐、日志、流处理 | 大数据、互联网大厂 |
| 2 | RabbitMQ | 可靠投递、灵活路由、易运维 | 中小企业、传统行业 |
| 3 | RocketMQ | 事务消息、顺序消费、高可靠 | 中国互联网、电商金融 |
本文就前两种进行简单的介绍和示例,对于 RocketMQ 待后续有机会进行补充。
一、消息队列 Sinks 的用法
1.1 Serilog.Sinks.Kafka:将日志信息写入 Kafka 队列
Serilog.Sinks.Kafka 是 Serilog 日志库的一个 Sink(接收器)插件,用于将结构化日志数据发送到 Apache Kafka 主题。它利用 Kafka 高吞吐量、分布式发布-订阅消息系统的特点,构建实时日志管道,使日志系统能够轻松处理海量日志数据,并支持多系统集成分析。
1.1.1 在 Windows 上安装 Kafka*(用于开发测试,生产环境建议 Linux)*
注意:Kafka 官方主要支持 Linux 环境,Windows 安装不是官方推荐的方式。但如果是在 Windows 上进行开发测试,还是可以的。
本文使用现今最新的版本 4.1.1,Kafka 4.1.1 默认使用 KRaft(Kafka Raft)模式,即去 ZooKeeper 架构,因此只需安装 java 环境,无需在安装 ZooKeeper 。
1)安装 Java 环境
由于 Kafka 4.1.1 是用 Java 17(class version 61)编译的,对应关系如下:
Java 版本与 class file version 对照关系:
Java 8 → 52
Java 11 → 55
Java 17 → 61
Java 21 → 65
因此,在安装 Kafka 之前可以先安装下 JDK 17。官方下载地址:https://www.oracle.com/java/technologies/javase/jdk17-archive-downloads.html。
直接默认选项安装即可。
然后配置环境变量:JAVA_HOME:C:\Program Files\Java\jdk-17。安装时若改了路径需要改成对应的路径。
Path 中添加一行:%JAVA_HOME%\bin。
然后打开 cmd 窗口验证安装成功:
C:\Users\Administrator>java -version
java version "17.0.12" 2024-07-16 LTS
Java(TM) SE Runtime Environment (build 17.0.12+8-LTS-286)
Java HotSpot(TM) 64-Bit Server VM (build 17.0.12+8-LTS-286, mixed mode, sharing)
2)安装 Kafka
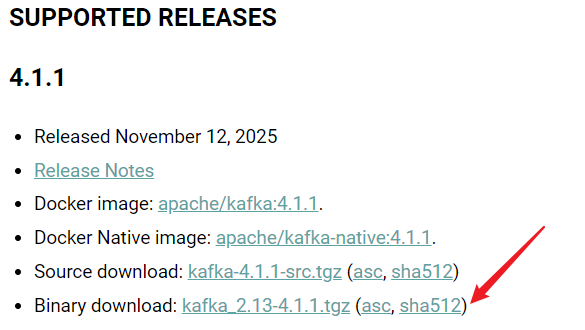
下载如下图中的二进制版本(Binary),可以直接运行,无需自己编译。文件名中的 2.13 表示该 Kafka 版本是用 Scala 2.13 编译的,可以忽略。
官方下载地址:https://kafka.apache.org/downloads。
解压到文件夹:D:\kafka_2.13-4.1.1。
修改配置文件夹D:\kafka_2.13-4.1.1\config\server.properties:
# 【已默认】启用 KRaft 模式(同时作为 broker 和 controller)
process.roles=broker,controller
node.id=1
broker.id=1

# 【必须设置,需手动新增】
# 定义 controller quorum 的投票成员
# 格式:nodeId@host:port
controller.quorum.voters=1@localhost:9093
# controller.quorum.voters=1@localhost:9093 中的 1 必须和 node.id=1 一致
# 9093 是 CONTROLLER 监听端口,必须与 listeners 中的 CONTROLLER://:9093 匹配

# 必须设置!定义 controller quorum 的投票成员
# 格式:nodeId@host:port
controller.quorum.voters=1@localhost:9093

# 【已默认】监听器配置
listeners=PLAINTEXT://:9092,CONTROLLER://:9093
inter.broker.listener.name=PLAINTEXT
controller.listener.names=CONTROLLER

# 日志目录(建议使用 Windows 路径)
log.dirs=/tmp/kraft-combined-logs
然后生成集群 ID 并格式化日志目录:(必要步骤,若直接启动,会报错:找不到 meta.properties 文件)
# 虽然出现了 Log4j 的 ERROR 日志,但实际上 UUID 已成功生成
PS D:\kafka_2.13-4.1.1> bin\windows\kafka-storage.bat random-uuid
2025-12-04T11:26:06.769887100Z main ERROR Reconfiguration failed: No configuration found for '4dc63996' at 'null' in 'null'
wTL_esmQSuKMtvzx6eclsQ
# 使用生成的 Cluster ID 格式化 Kafka 存储目录
PS D:\kafka_2.13-4.1.1> bin\windows\kafka-storage.bat format -t wTL_esmQSuKMtvzx6eclsQ -c config/server.properties
2025-12-04T11:29:22.735759Z main ERROR Reconfiguration failed: No configuration found for '4dc63996' at 'null' in 'null'
Formatting metadata directory /tmp/kraft-combined-logs with metadata.version 4.1-IV1.

# 关于 Log4j ERROR 警告
# main ERROR Reconfiguration failed: No configuration found for '4dc63996' at 'null' in 'null'
# 是因为 Kafka 工具脚本(如 kafka-storage.bat)没有找到 Log4j 2 配置文件
# 它不影响功能,只是日志系统初始化失败,但仍会使用默认配置。
最后再启动 Kafka:bin\windows\kafka-server-start.bat config/server.properties。
看到如下输出就是启动成功了:

注意:Windows 安装 Kafka 仅适用于开发测试环境,生产环境建议使用 Linux 或 Docker 部署。
server.properties 示例
 # Licensed to the Apache Software Foundation (ASF) under one or more
# contributor license agreements.  See the NOTICE file distributed with
# this work for additional information regarding copyright ownership.
# The ASF licenses this file to You under the Apache License, Version 2.0
# (the "License"); you may not use this file except in compliance with
# the License.  You may obtain a copy of the License at
#
#    http://www.apache.org/licenses/LICENSE-2.0
#
# Unless required by applicable law or agreed to in writing, software
# distributed under the License is distributed on an "AS IS" BASIS,
# WITHOUT WARRANTIES OR CONDITIONS OF ANY KIND, either express or implied.
# See the License for the specific language governing permissions and
# limitations under the License.

############################# Server Basics #############################

# The role of this server. Setting this puts us in KRaft mode
process.roles=broker,controller

# The node id associated with this instance's roles
node.id=1

broker.id=1

# List of controller endpoints used connect to the controller cluster
controller.quorum.bootstrap.servers=localhost:9093

# 必须设置!定义 controller quorum 的投票成员
# 格式:nodeId@host:port
controller.quorum.voters=1@localhost:9093

############################# Socket Server Settings #############################

# The address the socket server listens on.
# Combined nodes (i.e. those with `process.roles=broker,controller`) must list the controller listener here at a minimum.
# If the broker listener is not defined, the default listener will use a host name that is equal to the value of java.net.InetAddress.getCanonicalHostName(),
# with PLAINTEXT listener name, and port 9092.
#   FORMAT:
#     listeners = listener_name://host_name:port
#   EXAMPLE:
#     listeners = PLAINTEXT://your.host.name:9092
listeners=PLAINTEXT://:9092,CONTROLLER://:9093

# Name of listener used for communication between brokers.
inter.broker.listener.name=PLAINTEXT

# Listener name, hostname and port the broker or the controller will advertise to clients.
# If not set, it uses the value for "listeners".
advertised.listeners=PLAINTEXT://localhost:9092,CONTROLLER://localhost:9093

# A comma-separated list of the names of the listeners used by the controller.
# If no explicit mapping set in `listener.security.protocol.map`, default will be using PLAINTEXT protocol
# This is required if running in KRaft mode.
controller.listener.names=CONTROLLER

# Maps listener names to security protocols, the default is for them to be the same. See the config documentation for more details
listener.security.protocol.map=CONTROLLER:PLAINTEXT,PLAINTEXT:PLAINTEXT,SSL:SSL,SASL_PLAINTEXT:SASL_PLAINTEXT,SASL_SSL:SASL_SSL

# The number of threads that the server uses for receiving requests from the network and sending responses to the network
num.network.threads=3

# The number of threads that the server uses for processing requests, which may include disk I/O
num.io.threads=8

# The send buffer (SO_SNDBUF) used by the socket server
socket.send.buffer.bytes=102400

# The receive buffer (SO_RCVBUF) used by the socket server
socket.receive.buffer.bytes=102400

# The maximum size of a request that the socket server will accept (protection against OOM)
socket.request.max.bytes=104857600


############################# Log Basics #############################

# A comma separated list of directories under which to store log files
# log.dirs=/tmp/kraft-combined-logs
# 数据目录(确保路径存在且可写)
log.dirs=D:/kafka_2.13-4.1.1/data/kafka-logs

# The default number of log partitions per topic. More partitions allow greater
# parallelism for consumption, but this will also result in more files across
# the brokers.
num.partitions=1

# The number of threads per data directory to be used for log recovery at startup and flushing at shutdown.
# This value is recommended to be increased for installations with data dirs located in RAID array.
num.recovery.threads.per.data.dir=1

############################# Internal Topic Settings  #############################
# The replication factor for the group metadata internal topics "__consumer_offsets", "__share_group_state" and "__transaction_state"
# For anything other than development testing, a value greater than 1 is recommended to ensure availability such as 3.
offsets.topic.replication.factor=1
share.coordinator.state.topic.replication.factor=1
share.coordinator.state.topic.min.isr=1
transaction.state.log.replication.factor=1
transaction.state.log.min.isr=1

############################# Log Flush Policy #############################

# Messages are immediately written to the filesystem but by default we only fsync() to sync
# the OS cache lazily. The following configurations control the flush of data to disk.
# There are a few important trade-offs here:
#    1. Durability: Unflushed data may be lost if you are not using replication.
#    2. Latency: Very large flush intervals may lead to latency spikes when the flush does occur as there will be a lot of data to flush.
#    3. Throughput: The flush is generally the most expensive operation, and a small flush interval may lead to excessive seeks.
# The settings below allow one to configure the flush policy to flush data after a period of time or
# every N messages (or both). This can be done globally and overridden on a per-topic basis.

# The number of messages to accept before forcing a flush of data to disk
#log.flush.interval.messages=10000

# The maximum amount of time a message can sit in a log before we force a flush
#log.flush.interval.ms=1000

############################# Log Retention Policy #############################

# The following configurations control the disposal of log segments. The policy can
# be set to delete segments after a period of time, or after a given size has accumulated.
# A segment will be deleted whenever *either* of these criteria are met. Deletion always happens
# from the end of the log.

# The minimum age of a log file to be eligible for deletion due to age
log.retention.hours=168

# A size-based retention policy for logs. Segments are pruned from the log unless the remaining
# segments drop below log.retention.bytes. Functions independently of log.retention.hours.
#log.retention.bytes=1073741824

# The maximum size of a log segment file. When this size is reached a new log segment will be created.
log.segment.bytes=1073741824

# The interval at which log segments are checked to see if they can be deleted according
# to the retention policies
log.retention.check.interval.ms=300000

# 允许自动创建 Topic
auto.create.topics.enable=true
3)创建 topic
创建语句:(注意,可以替换自定义的 topic 名:my-logs-topic1212)
.\bin\windows\kafka-topics.bat --create --topic my-logs-topic1212 --bootstrap-server localhost:9092 --partitions 3 --replication-factor 1注意:此语句正常几秒钟就可以执行完成,若时间比较长,需要等待其返回错误提示。
可能会遇到如下错误:
Error while executing topic command : Call(...createTopics...) timed out...
Caused by: org.apache.kafka.common.errors.DisconnectException: Cancelled createTopics request... due to node 1 being disconnected
原因:说明 Kafka 客户端(kafka-topics.bat)无法连接到 Kafka broker,或者 broker 虽然启动但未完全就绪(特别是 KRaft Controller 未选举完成)。
在 KRaft 模式 下,Kafka 启动分为两个角色:Controller:管理元数据(topics、partitions 等);Broker:处理生产/消费请求。如果 Controller 尚未完成初始化或选举,即使 kafka-server-start.bat 看似"已启动",元数据操作(如创建 Topic)仍会失败。
解决方案:
# 【步骤 1】确认 Kafka 是以 KRaft 模式 启动的
# 检查是否使用了 正确的配置文件:
# 正确启动命令(KRaft 模式)
.\bin\windows\kafka-server-start.bat .\config\server.properties

# 【步骤 2】检查 server.properties 中的关键配置
# 打开 config/server.properties,确保包含:
# 监听地址(必须!)
process.roles=broker,controller
node.id=1
broker.id=1
controller.quorum.voters=1@localhost:9093
listeners=PLAINTEXT://:9092,CONTROLLER://:9093
advertised.listeners=PLAINTEXT://localhost:9092
inter.broker.listener.name=PLAINTEXT
controller.listener.names=CONTROLLER
# 数据目录(确保路径存在且可写)
log.dirs=D:/kafka_2.13-4.1.1/data/kafka-logs
# 注意:
# controller.quorum.voters 必须与 node.id 匹配
# log.dirs 路径不能包含空格或中文
# 第一次启动前,清空 log.dirs 目录

# 【步骤 3】首次启动前格式化存储目录(关键!)
# KRaft 模式要求:先格式化存储目录,否则 broker 无法正常加入集群
# 1. 生成 Cluster ID(只需一次)
.\bin\windows\kafka-storage.bat random-uuid
# 2. 格式化日志目录
.\bin\windows\kafka-storage.bat format -t <上一步生成的UUID> -c .\config\kraft\server.properties

# 【步骤 4】启动 Kafka 并等待完全就绪
.\bin\windows\kafka-server-start.bat .\config\server.properties
# Kafka 启动成功后,等待 10~15 秒 再执行 kafka-topics.bat
# KRaft 启动比 ZooKeeper 模式慢,立即创建 Topic 会失败

# 实际操作过程示例:
PS D:\kafka_2.13-4.1.1> .\bin\windows\kafka-storage.bat random-uuid
nOhIgFFsQm2aiodLw8y7cQ

PS D:\kafka_2.13-4.1.1> bin\windows\kafka-storage.bat format -t nOhIgFFsQm2aiodLw8y7cQ -c config/server.properties --ignore-formatted
Formatting metadata directory /tmp/kraft-combined-logs with metadata.version 4.1-IV1.

PS D:\kafka_2.13-4.1.1> bin\windows\kafka-server-start.bat config/server.properties
DEPRECATED: A Log4j 1.x configuration file has been detected, which is no longer recommended.
。。。
[2025-12-12 17:31:28,080] INFO [BrokerServer id=1] Transition from STARTING to STARTED (kafka.server.BrokerServer)
[2025-12-12 17:31:28,082] INFO Kafka version: 4.1.1 (org.apache.kafka.common.utils.AppInfoParser)
[2025-12-12 17:31:28,082] INFO Kafka commitId: be816b82d25370ce (org.apache.kafka.common.utils.AppInfoParser)
[2025-12-12 17:31:28,084] INFO Kafka startTimeMs: 1765531888081 (org.apache.kafka.common.utils.AppInfoParser)
[2025-12-12 17:31:28,085] INFO [KafkaRaftServer nodeId=1] Kafka Server started (kafka.server.KafkaRaftServer)
# 至此重新启动成功,然后另打开一个窗口,进行下面操作:
# 添加 topic
PS D:\kafka_2.13-4.1.1> .\bin\windows\kafka-topics.bat --create --topic my-logs-topic1212 --bootstrap-server localhost:9092 --partitions 3 --replication-factor 1
Created topic my-logs-topic1212.
#查看已添加的 topic
PS D:\kafka_2.13-4.1.1> .\bin\windows\kafka-topics.bat --list --bootstrap-server localhost:9092
my-logs-topic1212
4)验证 Kafka 已经启动
# 可以列出 topic 表明:Kafka Broker 已接受客户端连接,并能响应元数据请求
PS D:\kafka_2.13-4.1.1> .\bin\windows\kafka-topics.bat --list --bootstrap-server localhost:9092
my-logs-topic1212
# Kafka 是 Java 应用,必须有 java.exe 进程
# 后续 netstat 显示该 PID 监听 9092 端口,确认就是 Kafka 进程
PS D:\kafka_2.13-4.1.1> tasklist /fi "imagename eq java.exe"

映像名称                       PID 会话名              会话#       内存使用
========================= ======== ================ =========== ============
java.exe                     90224 Console                    2    432,272 K
# 9092 端口处于 LISTENING 状态,且 PID 匹配
# 表示 Kafka Broker 正在监听所有 IPv4/IPv6 接口的 9092 端口
# PID 90224 与 tasklist 中的 Java 进程一致,确认是 Kafka 在监听
PS D:\kafka_2.13-4.1.1> netstat -ano | findstr :9092
  TCP    0.0.0.0:9092           0.0.0.0:0              LISTENING       90224
  TCP    127.0.0.1:52704        127.0.0.1:9092         TIME_WAIT       0
  TCP    127.0.0.1:52706        127.0.0.1:9092         TIME_WAIT       0
  TCP    127.0.0.1:52758        127.0.0.1:9092         TIME_WAIT       0
  TCP    127.0.0.1:52766        127.0.0.1:9092         TIME_WAIT       0
  TCP    [::]:9092              [::]:0                 LISTENING       90224
# 多个 TIME_WAIT 是之前 kafka-topics.bat 建立的短连接关闭后的正常状态
1.1.2 测试往 Kafka 队列中写入消息
1)创建 .NET 8.0 控制台应用程序,然后安装必要的包:
dotnet add package Serilog
dotnet add package Serilog.Sinks.Console
dotnet add package Serilog.Sinks.ConfluentKafka
2)修改 Program.cs
using Confluent.Kafka;
using Serilog;
using Serilog.Formatting.Json;
using Serilog.Sinks.Kafka;
// 配置 Kafka Producer
var kafkaConfig = new ProducerConfig
{
BootstrapServers = "localhost:9092",
ClientId = "serilog-dotnet8-demo",
Acks = Acks.All,
EnableIdempotence = true,
MessageTimeoutMs = 30000
};
// 配置 Serilog
Log.Logger = new LoggerConfiguration()
.MinimumLevel.Information()
.WriteTo.Console() // 可选:同时输出到控制台
.WriteTo.Kafka(
topic: "my-logs-topic1212",
null,
producerConfig: kafkaConfig,
formatter: new JsonFormatter() // 或自定义格式
)
.CreateLogger();
// 测试日志
Log.Information("应用程序启动成功");
Log.Warning("用户 {UserId} 尝试了高风险操作", 123);
Log.Error(new Exception("数据库连接失败"), "数据库错误");
// 模拟业务
for (int i = 1; i <= 3; i++)
{
Log.Information("处理任务 {TaskId},进度 {Progress:P}", i, i / 3.0);
await Task.Delay(200);
}
// 确保日志发送完成
Log.CloseAndFlush();
Console.WriteLine("\n日志已发送到 Kafka 主题 'app-logs'。按任意键退出...");
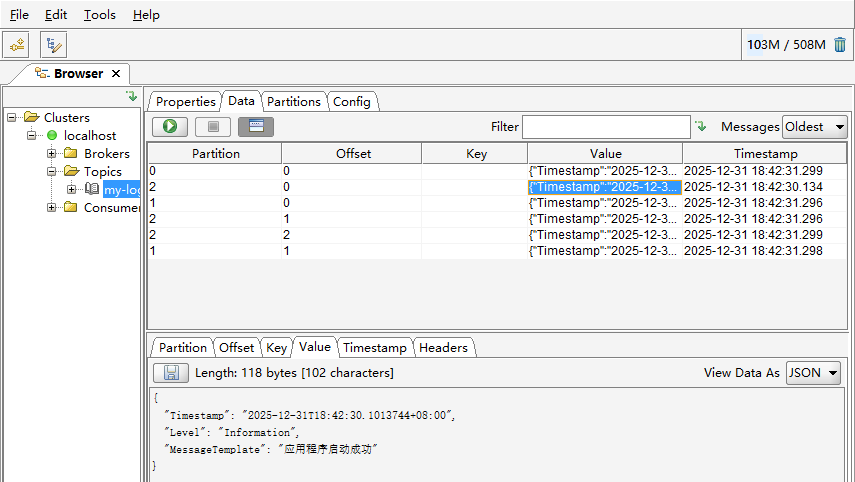
Console.ReadKey();启动项目,然后查看 Kafka 队列内容。
# 使用命令查看
.\bin\windows\kafka-console-consumer.bat --bootstrap-server localhost:9092 --topic <your-topic> --from-beginning
# 【kafka-console-consumer.bat】
# Kafka 自带的 命令行消费者工具(Console Consumer)
# 【--bootstrap-server localhost:9092】
# 指定 Kafka Broker 的连接地址(KRaft 模式下必需)
# 格式:host:port,多个 Broker 用逗号分隔,如 host1:9092,host2:9092
# 为什么叫 "bootstrap"?客户端只需连接其中一个 Broker,即可获取整个集群的元数据(包括所有 Topic、Partition 分布等),后续会直接与对应 Partition 的 Leader 通信
# 【--topic <your-topic>】
# 指定要消费的 Topic 名称,这里一次只能指定 一个 Topic
# 【--from-beginning】
# 从该 Topic 的最早消息(offset = 0)开始消费,而不是从最新位置开始
# 【--property print.key=true】同时打印消息的 Key(默认只打印 Value)
# 【--property print.timestamp=true】打印消息的时间戳(CreateTime 或 LogAppendTime)直接通过命令打印出消息列表时,会出现中文乱码,如何处理乱码和使用工具 Offset Explorer 来查看,详见本文写一节。
1.1.3 遇到的问题:查看队列消息时中文乱码
在 PowerShell 中通过命令查看队列消息时,出现乱码,如下图:
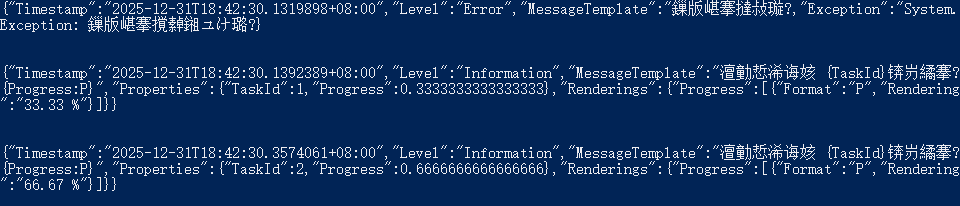
队列(Topic)中的中文消息显示为乱码,这通常是由于 字符编码不一致 导致的。Kafka 本身以字节(byte)形式存储消息,不关心内容编码;问题出在 生产者写入 和 消费者读取 时使用的字符编码不匹配,尤其是 Windows 控制台(CMD/PowerShell)默认使用 GBK(中文系统)而非 UTF-8。
# 即使 Kafka 正确输出 UTF-8,Windows 控制台默认用 GBK 显示,仍会乱码
# 在 PowerShell 或 CMD 中执行:
chcp 65001  # 65001 是 UTF-8 的代码页
# PowerShell 中设置环境变量后启动
$env:KAFKA_OPTS="-Dfile.encoding=UTF-8"
# 然后再重新运行 consumer 命令
.\bin\windows\kafka-console-consumer.bat --bootstrap-server localhost:9092 --topic <your-topic> --from-beginning
上边的配置仅当前窗口有效。
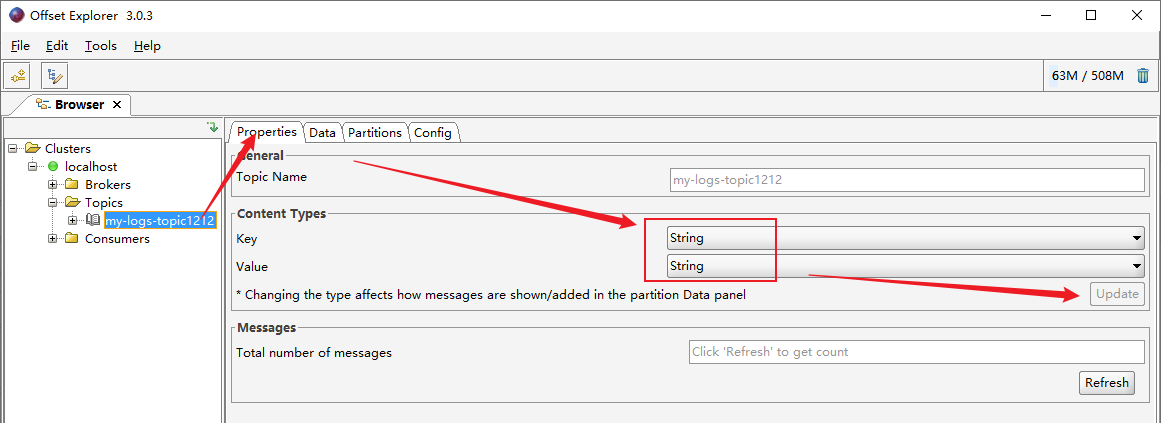
还可以通过 Offset Explorer 应用来查看消息。
下载 Offset Explorer:https://offsetexplorer.com/download.html。
1.1.4 遇到的问题:重启 Kafka 时不成功
报错内容例如:
WARN Stopping serving logs in dir D:\kafka_2.13-4.1.1\data\kafka-logs (kafka.log.LogManager)
ERROR Shutdown broker because all log dirs in D:\kafka_2.13-4.1.1\data\kafka-logs have failed (kafka.log.LogManager)
说明 Kafka Broker 启动后因日志目录(log.dirs)不可用而主动关闭。这是 Kafka 的保护机制------当所有配置的日志存储目录都失效时,它会拒绝运行以避免数据丢失。
可能的原因:
1)日志所在的目录权限不足。
Kafka 需要对 log.dirs 指定的目录有 读、写、删除、创建子目录 的权限。本文示例的目录为:D:\kafka_2.13-4.1.1\data\kafka-logs。
操作:右键 kafka-logs 文件夹 → 属性 → 安全 → 编辑;给当前用户配置 "完全控制" 权限;最后重启 Kafka。
2)目录被其他 Kafka 实例占用(文件锁)
如果之前启动过 Kafka 但未正常关闭,.lock 文件可能残留,导致新实例认为目录已被占用。
先确认有没有 Kafka 示例在运行,tasklist /fi "imagename eq java.exe"。
有就先结束,然后再把 .lock 文件删除。
测试阶段可以将日志文件夹下的全部文件都删掉,避免因未知的占用导致 Kafka 启动失败,但要谨慎操作,全部删除会造成之前队列消息清空。
注意:不要强行删除正在使用的日志目录内容!仅在确认 Kafka 已停止时操作。
3)磁盘空间不足,可以自行检查,确保有足够空间(至少几百 MB)。
1.2 Serilog.Sinks.RabbitMQ:将日志事件发送到 RabbitMQ 消息队列系统中
Serilog.Sinks.RabbitMQ 是一个 Serilog 的日志接收器(Sink),用于将应用程序的日志事件发送到 RabbitMQ 消息队列系统中。
通过该 Sink,开发者可以将结构化日志以消息的形式发布到 RabbitMQ 的 交换机(Exchange) 或直接绑定到 队列(Queue),从而实现日志的集中收集、异步处理、解耦或进一步转发到日志分析系统(如 ELK、Graylog 等)。
大概的步骤:
应用程序调用 Log.Information(...) 等方法记录日志;
Serilog 捕获日志事件;
RabbitMQ Sink 将日志事件序列化;
通过 AMQP 客户端连接 RabbitMQ;
将消息发布到配置的 Exchange(可选绑定 Routing Key);
RabbitMQ 根据绑定规则将消息路由到一个或多个队列;
消费者(如日志处理器、ELK 输入插件)从队列中消费日志。
注意:Sink 默认不声明队列,只负责发布消息到 Exchange。因此,在往 RabbitMQ 发送消息前,需要提前配置好 Exchange、Queue 和绑定关系,或者启用自动声明(部分版本支持)。
1.2.1 在 Windows 上安装 RabbitMQ
最常见的是通过 Erlang + RabbitMQ 安装包 的组合方式(因为RabbitMQ 是用 Erlang 编写的,依赖 Erlang/OTP 运行时)。
注意:Erlang 和 RabbitMQ 的版本必须兼容。请参考官方兼容性矩阵:https://www.rabbitmq.com/docs/which-erlang。
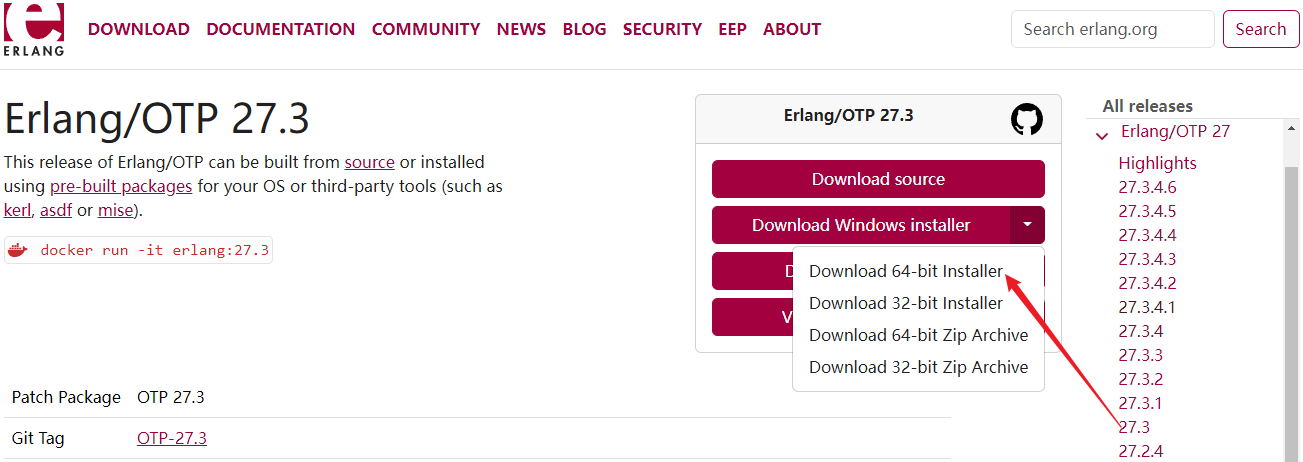
1)下载和安装 Erlang/OTP
官方下载页:https://www.erlang.org/downloads。
推荐使用 Windows 64-bit Binary File (.exe),例如:otp_win64_27.3.exe(对应 OTP 27.3)。截至 2025 年 12 月,RabbitMQ 4.2+ 通常要求 Erlang 26.2 ~ 27.x。
然后直接双击安装包,直接下一步安装完成。
再改下系统环境变量:
新增:ERLANG_HOME:C:\Program Files\Erlang OTP。
在 Path 中添加:%ERLANG_HOME%\bin。
最后,用 erl 命令验证下是否安装成功:
C:\Windows\system32>erl
Erlang/OTP 27 [erts-15.2.3] [source] [64-bit] [smp:20:20] [ds:20:20:10] [async-threads:1] [jit:ns]

Eshell V15.2.3 (press Ctrl+G to abort, type help(). for help)
1>
2)下载和安装 RabbitMQ
官方下载地址:https://www.rabbitmq.com/docs/install-windows#downloads。
下载 RabbitMQ Server Windows Installer (.exe)。例如:rabbitmq-server-4.2.1.exe。推荐使用 .exe 安装包(带图形界面和 Windows 服务),而非 .zip 压缩包。

安装完成后,同样需要修改环境变量:
新增一个,RABBITMQ_SERVER:C:\Program Files\RabbitMQ Server。
追加 Path:%RABBITMQ_SERVER%\bin。
最后,验证是否安装成功。
C:\Windows\system32>sc query RabbitMQ

SERVICE_NAME: RabbitMQ
        TYPE               : 10  WIN32_OWN_PROCESS
        STATE              : 4  RUNNING
                                (STOPPABLE, NOT_PAUSABLE, ACCEPTS_SHUTDOWN)
        WIN32_EXIT_CODE    : 0  (0x0)
        SERVICE_EXIT_CODE  : 0  (0x0)
        CHECKPOINT         : 0x0
        WAIT_HINT          : 0x0
另外,RabbitMQ 自带一个 Web 管理界面(Management Plugin),默认未启用。
# 以管理员身份打开 命令提示符 或 PowerShell,执行(共两步):
# 1)进入 RabbitMQ 安装目录的 sbin 文件夹(通常如下,版本号需要改成本地的)
C:\Program Files\RabbitMQ Server>cd C:\Program Files\RabbitMQ Server\rabbitmq_server-4.2.1\sbin
# 2)启用管理插件
C:\Program Files\RabbitMQ Server\rabbitmq_server-4.2.1\sbin>.\rabbitmq-plugins.bat enable rabbitmq_management
Enabling plugins on node rabbit@chengzijia:
rabbitmq_management
The following plugins have been configured:
  rabbitmq_management
  rabbitmq_management_agent
  rabbitmq_web_dispatch
Applying plugin configuration to rabbit@chengzijia...
The following plugins have been enabled:
  rabbitmq_management
  rabbitmq_management_agent
  rabbitmq_web_dispatch

set 3 plugins.
Offline change; changes will take effect at broker restart.
启用后需要手动重启下 RabbitMQ 服务,然后通过 http://localhost:15672/ 访问。需要登录账号和密码,均为 guest。
注意:guest 用户默认只能从 localhost 登录,若需远程访问,需创建新用户并授权。
在 sbin 目录下可使用以下命令:
| 命令 | 说明 |
|---|---|
.\rabbitmqctl.bat status |
查看节点状态 |
.\rabbitmqctl.bat list_users |
列出用户 |
.\rabbitmqctl.bat add_user myuser mypass |
添加用户 |
.\rabbitmqctl.bat set_user_tags myuser administrator |
设置用户为管理员 |
.\rabbitmqctl.bat set_permissions -p / myuser ".*" ".*" ".*" |
授予 vhost / 的全部权限 |
配置允许远程访问:
# 创建新用户
.\rabbitmqctl.bat add_user admin yourpassword
.\rabbitmqctl.bat set_user_tags admin administrator
.\rabbitmqctl.bat set_permissions -p / admin ".*" ".*" ".*"
# 确保防火墙开放端口:
# AMQP 默认端口:5672
# Management Web UI 端口:15672
1.2.2 通过 Serilog.Sinks.RabbitMQ 8.0.0 实现讲消息写入到队列
示例程序的目标:将日志信息通过 localhost guest 账号,推送到 amq.fanout 交换机。
1)创建项目并引入必要的包
创建一个基于 .net8 的控制台应用程序,并引入以下包:
dotnet add package Serilog
dotnet add package Serilog.Sinks.Console
dotnet add package Serilog.Sinks.RabbitMQ
2)修改 Program.cs
using RabbitMQ.Client;
using Serilog;
using Serilog.Events;
using Serilog.Formatting.Json;
using Serilog.Sinks.RabbitMQ;
// 将 Serilog Sink 内部的异常(如连接失败、权限错误、exchange 不存在等)输出到控制台
Serilog.Debugging.SelfLog.Enable(Console.Error);
// 配置 Serilog
Log.Logger = new LoggerConfiguration()
.MinimumLevel.Debug()
.WriteTo.Console()
.WriteTo.RabbitMQ((clientConfiguration, sinkConfiguration) =>
{
clientConfiguration.Port = 5672;
clientConfiguration.DeliveryMode = RabbitMQDeliveryMode.Durable;
clientConfiguration.Exchange = "amq.fanout";
clientConfiguration.Username = "guest";
clientConfiguration.Password = "guest";
clientConfiguration.ExchangeType = "fanout";
clientConfiguration.Hostnames.Add("localhost");
sinkConfiguration.TextFormatter = new JsonFormatter();
}).CreateLogger();
try
{
Log.Information("应用程序启动");
// 示例结构化日志
var userId = 12345;
var userName = "alice";
Log.Information("用户 {@User} 登录成功,ID: {UserId}", new { Name = userName, Role = "Admin" }, userId);
Log.Warning("这是一个警告日志,包含属性 {RetryCount}", 3);
Log.Error(new InvalidOperationException("模拟异常"), "处理请求时发生错误,请求ID: {RequestId}", Guid.NewGuid());
Log.Information("应用程序即将关闭");
}
catch (Exception ex)
{
Log.Fatal(ex, "应用程序崩溃");
}
finally
{
Log.CloseAndFlush(); // 确保日志被发送
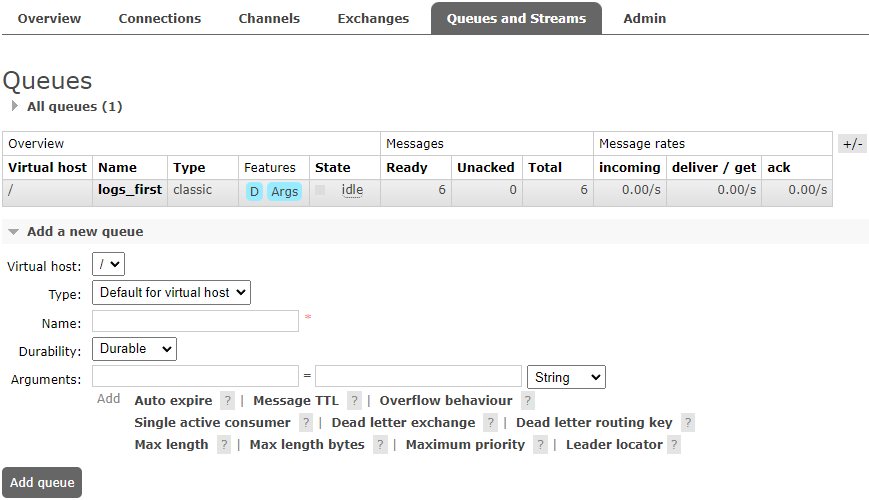
}在测试写入日志之前,需要先手动新增队列:logs_first,然后再将此队列加入到 amq.fanout 交换机中。
新增队列,填入 Name,然后其他默认,直接保存。
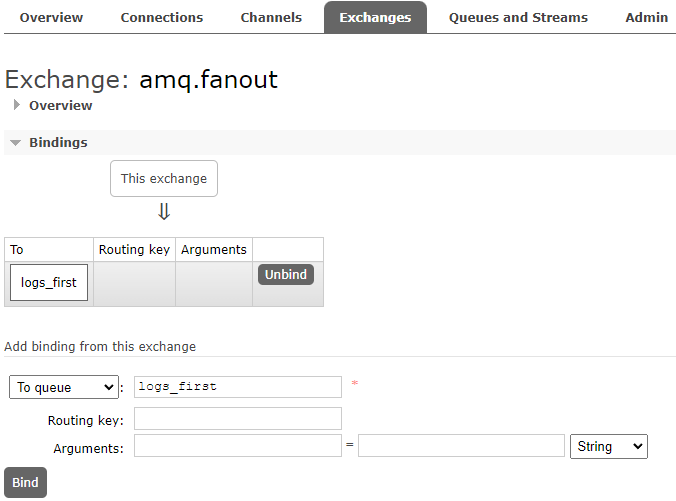
将新增的队列绑定到交换机 amq.fanout 中:(直接输入上一步新增的队列,点击 Bind)
然后运行程序,查看队列中的消息,确认是否写入成功。
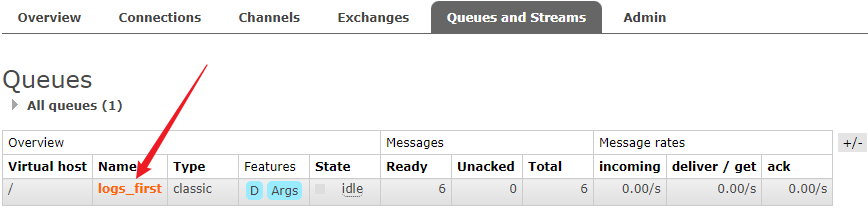
1.2.3 查看消息写入结果
点击队列名,进入队列的详细信息。
点击(Get Message(s))获取指定条数队列中的消息。
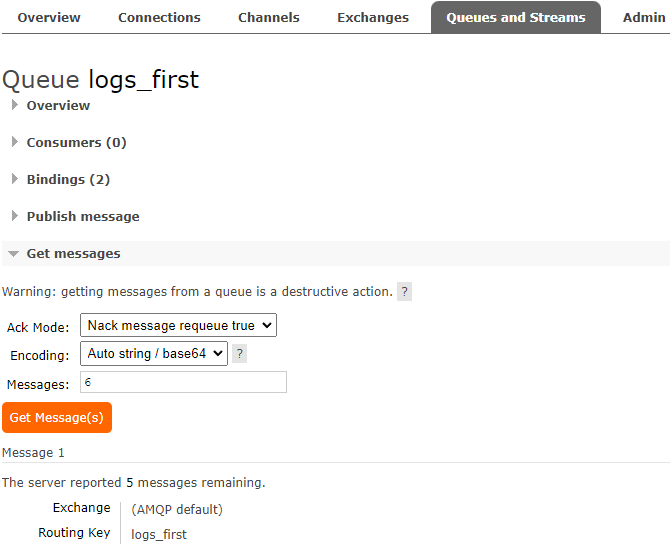
如下是消息的详细信息:
Message 1
The server reported 4 messages remaining.

Exchange	amq.fanout
Routing Key
Redelivered	●
Properties
delivery_mode:	2
Payload
112 bytes
Encoding: string
{"Timestamp":"2025-12-02T19:25:27.5782940+08:00","Level":"Information","MessageTemplate":"应用程序启动"}

Message 2
The server reported 3 messages remaining.

Exchange	amq.fanout
Routing Key
Redelivered	●
Properties
delivery_mode:	2
Payload
205 bytes
Encoding: string
{"Timestamp":"2025-12-02T19:25:28.2261865+08:00","Level":"Information","MessageTemplate":"用户 {@User} 登录成功,ID: {UserId}","Properties":{"User":{"Name":"alice","Role":"Admin"},"UserId":12345}}

Message 3
The server reported 2 messages remaining.

Exchange	amq.fanout
Routing Key
Redelivered	●
Properties
delivery_mode:	2
Payload
172 bytes
Encoding: string
{"Timestamp":"2025-12-02T19:25:28.2352913+08:00","Level":"Warning","MessageTemplate":"这是一个警告日志,包含属性 {RetryCount}","Properties":{"RetryCount":3}}

Message 4
The server reported 1 messages remaining.

Exchange	amq.fanout
Routing Key
Redelivered	●
Properties
delivery_mode:	2
Payload
266 bytes
Encoding: string
{"Timestamp":"2025-12-02T19:25:28.2368545+08:00","Level":"Error","MessageTemplate":"处理请求时发生错误,请求ID: {RequestId}","Exception":"System.InvalidOperationException: 模拟异常","Properties":{"RequestId":"0003f90d-4b1e-4cd9-87ef-a875e31b3acb"}}

Message 5
The server reported 0 messages remaining.

Exchange	amq.fanout
Routing Key
Redelivered	●
Properties
delivery_mode:	2
Payload
118 bytes
Encoding: string
{"Timestamp":"2025-12-02T19:25:28.2457995+08:00","Level":"Information","MessageTemplate":"应用程序即将关闭"}