什么是pytorch
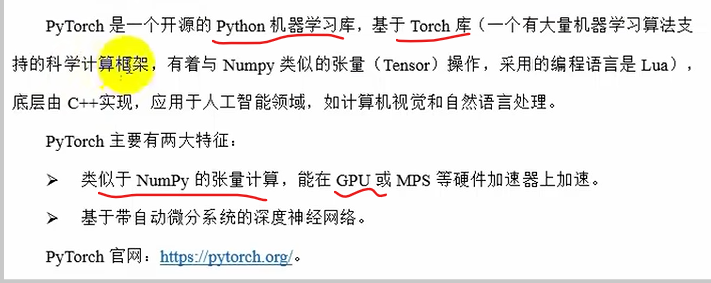
接口是python,底层实现是c++
google-->TensorFlow 偏底层偏工程
facebook--->pytorch
pytorch安装
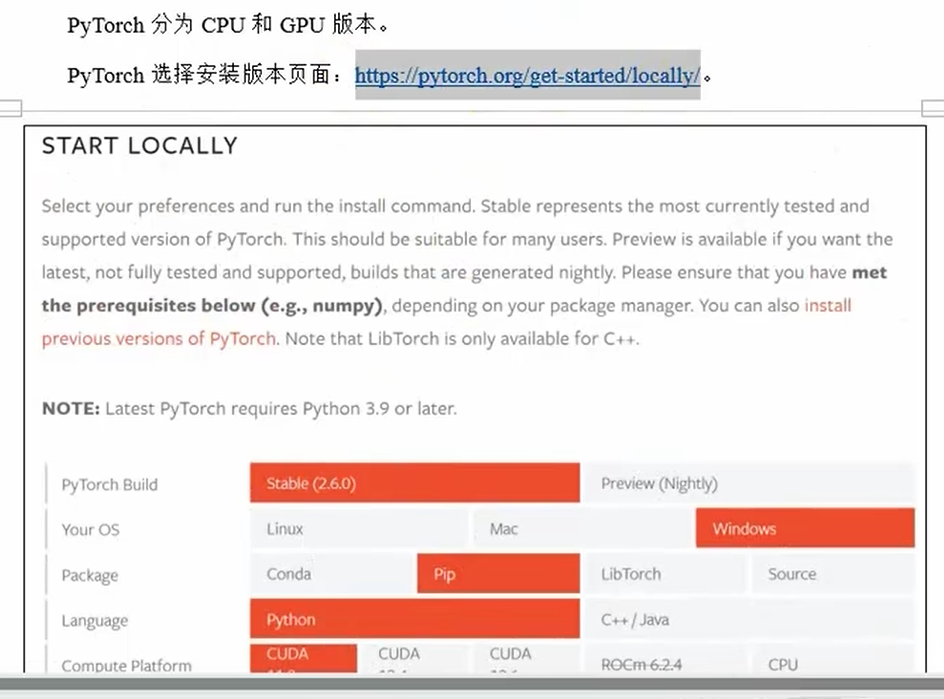
cpu版本
gpu版本
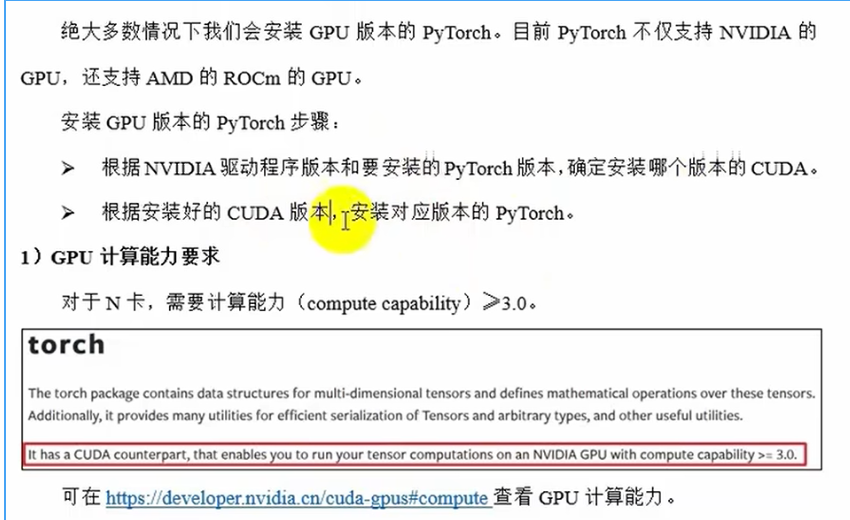
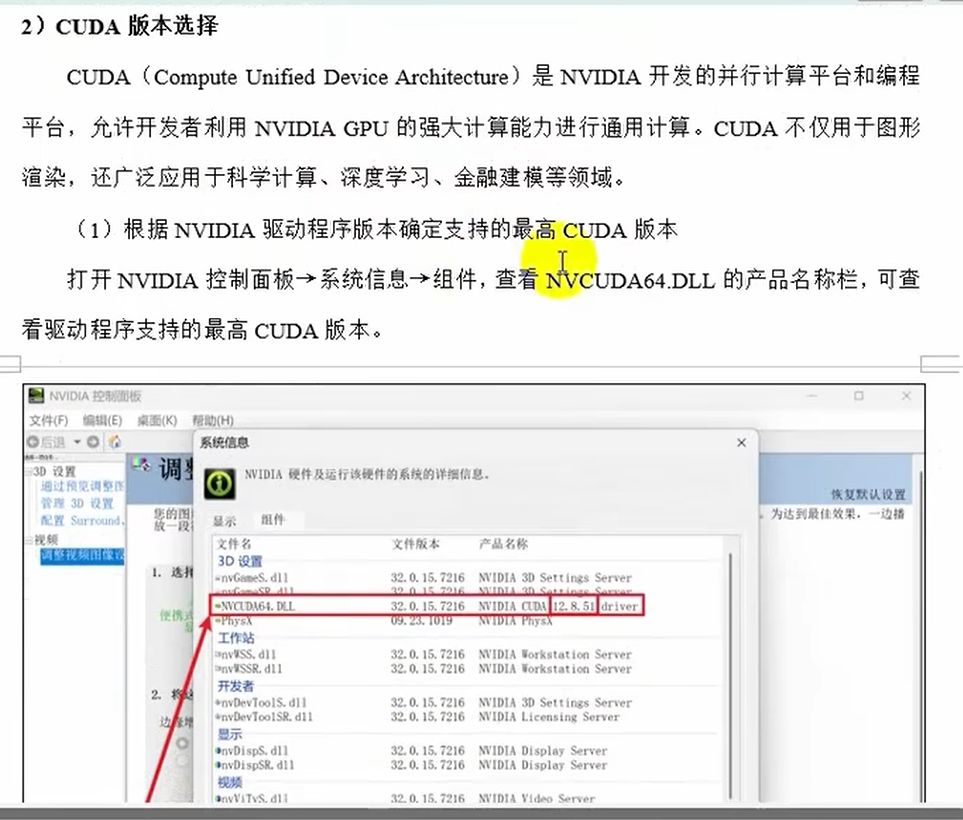
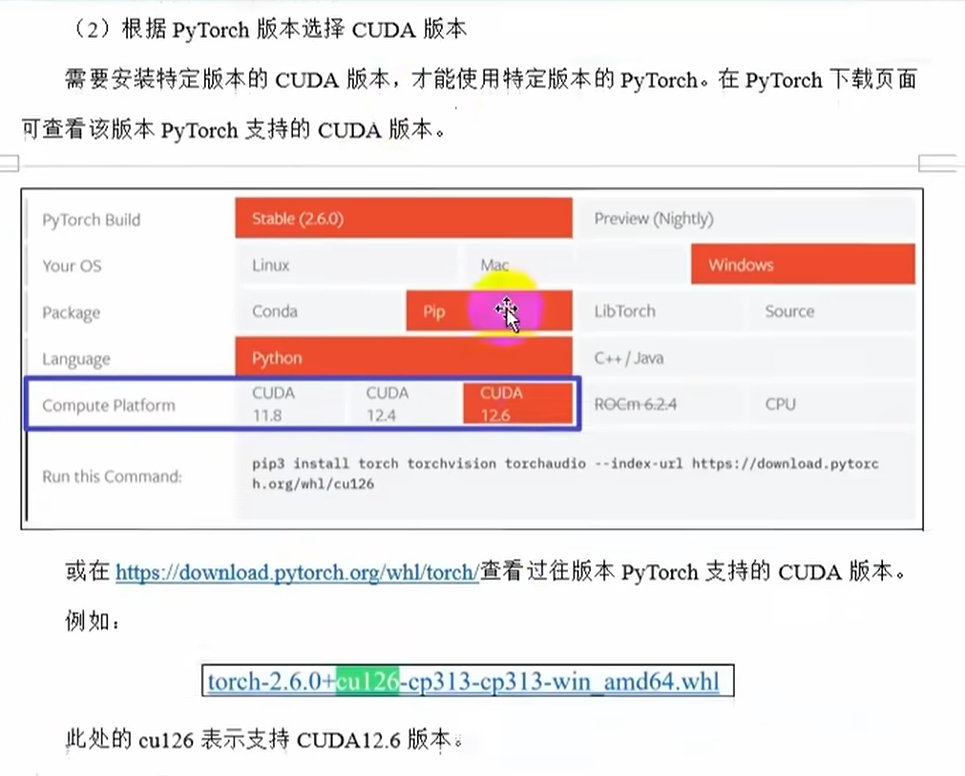
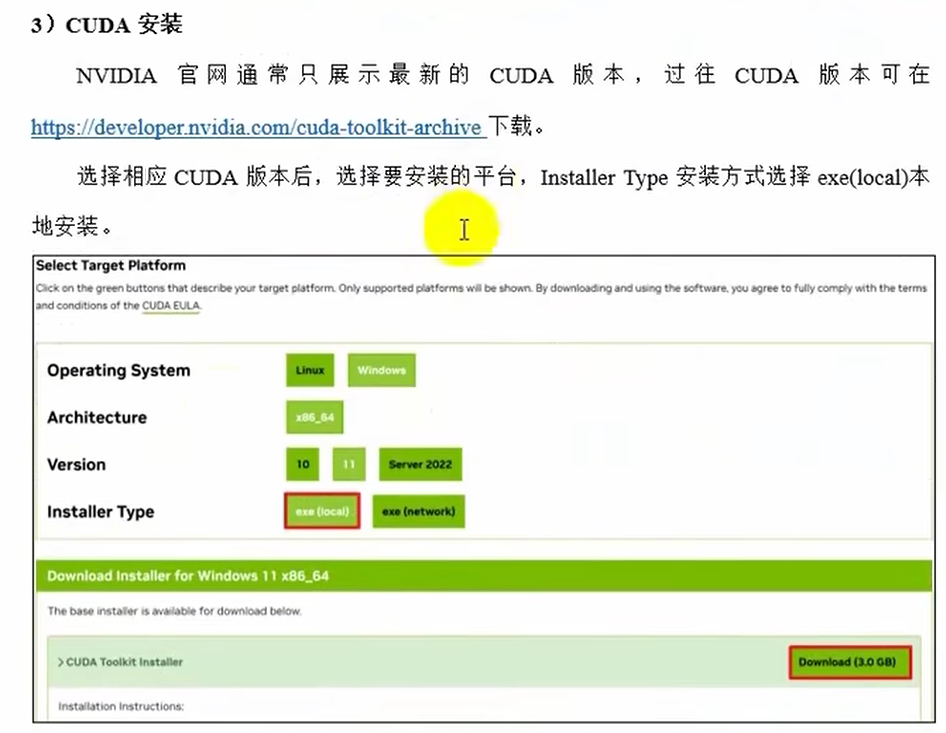
注意:cuda版本要≥pytorch支持版本
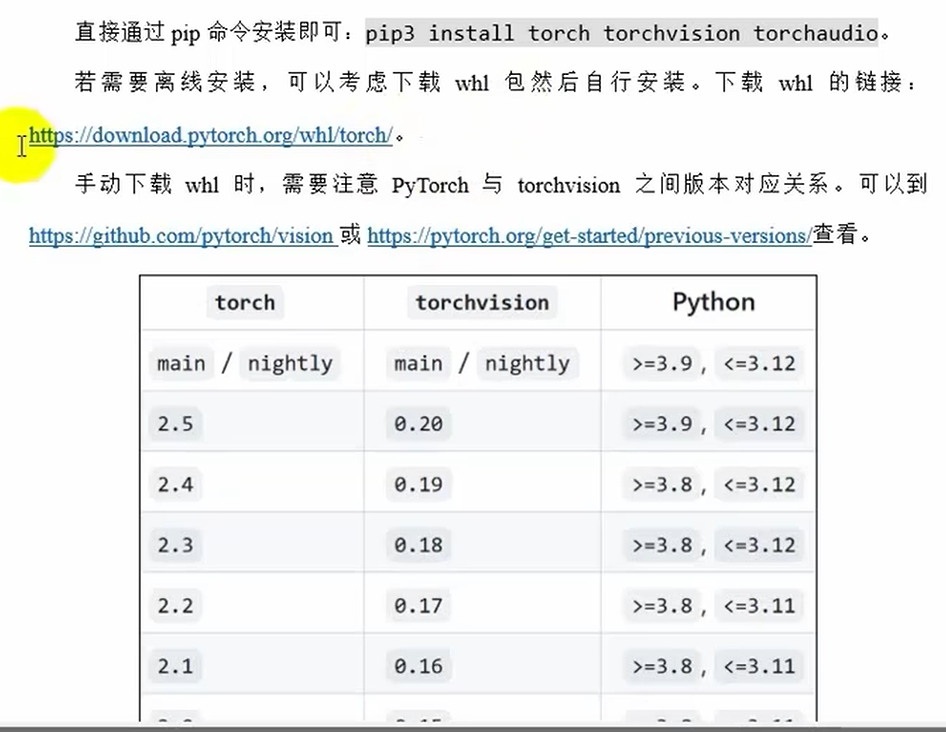
pip3 install torch torchvision --index-url https://download.pytorch.org/whl/cu126
pip config set global.index-url https://pypi.tuna.tsinghua.edu.cn/simple
执行后,pip会优先从清华镜像源下载包,而非默认的官方PyPI源(
https://pypi.org/simple)。
- 配置会写入全局配置文件(Windows:
C:\Users\<用户名>\AppData\Roaming\pip\pip.ini;Linux/macOS:~/.pip/pip.conf)。验证是否生效
运行以下命令检查配置:
pip config list输出应包含:
global.index-url='https://pypi.tuna.tsinghua.edu.cn/simple'恢复默认源
若需恢复官方源,可运行:
pip config unset global.index-url
张量创建

基本张量创建
1.按内容创建张量torch.tensor(data)
import numpy as np
import torch
'''基本张量创建
1.按内容创建张量'''
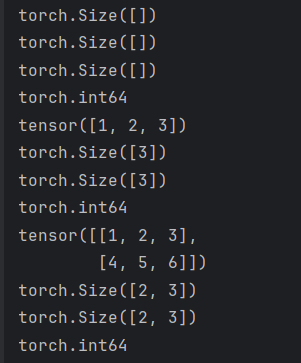
tensor1=torch.tensor(10)
print(tensor1.shape)
print(tensor1.size())
print(tensor1.shape)
print(tensor1.dtype)
# 传入一个一维数组
tensor2=torch.tensor([1,2,3])
print(tensor2)
print(tensor2.size())
print(tensor2.shape)
print(tensor2.dtype)
# 传入一个二维ndarray
tensor3=torch.tensor(np.array([[1,2,3],[4,5,6]]))
print(tensor3)
print(tensor3.shape)
print(tensor3.size())
print(tensor3.dtype)
'''运行结果:
2.按形状创建张量torch.Tensor(size)
'''
2.按形状创建张量
'''
tensor4=torch.Tensor(3,2,4)
print('---')
print(tensor4)
print(tensor4.shape)
print(tensor4.size())
print(tensor4.dtype)
tensor5=torch.Tensor(np.array([[1,2,3],[4,5,6]]))
print('---')
print(tensor5)
print(tensor5.shape)
print(tensor5.size())
print(tensor5.dtype)
tensor6=torch.Tensor(10)
print('---')
print(tensor6)
print(tensor6.shape)
print(tensor6.size())
print(tensor6.dtype)
运行结果:
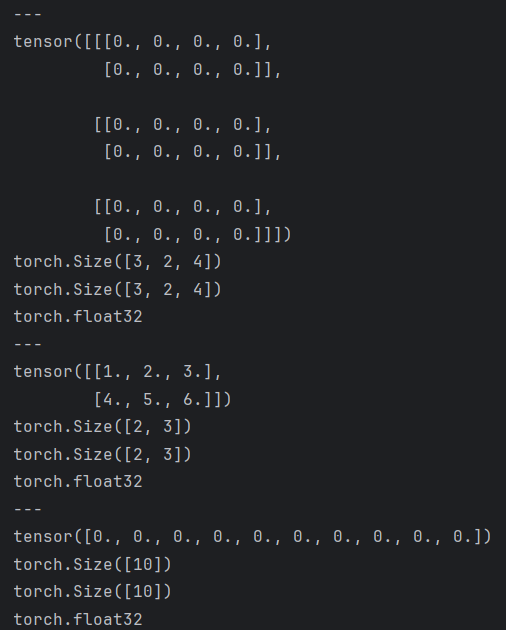
注意:大写Tensor即可以传形状也可以传数据,但是数据内容的dtype固定是float,小写tensor的类型和原始数据相同,但大写Tensor传入num不是当标量而是当成一维数组
3.创建指定类型的张量

'''
3.按类型创建张量
'''
# int32类型
tensor7=torch.IntTensor(2,3)
tensor8=torch.tensor([1,2,3],dtype=torch.int32)
print(tensor7.dtype)
print(tensor8.dtype)
# long(int64)类型
tensor9=torch.LongTensor(3,2)
tensor10=torch.tensor([1,2,3],dtype=torch.int64)
print(tensor9.dtype)
print(tensor10.dtype)
# Byte(int8)类型
tensor11=torch.ByteTensor(2,3)
tensor12=torch.tensor([1,2,3],dtype=torch.uint8)
# float类型
tensor13=torch.FloatTensor(2,3)
tensor14=torch.tensor([1,2,3],dtype=torch.float32)
# double(float64)类型
tensor15=torch.DoubleTensor(2,3)
tensor16=torch.tensor([1,2,3],dtype=torch.float64)
# half(float16)类型
tensor17=torch.HalfTensor(2,3)
tensor18=torch.tensor([1,2,3],dtype=torch.float16)
# bool类型
tensor19=torch.BoolTensor(2,3)
tensor20=torch.tensor([1,2,3],dtype=torch.bool)
# 0为Flase 1为True
指定区间的张量创建
1.torch.arange(start,end,step)在区间内按步长创建张量
'''
指定区间的张量创建
'''
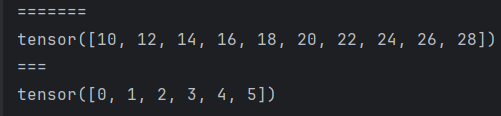
tensor21=torch.arange(10,30,2)
print('=======')
print(tensor21)
tensor22=torch.arange(6)
print('===')
print(tensor22)运行结果:
2.torch.linspace(start,end,steps)在区间内按元素创建张量
# 共生成5个元素,要包含边界10和30,中间均匀分3个元素生成
tensor23=torch.linspace(10,30,5)
print('=======')
print(tensor23)
运行结果:

3.torch.logspace(start,end,steps,base)在指数区间内按指定底数创建张量
#在tensor23的基础上取log2(最后一个参数2就是以2为底)
tensor24=torch.logspace(10,30,5,2)
print(tensor24)
运行结果:

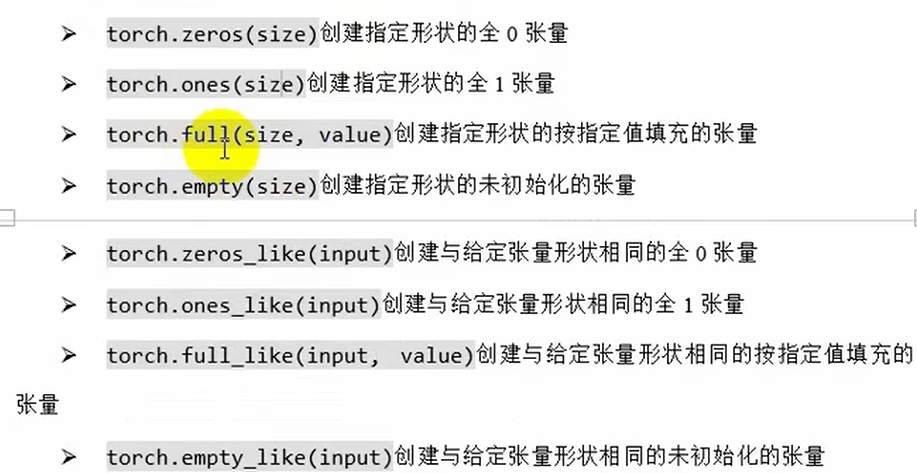
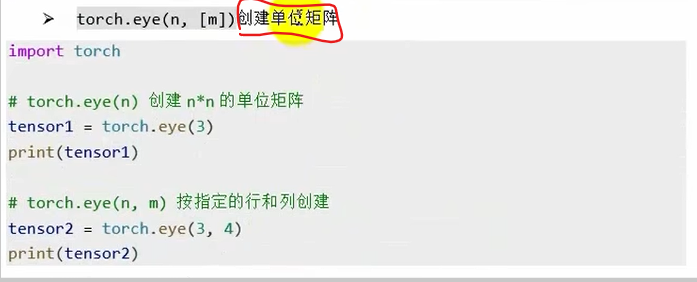
按数值填充张量
随机张量创建
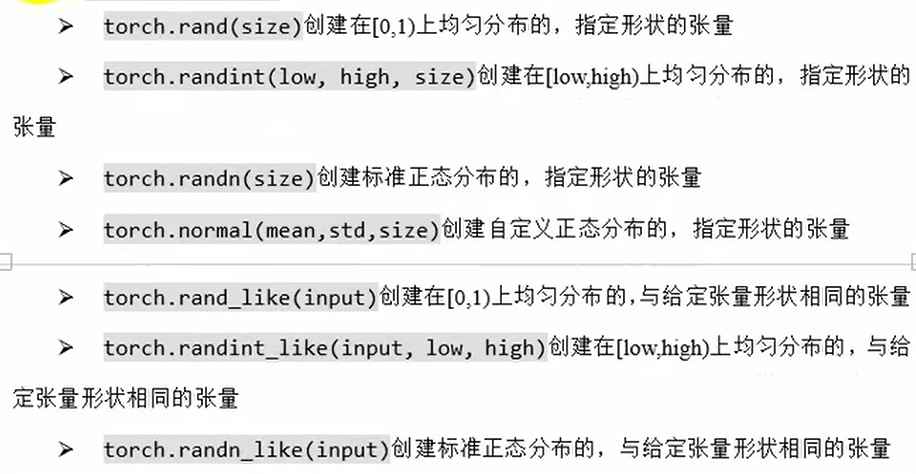
'''
随机张量创建
'''
tensor25=torch.rand(2,3) #【0,1)均匀,size=(2,3)
tensor26=torch.rand_like(tensor25)

tensor27=torch.randint(low=0,high=100,size=(2,3)) #【0,100)均匀,size=(2,3)
tensor28=torch.randint_like(tensor27,low=10,high=20)

tensor29=torch.randn(4,2) # 标准正太分布,size=(4,2)
tensor30=torch.randn_like(tensor29)

tensor31=torch.normal(5,2,size=(2,3)) # 均值5,标准差2的正态分布
'''
随机排列
随机数种子
'''
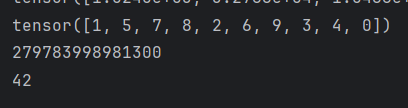
# 将已知的排列打乱,相当于洗牌
tensor32=torch.randperm(10)
print(tensor32)
# 查看和指定随机数种子
print(torch.random.initial_seed())
torch.manual_seed(42)
print(torch.random.initial_seed())运行结果: