Windows + Conda + OpenMM GPU(CUDA)完整安装教程
适用于:Windows 10 / 11 + NVIDIA GPU
已验证:RTX 5090 + Driver 591.xx
一、前置条件(必须满足)
操作系统
- Windows 10 / 11(64 位)
显卡
- NVIDIA GPU(如 RTX 系列)
驱动
- 已安装 NVIDIA 驱动
- 验证方式(PowerShell):
powershell
nvidia-smi你应看到:
- GPU 名称
- Driver Version
- CUDA Version(显示 13.x 没关系)
二、安装 Conda(如果你已经有,可跳过)
推荐:
- Anaconda 或 Miniconda
安装完成后,打开 Anaconda Prompt 或 PowerShell。
三、创建 AIDD / OpenMM 专用环境(推荐做法)
创建新环境(Python 3.10 最稳)
powershell
conda create -n AIDD python=3.10 -y激活环境
powershell
conda activate AIDD确认前缀变为:
text
(AIDD)四、配置 conda-forge(非常重要)
OpenMM 必须来自 conda-forge:
powershell
conda config --add channels conda-forge
conda config --set channel_priority strict
五、安装 OpenMM + CUDA(GPU 关键步骤)
核心原则
- 不用系统 CUDA
- 不用 pip
- 用 conda 内置 CUDA 11.8
安装 OpenMM GPU 版
powershell
conda install openmm cudatoolkit=11.8 -y说明:
openmm:分子动力学引擎cudatoolkit=11.8:OpenMM 官方最稳定 CUDA 版本- 自动兼容你的新显卡 + 新驱动
六、安装常用 AIDD / 分析依赖(可选但推荐)
powershell
conda install mdtraj numpy scipy scikit-learn matplotlib seaborn pdbfixer -y七、验证 OpenMM 是否成功安装(基础验证)
进入 Python
powershell
python你会看到:
text
>>>验证模块可导入
python
import openmm
import mdtraj
import numpy
import pdbfixer
print("Basic import OK")
无报错即成功。
八、验证 GPU(CUDA)是否真的可用(关键)
查看可用平台
python
from openmm import Platform
print([Platform.getPlatform(i).getName() for i in range(Platform.getNumPlatforms())])
正确输出(至少包含 CUDA):
text
['Reference', 'CPU', 'CUDA', 'OpenCL']如果你看到 CUDA:
🎉 OpenMM GPU 已成功启用
查看 CUDA 平台属性(深度验证)
python
platform = Platform.getPlatformByName("CUDA")
print(platform.getPropertyNames())
你应看到类似:
text
('DeviceIndex', 'DeviceName', 'Precision', 'UseCpuPme', ...)这说明:
- CUDA kernel 能被编译
- GPU 真正参与计算(不是假 GPU)
九、最小 GPU 测试示例(推荐保存)
你可以新建一个文件 test_openmm_cuda.py:
python
from openmm import Platform
platform = Platform.getPlatformByName("CUDA")
print("Using platform:", platform.getName())
print("Properties:", platform.getPropertyNames())
运行:
powershell
python test_openmm_cuda.py十、常见错误与解决方案(必看)
1. PowerShell 报错:import is not recognized
原因:你在 PowerShell 里直接写 Python 语句
解决:先 python 进入解释器
2. 使用了 \ 换行
这是 Linux 语法
PowerShell 要么一行写完,要么用反引号 ```
3. 没看到 CUDA 平台
解决顺序:
nvidia-smi是否正常- 是否安装了
cudatoolkit=11.8 - 是否用 conda-forge
- 是否混用了 pip
4. 用了 pip 安装 openmm
bash
pip install openmm Windows 下几乎必翻车(无 CUDA)
十一、你现在这套环境能做什么(实战价值)
- GPU 分子动力学(ns~µs)
- 蛋白 / 蛋白-配体模拟
- Enhanced sampling
- AIDD 特征生成
- 后接 PyTorch / ML
十二、推荐的后续结构(不强制)
text
AIDD/
├── env/            # conda 环境
├── data/           # pdb / sdf
├── md/             # OpenMM 脚本
├── features/       # mdtraj 输出
├── ml/             # 机器学习
└── notebooks/
最终一句话总结
你现在已经拥有:
- Windows 上「正确、稳定、可复现」的 OpenMM GPU 环境
- 支持新显卡(RTX 5090)
- 不依赖系统 CUDA
- 科研级配置(不是试玩)
一、10 行 OpenMM GPU MD 最小示例(Sanity Check)
目标:确认 GPU 真正在算 MD
用的是 OpenMM 自带的示例体系(避免文件依赖)
python
from openmm.app import *
from openmm import *
from openmm.unit import *

pdb = PDBFile('https://raw.githubusercontent.com/openmm/openmm/master/examples/data/alanine-dipeptide.pdb')
forcefield = ForceField('amber14-all.xml')
system = forcefield.createSystem(pdb.topology, nonbondedMethod=NoCutoff)

integrator = LangevinIntegrator(300*kelvin, 1/picosecond, 2*femtoseconds)
platform = Platform.getPlatformByName('CUDA')

simulation = Simulation(pdb.topology, system, integrator, platform)
simulation.context.setPositions(pdb.positions)
simulation.step(1000)

print("GPU MD run OK")
如果你看到:
GPU MD run OK说明 GPU + OpenMM + CUDA 全链路已打通
二、完整 AIDD Demo
pdbfixer → OpenMM(GPU)→ mdtraj(特征)
这是一个真实科研流程的最小闭环。
目录结构(建议你照这个来)
text
aidd_demo/
├── data/
│   └── protein.pdb
├── md/
│   └── run_md.py
├── features/
│   └── featurize.py
└── results/
pdbfixer:修复 PDB(缺失原子 / 氢)
python
# data/fix_pdb.py
from pdbfixer import PDBFixer
from openmm.app import PDBFile

fixer = PDBFixer(filename='protein.pdb')
fixer.findMissingResidues()
fixer.findMissingAtoms()
fixer.addMissingAtoms()
fixer.addMissingHydrogens(pH=7.0)

PDBFile.writeFile(fixer.topology, fixer.positions, open('protein_fixed.pdb', 'w'))
print("PDB fixed")
OpenMM GPU 跑 MD
python
# md/run_md.py
from openmm.app import *
from openmm import *
from openmm.unit import *

pdb = PDBFile('../data/protein_fixed.pdb')
forcefield = ForceField('amber14-all.xml', 'amber14/tip3p.xml')

system = forcefield.createSystem(
    pdb.topology,
    nonbondedMethod=PME,
    constraints=HBonds
)

integrator = LangevinIntegrator(300*kelvin, 1/picosecond, 2*femtoseconds)
platform = Platform.getPlatformByName('CUDA')

simulation = Simulation(pdb.topology, system, integrator, platform)
simulation.context.setPositions(pdb.positions)
simulation.minimizeEnergy()

simulation.reporters.append(DCDReporter('../results/traj.dcd', 1000))
simulation.reporters.append(StateDataReporter(
    '../results/log.txt', 1000,
    step=True, potentialEnergy=True, temperature=True
))

simulation.step(10000)
print("MD finished")
mdtraj:提取 AIDD 特征
python
# features/featurize.py
import mdtraj as md
import numpy as np

traj = md.load('../results/traj.dcd', top='../data/protein_fixed.pdb')

rmsd = md.rmsd(traj, traj, 0)
rg = md.compute_rg(traj)

features = np.column_stack([rmsd, rg])
np.save('../results/features.npy', features)

print("Features saved:", features.shape)
👉 你现在已经完成:
结构 → 动力学 → 数值特征 → ML 输入
三、OpenMM + PyTorch CUDA 共存方案(不炸环境)
这是很多人翻车的地方,你可以直接用下面方案。
原则(记住这 3 条)
-
OpenMM 用 conda CUDA(11.8)
-
PyTorch 用官方 CUDA wheel

-
不共享 cudatoolkit
安装 PyTorch(在 AIDD 环境里)
powershell
pip install torch torchvision torchaudio --index-url https://download.pytorch.org/whl/cu118验证:
python
import torch
print(torch.cuda.is_available())
print(torch.cuda.get_device_name(0))
你应看到 RTX 5090。
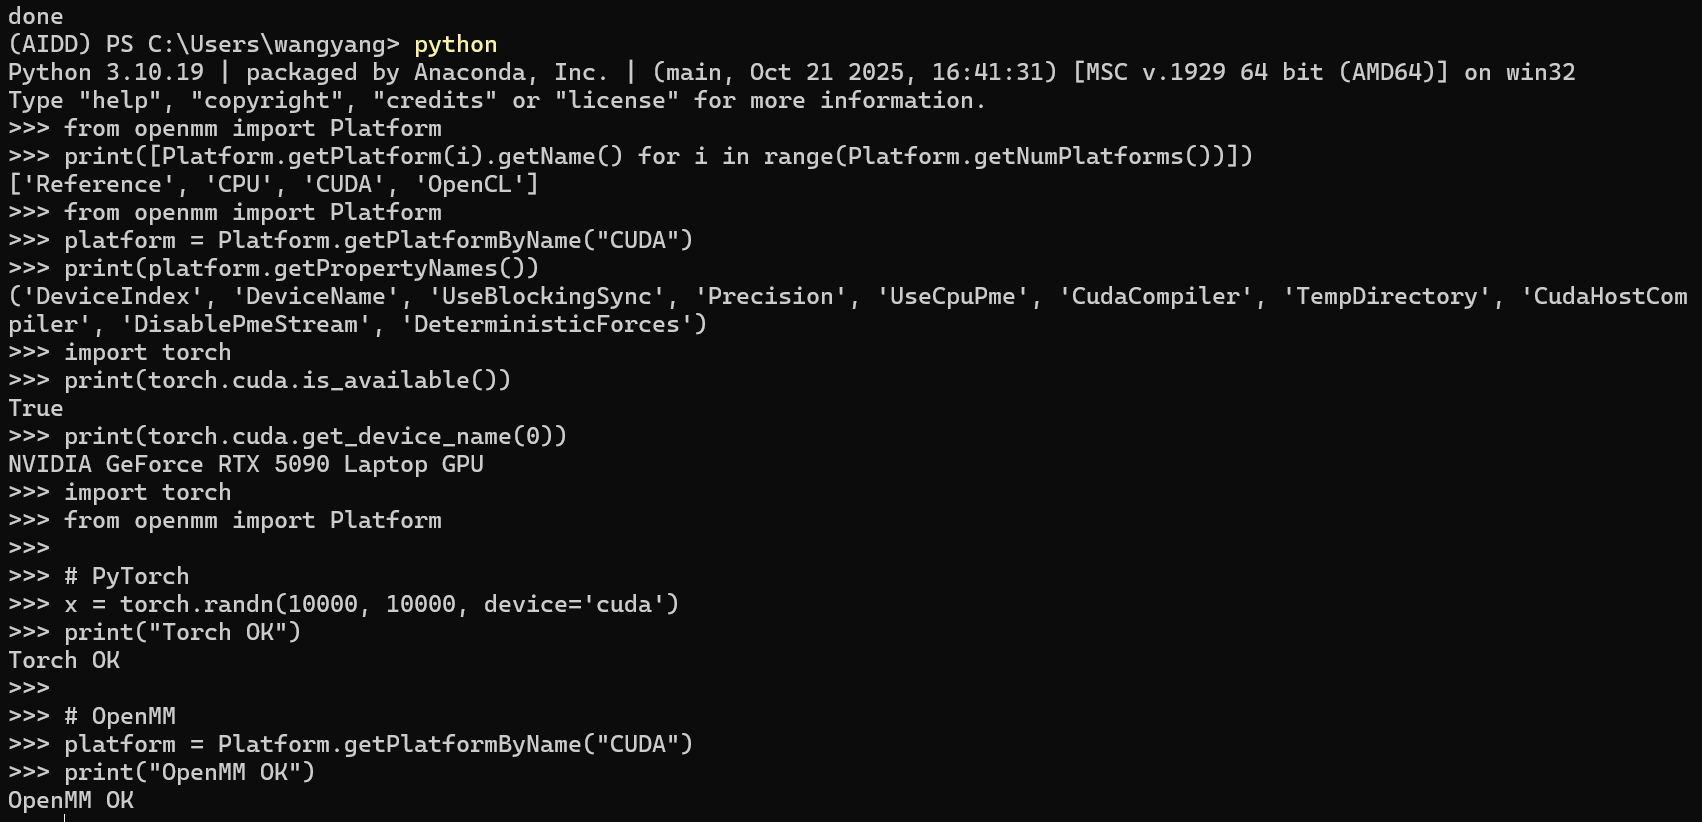
OpenMM + PyTorch 同时用 GPU(示例)
python
import torch
from openmm import Platform

# PyTorch
x = torch.randn(10000, 10000, device='cuda')
print("Torch OK")

# OpenMM
platform = Platform.getPlatformByName("CUDA")
print("OpenMM OK")
这说明你已经是"高阶 AIDD 用户配置"
四、可直接复现实验的项目模板(推荐)
text
AIDD_Project/
├── environment.yml
├── data/
├── md/
│   ├── run_md.py
│   └── analyze.py
├── features/
│   └── featurize.py
├── ml/
│   ├── train.py
│   └── model.py
├── results/
└── README.mdenvironment.yml(不锁死版本,兼容型)
yaml
name: AIDD
channels:
  - conda-forge
dependencies:
  - python>=3.10
  - openmm
  - cudatoolkit=11.8
  - mdtraj
  - pdbfixer
  - numpy
  - scipy
  - scikit-learn
  - matplotlib
  - seaborn
  - pip
  - pip:
      - torch
README(你以后一定会感谢现在的你)
markdown
# AIDD Project

## Environment
conda env create -f environment.yml
conda activate AIDD

## Run MD
python data/fix_pdb.py
python md/run_md.py

## Extract Features
python features/featurize.py

## Train ML
python ml/train.py