之前OCR的对于扫描类的文档倒是还有点用处,但是一旦文档中有截图,截图上带文字之类的,识别出来的东西就乱套了,最主要的时ocr识别出来的格式都乱了,而且效率还比较低,性能差点的机子,经不起几个服务就垮掉了,于是乎还是自己重新整一个,放弃ocr,因为日常的PDF扫描的连10%都占不到。
之前看到很多PDF工具,但是功能似乎都不是很全,尤其是在现在的统信UOS和银河麒麟这种国产操作系统上,应用更是少的可怜,要知道在Windows上还有adobe里提供的arcrobat这个处理PDF的大神,但是linux上就没戏了,要说没有也不行,毕竟wps还带了个PDF处理工具,就是处处要会员,要花钱。。。。。。
先来个界面图再介绍会更直观一些,非常简陋哈。

一、 项目概述
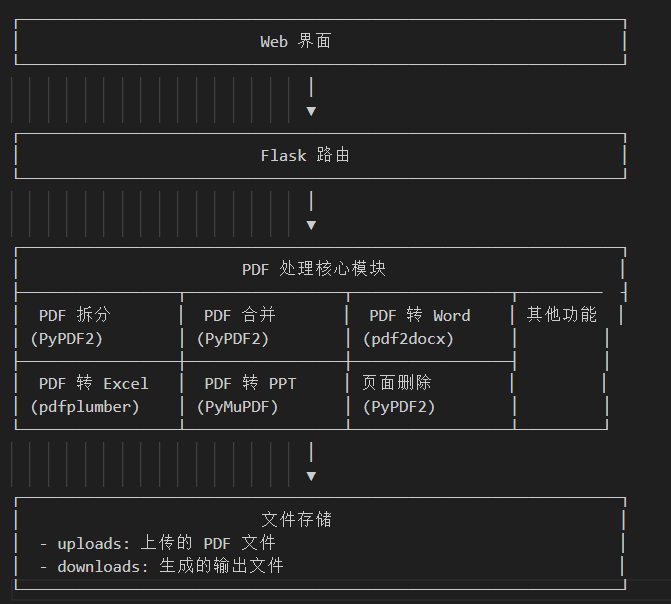
PDFTools 是一个基于 Python Flask 框架开发的 PDF 文档处理工具,提供了 PDF 转 Word、PDF 转 Excel、PDF 转 PPT、PDF 拆分、PDF 合并、PDF 页面删除等多种功能。该工具采用 Web 界面设计,操作简单直观,支持多文件处理。
二、技术架构
技术栈:
-
**后端框架**: Flask 2.0+
-
**PDF 处理库**:
-
PyPDF2: PDF 文件的基础操作(拆分、合并、页面删除)
-
pdf2docx: PDF 转 Word 功能
- pdfplumber: PDF 内容提取和表格识别 (看了别人的对比文章说这个提取的效果最好!就用上了,发现还真的不错!!)
-
PyMuPDF (fitz): 高级 PDF 内容提取和图像处理
-
**文档处理库**:
-
openpyxl: Excel 文件创建和编辑
-
python-pptx: PPT 文件创建和编辑
-
PIL (Pillow): 图像处理
-
**前端技术**: HTML5、CSS3、JavaScript (jQuery)
架构
三、功能
截图上都看的够清楚的了不用多做介绍了,说说怎么实现的然后上代码。
1、PDF 拆分模块
顾名思义就是将一个 PDF 文件拆分为多个 PDF 文件,可以按指定页码范围拆分或一次性的全部拆分所有单页。
使用 PyPDF2 库读取 PDF 文件,根据用户指定的页码范围或拆分模式,将指定页面写入新的 PDF 文件。
**关键函数**: `split_pdf()`
python
def split_pdf(input_path, output_dir, ranges=None, split_all=False, original_name="pdf"):
    """
    拆分PDF文件
    :param input_path: 输入PDF文件路径
    :param output_dir: 输出目录
    :param ranges: 页码范围列表,格式如["1-3", "5-7", "9"]
    :param split_all: 是否拆分所有页面为单页
    :param original_name: 原始文件名(不带扩展名)
    :return: 生成的文件路径列表
    """
    output_files = []

    with open(input_path, 'rb') as pdf_file:
        pdf_reader = PyPDF2.PdfReader(pdf_file)
        total_pages = len(pdf_reader.pages)

        if split_all:
            # 拆分所有页面为单页
            for i in range(total_pages):
                pdf_writer = PyPDF2.PdfWriter()
                pdf_writer.add_page(pdf_reader.pages[i])

                # 保存新PDF,使用原始文件名
                output_filename = f"{original_name}_page_{i+1}.pdf"
                output_path = os.path.join(output_dir, output_filename)

                with open(output_path, 'wb') as output_file:
                    pdf_writer.write(output_file)

                output_files.append(output_path)
        elif ranges:
            # 按指定范围拆分
            for i, page_range in enumerate(ranges):
                pdf_writer = PyPDF2.PdfWriter()

                # 解析页码范围
                if '-' in page_range:
                    start, end = map(int, page_range.split('-'))
                    # 确保页码在有效范围内
                    start = max(1, min(start, total_pages))
                    end = max(start, min(end, total_pages))
                    pages = range(start-1, end)
                else:
                    page_num = int(page_range)
                    page_num = max(1, min(page_num, total_pages))
                    pages = [page_num-1]

                # 添加指定页码到新PDF
                for page_idx in pages:
                    pdf_writer.add_page(pdf_reader.pages[page_idx])

                # 保存新PDF,使用原始文件名
                output_filename = f"{original_name}_split_{i+1}.pdf"
                output_path = os.path.join(output_dir, output_filename)

                with open(output_path, 'wb') as output_file:
                    pdf_writer.write(output_file)

                output_files.append(output_path)

    return output_files
2、PDF 合并模块
将多个 PDF 文件合并为一个 PDF 文件。
使用 PyPDF2 库读取多个 PDF 文件,将所有页面按顺序添加到新的 PDF 文件中。
**关键函数**: `merge_pdfs()`
python
def merge_pdfs(input_paths, output_path):
    """
    合并多个PDF文件
    :param input_paths: 输入PDF文件路径列表
    :param output_path: 输出PDF文件路径
    :return: 输出文件路径
    """
    pdf_writer = PyPDF2.PdfWriter()

    try:
        # 逐个处理PDF文件
        for input_path in input_paths:
            # 读取文件内容到内存
            with open(input_path, 'rb') as pdf_file:
                pdf_content = pdf_file.read()

            # 创建内存流对象
            from io import BytesIO
            pdf_stream = BytesIO(pdf_content)

            # 使用内存流创建PdfReader对象
            pdf_reader = PyPDF2.PdfReader(pdf_stream)

            # 逐个添加页面
            for page in pdf_reader.pages:
                pdf_writer.add_page(page)

        # 写入合并后的PDF
        with open(output_path, 'wb') as output_file:
            pdf_writer.write(output_file)

    except Exception as e:
        # 记录详细错误信息
        print(f"Error merging PDFs: {e}")
        print(f"Input paths: {input_paths}")
        print(f"Output path: {output_path}")
        raise

    return output_path
3、PDF 页面删除模块
删除 PDF 文件中的指定页面。
使用 PyPDF2 库读取 PDF 文件,根据用户指定的页码范围,将不需要删除的页面写入新的 PDF 文件。
**关键函数**: `delete_pages()`
python
def delete_pages(pdf_path, output_path, delete_ranges):
    """
    删除PDF文件中的指定页面
    :param pdf_path: 输入PDF文件路径
    :param output_path: 输出PDF文件路径
    :param delete_ranges: 要删除的页码范围列表,格式如["1-3", "5-7", "9"]
    :return: 输出文件路径
    """
    with open(pdf_path, 'rb') as pdf_file:
        pdf_reader = PyPDF2.PdfReader(pdf_file)
        pdf_writer = PyPDF2.PdfWriter()

        total_pages = len(pdf_reader.pages)

        # 创建要保留的页码集合
        keep_pages = set(range(total_pages))

        # 解析要删除的页码范围
        for page_range in delete_ranges:
            if '-' in page_range:
                # 处理页码范围(如1-3)
                start, end = map(int, page_range.split('-'))
                # 确保页码在有效范围内
                start = max(1, min(start, total_pages))
                end = max(start, min(end, total_pages))
                # 从要保留的页码集合中移除这个范围内的页码
                for i in range(start-1, end):
                    if i in keep_pages:
                        keep_pages.remove(i)
            else:
                # 处理单个页码(如5)
                page_num = int(page_range)
                page_num = max(1, min(page_num, total_pages))
                # 从要保留的页码集合中移除这个页码
                if (page_num-1) in keep_pages:
                    keep_pages.remove(page_num-1)

        # 将保留的页码按顺序添加到新PDF
        for page_idx in sorted(keep_pages):
            pdf_writer.add_page(pdf_reader.pages[page_idx])

        # 保存新PDF
        with open(output_path, 'wb') as output_file:
            pdf_writer.write(output_file)

    return output_path
4、PDF 转 Word 模块 这个很成熟也最简单
将 PDF 文件转换为 Word 文档(.docx 格式)。
使用 pdf2docx 库实现 PDF 到 Word 的转换,保留原始文档的格式和布局。
**关键函数**: `pdf_to_word()`
python
def pdf_to_word(pdf_path, output_path):
    """
    将PDF转换为Word文档
    :param pdf_path: 输入PDF文件路径
    :param output_path: 输出Word文件路径
    :return: 输出文件路径
    """
    cv = Converter(pdf_path)
    cv.convert(output_path)
    cv.close()
    return output_path
5、PDF 转 Excel 模块
将 PDF 文件中的表格和文本转换为 Excel 表格。
为了更好的实现转换,所以使用了 pdfplumber 库,用来精确的提取 PDF 中的表格和文本内容,然后使用 openpyxl 库创建 Excel 文件并写入内容。
**关键函数**: `pdf_to_excel()`
python
def pdf_to_excel(pdf_path, output_path):
    """
    将PDF转换为Excel文件
    :param pdf_path: 输入PDF文件路径
    :param output_path: 输出Excel文件路径
    :return: 输出文件路径
    """
    wb = openpyxl.Workbook()
    ws = wb.active

    # 使用pdfplumber提取表格
    with pdfplumber.open(pdf_path) as pdf:
        row = 1

        for page_num, page in enumerate(pdf.pages):
            # 提取页面中的所有表格
            tables = page.extract_tables()

            if tables:
                for table in tables:
                    for table_row in table:
                        if any(cell and cell.strip() for cell in table_row):
                            for col, cell_value in enumerate(table_row, 1):
                                if cell_value and cell_value.strip():
                                    ws.cell(row=row, column=col, value=cell_value.strip())
                            row += 1
            else:
                # 如果没有表格,提取文本并按行写入
                text = page.extract_text()
                if text:
                    lines = text.split('\n')
                    for line in lines:
                        if line.strip():
                            ws.cell(row=row, column=1, value=line.strip())
                            row += 1

            # 每页之间添加空行
            row += 2

    wb.save(output_path)
    return output_path
6、PDF 转 PPT 模块
将 PDF 文件转换为 PowerPoint 演示文稿(.pptx 格式)。
结合使用 pdfplumber 和 PyMuPDF 库提取 PDF 中的文本、表格和图片内容,然后使用 python-pptx 库创建 PPT 文件并添加内容。
**关键函数**: `pdf_to_ppt()`
python
def pdf_to_ppt(pdf_path, output_path):
    """
    将PDF转换为PPT文件
    :param pdf_path: 输入PDF文件路径
    :param output_path: 输出PPT文件路径
    :return: 输出文件路径
    """
    prs = Presentation()

    # 使用pdfplumber和PyMuPDF结合提取内容
    pdf_document = fitz.open(pdf_path)

    with pdfplumber.open(pdf_path) as pdf_plumber:
        for page_num in range(len(pdf_document)):
            # 获取页面
            fitz_page = pdf_document[page_num]
            plumber_page = pdf_plumber.pages[page_num]

            # 使用空白幻灯片布局
            slide_layout = prs.slide_layouts[6]  # 空白布局
            slide = prs.slides.add_slide(slide_layout)

            current_top = prs.slide_height * 0.05
            content_height = prs.slide_height * 0.05

            # 提取并添加文本
            text = plumber_page.extract_text()
            if text:
                # 添加文本框到幻灯片顶部
                left = prs.slide_width * 0.05
                width = prs.slide_width * 0.9
                height = prs.slide_height * 0.15  # 文本高度

                textbox = slide.shapes.add_textbox(left, current_top, width, height)
                text_frame = textbox.text_frame
                text_frame.text = text
                current_top += height + prs.slide_height * 0.05
                content_height += height + prs.slide_height * 0.05

            # 提取并添加表格
            tables = plumber_page.extract_tables()
            if tables:
                for table in tables:
                    # 计算表格大小
                    table_height = prs.slide_height * 0.2  # 表格高度

                    # 确保表格不会超出幻灯片底部
                    if current_top + table_height > prs.slide_height * 0.9:
                        # 如果超出,创建新幻灯片
                        slide_layout = prs.slide_layouts[6]
                        slide = prs.slides.add_slide(slide_layout)
                        current_top = prs.slide_height * 0.05

                    left = prs.slide_width * 0.1
                    width = prs.slide_width * 0.8

                    # 添加表格
                    table_shape = slide.shapes.add_table(
                        rows=len(table),
                        cols=len(table[0]) if table else 1,
                        left=left,
                        top=current_top,
                        width=width,
                        height=table_height
                    )

                    # 填充表格内容
                    table_object = table_shape.table
                    for row_idx, table_row in enumerate(table):
                        for col_idx, cell_value in enumerate(table_row):
                            if cell_value and cell_value.strip():
                                table_object.cell(row_idx, col_idx).text = cell_value.strip()

                    current_top += table_height + prs.slide_height * 0.05
                    content_height += table_height + prs.slide_height * 0.05

            # 提取并添加图片
            images = fitz_page.get_images(full=True)

            print(f"第 {page_num+1} 页发现 {len(images)} 张图片")

            if images:
                for img_index, img in enumerate(images):
                    try:
                        xref = img[0]
                        base_image = pdf_document.extract_image(xref)
                        image_bytes = base_image["image"]
                        image_ext = base_image["ext"]

                        print(f"  处理图片 {img_index+1}/{len(images)}: {image_ext}")

                        # 使用PIL处理图片,确保格式兼容
                        image_stream = io.BytesIO(image_bytes)
                        pil_image = Image.open(image_stream)

                        # 如果图片格式不是RGB,转换为RGB
                        if pil_image.mode != 'RGB':
                            pil_image = pil_image.convert('RGB')

                        # 将图片保存为临时JPEG格式
                        temp_stream = io.BytesIO()
                        pil_image.save(temp_stream, format='JPEG', quality=95)
                        temp_stream.seek(0)

                        # 获取原始图片大小
                        img_width, img_height = pil_image.size
                        aspect_ratio = img_width / img_height

                        print(f"  原始图片大小: {img_width}x{img_height}, 宽高比: {aspect_ratio:.2f}")

                        # 设置幻灯片可用区域
                        available_width = prs.slide_width * 0.9
                        available_height = prs.slide_height * 0.9

                        # 计算图片在幻灯片上的最佳大小(保持宽高比)
                        scale_factor = min(available_width / img_width, available_height / img_height)
                        new_width = img_width * scale_factor
                        new_height = img_height * scale_factor

                        print(f"  调整后图片大小: {int(new_width)}x{int(new_height)}")

                        # 计算图片位置(居中)
                        left = (prs.slide_width - new_width) / 2
                        top = (prs.slide_height - new_height) / 2

                        print(f"  图片位置: ({int(left)}, {int(top)})")

                        # 确保图片大小合理
                        if new_width > 0 and new_height > 0:
                            # 添加图片到幻灯片
                            slide.shapes.add_picture(
                                temp_stream,
                                left,
                                top,
                                width=new_width,
                                height=new_height
                            )
                            print(f"  ✅ 图片添加成功")
                        else:
                            print(f"  ❌ 图片大小无效")
                    except Exception as e:
                        # 如果图片处理失败,记录详细错误
                        print(f"  ❌ 处理图片时出错: {e}")
                        import traceback
                        traceback.print_exc()
                        pass

    # 关闭PDF文档
    pdf_document.close()

    # 保存PPT文件
    prs.save(output_path)
    return output_path
另外还有多文件选择列表的和排序、删除,都是js的不多说了。
javascript
// 删除文件
function deleteFile(index) {
    // 从数组中移除文件
    uploadedFiles.splice(index, 1);

    // 清空文件列表并重新显示
    fileList.innerHTML = '';
    uploadedFiles.forEach((fileInfo, idx) => {
        displayFile(fileInfo, idx);
    });

    // 更新执行按钮状态
    checkExecuteBtn();
}

// 排序文件(上下移动)
function moveFile(currentIndex, direction) {
    if (direction === 'up' && currentIndex > 0) {
        // 向上移动
        [uploadedFiles[currentIndex], uploadedFiles[currentIndex - 1]] =
            [uploadedFiles[currentIndex - 1], uploadedFiles[currentIndex]];
    } else if (direction === 'down' && currentIndex < uploadedFiles.length - 1) {
        // 向下移动
        [uploadedFiles[currentIndex], uploadedFiles[currentIndex + 1]] =
            [uploadedFiles[currentIndex + 1], uploadedFiles[currentIndex]];
    }

    // 重新显示文件列表
    fileList.innerHTML = '';
    uploadedFiles.forEach((fileInfo, idx) => {
        displayFile(fileInfo, idx);
    });
四、主要依赖
-
Flask>=2.0.0
-
PyPDF2>=2.0.0
-
pdf2docx>=0.5.0
-
openpyxl>=3.0.0
-
python-pptx>=0.6.0
-
PyMuPDF>=1.20.0
-
pdfplumber>=0.6.0
-
Pillow>=8.0.0
-
Wand>=0.6.0
为了兼容Windows7系统上部署使用,用的版本都比较低,python为3.8版本。
五、目录结构
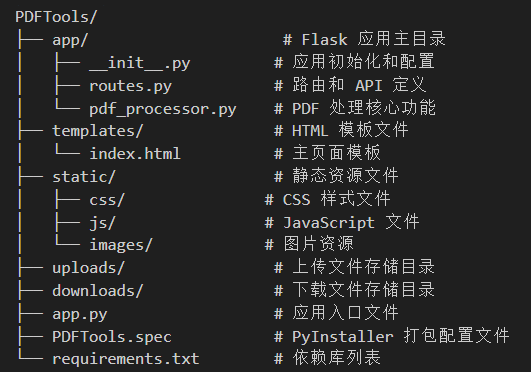
也就这些了,有兴趣的看看,欢迎讨论。