一、通过ContentProvider封装数据
1、ContentProvider
ContentProvider为App存取内部数据提供统一的外部接口,让不同的应用之间得以共享数据
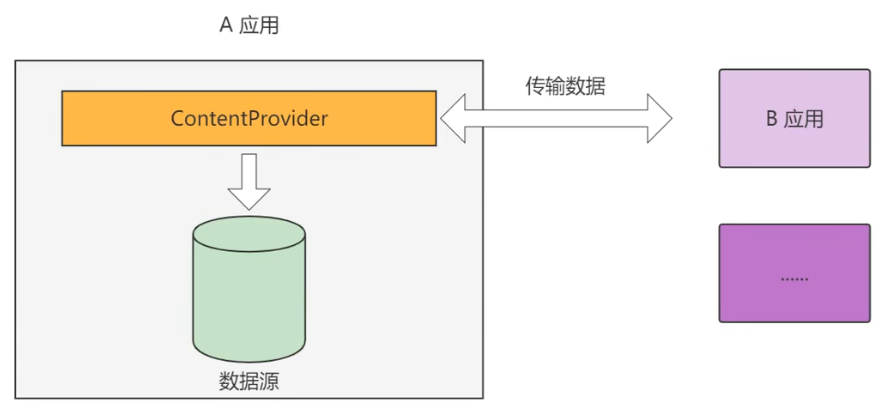
ContentProvider相当于一个窗口、一个门卫
一个应用读取另一个应用的数据,比如用户登录时,收到验证码自动读取
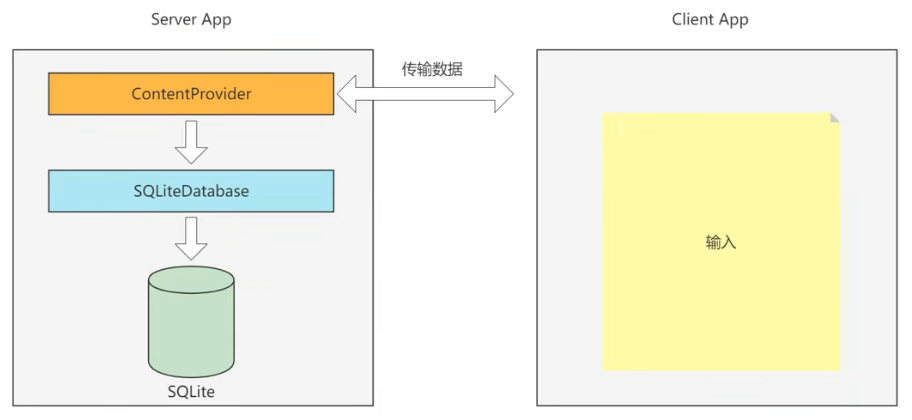
2、ContentProvider案例
Client App将用户的输入内容,通过ContentProvider跨进程通信传递给Server App
3、ContentProvider只是服务端App存取数据的抽象类,我们需要在其基础上实现一个完整的内容提供器,并重写下列方法
(1)onCreate:初始化资源
Provider在应用启动的时候就创建了
(2)insert:插入数据
(3)delete:删除数据
(4)update:更新数据
(5)query:查询数据
(6)getType:获取内容提供器支持的数据类型
4、Uri
Uri(通用资源标识符Universal Resource Identifer),代表数据操作的地址,每一个ContentProvider都会有唯一的地址,格式content://authority/data_path/id
说明:
(1)"content://":通用前缀,表示该Uri用于ContentProvider定位资源
(2)"authority":授权者名称,用来确定具体由哪一个ContentProvider提供资源。因此一般authority都由类的小写全称组成,以保证唯一性
(3)"data_path":数据路径,用来确定请求的是哪个数据集
(4)id:数据编号,用来请求单条数据。如果是多条这个字段忽略
二、创建Server App
1、新建一个Module,chapter07-server
2、创建ContentProvider
【New】->【Other】->【Content Provider】,会自动生成文件
3、修改清单文件
authorities填生成的Provider文件的包名+类名
XML
<provider
            android:name=".provider.UserInfoProvider"
            android:authorities="com.example.chapter07_server.provider.UserInfoProvider"
            android:enabled="true"
            android:exported="true" />
服务端要说明下访问客户端软件包
XML
<queries>
    <package android:name="com.example.chapter07_client" />
</queries>
4、UserInfoProvider.java
java
package com.example.chapter07_server.provider;

import android.content.ContentProvider;
import android.content.ContentValues;
import android.database.Cursor;
import android.net.Uri;
import android.util.Log;

public class UserInfoProvider extends ContentProvider {
    public UserInfoProvider() {
    }

    @Override
    public int delete(Uri uri, String selection, String[] selectionArgs) {
        Log.d("sam", "UserInfoProvider delete");
        return 0;
    }

    @Override
    public String getType(Uri uri) {
        // TODO: Implement this to handle requests for the MIME type of the data
        // at the given URI.
        throw new UnsupportedOperationException("Not yet implemented");
    }

    @Override
    public Uri insert(Uri uri, ContentValues values) {
        Log.d("sam", "UserInfoProvider insert");
        Log.d("sam", "uri " + uri.toString());
        Log.d("sam", "values " + values.toString());

        return uri;
    }

    @Override
    public boolean onCreate() {
        Log.d("sam", "UserInfoProvider onCreate");
        return true;
    }

    @Override
    public Cursor query(Uri uri, String[] projection, String selection,
                        String[] selectionArgs, String sortOrder) {
        Log.d("sam", "UserInfoProvider query");
        return null;
    }

    @Override
    public int update(Uri uri, ContentValues values, String selection,
                      String[] selectionArgs) {
        Log.d("sam", "UserInfoProvider update");
        return 0;
    }
}
5、清单文件
XML
<?xml version="1.0" encoding="utf-8"?>
<manifest xmlns:android="http://schemas.android.com/apk/res/android">

    <!-- 出于安全考虑,Android 11开始要求应用事先说明需要访问的其他软件包 -->
    <queries>
        <package android:name="com.example.chapter07_client" />
    </queries>

    <application
        android:allowBackup="true"
        android:icon="@mipmap/ic_launcher"
        android:label="@string/app_name"
        android:roundIcon="@mipmap/ic_launcher_round"
        android:supportsRtl="true"
        android:theme="@style/Theme.MyApplication">
        <provider
            android:name=".provider.UserInfoProvider"
            android:authorities="com.example.chapter07_server.provider.UserInfoProvider"
            android:enabled="true"
            android:exported="true" />

        <activity
            android:name=".MainActivity"
            android:exported="true">
            <intent-filter>
                <action android:name="android.intent.action.MAIN" />

                <category android:name="android.intent.category.LAUNCHER" />
            </intent-filter>
        </activity>
    </application>

</manifest>
Server端暴露数据访问接口,提供其他Client访问
三、通过ContentResolver访问数据
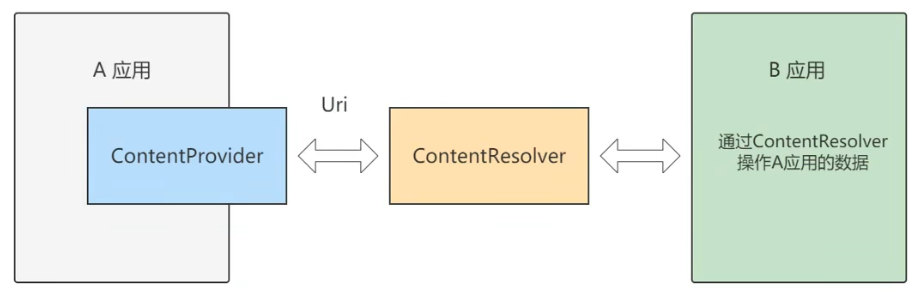
1、ContentResolver
利用ContentProvider只实现服务端App的数据封装,如果客户端App想访问对方的内部数据,就要通过内容解析器ContentResolver访问
四、创建Client App
1、新建一个Module,chapter07-client
2、ContentWriteActivity.java
java
package com.example.chapter07_client;

import androidx.appcompat.app.AppCompatActivity;

import android.content.ContentValues;
import android.os.Bundle;
import android.view.View;
import android.widget.CheckBox;
import android.widget.EditText;

public class ContentWriteActivity extends AppCompatActivity implements View.OnClickListener {

    private EditText et_name;
    private EditText et_age;
    private EditText et_height;
    private EditText et_weight;
    private CheckBox ck_married;

    @Override
    protected void onCreate(Bundle savedInstanceState) {
        super.onCreate(savedInstanceState);
        setContentView(R.layout.activity_content_write);

        et_name = findViewById(R.id.et_name);
        et_age = findViewById(R.id.et_age);
        et_height = findViewById(R.id.et_height);
        et_weight = findViewById(R.id.et_weight);
        ck_married = findViewById(R.id.ck_married);

        findViewById(R.id.btn_save).setOnClickListener(this);
        findViewById(R.id.btn_delete).setOnClickListener(this);
        findViewById(R.id.btn_update).setOnClickListener(this);
        findViewById(R.id.btn_query).setOnClickListener(this);
    }

    @Override
    public void onClick(View view) {
        String name = et_name.getText().toString();
        String age = et_age.getText().toString();
        String height = et_height.getText().toString();
        String weight = et_weight.getText().toString();

        if (view.getId() == R.id.btn_save) {
            ContentValues values = new ContentValues();

            values.put("name", name);
            values.put("age", Integer.parseInt(age));
            values.put("height", Float.parseFloat(height));
            values.put("weight", Float.parseFloat(weight));
            values.put("married", ck_married.isChecked());

            // 通过ContentResolver访问数据
            getContentResolver().insert(UserInfoContent.CONTENT_URI, values);

        } else if (view.getId() == R.id.btn_delete) {

        } else if (view.getId() == R.id.btn_update) {

        } else if (view.getId() == R.id.btn_query) {

        }
    }
}
3、UserInfoContent.java
java
package com.example.chapter07_client;

import android.net.Uri;

public class UserInfoContent {

    public static final String AUTHORITIES = "com.example.chapter07_server.provider.UserInfoProvider";

    // 访问内容提供器的URI
    // content://com.example.chapter07_server.provider.UserInfoProvider/user
    public static final Uri CONTENT_URI = Uri.parse("content://" + AUTHORITIES + "/user");

}
4、布局文件activity_content_write.xml
XML
<?xml version="1.0" encoding="utf-8"?>
<LinearLayout xmlns:android="http://schemas.android.com/apk/res/android"
    xmlns:app="http://schemas.android.com/apk/res-auto"
    xmlns:tools="http://schemas.android.com/tools"
    android:layout_width="match_parent"
    android:layout_height="match_parent"
    android:orientation="vertical"
    tools:context=".ContentWriteActivity">

    <GridLayout
        android:layout_width="match_parent"
        android:layout_height="wrap_content"
        android:columnCount="2"
        android:rowCount="4">

        <TextView
            android:layout_width="60dp"
            android:layout_height="wrap_content"
            android:text="姓名:"
            android:textSize="17sp"/>

        <EditText
            android:id="@+id/et_name"
            android:layout_width="0dp"
            android:layout_height="wrap_content"
            android:layout_columnWeight="1"
            android:inputType="text"
            android:hint="请输入姓名"/>

        <TextView
            android:layout_width="60dp"
            android:layout_height="wrap_content"
            android:text="年龄:"
            android:textSize="17sp"/>

        <EditText
            android:id="@+id/et_age"
            android:layout_width="0dp"
            android:layout_height="wrap_content"
            android:layout_columnWeight="1"
            android:inputType="number"
            android:maxLength="3"
            android:hint="请输入年龄"/>

        <TextView
            android:layout_width="60dp"
            android:layout_height="wrap_content"
            android:text="身高:"
            android:textSize="17sp"/>

        <EditText
            android:id="@+id/et_height"
            android:layout_width="0dp"
            android:layout_height="wrap_content"
            android:layout_columnWeight="1"
            android:inputType="numberDecimal"
            android:maxLength="6"
            android:hint="请输入身高"/>

        <TextView
            android:layout_width="60dp"
            android:layout_height="wrap_content"
            android:text="体重:"
            android:textSize="17sp"/>

        <EditText
            android:id="@+id/et_weight"
            android:layout_width="0dp"
            android:layout_height="wrap_content"
            android:layout_columnWeight="1"
            android:inputType="numberDecimal"
            android:maxLength="6"
            android:hint="请输入体重"/>

    </GridLayout>

    <CheckBox
        android:id="@+id/ck_married"
        android:layout_width="match_parent"
        android:layout_height="wrap_content"
        android:text="已婚"
        android:textSize="17sp"/>

    <Button
        android:id="@+id/btn_save"
        android:layout_width="match_parent"
        android:layout_height="wrap_content"
        android:text="添加"
        android:textSize="17sp"/>

    <Button
        android:id="@+id/btn_delete"
        android:layout_width="match_parent"
        android:layout_height="wrap_content"
        android:text="删除"
        android:textSize="17sp"/>

    <Button
        android:id="@+id/btn_update"
        android:layout_width="match_parent"
        android:layout_height="wrap_content"
        android:text="修改"
        android:textSize="17sp"/>

    <Button
        android:id="@+id/btn_query"
        android:layout_width="match_parent"
        android:layout_height="wrap_content"
        android:text="查询"
        android:textSize="17sp"/>

</LinearLayout>
5、清单文件
出于安全考虑,Android 11开始要求应用事先说明需要访问的其他软件包
这里服务端也要说明下访问客户端软件包,否则一直运行不出来
XML
<?xml version="1.0" encoding="utf-8"?>
<manifest xmlns:android="http://schemas.android.com/apk/res/android">

    <queries>
        <package android:name="com.example.chapter07_server" />
    </queries>

    <application
        android:allowBackup="true"
        android:icon="@mipmap/ic_launcher"
        android:label="@string/app_name"
        android:roundIcon="@mipmap/ic_launcher_round"
        android:supportsRtl="true"
        android:theme="@style/Theme.MyApplication">

        <activity
            android:name=".ContentWriteActivity"
            android:exported="true">
            <intent-filter>
                <action android:name="android.intent.action.MAIN" />

                <category android:name="android.intent.category.LAUNCHER" />
            </intent-filter>
        </activity>
    </application>

</manifest>
6、运行日志
以添加数据为例
bash
2026-01-12 16:10:28.223 20546-20546 sam                     com.example.chapter07_server         D  UserInfoProvider onCreate
2026-01-12 16:11:00.935 20546-20557 sam                     com.example.chapter07_server         D  UserInfoProvider insert
2026-01-12 16:11:00.935 20546-20557 sam                     com.example.chapter07_server         D  uri content://com.example.chapter07_server.provider.UserInfoProvider/user
2026-01-12 16:11:00.936 20546-20557 sam                     com.example.chapter07_server         D  values height=170.0 weight=56.0 age=12 name=qwer married=true