cv::Mat对象共享相同
cv::Mat对象可以共享相同的数据,这通过矩阵指针指向同一个地址来实现。
clone() 方法
功能:
clone() 方法创建一个与原矩阵完全相同的新矩阵,包括矩阵头和矩阵数据。新矩阵与原矩阵在内存上是完全独立的,对新矩阵的任何修改都不会影响原矩阵,反之亦然。
bash
#include <opencv2/opencv.hpp>
#include <iostream>

int main() {
    cv::Mat originalMat = cv::Mat::ones(3, 3, CV_32F);
    cv::Mat clonedMat = originalMat.clone();

    clonedMat.at<float>(0, 0) = 2.0f;

    std::cout << "Original Mat:" << std::endl;
    for (int i = 0; i < originalMat.rows; ++i) {
        for (int j = 0; j < originalMat.cols; ++j) {
            std::cout << originalMat.at<float>(i, j) << " ";
        }
        std::cout << std::endl;
    }

    std::cout << "Cloned Mat:" << std::endl;
    for (int i = 0; i < clonedMat.rows; ++i) {
        for (int j = 0; j < clonedMat.cols; ++j) {
            std::cout << clonedMat.at<float>(i, j) << " ";
        }
        std::cout << std::endl;
    }

    return 0;
}
copyTo 方法
功能:
copyTo 方法将源矩阵的数据复制到目标矩阵中。目标矩阵可以是预先分配好内存的 cv::Mat 对象,且其大小和数据类型需与源矩阵兼容。如果目标矩阵的大小和数据类型与源矩阵不一致,copyTo 方法会抛出异常。
bash
#include <opencv2/opencv.hpp>
#include <iostream>

int main() {
    cv::Mat originalMat = cv::Mat::ones(3, 3, CV_32F);
    cv::Mat newMat(3, 3, CV_32F);

    originalMat.copyTo(newMat);

    newMat.at<float>(0, 0) = 2.0f;

    std::cout << "Original Mat:" << std::endl;
    for (int i = 0; i < originalMat.rows; ++i) {
        for (int j = 0; j < originalMat.cols; ++j) {
            std::cout << originalMat.at<float>(i, j) << " ";
        }
        std::cout << std::endl;
    }

    std::cout << "New Mat after copyTo:" << std::endl;
    for (int i = 0; i < newMat.rows; ++i) {
        for (int j = 0; j < newMat.cols; ++j) {
            std::cout << newMat.at<float>(i, j) << " ";
        }
        std::cout << std::endl;
    }

    return 0;
}
数据共享
bash
#include "mainwindow.h"
#include "ui_mainwindow.h"

#include <opencv2/opencv.hpp>
#include <QDebug>

void shareMatDataExample() {
    // 创建一个初始的cv::Mat对象
    cv::Mat originalMat = cv::Mat::ones(3, 3, CV_32F);

    // 创建其他cv::Mat对象,它们将共享originalMat的数据
    cv::Mat sharedMat1 = originalMat;
    cv::Mat sharedMat2 = originalMat.clone(); // clone方法会复制数据,这里为了对比展示,下面再修改为共享
    cv::Mat sharedMat3;
    originalMat.copyTo(sharedMat3); // copyTo方法也会复制数据,同样为对比展示,后面修改为共享

    // 修改sharedMat1的数据,这会影响originalMat,因为它们共享数据
    sharedMat1.at<float>(0, 0) = 2.0f;

    qDebug() << "Original Mat:";
    for (int i = 0; i < originalMat.rows; ++i) {
        for (int j = 0; j < originalMat.cols; ++j) {
            qDebug() << originalMat.at<float>(i, j);
        }
    }

    qDebug() << "Shared Mat 1:";
    for (int i = 0; i < sharedMat1.rows; ++i) {
        for (int j = 0; j < sharedMat1.cols; ++j) {
            qDebug() << sharedMat1.at<float>(i, j);
        }
    }

    qDebug() << "Shared Mat 2:";
    for (int i = 0; i < sharedMat2.rows; ++i) {
        for (int j = 0; j < sharedMat2.cols; ++j) {
            qDebug() << sharedMat2.at<float>(i, j);
        }
    }
    // 让sharedMat2共享originalMat的数据
    sharedMat2 = originalMat;
    // 修改sharedMat2的数据,这会影响originalMat和sharedMat1
    sharedMat2.at<float>(1, 1) = 3.0f;

    qDebug() << "Original Mat after modifying Shared Mat 2:";
    for (int i = 0; i < originalMat.rows; ++i) {
        for (int j = 0; j < originalMat.cols; ++j) {
            qDebug() << originalMat.at<float>(i, j);
        }
    }

    qDebug() << "Shared Mat 2:";
    for (int i = 0; i < sharedMat2.rows; ++i) {
        for (int j = 0; j < sharedMat2.cols; ++j) {
            qDebug() << sharedMat2.at<float>(i, j);
        }
    }

    qDebug() << "Shared Mat 3:";
    for (int i = 0; i < sharedMat3.rows; ++i) {
        for (int j = 0; j < sharedMat3.cols; ++j) {
            qDebug() << sharedMat3.at<float>(i, j);
        }
    }

    // 让sharedMat3共享originalMat的数据
    sharedMat3 = originalMat;
    // 修改sharedMat3的数据,这会影响originalMat、sharedMat1和sharedMat2
    sharedMat3.at<float>(2, 2) = 4.0f;

    qDebug() << "Original Mat after modifying Shared Mat 3:";
    for (int i = 0; i < originalMat.rows; ++i) {
        for (int j = 0; j < originalMat.cols; ++j) {
            qDebug() << originalMat.at<float>(i, j);
        }
    }

    qDebug() << "Shared Mat 3:";
    for (int i = 0; i < sharedMat3.rows; ++i) {
        for (int j = 0; j < sharedMat3.cols; ++j) {
            qDebug() << sharedMat3.at<float>(i, j);
        }
    }
}

// MainWindow类的构造函数
// 功能:初始化MainWindow对象,设置用户界面并调用主测试函数
MainWindow::MainWindow(QWidget *parent)
    : QMainWindow(parent)
    , ui(new Ui::MainWindow)
{
    // 设置用户界面
    ui->setupUi(this);
    shareMatDataExample();
}

// MainWindow类的析构函数
// 功能:释放ui对象所占用的资源
MainWindow::~MainWindow()
{
    delete ui;
}
cv::Mat 创建方法
构造法:使用cv::Mat的构造函数来初始化矩阵,指定矩阵的行数、列数和数据类型。
直接赋值法:通过直接将一个已有的cv::Mat对象赋值给另一个cv::Mat对象,实现数据共享。
数组法:先定义一个数组,然后使用cv::Mat的构造函数将数组数据复制到矩阵中。
create 函数法:先创建一个空的cv::Mat对象,然后使用create函数来分配内存并指定矩阵的大小和数据类型。
定义特殊矩阵:使用cv::Mat提供的静态函数创建特殊矩阵,如全零矩阵、全一矩阵和单位矩阵。
bash
#include "mainwindow.h"
#include "ui_mainwindow.h"

#include <opencv2/opencv.hpp>
#include <QDebug>

void initializeMatExamples() {
    // 构造法
    cv::Mat mat1(3, 3, CV_32F);
    for (int i = 0; i < mat1.rows; ++i) {
        for (int j = 0; j < mat1.cols; ++j) {
            mat1.at<float>(i, j) = i * mat1.cols + j;
        }
    }
    qDebug() << "构造法初始化的矩阵mat1:";
    for (int i = 0; i < mat1.rows; ++i) {
        for (int j = 0; j < mat1.cols; ++j) {
            qDebug() << mat1.at<float>(i, j);
        }
    }

    // 直接赋值法
    cv::Mat mat2 = mat1;
    qDebug() << "直接赋值法初始化的矩阵mat2(与mat1共享数据):";
    for (int i = 0; i < mat2.rows; ++i) {
        for (int j = 0; j < mat2.cols; ++j) {
            qDebug() << mat2.at<float>(i, j);
        }
    }

    // 数组法
    float data[] = {1.0f, 2.0f, 3.0f, 4.0f, 5.0f, 6.0f, 7.0f, 8.0f, 9.0f};
    cv::Mat mat3(3, 3, CV_32F, data);
    qDebug() << "数组法初始化的矩阵mat3:";
    for (int i = 0; i < mat3.rows; ++i) {
        for (int j = 0; j < mat3.cols; ++j) {
            qDebug() << mat3.at<float>(i, j);
        }
    }

    // create函数法
    cv::Mat mat4;
    mat4.create(3, 3, CV_32F);
    for (int i = 0; i < mat4.rows; ++i) {
        for (int j = 0; j < mat4.cols; ++j) {
            mat4.at<float>(i, j) = i * mat4.cols + j + 10.0f;
        }
    }
    qDebug() << "create函数法初始化的矩阵mat4:";
    for (int i = 0; i < mat4.rows; ++i) {
        for (int j = 0; j < mat4.cols; ++j) {
            qDebug() << mat4.at<float>(i, j);
        }
    }

    // 定义特殊矩阵
    cv::Mat mat5 = cv::Mat::zeros(3, 3, CV_32F);
    qDebug() << "全零矩阵mat5:";
    for (int i = 0; i < mat5.rows; ++i) {
        for (int j = 0; j < mat5.cols; ++j) {
            qDebug() << mat5.at<float>(i, j);
        }
    }

    cv::Mat mat6 = cv::Mat::ones(3, 3, CV_32F);
    qDebug() << "全一矩阵mat6:";
    for (int i = 0; i < mat6.rows; ++i) {
        for (int j = 0; j < mat6.cols; ++j) {
            qDebug() << mat6.at<float>(i, j);
        }
    }

    cv::Mat mat7 = cv::Mat::eye(3, 3, CV_32F);
    qDebug() << "单位矩阵mat7:";
    for (int i = 0; i < mat7.rows; ++i) {
        for (int j = 0; j < mat7.cols; ++j) {
            qDebug() << mat7.at<float>(i, j);
        }
    }
}


// MainWindow类的构造函数
// 功能:初始化MainWindow对象,设置用户界面并调用主测试函数
MainWindow::MainWindow(QWidget *parent)
    : QMainWindow(parent)
    , ui(new Ui::MainWindow)
{
    // 设置用户界面
    ui->setupUi(this);
    initializeMatExamples();
}

// MainWindow类的析构函数
// 功能:释放ui对象所占用的资源
MainWindow::~MainWindow()
{
    delete ui;
}
创建和初始化数组
bash
#include <opencv2/opencv.hpp>
#include <QDebug>

void createAndInitArray() {
    // 创建一个3x3的单精度浮点数矩阵并初始化
    cv::Mat mat1(3, 3, CV_32F);
    for (int i = 0; i < mat1.rows; ++i) {
        for (int j = 0; j < mat1.cols; ++j) {
            mat1.at<float>(i, j) = i * mat1.cols + j;
        }
    }
    qDebug() << "创建并初始化的矩阵mat1:";
    for (int i = 0; i < mat1.rows; ++i) {
        for (int j = 0; j < mat1.cols; ++j) {
            qDebug() << mat1.at<float>(i, j);
        }
    }

    // 创建一个全零的3x3双精度浮点数矩阵
    cv::Mat mat2 = cv::Mat::zeros(3, 3, CV_64F);
    qDebug() << "全零矩阵mat2:";
    for (int i = 0; i < mat2.rows; ++i) {
        for (int j = 0; j < mat2.cols; ++j) {
            qDebug() << mat2.at<double>(i, j);
        }
    }

    // 创建一个全一的2x2整数矩阵
    cv::Mat mat3 = cv::Mat::ones(2, 2, CV_32S);
    qDebug() << "全一矩阵mat3:";
    for (int i = 0; i < mat3.rows; ++i) {
        for (int j = 0; j < mat3.cols; ++j) {
            qDebug() << mat3.at<int>(i, j);
        }
    }

    // 创建一个单位矩阵
    cv::Mat mat4 = cv::Mat::eye(3, 3, CV_32F);
    qDebug() << "单位矩阵mat4:";
    for (int i = 0; i < mat4.rows; ++i) {
        for (int j = 0; j < mat4.cols; ++j) {
            qDebug() << mat4.at<float>(i, j);
        }
    }
}
访问和修改数组元素
bash
void accessAndModifyArray() {
    cv::Mat mat = cv::Mat::ones(3, 3, CV_32F);
    // 访问并修改特定位置的元素
    mat.at<float>(1, 1) = 5.0f;
    qDebug() << "修改后的矩阵:";
    for (int i = 0; i < mat.rows; ++i) {
        for (int j = 0; j < mat.cols; ++j) {
            qDebug() << mat.at<float>(i, j);
        }
    }

    // 遍历并修改所有元素
    for (int i = 0; i < mat.rows; ++i) {
        for (int j = 0; j < mat.cols; ++j) {
            mat.at<float>(i, j) = mat.at<float>(i, j) * 2;
        }
    }
    qDebug() << "再次修改后的矩阵:";
    for (int i = 0; i < mat.rows; ++i) {
        for (int j = 0; j < mat.cols; ++j) {
            qDebug() << mat.at<float>(i, j);
        }
    }
}
数组运算
bash
void arrayOperations() {
    cv::Mat mat1 = cv::Mat::ones(3, 3, CV_32F);
    cv::Mat mat2 = cv::Mat::ones(3, 3, CV_32F);

    // 矩阵加法
    cv::Mat sumMat;
    cv::add(mat1, mat2, sumMat);
    qDebug() << "矩阵相加的结果:";
    for (int i = 0; i < sumMat.rows; ++i) {
        for (int j = 0; j < sumMat.cols; ++j) {
            qDebug() << sumMat.at<float>(i, j);
        }
    }

    // 矩阵乘法(点乘,对应元素相乘)
    cv::Mat multiplyMat;
    cv::multiply(mat1, mat2, multiplyMat);
    qDebug() << "矩阵点乘的结果:";
    for (int i = 0; i < multiplyMat.rows; ++i) {
        for (int j = 0; j < multiplyMat.cols; ++j) {
            qDebug() << multiplyMat.at<float>(i, j);
        }
    }

    // 矩阵乘法(矩阵相乘)
    cv::Mat mat3 = cv::Mat::ones(3, 2, CV_32F);
    cv::Mat mat4 = cv::Mat::ones(2, 3, CV_32F);
    cv::Mat matrixMultiplyMat;
    cv::gemm(mat3, mat4, 1.0, cv::Mat(), 0.0, matrixMultiplyMat);
    qDebug() << "矩阵相乘的结果:";
    for (int i = 0; i < matrixMultiplyMat.rows; ++i) {
        for (int j = 0; j < matrixMultiplyMat.cols; ++j) {
            qDebug() << matrixMultiplyMat.at<float>(i, j);
        }
    }
}
数组的合并与拆分
bash
void splitAndMergeArrays() {
    cv::Mat mat1 = cv::Mat::ones(3, 3, CV_8U);
    cv::Mat mat2 = cv::Mat::ones(3, 3, CV_8U) * 2;
    cv::Mat mat3 = cv::Mat::ones(3, 3, CV_8U) * 3;

    std::vector<cv::Mat> channels;
    channels.push_back(mat1);
    channels.push_back(mat2);
    channels.push_back(mat3);

    // 合并数组
    cv::Mat mergedMat;
    cv::merge(channels, mergedMat);
    qDebug() << "合并后的矩阵维度:" << mergedMat.channels();

    // 拆分数组
    std::vector<cv::Mat> splitChannels;
    cv::split(mergedMat, splitChannels);
    qDebug() << "拆分后的第一个矩阵:";
    for (int i = 0; i < splitChannels[0].rows; ++i) {
        for (int j = 0; j < splitChannels[0].cols; ++j) {
            qDebug() << (int)splitChannels[0].at<uchar>(i, j);
        }
    }
}
文件读写
XML文件
bash
#include <opencv2/opencv.hpp>
#include <QDebug>

void writeXMLFile() {
    cv::FileStorage fs("data.xml", cv::FileStorage::WRITE);

    // 写入基本数据类型
    fs << "frameCount" << 5;
    fs << "cameraMatrix" << (cv::Mat_<double>(3, 3) << 1000, 0, 320, 0, 1000, 240, 0, 0, 1);
    fs << "distCoeffs" << (cv::Mat_<double>(5, 1) << 0.1, 0.2, -0.3, 0.4, 0.5);

    // 写入序列(类似于数组)
    fs << "features" << "[";
    for (int i = 0; i < 3; ++i) {
        cv::Point2f pt((float)(i * 10), (float)(i * 20));
        fs << "{:" << "x" << pt.x << "y" << pt.y << "}";
    }
    fs << "]";

    fs.release();
}

void readXMLFile() {
    cv::FileStorage fs("data.xml", cv::FileStorage::READ);
    if (!fs.isOpened()) {
        qDebug() << "无法打开XML文件";
        return;
    }

    int frameCount;
    cv::Mat cameraMatrix, distCoeffs;
    fs["frameCount"] >> frameCount;
    fs["cameraMatrix"] >> cameraMatrix;
    fs["distCoeffs"] >> distCoeffs;

    qDebug() << "frameCount: " << frameCount;
    qDebug() << "cameraMatrix: " << cameraMatrix;
    qDebug() << "distCoeffs: " << distCoeffs;

    cv::FileNode features = fs["features"];
    if (features.type() == cv::FileNode::SEQ) {
        for (cv::FileNodeIterator it = features.begin(); it != features.end(); ++it) {
            cv::Point2f pt;
            (*it)["x"] >> pt.x;
            (*it)["y"] >> pt.y;
            qDebug() << "Feature point: (" << pt.x << ", " << pt.y << ")";
        }
    }

    fs.release();
}
写入:
cv::FileStorage类用于打开文件进行写入操作,第一个参数是文件名,第二个参数cv::FileStorage::WRITE表示写入模式。
使用<<运算符写入基本数据类型,如整数、矩阵等。对于序列,先写入""开始序列,然后逐个写入元素,最后写入""结束序列。
写入完成后,调用fs.release()关闭文件。
读取:
以cv::FileStorage::READ模式打开文件。
使用>>运算符从文件中读取数据到相应的变量中。对于序列,通过cv::FileNode和cv::FileNodeIterator遍历序列中的元素
YAML文件
bash
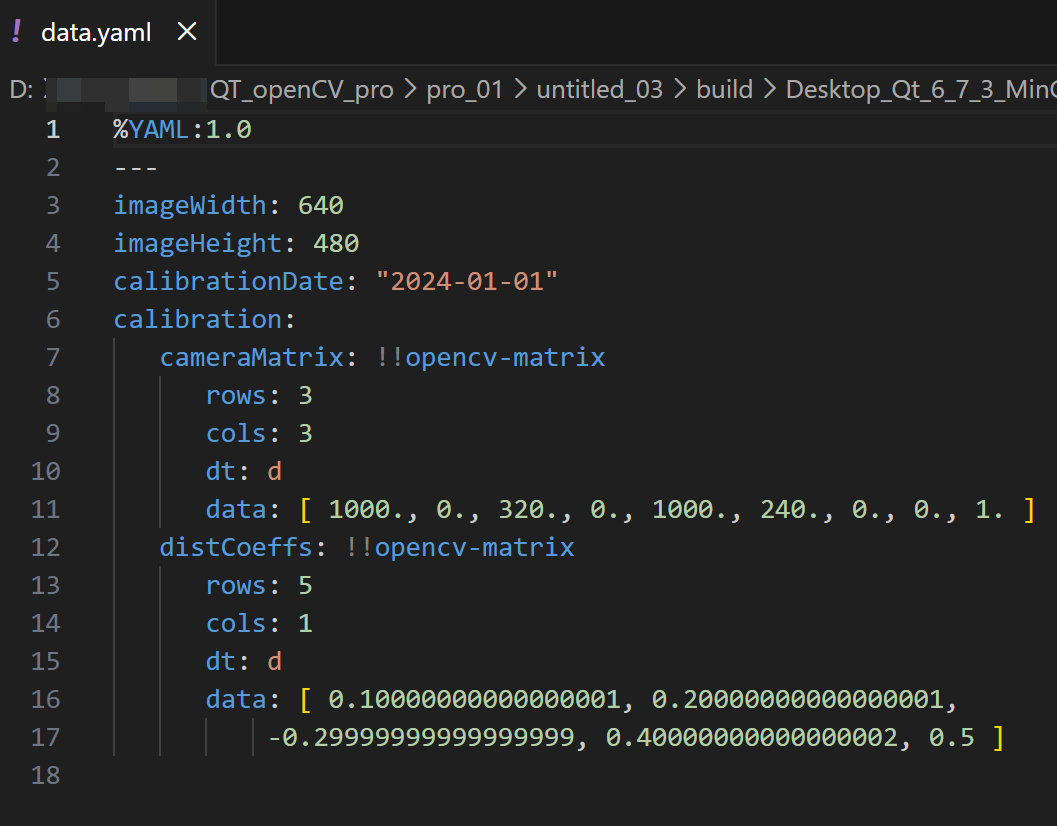
void writeYAMLFile() {
    cv::FileStorage fs("data.yaml", cv::FileStorage::WRITE);

    // 写入基本数据类型
    fs << "imageWidth" << 640;
    fs << "imageHeight" << 480;
    fs << "calibrationDate" << "2024-01-01";

    // 写入映射(类似于字典)
    fs << "calibration" << "{"
       << "cameraMatrix" << (cv::Mat_<double>(3, 3) << 1000, 0, 320, 0, 1000, 240, 0, 0, 1)
       << "distCoeffs" << (cv::Mat_<double>(5, 1) << 0.1, 0.2, -0.3, 0.4, 0.5)
       << "}";

    fs.release();
}

void readYAMLFile() {
    cv::FileStorage fs("data.yaml", cv::FileStorage::READ);
    if (!fs.isOpened()) {
        qDebug() << "无法打开YAML文件";
        return;
    }

    int imageWidth, imageHeight;
    std::string calibrationDate;
    fs["imageWidth"] >> imageWidth;
    fs["imageHeight"] >> imageHeight;
    fs["calibrationDate"] >> calibrationDate;

    qDebug() << "imageWidth: " << imageWidth;
    qDebug() << "imageHeight: " << imageHeight;
    qDebug() << "calibrationDate: " << calibrationDate.c_str();

    cv::Mat cameraMatrix, distCoeffs;
    cv::FileNode calibration = fs["calibration"];
    calibration["cameraMatrix"] >> cameraMatrix;
    calibration["distCoeffs"] >> distCoeffs;

    qDebug() << "cameraMatrix: " << cameraMatrix;
    qDebug() << "distCoeffs: " << distCoeffs;

    fs.release();
}
写入:
同样使用cv::FileStorage打开文件进行写入,这次文件扩展名为.yaml。
写入基本数据类型和映射。映射使用{"}包围,内部通过<<依次写入键值对。
读取:
以读取模式打开 YAML 文件。
从文件中读取数据到变量,对于映射,先获取对应的cv::FileNode,再从该节点中读取具体的数据。
重载QDebug
bash
// 重载QDebug的<<运算符以支持cv::Mat输出
QDebug operator<<(QDebug debug, const cv::Mat& mat) {
    debug.nospace() << "cv::Mat(" << mat.rows << "x" << mat.cols << ", "
                    << (mat.type() == CV_8U? "CV_8U" :
                            mat.type() == CV_8S? "CV_8S" :
                            mat.type() == CV_16U? "CV_16U" :
                            mat.type() == CV_16S? "CV_16S" :
                            mat.type() == CV_32S? "CV_32S" :
                            mat.type() == CV_32F? "CV_32F" :
                            mat.type() == CV_64F? "CV_64F" : "unknown type")
                    << ") {";
    for (int i = 0; i < mat.rows; ++i) {
        if (i > 0) {
            debug << "\n ";
        }
        for (int j = 0; j < mat.cols; ++j) {
            if (mat.type() == CV_8U) {
                debug << (int)mat.at<uchar>(i, j);
            } else if (mat.type() == CV_8S) {
                debug << (int)mat.at<char>(i, j);
            } else if (mat.type() == CV_16U) {
                debug << mat.at<ushort>(i, j);
            } else if (mat.type() == CV_16S) {
                debug << mat.at<short>(i, j);
            } else if (mat.type() == CV_32S) {
                debug << mat.at<int>(i, j);
            } else if (mat.type() == CV_32F) {
                debug << mat.at<float>(i, j);
            } else if (mat.type() == CV_64F) {
                debug << mat.at<double>(i, j);
            }
            if (j < mat.cols - 1) {
                debug << ", ";
            }
        }
    }
    debug << "}";
    return debug.space();
}