使用 frp 实现内网穿透:让本地服务器安全暴露到公网
frp(frp 是 Fast Reverse Proxy 的缩写)是一个轻量、高效的内网穿透工具,可以将内网的 SSH、Web、MySQL 等服务安全地暴露到公网。本文基于一个实际生产环境,介绍 frp 的安装、配置和使用方法,实现:
-
通过域名访问本地服务器的 Web 服务
-
通过公网 SSH 端口访问本地服务器的 SSH
-
(可选)通过公网访问 MySQL
整个方案紧凑、安全,只需一台有公网 IP 的云服务器作为 frps 服务端。
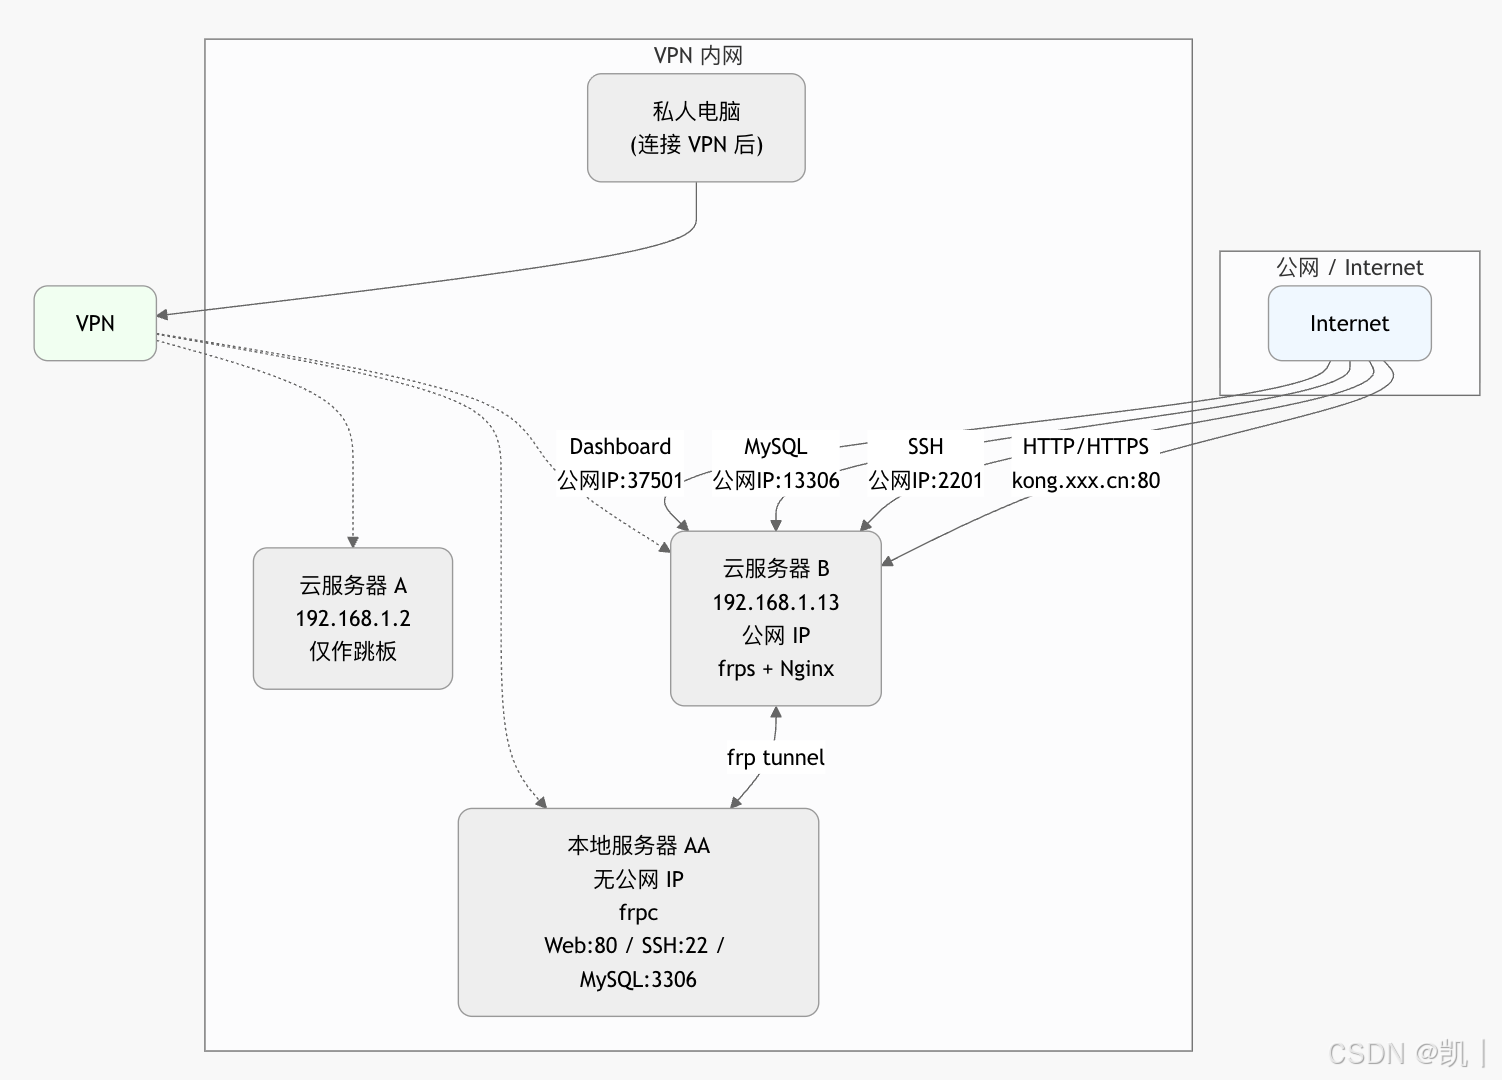
网络拓扑图
-
云服务器 B 拥有公网 IP,运行 frps 和 Nginx
-
本地服务器 AA 通过 VPN 能访问云服务器 B 的内网 IP,运行 frpc
-
VPN 内用户也可通过
云服务器B内网IP:2201直接 SSH 到本地 AA(无需知道 AA 内网 IP)
1. 安装 frp
前往 frp GitHub Releases 下载最新版本(推荐 amd64 或 arm64)。
服务端(云服务器 B)
bash
# 创建目录
mkdir -p /opt/frp && cd /opt/frp

# 下载(按你的 CPU 架构选择)
wget https://github.com/fatedier/frp/releases/download/v0.66.0/frp_0.66.0_linux_amd64.tar.gz

tar zxvf frp_0.66.0_linux_amd64.tar.gz
cd frp_0.66.0_linux_amd64

# 拷贝二进制
cp frps /usr/local/bin/
chmod +x /usr/local/bin/frps
客户端(本地服务器 AA)
bash
mkdir -p /opt/frp && cd /opt/frp

wget https://github.com/fatedier/frp/releases/download/v0.66.0/frp_0.66.0_linux_amd64.tar.gz
tar zxvf frp_0.66.0_linux_amd64.tar.gz

cp frp_0.66.0_linux_amd64/frpc /usr/local/bin/
chmod +x /usr/local/bin/frpc
建议使用 systemd 服务开机自启(略,可自行搜索 "frp systemd")。
2. 服务端配置(云服务器 B)
/etc/frp/frps.toml
toml
bindPort = 37001          # frpc 连接 frps 的端口(内网安全)
bindAddr = "0.0.0.0"

vhostHTTPPort = 31080     # HTTP 穿透虚拟主机端口

# Dashboard(可选,监控用)
webServer.addr = "0.0.0.0"
webServer.port = 37501
webServer.user = "frp_topka"
webServer.password = "xxxx"

# 必须开启鉴权
auth.method = "token"
auth.token = "xxxx"       # 自定义强令牌

log.to = "/var/log/frps.log"
log.level = "info"
log.maxDays = 7
systemd 服务(服务端)
bash
vim /etc/systemd/system/frps.service[Unit]
Description=FRP Server
After=network.target
[Service]
Type=simple
ExecStart=/usr/local/bin/frps -c /etc/frp/frps.toml
Restart=always
RestartSec=5
[Install]
WantedBy=multi-user.target启动
bash
systemctl daemon-reload
systemctl enable frps
systemctl start frps
systemctl status frps
3. Nginx 配置(云服务器 B,反向代理 frp HTTP 端口)
nginx
server {

    listen 80;
    server_name *.kong.xxx.cn kong.xxx.cn;

    # IP 白名单
    #allow 1.2.3.4;
    #allow 5.6.7.0/24;
    #deny all;

    location / {
        proxy_pass http://127.0.0.1:31080;
        proxy_set_header Host $host;
        proxy_set_header X-Real-IP $remote_addr;
        proxy_set_header X-Forwarded-For $proxy_add_x_forwarded_for;
    }
}
重启 Nginx 即可。域名已解析到云服务器 B 的公网 IP。
4. 客户端配置(本地服务器 AA)
/etc/frp/frpc.toml
toml
serverAddr = "192.168.1.13"   # 云服务器 B 的内网 IP
serverPort = 37001

auth.method = "token"
auth.token = "xxxx"           # 与服务端一致

# SSH 穿透
[[proxies]]
name = "ubuntu"
type = "tcp"
localIP = "127.0.0.1"
localPort = 22
remotePort = 2201             # 公网访问:公网IP:2201 → 本地SSH

# Web 穿透
[[proxies]]
name = "admin_workstation"
type = "http"
localIP = "127.0.0.1"
localPort = 80
customDomains = ["kong.xxx.cn"]

# MySQL 穿透(可选)
[[proxies]]
name = "mysql"
type = "tcp"
localIP = "127.0.0.1"
localPort = 3306
remotePort = 13306
systemd 服务(客户端)
bash
vim /etc/systemd/system/frpc.service[Unit]
Description=FRP Client
After=network.target
[Service]
Type=simple
ExecStart=/usr/local/bin/frpc -c /etc/frp/frpc.toml
Restart=always
RestartSec=5
[Install]
WantedBy=multi-user.target启动
bash
systemctl daemon-reload
systemctl enable frpc
systemctl start frpc
systemctl status frpc
5. 使用方式
-
Web 服务 :直接访问
http://kong.xxx.cn(或子域名)即可访问本地 AA 的 Web 服务 -
SSH 访问本地 AA:
-
公网:
ssh user@云服务器B公网IP -p 2201 -
VPN 内:
ssh user@192.168.1.13 -p 2201(无需知道 AA 内网 IP)
-
-
MySQL :连接
云服务器B公网IP:13306 -
管理面板 :访问
云服务器B公网IP:37501,用户名frp_topka,密码自行设置
安全建议
-
令牌(token)设置复杂
-
防火墙只开放必要端口(80、2201、13306、37501 等)
-
可配合 Nginx 添加 IP 白名单或基本认证进一步加强安全
-
定期查看 Dashboard 监控连接状态
这样就完成了安全、稳定的内网穿透方案,整个配置简单高效,适合个人和小型团队使用。祝使用愉快!