一、Ajax请求:与后端沟通的桥梁
为什么需要Ajax?
在传统网页中,每次与服务器交互都需要刷新整个页面。Ajax(Asynchronous JavaScript and XML)让我们能够:
- 异步请求:不刷新页面获取/发送数据
- 更好体验:局部更新,页面无刷新
- 提高性能:减少不必要的数据传输
多种请求方式对比
| 方式 | 说明 | 特点 |
|---|---|---|
| 原生XHR | 原生API,最早的标准 | 代码冗长,使用复杂 |
| jQuery | 封装XHR,简化操作 | 依赖jQuery,体积大 |
| axios | 基于Promise,推荐 | 功能全面,体积小,支持拦截器 |
| fetch | 现代浏览器原生API | 语法简洁,但兼容性需处理 |
axios:Vue项目的最佳选择
bash
# 第一步:安装axios
npm install axios
基础使用
bash
import axios from 'axios'

// GET请求
axios.get('https://api.example.com/users')
  .then(response => {
    console.log(response.data)
  })
  .catch(error => {
    console.error('请求失败:', error)
  })

// POST请求
axios.post('https://api.example.com/users', {
  name: '张三',
  age: 25
})
.then(response => {
    console.log('创建成功:', response.data)
  })

// 并发请求
axios.all([
  axios.get('/api/users'),
  axios.get('/api/posts')
])
.then(axios.spread((users, posts) => {
    console.log('用户:', users.data)
    console.log('文章:', posts.data)
  }))
axios实例配置
bash
// 创建axios实例
const api = axios.create({
  baseURL: 'https://api.example.com',
  timeout: 5000, // 超时时间
  headers: {
    'Content-Type': 'application/json'
  }
})

// 请求拦截器
api.interceptors.request.use(
  config => {
    // 在发送请求前做些什么(如添加token)
    const token = localStorage.getItem('token')
    if (token) {
      config.headers.Authorization = `Bearer ${token}`
    }
    return config
  },
  error => {
    return Promise.reject(error)
  }
)

// 响应拦截器
api.interceptors.response.use(
  response => {
    // 对响应数据做点什么
    return response.data
  },
  error => {
    // 对响应错误做点什么
    if (error.response?.status === 401) {
      // token过期,跳转到登录页
      router.push('/login')
    }
    return Promise.reject(error)
  }
)

// 使用实例
api.get('/users')
api.post('/login', { username, password })
二、解决跨域问题:代理服务器配置
什么是跨域?
浏览器有 "同源策略 ":只有协议(http/https) 、主机名(localhost) 、端口号(8080) 全一致,才允许请求接口,否则就是 "跨域"(比如前端 8080 请求后端 5000 的接口)。
跨域解决方案(此处只需关注代理)
CORS:后端配置(最常用,前端无需操作);JSONP:只支持 GET 请求,几乎不用;代理服务器:Vue 脚手架自带,前端简单配置即可(重点)
配置代理的两种方式
第一步:创建 / 修改 vue.config.js(项目根目录)
bash
module.exports = {
  pages: {
    index: {
      entry: 'src/main.js', // 项目入口文件
    },
  },
  lintOnSave: false, // 关闭代码格式检查(避免新手报错)
  // 代理服务器核心配置
  devServer: {
    // 方式一:单代理(只能代理一个后端地址)
    // proxy: 'http://localhost:5000'

    // 方式二:多代理(推荐,支持多个后端地址)
    proxy: {
      '/jojo': { // 前缀:所有以/jojo开头的请求走这个代理
        target: 'http://localhost:5000', // 后端服务器地址1
        pathRewrite: {'^/jojo': ''}, // 去掉前缀(后端接口无/jojo)
        changeOrigin: true // 伪装请求来源(让后端以为是5000自己的请求)
      },
      '/atguigu': { // 前缀:所有以/atguigu开头的请求走这个代理
        target: 'http://localhost:5001', // 后端服务器地址2
        pathRewrite: {'^/atguigu': ''},
        changeOrigin: true
      }
    }
  }
}
第二步:组件中发送请求(src/App.vue)
bash
<template>
  <div id="root">
    <button @click="getStudents">获取学生信息(5000端口)</button><br/>
    <button @click="getCars">获取汽车信息(5001端口)</button>
  </div>
</template>

<script>
import axios from 'axios'
export default {
  name: 'App',
  methods: {
    getStudents() {
      // 前端8080 → 代理前缀/jojo → 实际请求5000/students
      axios.get('http://localhost:8080/jojo/students')
        .then(res => console.log('请求成功:', res.data))
        .catch(err => console.log('请求失败:', err.message))
    },
    getCars() {
      // 前端8080 → 代理前缀/atguigu → 实际请求5001/cars
      axios.get('http://localhost:8080/atguigu/cars')
        .then(res => console.log('请求成功:', res.data))
        .catch(err => console.log('请求失败:', err.message))
    }
  }
}
</script>
两种代理方式对比
| 方式 | 配置写法 | 优点 | 缺点 |
|---|---|---|---|
| 方式一 | proxy: 'http://localhost:5000' | 配置极简 | 只能代理 1 个地址,无法灵活控制 |
| 方式二 | proxy: { '/前缀': { target: '地址' } } | 支持多代理,灵活可控 | 配置稍繁琐,请求需加前缀 |
补充:vue-resource(了解即可)
vue-resource是 Vue 早期的 Ajax 插件,现在官方推荐 axios,只需简单了解:
bash
# 安装
npm i vue-resource
运行
bash
// src/main.js 全局注册
import Vue from 'vue'
import vueResource from 'vue-resource'
Vue.use(vueResource)

// 组件中使用(替代axios)
this.$http.get('接口地址').then(res => console.log(res.data))
三、插槽:父向子传 HTML 结构
为什么需要插槽?
想象一下:你买了一个手机壳,但不同人的手机型号不同。插槽就像手机壳上"放手机的地方",让父组件可以插入自定义内容。
3.1 插槽的核心作用
插槽是父组件给子组件传递 HTML 结构 的专属方式(也是组件通信),解决 "子组件部分内容需要自定义" 的问题(比如卡片组件的标题、内容区想自定义)。
3.2 三种插槽类型
1. 默认插槽(基础版)
bash
<!-- 父组件(App.vue) -->
<template>
  <div>
    <!-- 父组件给子组件传HTML结构 -->
    <Category>
      <div>我是父组件传给子组件的HTML内容</div>
    </Category>
  </div>
</template>

<script>
import Category from './components/Category.vue'
export default { components: { Category } }
</script>

<!-- 子组件(Category.vue) -->
<template>
  <div class="category">
    <!-- slot是插槽:父传了内容就显示传的,没传就显示默认内容 -->
    <slot>插槽默认内容(父组件没传时显示)</slot>
  </div>
</template>
2. 具名插槽(多区域自定义)
当子组件有多个自定义区域(比如卡片的"头部""底部"),用name区分插槽
bash
<!-- 父组件(App.vue) -->
<<template>
<div>
<Category>
<!-- 方式1:slot属性(旧写法) -->
<template slot="center">
<div>我是中间区域的内容</div>
</template>
<!-- 方式2:v-slot:name(新写法,推荐) -->
<template v-slot:footer>
<div>我是底部区域的内容</div>
</template>
</Category>
</div>
</template>
<!-- 子组件(Category.vue) -->
<template>
<div class="category">
<!-- 命名插槽:center -->
<slot name="center">默认中间内容</slot>
<!-- 命名插槽:footer -->
<slot name="footer">默认底部内容</slot>
</div>
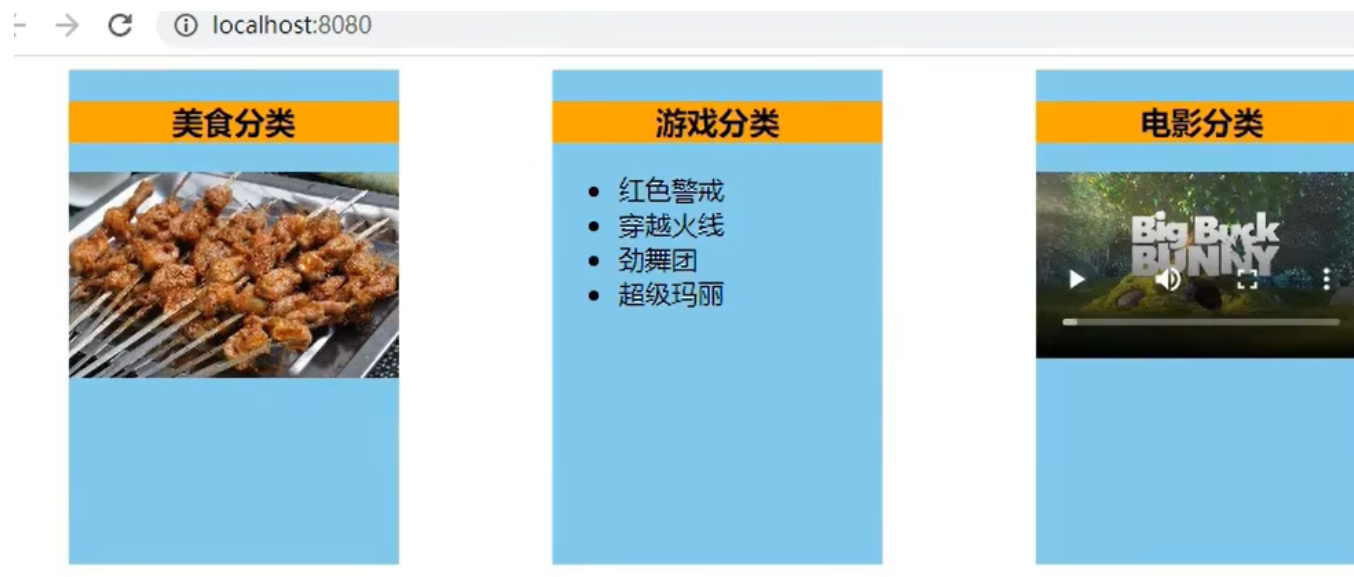
</template>3. 作用域插槽(子传数据,父自定义结构)
核心场景:数据在子组件里,但父组件想自定义数据的展示形式(比如子组件有游戏列表,父组件想分别用ul、h4展示)
bash
<!-- 子组件(Category.vue) -->
<template>
  <div class="category">
    <!-- 把子组件的games数据传给父组件(:games="games") -->
    <slot :games="games"></slot>
  </div>
</template>

<script>
export default {
  name: 'Category',
  data() {
    return {
      games: ['红色警戒', '穿越火线', '劲舞团', '超级玛丽'] // 子组件的私有数据
    }
  }
}
</script>


<!-- 父组件(App.vue) -->
<template>
  <div>
    <!-- 方式1:scope接收子组件传的参数 -->
    <Category>
      <template scope="scopeData">
        <!-- 父自定义:用ul展示数据 -->
        <ul>
          <li v-for="g in scopeData.games" :key="g">{{ g }}</li>
        </ul>
      </template>
    </Category>

    <!-- 方式2:slot-scope(旧写法,兼容用) -->
    <Category>
      <template slot-scope="scopeData">
        <!-- 父自定义:用h4展示数据 -->
        <h4 v-for="g in scopeData.games" :key="g">{{ g }}</h4>
      </template>
    </Category>
  </div>
</template>
3.3 插槽的实际应用场景
bash
<!-- 场景1:可配置的按钮组件 -->
<!-- Button.vue -->
<template>
  <button :class="['btn', type]">
    <slot>按钮</slot>  <!-- 默认文本 -->
  </button>
</template>

<!-- 使用 -->
<Button type="primary">提交</Button>
<Button type="danger">
  <i class="icon-delete"></i> 删除
</Button>

<!-- 场景2:可复用的模态框 -->
<!-- Modal.vue -->
<template>
  <div v-if="visible" class="modal">
    <div class="modal-content">
      <div class="modal-header">
        <slot name="header">
          <h3>提示</h3>
        </slot>
        <button @click="$emit('close')">×</button>
      </div>
      <div class="modal-body">
        <slot></slot>
      </div>
      <div class="modal-footer">
        <slot name="footer">
          <button @click="$emit('confirm')">确认</button>
          <button @click="$emit('close')">取消</button>
        </slot>
      </div>
    </div>
  </div>
</template>
3.4 插槽核心总结
| 类型 | 核心特点 | 使用场景 |
|---|---|---|
| 默认插槽 | 无 name,单个自定义区域 | 子组件只有 1 处需要自定义 |
| 具名插槽 | 有 name,多个自定义区域 | 子组件有多处需要自定义 |
| 作用域插槽 | 子传数据给父,父自定义数据展示结构 | 数据在子、结构在父 |
四、Vuex:集中式状态管理(多组件共享数据)
为什么需要Vuex?
- 随着应用变大,组件间共享状态变得复杂:
- props层层传递:深度嵌套组件通信困难
- 事件总线混乱:难以追踪状态变化
- 状态不一致:不同组件可能修改同一状态
4.1 什么是 Vuex?
Vuex 是 Vue 的 "全局数据仓库 ",专门管理多个组件共享的数据(比如用户登录态、购物车、全局计数器),所有组件都能读写这个仓库的数据,不用再挨个组件传值。
何时使用Vuex?
- ✅ 需要共享的状态:用户信息、购物车、主题设置
- ✅ 需要跨组件通信:多个组件需要同步状态
- ✅ 需要持久化:登录状态、用户偏好
- ❌ 局部状态:单个组件内部的状态(使用组件data)
- ❌ 简单父子通信(使用props和事件)
Vuex 核心流程(餐饮比喻)
- State:数据仓库(后厨的食材);
- Mutations:修改数据的唯一入口(大厨,只能同步操作);
- Actions:处理业务逻辑(服务员,可异步操作,最终找大厨);
- Dispatch:组件通知服务员(this.$store.dispatch());
- Commit:服务员通知大厨(context.commit())。
4.2 搭建 Vuex 环境(Vue2 用 Vuex3)
bash
# 安装Vuex3(Vue2专用,Vue3用Vuex4)
npm i vuex@3
第一步:创建 src/store/index.js(核心文件)
bash
// 1. 引入Vue和Vuex
import Vue from 'vue'
import Vuex from 'vuex'

// 2. 安装Vuex插件
Vue.use(Vuex)

// 3. 准备核心模块
const actions = {} // 处理业务逻辑
const mutations = {} // 修改State
const state = {} // 存储数据

// 4. 创建并暴露Store
export default new Vuex.Store({
  actions,
  mutations,
  state
})
第二步:在 main.js 中注册 Store
bash
import Vue from 'vue'
import App from './App.vue'
import store from './store' // 引入store

Vue.config.productionTip = false

new Vue({
  el: '#app',
  render: h => h(App),
  store // 全局注册:所有组件都能通过this.$store访问
})
4.3 Vuex 基本使用(求和案例)
第一步:完善 store/index.js
bash
import Vue from 'vue'
import Vuex from 'vuex'
Vue.use(Vuex)

// 1. Actions:处理业务逻辑(异步/条件判断)
const actions = {
  // 奇数时才加
  addOdd(context, value) {
    if (context.state.sum % 2) {
      context.commit('ADD', value) // 通知Mutations
    }
  },
  // 延迟500ms加(异步)
  addWait(context, value) {
    setTimeout(() => {
      context.commit('ADD', value)
    }, 500)
  }
}

// 2. Mutations:修改State数据(只能同步)
const mutations = {
  ADD(state, value) {
    state.sum += value
  },
  SUBTRACT(state, value) {
    state.sum -= value
  }
}

// 3. State:存储共享数据,应用的所有状态集中在这里
const state = {
  sum: 0 // 初始求和为0
}

// 4. 暴露Store
export default new Vuex.Store({
  actions,
  mutations,
  state
})
第二步:组件中使用 Vuex(Count.vue)
bash
<template>
  <div>
    <h1>当前求和:{{ $store.state.sum }}</h1>
    <select v-model.number="n">
      <option value="1">1</option>
      <option value="2">2</option>
      <option value="3">3</option>
    </select>
    <button @click="increment">+</button>
    <button @click="decrement">-</button>
    <button @click="incrementOdd">奇数再加</button>
    <button @click="incrementWait">延迟加</button>
  </div>
</template>

<script>
export default {
  name: 'Count',
  data() {
    return { n: 1 } // 用户选择的数字
  },
  methods: {
    // 无业务逻辑:直接操作Mutations
    increment() {
      this.$store.commit('ADD', this.n)
    },
    decrement() {
      this.$store.commit('SUBTRACT', this.n)
    },
    // 有业务逻辑/异步:先操作Actions
    incrementOdd() {
      this.$store.dispatch('addOdd', this.n)
    },
    incrementWait() {
      this.$store.dispatch('addWait', this.n)
    }
  }
}
</script>
4.4 getters 配置项:数据加工
当 State 数据需要 "加工后使用 "(比如求和结果 ×10),用 getters(类似组件的计算属性)。
第一步:store/index.js 中添加 getters
bash
// ...其他代码不变
const getters = {
  bigSum(state) {
    return state.sum * 10 // 求和结果×10
  }
}

// 暴露Store时加入getters
export default new Vuex.Store({
  actions,
  mutations,
  state,
  getters // 新增
})
第二步:组件中使用 getters
bash
<!-- 直接通过$store.getters.xxx访问 -->
<h1>求和×10:{{ $store.getters.bigSum }}</h1>
4.5 四个 map 方法:简化代码
手动写$store.state.sum/$store.commit()太繁琐,Vuex 提供 4 个 map 方法,map函数让我们可以像使用本地数据一样使用Vuex,帮我们快速生成代码。
核心用法(Count.vue)
bash
<template>
  <div>
    <h1>当前求和:{{ sum }}</h1>
    <h1>求和×10:{{ bigSum }}</h1>
    <button @click="increment(n)">+</button>
    <button @click="decrement(n)">-</button>
    <button @click="addOdd(n)">奇数再加</button>
    <button @click="addWait(n)">延迟加</button>
  </div>
</template>

<script>
// 引入4个map方法
import { mapState, mapGetters, mapMutations, mapActions } from 'vuex'

export default {
  name: 'Count',
  data() {
    return { n: 1 }
  },
  // 1. mapState + mapGetters:生成计算属性
  computed: {
    // mapState:映射State数据(数组写法,名称一致)
    ...mapState(['sum']),
    // mapGetters:映射getters数据
    ...mapGetters(['bigSum']),

    // 名称不一致用对象写法:...mapState({ 别名: '原名称' })
    // ...mapState({ heji: 'sum' })
  },
  // 2. mapMutations + mapActions:生成方法
  methods: {
    // mapMutations:映射Mutations方法
    ...mapMutations(['ADD', 'SUBTRACT']),
    // mapActions:映射Actions方法
    ...mapActions(['addOdd', 'addWait']),

    // 封装方法,传递参数n
    increment(n) { this.ADD(n) },
    decrement(n) { this.SUBTRACT(n) }
  }
}
</script>
4.6 模块化 + 命名空间(进阶:分类管理数据)
当项目数据多(比如 "求和数据""用户数据"),用模块化分类管理,代码更清晰。
第一步:修改 store/index.js
bash
import Vue from 'vue'
import Vuex from 'vuex'
Vue.use(Vuex)

// 模块1:求和相关
const countAbout = {
  namespaced: true, // 开启命名空间
  state: { sum: 0, x: 1 },
  mutations: { ADD(state, value) { state.sum += value } },
  actions: { addOdd(context, value) { /* 业务逻辑 */ } },
  getters: { bigSum(state) { return state.sum * 10 } }
}

// 模块2:用户相关
const personAbout = {
  namespaced: true, // 开启命名空间
  state: { list: ['张三', '李四'] },
  mutations: { ADD_PERSON(state, value) { state.list.push(value) } },
  actions: { /* 业务逻辑 */ }
}

// 注册模块
export default new Vuex.Store({
  modules: {
    countAbout, // 求和模块
    personAbout // 用户模块
  }
})
第二步:组件中使用模块化数据
bash
<script>
import { mapState, mapGetters, mapMutations, mapActions } from 'vuex'

export default {
  computed: {
    // 方式1:直接读取(模块名.数据名)
    sum() { return this.$store.state.countAbout.sum },
    // 方式2:mapState(指定模块名)
    ...mapState('countAbout', ['sum', 'x']),

    // getters读取(方式1:字符串拼接)
    bigSum() { return this.$store.getters['countAbout/bigSum'] },
    // 方式2:mapGetters
    ...mapGetters('countAbout', ['bigSum'])
  },
  methods: {
    // commit(方式1:模块名/方法名)
    add() { this.$store.commit('countAbout/ADD', 1) },
    // 方式2:mapMutations(指定模块名)
    ...mapMutations('countAbout', { increment: 'ADD' }),

    // dispatch(方式1:模块名/方法名)
    addOdd() { this.$store.dispatch('countAbout/addOdd', 1) },
    // 方式2:mapActions
    ...mapActions('countAbout', ['addOdd'])
  }
}
</script>
五、最佳实践与常见问题
1. 组织store结构
bash
store/
├── index.js          # 主文件,组装模块
├── modules/          # 模块目录
│   ├── user.js       # 用户相关状态
│   ├── cart.js       # 购物车状态
│   ├── products.js   # 商品状态
│   └── order.js      # 订单状态
├── getters.js        # 全局getters
└── mutation-types.js # 常量定义(可选)
2. 错误处理模式
bash
// store/modules/user.js
actions: {
  async login({ commit }, credentials) {
    try {
      commit('SET_LOADING', true)
      const response = await axios.post('/api/login', credentials)

      if (response.data.success) {
        commit('SET_USER', response.data.user)
        return { success: true, data: response.data }
      } else {
        commit('SET_ERROR', response.data.message)
        return { success: false, error: response.data.message }
      }
    } catch (error) {
      commit('SET_ERROR', error.message)
      return { success: false, error: error.message }
    } finally {
      commit('SET_LOADING', false)
    }
  }
}
3. 调试技巧
bash
// 在组件中
this.$store.subscribe((mutation, state) => {
  console.log('Mutation:', mutation.type)
  console.log('Payload:', mutation.payload)
  console.log('State:', state)
})

// 浏览器中
// 1. 安装Vue DevTools
// 2. 查看Vuex面板
// 3. 使用时间旅行调试
六、实战:电商应用状态管理
完整示例:商品列表与购物车
bash
<!-- ProductList.vue -->
<template>
  <div class="product-list">
    <div v-for="product in products" :key="product.id" class="product-card">
      <h3>{{ product.name }}</h3>
      <p>价格:¥{{ product.price }}</p>
      <p>库存:{{ product.stock }}</p>
      <button
        @click="addToCart(product)"
        :disabled="!product.stock || isInCart(product.id)"
      >
        {{ isInCart(product.id) ? '已加入' : '加入购物车' }}
      </button>
    </div>
  </div>
</template>

<script>
import { mapState, mapGetters, mapActions } from 'vuex'

export default {
  computed: {
    ...mapState('products', ['list', 'loading']),
    ...mapState('cart', ['items']),

    products() {
      return this.list.filter(p => p.stock > 0)
    }
  },

  methods: {
    ...mapActions('cart', ['addItem']),
    ...mapGetters('cart', ['isItemInCart']),

    isInCart(productId) {
      return this.items.some(item => item.id === productId)
    },

    addToCart(product) {
      this.addItem(product)
      this.$message.success(`已添加 ${product.name}`)
    }
  },

  created() {
    this.$store.dispatch('products/fetchProducts')
  }
}
</script>
购物车组件
bash
<!-- ShoppingCart.vue -->
<template>
  <div class="shopping-cart">
    <h2>购物车 ({{ cartCount }})</h2>

    <div v-if="cartItems.length === 0" class="empty-cart">
      购物车是空的
    </div>

    <div v-else>
      <div v-for="item in cartItems" :key="item.id" class="cart-item">
        <div class="item-info">
          <h4>{{ item.name }}</h4>
          <p>单价:¥{{ item.price }}</p>
        </div>

        <div class="item-quantity">
          <button @click="decreaseQuantity(item.id)">-</button>
          <span>{{ item.quantity }}</span>
          <button
            @click="increaseQuantity(item.id)"
            :disabled="item.quantity >= item.stock"
          >+</button>
        </div>

        <div class="item-total">
          ¥{{ item.price * item.quantity }}
        </div>

        <button @click="removeItem(item.id)" class="remove-btn">
          删除
        </button>
      </div>

      <div class="cart-summary">
        <p>总计:¥{{ cartTotal }}</p>
        <button @click="checkout" :disabled="!isLoggedIn">
          {{ isLoggedIn ? '去结算' : '请先登录' }}
        </button>
      </div>
    </div>
  </div>
</template>

<script>
import { mapState, mapGetters, mapActions } from 'vuex'

export default {
  computed: {
    ...mapState('cart', ['items']),
    ...mapState('user', ['info']),
    ...mapGetters('cart', ['totalCount', 'totalPrice']),

    cartItems() {
      return this.items
    },
    cartCount() {
      return this.totalCount
    },
    cartTotal() {
      return this.totalPrice
    },
    isLoggedIn() {
      return !!this.info
    }
  },

  methods: {
    ...mapActions('cart', [
      'updateQuantity',
      'removeItem',
      'clearCart'
    ]),

    increaseQuantity(productId) {
      const item = this.items.find(i => i.id === productId)
      if (item && item.quantity < item.stock) {
        this.updateQuantity({ productId, quantity: item.quantity + 1 })
      }
    },

    decreaseQuantity(productId) {
      const item = this.items.find(i => i.id === productId)
      if (item && item.quantity > 1) {
        this.updateQuantity({ productId, quantity: item.quantity - 1 })
      }
    },

    checkout() {
      this.$store.dispatch('order/createOrder', this.items)
        .then(() => {
          this.clearCart()
          this.$router.push('/orders')
        })
    }
  }
}
</script>
七、总结
核心要点回顾
- Ajax 代理 :Vue 脚手架配置代理分单代理(简单)和多代理(灵活),核心是
pathRewrite去掉前缀、changeOrigin伪装请求来源; - 插槽:默认插槽传单个 HTML、具名插槽传多个 HTML、作用域插槽实现 "子传数据,父定结构";
- Vuex :
State存数据、Mutations改数据(同步)、Actions处理业务(异步)、Getters加工数据;- 四个 map 方法简化代码,模块化需开启
namespaced,访问时加模块名。