MCP学习笔记
最近由于组织架构变动,负责AI相关工具建设,学习一下MCP相关的知识
1、MCP介绍
1.1、什么是MCP
MCP(Model Context Protocol,模型上下文协议)是 Anthropic 开发的一个开放标准协议,用于让 AI 助手能够安全地连接各种外部数据源和工具。
- 为 AI 应用提供统一的方式来访问数据和工具
- 类似于 USB-C 接口 - 一个标准协议连接多种服务
- 让 AI模型 能够访问文件系统、数据库、API 等外部资源
1.2、MCP组成部分
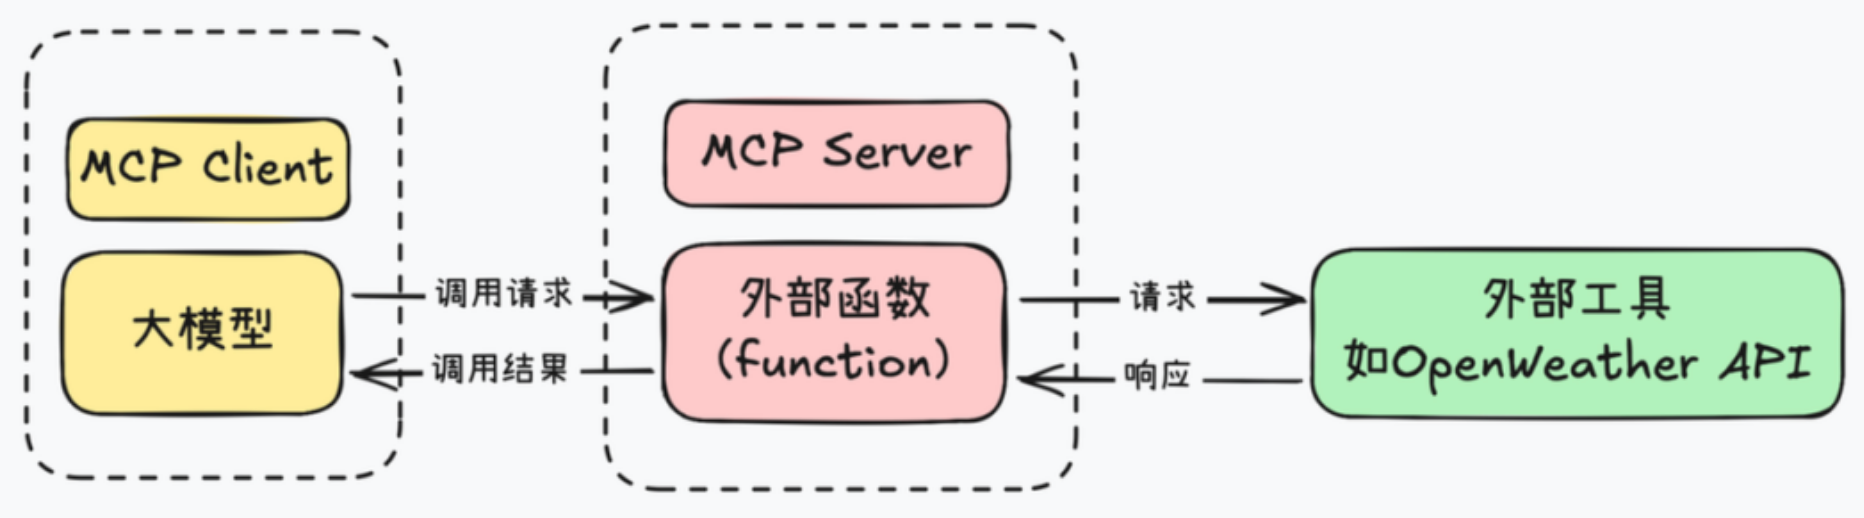
MCP Server(服务器)
提供特定功能的服务
- 文件系统访问
- 数据库查询
- Web 搜索
- 第三方 API 集
MCP Client(客户端)
使用这些服务的应用
- Claude Code CLI
- Claude Desktop
- 其他集成了 MCP 的应用
2、uv
新一代高性能 Python 包管理工具,官网文档:https://docs.astral.sh/uv/
2.1、旧python包管理工具
1、pip
pip 是 Python 官方推荐的包管理器,主要用于安装和卸载 Python 包,支持从 PyPI、Git 仓库、本地目录等多种来源安装
优点
- 广泛使用,社区支持良好
- 简单易用,适合初学者
缺点
- 不支持依赖锁定
- 缺乏虚拟环境和项目管理功能
2、pip-tools
pip-tools 是由 Jazzband 社区维护的工具集,旨在增强 pip 的功能
pip-compile:从requirements.in生成锁定的requirements.txtpip-sync:根据requirements.txt安装或卸载依赖
优点
- 确保项目依赖的一致性
- 与 pip 兼容,易于集成
缺点
- 依赖解析速度较慢
- 功能相对单一,仅处理依赖锁定
3、pipx
pipx 是由 PyPA 维护的工具,专注于在隔离的环境中安装和运行 Python 命令行应用
- 在隔离的虚拟环境中安装 CLI 工具
- 运行一次性命令
优点
- 避免全局污染,隔离性好
- 便于管理和运行 CLI 工具
4、poetry
Poetry 是由 Python 社区开发的项目管理工具,旨在简化依赖管理和打包发布流程
- 使用
pyproject.toml管理项目依赖 - 自动创建和管理虚拟环境
- 构建和发布 Python 包
优点
- 一体化管理项目生命周期
- 使用
pyproject.toml,符合 PEP 518 标准
缺点
- 依赖解析速度较慢
- 对 Python 版本管理支持有限
5、pyenv
pyenv 是由社区开发的工具,用于安装和管理多个 Python 版本
- 安装和切换多个 Python 版本
- 支持全局和本地(每个项目)版本设置
优点
- 支持多个 Python 版本的切换
- 适用于开发和测试不同版本的兼容性
缺点
- 安装新版本需编译,耗时较长
- 不支持 Windows 系统
6、virtualenv
virtualenv 是由社区开发的工具,用于创建隔离的 Python 虚拟环境
- 创建隔离的虚拟环境
- 支持不同项目使用不同的依赖
优点
- 轻量级,创建环境速度快
缺点
- 不包含依赖管理功能
- 需要与 pip 或 pip-tools 结合使用
2.2、什么是uv
由 Astral 公司用 Rust 开发的高性能Python 包管理工具,旨在提供比传统 pip 更快的包安装和依赖管理体验,并整合了多个传统 Python 工具的核心功能,实现了 "一个工具搞定包管理、环境管理、版本管理、打包发布" 的一站式体验
- 比 pip 快 10-100 倍
- 锁文件保证依赖一致性
- 单一工具替代 pip、pip-tools、pipx、poetry、pyenv、virtualenv
- 完全兼容 pip 和 PyPI
- 包管理 + 项目管理 + Python 版本管理
2.3、安装uv
1、安装
macOS/Linux
shell
# 1、官方安装脚本
curl -LsSf https://astral.sh/uv/install.sh | sh
# 2、Homebrew
brew install uv
# 3、pip
pip install uv
windows
shell
# 1、官方安装脚本
powershell -c "irm https://astral.sh/uv/install.ps1 | iex"
# 2、pip
pip install uv
2、验证
shell
uv -V
uv --version
2.3、使用uv
1、Python 版本管理
安装 Python
shell
# 列出所有可用的 Python 版本(简介版)
uv python list

# 安装指定版本 Python
uv python install 3.14
# 安装多个版本
uv python install 3.11 3.12 3.13

# 卸载 Python 版本
uv python uninstall 3.11

# 列出本地已安装的所有 Python 版本
uv python list --only-installed
设置全局 Python 版本
shell
# 1、使用环境变量(推荐)
vim ~/.zshrc
export UV_PYTHON="3.14"
source ~/.zshrc

# 2、使用全局配置文件
mkdir -p ~/.config/uv
cat > ~/.config/uv/uv.toml << 'EOF'
[python]
# 默认 Python 版本
default = "3.12"
# Python 查找偏好
preference = "managed"  # 优先使用 uv 管理的 Python
EOF
2、项目管理
创建项目
shell
# 创建应用项目
uv init my-app

# 在现有目录初始化
uv initmy-app/
├── .gitignore
├── .python-version # Python 版本锁定
├── main.py
├── pyproject.toml # 项目配置
├── README.md
└── uv.lock # 记录所有依赖的精确版本 类似package-lock.json依赖管理
shell
# 添加生产依赖
uv add requests

# 添加指定版本依赖
uv add "django==5.0"

# 添加开发依赖
uv add pytest --dev

# 移除依赖
uv remove django

# 安装项目所有依赖
uv sync

# 生成/更新锁文件
uv lock
运行项目
如果 project.scripts 发生变动要首先执行 uv sync
.
├── README.md
├── pyproject.toml
├── src
│   └── weather_mcp
│       └── weather
│           ├── __init__.py
│           ├── model.py
│           └── weather.py
└── uv.lock
python
# src/weather_mcp/weather/weather.py
def today_weather():
    return "It's rainy tomorrow!"

def tomorrow_weather():
    return "It's sunny tomorrow!"
python
# src/weather/__init__.py
from .weather import today_weather
from .weather import tomorrow_weather
toml
[project]
name = "xumeng03-mcp"
version = "0.1.0"
description = "Add your description here"
readme = "README.md"
requires-python = ">=3.14"

dependencies = [
    "pydantic>=2.12.5",
    "requests>=2.32.5",
]

[project.scripts]
today_weather = "weather_mcp.weather:today_weather"
tomorrow_weather = "weather_mcp.weather:tomorrow_weather"

[dependency-groups]
dev = [
    "pytest>=9.0.2",
]

[build-system]
requires = ["setuptools>=61.0"]
build-backend = "setuptools.build_meta"

[tool.uv]
index-url = "https://pypi.tuna.tsinghua.edu.cn/simple"
extra-index-url = ["https://mirrors.aliyun.com/pypi/simple/"]
shell
tomorrow_weather
uv run tomorrow_weather
3、工具管理
全局安装和管理 Python 的工具
- 安装在独立的隔离环境中
- 全局可用(任何地方都能运行)
shell
# 安装工具
uv tool install ruff
# 安装指定版本工具
uv tool install "black==24.10.0"

# 查看已安装的工具
uv tool list

# 升级单个工具
uv tool upgrade ruff
# 升级单个工具到指定版本
uv tool install --upgrade "ruff==0.8.5"
# 升级所有工具
uv tool upgrade --all

# 卸载单个工具
uv tool uninstall ruff
# 卸载多个工具
uv tool uninstall black ruff mypy
4、其他
shell
# 清理缓存
uv cache clean
# 构建项目
uv build
3、Pydantic
3.1、Pydantic是什么
Pydantic 是 Python 中最流行的数据验证和设置管理库,使用 Python 类型注解进行运行时数据验证
- 运行时数据验证
- 自动类型转换
- 清晰的错误消息
- JSON 序列化/反序列化
- 高性能
python
from pydantic import BaseModel


class WeatherA:
    def __init__(self, lon, lat):
        self.lon = lon
        self.lat = lat

class WeatherB(BaseModel):
    lon: float
    lat: float
python
from weather_mcp.weather.model import WeatherA, WeatherB

# 类型错误但没有被捕获
def test_weather_a():
    weather = WeatherA(lon="116.4", lat="AAAAA")
    print(weather)

# 抛出验证错误
def test_weather_b():
    weather = WeatherB(lon="116.4", lat="AAAAA")
    print(weather)
3.2、基础用法
1、定义模型(属性)
python
from pydantic import BaseModel


class Weather(BaseModel):
    id: int
    main: str
    description: str
    icon: str
python
from weather_mcp.weather.model import Weather


def test_weather1() -> None:
    weather = Weather(id=802, main="Clouds", description="scattered clouds", icon="03n")
    print(weather)
    weather = Weather(id="802", main="Clouds", description="scattered clouds", icon="03n")
    print(weather)
    weather = Weather(id="undefined", main="Clouds", description="scattered clouds", icon="03n")
    print(weather)
2、定义模型(方法)
python
class Weather(BaseModel):
    id: int = Field(
        default= 1,
        description="id of the weather"
    )
    main: str = Field(
        description="只能包含字母数字和下划线"
    )
    description: str
    icon: str

    def hello(self) -> str:
        return f"Weather: {self.main} - {self.description}"

    @classmethod
    def default_id(cls) -> int:
        return cls.model_fields['id'].default
python
def test_weather2() -> None:
    weather = Weather(id=802, main="Clouds", description="scattered clouds", icon="03n")
    print(weather)
    print(weather.hello())
    print(Weather.default_id())
3、从字典和 JSON 创建
python
from weather_mcp.weather.model import Weather


def test_weather3() -> None:
    data = {"id": 802, "main": "Clouds", "description": "scattered clouds", "icon": "03n"}
    weather = Weather(**data)
    print(weather)
    weather = Weather.model_validate(data)
    print(weather)
    data = '{"id": 802, "main": "Clouds", "description": "scattered clouds", "icon": "03n"}'
    weather = Weather.model_validate_json(data)
    print(weather)
4、字段约束
python
# 各个类型的字段约束示例
from pydantic import BaseModel, Field
from typing import Optional

class User(BaseModel):
    # 字符串约束
    username: str = Field(
        min_length=3,
        max_length=20,
        pattern=r'^[a-zA-Z0-9_]+$',
        description="用户名,只能包含字母数字和下划线"
    )

    # 数值约束
    age: int = Field(
        ge=0,      # greater than or equal
        le=150,    # less than or equal
        description="年龄,0-150岁"
    )

    # 浮点数约束
    score: float = Field(
        gt=0.0,    # greater than
        lt=100.0,  # less than
        description="分数,0-100分"
    )

    # 列表约束
    tags: list[str] = Field(
        min_length=1,
        max_length=5,
        description="标签,1-5个"
    )

    # 默认值和示例
    email: str = Field(
        default="user@example.com",
        examples=["alice@example.com", "bob@example.com"]
    )
实际例子
python
from pydantic import BaseModel, Field


class Weather(BaseModel):
    id: int = Field(
        ge=-100,
        le=100,
        description="id of the weather"
    )
    main: str = Field(
        min_length=2,
        max_length=20,
        pattern=r'^[a-zA-Z0-9_]+$',
        description="只能包含字母数字和下划线"
    )
    description: str
    icon: str
python
def test_weather4() -> None:
    data = {"id": 100, "main": "Clouds", "description": "scattered clouds", "icon": "03n"}
    weather = Weather(**data)
    print(weather)
5、验证器
内置验证器
python
from pydantic import (
    BaseModel,
    EmailStr,      # 邮箱验证
    HttpUrl,       # URL 验证
    IPvAnyAddress, # IP 地址验证
    Json,          # JSON 字符串
    constr,        # 约束字符串
    conint,        # 约束整数
    confloat,      # 约束浮点数
)
from typing import List

# 需要安装: uv add "pydantic[email]"

class UserProfile(BaseModel):
    # 邮箱验证
    email: EmailStr

    # URL 验证
    website: HttpUrl

    # IP 地址
    ip_address: IPvAnyAddress

    # 约束字符串(旧式写法,仍然支持)
    username: constr(min_length=3, max_length=20, pattern=r'^[a-zA-Z0-9_]+$')

    # 约束整数
    age: conint(ge=0, le=150)

    # 约束浮点数
    rating: confloat(ge=0.0, le=5.0)

    # JSON 字符串
    metadata: Json[dict]
自定义验证器
python
class Weather(BaseModel):
    id: int = Field(
        ge=-100,
        le=100,
        description="id of the weather"
    )
    main: str = Field(
        min_length=2,
        max_length=20,
        pattern=r'^[a-zA-Z0-9_]+$',
        description="只能包含字母数字和下划线"
    )
    description: str
    icon: str

    @field_validator('icon')
    # cls 是类本身,v 是被验证的值
    def validate_icon(cls, v: str) -> str:
        if not v.startswith(('0', '1', '2', '3', '4', '5', '6', '7', '8', '9')):
            raise ValueError('icon must start with a digit')
        return v

    # 对多个字段验证的时候 会对每个字段分别调用该方法
    @field_validator('description', 'icon')
    def validate_non_empty(cls, v: str) -> str:
        if not v:
            raise ValueError('must not be empty')
        return v
6、嵌套模型
python
from pydantic import BaseModel, Field, field_validator


class Coord(BaseModel):
    lon: float = Field(
        description="Longitude in decimal degrees",
    )
    lat: float = Field(
        description="Latitude in decimal degrees",
    )


class Weather(BaseModel):
    id: int = Field(
        description="id of the weather"
    )
    main: str = Field(
        description="只能包含字母数字和下划线"
    )
    description: str
    icon: str


class Main(BaseModel):
    temp: float
    feels_like: float
    temp_min: float
    temp_max: float
    pressure: int
    humidity: int
    sea_level: int
    grnd_level: int


class Wind(BaseModel):
    speed: float
    deg: int
    gust: float


class Clouds(BaseModel):
    all: int


class sys(BaseModel):
    country: str
    sunrise: int
    sunset: int


class OpenWeatherMap(BaseModel):
    coord: Coord
    weather: list[Weather]
    base: str
    main: Main
    visibility: int
    wind: Wind
    clouds: Clouds
    dt: int
    sys: sys
    timezone: int
    id: int
    name: str
    cod: int
python
from weather_mcp.weather.model import Weather, OpenWeatherMap


def test_weather5() -> None:
    data = {
    "coord": {
        "lon": 121.5057,
        "lat": 31.316
    },
    "weather": [
        {
            "id": 802,
            "main": "Clouds",
            "description": "scattered clouds",
            "icon": "03n"
        }
    ],
    "base": "stations",
    "main": {
        "temp": 274.53,
        "feels_like": 269.46,
        "temp_min": 274.53,
        "temp_max": 274.53,
        "pressure": 1034,
        "humidity": 51,
        "sea_level": 1034,
        "grnd_level": 1034
    },
    "visibility": 10000,
    "wind": {
        "speed": 5.98,
        "deg": 352,
        "gust": 7.72
    },
    "clouds": {
        "all": 42
    },
    "dt": 1768998391,
    "sys": {
        "country": "CN",
        "sunrise": 1768949512,
        "sunset": 1768987082
    },
    "timezone": 28800,
    "id": 1787375,
    "name": "Yangpu",
    "cod": 200
}
    openweathermap = OpenWeatherMap(**data)
    print(openweathermap)
7、模型配置
python
from pydantic import BaseModel, Field, field_validator, ConfigDict


class Coord(BaseModel):
    lon: float = Field(
        description="Longitude in decimal degrees",
    )
    lat: float = Field(
        description="Latitude in decimal degrees",
    )


class Weather(BaseModel):
    id: int = Field(
        description="id of the weather"
    )
    main: str = Field(
        description="只能包含字母数字和下划线"
    )
    description: str
    icon: str


class Main(BaseModel):
    temp: float
    feels_like: float
    temp_min: float
    temp_max: float
    pressure: int
    humidity: int
    sea_level: int
    grnd_level: int


class Wind(BaseModel):
    speed: float
    deg: int
    gust: float


class Clouds(BaseModel):
    all: int


class sys(BaseModel):
    country: str
    sunrise: int
    sunset: int


class OpenWeatherMap(BaseModel):
    model_config = ConfigDict(
        # 字段验证
        validate_assignment=True,  # 赋值时也验证
        str_strip_whitespace=True,  # 自动去除字符串空白
        str_to_lower=False,  # 不自动转小写

        # JSON 配置
        populate_by_name=True,  # 允许使用字段别名

        # 额外字段处理
        extra='forbid',  # 'forbid', 'allow', 'ignore'

        # 性能优化
        use_enum_values=True,  # 使用枚举值而非枚举对象

        # 序列化配置
        json_schema_extra={
            "examples": [
                {
                    "id": 1,
                    "name": "Alice",
                    "email": "alice@example.com"
                }
            ]
        }
    )
    coord: Coord
    weather: list[Weather]
    base: str
    main: Main
    visibility: int
    wind: Wind
    clouds: Clouds
    dt: int
    sys: sys
    timezone: int
    id: int
    name: str
    cod: int
8、环境变量
txt
MYAPP_APP_NAME=My_Awesome_App
MYAPP_DEBUG=true
MYAPP_DATABASE_URL=postgresql://localhost/mydb
MYAPP_API_KEY=secret-key-123
MYAPP_ALLOWED_HOSTS=["localhost","example.com","*.example.org"]
python
from pydantic_settings import BaseSettings, SettingsConfigDict


class Settings(BaseSettings):
    # 应用配置
    app_name: str = "My Application"
    debug: bool = False

    # 数据库配置
    database_url: str = "sqlite:///./test.db"
    database_pool_size: int = 5

    # API 配置
    api_key: str = "default"
    api_timeout: int = 30

    # 服务器配置
    host: str = "0.0.0.0"
    port: int = 8000

    # 列表配置(逗号分隔)
    allowed_hosts: list[str] = ["localhost"]

    # 配置来源
    model_config = SettingsConfigDict(
        env_file='.env',            # 从 .env 文件读取
        env_file_encoding='utf-8',
        case_sensitive=False,       # 环境变量不区分大小写
        env_prefix='MYAPP_',        # 环境变量前缀
    )
python
from weather_mcp.setting.setting import Settings


def test_setting() -> None:
    setting = Settings()
    print(setting)
9、序列化和反序列化
python
from weather_mcp.weather.model import Weather, OpenWeatherMap


def test_weather6() -> None:
    data = {
        "coord": {
            "lon": 121.5057,
            "lat": 31.316
        },
        "weather": [
            {
                "id": 802,
                "main": "Clouds",
                "description": "scattered clouds",
                "icon": "03n"
            }
        ],
        "base": "stations",
        "main": {
            "temp": 274.53,
            "feels_like": 269.46,
            "temp_min": 274.53,
            "temp_max": 274.53,
            "pressure": 1034,
            "humidity": 51,
            "sea_level": 1034,
            "grnd_level": 1034
        },
        "visibility": 10000,
        "wind": {
            "speed": 5.98,
            "deg": 352,
            "gust": 7.72
        },
        "clouds": {
            "all": 42
        },
        "dt": 1768998391,
        "sys": {
            "country": "CN",
            "sunrise": 1768949512,
            "sunset": 1768987082
        },
        "timezone": 28800,
        "id": 1787375,
        "name": "Yangpu",
        "cod": 200
    }
    openweathermap = OpenWeatherMap(**data)
    print(openweathermap.model_dump())
    print(openweathermap.model_dump_json())
    print(OpenWeatherMap.model_validate_json(openweathermap.model_dump_json()))
10、高级特性-泛型
python
from pydantic import BaseModel
from typing import TypeVar, Generic

T = TypeVar('T')


class Response(BaseModel, Generic[T]):
    code: int
    message: str
    data: T


class User(BaseModel):
    id: int
    name: str


class Product(BaseModel):
    id: int
    name: str
    price: float
python
from weather_mcp.response.response import Response, User, Product


def test_response1():
    user_response = Response[User](
        code=200,
        message="Success",
        data=User(id=1, name="Alice")
    )
    print(user_response)
    product_response = Response[Product](
        code=200,
        message="Success",
        data=Product(id=101, name="Laptop", price=999.99)
    )
    print(product_response)
11、高级特性-继承
python
from pydantic import BaseModel
from typing import TypeVar, Generic

T = TypeVar('T')


class Response(BaseModel, Generic[T]):
    code: int
    message: str
    data: T


class User(BaseModel):
    id: int
    name: str


class VipUser(User):
    level: int


class Product(BaseModel):
    id: int
    name: str
    price: float
python
from weather_mcp.response.response import Response, User, Product, VipUser


def test_response2():
    vip_user_response = Response[VipUser](
        code=200,
        message="Success",
        data=VipUser(id=1, name="Alice", level=5)
    )
    print(vip_user_response)
12、高级特性-计算属性
python
from pydantic import BaseModel, computed_field
from typing import TypeVar, Generic

T = TypeVar('T')


class Response(BaseModel, Generic[T]):
    code: int
    message: str
    data: T


class User(BaseModel):
    id: int
    name: str


class VipUser(User):
    level: int

    @computed_field
    @property
    def full_name(self) -> str:
        return f"{self.name} (VIP Level {self.level})"


class Product(BaseModel):
    id: int
    name: str
    price: float
python
from weather_mcp.response.response import Response, User, Product, VipUser


def test_response3():
    vip_user_response = Response[VipUser](
        code=200,
        message="Success",
        data=VipUser(id=1, name="Alice", level=5)
    )
    print(vip_user_response.data.full_name)