引言:编译期的魔法
还记得第一次使用 @Parcelize 注解时的感觉吗?
kotlin
@Parcelize
data class User(val name: String, val age: Int) : Parcelable
只需要一个注解,编译器就自动帮你生成了 Parcelable 的所有模板代码。这不是运行时反射,而是编译期代码生成------编译器插件的魔法。
什么是编译器插件和注解处理器?
| 技术 | 时机 | 能力 | 典型应用 |
|---|---|---|---|
| 注解处理器 | 编译期 | 读取注解,生成新文件 | Room、Dagger、Glide |
| 编译器插件 | 编译期 | 修改AST,改变代码行为 | Parcelize、Compose、Serialization |
两者都在编译期工作,但编译器插件更强大------它可以修改现有代码,而不只是生成新代码。
为什么要学习编译期元编程?
✅ 优势:
- 性能:零运行时开销,没有反射损耗
- 安全:编译期类型检查,提前发现错误
- 简洁:减少样板代码,提升开发体验
- 强大:可以实现运行时无法做到的功能
🔧 应用场景:
- 自动生成代码(Builder、DTO转换、序列化)
- 自定义编译器检查(禁止某些API、强制命名规范)
- 字节码增强(AOP、性能监控、日志注入)
- DSL支持(IDE提示、语法检查)
💡 提示
本文将带你从零开始构建Kotlin编译器插件和注解处理器,涵盖理论、实战和最佳实践。
Kotlin编译流程
在深入编译器插件之前,我们需要了解Kotlin的编译流程。
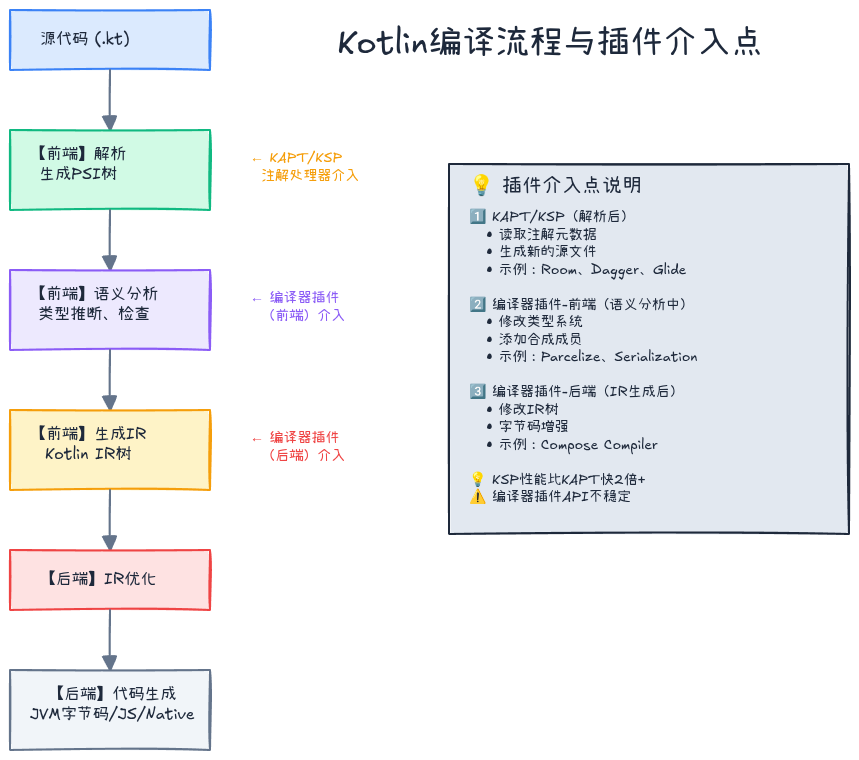
编译阶段
源代码 (.kt)
    ↓
【1. 前端】解析(Parse)
    → 生成PSI(Program Structure Interface)树
    ↓
【2. 前端】语义分析(Semantic Analysis)
    → 类型推断、类型检查
    → 生成Binding Context
    ↓
【3. 前端】生成IR(Intermediate Representation)
    → Kotlin IR树
    ↓
【4. 后端】IR优化
    ↓
【5. 后端】代码生成
    → JVM字节码 (.class)
    → JS代码 (.js)
    → Native二进制 (.kexe)
插件介入点
| 阶段 | 插件类型 | 能力 | 示例 |
|---|---|---|---|
| 解析后 | 注解处理器(KAPT/KSP) | 读取注解,生成新文件 | Room、Dagger |
| 语义分析中 | 编译器插件(前端) | 修改类型系统 | Parcelize、Serialization |
| IR生成后 | 编译器插件(后端) | 修改字节码逻辑 | Compose编译器插件 |
⚠️ 注意
KAPT(Kotlin Annotation Processing Tool)基于Java的APT(Annotation Processing Tool),需要将Kotlin代码转换为Java存根(stub),效率较低。KSP(Kotlin Symbol Processing)是Kotlin原生的注解处理方案,性能更好。
KSP vs KAPT:注解处理器对比
KAPT(Kotlin Annotation Processing Tool)
工作原理:
- 将Kotlin代码转换为Java存根(只保留签名,丢失实现细节)
- 调用Java注解处理器处理存根
- 生成新的Java/Kotlin代码
- 重新编译
缺点:
- 慢:需要生成存根,编译两次
- 信息丢失:Kotlin特性(默认参数、扩展函数等)在存根中丢失
- 维护成本高:依赖于Java APT
KSP(Kotlin Symbol Processing)
工作原理:
- 直接访问Kotlin编译器的符号(Symbol)
- 通过KSP API读取类型信息
- 生成新代码
- 编译一次完成
优势:
- 快:比KAPT快2倍以上
- 完整:完全理解Kotlin语义
- 现代化:专为Kotlin设计
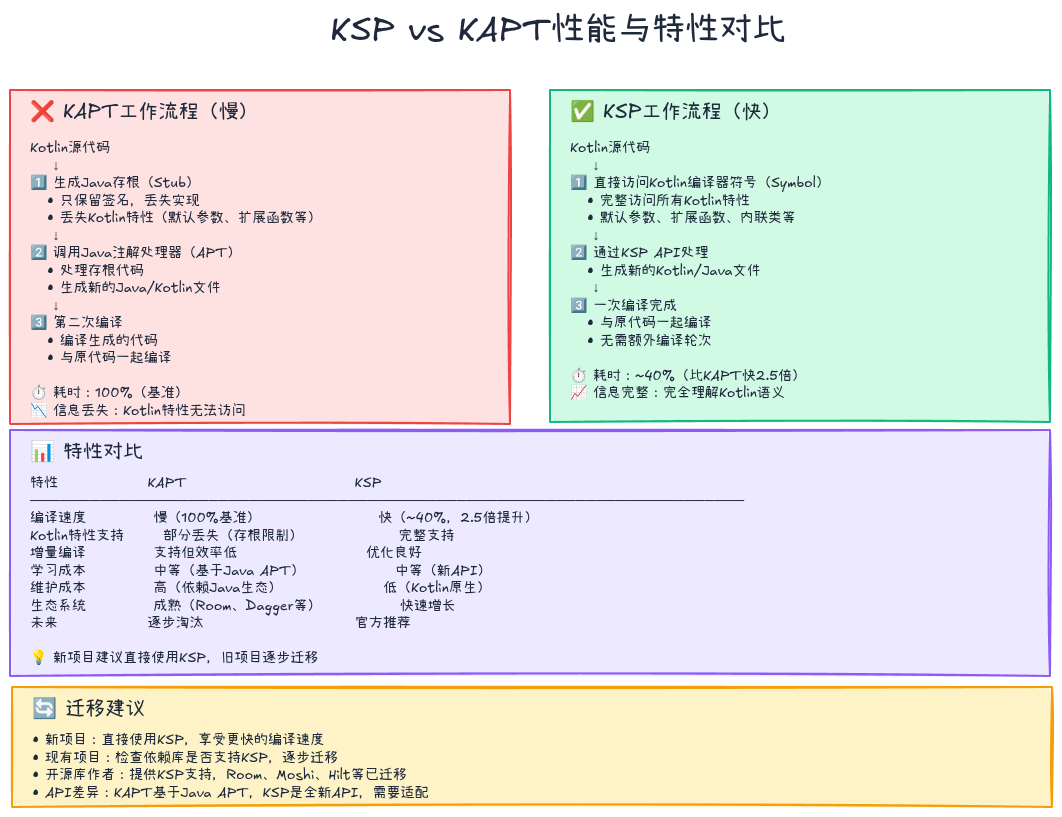
迁移建议
| 场景 | 建议 |
|---|---|
| 新项目 | 直接使用KSP |
| 现有KAPT项目 | 逐步迁移到KSP |
| 依赖KAPT的库 | 等待库作者支持KSP |
KSP实战:构建自定义注解处理器
让我们通过一个实际案例学习KSP:自动生成Builder模式代码。
目标
kotlin
// 输入:使用注解
@AutoBuilder
data class User(
    val name: String,
    val age: Int,
    val email: String?
)

// 输出:自动生成Builder
class UserBuilder {
    private var name: String? = null
    private var age: Int? = null
    private var email: String? = null

    fun name(value: String) = apply { name = value }
    fun age(value: Int) = apply { age = value }
    fun email(value: String?) = apply { email = value }

    fun build(): User {
        requireNotNull(name) { "name is required" }
        requireNotNull(age) { "age is required" }
        return User(name!!, age!!, email)
    }
}

// 使用
val user = UserBuilder()
    .name("Alice")
    .age(30)
    .email("alice@example.com")
    .build()
步骤1:添加依赖
kotlin
// build.gradle.kts
plugins {
    id("com.google.devtools.ksp") version "1.9.0-1.0.13"
}

dependencies {
    implementation("com.google.devtools.ksp:symbol-processing-api:1.9.0-1.0.13")
}

// 在需要使用注解的模块
dependencies {
    ksp(project(":annotation-processor"))
}
步骤2:定义注解
kotlin
// annotations/src/main/kotlin/AutoBuilder.kt
@Target(AnnotationTarget.CLASS)
@Retention(AnnotationRetention.SOURCE)
annotation class AutoBuilder
步骤3:实现KSP处理器
kotlin
// processor/src/main/kotlin/AutoBuilderProcessor.kt
import com.google.devtools.ksp.processing.*
import com.google.devtools.ksp.symbol.*
import com.google.devtools.ksp.validate
import java.io.OutputStream

class AutoBuilderProcessor(
    private val codeGenerator: CodeGenerator,
    private val logger: KSPLogger
) : SymbolProcessor {

    override fun process(resolver: Resolver): List<KSAnnotated> {
        // 1. 查找所有标注了@AutoBuilder的类
        val symbols = resolver.getSymbolsWithAnnotation("com.example.AutoBuilder")
        val unprocessed = symbols.filterIsInstance<KSClassDeclaration>()
            .filter { !it.validate() }  // 过滤掉无效的符号
            .toList()

        // 2. 处理每个类
        symbols.filterIsInstance<KSClassDeclaration>()
            .filter { it.validate() }
            .forEach { classDeclaration ->
                generateBuilder(classDeclaration)
            }

        return unprocessed
    }

    private fun generateBuilder(classDeclaration: KSClassDeclaration) {
        val className = classDeclaration.simpleName.asString()
        val packageName = classDeclaration.packageName.asString()
        val builderClassName = "${className}Builder"

        // 3. 获取主构造函数的参数
        val constructor = classDeclaration.primaryConstructor
            ?: run {
                logger.error("No primary constructor found", classDeclaration)
                return
            }

        val parameters = constructor.parameters

        // 4. 生成Builder代码
        val fileContent = buildString {
            appendLine("package $packageName")
            appendLine()
            appendLine("class $builderClassName {")

            // 生成属性
            parameters.forEach { param ->
                val paramName = param.name!!.asString()
                val paramType = param.type.resolve().declaration.qualifiedName!!.asString()
                val isNullable = param.type.resolve().isMarkedNullable
                val nullableMark = if (isNullable) "?" else "?"
                appendLine("    private var $paramName: $paramType$nullableMark = null")
            }
            appendLine()

            // 生成setter方法
            parameters.forEach { param ->
                val paramName = param.name!!.asString()
                val paramType = param.type.resolve().declaration.qualifiedName!!.asString()
                val isNullable = param.type.resolve().isMarkedNullable
                val nullableMark = if (isNullable) "?" else ""
                appendLine("    fun $paramName(value: $paramType$nullableMark) = apply { $paramName = value }")
            }
            appendLine()

            // 生成build方法
            appendLine("    fun build(): $className {")
            parameters.forEach { param ->
                val paramName = param.name!!.asString()
                if (!param.type.resolve().isMarkedNullable) {
                    appendLine("        requireNotNull($paramName) { \"$paramName is required\" }")
                }
            }
            val paramList = parameters.joinToString(", ") { param ->
                val paramName = param.name!!.asString()
                if (param.type.resolve().isMarkedNullable) {
                    paramName
                } else {
                    "$paramName!!"
                }
            }
            appendLine("        return $className($paramList)")
            appendLine("    }")
            appendLine("}")
        }

        // 5. 写入文件
        val file = codeGenerator.createNewFile(
            dependencies = Dependencies(false, classDeclaration.containingFile!!),
            packageName = packageName,
            fileName = builderClassName
        )

        file.write(fileContent.toByteArray())
        file.close()
    }
}

// 处理器工厂
class AutoBuilderProcessorProvider : SymbolProcessorProvider {
    override fun create(environment: SymbolProcessorEnvironment): SymbolProcessor {
        return AutoBuilderProcessor(environment.codeGenerator, environment.logger)
    }
}
步骤4:注册处理器
kotlin
// processor/src/main/resources/META-INF/services/com.google.devtools.ksp.processing.SymbolProcessorProvider
com.example.processor.AutoBuilderProcessorProvider
步骤5:使用
kotlin
@AutoBuilder
data class User(
    val name: String,
    val age: Int,
    val email: String?
)

// 编译后自动生成UserBuilder类
val user = UserBuilder()
    .name("Alice")
    .age(30)
    .build()
✅ 最佳实践
- 使用
Dependencies跟踪依赖,确保增量编译正确性- 使用
validate()过滤无效符号,避免多轮处理- 使用
logger输出错误和警告信息- 生成的代码应该易读,包含必要的注释
编译器插件实战:自定义编译器检查
KSP只能生成新代码,无法修改现有代码。如果想在编译期添加自定义检查(如禁止使用某些API),需要编译器插件。
目标
禁止在生产代码中使用 println,编译时报错。
kotlin
fun debugLog() {
    println("Debug info")  // ❌ 编译错误:禁止使用println
}
编译器插件架构
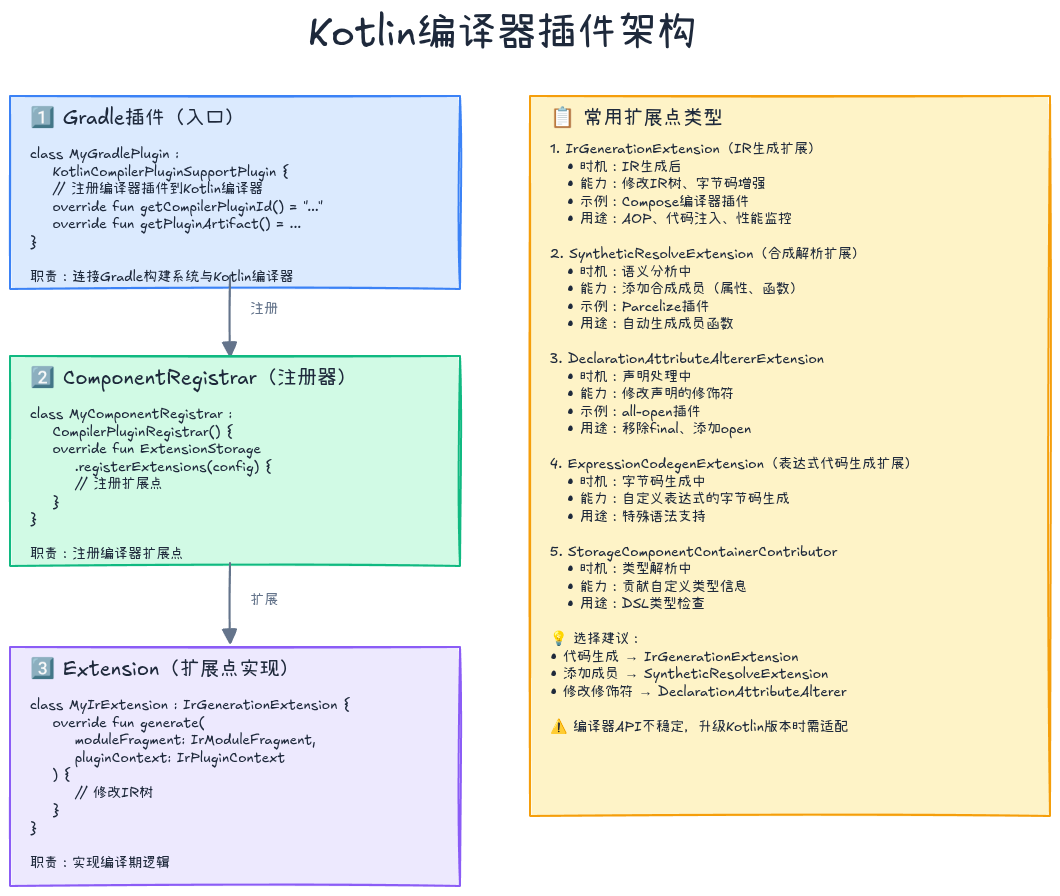
编译器插件由两部分组成:
- Gradle插件:注册编译器插件到Kotlin编译器
- 编译器插件:实现编译期逻辑
步骤1:添加依赖
kotlin
// build.gradle.kts
plugins {
    kotlin("jvm")
    id("com.github.gmazzo.buildconfig") version "3.1.0"
}

dependencies {
    compileOnly("org.jetbrains.kotlin:kotlin-compiler-embeddable:1.9.0")
}
步骤2:实现编译器插件
kotlin
// compiler-plugin/src/main/kotlin/NoPrintlnChecker.kt
import org.jetbrains.kotlin.backend.common.IrElementTransformerVoidWithContext
import org.jetbrains.kotlin.backend.common.extensions.IrPluginContext
import org.jetbrains.kotlin.ir.IrStatement
import org.jetbrains.kotlin.ir.expressions.IrCall
import org.jetbrains.kotlin.cli.common.messages.CompilerMessageSeverity
import org.jetbrains.kotlin.cli.common.messages.MessageCollector

class NoPrintlnChecker(
    private val messageCollector: MessageCollector
) : IrElementTransformerVoidWithContext() {

    override fun visitCall(expression: IrCall): IrStatement {
        // 检查是否是println调用
        val callee = expression.symbol.owner
        if (callee.name.asString() == "println") {
            messageCollector.report(
                CompilerMessageSeverity.ERROR,
                "Using println is not allowed in production code",
                expression.startOffset?.let {
                    // 获取源代码位置
                    it.getLineAndColumnInFile()
                } ?: CompilerMessageLocation.NO_LOCATION
            )
        }

        return super.visitCall(expression)
    }
}
步骤3:创建IR扩展
kotlin
// compiler-plugin/src/main/kotlin/NoPrintlnExtension.kt
import org.jetbrains.kotlin.backend.common.extensions.IrGenerationExtension
import org.jetbrains.kotlin.backend.common.extensions.IrPluginContext
import org.jetbrains.kotlin.ir.declarations.IrModuleFragment
import org.jetbrains.kotlin.cli.common.messages.MessageCollector

class NoPrintlnExtension(
    private val messageCollector: MessageCollector
) : IrGenerationExtension {

    override fun generate(moduleFragment: IrModuleFragment, pluginContext: IrPluginContext) {
        // 遍历IR树,应用检查
        moduleFragment.transform(NoPrintlnChecker(messageCollector), null)
    }
}
步骤4:创建编译器插件注册器
kotlin
// compiler-plugin/src/main/kotlin/NoPrintlnComponentRegistrar.kt
import org.jetbrains.kotlin.backend.common.extensions.IrGenerationExtension
import org.jetbrains.kotlin.compiler.plugin.CompilerPluginRegistrar
import org.jetbrains.kotlin.config.CompilerConfiguration
import org.jetbrains.kotlin.cli.common.messages.MessageCollector

class NoPrintlnComponentRegistrar : CompilerPluginRegistrar() {

    override fun ExtensionStorage.registerExtensions(configuration: CompilerConfiguration) {
        val messageCollector = configuration.get(CLIConfigurationKeys.MESSAGE_COLLECTOR_KEY, MessageCollector.NONE)

        IrGenerationExtension.registerExtension(NoPrintlnExtension(messageCollector))
    }

    override val supportsK2: Boolean = true
}
步骤5:创建Gradle插件
kotlin
// gradle-plugin/src/main/kotlin/NoPrintlnGradlePlugin.kt
import org.gradle.api.Project
import org.gradle.api.provider.Provider
import org.jetbrains.kotlin.gradle.plugin.*

class NoPrintlnGradlePlugin : KotlinCompilerPluginSupportPlugin {

    override fun apply(target: Project) {
        // Gradle插件应用逻辑
    }

    override fun getCompilerPluginId(): String = "no-println-plugin"

    override fun getPluginArtifact(): SubpluginArtifact {
        return SubpluginArtifact(
            groupId = "com.example",
            artifactId = "no-println-compiler-plugin",
            version = "1.0.0"
        )
    }

    override fun isApplicable(kotlinCompilation: KotlinCompilation<*>): Boolean = true

    override fun applyToCompilation(
        kotlinCompilation: KotlinCompilation<*>
    ): Provider<List<SubpluginOption>> {
        return kotlinCompilation.target.project.provider { emptyList() }
    }
}
步骤6:注册服务
kotlin
// gradle-plugin/src/main/resources/META-INF/services/org.jetbrains.kotlin.compiler.plugin.CompilerPluginRegistrar
com.example.NoPrintlnComponentRegistrar

// gradle-plugin/src/main/resources/META-INF/gradle-plugins/no-println-plugin.properties
implementation-class=com.example.NoPrintlnGradlePlugin
步骤7:使用插件
kotlin
// build.gradle.kts
plugins {
    id("no-println-plugin")
}

// 编译时会检查println调用
fun test() {
    println("Hello")  // ❌ 编译错误:Using println is not allowed in production code
}
⚠️ 注意
编译器插件开发需要深入理解Kotlin编译器内部实现,API不稳定,升级Kotlin版本时可能需要适配。
实战案例:字节码增强
编译器插件的另一个强大能力是字节码增强,可以在不修改源代码的情况下注入逻辑。
案例:自动日志注入
自动为所有函数入口和出口添加日志:
kotlin
// 原始代码
fun calculateSum(a: Int, b: Int): Int {
    return a + b
}

// 编译后实际行为
fun calculateSum(a: Int, b: Int): Int {
    println("[ENTER] calculateSum(a=$a, b=$b)")
    try {
        val result = a + b
        println("[EXIT] calculateSum -> $result")
        return result
    } catch (e: Exception) {
        println("[ERROR] calculateSum -> $e")
        throw e
    }
}
实现思路
kotlin
class AutoLogTransformer : IrElementTransformerVoidWithContext() {

    override fun visitFunction(declaration: IrFunction): IrStatement {
        // 跳过编译器生成的函数
        if (declaration.origin != IrDeclarationOrigin.DEFINED) {
            return super.visitFunction(declaration)
        }

        val body = declaration.body ?: return super.visitFunction(declaration)

        // 在函数入口注入日志
        val enterLog = buildStatement(declaration.startOffset, declaration.endOffset) {
            irCall(printlnFunction).apply {
                putValueArgument(0, irString("[ENTER] ${declaration.name}(...)"))
            }
        }

        // 在函数出口注入日志
        val exitLog = buildStatement(declaration.startOffset, declaration.endOffset) {
            irCall(printlnFunction).apply {
                putValueArgument(0, irString("[EXIT] ${declaration.name}"))
            }
        }

        // 修改函数体
        declaration.body = IrBlockBodyImpl(
            startOffset = body.startOffset,
            endOffset = body.endOffset,
            statements = listOf(enterLog) + body.statements + listOf(exitLog)
        )

        return super.visitFunction(declaration)
    }
}
💡 应用场景
- 性能监控:自动统计函数执行时间
- AOP:实现切面编程(事务、权限检查)
- 代码注入:自动添加空值检查、日志
- 热修复:在编译期插入补丁逻辑
编译器插件 vs 注解处理器:如何选择
| 维度 | 注解处理器(KSP) | 编译器插件 |
|---|---|---|
| 能力 | 生成新代码 | 修改现有代码、字节码 |
| 难度 | 简单 | 复杂 |
| 稳定性 | 高(KSP API稳定) | 低(编译器API不稳定) |
| 性能 | 快(KSP优化良好) | 中等 |
| 适用场景 | 代码生成 | 自定义检查、字节码增强 |
| 维护成本 | 低 | 高 |
选择建议
优先使用KSP:
- ✅ 代码生成(Builder、DTO转换、序列化)
- ✅ 基于注解的框架(依赖注入、ORM)
- ✅ 需要稳定API的项目
考虑编译器插件:
- ✅ 修改现有代码行为(如Parcelize)
- ✅ 自定义编译器检查
- ✅ 字节码增强(AOP、性能监控)
- ⚠️ 能接受高维护成本
最佳实践
1. 增量编译友好
kotlin
// ✅ 正确:使用Dependencies跟踪依赖
val file = codeGenerator.createNewFile(
    dependencies = Dependencies(
        aggregating = false,  // 非聚合依赖
        sources = arrayOf(classDeclaration.containingFile!!)  // 明确依赖的源文件
    ),
    packageName = packageName,
    fileName = fileName
)

// ❌ 错误:不跟踪依赖
val file = codeGenerator.createNewFile(
    dependencies = Dependencies(false),  // 缺少sources
    packageName = packageName,
    fileName = fileName
)
2. 错误处理
kotlin
// ✅ 使用logger输出错误
if (constructor == null) {
    logger.error("No primary constructor found", classDeclaration)
    return
}

// ✅ 提供有用的错误信息
logger.error(
    "Parameter ${param.name} must be non-nullable",
    param
)

// ❌ 抛出异常(会中断编译,无法继续)
throw IllegalArgumentException("No constructor")
3. 生成可读代码
kotlin
// ✅ 生成格式化的代码
val fileContent = buildString {
    appendLine("package $packageName")
    appendLine()
    appendLine("/**")
    appendLine(" * Auto-generated by @AutoBuilder")
    appendLine(" * Do not modify this file manually")
    appendLine(" */")
    appendLine("class $builderClassName {")
    // ...
}

// ❌ 生成难以阅读的代码
val fileContent = "package $packageName\nclass $builderClassName{..."
4. 支持Kotlin特性
kotlin
// ✅ 正确处理可空类型
val isNullable = param.type.resolve().isMarkedNullable

// ✅ 正确处理默认参数
val hasDefault = param.hasDefault

// ✅ 正确处理泛型
val typeArguments = param.type.resolve().arguments
5. 测试
kotlin
// 使用kotlin-compile-testing测试KSP处理器
@Test
fun `test AutoBuilder generation`() {
    val result = KotlinCompilation().apply {
        sources = listOf(
            SourceFile.kotlin("User.kt", """
                @AutoBuilder
                data class User(val name: String, val age: Int)
            """)
        )
        symbolProcessorProviders = listOf(AutoBuilderProcessorProvider())
        inheritClassPath = true
    }.compile()

    assertEquals(KotlinCompilation.ExitCode.OK, result.exitCode)

    // 验证生成的代码
    val generatedFile = result.generatedFiles.find { it.name == "UserBuilder.kt" }
    assertNotNull(generatedFile)
}
性能优化
1. 缓存符号查询
kotlin
// ❌ 每次都查询
fun process(resolver: Resolver) {
    resolver.getSymbolsWithAnnotation("com.example.AutoBuilder").forEach { ... }
    resolver.getSymbolsWithAnnotation("com.example.AutoBuilder").forEach { ... }  // 重复查询
}

// ✅ 缓存查询结果
class AutoBuilderProcessor {
    private var cachedSymbols: List<KSClassDeclaration>? = null

    fun process(resolver: Resolver) {
        val symbols = cachedSymbols ?: resolver.getSymbolsWithAnnotation("com.example.AutoBuilder")
            .filterIsInstance<KSClassDeclaration>()
            .toList()
            .also { cachedSymbols = it }
        // ...
    }
}
2. 避免过度遍历
kotlin
// ❌ 遍历整个模块
moduleFragment.acceptChildren(visitor, null)

// ✅ 只遍历需要的部分
moduleFragment.files.forEach { file ->
    if (shouldProcess(file)) {
        file.acceptChildren(visitor, null)
    }
}
3. 并行处理
kotlin
// ✅ 使用协程并行生成代码
runBlocking {
    symbols.map { symbol ->
        async(Dispatchers.IO) {
            generateBuilder(symbol)
        }
    }.awaitAll()
}
常见陷阱
1. 忘记处理多轮编译
KSP可能需要多轮编译(当生成的代码又有注解时):
kotlin
// ✅ 正确:返回未处理的符号
override fun process(resolver: Resolver): List<KSAnnotated> {
    val symbols = resolver.getSymbolsWithAnnotation("com.example.AutoBuilder")
    val (valid, invalid) = symbols.partition { it.validate() }

    valid.forEach { processSymbol(it) }

    return invalid.toList()  // 返回未处理的符号,下一轮继续处理
}
2. 依赖跟踪不正确
kotlin
// ❌ 错误:aggregating=false但没有指定sources
val file = codeGenerator.createNewFile(
    dependencies = Dependencies(aggregating = false),  // 缺少sources
    packageName = packageName,
    fileName = fileName
)

// ✅ 正确
val file = codeGenerator.createNewFile(
    dependencies = Dependencies(
        aggregating = false,
        sources = arrayOf(classDeclaration.containingFile!!)
    ),
    packageName = packageName,
    fileName = fileName
)
3. 生成的代码与原代码冲突
kotlin
// ❌ 可能冲突:生成的类与现有类同名
class UserBuilder { ... }

// ✅ 使用命名约定避免冲突
class UserAutoGenBuilder { ... }
实战项目:完整的Room-like ORM
让我们整合所有知识,构建一个简化版的Room ORM:
功能
kotlin
// 1. 定义实体
@Entity(tableName = "users")
data class User(
    @PrimaryKey val id: Long,
    @ColumnInfo(name = "user_name") val name: String,
    val age: Int
)

// 2. 定义DAO
@Dao
interface UserDao {
    @Query("SELECT * FROM users WHERE age > :minAge")
    fun getUsersOlderThan(minAge: Int): List<User>

    @Insert
    fun insert(user: User)

    @Delete
    fun delete(user: User)
}

// 3. 定义Database
@Database(entities = [User::class], version = 1)
abstract class AppDatabase {
    abstract fun userDao(): UserDao
}

// 4. 自动生成实现
val db = RoomDatabase.build<AppDatabase>(context, "app.db")
val users = db.userDao().getUsersOlderThan(18)
实现思路
kotlin
// 1. 解析@Entity注解,生成表结构SQL
fun generateTableCreationSQL(entity: KSClassDeclaration): String {
    val tableName = entity.getAnnotation<Entity>()?.tableName ?: entity.simpleName.asString()
    val columns = entity.primaryConstructor!!.parameters.map { param ->
        val columnName = param.getAnnotation<ColumnInfo>()?.name ?: param.name!!.asString()
        val columnType = mapKotlinTypeToSQLType(param.type.resolve())
        val isPrimaryKey = param.hasAnnotation<PrimaryKey>()
        "$columnName $columnType" + (if (isPrimaryKey) " PRIMARY KEY" else "")
    }
    return "CREATE TABLE $tableName (${columns.joinToString(", ")})"
}

// 2. 解析@Query注解,生成查询实现
fun generateQueryImplementation(method: KSFunctionDeclaration): String {
    val query = method.getAnnotation<Query>()!!.value
    val returnType = method.returnType!!.resolve()

    return """
        override fun ${method.simpleName.asString()}(...): ${returnType.toString()} {
            val cursor = db.rawQuery("$query", arrayOf(...))
            return cursor.use {
                // 解析Cursor,构造返回对象
            }
        }
    """.trimIndent()
}

// 3. 生成DAO实现
fun generateDaoImplementation(dao: KSClassDeclaration): String {
    val methods = dao.getAllFunctions()
    val implementations = methods.map { method ->
        when {
            method.hasAnnotation<Query>() -> generateQueryImplementation(method)
            method.hasAnnotation<Insert>() -> generateInsertImplementation(method)
            method.hasAnnotation<Delete>() -> generateDeleteImplementation(method)
            else -> throw IllegalArgumentException("Unknown annotation")
        }
    }

    return """
        class ${dao.simpleName.asString()}Impl(private val db: SQLiteDatabase) : ${dao.qualifiedName!!.asString()} {
            ${implementations.joinToString("\n\n")}
        }
    """.trimIndent()
}
💡 完整实现
完整的Room ORM实现涉及更多细节(事务、类型转换器、迁移等),这里展示的是核心思路。真实项目中建议直接使用官方Room库。
总结
核心要点
| 技术 | 使用场景 | 优势 | 劣势 |
|---|---|---|---|
| KSP | 代码生成 | 快速、稳定、易用 | 只能生成新代码 |
| KAPT | 旧项目兼容 | 兼容Java APT | 慢、信息丢失 |
| 编译器插件 | 代码修改、检查 | 强大、灵活 | 复杂、不稳定 |
最佳实践总结
- 优先使用KSP:对于代码生成需求,KSP是首选
- 增量编译友好 :正确使用
Dependencies跟踪依赖 - 错误处理 :使用
logger而非异常,提供清晰的错误信息 - 生成可读代码:格式化输出,添加注释
- 充分测试 :使用
kotlin-compile-testing编写测试 - 性能优化:缓存查询、避免过度遍历、并行处理
学习资源
- 官方文档 :KSP Documentation
- 开源项目:Room、Dagger、Moshi的KSP实现
- 编译器源码 :
kotlin-compiler模块 - 社区:Kotlin Slack #ksp频道
系列文章导航:
- 👉 上一篇: DSL设计:构建类型安全的领域语言
如果这篇文章对你有帮助,欢迎点赞、收藏、分享!有任何问题或建议,欢迎在评论区留言讨论。让我们一起学习,一起成长!
也欢迎访问我的个人主页发现更多宝藏资源