前言
这是一个基于Python的Excel自动化工具,能够根据数据模板批量生成个性化的多工作表Excel文件。能让测试人员告别手动复制粘贴!一键将数据批量填充到模板,自动生成上百份标准化报告。
现成工具分享:
通过网盘分享的文件:TestTool_V3.0.exe
链接: https://pan.baidu.com/s/1y2uoE-c0BaZMW5lIl04Amg?pwd=i5pq 提取码: i5pq
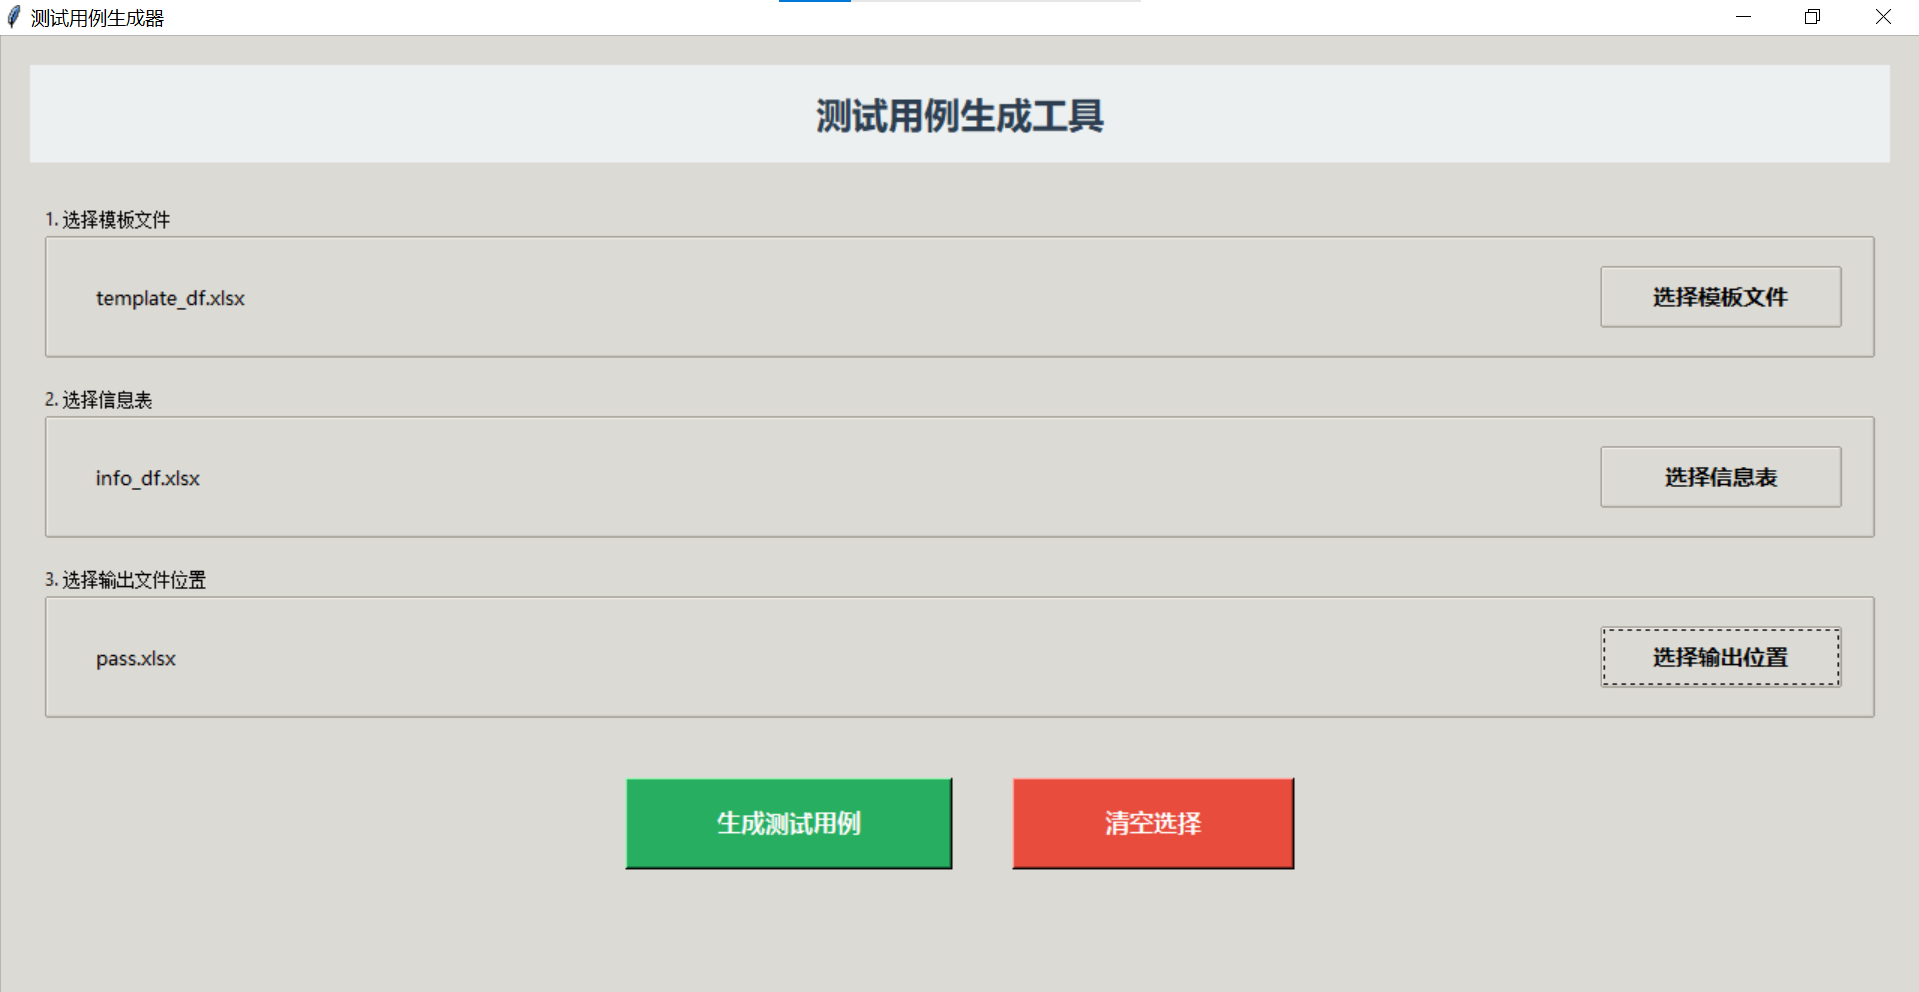
工具介绍:
导入模板文件+信息文件,选择输出文件位置,点击"生成测试用例"按钮,自动生成完整的用例表并自动调整列宽。
背景
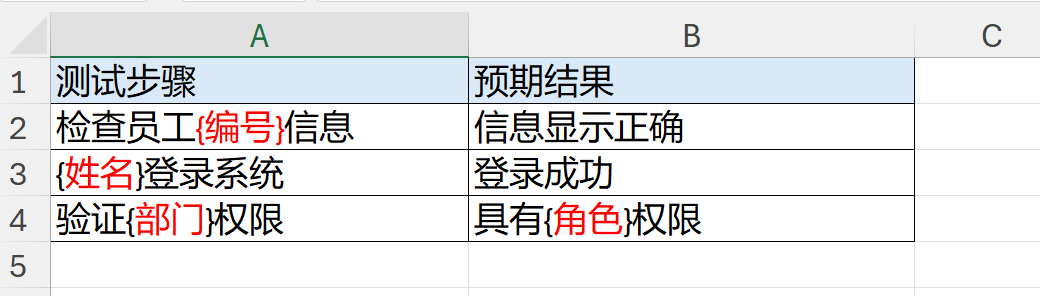
模板表如下:
信息表如下:

如上:信息表提供了两个人的信息。现在需要在模板表的基础上,分别为2人生成一个sheet,并将模板中{}的内容替换为信息表中对应的数据。
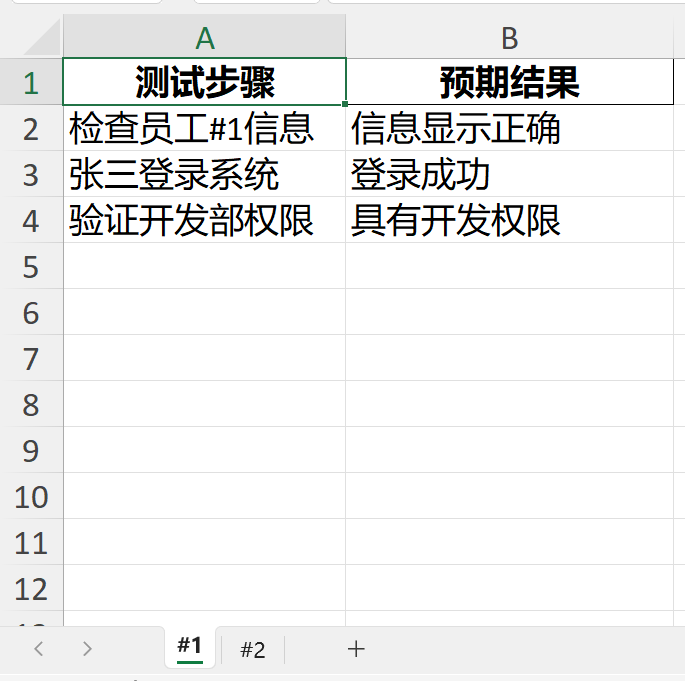
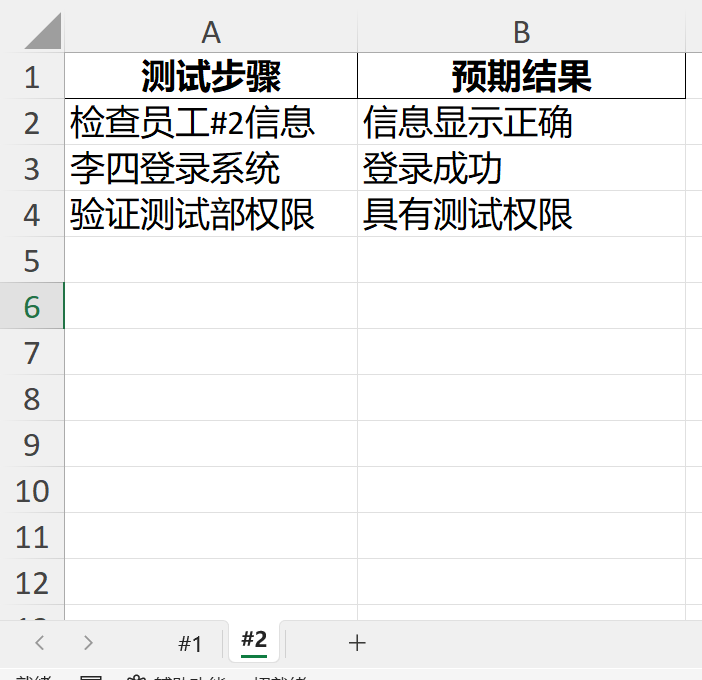
预期效果如下:
一、clean_sheet_name()
Excel本身有一套针对sheet的命名规则。clean_sheet_name() 函数的作用就是写出命名规则,具体是:
-
预处理:在数据传给 Excel 前,确保名称合规
-
避免错误:防止写入 Excel 时失败
-
保持一致性:确保所有工作表名称都符合规范
1.1 切片操作
python
name = 'Hello world'
print(name[:3])
print(name[0:3])
print(name[slice(0,3)])
结果:

1.2 strip()移除首尾两端的空格
python
name = '  12Hello world34  '
print(f"移除首尾空格:",name.strip())
print(f"移除左边空格:",name.lstrip())
print(f"移除右边空格:",name.rstrip())
# 先移除首端的空白再移除数字
print(f"移除指定字符:",name.lstrip().strip('12'))
结果:

通过strip()检查字符串是否为空:
python
# 确保名称不为空
# 方法1
    if not name.strip():
        name = "Sheet"

# 方法2
if name.strip() == "":
    name = "Sheet"

# 方法3
if len(name.strip()) == 0:
    name = "Sheet"
(1)not name.strip() 的判断逻辑
在Python中,空字符串 "" 在布尔上下文中被视为 False,非空字符串被视为 True。
所以:
-
name.strip()返回空字符串 →if not ""→True -
name.strip()返回非空字符串 →if not "some_value"→False
(2)Python中可以写 if False,但它没有实际意义,不会执行
python
# 实际上,if 语句会自动进行布尔转换
value = ""
if value:  # 这里会自动转换为 if bool(value)
    print("非空")
else:
    print("空")  # 会执行这个

# 所以这些都是等价的:
if not value:
    pass

if value == "":
    pass

if len(value) == 0:
    pass

if bool(value) == False:
    pass
1.3 clean_sheet_name()修改不合规则的sheet名
pd.isna():专门检测 pandas/Numpy的缺失值(None, np.nan, NaT等)
python
import pandas as pd
def clean_sheet_name(name, max_length=31):
    """
    清理sheet名称,确保符合Excel命名规则

    参数:
    name: 原始sheet名称
    max_length: 最大长度限制(Excel限制为31个字符)
    """
    if pd.isna(name):
        name = "Sheet"
    else:
        name = str(name)

    # 移除非法字符
    illegal_chars = [':', '\\', '/', '?', '*', '[', ']']
    for char in illegal_chars:
        name = name.replace(char, '')

    # 截断到最大长度
    if len(name) > max_length:
        name = name[:max_length]

    # 确保名称不为空
    if not name.strip():
        name = "Sheet"

    return name
# 测试各种情况
test_cases = [
    None,                     # 空值
    "销售数据:2024年/第一季度",  # 包含非法字符
    "这是一个非常非常非常长的Excel工作表名称超过了31个字符llll",  # 超长
    "   ",                    # 只有空白
    "正常名称",               # 正常情况
]

for test in test_cases:
    print(f"原始Sheet名称:{test} -> 清理后名称:{clean_sheet_name(test)}")
结果:

二、Pandas内置方法
2.1 iterrows()
iterrows() 返回一个迭代器,每次迭代返回一个元组,包含两个值:
-
第一个值:行索引(从0开始的整数)
-
第二个值:该行的数据(pandas Series对象)
python
import pandas as pd

df = pd.DataFrame({'A': [1, 2, 3], 'B': ['a', 'b', 'c']})

for idx,row in df.iterrows():
    print(f"索引:{idx},行数据:{row['A']},{row['B']}")
结果:

1、可以只接收行数据,不要索引吗?
可以,但需要用下划线 _ 表示不关心的变量:
python
for _,row in df.iterrows():
    print(f"行数据:{row['A']},{row['B']}")
2.2 read_excel()
read_excel() 是 pandas 的一个内置函数, 是一个顶级函数。
# 读取Excel文件
df = pd.read_excel('文件.xlsx', sheet_name='Sheet1')
2.3 .loc()
test_case_df.loc[idx, col] 的作用是:
-
精确定位 :通过行标签
idx和列标签col找到DataFrame中的特定单元格 -
支持CRUD:可用于读取、修改、创建数据
-
标签导向:使用有意义的标签而非容易变化的位置索引
python
import pandas as pd

df = pd.DataFrame({
    'A': [1, 2, 3],
    'B': [4, 5, 6],
    'C': [7, 8, 9]
}, index=['row1', 'row2', 'row3'])

# 使用.loc - 基于标签
print(df.loc['row2', 'B'])  # 输出: 5

# 使用.iloc - 基于位置(整数索引)
print(df.iloc[1, 1])       # 输出: 5 (第2行第2列)
loc()会选择DataFrame中特定行和列的单个值(也就是单元格的值), 这是Pandas中最常用、最推荐的数据选择方法之一。
2.4 columns返回列名
python
import pandas as pd

# 创建一个DataFrame
df = pd.DataFrame({
    '姓名': ['张三', '李四', '王五'],
    '年龄': [25, 30, 28],
    '城市': ['北京', '上海', '广州']
})

# .columns 返回列名
print(df.columns)
# 输出: Index(['姓名', '年龄', '城市'], dtype='object')
print(type(df.columns))  # <class 'pandas.core.indexes.base.Index'>
2.5 f-string中花括号的转义规则
python
name = "张三"
age = 25

print(f"{name}")           # 张三
print(f"{{name}}")         # {name}
print(f"{{{name}}}")       # {张三}
print(f"{{{{{name}}}}}")   # {{张三}}
三、主函数
3.1 with pd.ExcelWriter() as writer
这是上下文管理器的使用方式
python
# 等价写法(不推荐,因为需要手动关闭)
writer = pd.ExcelWriter(output_file, engine='openpyxl')
try:
    # 写入操作
    total_rows = len(info_df)
    # ...
finally:
    writer.save()  # 必须手动保存
    writer.close()  # 必须手动关闭

# 使用 with 语句(推荐)
# 自动处理资源的打开和关闭,即使出错也会正确关闭
with pd.ExcelWriter(...) as writer:
    # 写入操作
    pass
# 退出 with 块时自动调用 writer.save() 和 writer.close()
(1)参数说明:
-
output_file:输出文件的路径字符串 -
engine='openpyxl':指定使用 openpyxl 引擎处理 Excel 文件
(2) 基本用法
writer 指的是什么?
writer 是 pd.ExcelWriter 创建的一个Excel写入器对象,它代表了名为"output.xlsx"的这个Excel文件。
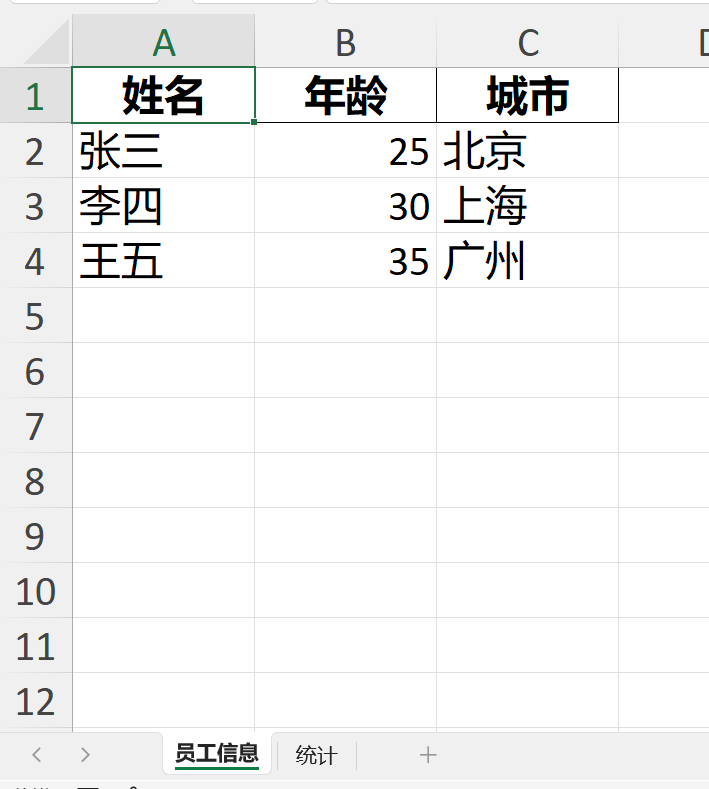
python
import pandas as pd
# 创建示例数据
info_df = pd.DataFrame({
'姓名': ['张三', '李四', '王五'],
'年龄': [25, 30, 35],
'城市': ['北京', '上海', '广州']
})
output_file = r'C:\Users\uexwcl\Downloads\output.xlsx'
with pd.ExcelWriter(output_file,engine='openpyxl') as writer:
total_rows = len(info_df)
# 1.将DataFrame写入Excel,指定sheet名
info_df.to_excel(writer, sheet_name='员工信息', index=False)
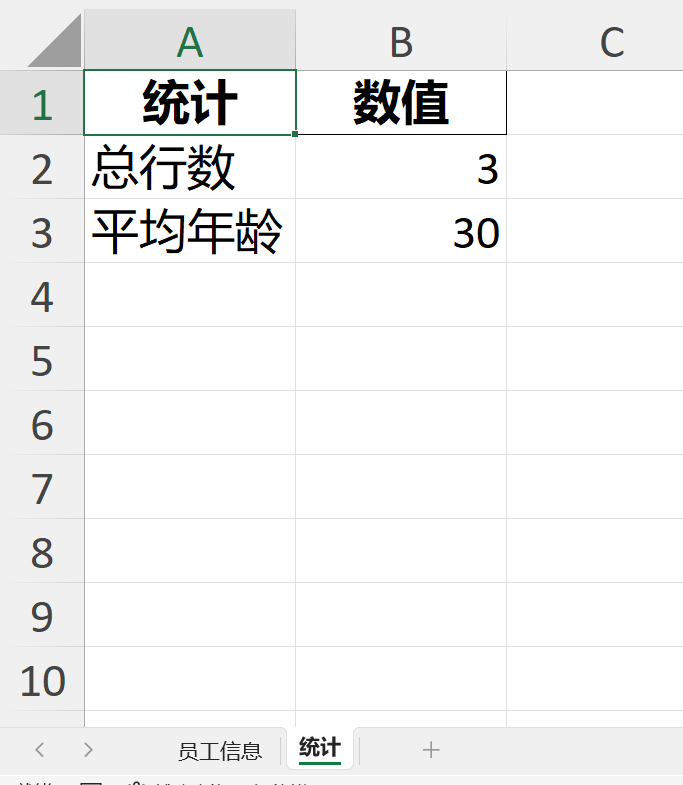
# 2.写入多个工作表
summary_df = pd.DataFrame({
'统计': ['总行数', '平均年龄'],
'数值': [total_rows, info_df['年龄'].mean()]
})
summary_df.to_excel(writer,sheet_name='统计',index=False)结果:
3.2 替换占位符逻辑(优化)
仍然是4层循环,不过是先提取模板表中每个单元格的占位符,并对占位符进行去重处理,再来和信息表中的列名比对。一致则替换。
算法层通过占位符去重减少计算;数据层使用Pandas向量化操作;内存层采用流式处理和模板复用来控制内存峰值。
python
 # 4. 为信息表中的每一行生成一个sheet
            for index, row in info_df.iterrows():
                # 获取编号(用于sheet名称)
                sheet_name = clean_sheet_name(row.get('编号'))

                print(f"正在处理第 {index + 1}/{total_rows} 行: {sheet_name}")

                # 复制模板
                test_case_df = template_df.copy()

                # 5. 替换模板中的占位符
                for col in test_case_df.columns:
                    for idx in test_case_df.index:
                        cell_value = clean_value(test_case_df.loc[idx, col])

                        # 提取实际存在的占位符-- 非贪婪匹配,匹配 { 和 } 之间的所有内容
                        placeholders = re.findall(r'\{(.*?)\}', cell_value)

                        if placeholders:  # 只有存在占位符时才处理
                            for placeholder in set(placeholders):  # 去重
                                if placeholder in info_df.columns:
                                    replacement = clean_value(row.get(placeholder, ""))
                                    cell_value = cell_value.replace(f"{{{placeholder}}}", replacement)

                        test_case_df.loc[idx, col] = cell_value
四、问题记录
1、模板中{}里包含":"、空格,就无法替换成信息表的具体内容
# 提取实际存在的占位符
placeholders = re.findall(r'\{(\w+)\}', cell_value)
python
import re

# 示例1
cell_value = "Hello {name}, your score is {score_2023}"
placeholders = re.findall(r'\{(\w+)\}', cell_value)
# 结果: ['name', 'score_2023']

# 示例2 - 不匹配的情况
cell_value = "No placeholders here"
placeholders = re.findall(r'\{(\w+)\}', cell_value)
# 结果: []使用正则表达式从字符串中提取的占位符特点:
-
只提取花括号
{}内的内容 -
占位符名称只能包含:字母、数字、下划线(
\w的含义) -
区分大小写
-
不支持带空格的占位符名称
-
不支持特殊字符(如
{user-name}不会被匹配)
2、自动调整列宽
python
def auto_adjust_column_width(worksheet, df):
    """
    自动调整Excel列的宽度以适应内容

    参数:
    worksheet: openpyxl的worksheet对象
    df: 对应的DataFrame
    """
    try:
        # 遍历DataFrame的每一列
        for column in df:
            # 获取列索引(从1开始)
            column_letter = openpyxl.utils.get_column_letter(df.columns.get_loc(column) + 1)

            # 计算列的最大宽度
            # 考虑列名本身的宽度
            max_length = max(
                len(str(column)),  # 列名宽度
                df[column].astype(str).map(len).max()  # 该列数据最大宽度
            )

            # 添加一些边距(增加20%的宽度或至少5个字符)
            adjusted_width = max_length * 1.2 + 5

            # 设置列宽,限制在5到50之间
            adjusted_width = max(5, min(adjusted_width, 50))

            # 应用列宽
            worksheet.column_dimensions[column_letter].width = adjusted_width
五、源码
51. CaseOutput.py
python
import pandas as pd
import openpyxl
import warnings
import re  # 正则表达式模块,用于提取占位符

warnings.filterwarnings('ignore')


def clean_sheet_name(name, max_length=31):
    """
    清理sheet名称,确保符合Excel命名规则

    参数:
    name: 原始sheet名称
    max_length: 最大长度限制(Excel限制为31个字符)
    """
    if pd.isna(name):
        name = "Sheet"
    else:
        name = str(name)

    # 移除非法字符
    illegal_chars = [':', '\\', '/', '?', '*', '[', ']']
    for char in illegal_chars:
        name = name.replace(char, '')

    # 截断到最大长度
    if len(name) > max_length:
        name = name[:max_length]

    # 确保名称不为空
    if not name.strip():
        name = "Sheet"

    return name


def clean_value(value):
    """
    清理单元格值,处理NaN和None

    参数:
    value: 原始值
    返回: 清理后的字符串
    """
    if pd.isna(value):
        return ""
    return str(value)


def auto_adjust_column_width(worksheet, df):
    """
    自动调整Excel列的宽度以适应内容

    参数:
    worksheet: openpyxl的worksheet对象
    df: 对应的DataFrame
    """
    try:
        # 遍历DataFrame的每一列
        for column in df:
            # 获取列索引(从1开始)
            column_letter = openpyxl.utils.get_column_letter(df.columns.get_loc(column) + 1)

            # 计算列的最大宽度
            # 考虑列名本身的宽度
            max_length = max(
                len(str(column)),  # 列名宽度
                df[column].astype(str).map(len).max()  # 该列数据最大宽度
            )

            # 添加一些边距(增加20%的宽度或至少5个字符)
            adjusted_width = max_length * 1.2 + 5

            # 设置列宽,限制在5到50之间
            adjusted_width = max(5, min(adjusted_width, 50))

            # 应用列宽
            worksheet.column_dimensions[column_letter].width = adjusted_width

    except Exception as e:
        print(f"自动调整列宽时发生错误: {e}")
        # 如果出错,设置默认列宽
        for column in df.columns:
            column_letter = openpyxl.utils.get_column_letter(df.columns.get_loc(column) + 1)
            worksheet.column_dimensions[column_letter].width = 20
def generate_test_cases_from_files(template_file, info_file, output_file):
    """
    处理文件生成测试用例

    参数:
    template_file: 模板文件路径
    info_file: 信息表文件路径
    output_file: 输出文件路径

    返回: 生成的测试用例数量
    """
    try:
        print("正在读取模板文件...")

        # 1. 读取模板文件,保持空单元格为空字符串
        template_df = pd.read_excel(
            template_file,
            dtype=str,  # 所有列都读取为字符串类型
            keep_default_na=False
        )

        print("正在读取信息表...")

        # 2. 读取信息表,保持空单元格为空字符串
        info_df = pd.read_excel(
            info_file,
            dtype=str,
            keep_default_na=False
        )

        print("正在生成Excel文件...")

        # 3. 创建Excel写入对象
        with pd.ExcelWriter(output_file, engine='openpyxl') as writer:
            total_rows = len(info_df)

            # 4. 为信息表中的每一行生成一个sheet
            for index, row in info_df.iterrows():
                # 获取编号(用于sheet名称)
                sheet_name = clean_sheet_name(row.get('编号'))

                print(f"正在处理第 {index + 1}/{total_rows} 行: {sheet_name}")

                # 复制模板
                test_case_df = template_df.copy()

                # 5. 替换模板中的占位符
                for col in test_case_df.columns:
                    for idx in test_case_df.index:
                        cell_value = clean_value(test_case_df.loc[idx, col])

                        # 提取实际存在的占位符-- 非贪婪匹配,匹配 { 和 } 之间的所有内容
                        placeholders = re.findall(r'\{(.*?)\}', cell_value)

                        if placeholders:  # 只有存在占位符时才处理
                            for placeholder in set(placeholders):  # 去重
                                if placeholder in info_df.columns:
                                    replacement = clean_value(row.get(placeholder, ""))
                                    cell_value = cell_value.replace(f"{{{placeholder}}}", replacement)

                        test_case_df.loc[idx, col] = cell_value

                # 6. 将当前指示灯的测试用例保存到sheet
                test_case_df.to_excel(
                    writer,
                    sheet_name=sheet_name,
                    index=False
                )
                # 获取当前sheet的worksheet对象
                worksheet = writer.sheets[sheet_name]

                # 调用自动调整列宽函数
                auto_adjust_column_width(worksheet, test_case_df)

                print(f"  已自动调整 {sheet_name} 的列宽")

        print(f"Excel文件生成完成,共生成 {total_rows} 个测试用例")
        return total_rows

    except KeyError as e:
        raise Exception(f"Excel文件中缺少必要的列: {e}")
    except PermissionError as e:
        raise Exception(f"文件访问权限错误,请关闭Excel文件后重试: {e}")
    except Exception as e:
        raise Exception(f"文件处理错误: {e}")
5.2 panel.py
python
import tkinter as tk
from tkinter import ttk, filedialog, messagebox
import os
from CaseOutput import generate_test_cases_from_files


class TestCaseGeneratorGUI:
    def __init__(self, root):
        self.root = root
        self.root.title("测试用例生成器")
        self.root.geometry("650x350")

        # 初始化文件路径
        self.template_file = ""
        self.info_file = ""
        self.output_file = ""

        # 设置样式
        self.setup_styles()

        # 创建界面
        self.create_widgets()

    def setup_styles(self):
        """设置界面样式"""
        style = ttk.Style()
        style.theme_use('clam')

        # 自定义大按钮样式
        style.configure(
            'Large.TButton',
            font=('Microsoft YaHei', 11, 'bold'),
            padding=(10, 8),
            anchor='center',
            relief='raised',
            width=15
        )

        # 标签样式
        style.configure(
            'File.TLabel',
            font=('Microsoft YaHei', 10),
            padding=(5, 2)
        )

        # 标签框样式
        style.configure(
            'TLabelframe',
            font=('Microsoft YaHei', 11, 'bold'),
            padding=10
        )

    def create_widgets(self):
        """创建界面组件"""
        # 主容器
        main_container = ttk.Frame(self.root, padding=20)
        main_container.pack(fill='both', expand=True)

        # 标题
        title_label = tk.Label(
            main_container,
            text="测试用例生成工具",
            font=("Microsoft YaHei", 18, "bold"),
            fg="#2c3e50",
            bg="#ecf0f1",
            pady=15
        )
        title_label.pack(fill='x', pady=(0, 20))

        # 创建内容框架
        content_frame = ttk.Frame(main_container)
        content_frame.pack(fill='both', expand=True)

        # 文件选择区域
        self.create_file_selection(content_frame)

        # 按钮区域
        self.create_button_area(content_frame)

    def create_file_selection(self, parent):
        """创建文件选择区域"""
        # 模板文件选择区域
        template_frame = ttk.LabelFrame(parent, text="1. 选择模板文件")
        template_frame.pack(fill="x", padx=10, pady=10)

        template_inner = ttk.Frame(template_frame)
        template_inner.pack(fill='x', padx=5, pady=8)

        self.template_label = ttk.Label(
            template_inner,
            text="未选择文件",
            foreground="gray",
            style='File.TLabel',
            width=50,
            anchor='w'
        )
        self.template_label.pack(side="left", fill='x', expand=True, padx=(10, 5))

        template_btn = ttk.Button(
            template_inner,
            text="选择模板文件",
            command=self.select_template_file,
            style='Large.TButton'
        )
        template_btn.pack(side="right", padx=5)

        # 信息表文件选择区域
        info_frame = ttk.LabelFrame(parent, text="2. 选择信息表")
        info_frame.pack(fill="x", padx=10, pady=10)

        info_inner = ttk.Frame(info_frame)
        info_inner.pack(fill='x', padx=5, pady=8)

        self.info_label = ttk.Label(
            info_inner,
            text="未选择文件",
            foreground="gray",
            style='File.TLabel',
            width=50,
            anchor='w'
        )
        self.info_label.pack(side="left", fill='x', expand=True, padx=(10, 5))

        info_btn = ttk.Button(
            info_inner,
            text="选择信息表",
            command=self.select_info_file,
            style='Large.TButton'
        )
        info_btn.pack(side="right", padx=5)

        # 输出文件选择区域
        output_frame = ttk.LabelFrame(parent, text="3. 选择输出文件位置")
        output_frame.pack(fill="x", padx=10, pady=10)

        output_inner = ttk.Frame(output_frame)
        output_inner.pack(fill='x', padx=5, pady=8)

        self.output_label = ttk.Label(
            output_inner,
            text="未选择位置",
            foreground="gray",
            style='File.TLabel',
            width=50,
            anchor='w'
        )
        self.output_label.pack(side="left", fill='x', expand=True, padx=(10, 5))

        output_btn = ttk.Button(
            output_inner,
            text="选择输出位置",
            command=self.select_output_file,
            style='Large.TButton'
        )
        output_btn.pack(side="right", padx=5)

    def create_button_area(self, parent):
        """创建按钮区域"""
        button_frame = ttk.Frame(parent)
        button_frame.pack(pady=30)

        # 使用tk.Button获得更多控制
        self.generate_btn = tk.Button(
            button_frame,
            text="生成测试用例",
            font=('Microsoft YaHei', 12, 'bold'),
            command=self.generate_test_cases,
            state="disabled",
            bg="#27ae60",
            fg="white",
            activebackground="#229954",
            activeforeground="white",
            relief="raised",
            bd=2,
            padx=30,
            pady=12,
            cursor="hand2",
            width=15
        )
        self.generate_btn.pack(side="left", padx=20)

        self.clear_btn = tk.Button(
            button_frame,
            text="清空选择",
            font=('Microsoft YaHei', 12, 'bold'),
            command=self.clear_selection,
            bg="#e74c3c",
            fg="white",
            activebackground="#c0392b",
            activeforeground="white",
            relief="raised",
            bd=2,
            padx=30,
            pady=12,
            cursor="hand2",
            width=12
        )
        self.clear_btn.pack(side="left", padx=20)

    def select_template_file(self):
        """选择模板文件"""
        file_path = filedialog.askopenfilename(
            title="选择模板文件",
            filetypes=[("Excel文件", "*.xlsx *.xls"), ("所有文件", "*.*")]
        )
        if file_path:
            self.template_file = file_path
            file_name = os.path.basename(file_path)
            self.template_label.config(text=file_name, foreground="black")
            self.check_generate_button()

    def select_info_file(self):
        """选择信息表文件"""
        file_path = filedialog.askopenfilename(
            title="选择信息表",
            filetypes=[("Excel文件", "*.xlsx *.xls"), ("所有文件", "*.*")]
        )
        if file_path:
            self.info_file = file_path
            file_name = os.path.basename(file_path)
            self.info_label.config(text=file_name, foreground="black")
            self.check_generate_button()

    def select_output_file(self):
        """选择输出文件位置"""
        file_path = filedialog.asksaveasfilename(
            title="保存测试用例文件",
            defaultextension=".xlsx",
            filetypes=[("Excel文件", "*.xlsx"), ("所有文件", "*.*")]
        )
        if file_path:
            self.output_file = file_path
            file_name = os.path.basename(file_path)
            self.output_label.config(text=file_name, foreground="black")
            self.check_generate_button()

    def check_generate_button(self):
        """检查是否启用生成按钮"""
        if self.template_file and self.info_file and self.output_file:
            self.generate_btn.config(state="normal", bg="#27ae60")
        else:
            self.generate_btn.config(state="disabled", bg="#95a5a6")

    def clear_selection(self):
        """清空所有选择"""
        self.template_file = ""
        self.info_file = ""
        self.output_file = ""
        self.template_label.config(text="未选择文件", foreground="gray")
        self.info_label.config(text="未选择文件", foreground="gray")
        self.output_label.config(text="未选择位置", foreground="gray")
        self.generate_btn.config(state="disabled", bg="#95a5a6")

    def generate_test_cases(self):
        """生成测试用例"""
        try:
            # 检查文件是否存在
            if not os.path.exists(self.template_file):
                messagebox.showerror("错误", f"模板文件不存在: {self.template_file}")
                return

            if not os.path.exists(self.info_file):
                messagebox.showerror("错误", f"信息表文件不存在: {self.info_file}")
                return

            # 调用生成函数
            result = generate_test_cases_from_files(
                self.template_file,
                self.info_file,
                self.output_file
            )

            if result:
                messagebox.showinfo(
                    "生成成功",
                    f"测试用例生成成功!\n\n"
                    f"保存位置: {self.output_file}\n"
                    f"共生成 {result} 个测试用例"
                )
            else:
                messagebox.showerror("错误", "生成失败,请检查文件格式")

        except Exception as e:
            messagebox.showerror("错误", f"生成过程中发生错误:\n{str(e)}")


def main():
    root = tk.Tk()

    # 设置窗口居中
    window_width = 650
    window_height = 400
    screen_width = root.winfo_screenwidth()
    screen_height = root.winfo_screenheight()
    x = (screen_width - window_width) // 2
    y = (screen_height - window_height) // 2
    root.geometry(f"{window_width}x{window_height}+{x}+{y}")

    # 创建应用
    app = TestCaseGeneratorGUI(root)

    # 运行主循环
    root.mainloop()


if __name__ == "__main__":
    main()
六、打包方法
1. 安装 PyInstaller
python
pip install pyinstaller2. 创建打包脚本
在项目根目录创建 build_exe.py:
python
# build_exe.py - 打包脚本
import PyInstaller.__main__
import os
import shutil
import sys

def build_executable():
    """构建可执行文件"""

    # 主程序入口文件
    main_script = "panel.py"  # 假设您的主程序是 panel.py

    # PyInstaller 配置参数
    args = [
        main_script,                # 主脚本
        '--name=TestCaseGenerator', # 程序名称
        '--onefile',                # 打包成单个exe文件
        '--windowed',               # 如果是GUI程序(控制台程序去掉这个)
        '--icon=icon.ico',         # 图标文件(可选)
        '--add-data=templates;templates',  # 包含模板文件夹
        '--add-data=*.xlsx;.',     # 包含Excel文件
        '--hidden-import=pandas',
        '--hidden-import=openpyxl',
        '--hidden-import=numpy',
        '--clean',                  # 清理临时文件
    ]

    # 运行打包
    PyInstaller.__main__.run(args)

    print("打包完成!可执行文件在 dist/TestCaseGenerator.exe")

if __name__ == "__main__":
    build_executable()
3. 简单打包命令
python
# 1. 将panel.py修改为可执行入口(如果需要)
# 2. 执行打包命令
pyinstaller --onefile --name=TestTool panel.py- 打包效果