文章目录
一.SpringBoot原理
1.配置优先级
在SpringBoot项目当中,常见的属性配置方式有5种, 3种配置文件,2种外部属性的配置
优先级(从低到高):
- application.yaml(忽略)
- application.yml
- application.properties
- java系统属性(-Dxxx=xxx)
- 命令行参数(--xxx=xxx)
eg:配置Tomcat端口号
- application.properties
properties
server.port=8081- application.yml
yml
server:
port: 8082- application.yaml
yaml
server:
   port: 8082
**注意事项:**虽然springboot支持多种格式配置文件,但是在项目开发时,推荐统一使用一种格式的配置(yml是主流)
为了增强程序的扩展性,除了支持配置文件的配置方式以外,还支持另外两种常见的配置方式:
-
Java系统属性配置 (格式: -Dkey=value)
yaml-Dserver.port=9000 -
命令行参数 (格式:--key=value)
yaml--server.port=10010
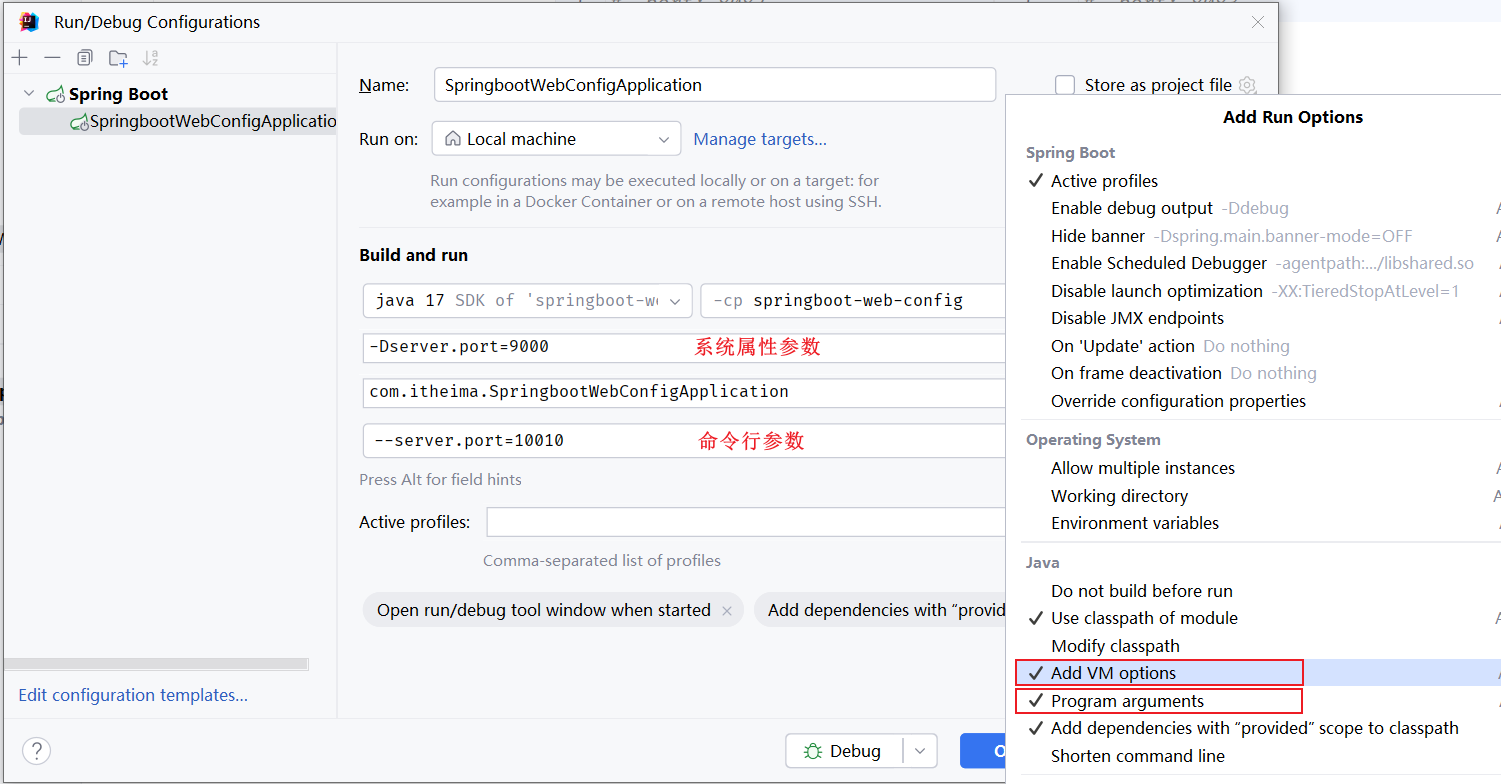
在idea中运行程序时,如何指定Java系统属性和命令行参数
1.编辑启动程序的配置信息
2.打开之后,选择Modify options, 选择Add VM options,Program arguments
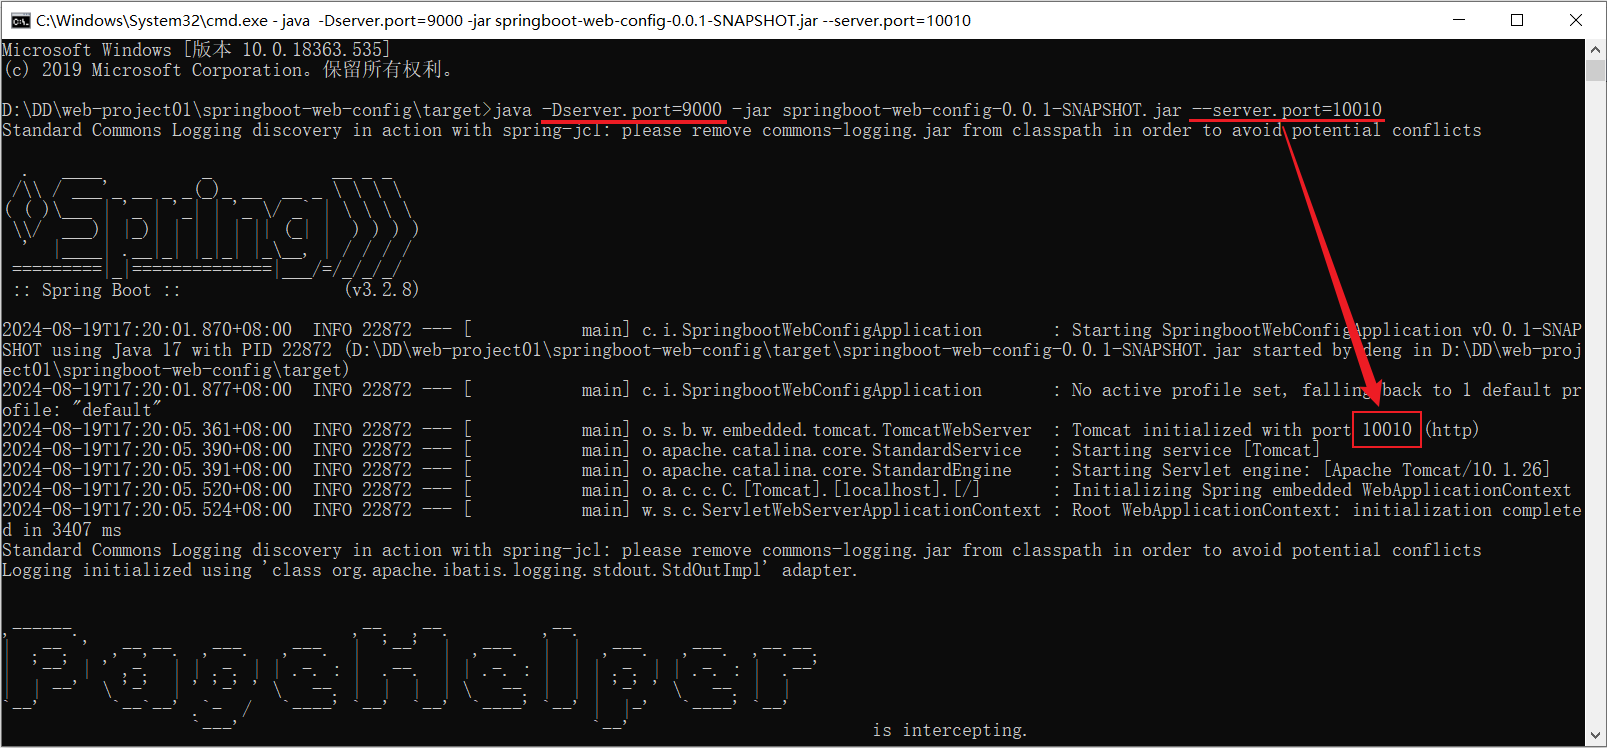
如果项目已经打包好了,怎么设置Java系统配置和命令行参数1.用maven打包好后
2.使用命令java -jar运行jar文件程序
同时设置Java系统属性和命令行参数
(命令行的优先级更高,所以最终端口号为10010)

2.Bean的管理
之前学过了通过Spring当中提供的注解@Component以及它的三个衍生注解(@Controller、@Service、@Repository)来声明IOC容器中的bean对象
2.1Bean的作用域
在IOC容器中,默认Bean对象时单例的(只有一个实例对象)
在Spring中支持五种作用域(后三种在web环境中才生效)
| 作用域 | 说明 |
|---|---|
| singleton | 容器内同名称的bean只有一个实例(单例)(默认) |
| prototype | 每次使用该bean时会创建新的实例(非单例) |
| request | 每个请求范围内会创建新的实例(web环境中) |
| session | 每个会话范围内会创建新的实例(web环境中) |
| application | 每个应用范围内会创建新的实例(web环境中) |
通过Spring中的@Scope注解设置作用域
java
@Scope("prototype")
//... ...
singleton
-
在IOC容器中的bean默认使用的作用域为singleton
-
默认singleton的bean在容器启动时被创建,可以通过
@Lazy注解延迟初始化(延迟到第一次使用)只有singleton默认在容器启动时创建,其他的都是在第一次使用时才被创建
prototype
eg:
java
@Scope("prototype") //bean作用域为非单例
@RestController
@RequestMapping("/depts")
public class DeptController {

    @Autowired
    private DeptService deptService;

    public DeptController(){
        System.out.println("DeptController constructor ....");
    }

    //... ...
}- prototype的bean,每一次使用该bean的时候都会创建一个新的实例
- 实际开发当中,绝大部分的Bean是单例的,也就是说绝大部分Bean不需要配置scope属性
2.2第三方Bean
引入的第三方依赖无法使用 @Component 及其衍生注解来声明bean
此时就需要使用**@Bean**注解来声明bean
法一:在启动类中声明Bean
java
//... ...
@ServletComponentScan
@EnableScheduling
@SpringBootApplication
public class TliasWebManagementApplication {

    public static void main(String[] args) {
        SpringApplication.run(TliasWebManagementApplication.class, args);
    }

    @Bean
    public AliyunOSSOperator aliyunOSSOperator(AliyunOSSProperties ossProperties) {
        return new AliyunOSSOperator(ossProperties);
    }
}@Bean是 Spring 框架提供的注解,用于将方法的返回值注册为 Spring 容器(IOC 容器)中的一个 Bean- 方法名 (这里是
aliyunOSSOperator)默认作为该 Bean 在容器中的 名称(bean name) - 返回的对象 (即
new AliyunOSSOperator(...))会被 Spring 管理,并放入 IOC 容器中 - 方法参数(如
AliyunOSSProperties ossProperties)会由 Spring 自动从容器中查找并注入(前提是该类型已经是一个 Bean)
为啥要在启动类里声明第三方Bean
@Bean注解在任何被@Configuration(或@SpringBootConfiguration、@Component等能被组件扫描到的类)标注的类中都可以生效
@SpringBootApplication一个组合注解,其源码大致如下(简化):
java@Target(ElementType.TYPE) @Retention(RetentionPolicy.RUNTIME) @SpringBootConfiguration @EnableAutoConfiguration @ComponentScan public @interface SpringBootApplication { ... }
法二:在配置类中声明
若要管理的第三方 bean 对象,建议对这些bean进行集中分类配置,可以通过 @Configuration 注解声明一个配置类
java
//... ...

@Configuration
public class OSSConfig {
    @Bean
    public AliyunOSSOperator aliyunOSSOperator(AliyunOSSProperties ossProperties) {
        return new AliyunOSSOperator(ossProperties);
    }
}
注意
-
通过
@Bean注解的name 或 value属性可以声明bean的名称,如果不指定,默认bean的名称就是方法名java@Bean public AliyunOSSOperator aliyunOSSOperator(AliyunOSSProperties props) { return new AliyunOSSOperator(props); }-
默认 Bean 名称 = 方法名
上面这个 Bean 在 Spring 容器中的名字就是:
aliyunOSSOperator -
可以通过
name或value显式指定名称(二者等价):
java@Bean("ossClient") // 或 @Bean(name = "ossClient") public AliyunOSSOperator aliyunOSSOperator(AliyunOSSProperties props) { return new AliyunOSSOperator(props); }
-
-
如果第三方bean需要依赖其他bean对象,直接在bean定义方法中设置形参即可,容器会根据类型自动装配
3.SpringBoot原理
Spring Boot = Spring + 自动配置 + 内嵌服务器 + 约定优于配置
| Spring | Spring Boot | |
|---|---|---|
| 配置文件 | 主要靠 XML 或 @Configuration + 大量手动配置 |
默认使用 application.yml / application.properties,大量自动配置 |
| 依赖管理 | 需手动管理所有依赖版本(容易冲突) | 通过 Starter 依赖(如 spring-boot-starter-web)自动引入兼容的依赖版本 |
| 示例:Web 项目 | 需配置 DispatcherServlet、视图解析器、组件扫描等 | 只需加 spring-boot-starter-web,自动配置好 Web 环境 |
SpringBoot的原理就是来解析SpringBoot当中的起步依赖与自动配置的原理
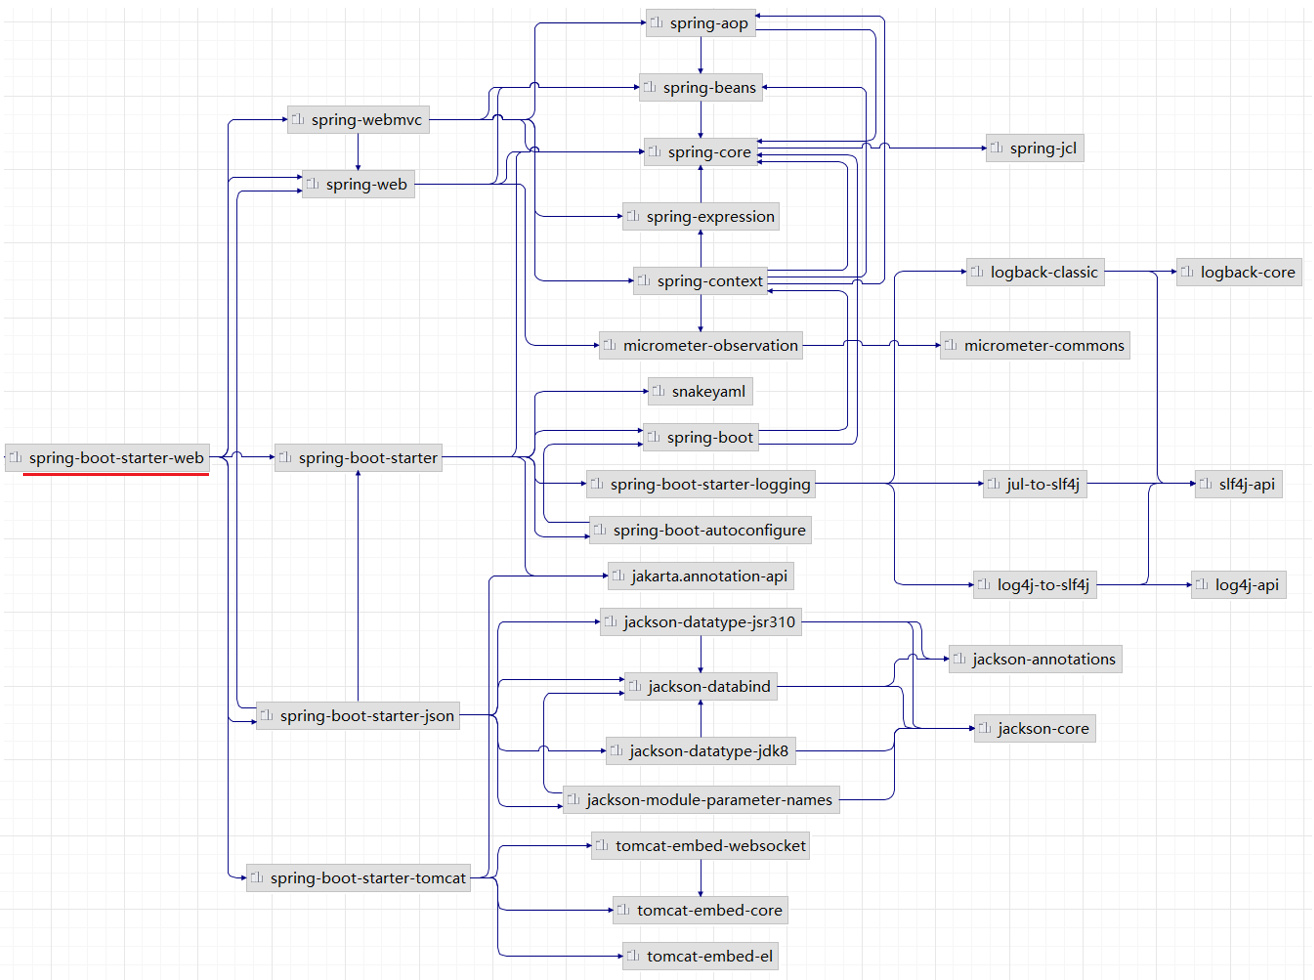
3.1起步依赖
起步依赖的原理就是maven的依赖传递
当我们引入了 spring-boot-starter-web 之后,maven会通过依赖传递特性,将web开发所需的常见依赖都传递下来。
3.2自动配置
SpringBoot的自动配置就是当spring容器启动后,一些配置类、bean对象就自动存入到了IOC容器中,不需要我们手动去声明
- 在类上添加
@Component注解来声明bean对象时,还需要保证@Component注解能被Spring的组件扫描到 - SpringBoot项目中的
@SpringBootApplication注解,具有包扫描的作用,但是它只会扫描启动类所在的当前包以及子包
那么怎样才能扫描到其他包中的Bean?
法一 :@ComponentScan组件扫描
用这个指定要扫描的范围
java
@SpringBootApplication
@ComponentScan({"com.itheima","com.example"}) //指定要扫描的包
public class SpringbootWebConfigApplication {
    public static void main(String[] args) {
        SpringApplication.run(SpringbootWebConfigApplication.class, args);
    }
}
缺点:
当需要引入大量的第三方的依赖,就需要在启动类上配置N多要扫描的包,这种方式会很繁琐,而且这种大面积的扫描性能也比较低
缺点:
- 使用繁琐
- 性能低
法二: @Import导入
导入形式主要有以下几种:
-
导入普通类
java@Import(TokenParser.class) //导入的类会被Spring加载到IOC容器中 @SpringBootApplication public class SpringbootWebConfigApplication { public static void main(String[] args) { SpringApplication.run(SpringbootWebConfigApplication.class, args); } } -
导入配置类
- 配置类
java@Configuration public class HeaderConfig { @Bean public HeaderParser headerParser(){ return new HeaderParser(); } @Bean public HeaderGenerator headerGenerator(){ return new HeaderGenerator(); } }- 启动类
java@Import(HeaderConfig.class) //导入配置类 @SpringBootApplication public class SpringbootWebConfig2Application { public static void main(String[] args) { SpringApplication.run(SpringbootWebConfig2Application.class, args); } } -
导入ImportSelector接口实现类
- ImportSelector接口实现类
javapublic class MyImportSelector implements ImportSelector { public String[] selectImports(AnnotationMetadata importingClassMetadata) { //返回值字符串数组(数组中封装了全限定名称的类) return new String[]{"com.example.HeaderConfig"}; } }- 启动类
java@Import(MyImportSelector.class) //导入ImportSelector接口实现类 @SpringBootApplication public class SpringbootWebConfig2Application { public static void main(String[] args) { SpringApplication.run(SpringbootWebConfig2Application.class, args); } }
三种方式对比
| 特性 | 1. 导入普通类 | 2. 导入配置类 | 3. 导入 ImportSelector |
|---|---|---|---|
| 目的 | 直接注册一个 Bean | 合并另一套配置 | 动态/条件化注册 Bean |
| 是否需要注解 | ❌ 不需要(即使无 @Component 也能注册) |
✅ 必须是 @Configuration 类 |
✅ 必须实现 ImportSelector 接口 |
| 灵活性 | 低(静态) | 中(静态组合) | 高(运行时动态决定) |
| 典型用途 | 注册第三方类 | 模块化配置拆分 | 条件装配(如 Spring Boot AutoConfig) |
| Bean 名称 | 全限定类名 | 由 @Bean 方法或类名决定 |
同方式1或2(取决于返回的是什么类) |
| 是否支持条件判断 | ❌ 否 | ❌ 否(除非配合 @Conditional) |
✅ 是(在 selectImports 中自由判断) |
以上方法还是比较繁琐,当我们要使用第三方依赖,依赖中到底有哪些bean和配置类,第三方依赖自身最清楚
所以第三方依赖提供了一个注解封装好了使用它时所要求的所有依赖
使用第三方依赖提供的 @EnableXxxxx注解
- 第三方依赖中提供的注解
Java
@Retention(RetentionPolicy.RUNTIME)
@Target(ElementType.TYPE)
@Import(MyImportSelector.class)//指定要导入哪些bean对象或配置类
public @interface EnableHeaderConfig {
}- 在使用时只需在启动类上加上@EnableXxxxx注解即可
java
@EnableHeaderConfig  //使用第三方依赖提供的Enable开头的注解
@SpringBootApplication
public class SpringbootWebConfig2Application {
    public static void main(String[] args) {
        SpringApplication.run(SpringbootWebConfig2Application.class, args);
    }
}
此方法也是SpringBoot当中所采用的方式
源码分析
自动配置原理源码入口就是 @SpringBootApplication 注解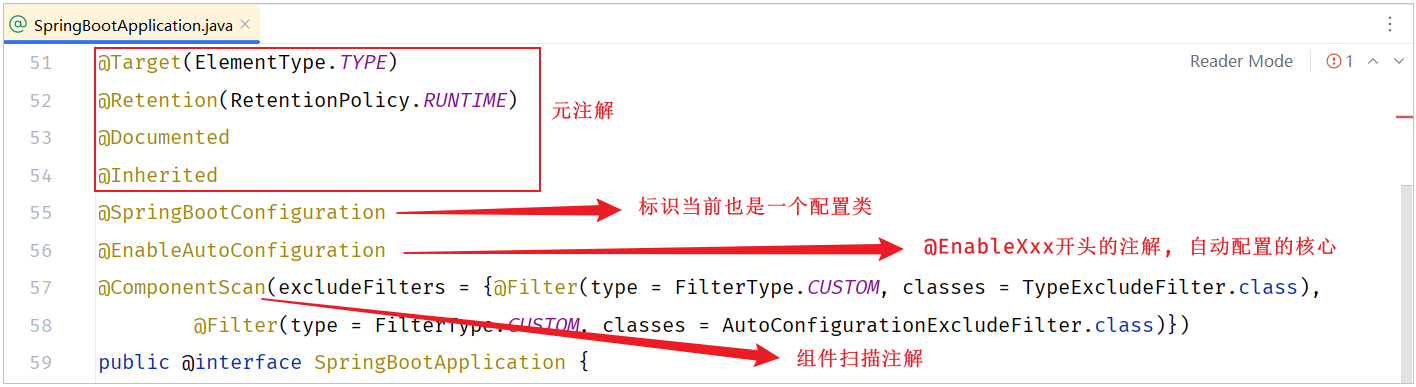
在这个注解中重点封装了3个注解,分别是:
-
@SpringBootConfiguration
-
声明当前类是一个配置类
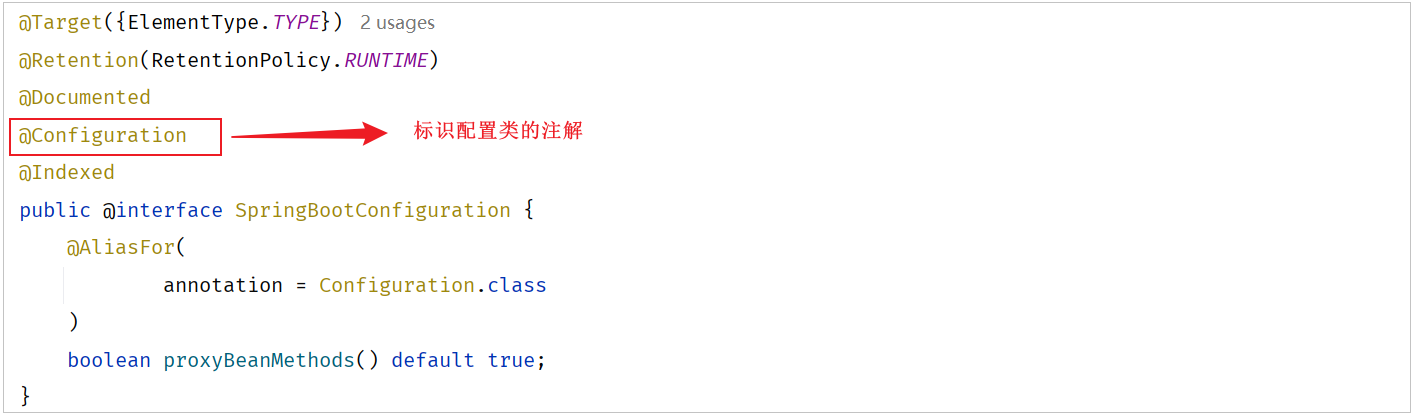
@SpringBootConfiguration注解上使用了@Configuration,表明SpringBoot启动类就是一个配置类。
@Indexed注解,是用来加速应用启动的(不用关心)
-
-
@ComponentScan
-
进行组件扫描(SpringBoot中默认扫描的是启动类所在的当前包及其子包)
@ComponentScan注解是用来进行组件扫描的,扫描启动类所在的包及其子包下所有被@Component及其衍生注解声明的类
SpringBoot启动类,之所以具备扫描包功能,就是因为包含了@ComponentScan注解
-
-
@EnableAutoConfiguration
-

-
封装了@Import注解(Import注解中指定了一个ImportSelector接口的实现类)
-
在实现类重写的selectImports()方法,读取当前项目下所有依赖jar包中
META-INF/spring/org.springframework.boot.autoconfigure.AutoConfiguration.imports两个文件里面定义的配置类(配置类中定义了@Bean注解标识的方法) -
META-INF/spring/org.springframework.boot.autoconfigure.AutoConfiguration.imports文件主要(几乎全部)存放的是第三方依赖(尤其是 Spring Boot 官方或社区提供的 Starter)中定义的自动配置类(Auto-configuration classes) ,而不是你项目中自己写的类
-
当SpringBoot程序启动时,就会加载配置文件当中所定义的配置类,并将这些配置类信息(类的全限定名)封装到String类型的数组中,最终通过@Import注解将这些配置类全部加载到Spring的IOC容器中,交给IOC容器管理
META-INF/spring/org.springframework.boot.autoconfigure.AutoConfiguration.imports里的Bean都会注入到IOC容器中吗?不会
在声明bean对象时,上面有加一个以
@Conditional开头的注解,这种注解的作用就是按照条件进行装配,只有满足条件之后,才会将bean注册到Spring的IOC容器中
@Conditional
以Conditional开头的这些注解都是条件装配的注解
- 作用:按照一定的条件进行判断,在满足给定条件后才会注册对应的bean对象到Spring的IOC容器中。
- 位置:方法、类
- @Conditional本身是一个父注解,派生出大量的子注解:
- @ConditionalOnClass:判断环境中有对应字节码文件,才注册bean到IOC容器。
- @ConditionalOnMissingBean:判断环境中没有对应的bean(类型或名称),才注册bean到IOC容器。
- @ConditionalOnProperty:判断配置文件中有对应属性和值,才注册bean到IOC容器。
eg:
@ConditionalOnClass注解
java
@Configuration
public class HeaderConfig {

    @Bean
    @ConditionalOnClass(name="io.jsonwebtoken.Jwts")//环境中存在指定的这个类,才会将该bean加入IOC容器
    public HeaderParser headerParser(){
        return new HeaderParser();
    }

    //省略其他代码...
}- @ConditionalOnMissingBean注解
java
@Configuration
public class HeaderConfig {

    @Bean
    @ConditionalOnMissingBean //不存在该类型的bean,才会将该bean加入IOC容器
    public HeaderParser headerParser(){
        return new HeaderParser();
    }

    //省略其他代码...
}- **
@ConditionalOnProperty**注解(这个注解和配置文件当中配置的属性有关系)
先在application.yml配置文件中添加如下的键值对:
yaml
name: itheima在声明bean的时候就可以指定一个条件@ConditionalOnProperty
java
@Configuration
public class HeaderConfig {

    @Bean
    @ConditionalOnProperty(name ="name",havingValue = "itheima")//配置文件中存在指定属性名与值,才会将bean加入IOC容器
    public HeaderParser headerParser(){
        return new HeaderParser();
    }

    @Bean
    public HeaderGenerator headerGenerator(){
        return new HeaderGenerator();
    }
}
@Conditional的作用时机
- 发生在 Spring 容器启动、解析配置类(
@Configuration)或组件(@Component)的阶段。 - 在 Bean 实例化之前 ,Spring 会先检查该 Bean 上是否有
@Conditional注解。 - 如果条件 不满足 → 直接跳过这个 Bean 的注册(不会创建 BeanDefinition,更不会实例化)。
- 如果条件 满足 → 正常注册并后续创建实例
自定义starter
starter指的就是SpringBoot当中的起步依赖
因为不是所有的第三方的技术官方都给我们提供了与SpringBoot整合的starter起步依赖,所以需要自定义
在springboot中,官方提供的起步依赖 或 第三方提供的起步依赖,基本都会包含两个模块,如下所示:
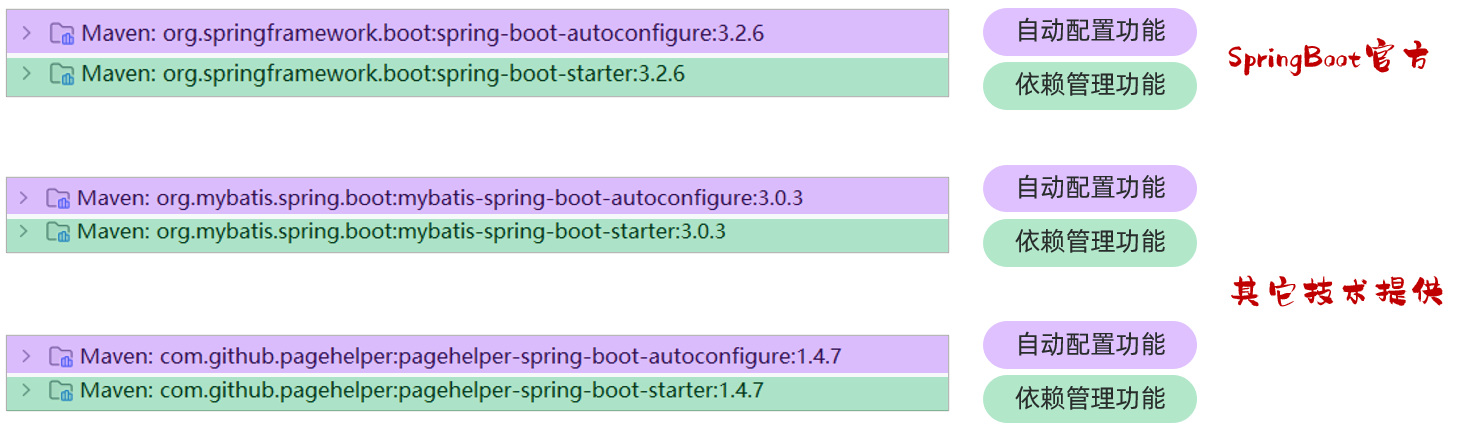
其中,spring-boot-starter 或 xxx-spring-boot-starter 这个模块主要是依赖管理的功能。 而 spring-boot-autoconfigure 或 xxxx-spring-boot-autoconfigure 主要是起到自动配置的作用,自动配置的核心代码就在这个模块中编写
SpringBoot官方starter命名: spring-boot-starter-xxxx
第三组织提供的starter命名: xxxx-spring-boot-starter
在自定义一个starter时,按照规范需要定义两个模块
- starter模块(进行依赖管理把程序开发所需要的依赖都定义在starter起步依赖中)
- autoconfigure模块(自动配置)
将来在项目当中进行相关功能开发时,只需要引入一个起步依赖就可以了,因为它会将autoconfigure自动配置的依赖给传递下来
eg:实现步骤
- 第1步:创建自定义starter模块
aliyun-oss-spring-boot-starter(进行依赖管理)- 把阿里云OSS所有的依赖统一管理起来
- 第2步:创建autoconfigure模块
aliyun-oss-spring-boot-autoconfigure- 在starter中引入autoconfigure (我们使用时只需要引入starter起步依赖即可)
- 第3步:在autoconfigure模块
aliyun-oss-spring-boot-autoconfigure中完成自动配置- 定义一个自动配置类,在自动配置类中将所要配置的bean都提前配置好
- 定义配置文件,把自动配置类的全类名定义在配置文件(
META-INF/spring/xxxx.imports)中