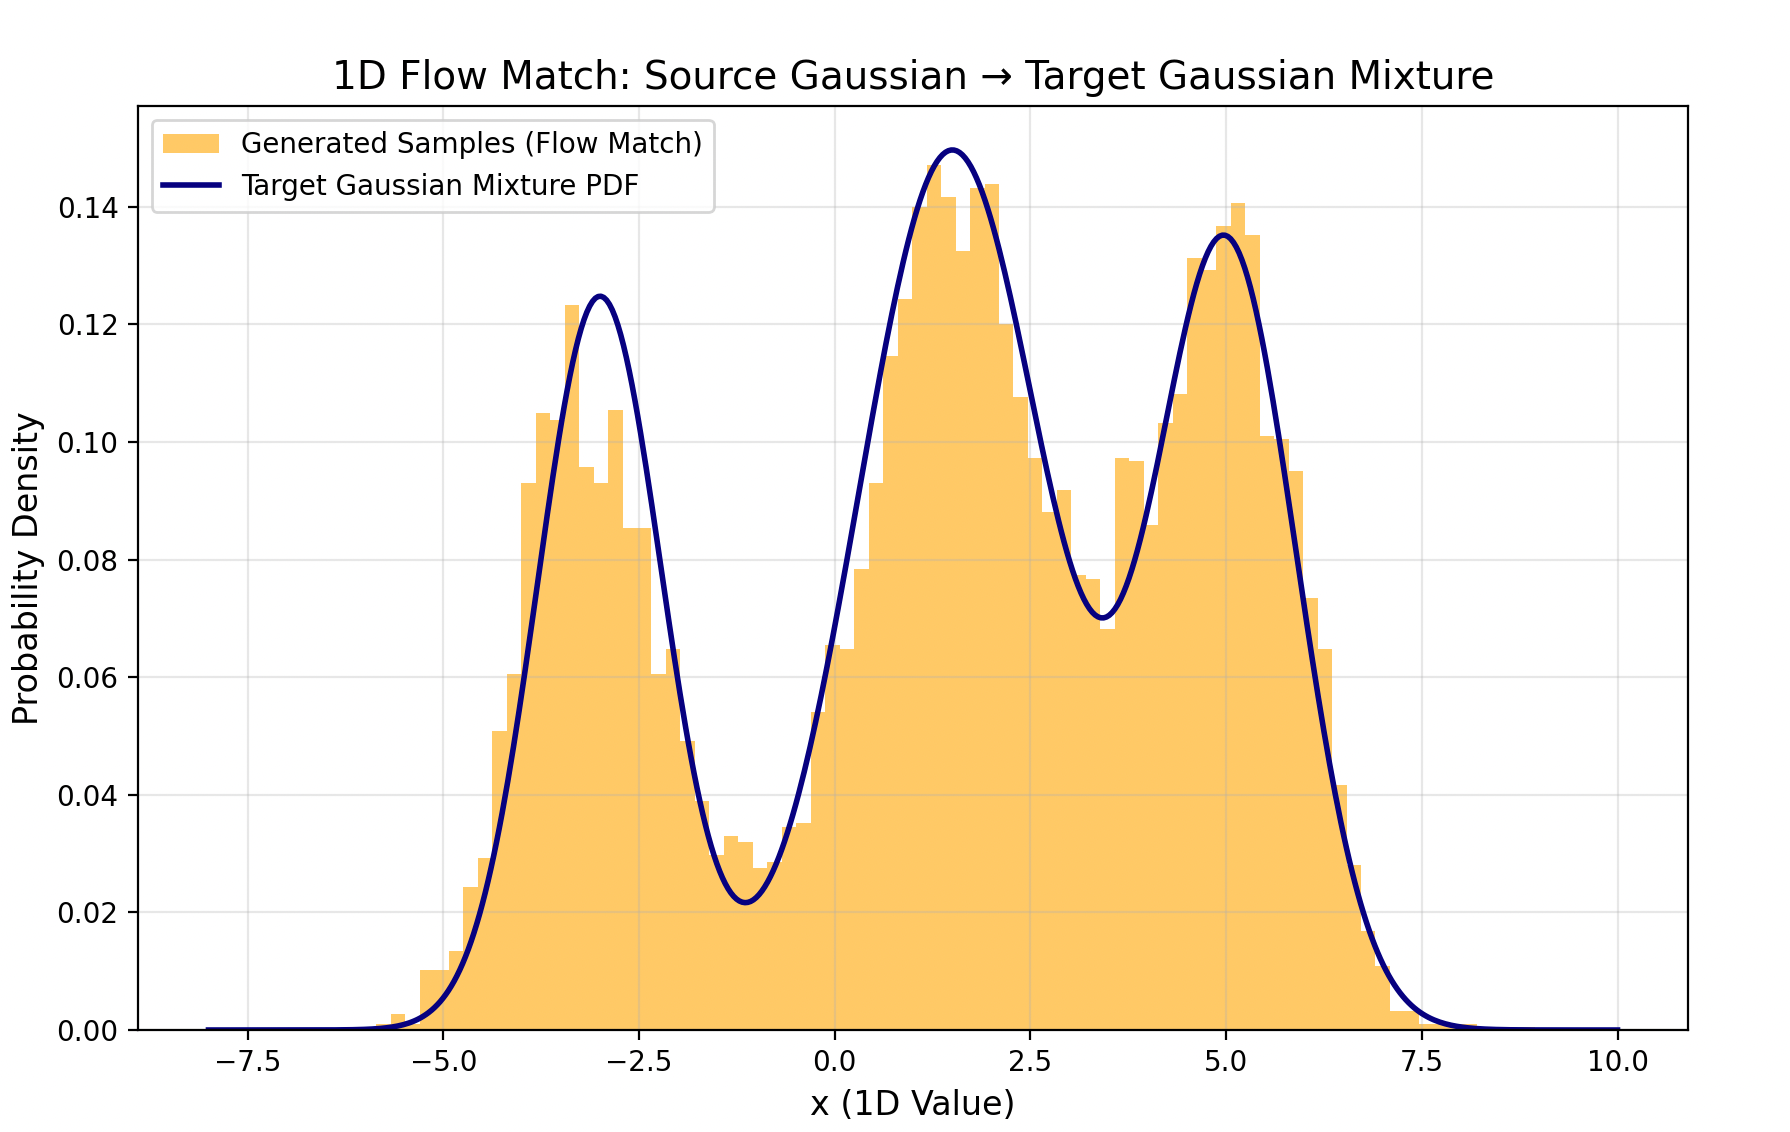
- 一句话概括:就是从简单分布建模复杂的分布;
- 这里我就用简单的例子去做一组简单的实验:用高斯分布建模出一个多项式混合分布;
- 代码
python
import torch
import torch.nn as nn
import torch.optim as optim
import numpy as np
import matplotlib.pyplot as plt
from scipy.stats import multivariate_normal
from tqdm import tqdm

# 设备配置
device = torch.device("cuda" if torch.cuda.is_available() else "cpu")

# ====================== 1. 定义目标多项式混合分布(固定参数) ======================
class GaussianMixture:
    def __init__(self):
        # 固定3个高斯分量的混合分布
        self.weights = np.array([0.3, 0.5, 0.2])  # 权重和为1
        self.means = np.array([[-2.0, -1.0], [1.0, 3.0], [4.0, -2.0]])  # 各分量均值
        self.covs = np.array([
            [[0.5, 0.1], [0.1, 0.4]],    # 分量1协方差
            [[0.6, -0.2], [-0.2, 0.5]],   # 分量2协方差
            [[0.4, 0.0], [0.0, 0.6]]     # 分量3协方差
        ])

    def sample(self, n_samples):
        """采样目标混合分布样本"""
        # 选择每个样本所属的分量
        component_indices = np.random.choice(3, size=n_samples, p=self.weights)
        samples = []
        for i in component_indices:
            sample = np.random.multivariate_normal(self.means[i], self.covs[i])
            samples.append(sample)
        return np.array(samples)

    def pdf(self, x):
        """计算混合分布的概率密度"""
        pdf_vals = 0.0
        for w, mu, cov in zip(self.weights, self.means, self.covs):
            pdf_vals += w * multivariate_normal.pdf(x, mean=mu, cov=cov)
        return pdf_vals

# ====================== 2. Flow Match 向量场预测网络 ======================
class FlowMatchNet(nn.Module):
    def __init__(self, input_dim=2, hidden_dim=128):
        super().__init__()
        self.net = nn.Sequential(
            nn.Linear(input_dim + 1, hidden_dim),  # 输入:x(2维) + t(1维)
            nn.ReLU(),
            nn.Linear(hidden_dim, hidden_dim),
            nn.ReLU(),
            nn.Linear(hidden_dim, hidden_dim),
            nn.ReLU(),
            nn.Linear(hidden_dim, input_dim)       # 输出:向量场(2维)
        )

    def forward(self, x, t):
        """
        输入:
            x: [batch_size, input_dim] 样本
            t: [batch_size, 1] 时间步(0~1)
        输出:
            v: [batch_size, input_dim] 预测的向量场
        """
        x_t = torch.cat([x, t], dim=-1)
        return self.net(x_t)

# ====================== 3. Flow Match 训练函数 ======================
def train_flow_match(
    net,
    target_dist,
    epochs=10000,
    batch_size=256,
    lr=1e-4,
    device=device
):
    optimizer = optim.Adam(net.parameters(), lr=lr)
    loss_fn = nn.MSELoss()
    net.train()

    pbar = tqdm(range(epochs), desc="Training Flow Match")
    for epoch in pbar:
        # 1. 采样时间t (0~1)
        t = torch.rand(batch_size, 1, device=device)

        # 2. 采样源分布样本x0 ~ N(0, I)
        x0 = torch.randn(batch_size, 2, device=device)

        # 3. 采样目标分布样本x1 ~ 混合分布
        x1 = torch.tensor(target_dist.sample(batch_size), dtype=torch.float32, device=device)

        # 4. 计算中间状态xt = (1-t)*x0 + t*x1 (Flow Match的核心插值)
        xt = (1 - t) * x0 + t * x1

        # 5. 计算目标流场:v_t^*(x_t) = x1 - x0 (条件流场)
        target_v = x1 - x0

        # 6. 模型预测流场
        pred_v = net(xt, t)

        # 7. 计算损失(匹配预测流场和目标流场)
        loss = loss_fn(pred_v, target_v)

        # 8. 反向传播
        optimizer.zero_grad()
        loss.backward()
        optimizer.step()

        # 打印进度
        if (epoch + 1) % 1000 == 0:
            pbar.set_postfix({"Loss": f"{loss.item():.6f}"})

    return net

# ====================== 4. 推理采样函数(欧拉法) ======================
def sample_flow_match(
    net,
    n_samples=10000,
    num_steps=100,  # 欧拉法步数
    device=device
):
    """
    从源分布出发,沿着学习到的向量场流动到目标分布
    """
    net.eval()
    # 1. 采样源分布样本
    x = torch.randn(n_samples, 2, device=device)
    dt = 1.0 / num_steps  # 时间步长

    with torch.no_grad():
        for step in range(num_steps):
            t = torch.ones(n_samples, 1, device=device) * (step / num_steps)
            # 欧拉法更新:x_{t+dt} = x_t + dt * v_t(x_t)
            v = net(x, t)
            x = x + dt * v

    return x.cpu().numpy()

# ====================== 5. 绘图函数 ======================
def plot_distributions(target_dist, generated_samples):
    """绘制目标分布、生成样本的对比图"""
    # 生成网格用于绘制概率密度等高线
    x = np.linspace(-6, 8, 100)
    y = np.linspace(-5, 6, 100)
    X, Y = np.meshgrid(x, y)
    pos = np.dstack((X, Y))

    # 计算目标分布的概率密度
    Z = target_dist.pdf(pos)

    # 创建子图
    fig, (ax1, ax2) = plt.subplots(1, 2, figsize=(12, 5))

    # 子图1:目标混合分布
    ax1.contourf(X, Y, Z, cmap="Blues", alpha=0.8)
    ax1.set_title("Target Gaussian Mixture Distribution", fontsize=12)
    ax1.set_xlabel("x1")
    ax1.set_ylabel("x2")
    ax1.set_xlim(-6, 8)
    ax1.set_ylim(-5, 6)

    # 子图2:Flow Match生成的样本
    ax2.scatter(generated_samples[:, 0], generated_samples[:, 1], s=1, alpha=0.6, c="orange")
    ax2.set_title("Generated Samples (Flow Match)", fontsize=12)
    ax2.set_xlabel("x1")
    ax2.set_ylabel("x2")
    ax2.set_xlim(-6, 8)
    ax2.set_ylim(-5, 6)

    plt.tight_layout()
    plt.savefig("flow_match_distribution.png", dpi=300)
    plt.show()

# ====================== 主程序 ======================
if __name__ == "__main__":
    # 1. 初始化目标分布
    target_dist = GaussianMixture()

    # 2. 初始化Flow Match网络
    net = FlowMatchNet(input_dim=2, hidden_dim=128).to(device)

    # 3. 训练模型
    trained_net = train_flow_match(
        net=net,
        target_dist=target_dist,
        epochs=10000,
        batch_size=256,
        lr=1e-4,
        device=device
    )

    # 4. 推理采样
    generated_samples = sample_flow_match(
        net=trained_net,
        n_samples=10000,
        num_steps=100,
        device=device
    )

    # 5. 绘制对比图
    plot_distributions(target_dist, generated_samples)

    # 保存模型
    torch.save(trained_net.state_dict(), "flow_match_model.pth")
    print("模型已保存为 flow_match_model.pth")
最后结果图:
-
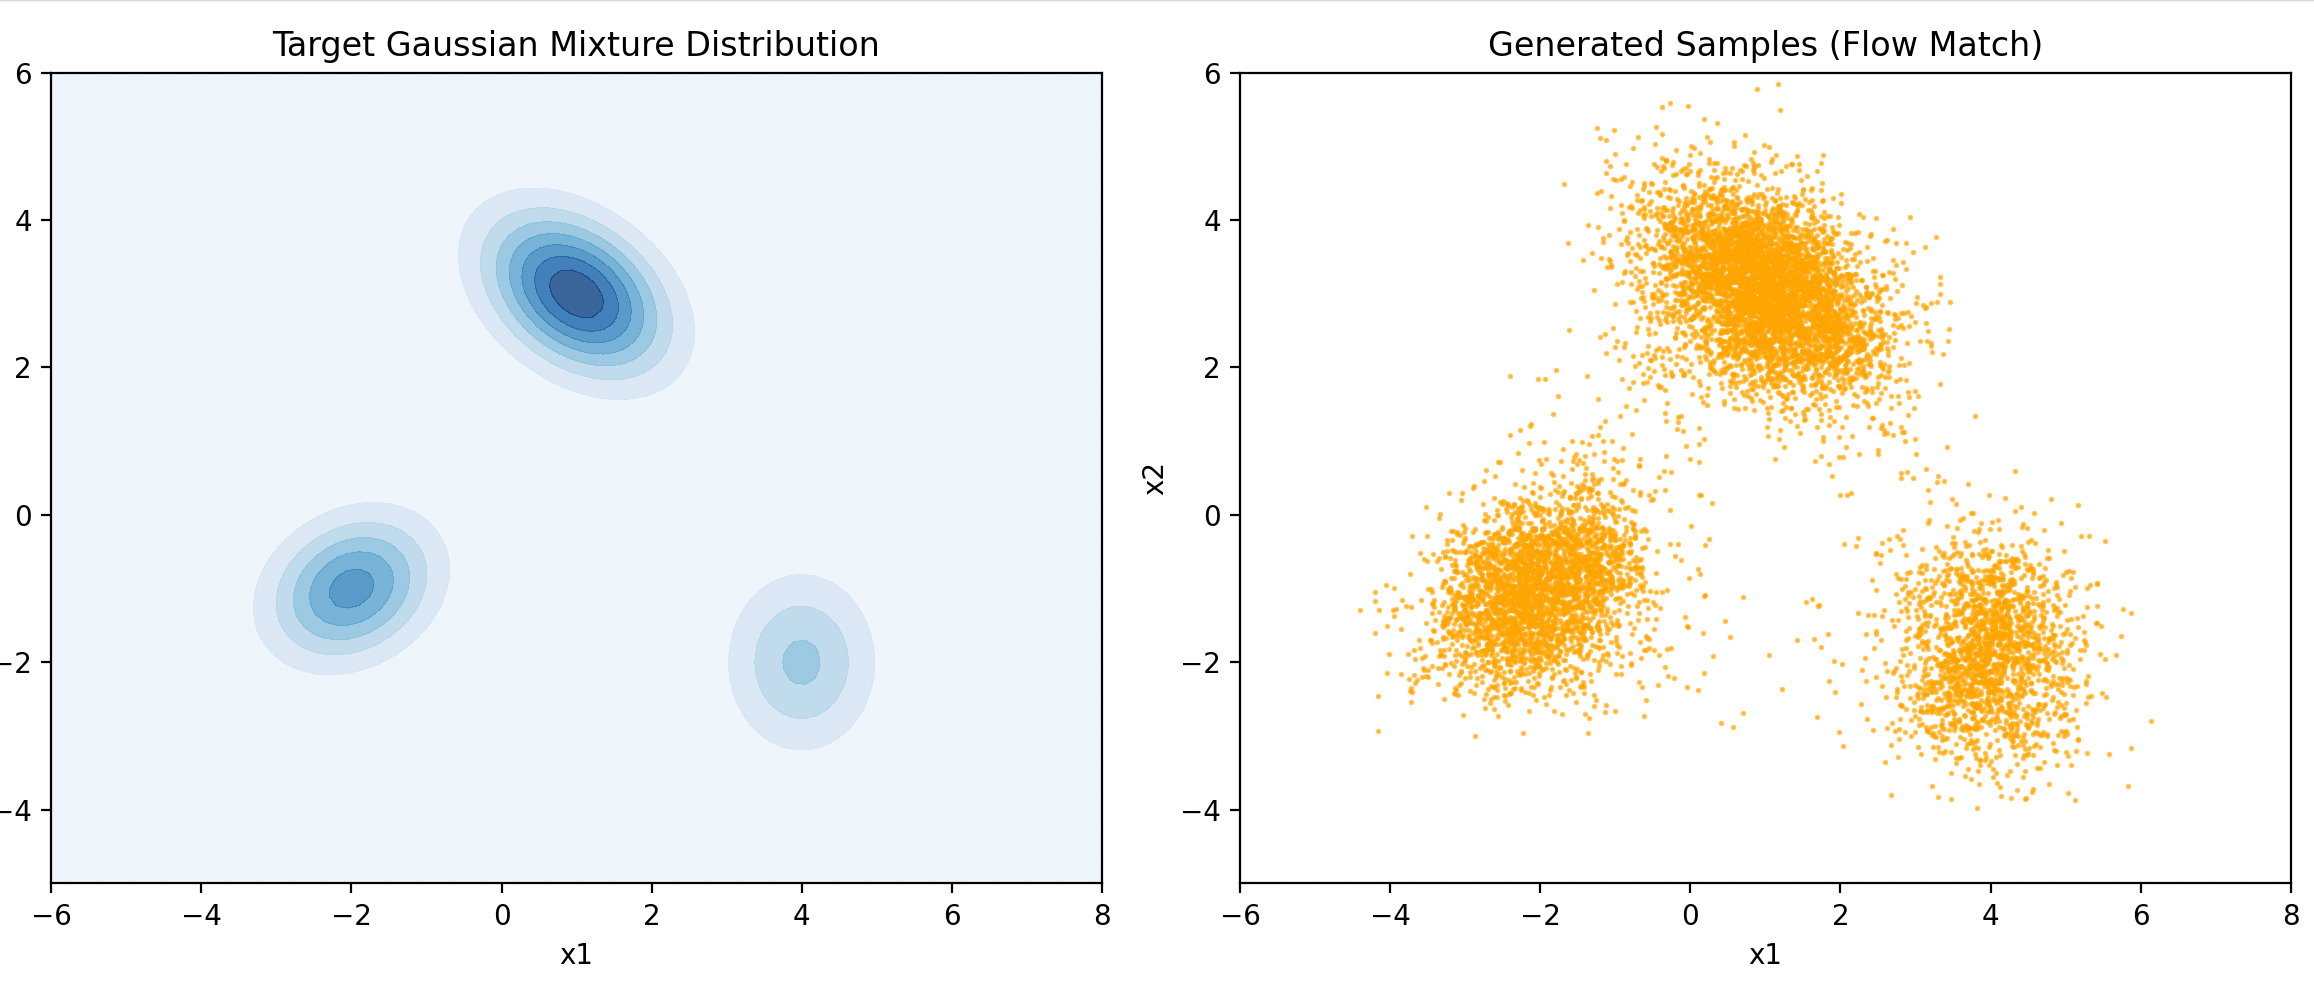
-
其他结果图(从高斯建立多个高斯):
-