Tool Calling Agent 的局限性又在于:虽然它可以自主选择工具,但在其架构中,每次仅能执行一次函数调用(无论是单个外部函数还是多个外部函数)**。因此,当任务需要依次执行 A 工具、B 工具和 C 工具时,它无法支持这种自主控制的过程。因此,面对这种更复杂的需求,就需要引入了 Full Autonomous(自治循环代理)架构,即如下图所示:
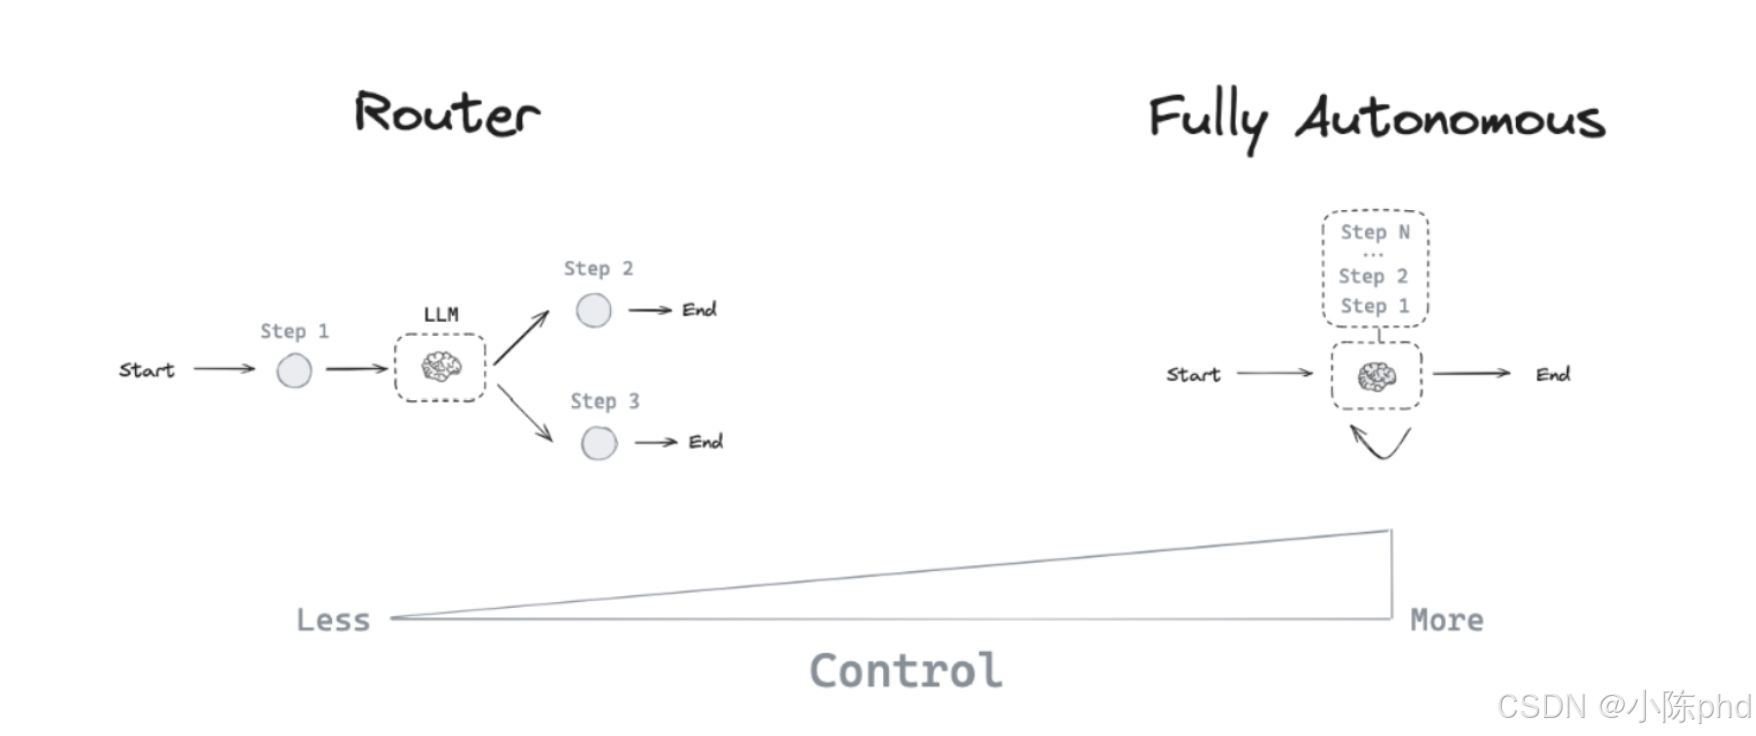
Full Autonmonous 以两种主要的方式去扩展了Agent对工作流的控制,分别是:
- 多步骤决策:
Agent可以控制一系列决策,而不仅仅是一个决策。 - 工具访问:
Agent可以选择并使用多种工具来完成任务。
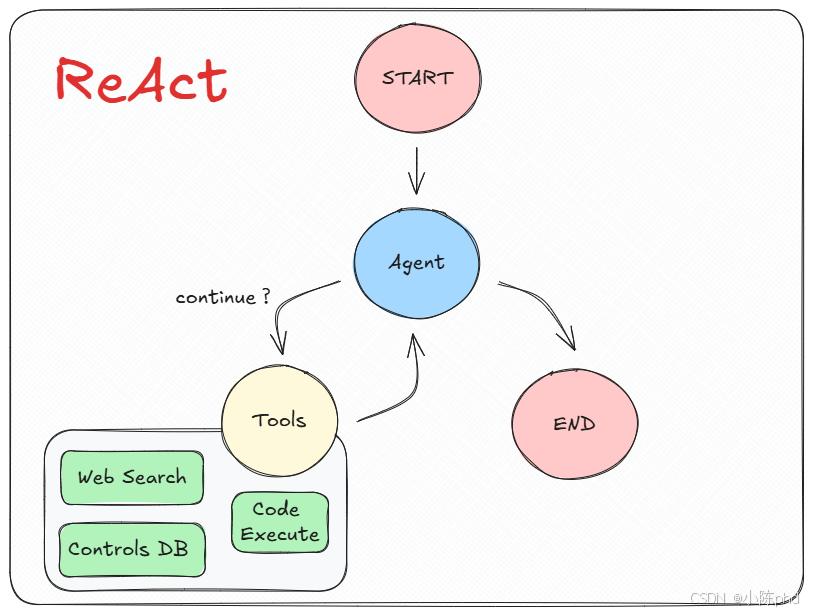
满足上述两个条件,典型且通用的代理架构,就是基于ReAct思想而形成的代理模式 。ReAct的核心理念还是在于为大模型配备足够丰富的外部工具,使用合适的提示词,引导大模型在接收到用户输入后,进入自主思考和循环执行的状态,以实现最终目标。
1. LangGraph中ReAct的构建原理
在 LangGraph 开发框架中有一些预构建的组件。上节课介绍的 ToolNode 是其中一个,它用于处理外部函数调用,其内部结合了 LangGraph 底层的图结构,能够接收 JSON Schema 形式的数据,执行工具函数并返回结果。除此之外,LangGraph的预构建组件中还包含了 ReAct 代理架构,该架构与我们在《ReAct 智能应用架构深度剖析》中手动实现的思路和流程基本一致。不同之处在于,在 LangGraph 框架中,ReAct 组件被改造成适配图结构的循环代理,其具体过程是:大模型可以在一个 while 循环中被重复调用。每一步,代理来自主决定调用哪些工具及其输入,然后执行这些工具,并将输出作为观察结果反馈给大模型。当代理判断不再需要调用更多工具时,while 循环便会终止,输出最终的结果。
因此,我们需要理解的关键概念是:LangGraph预构建的ReAct组件,其实就是通过接入大模型,搭配着Tool Calling Agent,再结合Router Agent 共同构建起来的图,这个图以自治循环代理的架构形式提供服务。 其图结构如下图所示:
这种代理实现的机制表明了,在LangGraph中实现的预构建ReAct代理结构,它支持:
- Tool calling :允许大模型根据需要选择和使用各种工具。
- Memory:使代理能够保留和使用先前步骤中的信息。
- Planning :授权大模型制定并遵循多步骤计划以实现目标。
而其在图结构中的具体构建的工作流如下图所示:
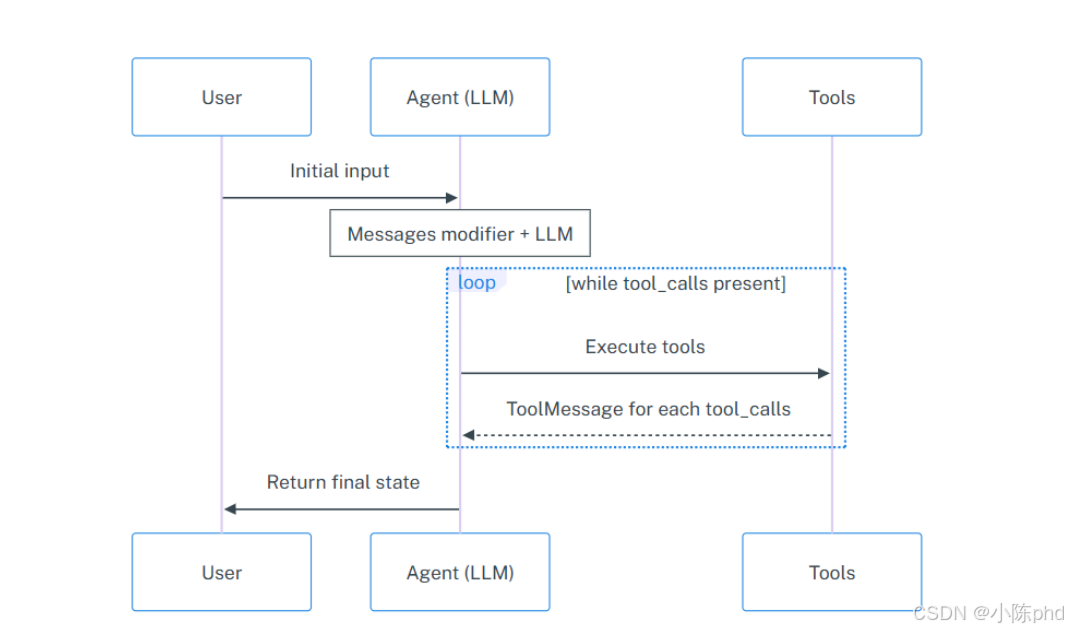
如图所示,Agent节点使用消息列表的形式来调用大语言模型,Messages Modifier指的是在传递到大模型之前,修饰用户的原始输入内容,可以是SystemMessage(作为背景信息添加的消息列表的开头)、Runnable(可运行)等不同状态,如果生成的 AIMessage 包含tool_calls,则该图将调用 tools 。 tools 节点执行工具(每个 tool_call 1 个工具)并且将响应作为ToolMessage对象添加到消息列表。然后Agent节点再次调用大语言模型。重复该过程,直到响应中不再存在tool_calls ,最终由Agent节点将完整的消息列表作为包含键 messages的字典返回。
那么如何实现上述这个非常复杂的过程呢?非常简单,既然我们一直提到的是预构建组件,则说明整个过程已经由LangGraph内部封装好了,其提供给开发者使用的接口就是:create_react_agent方法。
在这个案例中,我们将通过一个多工具场景需求来测试 LangGraph 中 ReAct 代理的构建方法和效果。我们设计了几个工具,以实现实时数据的查询和管理。首先,用户可以通过一个工具根据城市名称实时获取当前天气信息。接着,如果用户希望将查询到的天气数据保存到本地数据库中,可以使用另一个工具完成数据的插入操作。此外,我们还提供了一个工具,允许用户基于本地数据库中的天气数据进行提问数据进行提问。通过这些工具的组合,我们能够快速验证如何在复杂的应用场景中有效地整合不同功能,并实际的感知LangGraph框架下ReAct代理模式带来的开发便捷性和可扩展性。
首先,我们接入实时天气数据查询的在线API,代码定义如下:
OpenWeather API的注册与使用,注册地址:https://openweathermap.org/
python
import requests
import json

def get_weather(loc):
    """
    Function to query current weather.
    :param loc: Required parameter, of type string, representing the specific city name for the weather query. \
    Note that for cities in China, the corresponding English city name should be used. For example, to query the weather for Beijing, \
    the loc parameter should be input as 'Beijing'.
    :return: The result of the OpenWeather API query for current weather, with the specific URL request address being: https://api.openweathermap.org/data/2.5/weather. \
    The return type is a JSON-formatted object after parsing, represented as a string, containing all important weather information.
    """
    # Step 1.构建请求
    url = "https://api.openweathermap.org/data/2.5/weather"

    # Step 2.设置查询参数
    params = {
        "q": loc,
        "appid": "xxxxxxxxxxxxxxxxxxxxxxxx",    # 替换为自己的API key
        "units": "metric",            # 使用摄氏度而不是华氏度
        "lang":"zh_cn"                # 输出语言为简体中文
    }

    # Step 3.发送GET请求
    response = requests.get(url, params=params)

    # Step 4.解析响应
    data = response.json()
return json.dumps(data) 测试一下get_weather函数的有效性,正常情况下可以得到输入城市名的实时天气信息。测试代码如下所示:

从返回的结果是Json数据类型,包含了非常丰富的实时天气数据,如天气条件、温度、湿度、风速、天气描述等信息,这里我们选择一些重要的数据参数进行存储操作(存储至Mysql数据库中)。提取的参数如下:
| 字段名称 | 描述 |
|---|---|
| city_id | 城市的唯一标识符 |
| city_name | 城市名称 |
| main_weather | 主要天气状况 |
| description | 天气的详细描述 |
| temperature | 当前温度 |
| feels_like | 体感温度 |
| temp_min | 最低温度 |
| temp_max | 最高温度 |
接下来,设计一个用于存储实时天气信息的表。这里我们定义一个新的模型 Weather,并包括上述所提取出来的的字段。连接 Mysql数据库及创建表的代码如下所示:
python
from sqlalchemy import create_engine, Column, Integer, String, Float
from sqlalchemy.orm import sessionmaker, declarative_base

# 创建基类
Base = declarative_base()

# 定义 WeatherInfo 模型
class Weather(Base):
    __tablename__ = 'weather'
    city_id = Column(Integer, primary_key=True)  # 城市ID
    city_name = Column(String(50))                # 城市名称
    main_weather = Column(String(50))             # 主要天气状况
    description = Column(String(100))              # 描述
    temperature = Column(Float)                    # 温度
    feels_like = Column(Float)                    # 体感温度
    temp_min = Column(Float)                      # 最低温度
    temp_max = Column(Float)                      # 最高温度


# 数据库连接 URI,这里要替换成自己的Mysql 连接信息,以下是各个字段的对应解释:
# gpt:MySQL 数据库的用户名。
# gpt:MySQL 数据库的密码。
# localhost:MySQL 服务器的 IP 地址。
# langgraph:要连接的数据库的名称。
# charset=utf8mb4:设置数据库的字符集为 utf8mb4,支持更广泛的 Unicode 字符
DATABASE_URI = 'mysql+pymysql://gpt:gpt@localhost:20100/langgraph?charset=utf8mb4'

engine = create_engine(DATABASE_URI)

# 如果表不存在,则创建表
Base.metadata.create_all(engine)

# 创建会话
Session = sessionmaker(bind=engine) 接下来,使用LangChain的tool 装饰器将普通的函数注册为LangGraph中支持的工具服务,根据需求的设计,我们要依次创建三个外部函数,分别是:
get_weather工具:用于根据城市名称实时查询该城市的当前天气数据。insert_weather_to_db工具:如果用户想要把查询到的天气数据插入到数据库的表中,则使用此函数完成数据库的插入操作。query_weather_from_db工具:如果用户想基于本地数据库的天气数据直接进行提问,则使用此函数完成数据库的查询操作。
python
from langchain_core.tools import tool
from typing import Union, Optional
from pydantic import BaseModel, Field
import requests


## 第一个工具

class WeatherLoc(BaseModel):
    location: str = Field(description="The location name of the city")


class WeatherInfo(BaseModel):
    """Extracted weather information for a specific city."""
    city_id: int = Field(..., description="The unique identifier for the city")
    city_name: str = Field(..., description="The name of the city")
    main_weather: str = Field(..., description="The main weather condition")
    description: str = Field(..., description="A detailed description of the weather")
    temperature: float = Field(..., description="Current temperature in Celsius")
    feels_like: float = Field(..., description="Feels-like temperature in Celsius")
    temp_min: float = Field(..., description="Minimum temperature in Celsius")
    temp_max: float = Field(..., description="Maximum temperature in Celsius")

@tool(args_schema=WeatherLoc)
def get_weather(location):
    """
    Function to query current weather.
    :param loc: Required parameter, of type string, representing the specific city name for the weather query. \
    Note that for cities in China, the corresponding English city name should be used. For example, to query the weather for Beijing, \
    the loc parameter should be input as 'Beijing'.
    :return: The result of the OpenWeather API query for current weather, with the specific URL request address being: https://api.openweathermap.org/data/2.5/weather. \
    The return type is a JSON-formatted object after parsing, represented as a string, containing all important weather information.
    """
    # Step 1.构建请求
    url = "https://api.openweathermap.org/data/2.5/weather"

    # Step 2.设置查询参数
    params = {
        "q": location,
        "appid": "5c939a7cc59eb8696f4cd77bf75c5a9a",    # 输入API key
        "units": "metric",            # 使用摄氏度而不是华氏度
        "lang":"zh_cn"                # 输出语言为简体中文
    }

    # Step 3.发送GET请求
    response = requests.get(url, params=params)

    # Step 4.解析响应
    data = response.json()
    return json.dumps(data)


## 第二个工具

@tool(args_schema=WeatherInfo)
def insert_weather_to_db(city_id, city_name, main_weather, description, temperature, feels_like, temp_min, temp_max):
    """Insert weather information into the database."""
    session = Session()  # 确保为每次操作创建新的会话
    try:
        # 创建天气实例
        weather = Weather(
            city_id=city_id,
            city_name=city_name,
            main_weather=main_weather,
            description=description,
            temperature=temperature,
            feels_like=feels_like,
            temp_min=temp_min,
            temp_max=temp_max
        )
        # 使用 merge 方法来插入或更新(如果已有记录则更新)
        session.merge(weather)
        # 提交事务
        session.commit()
        return {"messages": [f"天气数据已成功存储至Mysql数据库。"]}
    except Exception as e:
        session.rollback()  # 出错时回滚
        return {"messages": [f"数据存储失败,错误原因:{e}"]}
    finally:
        session.close()  # 关闭会话

## 第三个工具

class QueryWeatherSchema(BaseModel):
    """Schema for querying weather information by city name."""
    city_name: str = Field(..., description="The name of the city to query weather information")

@tool(args_schema=QueryWeatherSchema)
def query_weather_from_db(city_name: str):
    """Query weather information from the database by city name."""
    session = Session()
    try:
        # 查询天气数据
        weather_data = session.query(Weather).filter(Weather.city_name == city_name).first()
        if weather_data:
            return {
                "city_id": weather_data.city_id,
                "city_name": weather_data.city_name,
                "main_weather": weather_data.main_weather,
                "description": weather_data.description,
                "temperature": weather_data.temperature,
                "feels_like": weather_data.feels_like,
                "temp_min": weather_data.temp_min,
                "temp_max": weather_data.temp_max
            }
        else:
            return {"messages": [f"未找到城市 '{city_name}' 的天气信息。"]}
    except Exception as e:
        return {"messages": [f"查询失败,错误原因:{e}"]}
    finally:
        session.close()  # 关闭会话
然后,定义实时联网检索外部工具,通过该函数获取最新的网络数据信息。
python
## 第四个工具

class SearchQuery(BaseModel):
    query: str = Field(description="Questions for networking queries")


@tool(args_schema = SearchQuery)
def fetch_real_time_info(query):
    """Get real-time Internet information"""
    url = "https://google.serper.dev/search"
    payload = json.dumps({
      "q": query,
      "num": 1,
    })
    headers = {
      'X-API-KEY': '22a84d67009121271e4a5eb21d809e11d3bc8d45',
      'Content-Type': 'application/json'
    }

    response = requests.post(url, headers=headers, data=payload)
    data = json.loads(response.text)  # 将返回的JSON字符串转换为字典
    if 'organic' in data:
        return json.dumps(data['organic'],  ensure_ascii=False)  # 返回'organic'部分的JSON字符串
    else:
        return json.dumps({"error": "No organic results found"},  ensure_ascii=False)  # 如果没有'organic'键,返回错误信息
然后把所有定义的工具存储在一个列表中,如下代码所示:
python
tools = [fetch_real_time_info, get_weather, insert_weather_to_db, query_weather_from_db]
tools
定义模型
python
import getpass
import os
from langchain_openai import ChatOpenAI
from dotenv import load_dotenv
load_dotenv()

key=os.getenv("DASHSCOPE_API_KEY")
base_url=os.getenv("DASHSCOPE_API_BASE")
llm = ChatOpenAI(model="qwen-plus", api_key=key,base_url=base_url,temperature=0) 当有了工具列表和模型后,就可以通过create_react_agent这个LangGraph框架中预构建的方法来创建自治循环代理(ReAct)的工作流,其必要的参数如下:
- model: 支持工具调用的LangChain聊天模型。
- tools: 工具列表、ToolExecutor 或 ToolNode 实例。
- state_schema:图的状态模式。必须有
messages和is_last_step键。默认为定义这两个键的Agent State。
python
from langgraph.prebuilt import create_react_agent

graph = create_react_agent(llm, tools=tools)

from IPython.display import Image, display

display(Image(graph.get_graph().draw_mermaid_png()))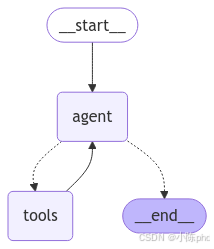
2.构建步骤解析
我们可以逐步的分析和解释一下这一行代码中涉及的图构建过程:
2.1 Step 1. 定义图状态模式
LangGraph中的主要图类型是StateGraph。每个节点通过State中的参数获取有效信息,执行完节点的内部逻辑后,更新该State状态中的值。不同的状态模式,可以通过注释设置状态的特定属性(例如覆盖现有值)或添加到现有属性。伪代码如下:
python
from typing import Annotated
from typing_extensions import TypedDict
from langgraph.graph.message import add_messages


class State(TypedDict):
    messages: Annotated[list, add_messages]
2.2 Step 2. 定义Router Function
设置边缘条件,有条件的原因是,根据节点的输出,可以采用多个路径之一。在该节点运行之前,所采用的路径是未知的(由大模型决定)。
- 条件边缘:调用代理后,如果代理说要采取行动,那么应该调用调用工具的函数。如果代理说已经完成,那么就应该完成。
- 正常边:调用工具后,它应该始终返回给代理来决定下一步做什么。
伪代码如下:
python
# 定义决定是否继续执行任务的路由函数
def should_continue(state: State):
    messages = state["messages"]
    last_message = messages[-1]
    # 如果不是工具调用,则结束
    if not last_message.tool_calls:
        return END
    # 如果是的话,则进入工具库中选择函数执行
    else:
        return "tools"
2.3 Step 3. 定义大模型的交互函数
接下来需要通过一个节点函数加载我想要使用的大模型。它需要满足两个标准:
- 应该与消息一起使用,因为图的状态主要是消息列表(聊天历史记录)。
- 需要与工具调用一起使用,其内部使用的是预构建的ToolNode。
伪代码如下:
python
from typing import Literal

from langchain_core.runnables import RunnableConfig

# 定义大模型交互的节点函数
async def call_model(state: State, config: RunnableConfig):
    messages = state["messages"]
    response = await model.ainvoke(messages, config)
    # 将调用大模型后得到的响应,追加到消息列表中
    return {"messages": response}
2.4 Step 4. 构建图结构
最后,把上述所有的组件放在一起构建图结构,这与我们手动构建图的方式基本一致,伪代码如下:
python
from langgraph.graph import END, START, StateGraph

# 定义一个新图
workflow = StateGraph(State)

# 添加两个节点
workflow.add_node("agent", call_model)
workflow.add_node("tools", tool_node)

# 设置起始节点为 agent
workflow.add_edge(START, "agent")

# 添加条件边 -- > Router Agent
workflow.add_conditional_edges(
    "agent",
    should_continue,
    ["tools", END],
)
# 添加回调边
workflow.add_edge("tools", "agent")

# 编译图
app = workflow.compile() 理解了上面的create_react_agent方法内部的构建原理后,其实就能明白:当通过create_react_agent(llm, tools=tools)一行代码的执行,现在得到的已经是一个编译后、可执行的图了。我们可以通过mermaid方法来可视化经过create_react_agent方法构造出来的图结构,代码如下所示:
python
from IPython.display import Image, display

display(Image(graph.get_graph().draw_mermaid_png())) 返回的是编译好的LangGraph可运行程序,可直接用于聊天交互。调用方式则和之前使用的方法一样,我们可以依次针对不同复杂程度的需求依次进行提问。首先是测试是否可以不使用工具,直接调用大模型生成响应。
python
finan_response = graph.invoke({"messages":["你好,请你介绍一下你自己"]})
finan_response