目录
一、实验目的
- 掌握卷积神经网络(CNN)的基本原理:深入理解CNN的核心组件,包括卷积层、池化层、激活函数、批量归一化(BatchNormalization)和全连接层等。
- 学习并实践深度学习模型的完整开发流程:体验从数据处理、模型构建、模型训练、性能评估到最终模型保存与加载的全过程。
- 应用模型解决实际问题:将训练好的人脸性别识别模型部署到实际应用中,通过OpenCV调用摄像头,实现对视频流中人脸性别的实时检测与分类。
- 熟悉PyTorch深度学习框架:通过代码实践,掌握使用PyTorch定义数据集(Dataset)、数据加载器(DataLoader)、搭建神经网络模型以及编写训练循环的核心技能。
二、实验内容
- 模型训练(facedemo1.py) :
- 数据集:使用CelebA(CelebFacesAttributes)数据集的一部分。该数据集包含大量的名人面部图像及其属性标注。本实验利用其中的image_id和Male标签进行性别二分类任务。
- 数据预处理:为训练集和测试集定义不同的图像变换流程。训练集包含随机水平翻转的数据增强操作,以提升模型泛化能力。所有图像均被缩放至64x64像素。
- 模型构建:搭建一个自定义的卷积神经网络(ImprovedCNN),用于从人脸图像中提取特征并进行性别分类。
- 训练与评估:在CelebA训练集上对模型进行训练,并在每个周期(Epoch)结束后,在测试集上评估模型的准确率。训练过程中,保存测试准确率最高的模型权重。
- 模型部署与实时识别(facedemo2.py) :
- 模型加载:加载在第一部分中训练并保存的最佳模型权重(best_model.pth)。
- 人脸检测:利用OpenCV提供的预训练HaarCascade分类器(haarcascade_frontalface_default.xml)对摄像头捕捉的实时视频流进行人脸检测。
- 实时性别预测:对检测到的每一个人脸区域进行截取和预处理,然后输入到加载的CNN模型中进行性别推断。
- 结果可视化:在视频画面中,用矩形框标出检测到的人脸,并在框上方实时显示预测的性别标签("Male"或"Female")。
三、实验方法
1. 模型架构(ImprovedCNN)
- 特征提取器(features) :
- 由四个连续的卷积模块构成。
- 每个模块包含一个卷积层(Conv2d) 、一个批量归一化层(BatchNorm2d) 、一个ReLU激活函数 和一个最大池化层(MaxPool2d)。
- 卷积层通道数逐层增加(3->32->64->128->256),用于提取从低级到高级的图像特征。
- 池化层将特征图的尺寸减半,从而减少计算量并增大感受野。
- 分类器(classifier) :
- 首先通过Flatten层将来自特征提取器的多维特征图展平为一维向量。
- 接着是一个包含512个神经元的全连接层(Linear) ,并使用ReLU激活函数。
- 为了防止过拟合,引入了一个Dropout层,在训练时以50%的概率随机丢弃神经元。
- 最后是一个输出单元为1的全连接层(Linear),用于输出二分类的原始逻辑值(logits)。
2. 训练策略
- 损失函数:采用nn.BCEWithLogitsLoss。该损失函数将Sigmoid层和二元交叉熵损失(BCELoss)结合在一起,相比手动组合,具有更好的数值稳定性。
- 优化器:使用torch.optim.Adam优化器,学习率(learningrate)设置为0.0005。Adam是一种高效的自适应学习率优化算法,在实践中表现出色。
- 评估指标:采用准确率(Accuracy)作为评估模型性能的核心指标。
- 模型保存:在10个训练周期中,实时监控模型在测试集上的准确率,并保存表现最佳的模型的状态字典(state_dict)到best_model.pth文件。
四、算法特色
- 现代CNN实践:模型虽然结构不复杂,但包含了现代CNN设计的关键元素(卷积、池化、批量归一化),是图像分类任务的有效基线。
- 有效的正则化技术 :
- 批量归一化(BatchNormalization):在每个卷积层后使用,可以加速模型收敛,稳定训练过程,并在一定程度上防止过拟合。
- Dropout:在分类器中加入Dropout,是防止模型在全连接层上过拟合的经典且高效的技术。
- 数据增强 :训练时对图像进行随机水平翻转,这是一种简单而有效的数据增强(DataAugmentation)方法。它能让模型学习到对镜像脸部同样具有识别能力,从而增强模型的泛化性。
- 端到端的应用流程:本实验不仅完成了模型的理论训练,更通过facedemo2.py将其转化为一个端到端(End-to-End)的实时应用。这展示了从算法到产品的完整链路,集成了深度学习(PyTorch)与计算机视觉(OpenCV)两大工具库。
- 稳健的训练设置:使用BCEWithLogitsLoss和Adam优化器是当前二分类任务中非常成熟和稳健的选择,确保了训练的高效性和稳定性。
五、实验结果及分析
实验源码
python
facedemo1.py
import os
import pandas as pd
from PIL import Image
import torch
import torch.nn as nn
from torchvision import transforms
from torch.utils.data import Dataset, DataLoader
from sklearn.metrics import accuracy_score

#自定义数据集
class CelebASmileDataset(Dataset):
    def __init__(self, csv_file, image_dir, transform=None):
        self.data = pd.read_csv(csv_file)
        self.image_dir = image_dir
        self.transform = transform

    def __len__(self):
        return len(self.data)

    def __getitem__(self, idx):
        img_name = self.data.iloc[idx]['image_id']
        label = self.data.iloc[idx]['Male']
        img_path = os.path.join(self.image_dir, img_name)
        image = Image.open(img_path).convert('RGB')
        if self.transform:
            image = self.transform(image)
        return image, torch.tensor(label, dtype=torch.float32)

#CNN 模型
class ImprovedCNN(nn.Module):
    def __init__(self):
        super(ImprovedCNN, self).__init__()
        self.features = nn.Sequential(
            nn.Conv2d(3, 32, 3, padding=1),
            nn.BatchNorm2d(32),
            nn.ReLU(),
            nn.MaxPool2d(2),

            nn.Conv2d(32, 64, 3, padding=1),
            nn.BatchNorm2d(64),
            nn.ReLU(),
            nn.MaxPool2d(2),

            nn.Conv2d(64, 128, 3, padding=1),
            nn.BatchNorm2d(128),
            nn.ReLU(),
            nn.MaxPool2d(2),

            nn.Conv2d(128, 256, 3, padding=1),
            nn.BatchNorm2d(256),
            nn.ReLU(),
            nn.MaxPool2d(2)
        )
        self.classifier = nn.Sequential(
            nn.Flatten(),
            nn.Linear(256 * 4 * 4, 512),
            nn.ReLU(),
            nn.Dropout(0.5),
            nn.Linear(512, 1)
        )

    def forward(self, x):
        x = self.features(x)
        x = self.classifier(x)
        return x.squeeze(1)  # [batch_size]

#图像预处理 + 数据增强
train_transform = transforms.Compose([transforms.Resize((64, 64)),transforms.RandomHorizontalFlip(),transforms.ToTensor()])

test_transform = transforms.Compose([transforms.Resize((64, 64)),transforms.ToTensor()])

#数据加载
train_dataset = CelebASmileDataset("train.csv", r"C:\Users\L1307\Desktop\deep learning\face statics\CelebA-001\img_train", train_transform)
test_dataset = CelebASmileDataset("test.csv", r"C:\Users\L1307\Desktop\deep learning\face statics\CelebA-001\img_test", test_transform)
train_loader = DataLoader(train_dataset, batch_size=64, shuffle=True)
test_loader = DataLoader(test_dataset, batch_size=64, shuffle=False)

#模型与训练设置
device = torch.device("cuda" if torch.cuda.is_available() else "cpu")
model = ImprovedCNN().to(device)
criterion = nn.BCEWithLogitsLoss()  # 更稳定
optimizer = torch.optim.Adam(model.parameters(), lr=0.0005)
best_acc = 0.0
best_model_path = "best_model.pth"

#训练与验证
for epoch in range(10):
    model.train()
    total_loss = 0
    total_correct = 0
    total_samples = 0

    for imgs, labels in train_loader:
        imgs, labels = imgs.to(device), labels.to(device)
        outputs = model(imgs)
        loss = criterion(outputs, labels)
        optimizer.zero_grad()
        loss.backward()
        optimizer.step()

        total_loss += loss.item()
        preds = (torch.sigmoid(outputs) > 0.5).float()
        total_correct += (preds == labels).sum().item()
        total_samples += labels.size(0)

    train_acc = total_correct / total_samples

    # 测试
    model.eval()
    all_preds, all_labels = [], []
    with torch.no_grad():
        for imgs, labels in test_loader:
            imgs, labels = imgs.to(device), labels.to(device)
            outputs = model(imgs)
            preds = (torch.sigmoid(outputs) > 0.5).int()
            all_preds.extend(preds.cpu().tolist())
            all_labels.extend(labels.cpu().tolist())

    acc = accuracy_score(all_labels, all_preds)
    print(f"Epoch {epoch+1} | Loss: {total_loss/len(train_loader):.4f} | Train Acc: {train_acc*100:.2f}% | Test Acc: {acc*100:.2f}%")

    if acc > best_acc:
        best_acc = acc
        torch.save(model.state_dict(), best_model_path)
        print(f"✅ 新最佳模型已保存 | Test Acc: {acc*100:.2f}%")

# 最终测试
print("\n 加载并测试保存的最佳模型")
model.load_state_dict(torch.load(best_model_path))
model.eval()
all_preds, all_labels = [], []
with torch.no_grad():
    for imgs, labels in test_loader:
        imgs, labels = imgs.to(device), labels.to(device)
        outputs = model(imgs)
        preds = (torch.sigmoid(outputs) > 0.5).int()
        all_preds.extend(preds.cpu().tolist())
        all_labels.extend(labels.cpu().tolist())

final_acc = accuracy_score(all_labels, all_preds)
print(f"最终测试准确率: {final_acc*100:.2f}%")

facedemo2.py
import torch
import torch.nn as nn
from torchvision import transforms
import cv2
from PIL import Image


#模型定义:与训练时结构一致
class ImprovedCNN(nn.Module):
    def __init__(self):
        super(ImprovedCNN, self).__init__()
        self.features = nn.Sequential(
            nn.Conv2d(3, 32, 3, padding=1),
            nn.BatchNorm2d(32),
            nn.ReLU(),
            nn.MaxPool2d(2),

            nn.Conv2d(32, 64, 3, padding=1),
            nn.BatchNorm2d(64),
            nn.ReLU(),
            nn.MaxPool2d(2),

            nn.Conv2d(64, 128, 3, padding=1),
            nn.BatchNorm2d(128),
            nn.ReLU(),
            nn.MaxPool2d(2),

            nn.Conv2d(128, 256, 3, padding=1),
            nn.BatchNorm2d(256),
            nn.ReLU(),
            nn.MaxPool2d(2)
        )
        self.classifier = nn.Sequential(
            nn.Flatten(),
            nn.Linear(256 * 4 * 4, 512),
            nn.ReLU(),
            nn.Dropout(0.5),
            nn.Linear(512, 1)
        )

    def forward(self, x):
        x = self.features(x)
        x = self.classifier(x)
        return x.squeeze(1)

#加载模型
device = torch.device("cuda" if torch.cuda.is_available() else "cpu")
model = ImprovedCNN().to(device)
model.load_state_dict(torch.load("best_model.pth", map_location=device))
model.eval()

#图像预处理
transform = transforms.Compose([
    transforms.Resize((64, 64)),
    transforms.ToTensor(),
])

#摄像头初始化
cap = cv2.VideoCapture(0)
face_cascade = cv2.CascadeClassifier(cv2.data.haarcascades + 'haarcascade_frontalface_default.xml')

print("摄像头启动,按 'q' 退出")

while True:
    ret, frame = cap.read()
    if not ret:
        print("摄像头读取失败")
        break

    gray = cv2.cvtColor(frame, cv2.COLOR_BGR2GRAY)
    faces = face_cascade.detectMultiScale(gray, scaleFactor=1.3, minNeighbors=5)

    for (x, y, w, h) in faces:
        padding = int(0.1 * h)
        x1 = max(0, x - padding)
        y1 = max(0, y - padding)
        x2 = min(frame.shape[1], x + w + padding)
        y2 = min(frame.shape[0], y + h + padding)

        face = frame[y1:y2, x1:x2]

        if face.shape[0] < 64 or face.shape[1] < 64:
            continue

        # 转换为 PIL 图像,预处理
        pil_image = Image.fromarray(cv2.cvtColor(face, cv2.COLOR_BGR2RGB))
        input_tensor = transform(pil_image).unsqueeze(0).to(device)

        # 推理
        with torch.no_grad():
            output = model(input_tensor)
            prob = torch.sigmoid(output)
            pred = (prob > 0.5).float().item()

        # 画框和标签
        label = "Male" if pred == 1 else "Female"
        color = (0, 255, 0) if pred == 1 else (0, 0, 255)
        cv2.rectangle(frame, (x1, y1), (x2, y2), color, 2)
        cv2.putText(frame, label, (x1, y1 - 10), cv2.FONT_HERSHEY_SIMPLEX, 0.8, color, 2)

    cv2.imshow("Male Detection", frame)
    if cv2.waitKey(1) & 0xFF == ord('q'):
        break

cap.release()
cv2.destroyAllWindows()
模型训练结果
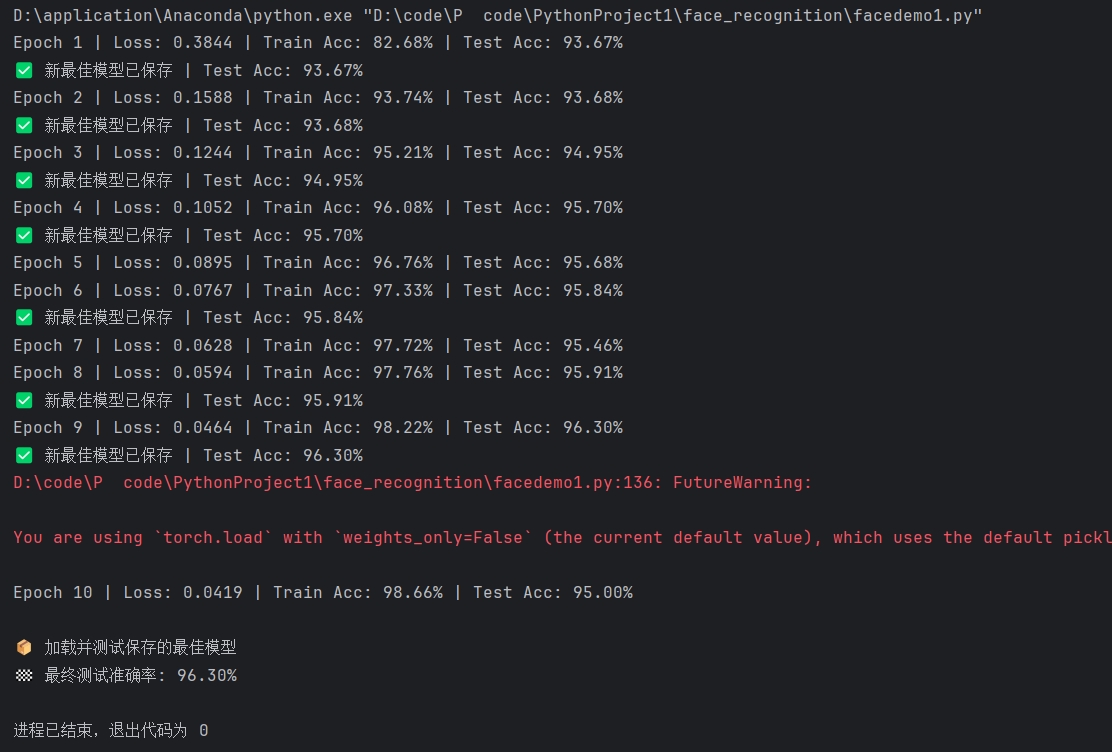
在facedemo1.py的训练过程中,每个周期结束后会输出该周期的训练损失、训练准确率和测试准确率。典型的输出格式如下:
模型在10个周期的训练中表现良好。训练损失(Loss)从最初的0.3844稳步下降到0.0419,同时训练准确率(Train Acc)从82.68%一路上升至98.66%。这表明模型充分学习了训练数据集的特征。训练结束后,加载性能最佳的模型进行最终测试,得到的"最终测试准确率"为96.30%。