文章目录
- 一、生命周期介绍
- 二、组件生命周期钩子
-
- [选项式 API 的代码示例](#选项式 API 的代码示例)
- 三、组合式API生命周期钩子
-
- [1. 与 Vue2 钩子函数的对比](#1. 与 Vue2 钩子函数的对比)
- [2. 代码实例](#2. 代码实例)
- 四、案例-生命周期钩子应用
-
- [1. 在 setup 中发起网络请求并渲染数据](#1. 在 setup 中发起网络请求并渲染数据)
-
- [① 安装axios](#① 安装axios)
- [② 完整代码](#② 完整代码)
- [2. 在 onMounted 中操作 DOM](#2. 在 onMounted 中操作 DOM)

一、生命周期介绍
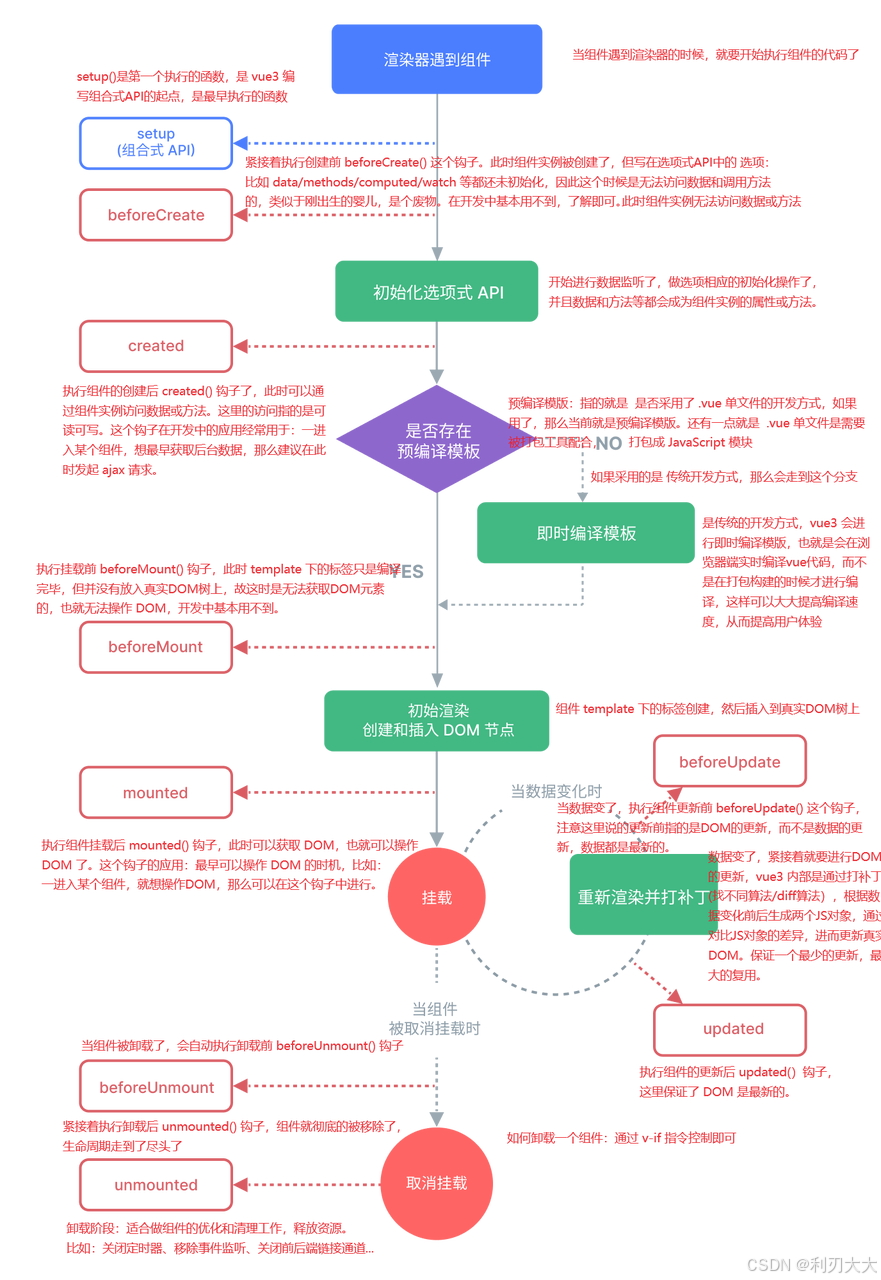
一个 Vue 实例(组件)从创建到卸载的整个过程,称为其生命周期。从宏观角度来看,一共有四个阶段,如下所示:
- 创建 :初始化
props、data、methods等响应式数据。 - 挂载 :渲染模板
template,把虚拟 DOM 渲染成真实 DOM,显示在页面上。 - 更新:当数据变化时,重新渲染视图。
- 卸载:组件销毁、释放资源。
二、组件生命周期钩子
每个 Vue 组件实例在创建时都需要经历一系列的初始化步骤,比如设置好数据监听,编译模板,挂载实例到真实 DOM 树上,以及在数据改变时更新 DOM。
在上述过程中,会自动运行一些函数,这些函数被称为【Vue生命周期钩子】。
作用:钩子函数在特定时机会自动执行,这给了开发者在特定阶段添加自己代码的机会。
选项式 API 的代码示例
新建 components/LifeCycle.vue文件:
javascript
<script>
export default {
  // 提供响应式数据
  data() {
    return {
      count: 0
    }
  },
  // 提供方法/函数
  methods: {
    fn() {
      console.log('fn 函数执行了')
    }
  },

  setup() {
    console.log('0-setup')
  },

  // 创建阶段(第一阶段):Vue组件创建/出生阶段:
  // 创建前:此时无法访问 data 数据,也无法调用 methods 方法
  beforeCreate() {
    console.log('1-beforeCreate')
    console.log(this.count) // undefined
    console.log(this.fn) // undefined
  },
  // 创建后:此时可以访问 data 数据,也可以调用 methods 方法
  created() {
    console.log('2-created')
    console.log(this.count) // 0
    console.log(this.fn) // 访问到函数
    this.fn()

    // 开启定时器
    // 给当前组件实例新增了一个 timerId 属性,保存了当前定时器的 id 值
    this.timerId = setInterval(() => {
      console.log(this.count)
    }, 1000)
  },

  // 挂载阶段(第二阶段):模版渲染阶段
  // 挂载前:此时写在 template 下的标签还没有变成真实DOM,故而无法获取DOM
  beforeMount() {
    console.log('3-beforeMount')
    console.log(document.querySelector('p')) // null
  },
  // 挂载后:此时写在 template 下的标签已经变成了真实DOM,故而可以获取DOM(是最早可以操作DOM的时机)
  mounted() {
    console.log('4-mounted')
    console.log(document.querySelector('p'))// <p>0</p>
    document.querySelector('p').style.color = 'red'
  },

  // 更新阶段(第三阶段):数据变了,组件重新渲染的过程
  // 更新前
  beforeUpdate() {
    console.log('5-beforeUpdate')
    // console.log(this.count)
    console.log(document.querySelector('p').innerText)// 旧内容(以前的内容)
  },
  // 更新后
  updated() {
    console.log('6-updated')
    // console.log(this.count)
    console.log(document.querySelector('p').innerText)// 新内容
  },

  // 卸载阶段(第四阶段):组件移除阶段
  beforeUnmount() {
    console.log('7-beforeUnmount')

    // 用于 依赖 DOM 或组件存在的清理逻辑,比如要解除某个挂在组件 DOM 上的事件监听。
  },
  unmounted() {
    console.log('8-mounted')

    // 这里尝试访问 this.$el 或 document.querySelector('#xxx')
    // 已经拿不到了,因为 DOM 被销毁了
    // 但是可以关闭定时器之类非 DOM 的资源
    clearInterval(this.timerId)
  }
}
</script>

<template>
  <div>
    <p>{{ count }}</p>
    <button @click="count++">+1</button>
  </div>
</template>App.vue文件:
javascript
<script setup>
    import { ref } from 'vue'
    import LifeCycle from './components/LifeCycle.vue'

    const isAlive = ref(true)
</script>

<template>
    <life-cycle v-if="isAlive"/>
</template>
三、组合式API生命周期钩子
1. 与 Vue2 钩子函数的对比
| 阶段 | Vue2(选项式) | Vue3(组合式) |
|---|---|---|
| 创建阶段 | beforeCreate、created | setup (网络请求) |
| 挂载阶段 | beforeMount、mounted | onBeforeMount、onMounted (操作DOM) |
| 更新阶段 | beforeUpdate、updated | onBeforeUpdate、onUpdated |
| 销毁阶段 | beforeUnmount、unmounted | onBeforeUnmount、onUnmounted (清理工作) |
其中 vue3 的 <script setup> 就直接包括了 vue2 中的 setup()、beforeCreate()、created(),所以可以直接在 <script setup> 中进行网络请求!
2. 代码实例
javascript
<script setup>
    import { onMounted, onUnmounted } from 'vue'

    // 开启定时器
    const timer = setInterval(() => {
      console.log('Hello World')
    }, 1000)

    // 组件挂载后
    onMounted(() => {
      // console.log(document.querySelector('p'))
      document.querySelector('p').style.color = 'green'
    })

    // 组件卸载后
    onUnmounted(() => {
      // 关闭定时器
      clearInterval(timer)
    })
</script>
四、案例-生命周期钩子应用
1. 在 setup 中发起网络请求并渲染数据
① 安装axios
bash
npm i axios② 完整代码
javascript
<script setup>
// 安装 axios
// 导入模块
// 定义请求函数并调用
import axios from 'axios'
import { ref } from 'vue'
const i = ref(0)
// 图片列表
const images = ref([])
getBannerData()
async function getBannerData() {
// 发请求,调接口
const resp = await axios({
method: 'GET', // 请求方式
url: 'http://localhost:4000/api/banner' // 请求路径
})
// 保存数据
console.log(resp);
images.value = resp.data.data
}
const prev = () => {
i.value--
if (i.value <= -1) {
i.value = images.value.length - 1
}
}
const next = () => {
i.value++
if (i.value >= images.value.length) {
i.value = 0
}
}
let timer = null
const play = () => {
timer = setInterval(() => {
next()
}, 3000)
}
play()
const stop = () => {
clearInterval(timer)
}
</script>
<template>
<div
class="banner"
@mouseenter="stop"
@mouseleave="play">
<ul>
<li
v-for="(url, index) in images"
:class="{ active: index === i }">
<img :src="url" />
</li>
</ul>
<div class="indicator">
<span
v-for="(n, index) in images.length"
:key="n"
:class="{ active: index === i }"
@click="i = index">
</span>
</div>
<div class="ctrl">
<a
href="javascript:;"
class="btn prev"
@click="prev"
><</a
><a
href="javascript:;"
class="btn next"
@click="next"
>></a
>
</div>
</div>
</template>
<style>
* {
margin: 0;
padding: 0;
}
a {
text-decoration: none;
color: #000;
}
.banner {
position: relative;
width: 1200px;
height: 337px;
margin: 150px auto;
}
.banner ul {
width: 100%;
height: 100%;
list-style: none;
}
.banner ul li {
position: absolute;
top: 0;
left: 0;
width: 100%;
height: 100%;
opacity: 0;
transition: opacity 1s;
}
.banner ul li.active {
opacity: 1;
}
.banner .indicator {
display: flex;
justify-content: center;
position: absolute;
left: 0;
bottom: 20px;
width: 100%;
}
.banner .indicator span {
width: 30px;
height: 2px;
margin: 0 5px;
cursor: pointer;
background: rgba(255, 2555, 255, 0.6);
}
.banner .indicator span.active {
background: rgba(255, 255, 255, 1);
}
.btn {
position: absolute;
top: 50%;
width: 30px;
height: 30px;
line-height: 30px;
margin-top: -15px;
font-size: 14px;
text-align: center;
background: rgba(0, 0, 0, 0.3);
color: #fff;
border-radius: 50%;
}
.btn.prev {
left: 15px;
}
.btn.next {
right: 15px;
}
</style>2. 在 onMounted 中操作 DOM
目标:打开网页的时候,输入框自动聚焦
javascript
<script setup>
    import { onMounted } from 'vue'

    // 组件挂载后
    onMounted(() => {
      // 获取 input 元素
      const input = document.querySelector('input')
      // 调用 focus 聚焦
      input.focus()
    })
</script>

<template>
  <div class="container">
    <img
      width="150"
      src="https://th.bing.com/th/id/ODL.ce819d0be740fd3c6b5e42d538119fab?w=310&h=198&c=7&rs=1&bgcl=ffff14&r=0&o=6&dpr=1.3&pid=AlgoBlockDebug"
      alt="logo" />
    <div class="search-box">
      <input type="text" />
      <button>搜 索</button>
    </div>
  </div>
</template>

<style>
html,
body {
  height: 100vh;
}
.container {
  position: absolute;
  top: 30%;
  left: 50%;
  transform: translate(-50%, -50%);
  text-align: center;
}
.container .search-box {
  display: flex;
}
.container img {
  margin-bottom: 30px;
}
.container .search-box input {
  width: 512px;
  height: 17px;
  padding: 12px 16px;
  font-size: 16px;
  margin: 0;
  vertical-align: top;
  outline: 0;
  box-shadow: none;
  border-radius: 10px 0 0 10px;
  border: 2px solid #c4c7ce;
  background: #fff;
  color: #222;
  overflow: hidden;
  -webkit-tap-highlight-color: transparent;
}
.container .search-box button {
  width: 112px;
  height: 44px;
  line-height: 42px;
  background-color: #ad2a27;
  border-radius: 0 5px 5px 0;
  font-size: 17px;
  box-shadow: none;
  font-weight: 400;
  margin-left: -1px;
  border: 0;
  outline: 0;
  letter-spacing: normal;
  color: white;
  cursor: pointer;
}
body {
  background: #f1f2f3 no-repeat center / cover;
}
</style>