引言
在之前的【Java基础到精通之路】专栏中,我们初步认识了一下Spring Boot的相关配置以及使用方式,并且用一个书城项目作为框架的实战使用,只是简单使用。但是作为最基础的学习内容,里面关于Spring Boot的文章内容深度并不能满足企业实际的开发需求,并且其中的实战项目过于简单,对于我们系统性使用Spring Boot是完全不能满足的。
为此,此专栏会详细讲解Spring Boot的深入内容,并且会用一个综合性较高的项目作为项目实战内容。
自我感觉此实战项目完全能够满足期末作业的要求,大家敬请期待吧!
需要注意的是:要想学习本专栏的内容,建议还是看一遍基础篇文章,跟着上面操作实际实操一下,这样会让你下面的学习很顺手。
 https://blog.csdn.net/io_123io_123/article/details/155305388
一、SpringBoot整合MyBatis
1.1 引入依赖
mybatis的起步依赖
XML
<!--mybatis的起步依赖-->
<dependency>
    <groupId>org.mybatis.spring.boot</groupId>
    <artifactId>mybatis-spring-boot-starter</artifactId>
    <version>3.0.3</version>
</dependency>
mysql的依赖
XML
<!--mysql驱动依赖-->
<dependency>
	<groupId>com.mysql</groupId>
	<artifactId>mysql-connector-j</artifactId>
</dependency>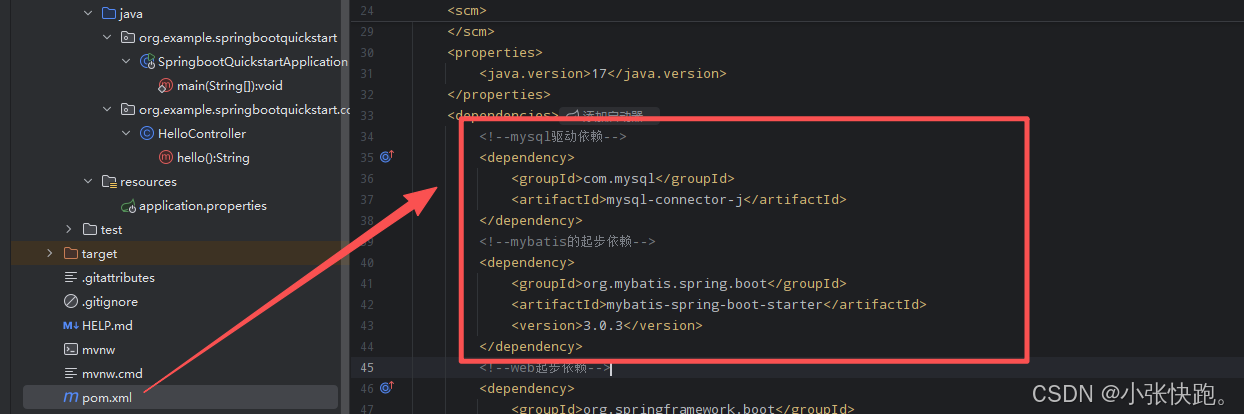
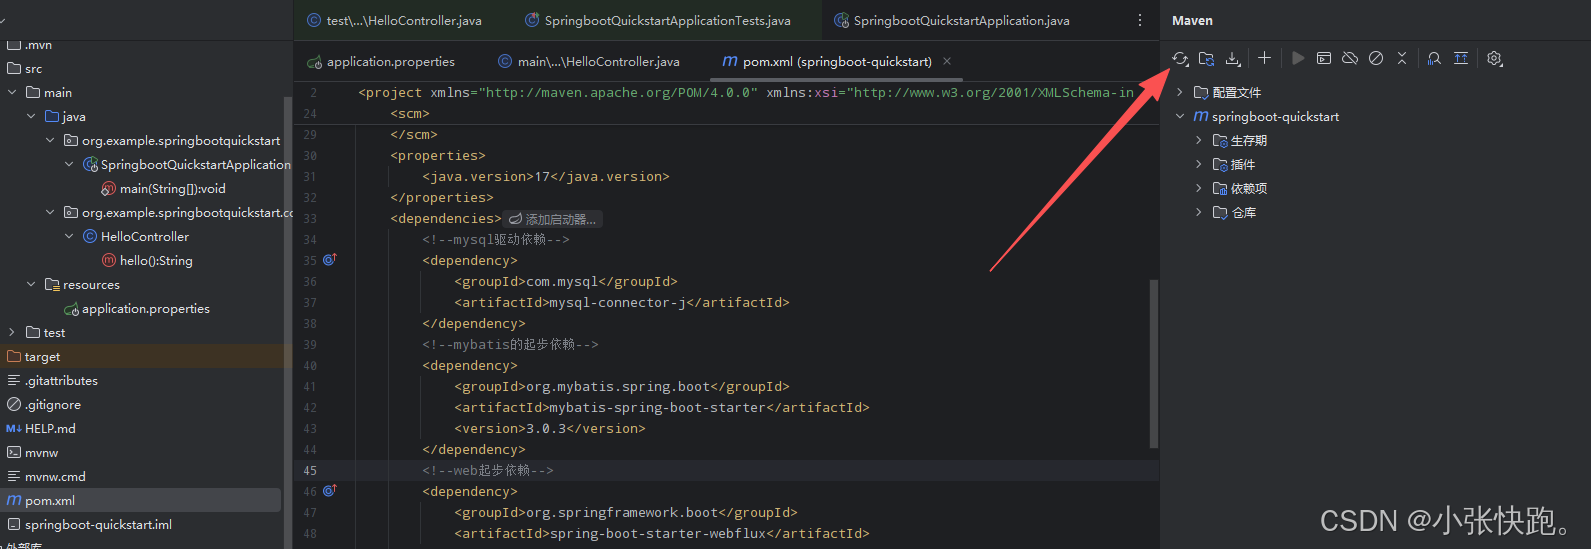
引入依赖后,记得刷新一下Maven
pom.xml完整内容
XML
<?xml version="1.0" encoding="UTF-8"?>
<project xmlns="http://maven.apache.org/POM/4.0.0" xmlns:xsi="http://www.w3.org/2001/XMLSchema-instance"
	xsi:schemaLocation="http://maven.apache.org/POM/4.0.0 https://maven.apache.org/xsd/maven-4.0.0.xsd">
	<modelVersion>4.0.0</modelVersion>
	<!--boot工程的父工程,用来管理起步依赖的版本-->
	<parent>
		<groupId>org.springframework.boot</groupId>
		<artifactId>spring-boot-starter-parent</artifactId>
		<version>3.5.9</version>
		<relativePath/> <!-- lookup parent from repository -->
	</parent>
	<groupId>org.example</groupId>
	<artifactId>springboot-quickstart</artifactId>
	<version>0.0.1-SNAPSHOT</version>
	<name>springboot-quickstart</name>
	<description>springboot-quickstart</description>
	<url/>
	<licenses>
		<license/>
	</licenses>
	<developers>
		<developer/>
	</developers>
	<scm>
		<connection/>
		<developerConnection/>
		<tag/>
		<url/>
	</scm>
	<properties>
		<java.version>17</java.version>
	</properties>
	<dependencies>
		<!--mysql驱动依赖-->
		<dependency>
			<groupId>com.mysql</groupId>
			<artifactId>mysql-connector-j</artifactId>
		</dependency>
		<!--mybatis的起步依赖-->
		<dependency>
			<groupId>org.mybatis.spring.boot</groupId>
			<artifactId>mybatis-spring-boot-starter</artifactId>
			<version>3.0.3</version>
		</dependency>
		<!--web起步依赖-->
		<dependency>
			<groupId>org.springframework.boot</groupId>
			<artifactId>spring-boot-starter-web</artifactId>
		</dependency>

		<dependency>
			<groupId>org.springframework.boot</groupId>
			<artifactId>spring-boot-starter-test</artifactId>
			<scope>test</scope>
		</dependency>
		<dependency>
			<groupId>io.projectreactor</groupId>
			<artifactId>reactor-test</artifactId>
			<scope>test</scope>
		</dependency>
	</dependencies>

	<build>
		<plugins>
			<plugin>
				<groupId>org.springframework.boot</groupId>
				<artifactId>spring-boot-maven-plugin</artifactId>
			</plugin>
		</plugins>
	</build>

</project>
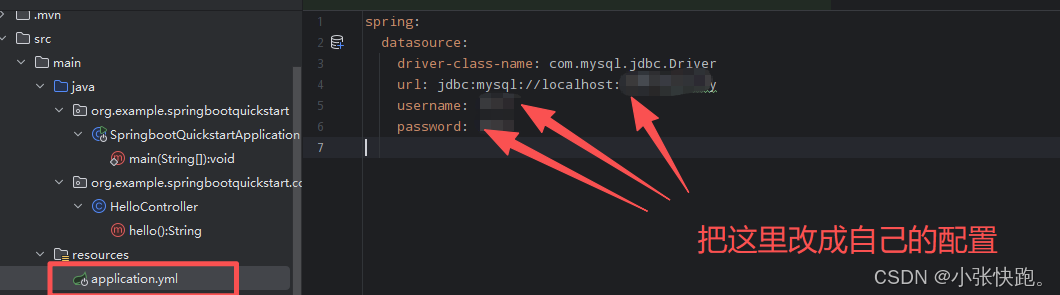
配置数据库的数据源信息
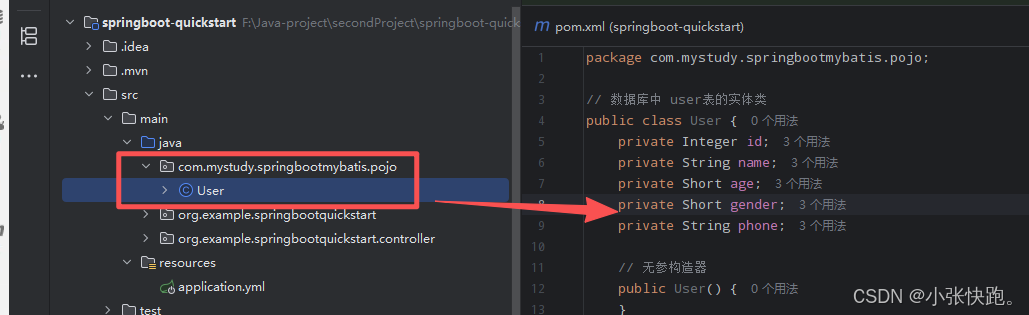
1.2 创建实体类
java
package com.mystudy.springbootmybatis.pojo;

// 数据库中 user表的实体类
public class User {
    private Integer id;
    private String name;
    private Short age;
    private Short gender;
    private String phone;

    // 无参构造器
    public User() {
    }

    // 有参构造器
    public User(Integer id, String name, Short age, Short gender, String phone) {
        this.id = id;
        this.name = name;
        this.age = age;
        this.gender = gender;
        this.phone = phone;
    }

    public Integer getId() {
        return id;
    }

    public void setId(Integer id) {
        this.id = id;
    }

    public String getName() {
        return name;
    }

    public void setName(String name) {
        this.name = name;
    }

    public short getAge() {
        return age;
    }

    public void setAge(short age) {
        this.age = age;
    }

    public Short getGender() {
        return gender;
    }

    public void setGender(Short gender) {
        this.gender = gender;
    }

    public String getPhone() {
        return phone;
    }

    public void setPhone(String phone) {
        this.phone = phone;
    }
}
1.3 创建Mapper
src/main/java/com/mystudy/springbootmybatis/mapper/UserMapper.java
java
package com.mystudy.springbootmybatis.mapper;

import com.mystudy.springbootmybatis.pojo.User;
import org.apache.ibatis.annotations.Mapper;
import org.apache.ibatis.annotations.Select;

@Mapper
public interface UserMapper {
    @Select("select * from mystudy.user where id = #{id}")
    public User findById(Integer id);
}
1.4 创建Service
src/main/java/com/mystudy/springbootmybatis**/**service/UserService.java
java
package com.mystudy.springbootmybatis.service;

import com.mystudy.springbootmybatis.pojo.User;
import org.springframework.stereotype.Service;

@Service
public interface UserService {
    public User findById(Integer id);
}
src/main/java/com/mystudy/springbootmybatis**/service/impl/UserServiceImpl.java**
java
package com.mystudy.springbootmybatis.service.impl;

import com.mystudy.springbootmybatis.mapper.UserMapper;
import com.mystudy.springbootmybatis.pojo.User;
import com.mystudy.springbootmybatis.service.UserService;
import org.springframework.beans.factory.annotation.Autowired;
import org.springframework.stereotype.Service;

@Service
public class UserServiceImpl implements UserService {
    @Autowired
    private UserMapper userMapper;

    @Override
    public User findById(Integer id) {
        return userMapper.findById(id);
    }
}
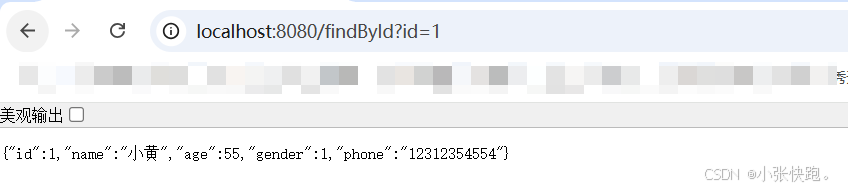
1.5 启动项目
二、SpringBoot中的Bean管理
通过上面SpringBoot整合MyBatis的练习,我们能够深刻地感受到SpringBoot自动配置对于我们开发带来地好处,是非常好用的。其实SpringBoot自动帮我们处理了很多在Spring中需要我们手都配置的东西,因此我们就得先了解SpringBoot中Bean对象的管理,才能搞明白SpringBoot自动配置的原理。
2.1 Bean扫描
关于Bean的扫描,在Spring中已经接触过了,可以通过下面两种方式进行配置:
- 在XML文件中,通过**<context:component-scan base-package="com.mystudy....."/>**来配置我们要扫描的包路径
- 使用配置类的方式,可以使用**@ComponentScan(backPackages="com.mystudy....")**这个注解来指定需要扫描的包路径
在SpringBoot中,我们的启动类上有一个**@SpringBootApplication**注解,他其实本质上是一个组合注解:
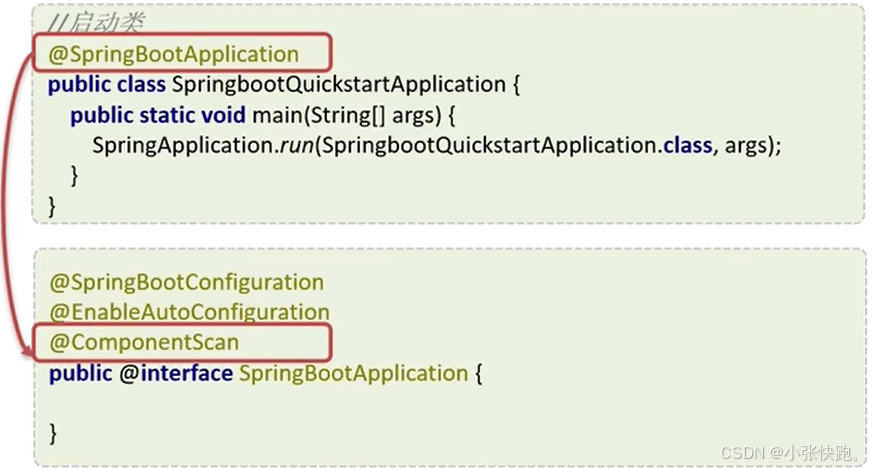
这种配置的话,就相当于,在启动类上默认添加了**@ComponentScan** 这个注解。@ComponentScan 这个注解默认会扫描添加了该注解的包及其子包,在我们的SpringBoot工程中实际上相当于是在启动类上添加了**@ComponentScan**这个注解,所以,默认只能扫描SpringBoot启动类所在的包及其子包。
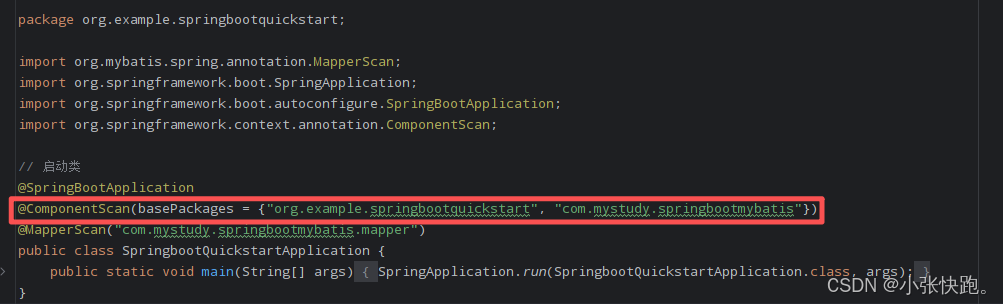
当我们需要扫描其它包的话,需要手动指定**@ComponentScan**这个注解要扫描的包路径,如下:
2.2 Bean注册
SpringBoot默认会扫描启动类所在的包及其子包,那么会有哪些注解会被扫描到注册到IOC容器中呢?
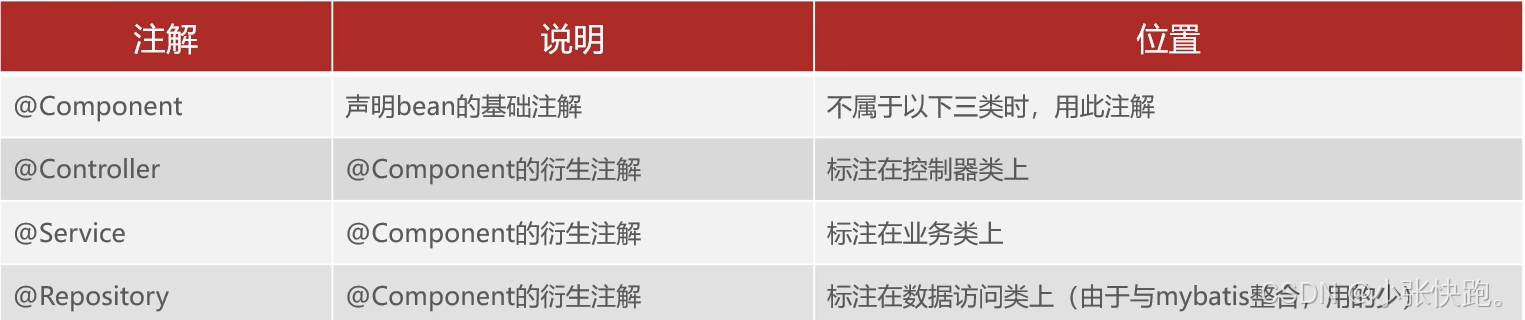
这些注解都能将我们创建的类的对象注册到IOC容器中。这些都是被用在controller层,service层,bo层的注解。那么我们如果使用的第三方依赖,我们如何将第三方类的类注册到IOC容器呢?
如果要注册的bean对象来自于第三方(不是自定义的),是无法用**@Component及其**衍生注解声名bean的。这里SpringBoot提供了两个注解来解决第三方依赖注册bean对象的问题:@Bean和@IMport
(1)通过@Bean注解注册bean对象
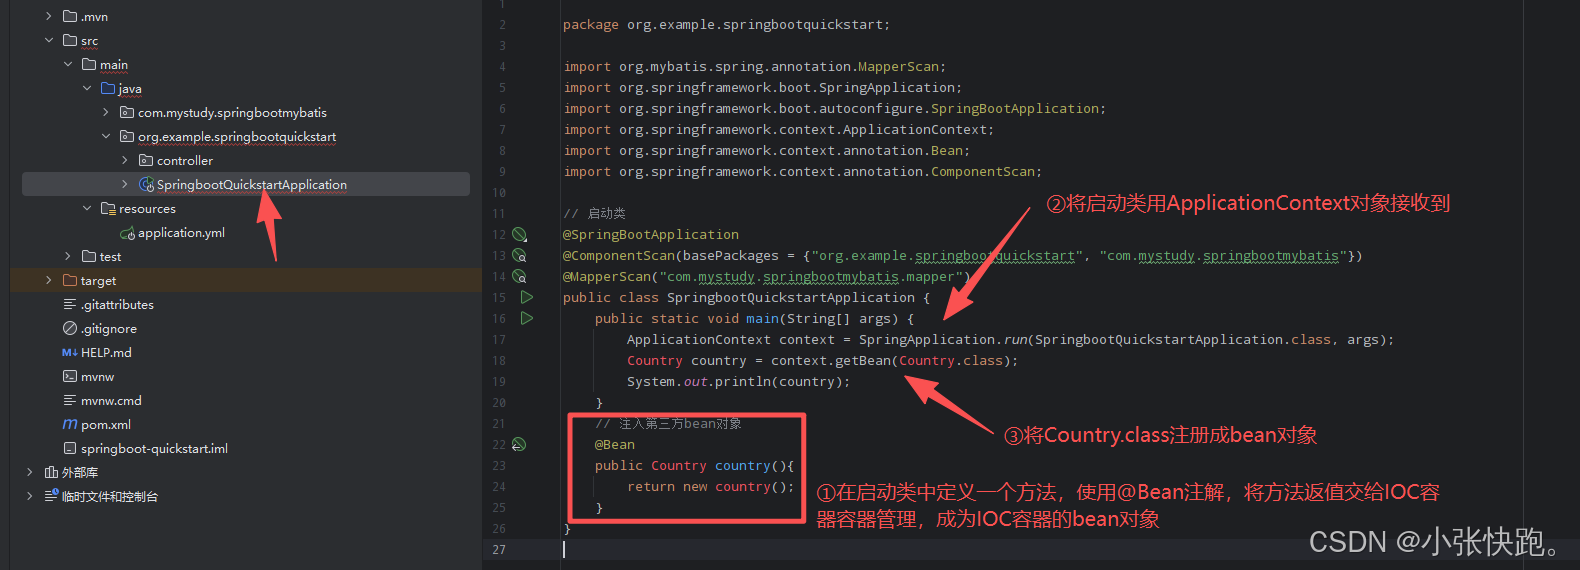
@Bean的用法(不建议单独使用)
如过要注册第三方bean,建议在配置类中集中注册,不建议在启动类中直接注册
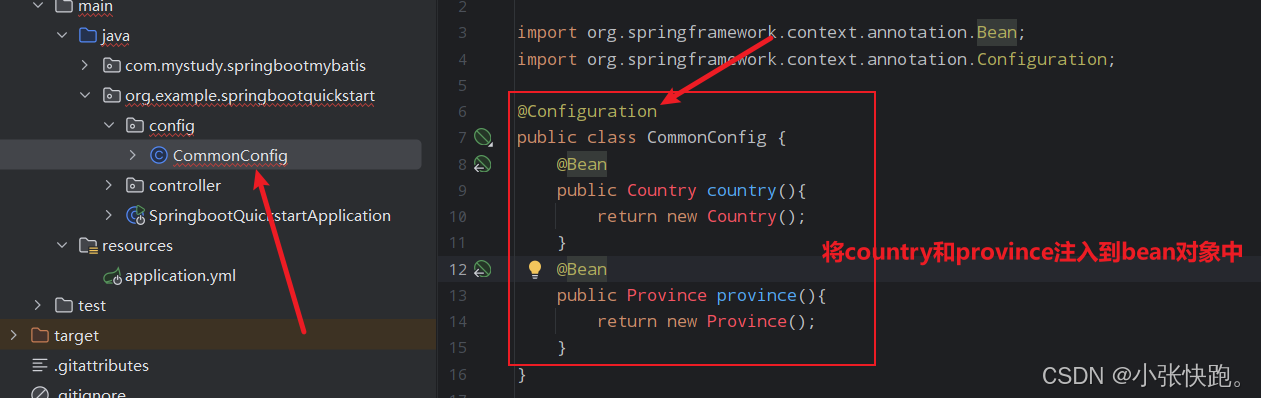
@Configuration(@ Configuration配合@bean使用**)**
@Configuration类需要放到启动类所在的包及其子包中才能被扫描到。
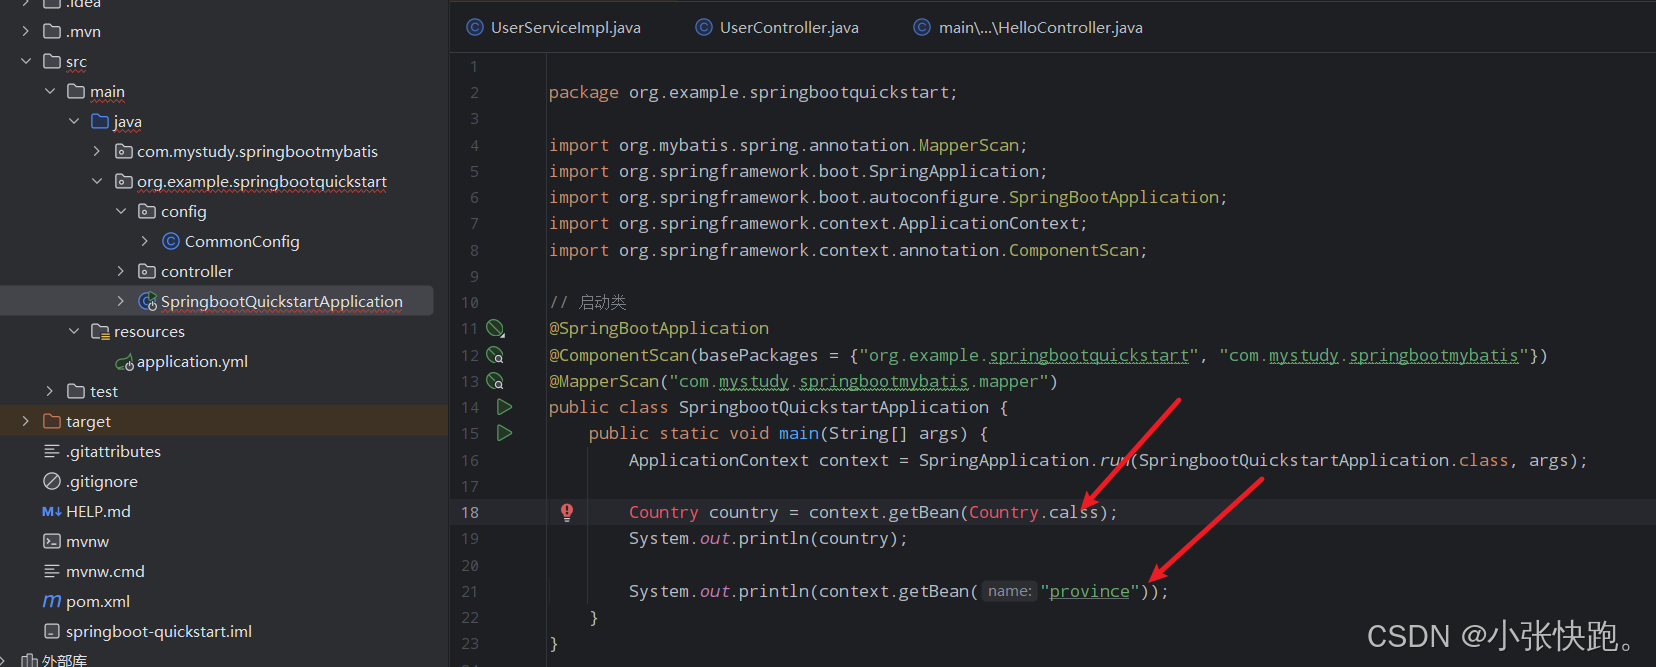
通过这两种方式都可以拿到刚刚我们配置的两个对象
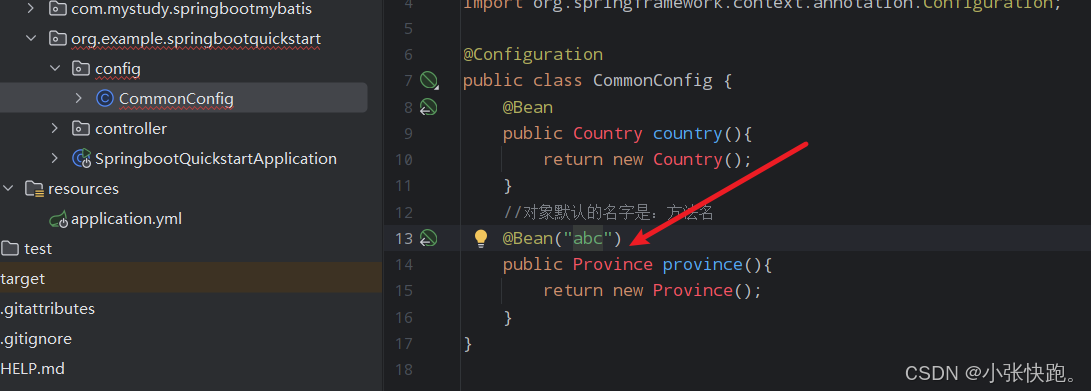
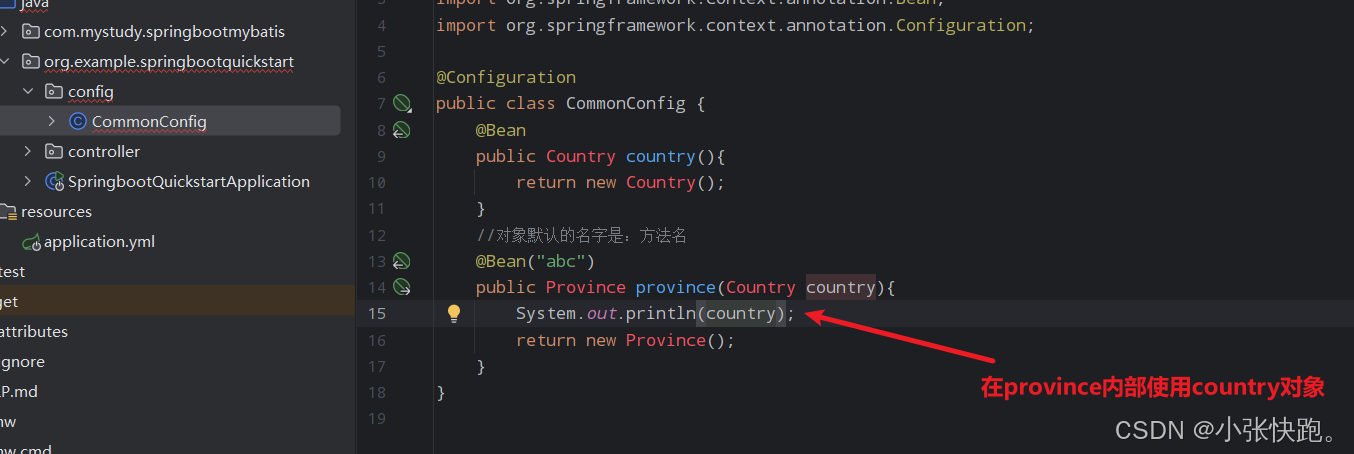
**知识点一:**通过@configuration注解注册的bean对象名字名字默认是方法名,可以通过@Bean注解来给这个bean对象重命名
知识点二:如果方法的内部需要使用到ioc容器中已经存在的Bean对象,那么只需要在方法上声名即可,spring会自动注入
(2)通过@Import注解注册Bean对象
①导入配置类
直接使用@Import导入配置类
@Import(CommonConfig.class) // 手动引入单个配置类
@Import({CommonConfig.class,Common.class}) // 手动引入多个配置类

②导入ImportSelector接口实现类
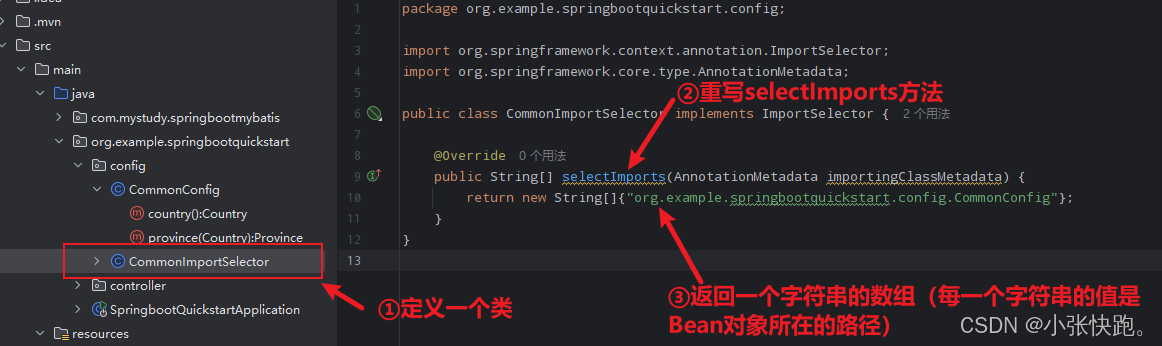
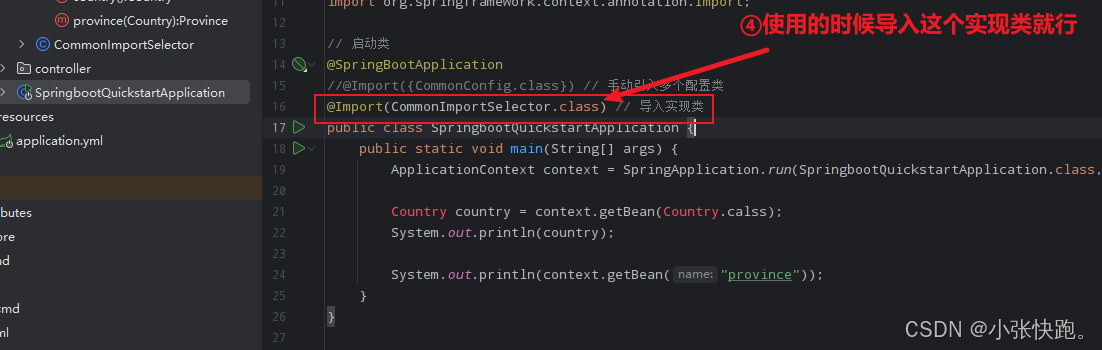
步骤:要定义一个类,去实现这个接口;并且重写selectImports方法,在这个方法内部只需要返回一个字符串的数组(每一个字符串就是你要注入到IOC容器中的Bean对象对于的全类名)
(3)使用自定义注解,封装 @Import注解的高级用法
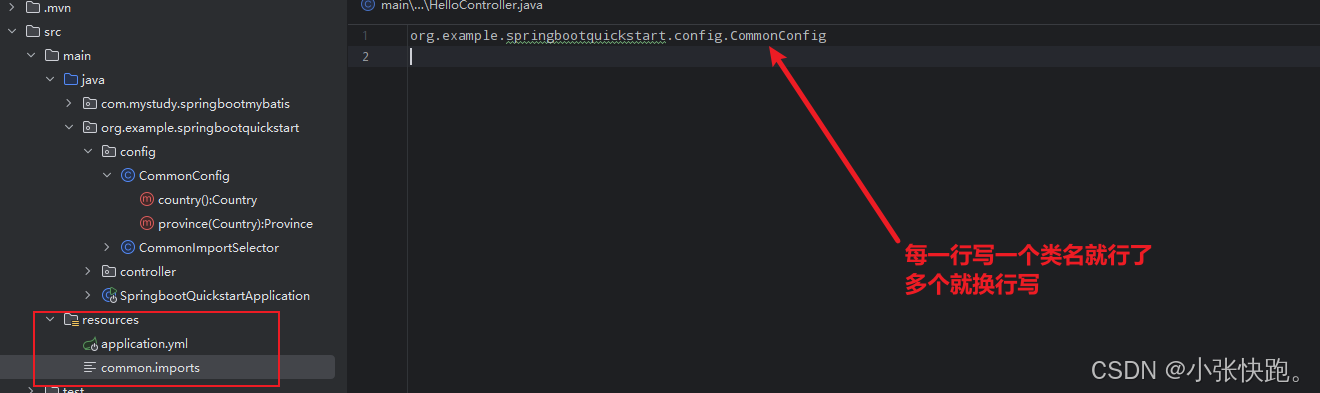
在实际开发过程中,我们所定义的实现类中,返回的内容一般都是写到配置文件中,这样能让我们在使用Bean对象的时候很灵活
① src/main/resources/common.imports
② 重写实现类
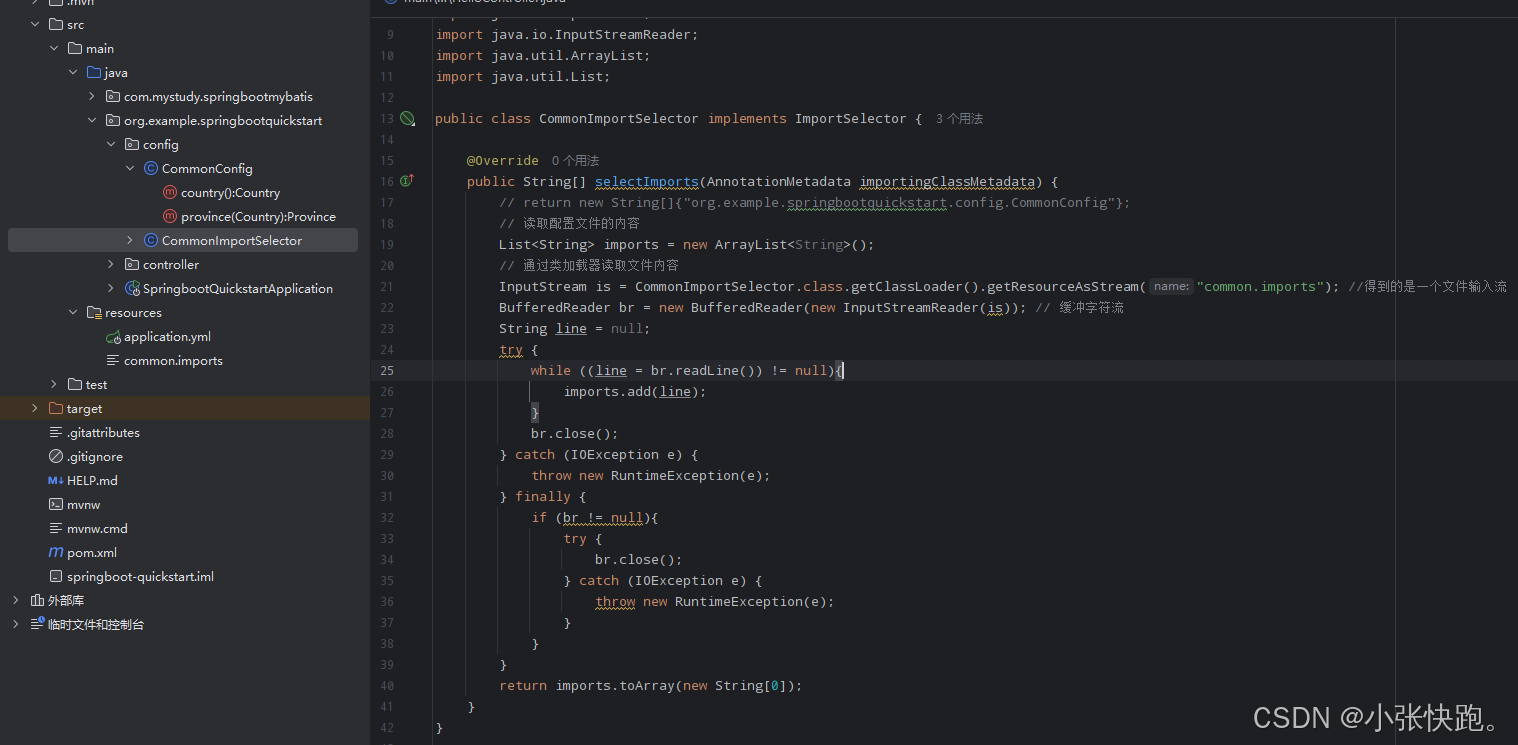
java
package org.example.springbootquickstart.config;

import org.springframework.context.annotation.ImportSelector;
import org.springframework.core.type.AnnotationMetadata;

import java.io.BufferedReader;
import java.io.IOException;
import java.io.InputStream;
import java.io.InputStreamReader;
import java.util.ArrayList;
import java.util.List;

public class CommonImportSelector implements ImportSelector {

    @Override
    public String[] selectImports(AnnotationMetadata importingClassMetadata) {
        // return new String[]{"org.example.springbootquickstart.config.CommonConfig"};
        // 读取配置文件的内容
        List<String> imports = new ArrayList<String>();
        // 通过类加载器读取文件内容
        InputStream is = CommonImportSelector.class.getClassLoader().getResourceAsStream("common.imports"); //得到的是一个文件输入流
        BufferedReader br = new BufferedReader(new InputStreamReader(is)); // 缓冲字符流
        String line = null;
        try {
            while ((line = br.readLine()) != null){
                imports.add(line);
            }
            br.close();
        } catch (IOException e) {
            throw new RuntimeException(e);
        } finally {
            if (br != null){
                try {
                    br.close();
                } catch (IOException e) {
                    throw new RuntimeException(e);
                }
            }
        }
        return imports.toArray(new String[0]);
    }
}
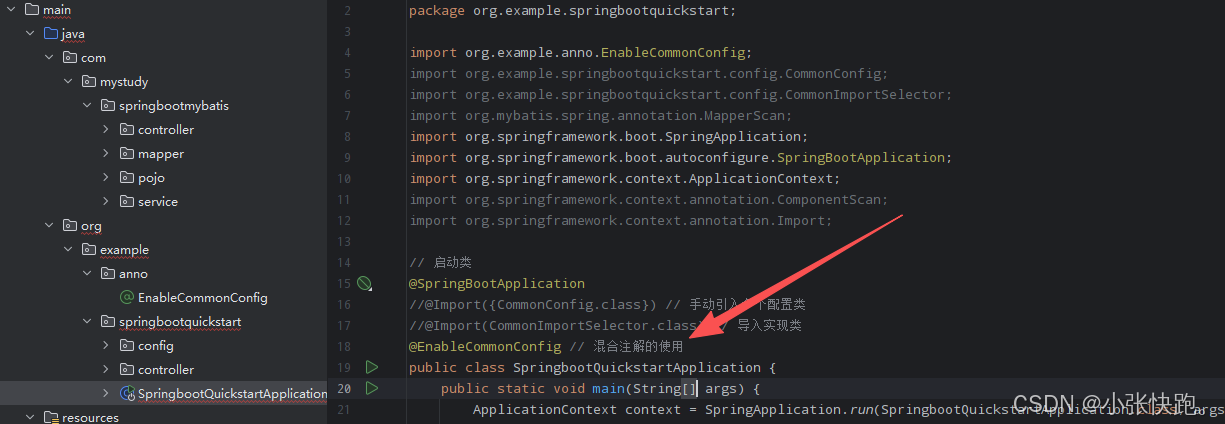
③使用自定义混合注解注册Bean对象
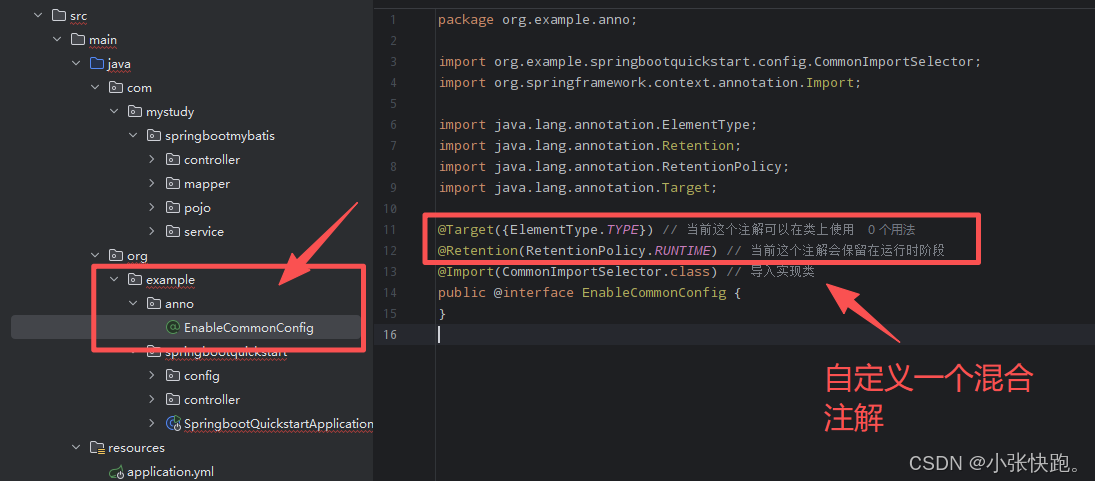
src/main/java/org/example/anno/EnableCommonConfig.java
java
package org.example.anno;

import org.example.springbootquickstart.config.CommonImportSelector;
import org.springframework.context.annotation.Import;

import java.lang.annotation.ElementType;
import java.lang.annotation.Retention;
import java.lang.annotation.RetentionPolicy;
import java.lang.annotation.Target;

@Target({ElementType.TYPE}) // 当前这个注解可以在类上使用
@Retention(RetentionPolicy.RUNTIME) // 当前这个注解会保留在运行时阶段
@Import(CommonImportSelector.class) // 导入实现类
public @interface EnableCommonConfig {
}
2.3 注册条件
SpringBoot提供了设置注册生效条件的注解@Conditional,该注解用起来比较麻烦,所以SpringBoot提供了这个注解的一些衍生注解:
| 注解 | 说明 |
|---|---|
| @ConditionalOnProperties | 配置文件中存在对应的属性,才声明该bean |
| @ConditionalOnMissingBean | 当不存在当前类型的bean时,才声明该bean |
| @ConditionalOnClass | 当前环境存在指定的这个类时,才声明该bean |
(1)@ConditionalOnProperties
检测配置文件中是否存在某个参数,存在 =》注入当前Bean对象;不存在 =》不注入当前Bean对象
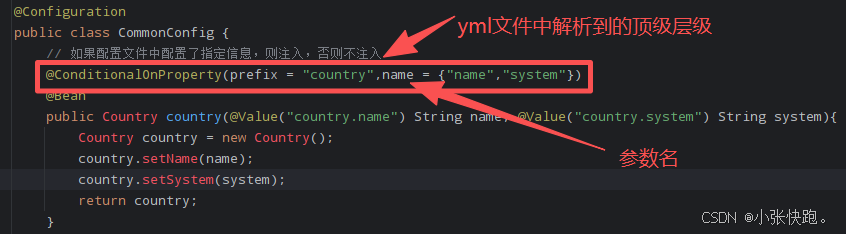
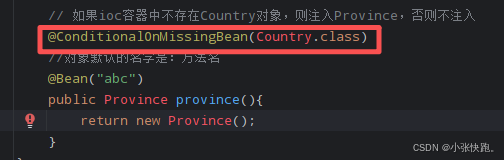
(2)@ConditionalOnMissingBean
检测IOC容器中是否存在某个对象,存在 =》不注入 当前Bean对象,不存在 =》注入当前Bean对象。
(3)@ConditionalOnClass
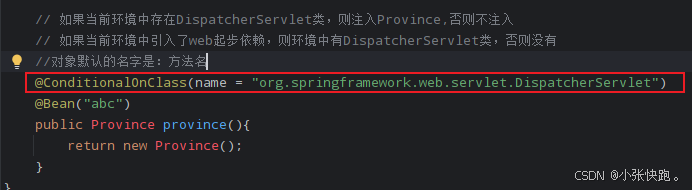
检测当前环境中是否存在某个类,存在 =》注入当前Bean对象,不存在 =》不注入当前Bean对象。
三、SpringBoot的自动配置原理
在实际开发中,我们常常会定义一些公共组件,提供给同事共同使用,为了让其他人使用更加方便,我们通常把这些公共组件自定义成starter。
并且这块的内容在面试中,是经常会被问到的一个重点内容:请说一下SpringBoot自动配置的原理?
原则:
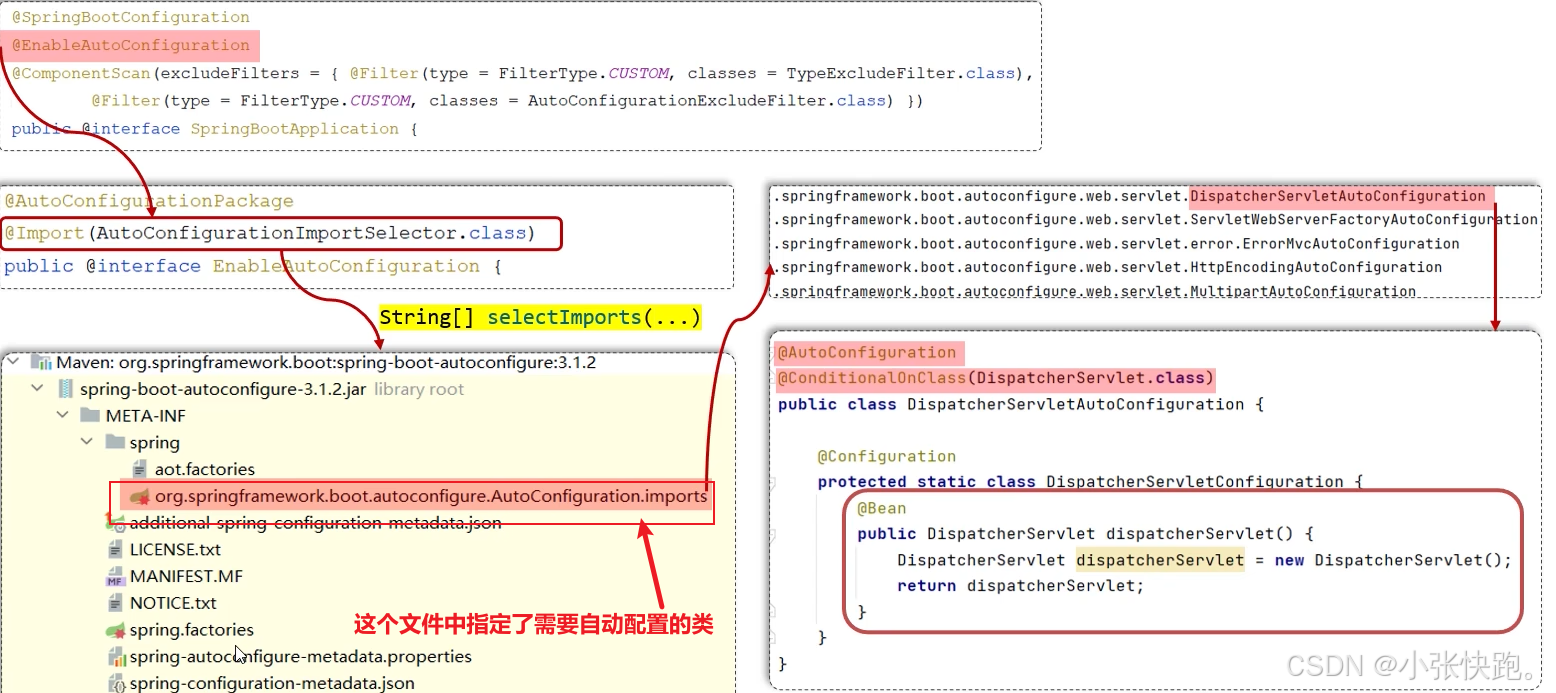
SpringBoot工程遵循约定大于配置的原则,在boot程序启动后,起步依赖中的一些bean对象会自动注入到IOC容器中。
源码分析:
SpringBoot工程引入spring-boot-statter-web起步依赖,启动后,会自动往IOC容器中注入DispatherServlet对象
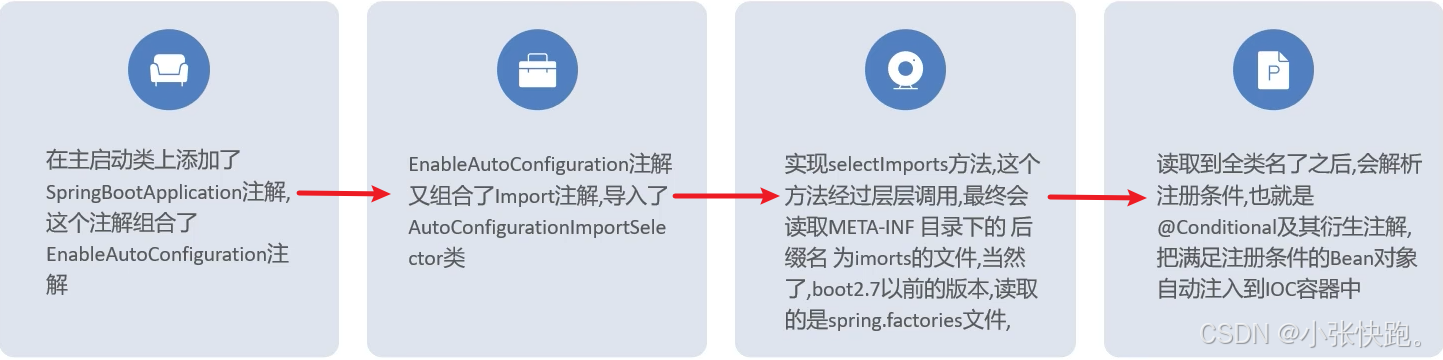
***面试重点:请说一说SpringBoot自动配置原理?
四、自定义starter
在实际开发中,经常会定义一些公共组件,提供给各个项目团队使用。而在SpringBoot的项目中,一般会将这些公共组件封装为SpringBoot的starter。
一般来说起步依赖会由两个工程组成:xxxx-autoconfigure 和xxxx-starter
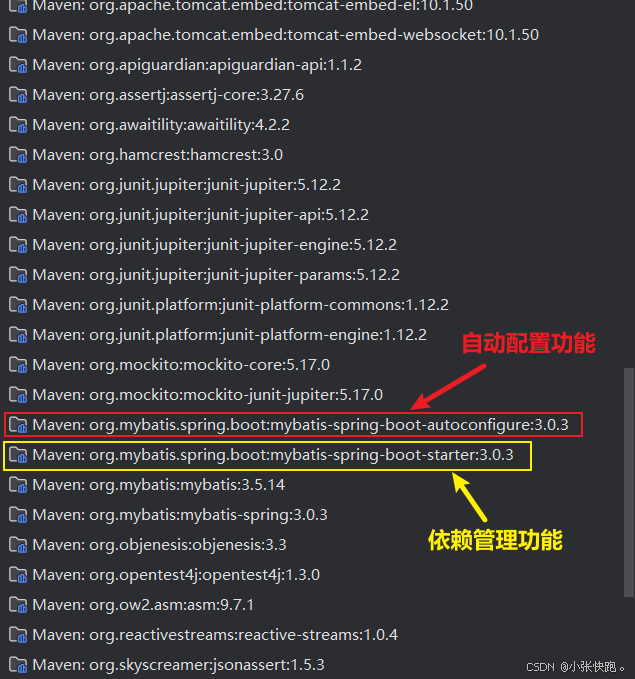
自定义制作一个starter
**需求:**自己制作一个mybatis的starter
步骤:
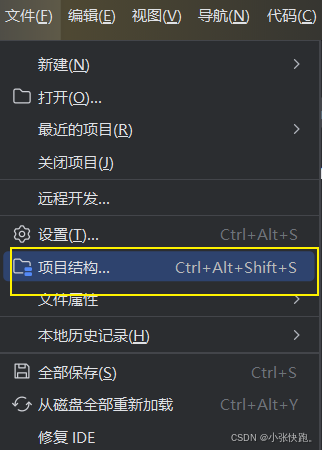
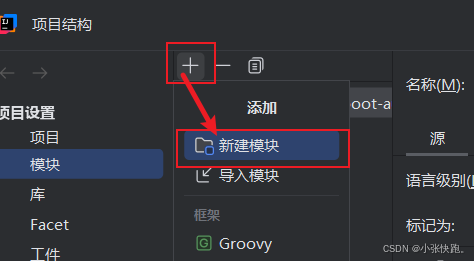
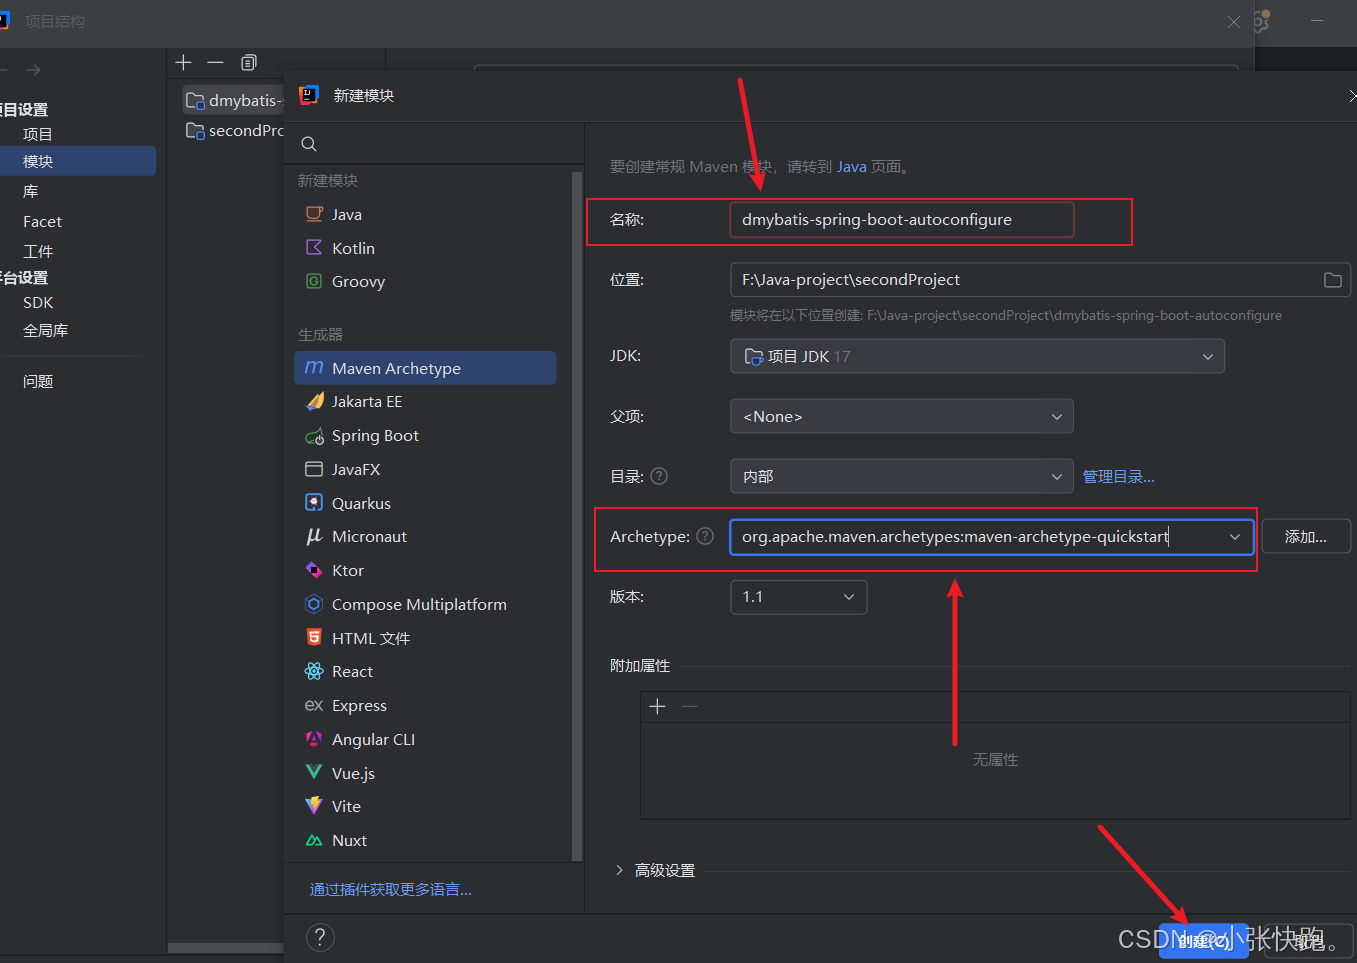
(1)创建dmybatis-spring-boot-autoconfigure模块
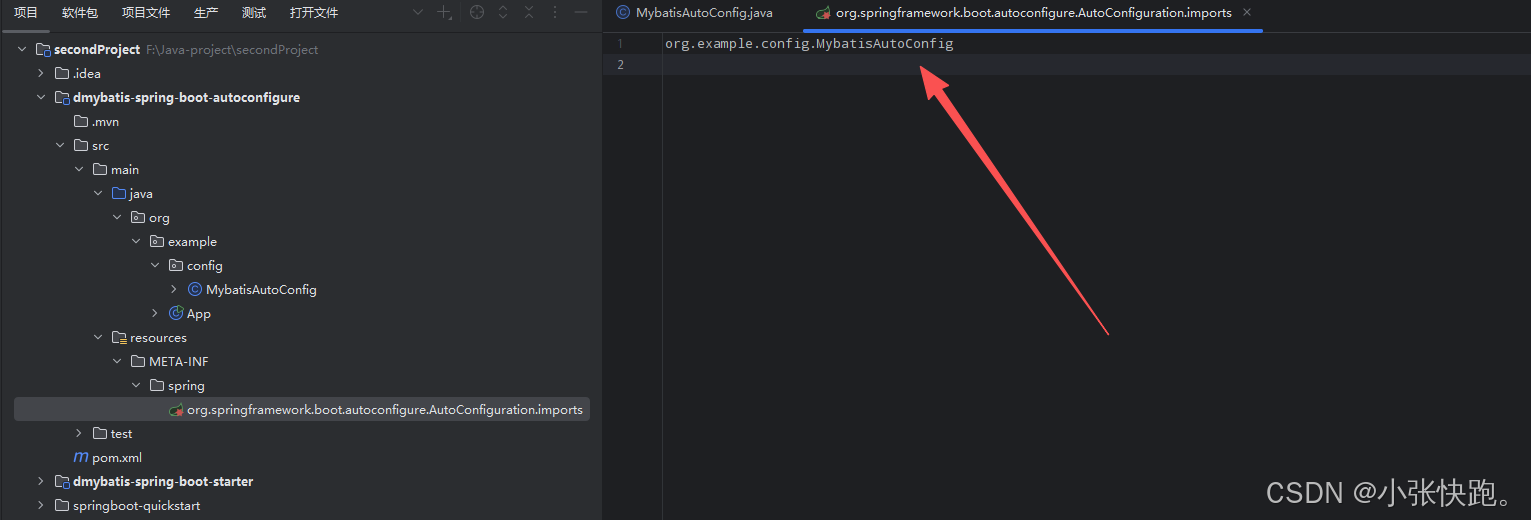
创建dmybatis-spring-boot-autoconfigure模块,提供自动配置功能,并自定义配置文件META-INF/spring/xxx.imports(用于springboot自动读取配置文件)
 (1)
(1)
 (2)
(2)
 (3)
(3)
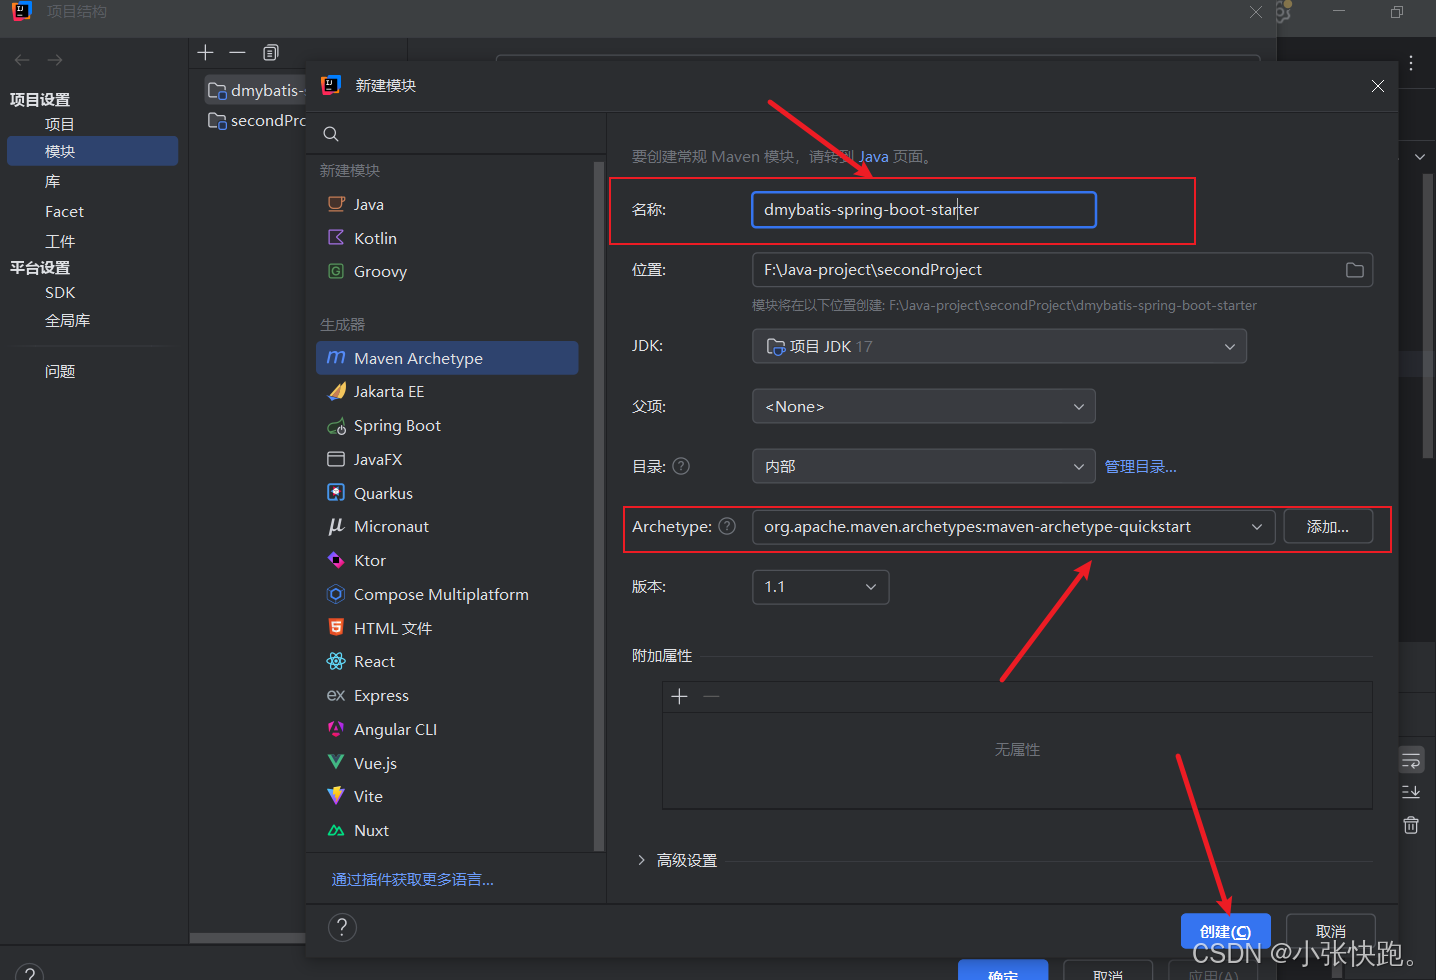
(2)创建dmybatis-spring-boot-starter模块
同上,创建dmybatis-spring-boot-starter模块,在starter中引入自动配置模块
(3)引入相关依赖
在dmybatis-spring-boot-autoconfigure模块的pom.xml文件中引入相关依赖,如下:
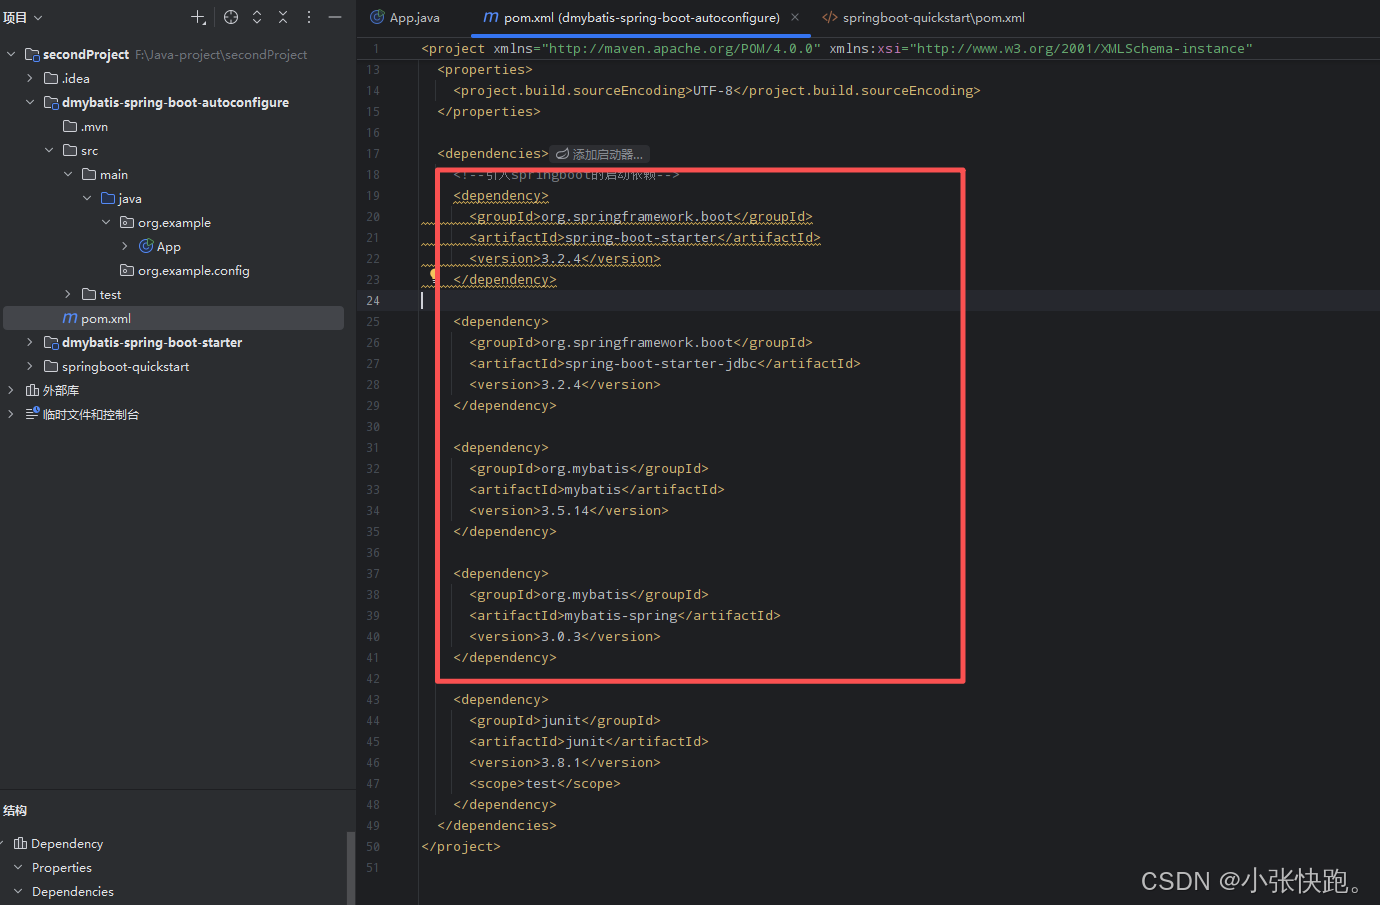
XML
<project xmlns="http://maven.apache.org/POM/4.0.0" xmlns:xsi="http://www.w3.org/2001/XMLSchema-instance"
  xsi:schemaLocation="http://maven.apache.org/POM/4.0.0 http://maven.apache.org/xsd/maven-4.0.0.xsd">
  <modelVersion>4.0.0</modelVersion>

  <groupId>org.example</groupId>
  <artifactId>dmybatis-spring-boot-autoconfigure</artifactId>
  <version>1.0-SNAPSHOT</version>
  <packaging>jar</packaging>

  <name>dmybatis-spring-boot-autoconfigure</name>
  <url>http://maven.apache.org</url>

  <properties>
    <project.build.sourceEncoding>UTF-8</project.build.sourceEncoding>
  </properties>

  <dependencies>
    <!--引入springboot的启动依赖-->
    <dependency>
      <groupId>org.springframework.boot</groupId>
      <artifactId>spring-boot-starter</artifactId>
      <version>3.2.4</version>
    </dependency>

    <dependency>
      <groupId>org.springframework.boot</groupId>
      <artifactId>spring-boot-starter-jdbc</artifactId>
      <version>3.2.4</version>
    </dependency>

    <dependency>
      <groupId>org.mybatis</groupId>
      <artifactId>mybatis</artifactId>
      <version>3.5.14</version>
    </dependency>

    <dependency>
      <groupId>org.mybatis</groupId>
      <artifactId>mybatis-spring</artifactId>
      <version>3.0.3</version>
    </dependency>

    <dependency>
      <groupId>junit</groupId>
      <artifactId>junit</artifactId>
      <version>3.8.1</version>
      <scope>test</scope>
    </dependency>
  </dependencies>

  <build>
    <plugins>
      <plugin>
        <!--这个插件用来指定maven默认java版本-->
        <groupId>org.apache.maven.plugins</groupId>
        <artifactId>maven-compiler-plugin</artifactId>
        <version>3.14.1</version>
        <configuration>
          <source>17</source>
          <target>17</target>
        </configuration>
      </plugin>
    </plugins>
  </build>
</project>
(4)创建自动配置类
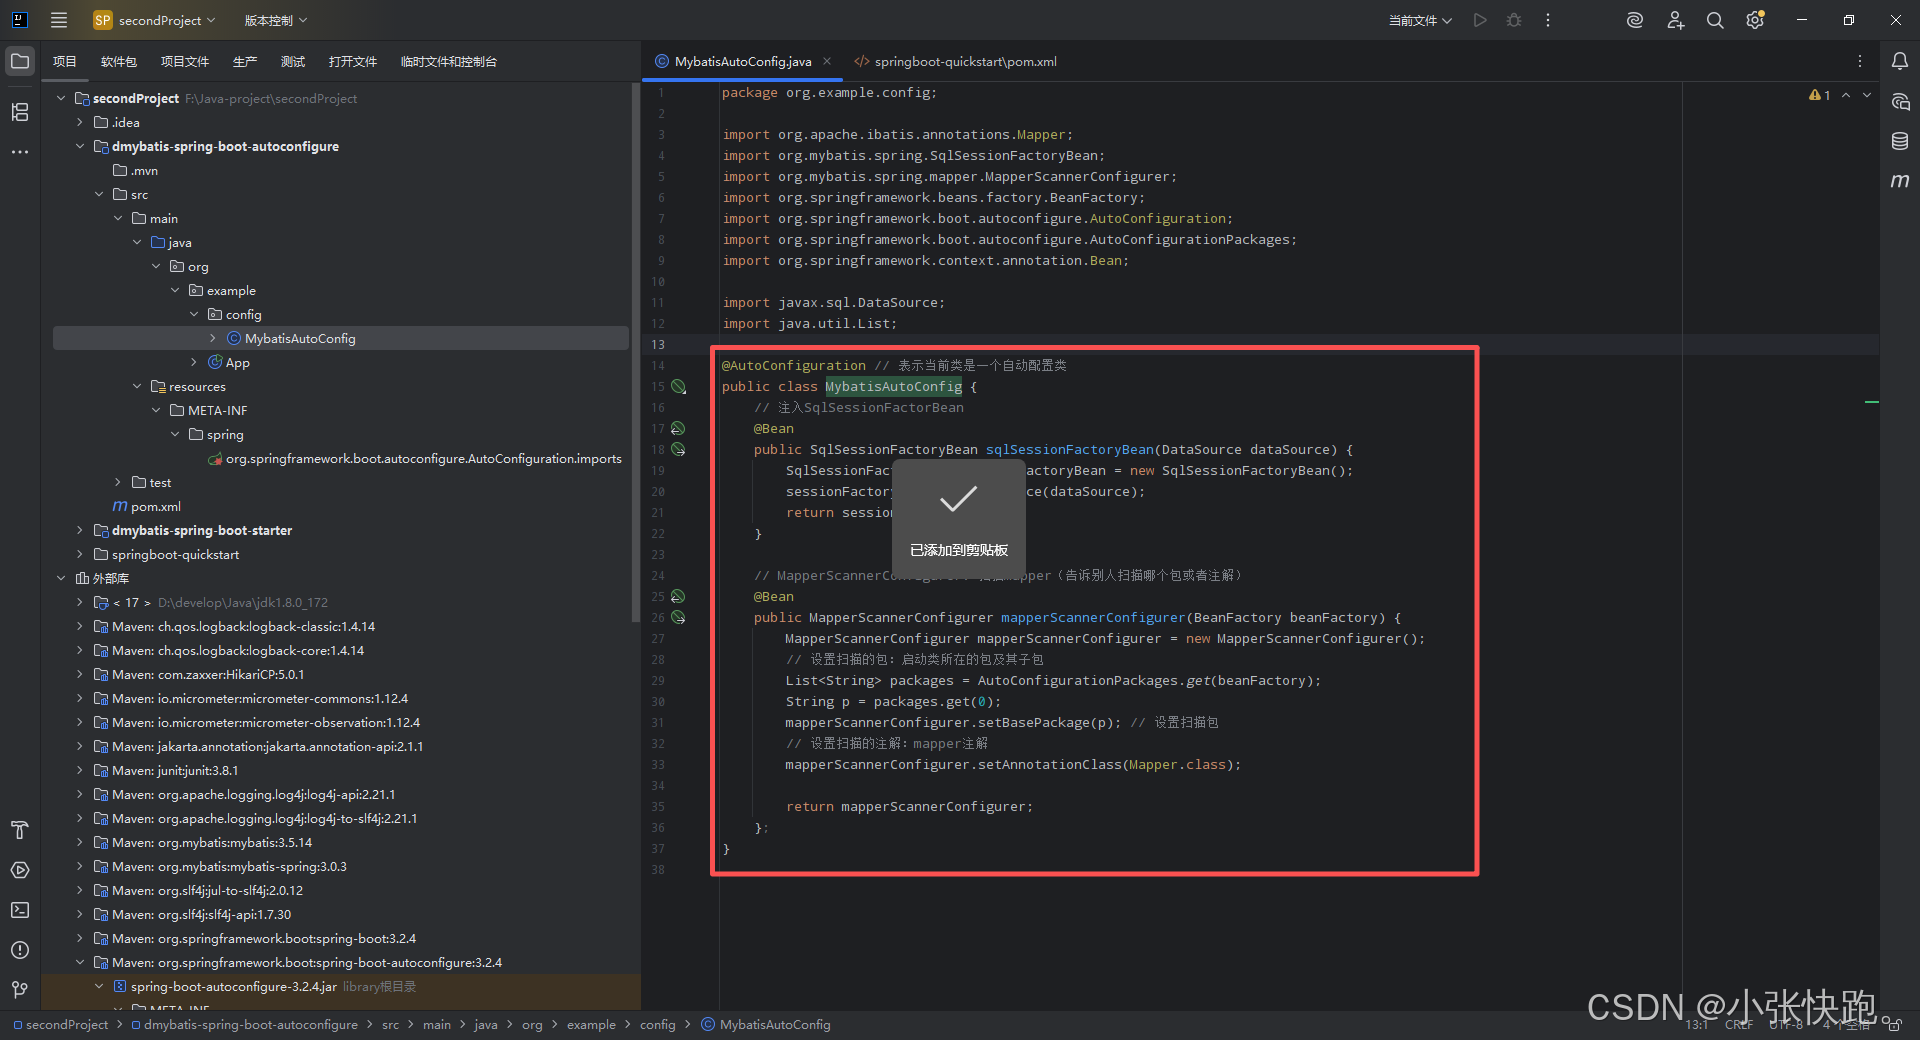
在dmybatis-spring-boot-autoconfigure模块创建mybatis的自动配置类
代码截图:
代码部分:
src/main/java/org/example/config/MybatisAutoConfig.java
java
package org.example.config;

import org.apache.ibatis.annotations.Mapper;
import org.mybatis.spring.SqlSessionFactoryBean;
import org.mybatis.spring.mapper.MapperScannerConfigurer;
import org.springframework.beans.factory.BeanFactory;
import org.springframework.boot.autoconfigure.AutoConfiguration;
import org.springframework.boot.autoconfigure.AutoConfigurationPackages;
import org.springframework.context.annotation.Bean;

import javax.sql.DataSource;
import java.util.List;

@AutoConfiguration // 表示当前类是一个自动配置类
public class MybatisAutoConfig {
    // 注入SqlSessionFactorBean
    @Bean
    public SqlSessionFactoryBean sqlSessionFactoryBean(DataSource dataSource) {
        SqlSessionFactoryBean sessionFactoryBean = new SqlSessionFactoryBean();
        sessionFactoryBean.setDataSource(dataSource);
        return sessionFactoryBean;
    }

    // MapperScannerConfigurer: 扫描mapper(告诉别人扫描哪个包或者注解)
    @Bean
    public MapperScannerConfigurer mapperScannerConfigurer(BeanFactory beanFactory) {
        MapperScannerConfigurer mapperScannerConfigurer = new MapperScannerConfigurer();
        // 设置扫描的包:启动类所在的包及其子包
        List<String> packages = AutoConfigurationPackages.get(beanFactory);
        String p = packages.get(0);
        mapperScannerConfigurer.setBasePackage(p); // 设置扫描包
        // 设置扫描的注解:mapper注解
        mapperScannerConfigurer.setAnnotationClass(Mapper.class);

        return mapperScannerConfigurer;
    };
}(5)引入dmybatis-spring-boot-autoconfigure自动配置
在dmybatis-spring-boot-starter模块中引入dmybatis-spring-boot-autoconfigure模块
(注意:dmybatis-spring-boot-autoconfigure模块中所涉及的依赖也要在dmybatis-spring-boot-starter模块引入一下,方便后续依赖排重)
XML
<project xmlns="http://maven.apache.org/POM/4.0.0" xmlns:xsi="http://www.w3.org/2001/XMLSchema-instance"
  xsi:schemaLocation="http://maven.apache.org/POM/4.0.0 http://maven.apache.org/xsd/maven-4.0.0.xsd">
  <modelVersion>4.0.0</modelVersion>

  <groupId>org.example</groupId>
  <artifactId>dmybatis-spring-boot-starter</artifactId>
  <version>1.0-SNAPSHOT</version>
  <packaging>jar</packaging>

  <name>dmybatis-spring-boot-starter</name>
  <url>http://maven.apache.org</url>

  <properties>
    <project.build.sourceEncoding>UTF-8</project.build.sourceEncoding>
  </properties>

  <dependencies>

    <dependency>
      <groupId>org.example</groupId>
      <artifactId>dmybatis-spring-boot-autoconfigure</artifactId>
      <version>1.0-SNAPSHOT</version>
    </dependency>

    <!--这里要注意的一点是:当我们在这里引入dmybatis-spring-boot-autoconfigure依赖后,dmybatis-spring-boot-autoconfigure所依赖的依赖项也都要在这里引入一下-->
    <!--引入springboot的启动依赖-->
    <dependency>
      <groupId>org.springframework.boot</groupId>
      <artifactId>spring-boot-starter</artifactId>
      <version>3.2.4</version>
    </dependency>

    <dependency>
      <groupId>org.springframework.boot</groupId>
      <artifactId>spring-boot-starter-jdbc</artifactId>
      <version>3.2.4</version>
    </dependency>

    <dependency>
      <groupId>org.mybatis</groupId>
      <artifactId>mybatis</artifactId>
      <version>3.5.14</version>
    </dependency>

    <dependency>
      <groupId>org.mybatis</groupId>
      <artifactId>mybatis-spring</artifactId>
      <version>3.0.3</version>
    </dependency>


    <dependency>
      <groupId>junit</groupId>
      <artifactId>junit</artifactId>
      <version>3.8.1</version>
      <scope>test</scope>
    </dependency>
  </dependencies>

  <build>
    <plugins>
      <plugin>
        <!--这个插件用来指定maven默认java版本-->
        <groupId>org.apache.maven.plugins</groupId>
        <artifactId>maven-compiler-plugin</artifactId>
        <version>3.14.1</version>
        <configuration>
          <source>17</source>
          <target>17</target>
        </configuration>
      </plugin>
    </plugins>
  </build>
</project>
总结
(1)创建dmybatis-spring-boot-autoconfigure模块,提供自动配置功能,并自定义配置文件META-INF/spring/xxx.imports
(2)创建**dmybatis-spring-boot-starter模块,**在start中引入自动配置模块(提供依赖管理功能)