大家好,我是CC,在这里欢迎大家的到来~
背景
最近业务上需要个滤镜功能,高级点的且可以直接应用的那种,但是 Fabric.js 上只提供了基础滤镜(像黑白、复古等等)和自定义滤镜(调节单个参数,像亮度、对比度、饱和度等等)。原本设想通过组合各个参数设定好来滤镜使用,但是很快就被现实打败------找不到合适的参数数据,自己也不动设计。后经人指导可以基于 LUT 进行实现。
LUT(Lookup Table,查找表)是一种颜色映射技术,通过预定义的颜色转换规则,将输入颜色映射到输出颜色。
这是一张 LUT 图:

基于这张图实现的滤镜的逻辑大概是:
- 颜色映射:通过查找表将输入颜色映射到输出颜色
- 3D到2D转换:将3D颜色空间展开为2D纹理存储
- 三线性插值:在3D颜色空间中进行插值计算
- GPU加速:利用WebGPU的并行计算能力高效处理每个像素
快速入门WebGPU
先看图理解
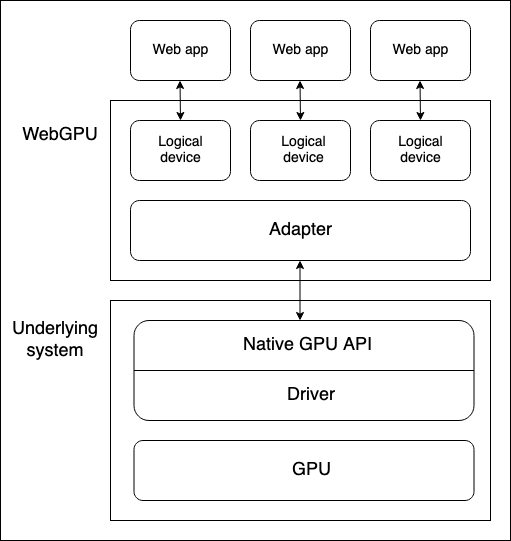
上边是浏览器的 WebGPU 对象,通过 Adapter(适配器)来匹配底层系统(电脑真实存在的物理设备)的 GPU,后续调用的也是 GPU 的原生 API。
下面介绍 WebGPU 常用 API 和原理。
调用
WebGPU 对象支持在 window 中调用,也可以在 worker 中调用。
TypeScript
Navigator.gpu
WorkerNavigator.gpu
获取适配器
TypeScript
const adapter = await Navigator.gpu.requestAdapter()
const adapter = await Navigator.gpu.requestAdapter({
  powerPreference: 'low-power' // 默认值,也可选 high-performance(非必要使用)
})
获取 GPU Device
TypeScript
const adapter = await Navigator.gpu.requestAdapter()
const device = await adapter.requestDevice({
  defaultQueue: '',
  label: '',
  requiredFeatures: [],
  requiredLimits:
})
管线和着色器
管线(pipeline)是一个逻辑结构,可通过编程完成程序工作。
目前管线包括渲染管线和计算管线,渲染管线用于图形渲染,计算管线用于通用计算。
渲染管线包括两个阶段:顶点着色阶段和片元着色阶段。
使用生产机器人的流水线来比喻 WebGPU、pipeline 和 shader 之间的关系。
┌─────────────────────────────────────────────┐
│            WebGPU 工厂                       │
│  ┌──────────────────────────────────────┐   │
│  │         Pipeline 生产线               │   │
│  │  ┌──────────────┐ ┌──────────────┐   │   │
│  │  │ 顶点着色器     │ │片段着色器     │   │   │
│  │  │(车体成型机器人) │ │(喷漆机器人)   │   │   │
│  │  └──────────────┘ └──────────────┘   │   │
│  │     ↓                ↓               │   │
│  │  车架成型          上色完成             │   │
│  └──────────────────────────────────────┘   │
└─────────────────────────────────────────────┘

关键关系:
1. 工厂(WebGPU)提供生产环境
2. 生产线(Pipeline)定义生产流程
3. 机器人(Shader)执行具体任务
4. 三者缺一不可,协同工作
着色器使用
WebGPU 着色器语言是用称为 WebGPU 着色器语言(WGSL)的低级的类 Rust 语言编写的。
建立渲染管线
顶点着色阶段(@vertex 代码块)接受包含位置和颜色的数据分块,根据给定的位置定位顶点,插入颜色,然后将数据传入到片元着色器阶段。
片元着色阶段(@fragment 代码块)接受来自顶点着色器阶段的数据,并根据给定的颜色为顶点着色。
TypeScript
const shaders = `
struct VertexOut {
  @builtin(position) position : vec4f,
  @location(0) color : vec4f
}

@vertex
fn vertex_main(@location(0) position: vec4f,
               @location(1) color: vec4f) -> VertexOut
{
  var output : VertexOut;
  output.position = position;
  output.color = color;
  return output;
}

@fragment
fn fragment_main(fragData: VertexOut) -> @location(0) vec4f
{
  return fragData.color;
}
`;

const shaderModule = device.createShaderModule({
  code: shaders,
});

const pipelineDescriptor = {
  vertex: {
    module: shaderModule,
    entryPoint: "vertex_main",
    buffers: vertexBuffers,
  },
  fragment: {
    module: shaderModule,
    entryPoint: "fragment_main",
    targets: [
      {
        format: navigator.gpu.getPreferredCanvasFormat(),
      },
    ],
  },
  primitive: {
    topology: "triangle-list",
  },
  layout: "auto",
};
const renderPipeline = device.createRenderPipeline(pipelineDescriptor);
创建缓冲区
TypeScript
const vertices = new Float32Array([
  0.0, 0.6, 0, 1, 1, 0, 0, 1, -0.5, -0.6, 0, 1, 0, 1, 0, 1, 0.5, -0.6, 0, 1, 0,
  0, 1, 1,
]);
const vertexBuffer = device.createBuffer({
  size: vertices.byteLength, // make it big enough to store vertices in
  usage: GPUBufferUsage.VERTEX | GPUBufferUsage.COPY_DST,
});
device.queue.writeBuffer(vertexBuffer, 0, vertices, 0, vertices.length);
配置 canvas 上下文
TypeScript
const canvas = document.querySelector("#gpuCanvas");
const context = canvas.getContext("webgpu");

context.configure({
  device: device,
  format: navigator.gpu.getPreferredCanvasFormat(), // 纹理texture格式
  alphaMode: "premultiplied", // 半透明纹理时使用的 alpha 模式
});
运行渲染管线
TypeScript
const commandEncoder = device.createCommandEncoder();
const textureView = context.getCurrentTexture().createView();

const renderPassDescriptor = {
  colorAttachments: [
    {
      clearValue: { r: 0.0, g: 0.5, b: 1.0, a: 1.0 },
      loadOp: "clear",
      storeOp: "store",
      view: textureView,
    },
  ],
};

const passEncoder = commandEncoder.beginRenderPass(renderPassDescriptor);
const passEncoder = commandEncoder.beginRenderPass(renderPassDescriptor);
passEncoder.setPipeline(pipeline);
passEncoder.setBindGroup(0, bindGroup);
passEncoder.draw(6);
passEncoder.end();

device.queue.submit([commandEncoder.finish()]);
滤镜实现
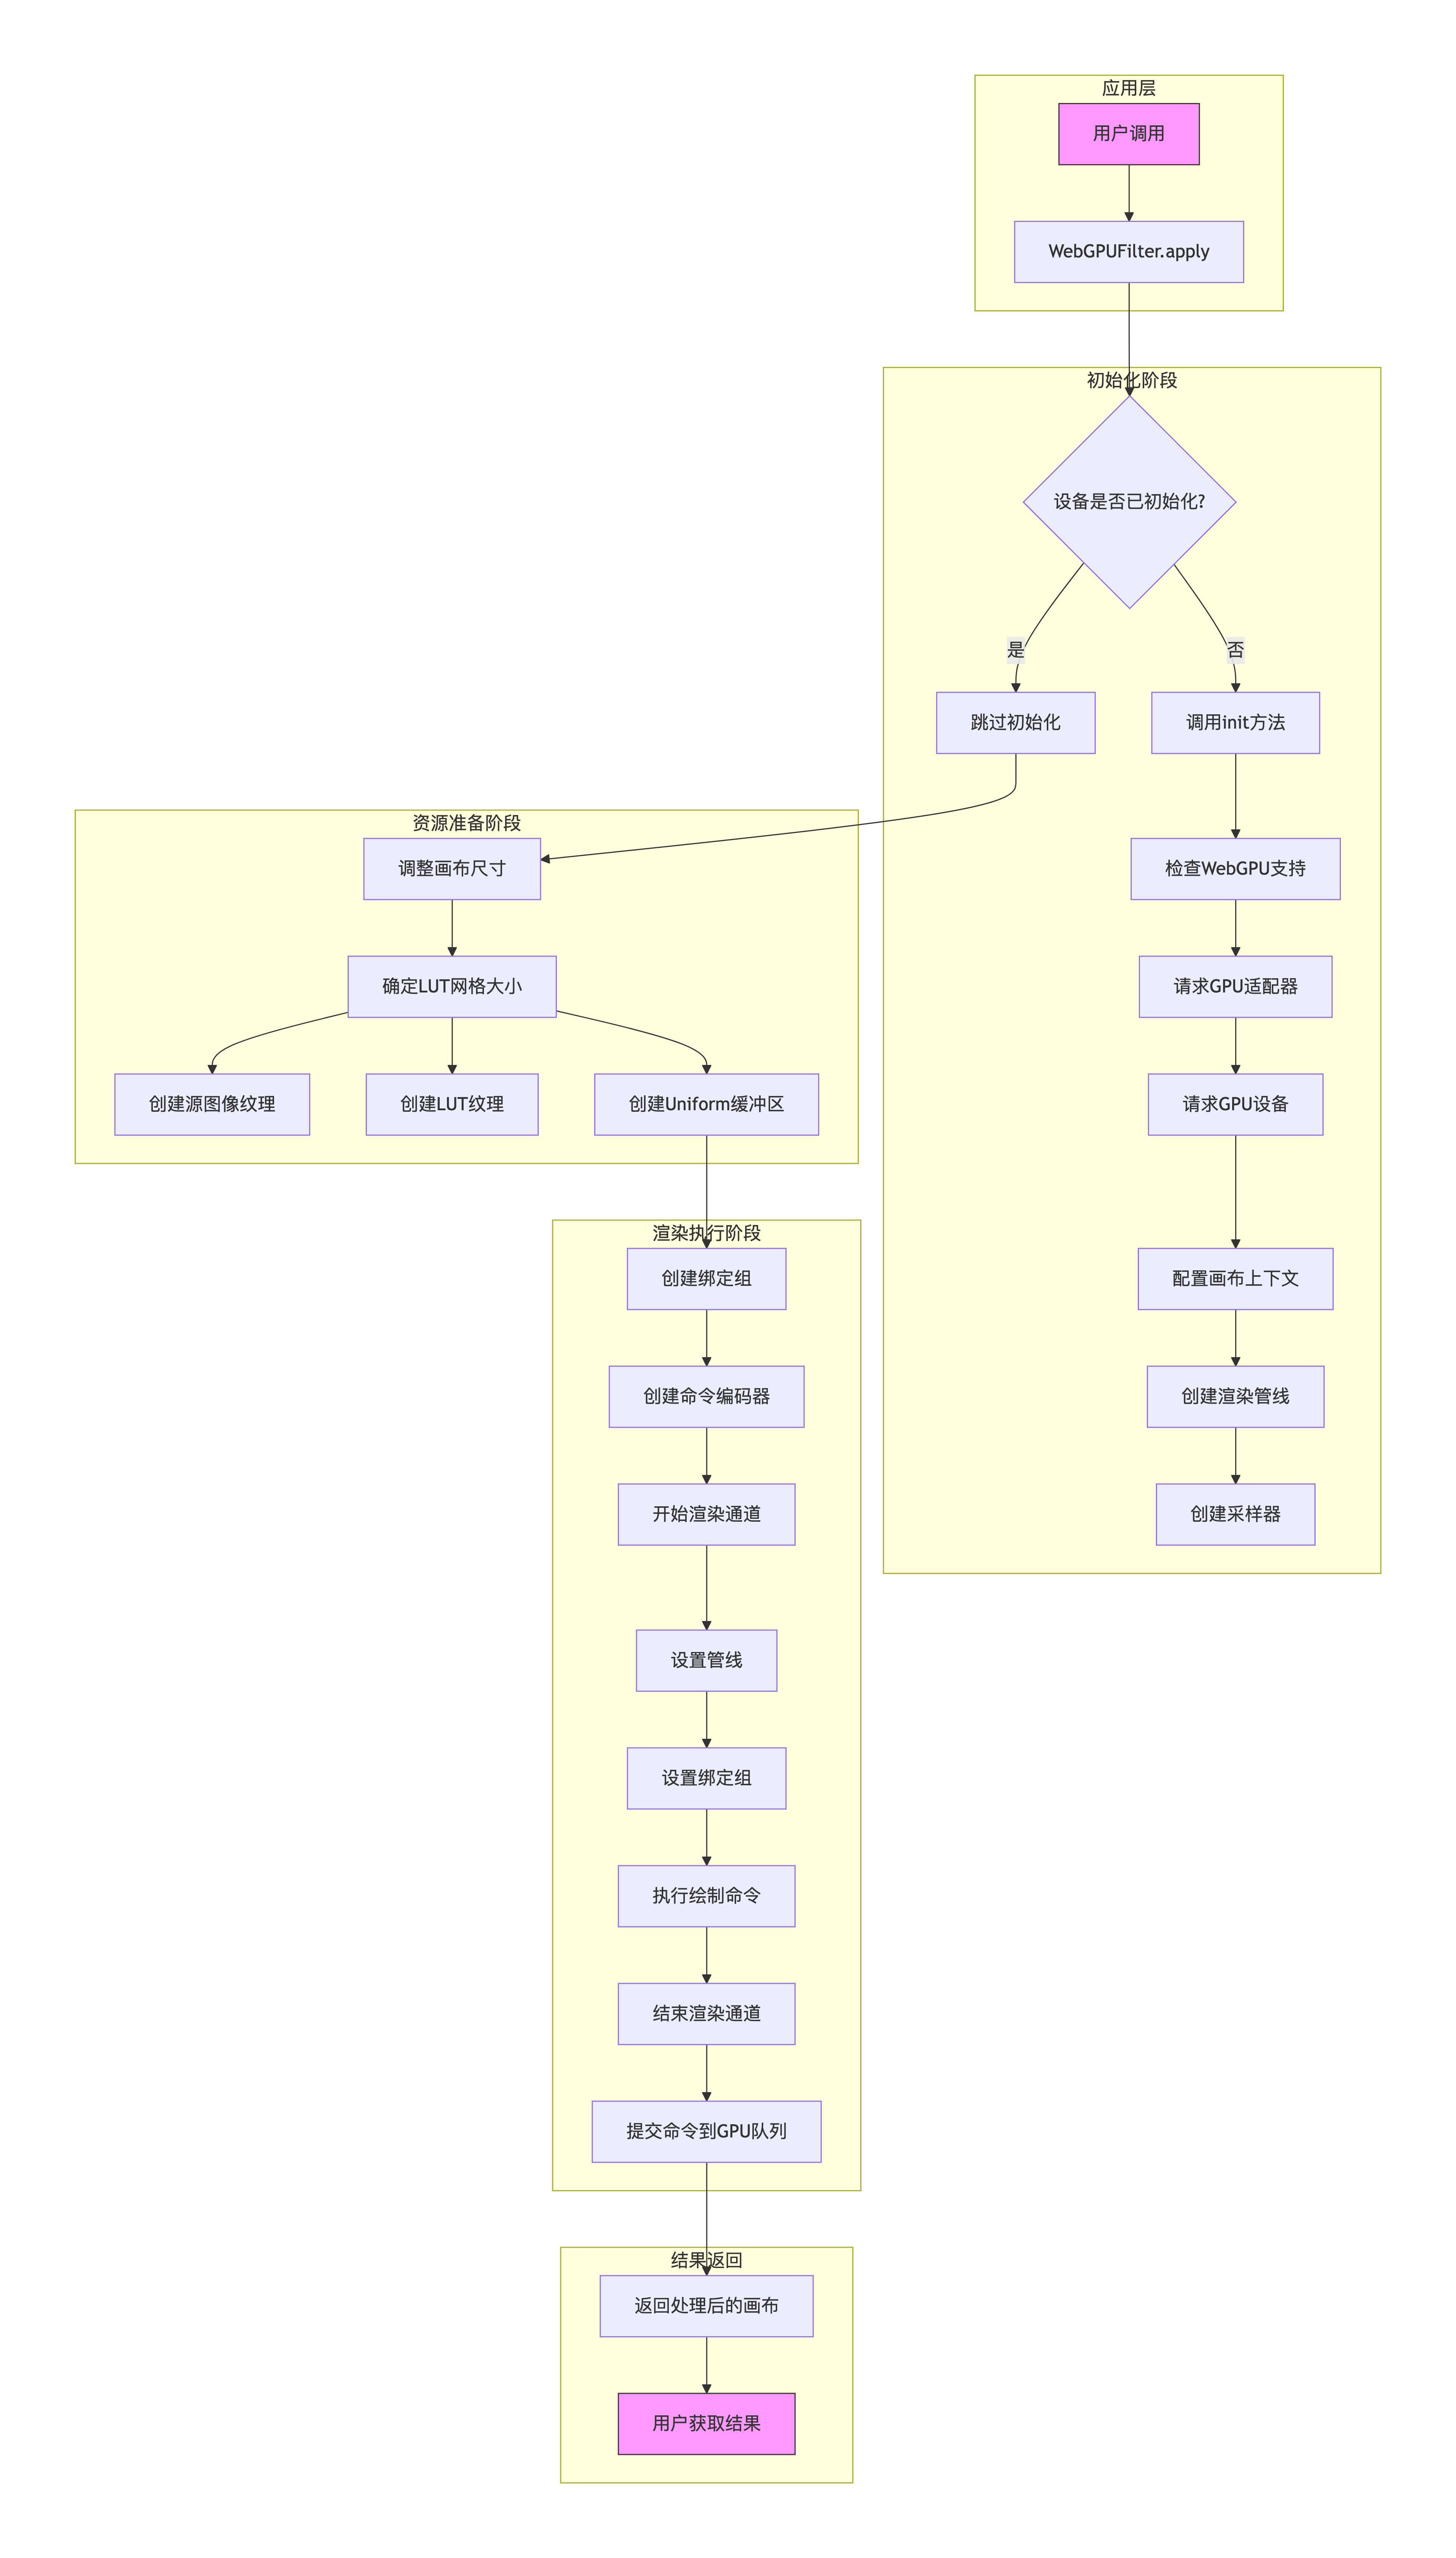
基础类
TypeScript
export class WebGPUFilter {
  private canvas: HTMLCanvasElement;
  private device: GPUDevice | null = null;
  private context: GPUCanvasContext | null = null;
  private pipeline: GPURenderPipeline | null = null;
  private sampler: GPUSampler | null = null;

  constructor() {
    this.canvas = document.createElement('canvas');
  }

  public async init() {
    if (!navigator.gpu) {
      console.error('WebGPU not supported');
      throw new Error('WebGPU not supported');
    }

    const adapter = await navigator.gpu.requestAdapter();
    if (!adapter) {
      console.error('No WebGPU adapter found');
      throw new Error('No WebGPU adapter found');
    }

    this.device = await adapter.requestDevice();
    this.context = this.canvas.getContext('webgpu');

    if (!this.context) {
      throw new Error('WebGPU context not found');
    }

    const presentationFormat = navigator.gpu.getPreferredCanvasFormat();

    this.context.configure({
      device: this.device,
      format: presentationFormat,
      alphaMode: 'premultiplied',
    });

    // Create shader module
    const shaderModule = this.device.createShaderModule({
      label: 'Filter Shader',
      code: `
        struct VertexOutput {
          @builtin(position) Position : vec4f,
          @location(0) v_texCoord : vec2f,
        }

        @vertex
        fn vs_main(@builtin(vertex_index) vertexIndex : u32) -> VertexOutput {
          var pos = array<vec2f, 6>(
            vec2f(-1.0, -1.0), vec2f(1.0, -1.0), vec2f(-1.0, 1.0),
            vec2f(-1.0, 1.0), vec2f(1.0, -1.0), vec2f(1.0, 1.0)
          );

          // UVs: Top-Left origin for WebGPU textures usually
          // But we need to match how the image is drawn.
          // Standard quad:
          // (-1,-1) -> (0, 1) in GL if 0,0 is bottom left.
          // In WebGPU, texture coords 0,0 is top-left.
          // If we map (-1,-1) [bottom-left on screen] to (0, 1) [bottom-left in texture uv], it matches.

          var tex = array<vec2f, 6>(
            vec2f(0.0, 1.0), vec2f(1.0, 1.0), vec2f(0.0, 0.0),
            vec2f(0.0, 0.0), vec2f(1.0, 1.0), vec2f(1.0, 0.0)
          );

          var output : VertexOutput;
          output.Position = vec4f(pos[vertexIndex], 0.0, 1.0);
          output.v_texCoord = tex[vertexIndex];
          return output;
        }

        struct Uniforms {
          intensity : f32,
          grid_size : f32,
        }

        @group(0) @binding(0) var u_image : texture_2d<f32>;
        @group(0) @binding(1) var u_image_sampler : sampler;
        @group(0) @binding(2) var u_lut : texture_2d<f32>;
        @group(0) @binding(3) var u_lut_sampler : sampler;
        @group(0) @binding(4) var<uniform> uniforms : Uniforms;

        @fragment
        fn fs_main(@location(0) v_texCoord : vec2f) -> @location(0) vec4f {
          let color = textureSample(u_image, u_image_sampler, v_texCoord);

          let blueColor = color.b * (uniforms.grid_size * uniforms.grid_size - 1.0);

          var quad1 : vec2f;
          quad1.y = floor(floor(blueColor) / uniforms.grid_size);
          quad1.x = floor(blueColor) - (quad1.y * uniforms.grid_size);

          var quad2 : vec2f;
          quad2.y = floor(ceil(blueColor) / uniforms.grid_size);
          quad2.x = ceil(blueColor) - (quad2.y * uniforms.grid_size);

          let N = uniforms.grid_size * uniforms.grid_size;
          let halfPixel = 0.5 / N;
          let scale = (N - 1.0) / N;

          let r = color.r * scale + halfPixel;
          let g = color.g * scale + halfPixel;

          var texPos1 : vec2f;
          texPos1.x = (quad1.x + r) / uniforms.grid_size;
          texPos1.y = (quad1.y + g) / uniforms.grid_size;

          var texPos2 : vec2f;
          texPos2.x = (quad2.x + r) / uniforms.grid_size;
          texPos2.y = (quad2.y + g) / uniforms.grid_size;

          let newColor1 = textureSample(u_lut, u_lut_sampler, texPos1);
          let newColor2 = textureSample(u_lut, u_lut_sampler, texPos2);

          let newColor = mix(newColor1, newColor2, fract(blueColor));

          let finalColor = mix(color.rgb, newColor.rgb, uniforms.intensity);
          return vec4f(finalColor, color.a);
        }
      `,
    });

    this.pipeline = this.device.createRenderPipeline({
      label: 'Filter Pipeline',
      layout: 'auto',
      vertex: {
        module: shaderModule,
        entryPoint: 'vs_main',
      },
      fragment: {
        module: shaderModule,
        entryPoint: 'fs_main',
        targets: [{ format: presentationFormat }],
      },
      primitive: {
        topology: 'triangle-list',
      },
    });

    this.sampler = this.device.createSampler({
      magFilter: 'linear',
      minFilter: 'linear',
    });
  }

  private async createTextureFromImage(
    image: HTMLImageElement | HTMLCanvasElement,
    flipY = false
  ): Promise<GPUTexture> {
    if (!this.device) throw new Error('Device not initialized');

    const texture = this.device.createTexture({
      size: [image.width, image.height],
      format: 'rgba8unorm',
      usage:
        GPUTextureUsage.TEXTURE_BINDING |
        GPUTextureUsage.COPY_DST |
        GPUTextureUsage.RENDER_ATTACHMENT,
    });

    const source = await createImageBitmap(image, {
      imageOrientation: flipY ? 'flipY' : 'none',
      premultiplyAlpha: 'none',
    });

    this.device.queue.copyExternalImageToTexture({ source: source }, { texture: texture }, [
      image.width,
      image.height,
    ]);

    return texture;
  }

  public async apply(
    sourceImage: HTMLImageElement,
    lutImage: HTMLImageElement,
    intensity: number
  ): Promise<HTMLCanvasElement> {
    if (!this.device || !this.context || !this.pipeline || !this.sampler) {
      // Attempt to init if not ready? Or just return canvas.
      // For simplicity, assume init() called.
      // If not, try init
      if (!this.device) await this.init();
      if (!this.device) return this.canvas;
    }

    const device = this.device!;
    const context = this.context!;
    const pipeline = this.pipeline!;
    const sampler = this.sampler!;

    // Resize canvas
    if (this.canvas.width !== sourceImage.width || this.canvas.height !== sourceImage.height) {
      this.canvas.width = sourceImage.width;
      this.canvas.height = sourceImage.height;
      // Re-configure context after resize
      context.configure({
        device: device,
        format: navigator.gpu.getPreferredCanvasFormat(),
        alphaMode: 'premultiplied',
      });
    }

    // Determine grid size
    let gridSize = 8.0;
    if (lutImage.width <= 256) {
      gridSize = 4.0;
    }

    // Create Textures
    // WebGL implementation had sourceImage flipped Y (flipY=true)
    // and LUT not flipped (flipY=false).
    // In WebGPU, texture origin is top-left. Our UVs map bottom-left screen to (0,1) texture (bottom-left).
    // So we should NOT flip the source image, otherwise (0,0) becomes bottom-left in memory,
    // and UV (0,0) [top-left screen] would sample bottom-left of image.
    const imageTexture = await this.createTextureFromImage(sourceImage, false);
    const lutTexture = await this.createTextureFromImage(lutImage, false);

    // Create Uniform Buffer
    const uniformBufferSize = 8; // 2 floats * 4 bytes
    const uniformBuffer = device.createBuffer({
      size: uniformBufferSize,
      usage: GPUBufferUsage.UNIFORM | GPUBufferUsage.COPY_DST,
    });
    const uniformData = new Float32Array([intensity, gridSize]);
    device.queue.writeBuffer(uniformBuffer, 0, uniformData);

    // Bind Group
    const bindGroup = device.createBindGroup({
      layout: pipeline.getBindGroupLayout(0),
      entries: [
        { binding: 0, resource: imageTexture.createView() },
        { binding: 1, resource: sampler },
        { binding: 2, resource: lutTexture.createView() },
        { binding: 3, resource: sampler },
        { binding: 4, resource: { buffer: uniformBuffer } },
      ],
    });

    const commandEncoder = device.createCommandEncoder();
    const textureView = context.getCurrentTexture().createView();

    const renderPassDescriptor: GPURenderPassDescriptor = {
      colorAttachments: [
        {
          view: textureView,
          clearValue: { r: 0.0, g: 0.0, b: 0.0, a: 0.0 },
          loadOp: 'clear',
          storeOp: 'store',
        },
      ],
    };

    const passEncoder = commandEncoder.beginRenderPass(renderPassDescriptor);
    passEncoder.setPipeline(pipeline);
    passEncoder.setBindGroup(0, bindGroup);
    passEncoder.draw(6);
    passEncoder.end();

    device.queue.submit([commandEncoder.finish()]);

    // Cleanup resources to avoid memory leaks?
    // In WebGPU, JS GC handles wrappers, but we might want to destroy textures manually if we create them every frame.
    // However, `apply` returns a canvas that has the content.
    // If we destroy `imageTexture` and `lutTexture` immediately, it might be fine because commands are submitted.
    // But let's let GC handle it for now unless performance is an issue.

    // Note: The canvas is now drawn.
    return this.canvas;
  }
}
使用
TypeScript
// 初始化类
const filter = new WebGPUFilter();
await filter.init();
webgpuFilterRef.value = filter;

// 应用滤镜
webgpuFilterRef.value
  .apply(img, filterImg, opacity)
  .then((result) => resolve(result))
注意
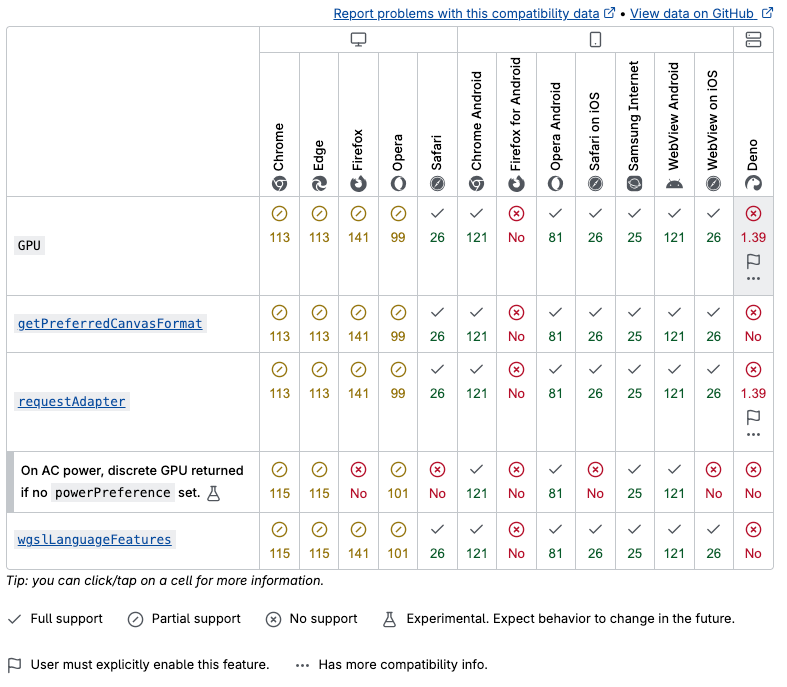
目前 WebGPU 在浏览器兼容性还存在一些问题,使用时需要特殊考虑场景。