Flutter for OpenHarmony 实战:打造天气预报应用
文章目录
- [Flutter for OpenHarmony 实战:打造天气预报应用](#Flutter for OpenHarmony 实战:打造天气预报应用)
-
- 一、项目背景与功能概述
-
- [1.1 天气预报应用的需求分析](#1.1 天气预报应用的需求分析)
- [1.2 为什么选择Flutter for OpenHarmony](#1.2 为什么选择Flutter for OpenHarmony)
- 二、技术选型与架构设计
-
- [2.1 技术栈选择](#2.1 技术栈选择)
- [2.2 应用架构设计](#2.2 应用架构设计)
- [2.3 数据流设计](#2.3 数据流设计)
- 三、数据模型设计与API集成
-
- [3.1 高德天气API接口分析](#3.1 高德天气API接口分析)
- [3.2 数据模型类设计](#3.2 数据模型类设计)
- [3.3 城市配置与编码映射](#3.3 城市配置与编码映射)
- 四、UI界面设计与实现
-
- [4.1 整体布局结构](#4.1 整体布局结构)
- [4.2 当前天气卡片设计](#4.2 当前天气卡片设计)
- [4.3 天气详情网格](#4.3 天气详情网格)
- [4.4 预报列表设计](#4.4 预报列表设计)
- 五、主题切换功能实现
-
- [5.1 主题状态管理](#5.1 主题状态管理)
- [5.2 主题应用方案](#5.2 主题应用方案)
- [5.3 主题适配组件](#5.3 主题适配组件)
- [5.4 天气图标映射](#5.4 天气图标映射)
- 六、完整代码实现
-
- [6.1 网络请求核心逻辑](#6.1 网络请求核心逻辑)
- [6.2 错误处理与加载状态](#6.2 错误处理与加载状态)
- [6.3 城市选择器实现](#6.3 城市选择器实现)
- 八、总结
本文将详细介绍如何使用Flutter for OpenHarmony框架开发一款功能完整的天气预报应用。文章涵盖了高德地图天气API的集成、数据模型设计、网络请求处理、UI界面设计、主题切换等核心技术点。通过本文学习,读者将掌握Flutter在鸿蒙平台上进行网络请求和数据处理的方法,了解移动应用开发的完整流程。
一、项目背景与功能概述
1.1 天气预报应用的需求分析
天气预报是移动应用中最常见的功能之一,它涉及网络请求、数据解析、UI展示等多个技术环节。开发一个高质量的天气预报应用需要考虑以下核心需求:
基础功能模块
- 实时天气数据显示(温度、天气状况、湿度、风力等)
- 未来几天天气预报展示
- 多城市切换支持
- 主题切换(日间/夜间模式)
用户体验优化
- 流畅的加载动画
- 优雅的错误提示
- 直观的天气图标展示
- 响应式布局适配
1.2 为什么选择Flutter for OpenHarmony
Flutter在开发天气预报类应用时具有明显优势:
网络请求能力
- 提供强大的http包支持RESTful API调用
- 异步编程模型确保UI不阻塞
- 完善的错误处理机制
UI渲染性能
- 60fps流畅动画体验
- 丰富的Widget组件库
- Material Design设计语言支持
跨平台一致性
- 一套代码在鸿蒙、iOS、Android上表现一致
- 响应式布局自动适配不同屏幕
二、技术选型与架构设计
2.1 技术栈选择
数据源选择
- 高德地图天气API:提供稳定可靠的天气数据服务
- 免费额度充足,适合开发和学习使用
- 数据格式标准,易于解析
网络请求库
- http包:Flutter官方推荐的轻量级HTTP客户端
- 支持异步请求、超时控制、错误处理
- 与Dart的async/await语法完美配合
状态管理
- StatefulWidget:基础的状态管理方案
- setState:简单直观的状态更新机制
- 适合中小型应用的状态管理需求
2.2 应用架构设计
采用分层架构设计,保证代码的可维护性和可扩展性:
表现层 (Presentation Layer)
├── WeatherHomePage (主页面)
├── WeatherCard (天气卡片)
├── ForecastCard (预报卡片)
└── CitySelector (城市选择器)

业务逻辑层 (Business Logic Layer)
├── _fetchWeatherData (数据获取)
├── _toggleTheme (主题切换)
└── _getWeatherIcon (图标映射)

数据层 (Data Layer)
├── WeatherData (实时天气模型)
├── ForecastData (预报数据模型)
└── API配置与城市映射
2.3 数据流设计
三、数据模型设计与API集成
3.1 高德天气API接口分析
高德地图天气API提供两种查询模式:
实时天气查询
html
URL: https://restapi.amap.com/v3/weather/weatherInfo
参数:
- key: API密钥
- city: 城市编码(adcode)
- extensions: base(基础实况天气)

返回数据结构:
{
  "status": "1",
  "lives": [{
    "province": "北京",
    "city": "北京市",
    "weather": "晴",
    "temperature": "15",
    "winddirection": "西",
    "windpower": "3级",
    "humidity": "25",
    "reporttime": "2024-01-15 14:00:00"
  }]
}
天气预报查询
html
参数: extensions: all(预报天气)
返回数据结构:
{
  "status": "1",
  "forecasts": [{
    "city": "北京市",
    "casts": [
      {
        "date": "2024-01-15",
        "dayweather": "晴",
        "nightweather": "晴",
        "daytemp": "18",
        "nighttemp": "5"
      }
    ]
  }]
}
3.2 数据模型类设计
WeatherData实时天气模型
dart
class WeatherData {
  final String province;      // 省份
  final String city;          // 城市
  final String weather;       // 天气状况
  final String temperature;   // 温度
  final String windDirection; // 风向
  final String windPower;     // 风力
  final String humidity;      // 湿度
  final String reportTime;    // 更新时间

  WeatherData({
    required this.province,
    required this.city,
    required this.weather,
    required this.temperature,
    required this.windDirection,
    required this.windPower,
    required this.humidity,
    required this.reportTime,
  });

  factory WeatherData.fromJson(Map<String, dynamic> json) {
    // 格式化时间显示
    String formatTime(String reportTime) {
      try {
        final dateTime = DateTime.parse(reportTime);
        return '${dateTime.hour.toString().padLeft(2, '0')}:${dateTime.minute.toString().padLeft(2, '0')}';
      } catch (e) {
        return reportTime;
      }
    }

    return WeatherData(
      province: json['province'] ?? '',
      city: json['city'] ?? '',
      weather: json['weather'] ?? '',
      temperature: json['temperature'] ?? '',
      windDirection: json['winddirection'] ?? '',
      windPower: json['windpower'] ?? '',
      humidity: json['humidity'] ?? '',
      reportTime: formatTime(json['reporttime'] ?? ''),
    );
  }
}
ForecastData预报数据模型
dart
class ForecastData {
  final String date;        // 日期
  final String dayWeather;  // 白天天气
  final String nightTemp;   // 夜间温度
  final String dayTemp;     // 白天温度

  ForecastData({
    required this.date,
    required this.dayWeather,
    required this.nightTemp,
    required this.dayTemp,
  });

  factory ForecastData.fromJson(Map<String, dynamic> json) {
    // 格式化日期显示
    String formatDate(String dateStr) {
      try {
        final parts = dateStr.split('-');
        if (parts.length == 3) {
          return '${parts[1]}月${parts[2]}日';
        }
        return dateStr;
      } catch (e) {
        return dateStr;
      }
    }

    return ForecastData(
      date: formatDate(json['date'] ?? ''),
      dayWeather: json['dayweather'] ?? '',
      nightTemp: json['nighttemp'] ?? '',
      dayTemp: json['daytemp'] ?? '',
    );
  }
}
3.3 城市配置与编码映射
dart
final Map<String, String> _cities = {
  "北京": "110000",
  "上海": "310000",
  "广州": "440100",
  "深圳": "440300",
  "成都": "510100",
  "杭州": "330100",
  "武汉": "420100",
  "西安": "610100",
  "南京": "320100",
  "重庆": "500000",
};
使用Map结构将城市名称映射到高德API所需的adcode,便于用户选择时快速查找对应编码。
四、UI界面设计与实现
4.1 整体布局结构
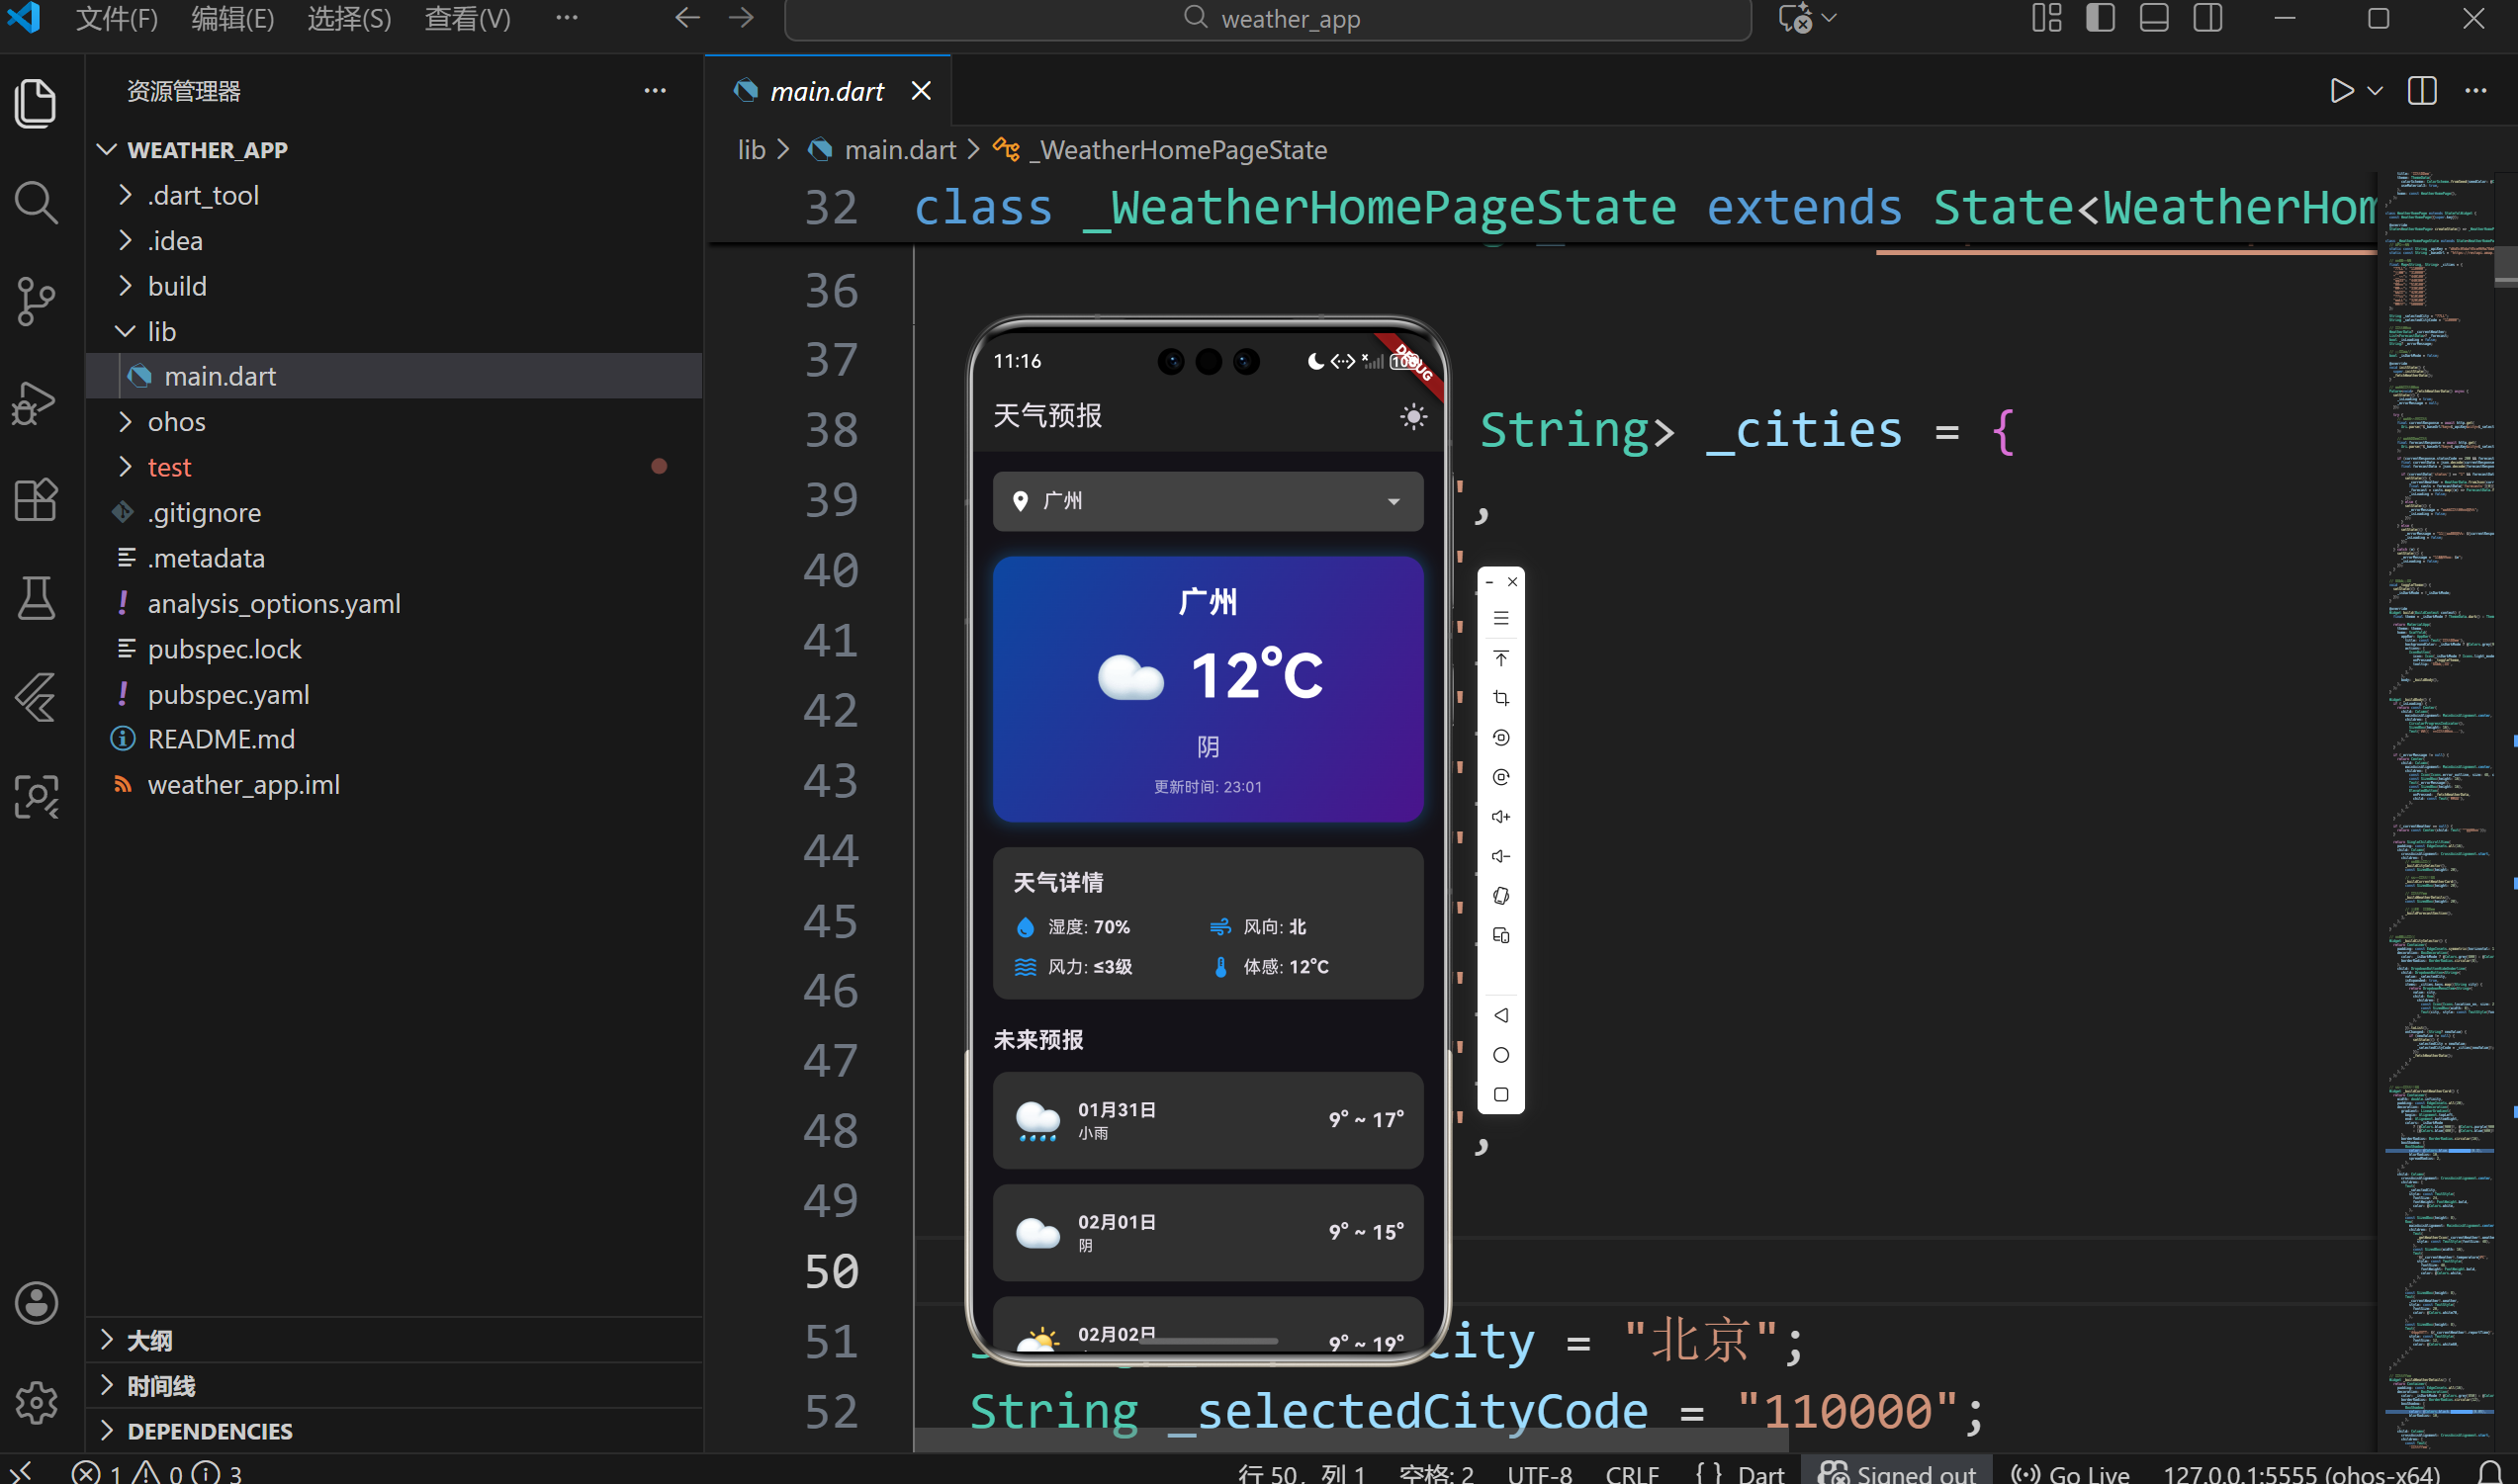
应用采用垂直滚动的单页面布局:
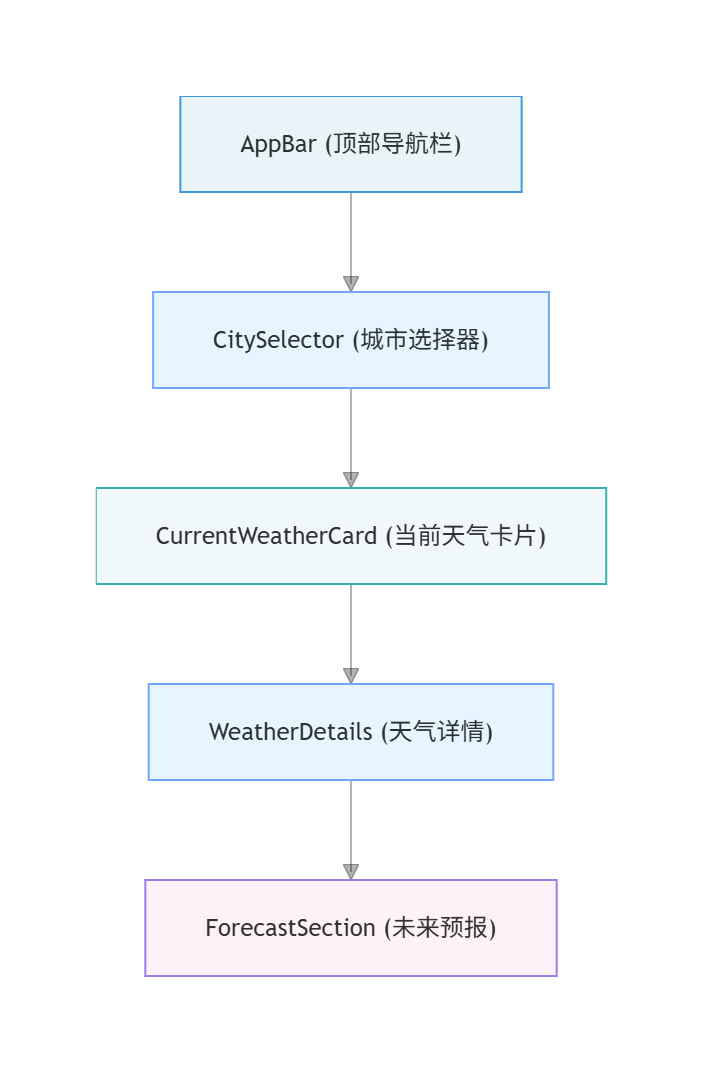
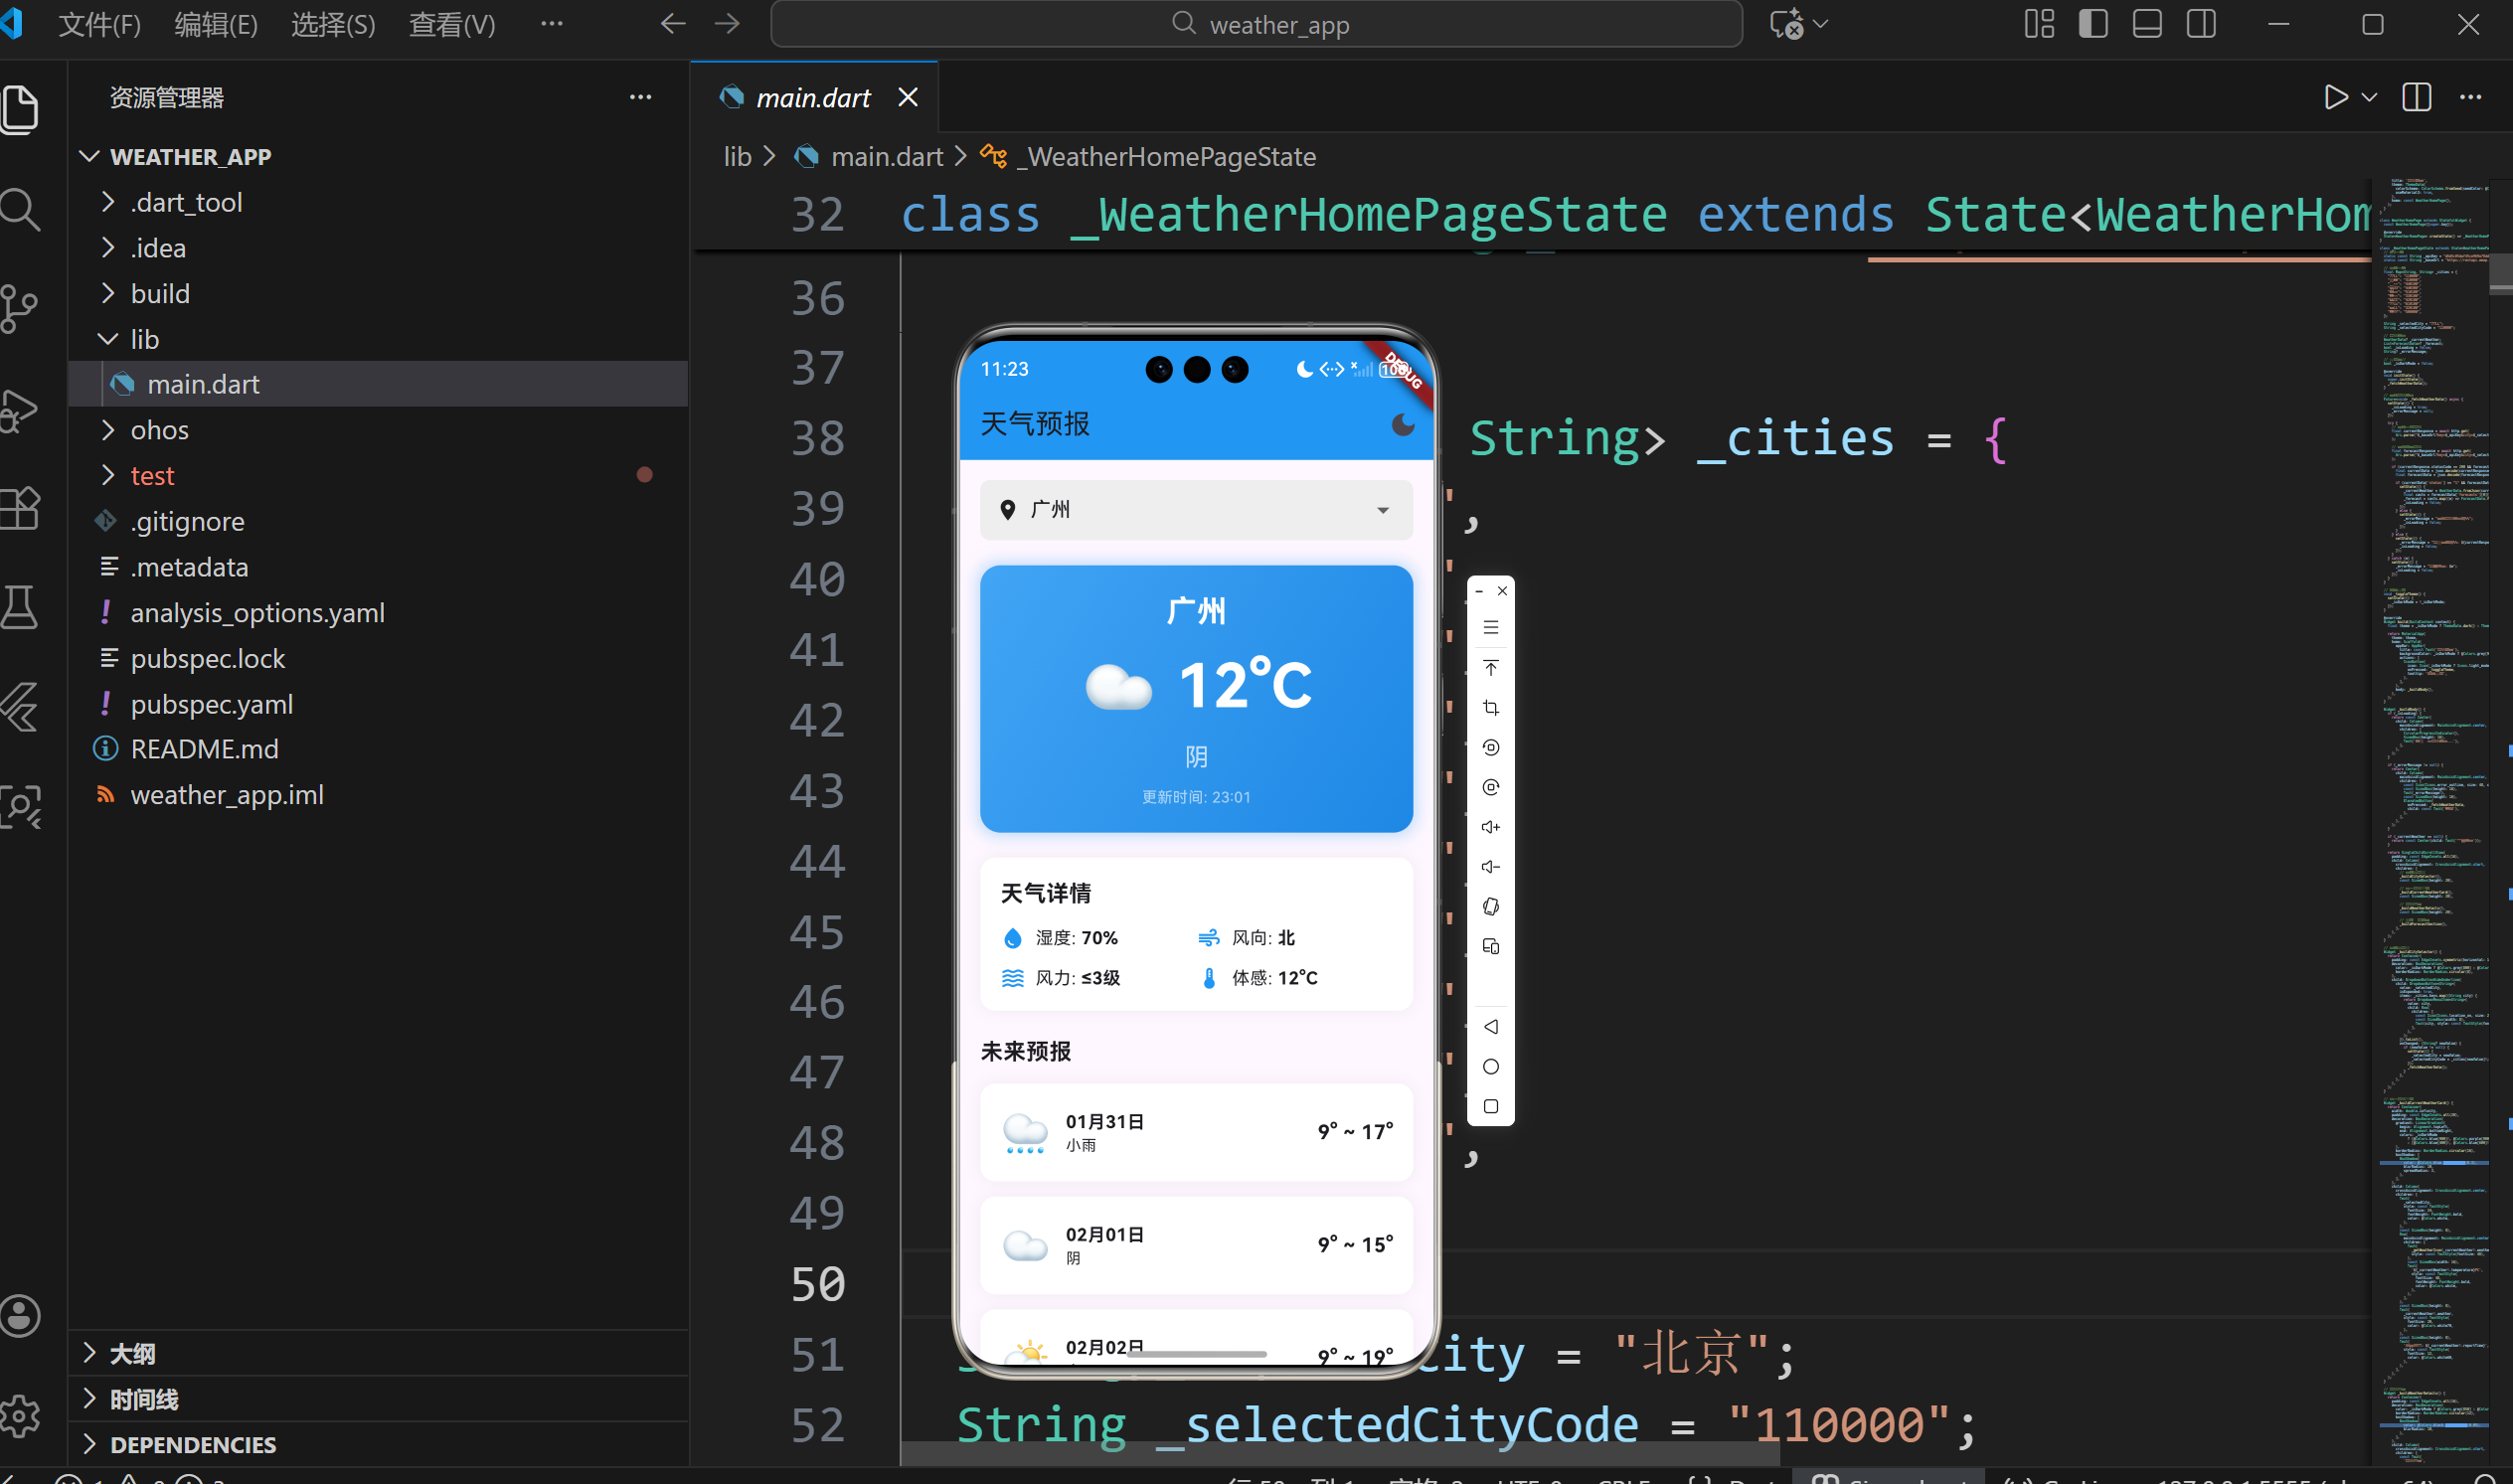
4.2 当前天气卡片设计
当前天气卡片是应用的视觉焦点,采用渐变背景和大字号温度显示:
dart
Widget _buildCurrentWeatherCard() {
  return Container(
    width: double.infinity,
    padding: const EdgeInsets.all(20),
    decoration: BoxDecoration(
      gradient: LinearGradient(
        begin: Alignment.topLeft,
        end: Alignment.bottomRight,
        colors: _isDarkMode
            ? [Colors.blue[900]!, Colors.purple[900]!]
            : [Colors.blue[400]!, Colors.blue[600]!],
      ),
      borderRadius: BorderRadius.circular(16),
      boxShadow: [
        BoxShadow(
          color: Colors.blue.withOpacity(0.3),
          blurRadius: 10,
          spreadRadius: 2,
        ),
      ],
    ),
    child: Column(
      children: [
        Text(_selectedCity, style: titleStyle),
        Row(
          children: [
            Text(_getWeatherIcon(_currentWeather!.weather)),
            Text('${_currentWeather!.temperature}°C'),
          ],
        ),
        Text(_currentWeather!.weather),
      ],
    ),
  );
}
设计要点
- 渐变背景增强视觉层次
- 圆角和阴影营造卡片悬浮效果
- 天气图标和温度并排显示
- 主题切换时背景色自动调整
4.3 天气详情网格
天气详情采用2x2网格布局,展示湿度、风向、风力等信息:
dart
Widget _buildWeatherDetails() {
  return Container(
    padding: const EdgeInsets.all(16),
    decoration: BoxDecoration(
      color: _isDarkMode ? Colors.grey[850] : Colors.white,
      borderRadius: BorderRadius.circular(12),
      boxShadow: [
        BoxShadow(
          color: Colors.black.withOpacity(0.05),
          blurRadius: 10,
        ),
      ],
    ),
    child: Column(
      children: [
        Row(
          children: [
            Expanded(child: _buildDetailItem(Icons.water_drop, '湿度', '${_currentWeather!.humidity}%')),
            Expanded(child: _buildDetailItem(Icons.air, '风向', _currentWeather!.windDirection)),
          ],
        ),
        Row(
          children: [
            Expanded(child: _buildDetailItem(Icons.waves, '风力', '${_currentWeather!.windPower}级')),
            Expanded(child: _buildDetailItem(Icons.thermostat, '体感', '${_currentWeather!.temperature}°C')),
          ],
        ),
      ],
    ),
  );
}
4.4 预报列表设计
未来预报使用垂直卡片列表展示:
dart
Widget _buildForecastCard(ForecastData data) {
  return Container(
    margin: const EdgeInsets.only(bottom: 12),
    padding: const EdgeInsets.all(16),
    decoration: BoxDecoration(
      color: _isDarkMode ? Colors.grey[850] : Colors.white,
      borderRadius: BorderRadius.circular(12),
      boxShadow: [
        BoxShadow(
          color: Colors.black.withOpacity(0.05),
          blurRadius: 10,
        ),
      ],
    ),
    child: Row(
      mainAxisAlignment: MainAxisAlignment.spaceBetween,
      children: [
        Row(
          children: [
            Text(_getWeatherIcon(data.dayWeather)),
            Column(
              children: [
                Text(data.date),
                Text(data.dayWeather),
              ],
            ),
          ],
        ),
        Text('${data.nightTemp}° ~ ${data.dayTemp}°'),
      ],
    ),
  );
}
五、主题切换功能实现
5.1 主题状态管理
使用布尔值记录当前主题模式:
dart
bool _isDarkMode = false;

void _toggleTheme() {
  setState(() {
    _isDarkMode = !_isDarkMode;
  });
}
5.2 主题应用方案
在build方法中动态创建ThemeData:
dart
@override
Widget build(BuildContext context) {
  final theme = _isDarkMode ? ThemeData.dark() : ThemeData.light();

  return MaterialApp(
    theme: theme,
    home: Scaffold(
      appBar: AppBar(
        backgroundColor: _isDarkMode ? Colors.grey[900] : Colors.blue,
        actions: [
          IconButton(
            icon: Icon(_isDarkMode ? Icons.light_mode : Icons.dark_mode),
            onPressed: _toggleTheme,
          ),
        ],
      ),
      body: _buildBody(),
    ),
  );
}
5.3 主题适配组件
所有UI组件都需要根据主题模式调整颜色:
dart
// 背景色适配
color: _isDarkMode ? Colors.grey[850] : Colors.white,

// 文字颜色适配
color: _isDarkMode ? Colors.white70 : Colors.black87,
5.4 天气图标映射
根据天气描述返回对应的Emoji图标:
dart
String _getWeatherIcon(String weather) {
  if (weather.contains('晴')) return '☀️';
  if (weather.contains('多云')) return '⛅';
  if (weather.contains('阴')) return '☁️';
  if (weather.contains('雨')) return '🌧️';
  if (weather.contains('雪')) return '❄️';
  if (weather.contains('雾') || weather.contains('霾')) return '🌫️';
  return '🌤️';
}
六、完整代码实现
6.1 网络请求核心逻辑
dart
Future<void> _fetchWeatherData() async {
  setState(() {
    _isLoading = true;
    _errorMessage = null;
  });

  try {
    // 获取实时天气
    final currentResponse = await http.get(
      Uri.parse("$_baseUrl?key=$_apiKey&city=$_selectedCityCode&extensions=base"),
    );

    // 获取预报天气
    final forecastResponse = await http.get(
      Uri.parse("$_baseUrl?key=$_apiKey&city=$_selectedCityCode&extensions=all"),
    );

    if (currentResponse.statusCode == 200 && forecastResponse.statusCode == 200) {
      final currentData = json.decode(currentResponse.body);
      final forecastData = json.decode(forecastResponse.body);

      if (currentData['status'] == "1" && forecastData['status'] == "1") {
        setState(() {
          _currentWeather = WeatherData.fromJson(currentData['lives'][0]);
          final casts = forecastData['forecasts'][0]['casts'] as List;
          _forecast = casts.map((e) => ForecastData.fromJson(e)).toList();
          _isLoading = false;
        });
      } else {
        setState(() {
          _errorMessage = "获取天气数据失败";
          _isLoading = false;
        });
      }
    } else {
      setState(() {
        _errorMessage = "网络请求失败: ${currentResponse.statusCode}";
        _isLoading = false;
      });
    }
  } catch (e) {
    setState(() {
      _errorMessage = "发生错误: $e";
      _isLoading = false;
    });
  }
}
6.2 错误处理与加载状态
dart
Widget _buildBody() {
  if (_isLoading) {
    return const Center(
      child: Column(
        mainAxisAlignment: MainAxisAlignment.center,
        children: [
          CircularProgressIndicator(),
          SizedBox(height: 16),
          Text('正在加载天气数据...'),
        ],
      ),
    );
  }

  if (_errorMessage != null) {
    return Center(
      child: Column(
        mainAxisAlignment: MainAxisAlignment.center,
        children: [
          const Icon(Icons.error_outline, size: 48, color: Colors.red),
          const SizedBox(height: 16),
          Text(_errorMessage!),
          const SizedBox(height: 16),
          ElevatedButton(
            onPressed: _fetchWeatherData,
            child: const Text('重试'),
          ),
        ],
      ),
    );
  }

  if (_currentWeather == null) {
    return const Center(child: Text('暂无数据'));
  }

  return SingleChildScrollView(
    padding: const EdgeInsets.all(16),
    child: Column(
      children: [
        _buildCitySelector(),
        _buildCurrentWeatherCard(),
        _buildWeatherDetails(),
        _buildForecastSection(),
      ],
    ),
  );
}
6.3 城市选择器实现
dart
Widget _buildCitySelector() {
  return Container(
    padding: const EdgeInsets.symmetric(horizontal: 12),
    decoration: BoxDecoration(
      color: _isDarkMode ? Colors.grey[800] : Colors.grey[200],
      borderRadius: BorderRadius.circular(8),
    ),
    child: DropdownButtonHideUnderline(
      child: DropdownButton<String>(
        value: _selectedCity,
        isExpanded: true,
        items: _cities.keys.map((String city) {
          return DropdownMenuItem<String>(
            value: city,
            child: Row(
              children: [
                const Icon(Icons.location_on, size: 20),
                const SizedBox(width: 8),
                Text(city, style: const TextStyle(fontSize: 16)),
              ],
            ),
          );
        }).toList(),
        onChanged: (String? newValue) {
          if (newValue != null) {
            setState(() {
              _selectedCity = newValue;
              _selectedCityCode = _cities[newValue]!;
            });
            _fetchWeatherData();
          }
        },
      ),
    ),
  );
}
八、总结
本文详细介绍了使用Flutter for OpenHarmony开发天气预报应用的完整过程,涵盖了以下核心技术点:
- 网络请求:使用http包调用高德天气API,处理异步请求和错误
- 数据模型:设计WeatherData和ForecastData模型,实现JSON数据解析
- UI设计:构建卡片式布局,实现主题切换功能
- 状态管理:使用setState管理加载状态、错误状态和数据状态
这个项目展示了Flutter在数据驱动型应用开发中的优势,代码结构清晰,易于扩展。读者可以基于此项目添加更多功能,如定位服务、天气预警、数据缓存等。
通过本文的学习,读者应该能够独立开发类似的网络应用,掌握Flutter在鸿蒙平台上的跨平台开发技巧。
欢迎加入开源鸿蒙跨平台社区 : 开源鸿蒙跨平台开发者社区