1. 适配器模式 (Adapter)
概念
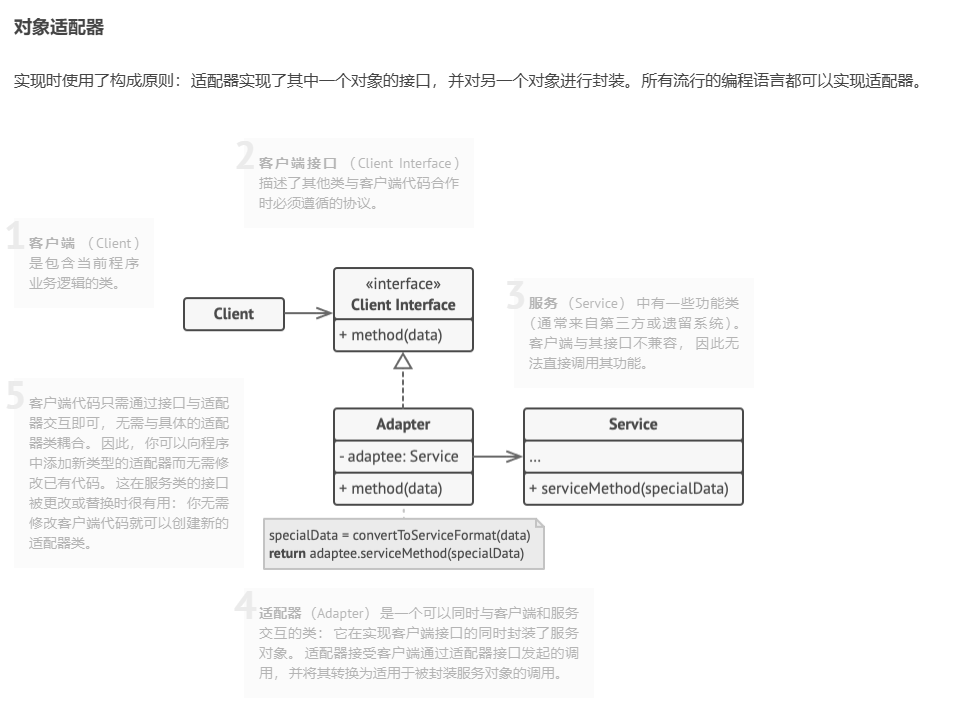
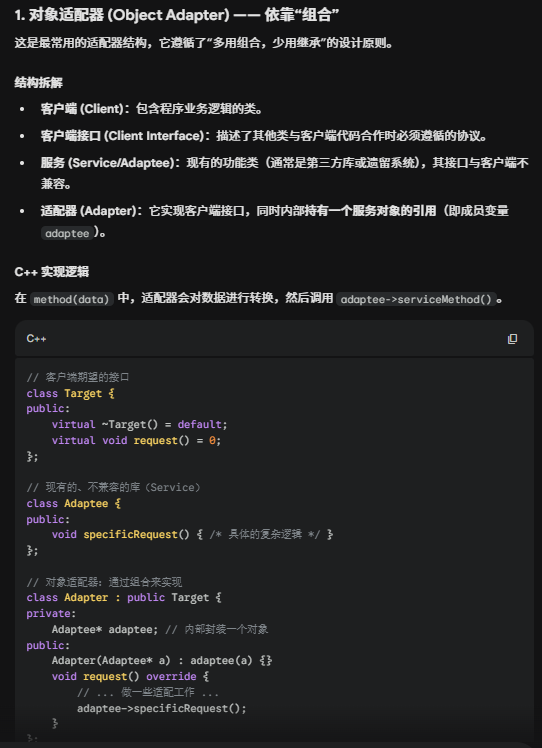
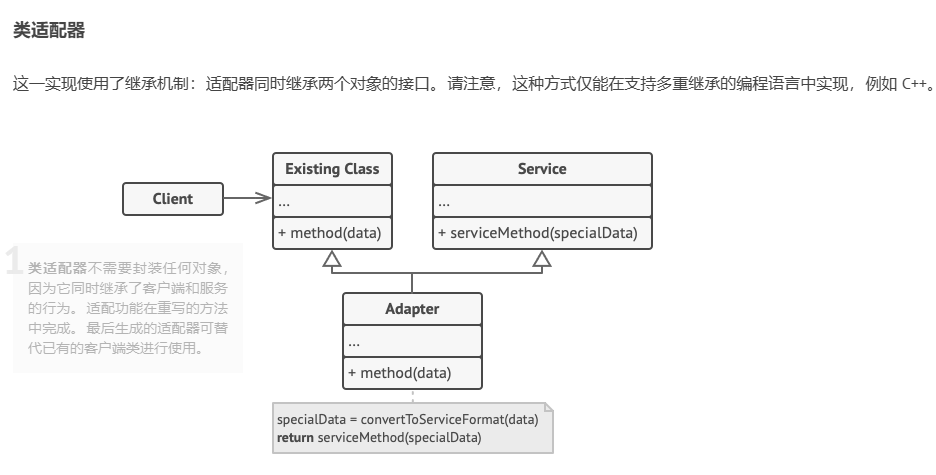
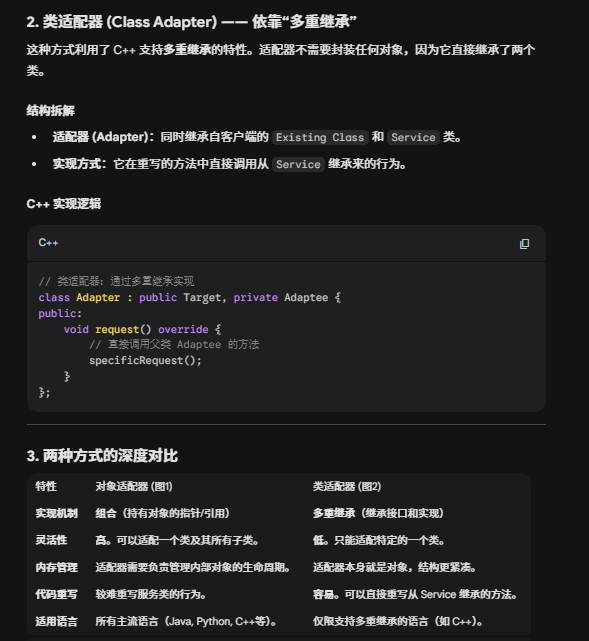
- 适配器模式是一种结构型设计模式, 它能使接口不兼容的对象能够相互合作。
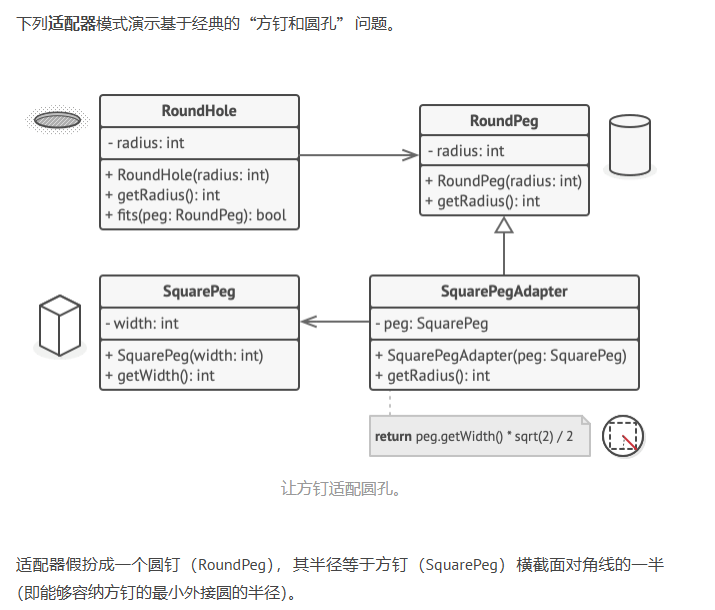
模式结构
举例说明
cpp
#include <iostream>

// 圆钉
class RoundPeg
{
public:
    explicit RoundPeg(double radius) : radius_(radius) {}

    double getRadius() const { return radius_; }

private:
    double radius_;
};
// 圆孔
class RoundHole
{
public:
    explicit RoundHole(double radius) : radius_(radius) {}
    double getRadius() const { return radius_; }
    bool fits(const RoundPeg &peg) const
    {
        return peg.getRadius() <= radius_;
    }

private:
    double radius_;
};

// 方钉
class SquarePeg
{
public:
    explicit SquarePeg(double width) : width_(width) {}

    double getWidth() const { return width_; }

private:
    double width_;
};

// 适配器类让你能够将方钉放入圆孔中。它会对 RoundPeg 类进行扩展,以接收适 配器对象作为圆钉。
class SquarePegAdapter : public RoundPeg
{
public:
    explicit SquarePegAdapter(const SquarePeg &squarePeg)
        : squarePeg_(squarePeg), RoundPeg(this->squarePeg_.getWidth() * 0.5 * 1.41421356237) {}

private:
    double getRadius()
    {
        // 计算适配器的半径,使其能够适应圆孔
        return this->squarePeg_.getWidth() * 0.5 * 1.41421356237; // width / 2 * sqrt(2)
    }

private:
    const SquarePeg &squarePeg_;
};
int main()
{
    // 圆钉适配圆孔
    RoundPeg roundPeg(12);
    RoundHole roundHole(10);
    if (roundHole.fits(roundPeg))
    {
        std::cout << "Round peg fits in round hole." << std::endl;
    }
    else
    {
        std::cout << "Round peg does not fit in round hole." << std::endl;
    }

    // 方钉适配圆孔
    SquarePeg squarePeg(10);
    SquarePegAdapter squarePegAdapter(squarePeg);
    if (roundHole.fits(squarePegAdapter))
    {
        std::cout << "Square peg fits in round hole." << std::endl;
    }
    else
    {
        std::cout << "Square peg does not fit in round hole." << std::endl;
    }
    return 0;
}
运用场景
实现方式
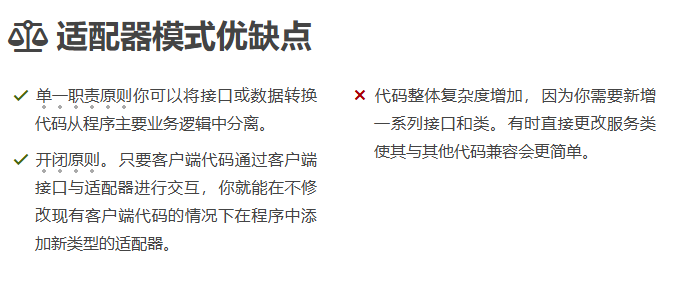
优缺点
2. 桥接模式 (Bridge)
概念
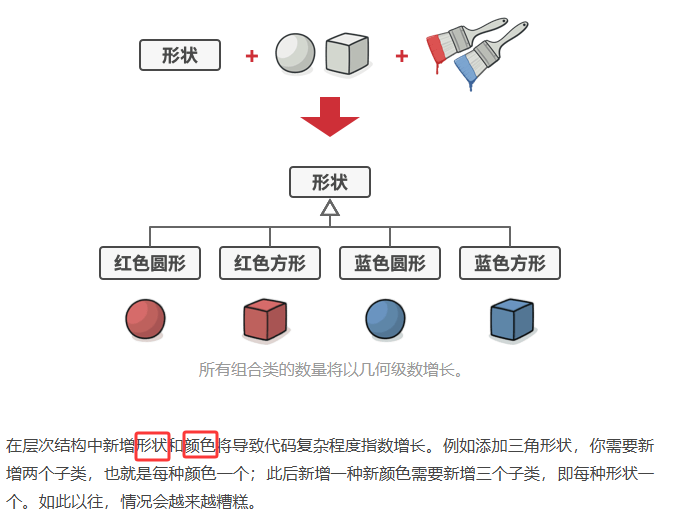
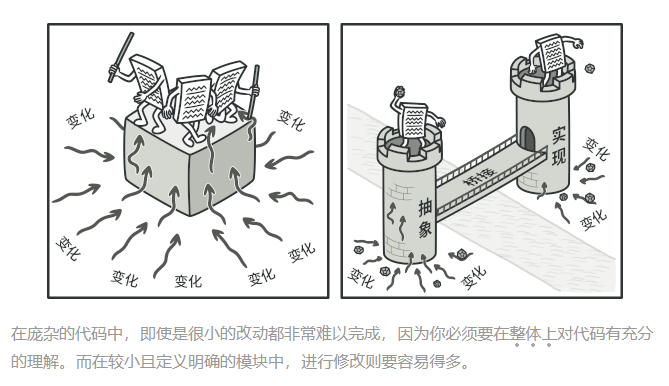
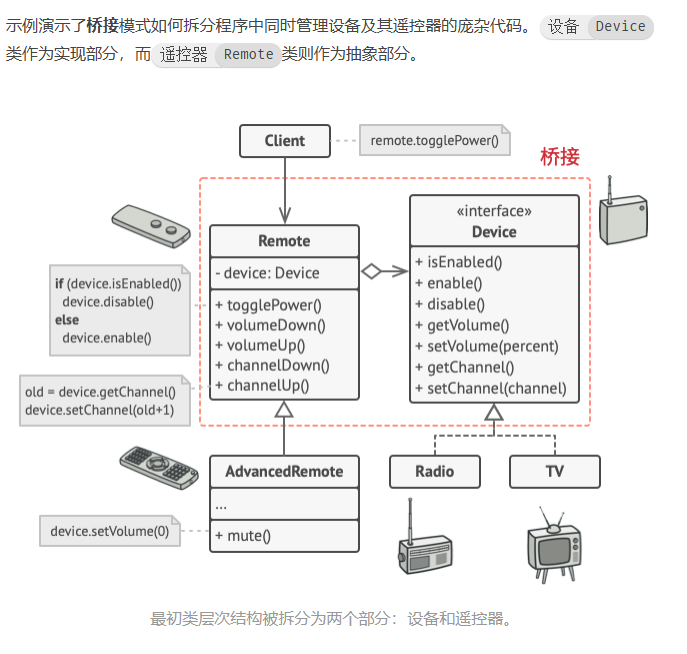
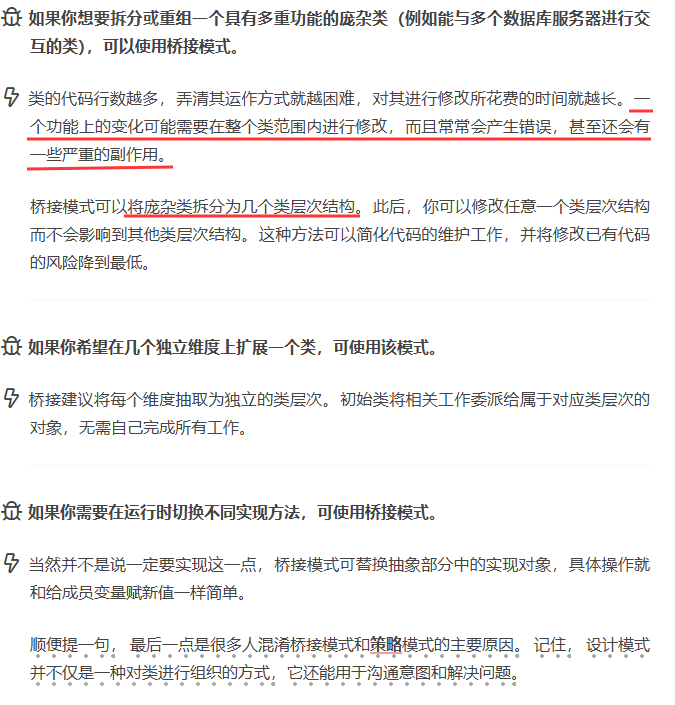
- 桥接模式是一种结构型设计模式, 可将一个大类或一系列紧密相关的类拆分为抽象和实现两个独立的层次结构, 从而能在开发时分别使用。

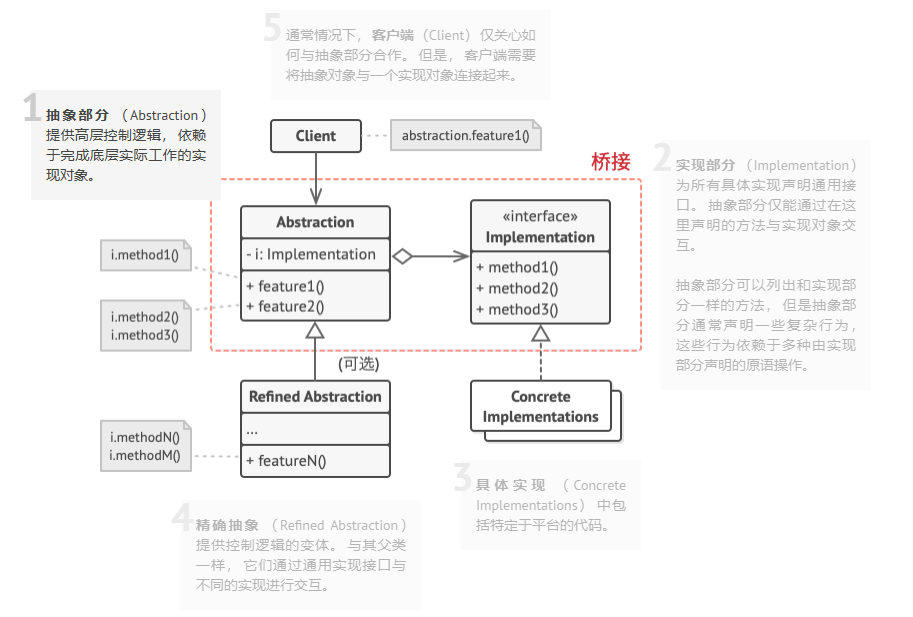
模式结构
举例说明
cpp
#include <iostream>
#include <memory>
#include <string>

// --- 1. 实现部分接口 (Implementation) ---
// 该接口声明了所有具体实现类通用的原语操作。
class Device {
public:
    virtual ~Device()                    = default;
    virtual bool isEnabled() const       = 0;
    virtual void enable()                = 0;
    virtual void disable()               = 0;
    virtual int  getVolume() const       = 0;
    virtual void setVolume(int percent)  = 0;
    virtual int  getChannel() const      = 0;
    virtual void setChannel(int channel) = 0;
};

// --- 2. 具体实现1 (Concrete Implementations) ---
class Tv : public Device {
private:
    bool on      = false;
    int  volume  = 30;
    int  channel = 1;

public:
    bool isEnabled() const override { return on; }
    void enable() override {
        on = true;
        std::cout << "TV: 已开启\n";
    }
    void disable() override {
        on = false;
        std::cout << "TV: 已关闭\n";
    }
    int  getVolume() const override { return volume; }
    void setVolume(int percent) override {
        volume = percent;
        std::cout << "TV: 音量调至 " << volume << "%\n";
    }
    int  getChannel() const override { return channel; }
    void setChannel(int ch) override {
        channel = ch;
        std::cout << "TV: 频道切换至 " << channel << "\n";
    }
};
// --- 2. 具体实现2 (Concrete Implementations) ---
class Radio : public Device {
private:
    bool on      = false;
    int  volume  = 20;
    int  channel = 101;

public:
    bool isEnabled() const override { return on; }
    void enable() override {
        on = true;
        std::cout << "Radio: 已开启\n";
    }
    void disable() override {
        on = false;
        std::cout << "Radio: 已关闭\n";
    }
    int  getVolume() const override { return volume; }
    void setVolume(int percent) override {
        volume = percent;
        std::cout << "Radio: 音量调至 " << volume << "%\n";
    }
    int  getChannel() const override { return channel; }
    void setChannel(int ch) override {
        channel = ch;
        std::cout << "Radio: 频率切换至 " << (float)channel / 10.0 << "MHz\n";
    }
};

// --- 3. 抽象部分 (Abstraction) ---
// 管理着一个指向实现部分对象的引用。
class RemoteControl {
protected:
    std::shared_ptr<Device> device;  // 通过组合方式持有实现部分的引用

public:
    explicit RemoteControl(std::shared_ptr<Device> dev) : device(std::move(dev)) {}
    virtual ~RemoteControl() = default;

    void togglePower() {
        if (device->isEnabled())
            device->disable();
        else
            device->enable();
    }

    void volumeDown() { device->setVolume(device->getVolume() - 10); }

    void volumeUp() { device->setVolume(device->getVolume() + 10); }

    void channelDown() { device->setChannel(device->getChannel() - 1); }

    void channelUp() { device->setChannel(device->getChannel() + 1); }
};

// --- 4. 精确抽象 (Refined Abstraction) ---
// 你可以独立于设备类的方式从抽象层中扩展功能。
class AdvancedRemoteControl : public RemoteControl {
public:
    explicit AdvancedRemoteControl(std::shared_ptr<Device> dev) : RemoteControl(std::move(dev)) {}

    void mute() {
        std::cout << "高级遥控器:执行静音操作\n";
        device->setVolume(0);
    }
};

// --- 5. 客户端代码 ---
int main() {
    // 演示 1:普通遥控器控制电视
    auto tv = std::make_shared<Tv>();
    std::cout << "--- 测试普通遥控器控制 TV ---\n";
    RemoteControl remote(tv);
    remote.togglePower();
    remote.volumeUp();

    // 演示 2:高级遥控器控制收音机
    auto radio = std::make_shared<Radio>();
    std::cout << "\n--- 测试高级遥控器控制 Radio ---\n";
    AdvancedRemoteControl advancedRemote(radio);
    advancedRemote.togglePower();
    advancedRemote.mute();  // 使用扩展功能

    return 0;
}
运用场景
实现方式
优缺点

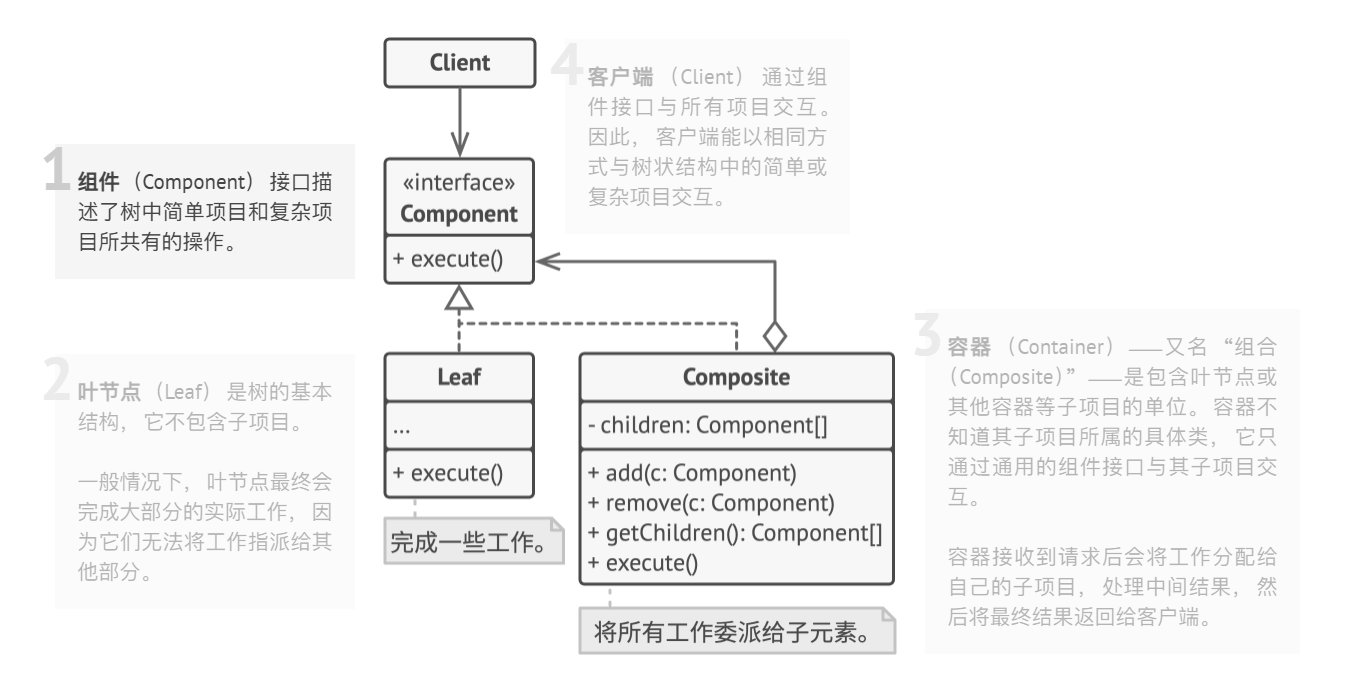
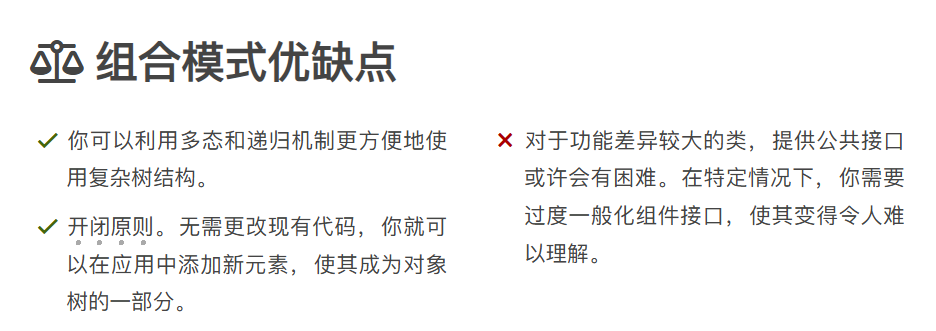
3. 组合模式 (Composite)
概念
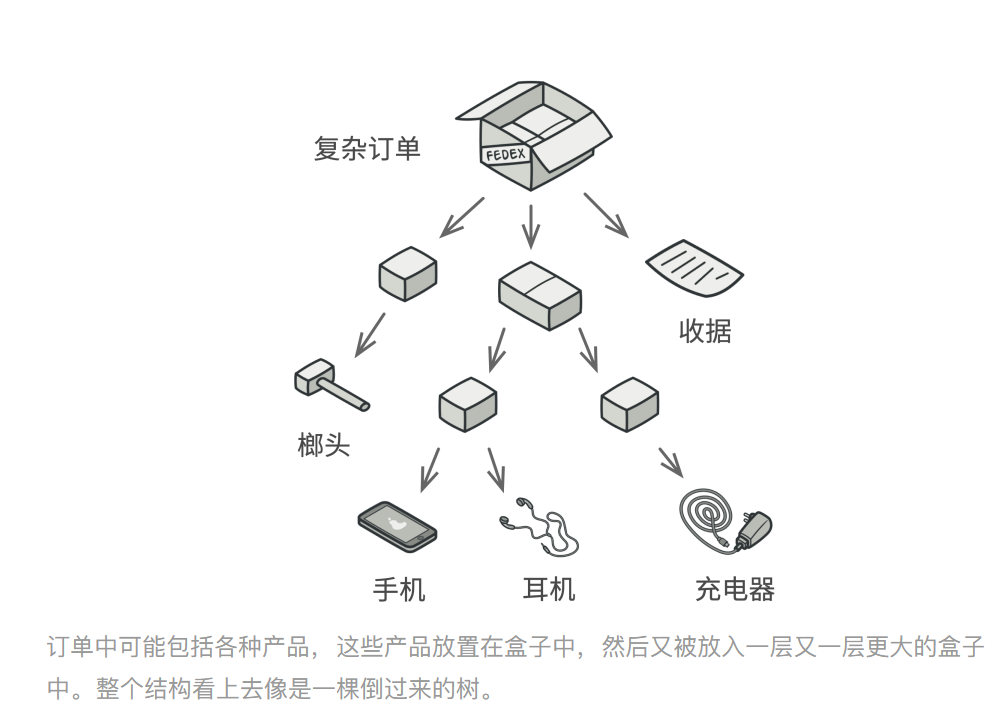
使用它将对象组合成树状结构, 并且能像使用独立对象一样使用它们。
如果应用的核心模型能用树状结构表示, 在应用中使用组合模式才有价值。
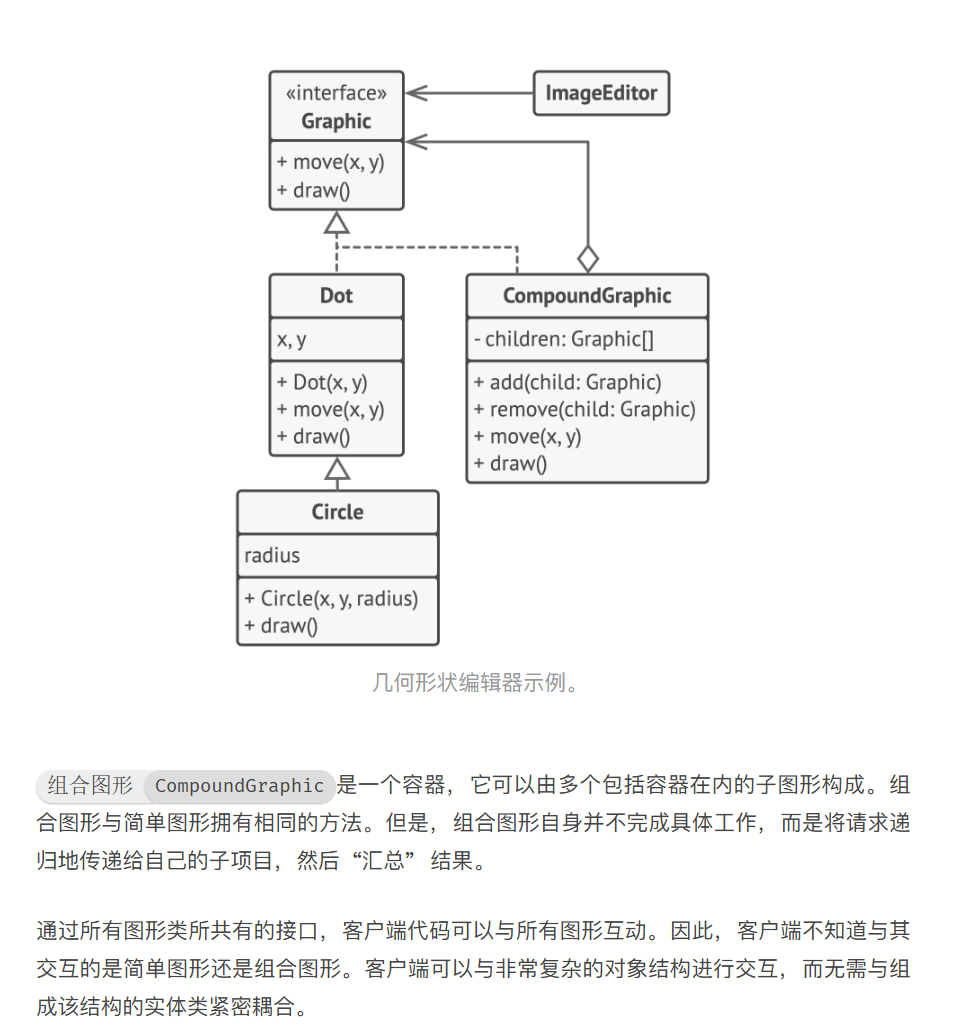
模式结构
举例说明
cpp
#include <algorithm>
#include <iostream>
#include <memory>
#include <vector>

// 1. 必须声明虚析构函数,否则通过基类指针删除子类时会发生内存泄漏
class Graphic {
public:
    virtual ~Graphic() = default;
    virtual void move(float x, float y) = 0;
    virtual void draw() const = 0; // 绘图操作通常应该是 const 的
};

class Dot : public Graphic {
public:
    Dot(float x, float y) : _x(x), _y(y) {}

    void move(float x, float y) override {
        _x += x;
        _y += y;
    }

    void draw() const override { std::cout << "画一个点 (" << _x << "," << _y << ")" << std::endl; }

protected:
    float _x, _y;
};

class Circle : public Dot {
public:
    Circle(float x, float y, float radius) : Dot(x, y), _radius(radius) {}

    // 使用 override 确保签名一致
    void draw() const override {
        std::cout << "在 (" << _x << "," << _y << ") 画一个半径为 " << _radius << " 的圆" << std::endl;
    }

    // 注意:如果 Circle 的 move 逻辑与 Dot 完全一样,可以不重写,直接继承基类行为
private:
    float _radius;
};

class CompoundGraphic : public Graphic {
public:
    // 修正:接收 shared_ptr 以确保所有权明确
    void add(std::shared_ptr<Graphic> child) {
        children.push_back(child);
    }

    void remove(std::shared_ptr<Graphic> child) {
        // std::find 需要匹配容器中的元素类型 (shared_ptr)
        auto it = std::find(children.begin(), children.end(), child);
        if (it != children.end()) {
            children.erase(it);
        }
    }

    void move(float x, float y) override {
        for (auto& item : children) { // 使用引用避免不必要的智能指针拷贝
            item->move(x, y);
        }
    }

    void draw() const override {
        std::cout << "--- 组合图形开始绘制 ---" << std::endl;
        for (const auto& item : children) {
            item->draw();
        }
    }

private:
    std::vector<std::shared_ptr<Graphic>> children;
};

int main() {
    // 客户端代码:始终通过接口与组件交互
    auto all = std::make_shared<CompoundGraphic>();

    // 必须使用 make_shared 在堆上创建对象
    auto dot = std::make_shared<Dot>(1, 2);
    auto circle = std::make_shared<Circle>(5, 3, 10);

    all->add(dot);
    all->add(circle);

    all->draw();
    all->move(10, 10);
    std::cout << "\n移动后:" << std::endl;
    all->draw();

    return 0;
}
运用场景
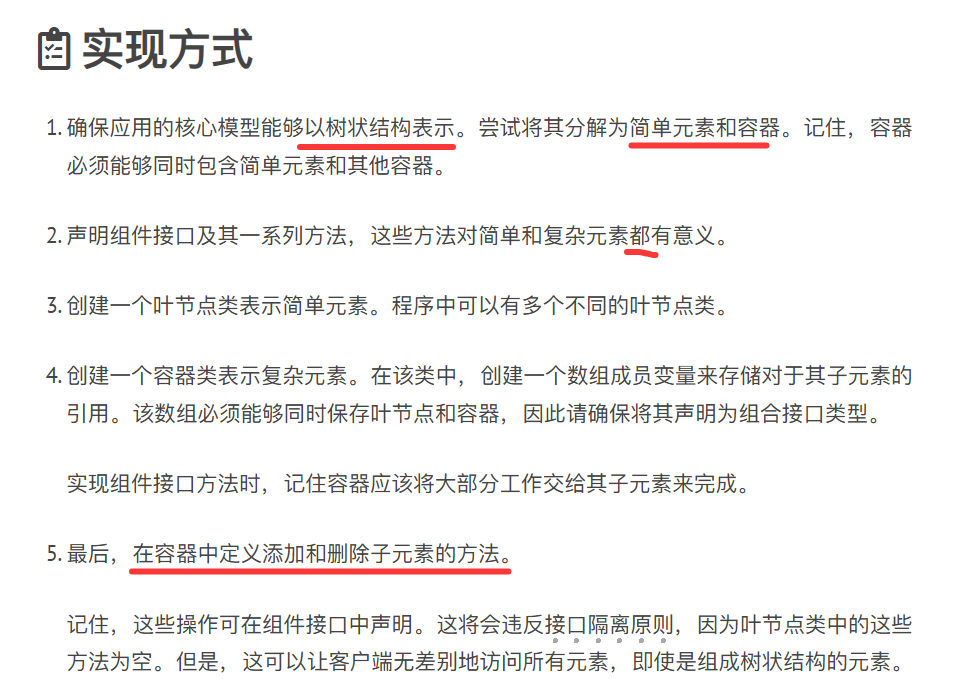
实现方式
优缺点
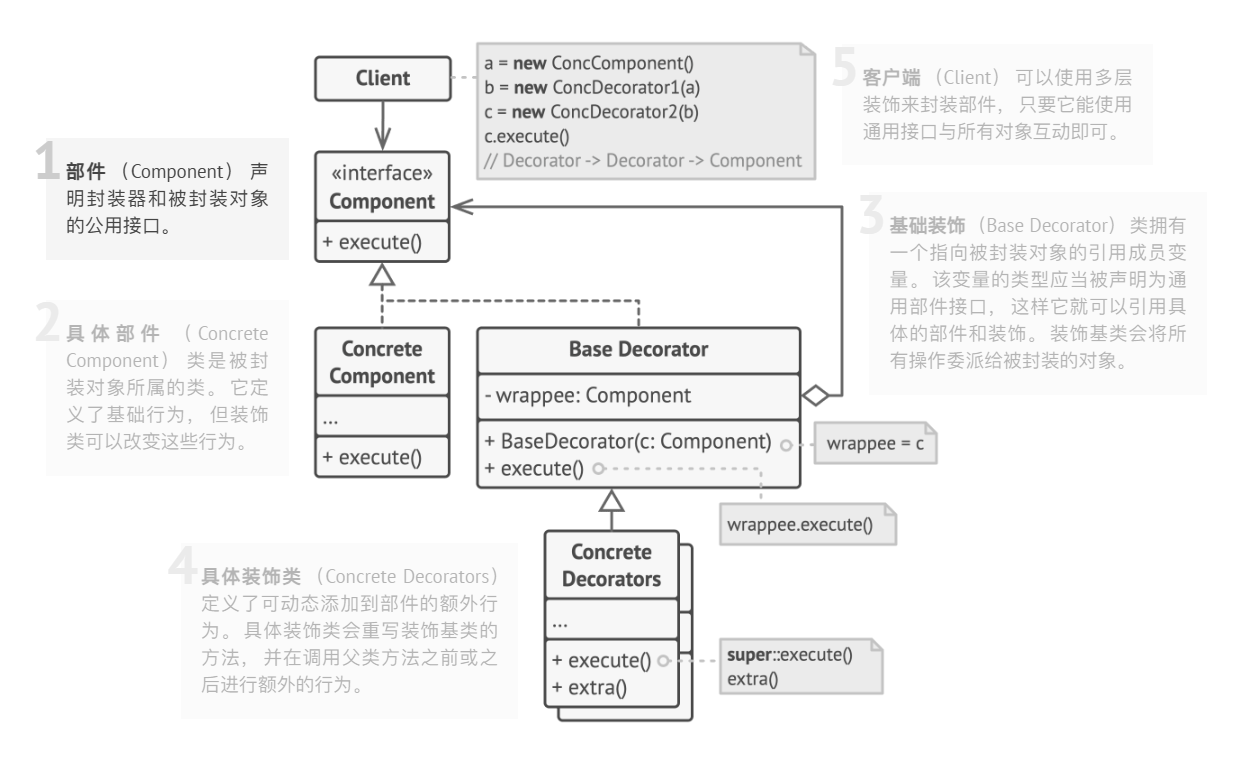
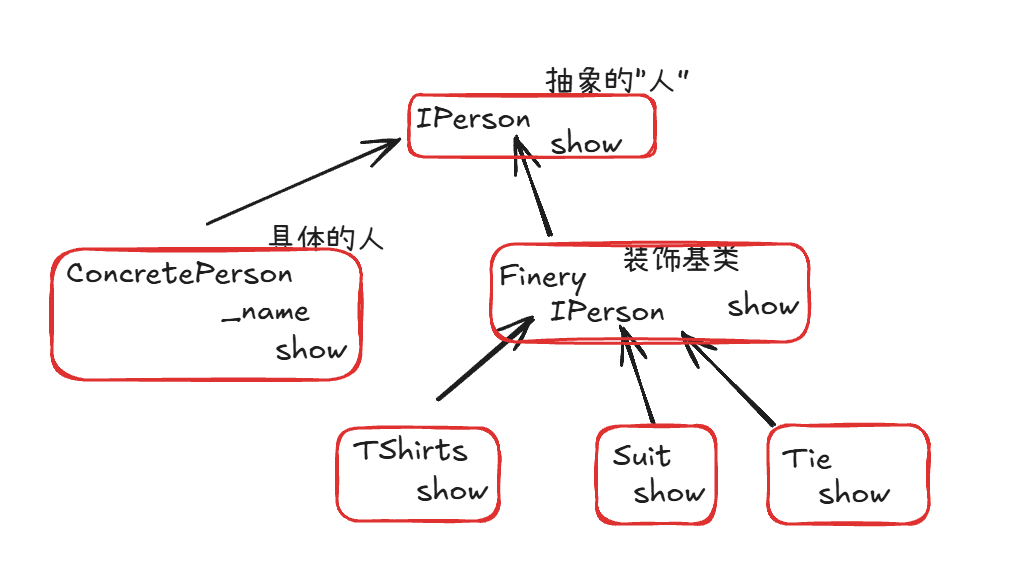
4. 装饰模式 (Decorator)
概念
- 装饰模式是一种结构型设计模式, 允许你通过将对象放入包含行为的特殊封装对象中来为原对象绑定新的行为。
模式结构
举例说明
cpp
#include <iostream>
#include <memory>
#include <string>
/**
* 【组件接口】:抽象的"人"
* 无论是赤身裸体的人还是穿了衣服的人,都能"展示"自己。
*/
class IPerson {
public:
virtual ~IPerson() = default;
virtual void show() = 0;
};
/**
* 【具体组件】:具体的人
* 这是装饰的起点,代表基础对象。
*/
class ConcretePerson : public IPerson {
private:
std::string _name;
public:
explicit ConcretePerson(std::string name) : _name(std::move(name)) {}
void show() override { std::cout << "装扮的是:" << _name << std::endl; }
};
/**
* 【装饰基类】:服饰类
* 它继承了 IPerson,并内部持有一个 IPerson 的指针。
*/
class Finery : public IPerson {
protected:
std::unique_ptr<IPerson> _component; // 被装饰的对象
public:
explicit Finery(std::unique_ptr<IPerson> component) : _component(std::move(component)) {}
void show() override {
if (_component) {
_component->show();
}
}
};
/**
* 【具体装饰 A】:大T恤
*/
class TShirts : public Finery {
public:
using Finery::Finery; // 继承构造函数
void show() override {
Finery::show(); // 先展示之前的装扮
std::cout << " -> 穿上大T恤" << std::endl;
}
};
/**
* 【具体装饰 B】:西装
*/
class Suit : public Finery {
public:
using Finery::Finery;
void show() override {
Finery::show();
std::cout << " -> 穿上华丽西装" << std::endl;
}
};
/**
* 【具体装饰 C】:领带
*/
class Tie : public Finery {
public:
using Finery::Finery;
void show() override {
Finery::show();
std::cout << " -> 戴上精美领带" << std::endl;
}
};
/**
* 【客户端逻辑】
*/
int main() {
// 1. 创建一个基础的人:小明
std::unique_ptr<IPerson> xiaoMing = std::make_unique<ConcretePerson>("小明");
// 2. 开始换装
std::cout << "--- 第一种装扮(休闲) ---" << std::endl;
auto casual = std::make_unique<TShirts>(std::move(xiaoMing));
casual->show();
std::cout << std::endl;
// 3. 另一种装扮:在之前的基础上继续叠 buff(比如小明现在想穿正式点)
// 注意:这里的 casual 已经是"穿了T恤的小明"
std::cout << "--- 第二种装扮(正式) ---" << std::endl;
// 为了演示逻辑,我们重新从一个"人"开始构建链条
std::unique_ptr<IPerson> xiaoHong = std::make_unique<ConcretePerson>("小红");
xiaoHong = std::make_unique<Suit>(std::move(xiaoHong)); // 先穿西装
xiaoHong = std::make_unique<Tie>(std::move(xiaoHong)); // 再戴领带
xiaoHong->show();
return 0;
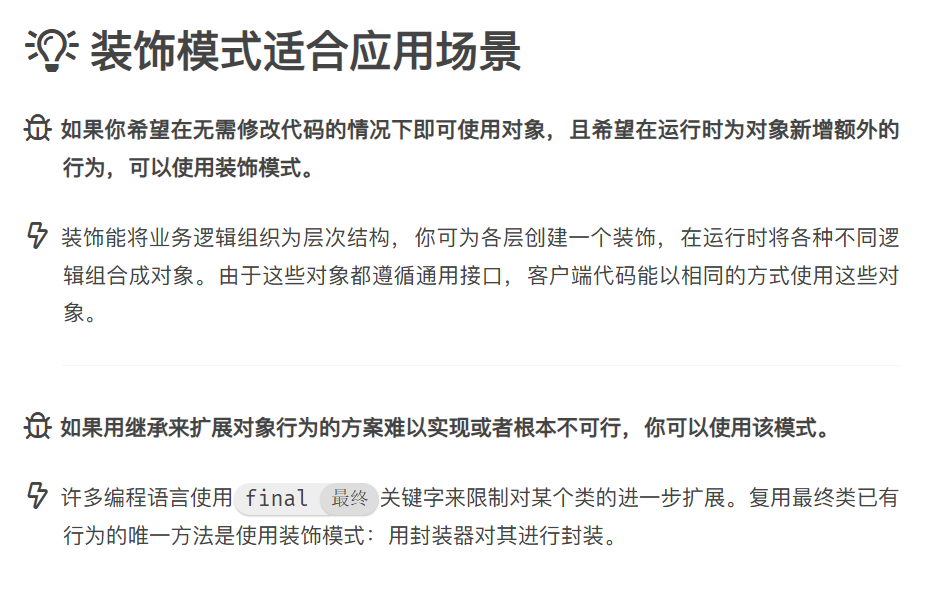
}运用场景
实现方式
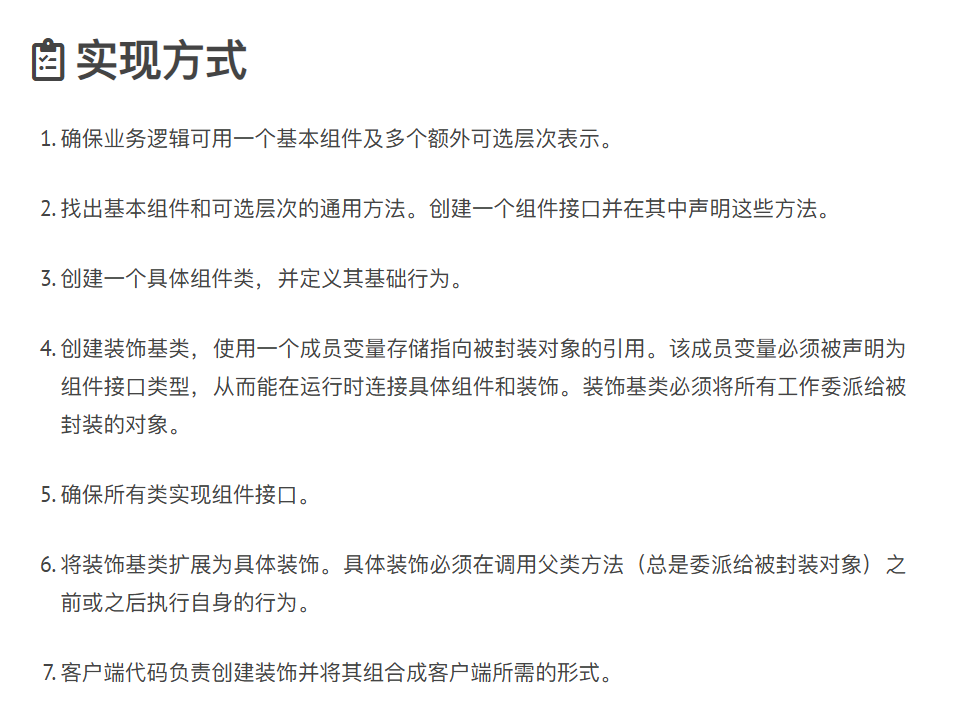
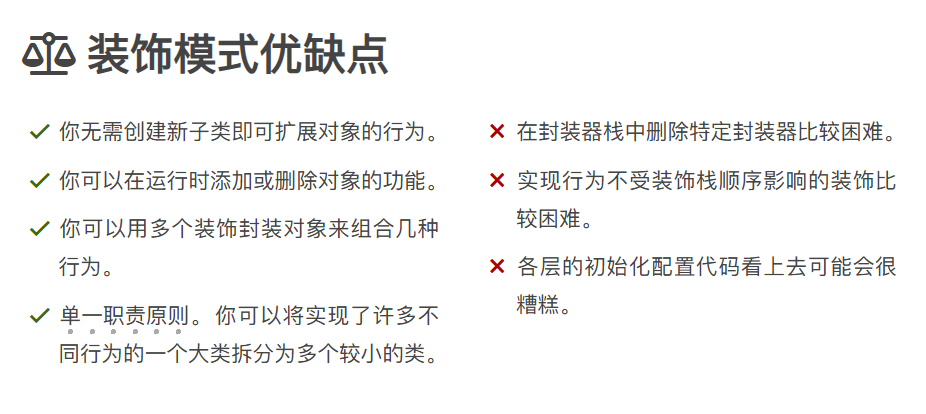
优缺点
5. 外观模式 (Facade)
概念
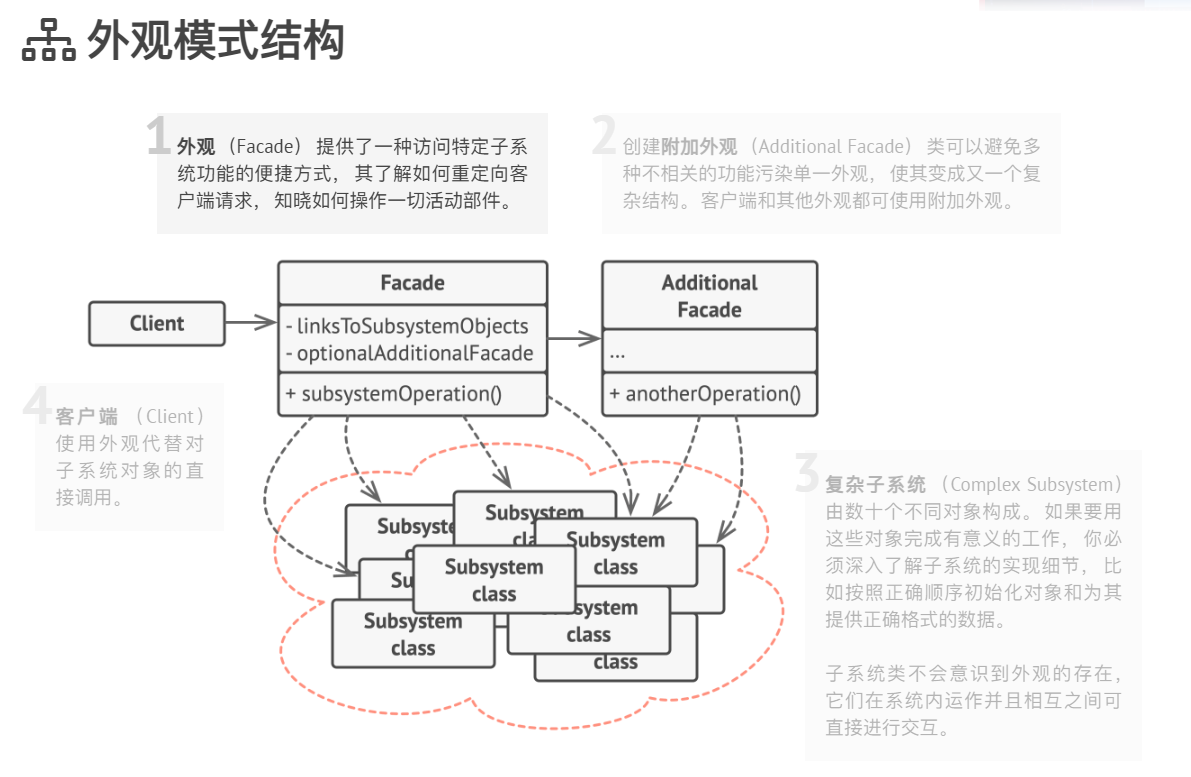
外观模式是一种结构型设计模式, 能为程序库、 框架或其他复杂类提供一个简单的接口。
模式结构
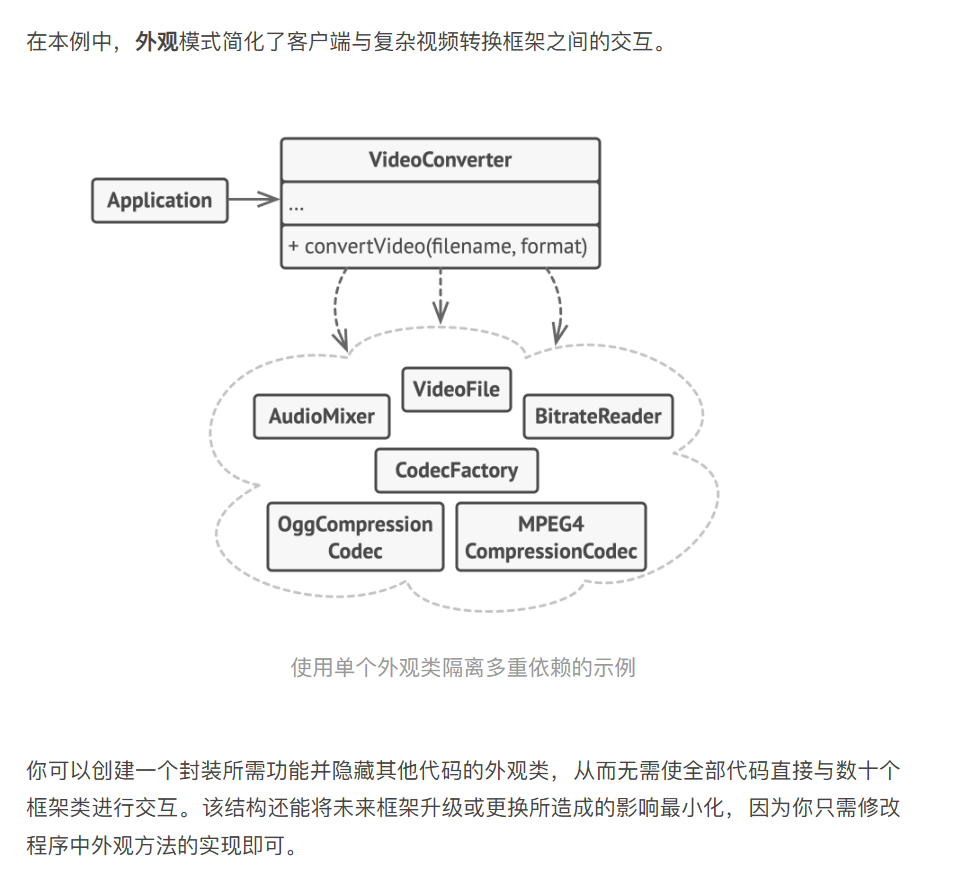
举例说明
cpp
#include <iostream>
#include <string>
#include <memory>

// ============================================================
// 第一部分:复杂的第三方框架(子系统)
// 这些类的接口非常细碎且复杂,客户端直接使用它们会产生高度耦合。
// ============================================================

class VideoFile {
public:
    VideoFile(std::string name) : _name(name) {
        std::cout << "[子系统] 加载视频文件: " << _name << std::endl;
    }
    std::string getName() { return _name; }
private:
    std::string _name;
};

class Codec { public: virtual ~Codec() = default; };
class OggCompressionCodec : public Codec {
public: OggCompressionCodec() { std::cout << "[子系统] 准备 Ogg 编解码器" << std::endl; }
};
class MPEG4CompressionCodec : public Codec {
public: MPEG4CompressionCodec() { std::cout << "[子系统] 准备 MPEG4 编解码器" << std::endl; }
};

class CodecFactory {
public:
    std::unique_ptr<Codec> extract(VideoFile& file) {
        std::cout << "[子系统] 正在从 " << file.getName() << " 提取原始编码..." << std::endl;
        return std::make_unique<OggCompressionCodec>(); // 假设总是从 Ogg 开始
    }
};

class BitrateReader {
public:
    static std::string read(std::string filename, Codec* codec) {
        std::cout << "[子系统] 正在读取原始码率数据..." << std::endl;
        return "RawVideoData";
    }
    static std::string convert(std::string buffer, Codec* codec) {
        std::cout << "[子系统] 正在进行像素数据转换..." << std::endl;
        return "ConvertedData";
    }
};

class AudioMixer {
public:
    std::string fix(std::string result) {
        std::cout << "[子系统] 正在修复并混音音频流..." << std::endl;
        return result + "_WithAudio";
    }
};

// 模拟最后生成的文件
struct File {
    std::string data;
    void save() { std::cout << ">> 最终结果: 已成功保存文件到磁盘!" << std::endl; }
};

// ============================================================
// 第二部分:外观类 (Facade)
// 这就是我们要设计的"挡箭牌",它封装了上面那一堆乱七八糟的调用逻辑。
// ============================================================

class VideoConverter {
public:
    // 客户端只需要这一个简单的接口
    File convert(std::string filename, std::string format) {
        std::cout << "==== 外观类:转换流程开始 ====" << std::endl;

        // 1. 加载文件
        VideoFile file(filename);

        // 2. 识别源编码
        CodecFactory factory;
        auto sourceCodec = factory.extract(file);

        // 3. 选择目标编码
        std::unique_ptr<Codec> destinationCodec;
        if (format == "mp4") {
            destinationCodec = std::make_unique<MPEG4CompressionCodec>();
        } else {
            destinationCodec = std::make_unique<OggCompressionCodec>();
        }

        // 4. 读取与转换(这里封装了繁琐的静态方法调用)
        std::string buffer = BitrateReader::read(filename, sourceCodec.get());
        std::string result = BitrateReader::convert(buffer, destinationCodec.get());

        // 5. 音频修复
        AudioMixer mixer;
        result = mixer.fix(result);

        std::cout << "==== 外观类:转换流程结束 ====" << std::endl;
        return File{result};
    }
};

// ============================================================
// 第三部分:客户端代码
// ============================================================

int main() {
    // 客户端甚至不需要知道 BitrateReader 或 CodecFactory 的存在
    VideoConverter converter;

    // 一键转换,简单优雅
    File mp4 = converter.convert("funny-cats-video.ogg", "mp4");

    mp4.save();

    return 0;
}
运用场景
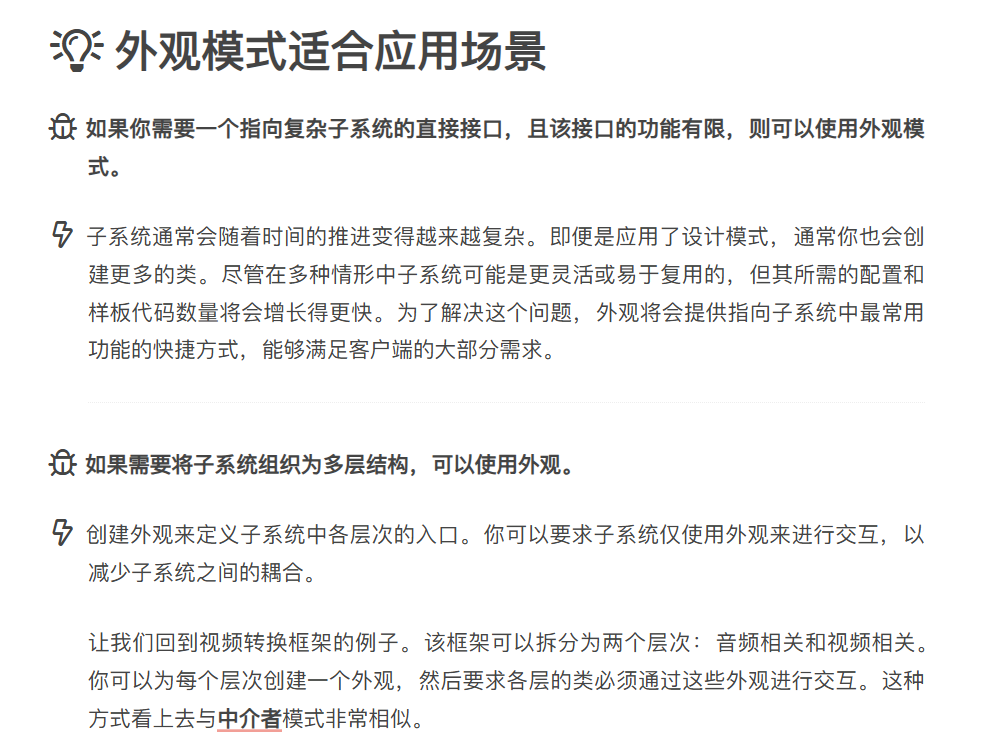
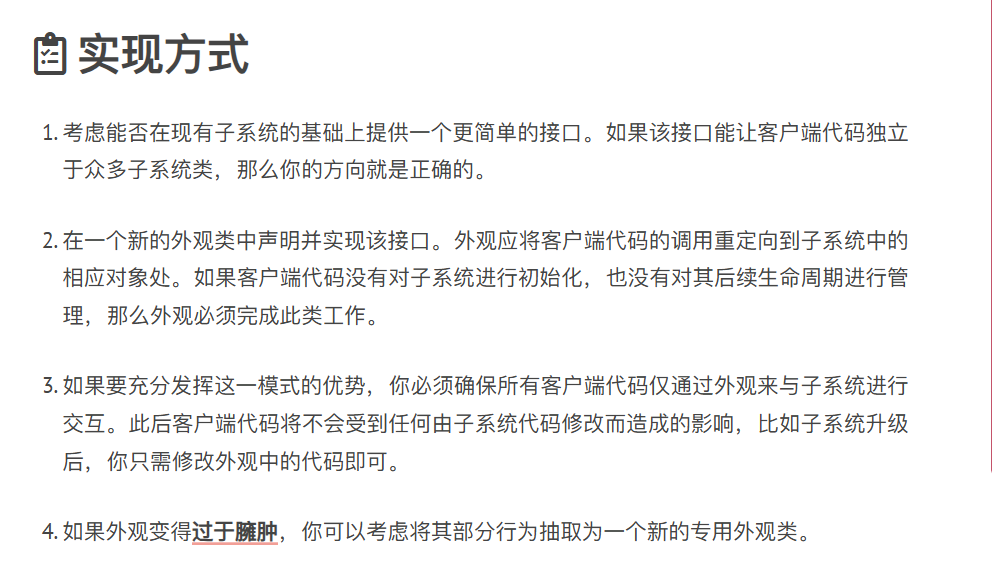
实现方式
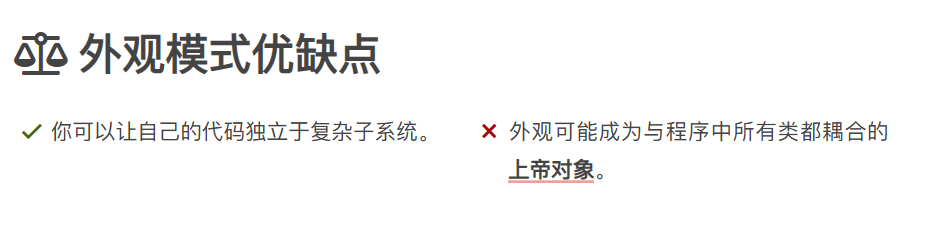
优缺点
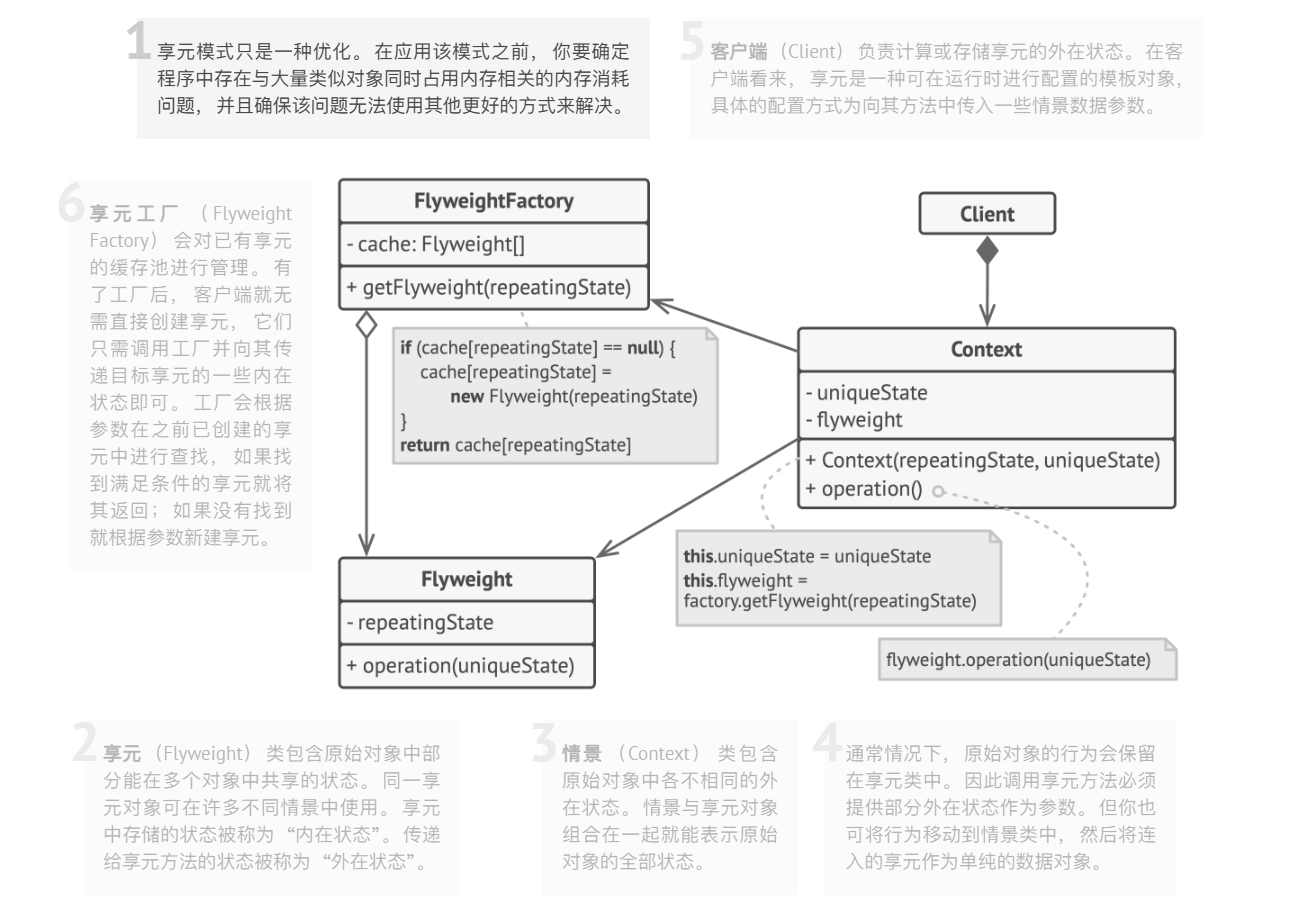
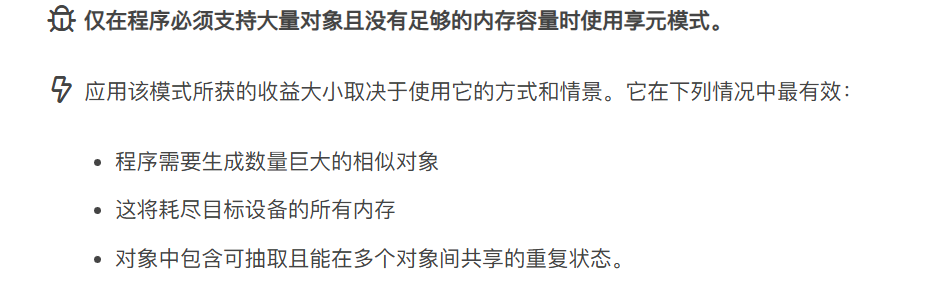
6. 享元模式 (Flyweight)
概念
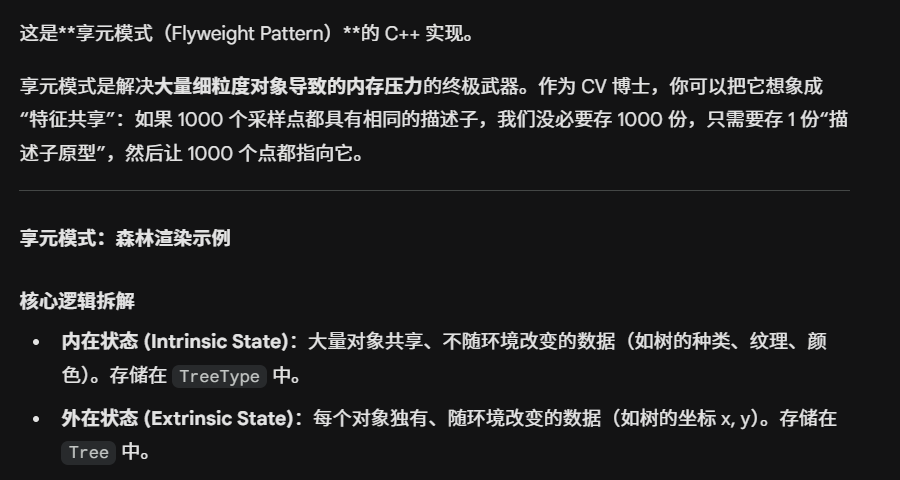
- 摒弃了在每个对象中保存所有数据的方式, 通过共享多个对象所共有的相同状态, 让你能在有限的内存容量中载入更多对象。
模式结构
举例说明
cpp
#include <iostream>
#include <string>
#include <vector>
#include <map>
#include <memory>

/**
 * 【享元类】:TreeType
 * 包含树的内在状态(名称、颜色、纹理数据)。
 * 在实际应用中,这里的 texture 可能是几十 MB 的图片数据。
 */
class TreeType {
public:
    std::string name;
    std::string color;
    std::string texture;

    TreeType(std::string n, std::string c, std::string t)
        : name(std::move(n)), color(std::move(c)), texture(std::move(t)) {}

    // 渲染时需要外在状态(坐标)作为参数
    void draw(const std::string& canvas, int x, int y) const {
        std::cout << "在 " << canvas << " 的 (" << x << "," << y << ") 处绘制一棵 "
                  << "颜色为 " << color << " 的 " << name << " [使用纹理: " << texture << "]\n";
    }
};

/**
 * 【享元工厂】:TreeFactory
 * 负责创建和管理享元对象,确保相同的内在状态只被创建一次。
 */
class TreeFactory {
private:
    // 使用 map 存储已有的树类型。Key 可以是 name+color+texture 的组合
    static std::map<std::string, std::shared_ptr<TreeType>> treeTypes;

public:
    static std::shared_ptr<TreeType> getTreeType(const std::string& name,
                                                const std::string& color,
                                                const std::string& texture) {
        std::string key = name + "_" + color + "_" + texture;

        if (treeTypes.find(key) == treeTypes.end()) {
            std::cout << ">> 工厂:创建新的树类型 [" << name << "]\n";
            treeTypes[key] = std::make_shared<TreeType>(name, color, texture);
        } else {
            std::cout << ">> 工厂:复用现有的树类型 [" << name << "]\n";
        }
        return treeTypes[key];
    }
};

// 静态成员初始化
std::map<std::string, std::shared_ptr<TreeType>> TreeFactory::treeTypes;

/**
 * 【情景对象】:Tree
 * 包含外在状态(坐标)。它非常轻量,只持有一个指向享元的指针。
 */
class Tree {
private:
    int x, y;
    std::shared_ptr<TreeType> type;

public:
    Tree(int x, int y, std::shared_ptr<TreeType> t) : x(x), y(y), type(std::move(t)) {}

    void draw(const std::string& canvas) const {
        type->draw(canvas, x, y);
    }
};

/**
 * 【客户端】:Forest
 */
class Forest {
private:
    std::vector<std::unique_ptr<Tree>> trees;

public:
    void plantTree(int x, int y, const std::string& name,
                   const std::string& color, const std::string& texture) {
        // 通过工厂获取(或创建)共享的享元对象
        auto type = TreeFactory::getTreeType(name, color, texture);
        // 创建轻量级的情景对象
        auto tree = std::make_unique<Tree>(x, y, type);
        trees.push_back(std::move(tree));
    }

    void draw(const std::string& canvas) {
        for (const auto& tree : trees) {
            tree->draw(canvas);
        }
    }
};

/**
 * 【测试代码】
 */
int main() {
    Forest forest;

    // 种植 100 万棵树也没问题,因为只有 2 种 TreeType 对象在内存中
    forest.plantTree(10, 20, "红杉", "深绿色", "SequoiaTexture_v1");
    forest.plantTree(15, 25, "红杉", "深绿色", "SequoiaTexture_v1"); // 复用
    forest.plantTree(100, 200, "白桦", "浅白色", "BirchTexture_v2");

    std::cout << "\n开始渲染森林:\n";
    forest.draw("三维地形画布");

    return 0;
}
运用场景
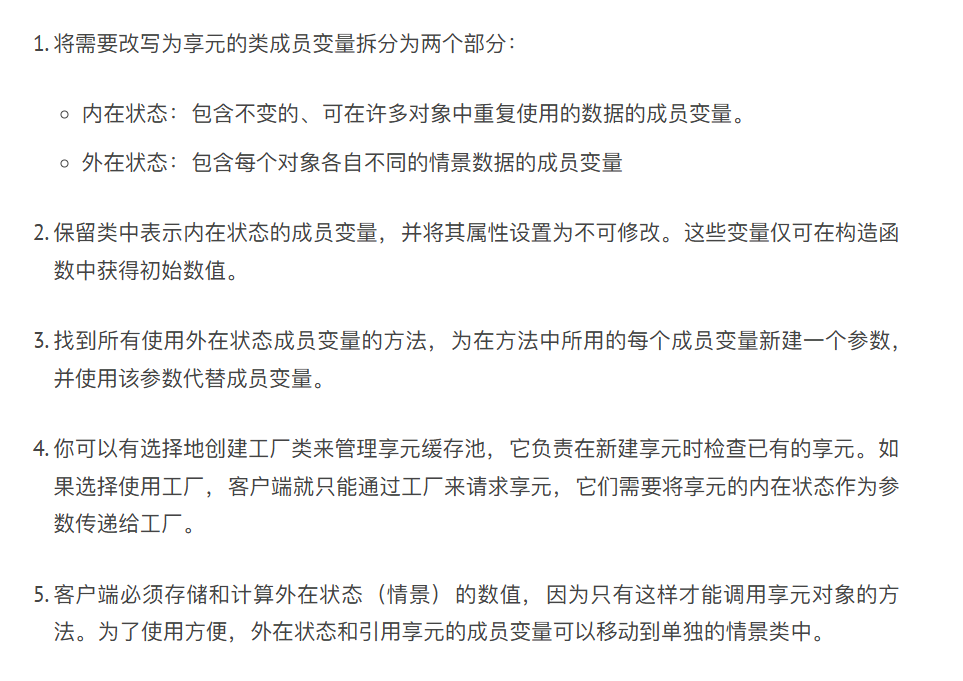
实现方式
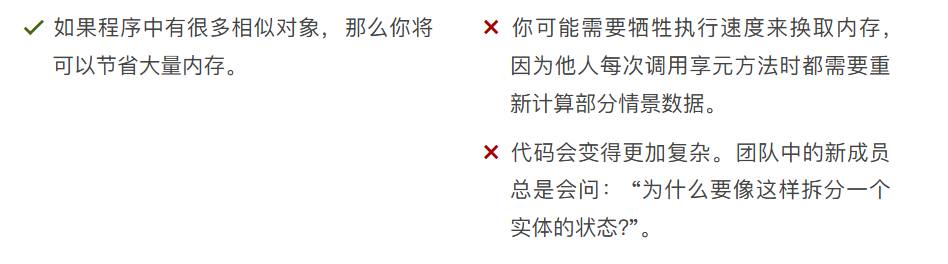
优缺点
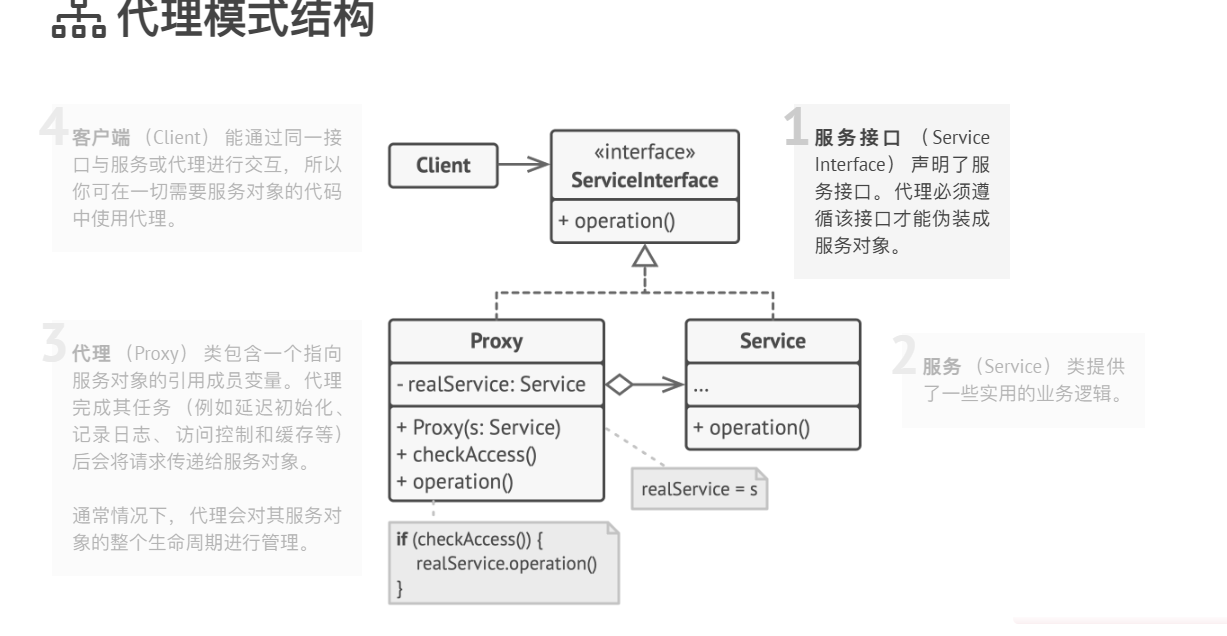
7. 代理模式 (Proxy)
概念
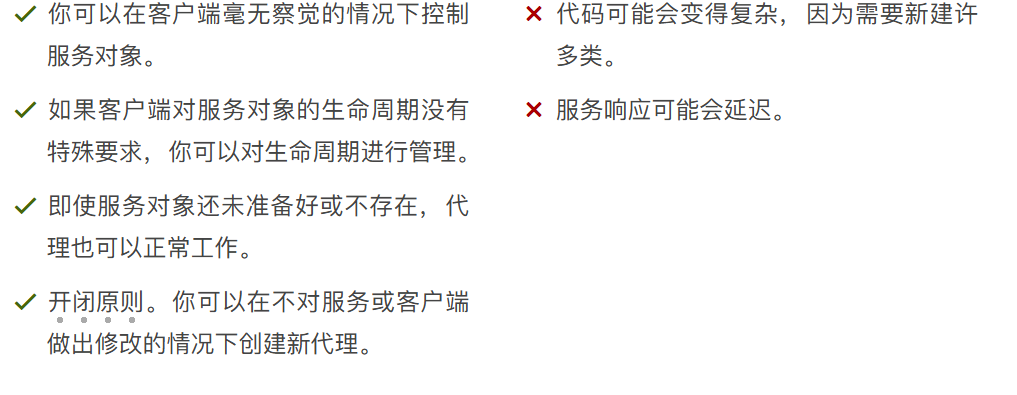
- 代理模式是一种结构型设计模式, 让你能够提供对象的替代品或其占位符。 代理控制着对于原对象的访问, 并允许在将请求提交给对象前后进行一些处理。
模式结构
举例说明
cpp
#include <iostream>
#include <string>
#include <vector>
#include <map>
#include <memory>

/**
 * 【远程服务接口】:ThirdPartyTVLib (Subject)
 * 声明了真实服务和代理的共同接口。
 */
class ThirdPartyTVLib {
public:
    virtual ~ThirdPartyTVLib() = default;
    virtual std::string listVideos() = 0;
    virtual std::string getVideoInfo(int id) = 0;
    virtual void downloadVideo(int id) = 0;
};

/**
 * 【服务具体实现】:ThirdPartyTVClass (RealSubject)
 * 模拟向腾讯视频请求数据的真实类。这些操作通常非常缓慢。
 */
class ThirdPartyTVClass : public ThirdPartyTVLib {
public:
    std::string listVideos() override {
        std::cout << "[RealService] 正在连接腾讯视频 API 获取列表...\n";
        return "视频列表数据";
    }

    std::string getVideoInfo(int id) override {
        std::cout << "[RealService] 正在从 API 获取视频 " << id << " 的元数据...\n";
        return "视频 " + std::to_string(id) + " 的详细信息";
    }

    void downloadVideo(int id) override {
        std::cout << "[RealService] 正在从腾讯视频下载视频文件 (ID: " << id << ")...\n";
    }
};

/**
 * 【缓存代理】:CachedTVClass (Proxy)
 * 它维护一个对真实服务的引用,并实现缓存逻辑。
 */
class CachedTVClass : public ThirdPartyTVLib {
private:
    std::unique_ptr<ThirdPartyTVLib> service;
    std::string listCache;
    std::map<int, std::string> videoCache;
    bool needReset = false;

public:
    explicit CachedTVClass(std::unique_ptr<ThirdPartyTVLib> s) : service(std::move(s)) {}

    std::string listVideos() override {
        if (listCache.empty() || needReset) {
            listCache = service->listVideos();
        } else {
            std::cout << "[Proxy] 从缓存中检索视频列表。\n";
        }
        return listCache;
    }

    std::string getVideoInfo(int id) override {
        if (videoCache.find(id) == videoCache.end() || needReset) {
            videoCache[id] = service->getVideoInfo(id);
        } else {
            std::cout << "[Proxy] 从缓存中检索视频 " << id << " 的信息。\n";
        }
        return videoCache[id];
    }

    void downloadVideo(int id) override {
        // 代理甚至可以检查本地磁盘是否已存在该视频
        std::cout << "[Proxy] 检查本地存储并准备调用下载服务。\n";
        service->downloadVideo(id);
    }

    void setNeedReset(bool reset) { needReset = reset; }
};

/**
 * 【GUI 管理器】:TVManager (Client)
 * 它只通过接口与服务交互,根本不知道自己拿到的是真实对象还是代理。
 */
class TVManager {
protected:
    ThirdPartyTVLib* service; // 仅依赖接口

public:
    explicit TVManager(ThirdPartyTVLib* s) : service(s) {}

    void renderVideoPage(int id) {
        std::string info = service->getVideoInfo(id);
        std::cout << ">> 渲染页面内容: " << info << "\n";
    }

    void renderListPanel() {
        std::string list = service->listVideos();
        std::cout << ">> 渲染面板列表: " << list << "\n";
    }
};

/**
 * 【应用程序初始化】
 */
int main() {
    // 1. 创建真实的服务对象
    auto aTVService = std::make_unique<ThirdPartyTVClass>();

    // 2. 将服务对象封装进代理对象中
    auto aTVProxy = std::make_unique<CachedTVClass>(std::move(aTVService));

    // 3. 将代理传递给客户端
    TVManager manager(aTVProxy.get());

    std::cout << "--- 第一次请求 (触发真实调用) ---\n";
    manager.renderListPanel();
    manager.renderVideoPage(101);

    std::cout << "\n--- 第二次请求 (应触发代理缓存) ---\n";
    manager.renderListPanel();
    manager.renderVideoPage(101);

    return 0;
}
运用场景
实现方式
优缺点