目录
-
- [1. 定位元素](#1. 定位元素)
-
- [1.1 Column 元素](#1.1 Column 元素)
- [1.2 Row 元素](#1.2 Row 元素)
- [1.3 Grid元素](#1.3 Grid元素)
- [1.4 Flow元素](#1.4 Flow元素)
1. 定位元素
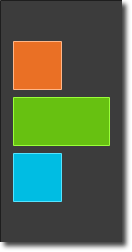
有许多 QML 元素用于定位子项。这些元素被称为定位器,Qt Quick 模块提供了以下几种: Row 、 Column 、 Grid 和 Flow 。在下图中,可以看到它们展示相同内容的效果。
在深入细节之前,让我先介绍一些辅助元素:红色、蓝色、绿色、浅色和深色方块。每个组件都包含一个 48x48 像素的有色矩形。作为参考,以下是 RedSquare 的源代码:
// RedSquare.qml

import QtQuick

Rectangle {
    width: 48
    height: 48
    color: "#ea7025"
    border.color: Qt.lighter(color)
}
请注意,这里使用了 Qt.lighter(color),以便根据填充颜色生成更浅的边框颜色。在接下来的示例中,我们将使用这些辅助组件,使源代码更加紧凑且易于阅读。请记住,每个矩形的初始大小均为 48x48 像素。
1.1 Column 元素
Column 元素通过将子项垂直堆叠,将它们排列成一列。spacing 属性可用于设置各子元素之间的间距。
// ColumnExample.qml

import QtQuick

DarkSquare {
    id: root
    width: 120
    height: 240

    Column {
        id: column
        anchors.centerIn: parent
        spacing: 8
        RedSquare { }
        GreenSquare { width: 96 }
        BlueSquare { }
    }
}
1.2 Row 元素
Row 元素将子项并排排列,根据 layoutDirection 属性的不同,可以从左向右或从右向左排列。同样,spacing 用于分隔子项。

// RowExample.qml

import QtQuick

BrightSquare {
    id: root
    width: 400; height: 120

    Row {
        id: row
        anchors.centerIn: parent
        spacing: 20
        BlueSquare { }
        GreenSquare { }
        RedSquare { }
    }
}layoutDirection属性包括Qt.LeftToRight(默认)和Qt.RightToLeft,可以控制元素从左往右排还是从右往左排。
1.3 Grid元素
Grid 元素将子项排列在网格中。通过设置 rows 和 columns 属性,可以限制行数或列数。如果不设置其中任何一个,则会根据子项数量计算出另一个属性的值。例如,将行数设置为 3 并添加 6 个子项,将生成 2 列。属性 flow 和 layoutDirection 用于控制项目添加到网格中的顺序,而 spacing 则控制子项之间的间距。

// GridExample.qml

import QtQuick

BrightSquare {
    id: root
    width: 160
    height: 160

    Grid {
        id: grid
        rows: 2
        columns: 2
        anchors.centerIn: parent
        spacing: 8
        RedSquare { }
        RedSquare { }
        RedSquare { }
        RedSquare { }
    }

}
flow 属性包括Grid.LeftToRight(默认)和Grid.TopToBottom,可以控制元素从左往右排还是从上往下排。
1.4 Flow元素
最后一个定位器是Flow 。它以流式布局添加子项。流的方向由 flow 和 layoutDirection 控制。它可以横向排列,也可以从上到下排列。它还可以从左到右或反方向排列。随着子项被添加到流中,它们会根据需要换行或换列。为了使流式布局正常工作,必须为其指定宽度或高度。这可以直接设置,也可以通过锚点布局(anchor layouts)来设置。

// FlowExample.qml

import QtQuick

BrightSquare {
    id: root
    width: 160
    height: 160

    Flow {
        anchors.fill: parent
        anchors.margins: 20
        spacing: 20
        RedSquare { }
        BlueSquare { }
        GreenSquare { }
    }
}flow属性包括Flow.LeftToRight(默认)和Flow.TopToBottom,控制元素从左往右排列,从上往下排列。
Flow和Grid的主要区别是Flow是流式的,行列数可变,Grid是定死的几行几列。
通常与定位器配合使用的元素是 Repeater 。它的工作原理类似于 for 循环,并对模型进行迭代。在最简单的情况下,模型仅是一个提供循环次数的数值。
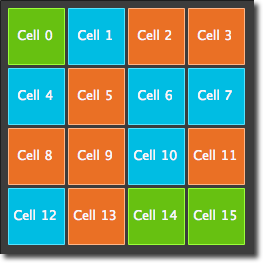
// RepeaterExample.qml

import QtQuick

DarkSquare {
    id: root
    width: 252
    height: 252
    property variant colorArray: ["#00bde3", "#67c111", "#ea7025"]

    Grid{
        anchors.fill: parent
        anchors.margins: 8
        spacing: 4
        Repeater {
            model: 16
            delegate: Rectangle {
                required property int index
                property int colorIndex: Math.floor(Math.random()*3)

                width: 56; height: 56
                color: root.colorArray[colorIndex]
                border.color: Qt.lighter(color)

                Text {
                    anchors.centerIn: parent
                    color: "#f0f0f0"
                    text: "Cell " + parent.index
                }
            }
        }
    }
}
在这个重复器(repeater)示例中,我们使用了一些新的技巧。我们定义了自己的 colorArray 属性,它是一个颜色数组。重复器会创建一系列矩形(根据模型定义为 16 个)。在每次循环中,它都会根据重复器的子项定义来创建矩形。在矩形中,我们通过使用 JS 数学函数 Math.floor(Math.random()*3) 来选择颜色。这会产生一个 0 到 2 范围内的随机数,我们用它从颜色数组中选择颜色。如前所述,JavaScript 是 Qt Quick 的核心部分,因此我们可以使用其标准库。
重复器会将 index 属性注入到子项中。它包含当前的循环索引(0, 1, ...15)。我们可以利用它根据索引做出决策,或者在我们的示例中,使用 Text 元素来可视化当前索引。
虽然 index 属性是动态注入到 Rectangle 中的,但将其声明为必需属性(required property)是一个良好的实践,这可以提高代码的可读性并辅助开发工具。这是通过 required property int index 这一行实现的。