🎯 系列导读:在前几篇文章中,我们探讨了 Agent 的基础架构、记忆系统和规划能力。本篇将深入剖析 Agent 的"感官系统"------感知模块,了解 Agent 如何通过多模态输入处理来"看见"和"听见"这个世界。
📑 目录
- [1. 🌟 引言:为什么 Agent 需要多模态感知?](#1. 🌟 引言:为什么 Agent 需要多模态感知?)
- [2. 👁️ 视觉感知模块](#2. 👁️ 视觉感知模块)
- [2.1 视觉感知的基础架构](#2.1 视觉感知的基础架构)
- [2.2 BLIP-2:高效的视觉语言预训练](#2.2 BLIP-2:高效的视觉语言预训练)
- [2.3 Flamingo:少样本多模态学习的先驱](#2.3 Flamingo:少样本多模态学习的先驱)
- [2.4 视觉编码器对比分析](#2.4 视觉编码器对比分析)
- [3. 👂 音频感知模块](#3. 👂 音频感知模块)
- [3.1 语音识别的演进历程](#3.1 语音识别的演进历程)
- [3.2 Whisper:通用语音识别的里程碑](#3.2 Whisper:通用语音识别的里程碑)
- [3.3 Whisper 的实战应用](#3.3 Whisper 的实战应用)
- [4. 🔗 多模态融合技术](#4. 🔗 多模态融合技术)
- [4.1 融合策略概述](#4.1 融合策略概述)
- [4.2 早期融合 vs 晚期融合](#4.2 早期融合 vs 晚期融合)
- [4.3 交叉注意力融合机制](#4.3 交叉注意力融合机制)
- [4.4 Q-Former:桥接视觉与语言的艺术](#4.4 Q-Former:桥接视觉与语言的艺术)
- [5. 🧠 视觉语言模型(VLM)深度解析](#5. 🧠 视觉语言模型(VLM)深度解析)
- [5.1 VLM 的发展脉络](#5.1 VLM 的发展脉络)
- [5.2 主流 VLM 架构对比](#5.2 主流 VLM 架构对比)
- [5.3 GPT-4V/GPT-4o 的多模态能力](#5.3 GPT-4V/GPT-4o 的多模态能力)
- [5.4 开源 VLM 生态](#5.4 开源 VLM 生态)
- [6. 🏗️ Agent 感知模块的工程实现](#6. 🏗️ Agent 感知模块的工程实现)
- [6.1 感知模块架构设计](#6.1 感知模块架构设计)
- [6.2 完整代码实现](#6.2 完整代码实现)
- [6.3 性能优化策略](#6.3 性能优化策略)
- [7. 🚀 实战案例:构建多模态 Agent](#7. 🚀 实战案例:构建多模态 Agent)
- [8. 🔮 未来展望与挑战](#8. 🔮 未来展望与挑战)
- [9. 📚 参考文献](#9. 📚 参考文献)
1. 🌟 引言:为什么 Agent 需要多模态感知?
1.1 从单模态到多模态的必然演进
人类感知世界的方式是天然多模态的------我们通过视觉看见色彩与形状,通过听觉捕捉声音与语言,通过触觉感受温度与质地。这种多模态感知能力让我们能够构建对世界的完整理解。
对于 AI Agent 而言,如果仅依赖文本输入,其能力将受到极大限制:
┌─────────────────────────────────────────────────────────────────┐
│                    人类与 Agent 的感知对比                        │
├─────────────────────────────────────────────────────────────────┤
│                                                                 │
│   人类感知系统                    传统 AI Agent                   │
│   ┌─────────┐                    ┌─────────┐                   │
│   │  👁️ 视觉 │ ──────────────────│  ❌ 无   │                   │
│   └─────────┘                    └─────────┘                   │
│   ┌─────────┐                    ┌─────────┐                   │
│   │  👂 听觉 │ ──────────────────│  ❌ 无   │                   │
│   └─────────┘                    └─────────┘                   │
│   ┌─────────┐                    ┌─────────┐                   │
│   │  📝 语言 │ ──────────────────│  ✅ 有   │                   │
│   └─────────┘                    └─────────┘                   │
│                                                                 │
│   多模态 AI Agent                                               │
│   ┌─────────┐  ┌─────────┐  ┌─────────┐                        │
│   │  👁️ 视觉 │  │  👂 听觉 │  │  📝 语言 │                        │
│   │   VLM   │  │ Whisper │  │   LLM   │                        │
│   └────┬────┘  └────┬────┘  └────┬────┘                        │
│        │            │            │                              │
│        └────────────┼────────────┘                              │
│                     ▼                                           │
│              ┌─────────────┐                                    │
│              │ 多模态融合层 │                                    │
│              └─────────────┘                                    │
│                                                                 │
└─────────────────────────────────────────────────────────────────┘
1.2 多模态感知的核心价值
💡 思考:为什么多模态感知对 Agent 如此重要?
🤔 解答:
-
信息完整性:单一模态往往只能提供部分信息。例如,一张菜谱图片包含的信息远比文字描述更加直观和完整。
-
跨模态验证:多模态信息可以相互验证,提高 Agent 理解的准确性。例如,视频中的口型与音频应该匹配。
-
自然交互:人类习惯于多模态交流,支持多模态的 Agent 能提供更自然的交互体验。
-
场景理解:某些任务天然需要多模态理解,如自动驾驶需要同时处理视觉、雷达和声音信息。
1.3 本章内容概览
本文将系统性地介绍 Agent 感知模块的核心技术:
┌──────────────────────────────────────────────────────────────┐
│                     Agent 感知模块技术栈                       │
├──────────────────────────────────────────────────────────────┤
│                                                              │
│  ┌────────────┐    ┌────────────┐    ┌────────────────┐     │
│  │  视觉感知   │    │  音频感知   │    │   多模态融合    │     │
│  │            │    │            │    │                │     │
│  │ • BLIP-2   │    │ • Whisper  │    │ • 早期融合     │     │
│  │ • Flamingo │    │ • Wav2Vec  │    │ • 晚期融合     │     │
│  │ • ViT      │    │ • HuBERT   │    │ • 交叉注意力   │     │
│  │ • CLIP     │    │            │    │ • Q-Former    │     │
│  └────────────┘    └────────────┘    └────────────────┘     │
│         │                │                   │               │
│         └────────────────┼───────────────────┘               │
│                          ▼                                   │
│                  ┌───────────────┐                           │
│                  │     VLM       │                           │
│                  │ GPT-4V/LLaVA  │                           │
│                  └───────────────┘                           │
│                                                              │
└──────────────────────────────────────────────────────────────┘
2. 👁️ 视觉感知模块
2.1 视觉感知的基础架构
视觉感知是 Agent 获取环境信息的重要途径。现代视觉感知系统通常基于深度学习,特别是 Vision Transformer (ViT) 架构。
2.1.1 从 CNN 到 Vision Transformer
┌─────────────────────────────────────────────────────────────────────┐
│                     视觉编码器演进历程                                │
├─────────────────────────────────────────────────────────────────────┤
│                                                                     │
│  2012          2015           2017           2020          2021    │
│   │             │              │              │             │       │
│   ▼             ▼              ▼              ▼             ▼       │
│ ┌─────┐     ┌──────┐      ┌───────┐      ┌──────┐      ┌──────┐   │
│ │AlexNet│    │ResNet│      │DenseNet│     │ ViT  │      │ CLIP │   │
│ └─────┘     └──────┘      └───────┘      └──────┘      └──────┘   │
│   │             │              │              │             │       │
│   └─────────────┴──────────────┴──────────────┴─────────────┘       │
│                              │                                      │
│                              ▼                                      │
│                     CNN 时代 → Transformer 时代                      │
│                                                                     │
└─────────────────────────────────────────────────────────────────────┘
Vision Transformer (ViT) 的核心思想是将图像分割成固定大小的 patch,然后将这些 patch 像处理文本 token 一样输入 Transformer:
python
import torch
import torch.nn as nn
from einops import rearrange

class PatchEmbedding(nn.Module):
    """
    将图像转换为 patch embeddings
    """
    def __init__(self, img_size=224, patch_size=16, in_channels=3, embed_dim=768):
        super().__init__()
        self.img_size = img_size
        self.patch_size = patch_size
        self.num_patches = (img_size // patch_size) ** 2

        # 使用卷积实现 patch embedding
        self.proj = nn.Conv2d(
            in_channels,
            embed_dim,
            kernel_size=patch_size,
            stride=patch_size
        )

    def forward(self, x):
        # x: (batch_size, channels, height, width)
        # 输出: (batch_size, num_patches, embed_dim)
        x = self.proj(x)  # (B, embed_dim, H/P, W/P)
        x = rearrange(x, 'b e h w -> b (h w) e')
        return x


class VisionTransformer(nn.Module):
    """
    完整的 Vision Transformer 实现
    """
    def __init__(
        self,
        img_size=224,
        patch_size=16,
        in_channels=3,
        embed_dim=768,
        depth=12,
        num_heads=12,
        mlp_ratio=4.0,
        num_classes=1000
    ):
        super().__init__()

        self.patch_embed = PatchEmbedding(
            img_size, patch_size, in_channels, embed_dim
        )
        num_patches = self.patch_embed.num_patches

        # CLS token 和位置编码
        self.cls_token = nn.Parameter(torch.zeros(1, 1, embed_dim))
        self.pos_embed = nn.Parameter(torch.zeros(1, num_patches + 1, embed_dim))

        # Transformer 编码器
        encoder_layer = nn.TransformerEncoderLayer(
            d_model=embed_dim,
            nhead=num_heads,
            dim_feedforward=int(embed_dim * mlp_ratio),
            activation='gelu',
            batch_first=True
        )
        self.transformer = nn.TransformerEncoder(encoder_layer, num_layers=depth)

        # 分类头
        self.norm = nn.LayerNorm(embed_dim)
        self.head = nn.Linear(embed_dim, num_classes)

    def forward(self, x, return_features=False):
        B = x.shape[0]

        # Patch embedding
        x = self.patch_embed(x)

        # 添加 CLS token
        cls_tokens = self.cls_token.expand(B, -1, -1)
        x = torch.cat([cls_tokens, x], dim=1)

        # 添加位置编码
        x = x + self.pos_embed

        # Transformer 编码
        x = self.transformer(x)
        x = self.norm(x)

        if return_features:
            return x  # 返回所有 token 的特征

        # 使用 CLS token 进行分类
        return self.head(x[:, 0])
2.1.2 CLIP:连接视觉与语言的桥梁
CLIP (Contrastive Language-Image Pre-training) 是视觉感知领域的重要突破,它通过对比学习将图像和文本映射到同一语义空间:
┌─────────────────────────────────────────────────────────────────────┐
│                         CLIP 架构示意图                              │
├─────────────────────────────────────────────────────────────────────┤
│                                                                     │
│    图像输入                              文本输入                     │
│       │                                    │                        │
│       ▼                                    ▼                        │
│  ┌─────────────┐                    ┌─────────────┐                 │
│  │ Image       │                    │ Text        │                 │
│  │ Encoder     │                    │ Encoder     │                 │
│  │ (ViT/ResNet)│                    │(Transformer)│                 │
│  └──────┬──────┘                    └──────┬──────┘                 │
│         │                                  │                        │
│         ▼                                  ▼                        │
│  ┌─────────────┐                    ┌─────────────┐                 │
│  │ Image       │                    │ Text        │                 │
│  │ Embedding   │◄────对比学习────►│ Embedding   │                 │
│  │   I_1...I_n │                    │   T_1...T_n │                 │
│  └─────────────┘                    └─────────────┘                 │
│                                                                     │
│              相似度矩阵 (Similarity Matrix)                          │
│         ┌─────┬─────┬─────┬─────┬─────┐                            │
│         │     │ T_1 │ T_2 │ T_3 │ ... │                            │
│         ├─────┼─────┼─────┼─────┼─────┤                            │
│         │ I_1 │ ✓✓  │  ✗  │  ✗  │     │  对角线元素                 │
│         │ I_2 │  ✗  │ ✓✓  │  ✗  │     │  最大化                     │
│         │ I_3 │  ✗  │  ✗  │ ✓✓  │     │                            │
│         │ ... │     │     │     │     │                            │
│         └─────┴─────┴─────┴─────┴─────┘                            │
│                                                                     │
└─────────────────────────────────────────────────────────────────────┘
python
import torch
import torch.nn as nn
import torch.nn.functional as F

class CLIP(nn.Module):
    """
    简化版 CLIP 实现
    """
    def __init__(
        self,
        image_encoder,
        text_encoder,
        embed_dim=512,
        temperature=0.07
    ):
        super().__init__()
        self.image_encoder = image_encoder
        self.text_encoder = text_encoder

        # 投影层
        self.image_proj = nn.Linear(image_encoder.embed_dim, embed_dim)
        self.text_proj = nn.Linear(text_encoder.embed_dim, embed_dim)

        # 可学习的温度参数
        self.logit_scale = nn.Parameter(torch.ones([]) * torch.log(torch.tensor(1/temperature)))

    def encode_image(self, image):
        """编码图像"""
        features = self.image_encoder(image, return_features=True)
        # 使用 CLS token 或全局平均池化
        image_features = features[:, 0]  # CLS token
        image_features = self.image_proj(image_features)
        return F.normalize(image_features, dim=-1)

    def encode_text(self, text_tokens):
        """编码文本"""
        features = self.text_encoder(text_tokens)
        # 使用 EOS token 的特征
        text_features = features[torch.arange(features.shape[0]), text_tokens.argmax(dim=-1)]
        text_features = self.text_proj(text_features)
        return F.normalize(text_features, dim=-1)

    def forward(self, images, texts):
        """
        计算图像-文本对比损失
        """
        image_features = self.encode_image(images)
        text_features = self.encode_text(texts)

        # 计算相似度
        logit_scale = self.logit_scale.exp()
        logits_per_image = logit_scale * image_features @ text_features.t()
        logits_per_text = logits_per_image.t()

        # 对比损失
        batch_size = images.shape[0]
        labels = torch.arange(batch_size, device=images.device)

        loss_i2t = F.cross_entropy(logits_per_image, labels)
        loss_t2i = F.cross_entropy(logits_per_text, labels)

        return (loss_i2t + loss_t2i) / 2
2.2 BLIP-2:高效的视觉语言预训练
2.2.1 BLIP-2 的核心创新
BLIP-2 (Bootstrapping Language-Image Pre-training 2) 是 Salesforce 在 2023 年提出的视觉语言模型,其核心创新在于 Q-Former 架构:
💡 思考:为什么 BLIP-2 能够高效地连接视觉和语言模型?
🤔 解答:
传统方法通常需要端到端训练整个视觉-语言模型,计算成本极高。BLIP-2 提出了一个轻量级的 Q-Former 模块,它能够:
-
冻结预训练模型:不需要重新训练视觉编码器和语言模型
-
桥接模态差距:Q-Former 学习提取与语言相关的视觉特征
-
参数高效:只需训练 Q-Former(约 188M 参数),而非整个模型
┌─────────────────────────────────────────────────────────────────────┐
│ BLIP-2 整体架构 │
├─────────────────────────────────────────────────────────────────────┤
│ │
│ ┌──────────────────────────────────────────────────────────────┐ │
│ │ 输入图像 │ │
│ └───────────────────────────┬──────────────────────────────────┘ │
│ │ │
│ ▼ │
│ ┌──────────────────────────────────────────────────────────────┐ │
│ │ 冻结的图像编码器 (ViT-G/14) │ │
│ │ 🔒 Frozen │ │
│ └───────────────────────────┬──────────────────────────────────┘ │
│ │ │
│ ▼ │
│ 图像特征 (257 × 1408) │
│ │ │
│ ┌───────────────────────────┼──────────────────────────────────┐ │
│ │ ▼ │ │
│ │ ┌─────────────────────────────────────────────────────┐ │ │
│ │ │ Q-Former │ │ │
│ │ │ ┌──────────────┐ ┌──────────────────────────┐ │ │ │
│ │ │ │ Learned │ │ Cross-Attention │ │ │ │
│ │ │ │ Queries │─────►│ with Image Features │ │ │ │
│ │ │ │ (32 × 768) │ └──────────────────────────┘ │ │ │
│ │ │ └──────────────┘ │ │ │ │
│ │ │ ▼ │ │ │
│ │ │ 视觉语言对齐特征 (32 × 768) │ │ │
│ │ └─────────────────────────────────────────────────────┘ │ │
│ │ 可训练模块 │ │
│ └───────────────────────────┬──────────────────────────────────┘ │
│ │ │
│ ▼ │
│ ┌──────────────────────────────────────────────────────────────┐ │
│ │ 冻结的 LLM (OPT/FlanT5) │ │
│ │ 🔒 Frozen │ │
│ └──────────────────────────────────────────────────────────────┘ │
│ │ │
│ ▼ │
│ 文本输出/回答 │
│ │
└─────────────────────────────────────────────────────────────────────┘
2.2.2 Q-Former 详解
Q-Former 是 BLIP-2 的核心组件,它由两个 Transformer 子模块组成:
python
import torch
import torch.nn as nn
from transformers import BertConfig, BertModel, BertLMHeadModel

class QFormer(nn.Module):
    """
    Q-Former: Query Transformer for BLIP-2

    包含两个共享参数的 Transformer:
    1. 用于图像-文本对比学习和图像-文本匹配
    2. 用于基于图像的文本生成
    """
    def __init__(
        self,
        num_query_tokens=32,
        vision_width=1408,
        cross_attention_freq=2,
        embed_dim=768,
        num_hidden_layers=12,
    ):
        super().__init__()

        # 可学习的 Query Tokens
        self.query_tokens = nn.Parameter(
            torch.zeros(1, num_query_tokens, embed_dim)
        )
        nn.init.normal_(self.query_tokens, std=0.02)

        # 配置 BERT 风格的 Transformer
        config = BertConfig(
            hidden_size=embed_dim,
            num_hidden_layers=num_hidden_layers,
            num_attention_heads=12,
            intermediate_size=embed_dim * 4,
            hidden_dropout_prob=0.1,
            attention_probs_dropout_prob=0.1,
        )

        # 添加交叉注意力层
        config.add_cross_attention = True
        config.cross_attention_freq = cross_attention_freq
        config.query_length = num_query_tokens

        self.bert = BertModel(config)

        # 视觉特征投影层
        self.vision_proj = nn.Linear(vision_width, embed_dim)

        # 图像-文本对比学习的投影头
        self.itc_head = nn.Linear(embed_dim, embed_dim)

        # 图像-文本匹配的分类头
        self.itm_head = nn.Linear(embed_dim, 2)

    def forward(
        self,
        image_features,
        text_input_ids=None,
        text_attention_mask=None,
        mode='multimodal'
    ):
        """
        Args:
            image_features: 图像编码器输出 (B, N_img, D_img)
            text_input_ids: 文本 token ids (B, N_txt)
            text_attention_mask: 文本注意力掩码 (B, N_txt)
            mode: 'image', 'text', 'multimodal'
        """
        batch_size = image_features.shape[0]

        # 投影图像特征
        image_features = self.vision_proj(image_features)

        # 扩展 query tokens
        query_tokens = self.query_tokens.expand(batch_size, -1, -1)

        if mode == 'image':
            # 仅使用图像特征(用于图像-文本对比)
            query_output = self.bert(
                inputs_embeds=query_tokens,
                encoder_hidden_states=image_features,
                return_dict=True,
            )
            return query_output.last_hidden_state

        elif mode == 'multimodal':
            # 多模态融合(用于图像-文本匹配和生成)
            # 将 query tokens 与文本 tokens 拼接
            text_embeds = self.bert.embeddings(input_ids=text_input_ids)
            input_embeds = torch.cat([query_tokens, text_embeds], dim=1)

            # 创建注意力掩码
            query_attention_mask = torch.ones(
                batch_size, query_tokens.shape[1],
                device=query_tokens.device
            )
            attention_mask = torch.cat(
                [query_attention_mask, text_attention_mask], dim=1
            )

            output = self.bert(
                inputs_embeds=input_embeds,
                attention_mask=attention_mask,
                encoder_hidden_states=image_features,
                return_dict=True,
            )

            return output.last_hidden_state

    def compute_itc_loss(self, image_features, text_features, temperature=0.07):
        """
        图像-文本对比损失
        """
        # 归一化
        image_features = F.normalize(self.itc_head(image_features[:, 0]), dim=-1)
        text_features = F.normalize(text_features, dim=-1)

        # 计算相似度
        sim_i2t = image_features @ text_features.t() / temperature
        sim_t2i = sim_i2t.t()

        # 对比损失
        batch_size = image_features.shape[0]
        labels = torch.arange(batch_size, device=image_features.device)

        loss_i2t = F.cross_entropy(sim_i2t, labels)
        loss_t2i = F.cross_entropy(sim_t2i, labels)

        return (loss_i2t + loss_t2i) / 2

    def compute_itm_loss(self, hidden_states, labels):
        """
        图像-文本匹配损失
        """
        # 使用第一个 query token 的输出进行分类
        logits = self.itm_head(hidden_states[:, 0])
        return F.cross_entropy(logits, labels)
2.2.3 BLIP-2 的两阶段训练
BLIP-2 采用两阶段训练策略:
┌─────────────────────────────────────────────────────────────────────┐
│                     BLIP-2 两阶段训练                                │
├─────────────────────────────────────────────────────────────────────┤
│                                                                     │
│  ═══════════════════ 第一阶段:视觉-语言表示学习 ═══════════════════  │
│                                                                     │
│  目标:让 Q-Former 学习提取与文本最相关的视觉特征                     │
│                                                                     │
│  ┌─────────────────┐                                               │
│  │  损失函数组合:   │                                               │
│  │                 │                                               │
│  │  1. ITC Loss    │ ── 图像-文本对比学习                           │
│  │     (对比学习)   │    使 Query 输出与文本对齐                      │
│  │                 │                                               │
│  │  2. ITM Loss    │ ── 图像-文本匹配                               │
│  │     (二分类)    │    判断图文是否匹配                             │
│  │                 │                                               │
│  │  3. LM Loss     │ ── 基于图像的文本生成                          │
│  │     (语言建模)   │    给定图像生成描述                            │
│  └─────────────────┘                                               │
│                                                                     │
│  ═══════════════════ 第二阶段:视觉-语言生成学习 ═══════════════════  │
│                                                                     │
│  目标:将 Q-Former 连接到冻结的 LLM,实现视觉问答                      │
│                                                                     │
│  ┌──────────────────────────────────────────────────────────────┐  │
│  │                                                              │  │
│  │   Q-Former 输出 ──► 全连接层 ──► LLM 输入空间                  │  │
│  │   (32 × 768)        投影       (32 × LLM_dim)                │  │
│  │                                                              │  │
│  │   训练目标:语言建模损失(预测下一个 token)                     │  │
│  │                                                              │  │
│  └──────────────────────────────────────────────────────────────┘  │
│                                                                     │
└─────────────────────────────────────────────────────────────────────┘
python
class BLIP2(nn.Module):
    """
    完整的 BLIP-2 模型实现
    """
    def __init__(
        self,
        vision_encoder,  # 冻结的 ViT
        llm,             # 冻结的 LLM
        num_query_tokens=32,
        vision_width=1408,
        llm_hidden_size=2048,
    ):
        super().__init__()

        # 冻结视觉编码器
        self.vision_encoder = vision_encoder
        for param in self.vision_encoder.parameters():
            param.requires_grad = False

        # 冻结 LLM
        self.llm = llm
        for param in self.llm.parameters():
            param.requires_grad = False

        # Q-Former(可训练)
        self.qformer = QFormer(
            num_query_tokens=num_query_tokens,
            vision_width=vision_width,
        )

        # 投影到 LLM 输入空间
        self.llm_proj = nn.Linear(768, llm_hidden_size)

    def forward(self, images, text_input_ids, text_attention_mask):
        """
        前向传播
        """
        # 1. 提取图像特征(冻结)
        with torch.no_grad():
            image_features = self.vision_encoder(images, return_features=True)

        # 2. Q-Former 处理
        query_output = self.qformer(
            image_features,
            text_input_ids=text_input_ids,
            text_attention_mask=text_attention_mask,
            mode='multimodal'
        )

        # 3. 投影到 LLM 空间
        query_tokens = query_output[:, :self.qformer.query_tokens.shape[1]]
        llm_input = self.llm_proj(query_tokens)

        # 4. LLM 生成
        outputs = self.llm(
            inputs_embeds=llm_input,
            labels=text_input_ids,
        )

        return outputs

    @torch.no_grad()
    def generate(self, images, prompt, max_length=50):
        """
        给定图像和提示生成文本
        """
        # 提取图像特征
        image_features = self.vision_encoder(images, return_features=True)

        # Q-Former 提取视觉 query
        query_output = self.qformer(image_features, mode='image')
        llm_input = self.llm_proj(query_output)

        # 拼接提示词
        # ... (tokenize prompt and concatenate)

        # LLM 生成
        generated = self.llm.generate(
            inputs_embeds=llm_input,
            max_length=max_length,
            num_beams=5,
        )

        return generated
2.3 Flamingo:少样本多模态学习的先驱
2.3.1 Flamingo 的设计理念
Flamingo 是 DeepMind 在 2022 年发布的多模态模型,其核心创新在于支持任意数量的图像/视频输入 和少样本学习能力:
💡 思考:Flamingo 如何实现处理任意数量的图像输入?
🤔 解答:
Flamingo 使用 Perceiver Resampler 将任意数量的视觉 token 压缩为固定数量的输出 token,然后通过交叉注意力门控机制将视觉信息注入预训练的语言模型。
┌─────────────────────────────────────────────────────────────────────┐
│                        Flamingo 架构                                 │
├─────────────────────────────────────────────────────────────────────┤
│                                                                     │
│   输入:交错的图像/视频和文本序列                                      │
│                                                                     │
│   [IMG_1] "这是一只猫" [IMG_2] "这是一只狗" [IMG_3] "这是什么?"       │
│      │                    │                    │                    │
│      ▼                    ▼                    ▼                    │
│  ┌────────┐          ┌────────┐          ┌────────┐                │
│  │ Vision │          │ Vision │          │ Vision │                │
│  │Encoder │          │Encoder │          │Encoder │                │
│  │(NFNet) │          │(NFNet) │          │(NFNet) │                │
│  └───┬────┘          └───┬────┘          └───┬────┘                │
│      │                   │                   │                      │
│      ▼                   ▼                   ▼                      │
│  ┌────────────────────────────────────────────────┐                │
│  │            Perceiver Resampler                 │                │
│  │  将可变长度的视觉特征压缩为固定数量 (64) 的 tokens │                │
│  └───────────────────────┬────────────────────────┘                │
│                          │                                          │
│                          ▼                                          │
│  ┌──────────────────────────────────────────────────────────────┐  │
│  │                   Frozen LLM (Chinchilla)                     │  │
│  │  ┌──────────────────────────────────────────────────────┐    │  │
│  │  │  Self-Attention │ Gated Cross-Attention │ FFN        │    │  │
│  │  │     (frozen)    │     (trainable)       │(frozen)    │    │  │
│  │  └──────────────────────────────────────────────────────┘    │  │
│  │                         × N layers                           │  │
│  └──────────────────────────────────────────────────────────────┘  │
│                                                                     │
└─────────────────────────────────────────────────────────────────────┘
2.3.2 Perceiver Resampler
Perceiver Resampler 使用可学习的 latent queries 来"采样"视觉特征:
python
import torch
import torch.nn as nn
import torch.nn.functional as F

class PerceiverResampler(nn.Module):
    """
    Perceiver Resampler: 将可变长度的视觉特征压缩为固定数量的 tokens

    核心思想:使用可学习的 latent queries 通过交叉注意力"查询"视觉特征
    """
    def __init__(
        self,
        dim=1024,
        num_latents=64,      # 输出 token 数量
        num_heads=16,
        depth=6,
        ff_mult=4,
    ):
        super().__init__()

        # 可学习的 latent queries
        self.latents = nn.Parameter(torch.randn(num_latents, dim))

        # 时间编码(用于视频)
        self.time_pos_embed = nn.Parameter(torch.randn(1, 1, dim))

        # Perceiver 层
        self.layers = nn.ModuleList([])
        for _ in range(depth):
            self.layers.append(nn.ModuleList([
                # 交叉注意力:latents attend to visual features
                CrossAttention(dim, num_heads),
                # 前馈网络
                FeedForward(dim, ff_mult),
            ]))

        self.norm = nn.LayerNorm(dim)

    def forward(self, x, time_step=None):
        """
        Args:
            x: 视觉特征 (batch, seq_len, dim)
            time_step: 时间步(用于视频),可选
        """
        batch_size = x.shape[0]

        # 扩展 latents
        latents = self.latents.unsqueeze(0).expand(batch_size, -1, -1)

        # 添加时间编码(如果是视频)
        if time_step is not None:
            x = x + self.time_pos_embed * time_step

        # Perceiver 处理
        for cross_attn, ff in self.layers:
            latents = cross_attn(latents, x) + latents
            latents = ff(latents) + latents

        return self.norm(latents)


class CrossAttention(nn.Module):
    """交叉注意力模块"""
    def __init__(self, dim, num_heads, dropout=0.1):
        super().__init__()
        self.num_heads = num_heads
        self.head_dim = dim // num_heads
        self.scale = self.head_dim ** -0.5

        self.q_proj = nn.Linear(dim, dim)
        self.k_proj = nn.Linear(dim, dim)
        self.v_proj = nn.Linear(dim, dim)
        self.out_proj = nn.Linear(dim, dim)

        self.dropout = nn.Dropout(dropout)
        self.norm_q = nn.LayerNorm(dim)
        self.norm_kv = nn.LayerNorm(dim)

    def forward(self, x, context):
        """
        Args:
            x: query 输入 (batch, seq_q, dim)
            context: key/value 输入 (batch, seq_kv, dim)
        """
        x = self.norm_q(x)
        context = self.norm_kv(context)

        batch_size = x.shape[0]

        # 投影
        q = self.q_proj(x)
        k = self.k_proj(context)
        v = self.v_proj(context)

        # 多头处理
        q = q.view(batch_size, -1, self.num_heads, self.head_dim).transpose(1, 2)
        k = k.view(batch_size, -1, self.num_heads, self.head_dim).transpose(1, 2)
        v = v.view(batch_size, -1, self.num_heads, self.head_dim).transpose(1, 2)

        # 注意力计算
        attn = torch.matmul(q, k.transpose(-2, -1)) * self.scale
        attn = F.softmax(attn, dim=-1)
        attn = self.dropout(attn)

        # 输出
        out = torch.matmul(attn, v)
        out = out.transpose(1, 2).contiguous().view(batch_size, -1, self.num_heads * self.head_dim)

        return self.out_proj(out)


class FeedForward(nn.Module):
    """前馈网络"""
    def __init__(self, dim, mult=4, dropout=0.1):
        super().__init__()
        self.net = nn.Sequential(
            nn.LayerNorm(dim),
            nn.Linear(dim, dim * mult),
            nn.GELU(),
            nn.Dropout(dropout),
            nn.Linear(dim * mult, dim),
            nn.Dropout(dropout),
        )

    def forward(self, x):
        return self.net(x)
2.3.3 Gated Cross-Attention
Flamingo 在 LLM 中插入门控交叉注意力层,让语言模型能够"看到"视觉信息:
python
class GatedCrossAttentionBlock(nn.Module):
    """
    门控交叉注意力块

    特点:
    1. tanh 门控:控制视觉信息的注入程度
    2. 初始化为 0:训练开始时等效于原始 LLM
    """
    def __init__(self, dim, num_heads, ff_mult=4):
        super().__init__()

        # 交叉注意力
        self.cross_attn = CrossAttention(dim, num_heads)

        # 门控参数(初始化为 0)
        self.attn_gate = nn.Parameter(torch.zeros(1))

        # 前馈网络
        self.ff = FeedForward(dim, ff_mult)
        self.ff_gate = nn.Parameter(torch.zeros(1))

    def forward(self, x, visual_features, visual_mask=None):
        """
        Args:
            x: 语言模型隐藏状态 (batch, seq_len, dim)
            visual_features: 视觉特征 (batch, num_visual_tokens, dim)
            visual_mask: 视觉掩码,指示哪些位置可以看到视觉信息
        """
        # 交叉注意力 + 门控
        attn_out = self.cross_attn(x, visual_features)
        x = x + torch.tanh(self.attn_gate) * attn_out

        # 前馈 + 门控
        ff_out = self.ff(x)
        x = x + torch.tanh(self.ff_gate) * ff_out

        return x


class FlamingoLayer(nn.Module):
    """
    Flamingo 修改后的 Transformer 层
    """
    def __init__(self, original_layer, dim, num_heads):
        super().__init__()

        # 保留原始 LLM 层(冻结)
        self.original_layer = original_layer
        for param in self.original_layer.parameters():
            param.requires_grad = False

        # 新增门控交叉注意力(可训练)
        self.gated_cross_attn = GatedCrossAttentionBlock(dim, num_heads)

    def forward(self, x, visual_features=None, **kwargs):
        # 原始自注意力 + FFN
        x = self.original_layer(x, **kwargs)

        # 门控交叉注意力(如果有视觉输入)
        if visual_features is not None:
            x = self.gated_cross_attn(x, visual_features)

        return x
2.4 视觉编码器对比分析
不同的视觉编码器各有优劣,选择合适的编码器对 Agent 的视觉感知能力至关重要:
┌─────────────────────────────────────────────────────────────────────────────┐
│                        主流视觉编码器对比                                     │
├───────────────┬──────────────┬───────────────┬──────────────┬───────────────┤
│    编码器      │   参数量     │    预训练     │     优势      │     劣势      │
├───────────────┼──────────────┼───────────────┼──────────────┼───────────────┤
│               │              │               │              │               │
│ CLIP ViT-L/14 │    304M     │  图文对比学习  │ 语义对齐好    │ 细节感知弱    │
│               │              │  4亿图文对    │ 零样本能力强  │               │
│               │              │               │              │               │
├───────────────┼──────────────┼───────────────┼──────────────┼───────────────┤
│               │              │               │              │               │
│ EVA-CLIP      │    1.0B     │  CLIP + MAE   │ 大规模       │ 计算成本高    │
│ ViT-G/14      │              │  混合训练     │ 效果最优     │               │
│               │              │               │              │               │
├───────────────┼──────────────┼───────────────┼──────────────┼───────────────┤
│               │              │               │              │               │
│ SigLIP        │    400M     │  Sigmoid Loss │ 训练稳定     │ 资源需求大    │
│               │              │  替代对比学习 │ 批量大小灵活  │               │
│               │              │               │              │               │
├───────────────┼──────────────┼───────────────┼──────────────┼───────────────┤
│               │              │               │              │               │
│ DINOv2        │    1.1B     │  自监督学习   │ 局部特征强    │ 语义对齐弱    │
│               │              │  无需标签     │ 分割任务优    │               │
│               │              │               │              │               │
├───────────────┼──────────────┼───────────────┼──────────────┼───────────────┤
│               │              │               │              │               │
│ ConvNeXt-XXL  │    846M     │  ImageNet-22k │ 局部感知好    │ 全局建模弱    │
│               │              │  监督学习     │ 计算高效     │               │
│               │              │               │              │               │
└───────────────┴──────────────┴───────────────┴──────────────┴───────────────┘
💡 思考:如何为 Agent 选择合适的视觉编码器?
🤔 解答:
选择视觉编码器时需要考虑以下因素:
-
任务类型:
- 图像理解/VQA → CLIP 系列(语义对齐好)
- 细粒度识别 → DINOv2(局部特征强)
- 文档理解 → 高分辨率编码器
-
计算资源:
- 边缘设备 → 小模型如 CLIP ViT-B
- 服务器端 → 大模型如 EVA-CLIP ViT-G
-
是否需要零样本能力:
- 需要 → CLIP 系列
- 不需要 → 任务特定微调的编码器
3. 👂 音频感知模块
3.1 语音识别的演进历程
语音识别是 Agent 理解用户语音指令的关键能力。从传统方法到深度学习,语音识别经历了革命性的变化:
┌─────────────────────────────────────────────────────────────────────┐
│                      语音识别技术演进                                 │
├─────────────────────────────────────────────────────────────────────┤
│                                                                     │
│  1990s-2010s                    2012-2018                          │
│  ┌──────────────────┐          ┌──────────────────┐                │
│  │  传统 HMM-GMM    │ ───────► │   深度学习       │                │
│  │  隐马尔可夫模型   │          │   DNN-HMM       │                │
│  │  + 高斯混合模型  │          │   RNN/LSTM      │                │
│  └──────────────────┘          └────────┬─────────┘                │
│                                         │                          │
│                                         ▼                          │
│                                2018-2020                           │
│                          ┌──────────────────┐                      │
│                          │  端到端模型      │                      │
│                          │  Wav2Vec        │                      │
│                          │  DeepSpeech     │                      │
│                          └────────┬─────────┘                      │
│                                   │                                │
│                                   ▼                                │
│                                2022-现在                           │
│                          ┌──────────────────┐                      │
│                          │  大规模预训练    │                      │
│                          │  Whisper        │                      │
│                          │  USM            │                      │
│                          └──────────────────┘                      │
│                                                                     │
└─────────────────────────────────────────────────────────────────────┘
3.2 Whisper:通用语音识别的里程碑
3.2.1 Whisper 的设计理念
OpenAI 的 Whisper 是一个通用的语音识别模型,其核心优势在于:
-
多语言支持:支持 99 种语言
-
多任务能力:语音识别、语音翻译、语言识别、VAD
-
鲁棒性强:对噪声、口音、专业术语有很好的泛化能力
-
零样本迁移:无需微调即可在新领域工作
┌─────────────────────────────────────────────────────────────────────┐
│ Whisper 架构 │
├─────────────────────────────────────────────────────────────────────┤
│ │
│ 音频输入 (30秒片段) │
│ │ │
│ ▼ │
│ ┌──────────────────────────────────────────────────────────────┐ │
│ │ 音频预处理 │ │
│ │ 1. 重采样到 16kHz │ │
│ │ 2. 计算 80 维 Log-Mel 频谱图 │ │
│ │ 3. 归一化 │ │
│ └───────────────────────────┬──────────────────────────────────┘ │
│ │ │
│ ▼ │
│ ┌──────────────────────────────────────────────────────────────┐ │
│ │ Audio Encoder │ │
│ │ ┌────────────────────────────────────────────────────────┐ │ │
│ │ │ 2 × Conv1D (kernel=3, stride=2) │ │ │
│ │ │ ↓ │ │ │
│ │ │ Sinusoidal Position Encoding │ │ │
│ │ │ ↓ │ │ │
│ │ │ N × Transformer Encoder Blocks │ │ │
│ │ │ • Multi-Head Self-Attention │ │ │
│ │ │ • Feed-Forward Network │ │ │
│ │ └────────────────────────────────────────────────────────┘ │ │
│ │ │ │
│ │ 输出:音频表示 (1500, d_model) │ │
│ └───────────────────────────┬──────────────────────────────────┘ │
│ │ │
│ ▼ │
│ ┌──────────────────────────────────────────────────────────────┐ │
│ │ Text Decoder │ │
│ │ ┌────────────────────────────────────────────────────────┐ │ │
│ │ │ Token Embedding + Position Encoding │ │ │
│ │ │ ↓ │ │ │
│ │ │ N × Transformer Decoder Blocks │ │ │
│ │ │ • Masked Multi-Head Self-Attention │ │ │
│ │ │ • Cross-Attention to Encoder Output │ │ │
│ │ │ • Feed-Forward Network │ │ │
│ │ └────────────────────────────────────────────────────────┘ │ │
│ │ │ │
│ │ 输出:文本 tokens │ │
│ └──────────────────────────────────────────────────────────────┘ │
│ │
│ 特殊 tokens: │
│ <|startoftranscript|> <|en|> <|transcribe|> <|notimestamps|> │
│ <|translate|> <|nospeech|> <|startoflm|> │
│ │
└─────────────────────────────────────────────────────────────────────┘
3.2.2 Whisper 模型实现
python
import torch
import torch.nn as nn
import torch.nn.functional as F
import numpy as np

class AudioEncoder(nn.Module):
    """
    Whisper 音频编码器
    """
    def __init__(
        self,
        n_mels=80,
        n_ctx=1500,
        d_model=512,
        n_heads=8,
        n_layers=6,
    ):
        super().__init__()

        # 两层卷积进行下采样
        self.conv1 = nn.Conv1d(n_mels, d_model, kernel_size=3, padding=1)
        self.conv2 = nn.Conv1d(d_model, d_model, kernel_size=3, stride=2, padding=1)

        # 位置编码
        self.positional_embedding = nn.Parameter(torch.zeros(n_ctx, d_model))

        # Transformer 编码器层
        encoder_layer = nn.TransformerEncoderLayer(
            d_model=d_model,
            nhead=n_heads,
            dim_feedforward=d_model * 4,
            activation='gelu',
            batch_first=True,
        )
        self.transformer = nn.TransformerEncoder(encoder_layer, num_layers=n_layers)

        self.ln_post = nn.LayerNorm(d_model)

    def forward(self, mel):
        """
        Args:
            mel: Log-Mel 频谱图 (batch, n_mels, n_frames)

        Returns:
            音频编码 (batch, n_ctx, d_model)
        """
        # 卷积处理
        x = F.gelu(self.conv1(mel))
        x = F.gelu(self.conv2(x))

        # 转置 (batch, d_model, n_ctx) -> (batch, n_ctx, d_model)
        x = x.permute(0, 2, 1)

        # 添加位置编码
        x = x + self.positional_embedding[:x.shape[1]]

        # Transformer 编码
        x = self.transformer(x)
        x = self.ln_post(x)

        return x


class TextDecoder(nn.Module):
    """
    Whisper 文本解码器
    """
    def __init__(
        self,
        vocab_size=51865,
        n_ctx=448,
        d_model=512,
        n_heads=8,
        n_layers=6,
    ):
        super().__init__()

        # Token 嵌入
        self.token_embedding = nn.Embedding(vocab_size, d_model)
        self.positional_embedding = nn.Parameter(torch.zeros(n_ctx, d_model))

        # Transformer 解码器层(带交叉注意力)
        decoder_layer = nn.TransformerDecoderLayer(
            d_model=d_model,
            nhead=n_heads,
            dim_feedforward=d_model * 4,
            activation='gelu',
            batch_first=True,
        )
        self.transformer = nn.TransformerDecoder(decoder_layer, num_layers=n_layers)

        self.ln = nn.LayerNorm(d_model)

    def forward(self, tokens, audio_features, kv_cache=None):
        """
        Args:
            tokens: 输入 token ids (batch, seq_len)
            audio_features: 编码器输出 (batch, audio_len, d_model)
            kv_cache: 用于增量解码的缓存

        Returns:
            logits: (batch, seq_len, vocab_size)
        """
        # Token 嵌入
        x = self.token_embedding(tokens)
        x = x + self.positional_embedding[:x.shape[1]]

        # 生成因果掩码
        seq_len = tokens.shape[1]
        causal_mask = torch.triu(
            torch.ones(seq_len, seq_len, device=tokens.device) * float('-inf'),
            diagonal=1
        )

        # Transformer 解码
        x = self.transformer(
            x,
            audio_features,
            tgt_mask=causal_mask,
        )
        x = self.ln(x)

        # 输出 logits
        logits = x @ self.token_embedding.weight.T

        return logits


class Whisper(nn.Module):
    """
    完整的 Whisper 模型
    """
    def __init__(
        self,
        n_mels=80,
        n_audio_ctx=1500,
        n_text_ctx=448,
        d_model=512,
        n_heads=8,
        n_audio_layers=6,
        n_text_layers=6,
        vocab_size=51865,
    ):
        super().__init__()

        self.encoder = AudioEncoder(
            n_mels=n_mels,
            n_ctx=n_audio_ctx,
            d_model=d_model,
            n_heads=n_heads,
            n_layers=n_audio_layers,
        )

        self.decoder = TextDecoder(
            vocab_size=vocab_size,
            n_ctx=n_text_ctx,
            d_model=d_model,
            n_heads=n_heads,
            n_layers=n_text_layers,
        )

    def forward(self, mel, tokens):
        """
        训练时的前向传播
        """
        audio_features = self.encoder(mel)
        logits = self.decoder(tokens, audio_features)
        return logits

    @torch.no_grad()
    def transcribe(self, mel, tokenizer, task='transcribe', language='en'):
        """
        推理时转录音频
        """
        # 编码音频
        audio_features = self.encoder(mel)

        # 初始化 tokens
        # <|startoftranscript|><|language|><|task|><|notimestamps|>
        initial_tokens = tokenizer.encode(
            f"<|startoftranscript|><|{language}|><|{task}|><|notimestamps|>"
        )
        tokens = torch.tensor([initial_tokens], device=mel.device)

        # 自回归生成
        for _ in range(448):
            logits = self.decoder(tokens, audio_features)
            next_token = logits[:, -1].argmax(dim=-1, keepdim=True)
            tokens = torch.cat([tokens, next_token], dim=1)

            # 检查是否生成了结束符
            if next_token.item() == tokenizer.eot:
                break

        # 解码 tokens
        text = tokenizer.decode(tokens[0].tolist())
        return text
3.2.3 Whisper 的多任务训练
Whisper 通过特殊 token 实现多任务学习:
┌─────────────────────────────────────────────────────────────────────┐
│                     Whisper 任务控制 Token                           │
├─────────────────────────────────────────────────────────────────────┤
│                                                                     │
│  输入序列格式:                                                      │
│                                                                     │
│  ┌─────────────────────────────────────────────────────────────┐   │
│  │ <|startoftranscript|>                                        │   │
│  │          │                                                   │   │
│  │          ▼                                                   │   │
│  │ <|language|>  ← 语言 token (如 <|en|>, <|zh|>, <|ja|>)       │   │
│  │          │                                                   │   │
│  │          ▼                                                   │   │
│  │ <|task|>      ← 任务 token                                   │   │
│  │              • <|transcribe|>  语音识别                      │   │
│  │              • <|translate|>   翻译成英语                    │   │
│  │          │                                                   │   │
│  │          ▼                                                   │   │
│  │ [时间戳 token 或 <|notimestamps|>]                           │   │
│  │          │                                                   │   │
│  │          ▼                                                   │   │
│  │ [转录文本...]                                                │   │
│  │          │                                                   │   │
│  │          ▼                                                   │   │
│  │ <|endoftext|>                                                │   │
│  └─────────────────────────────────────────────────────────────┘   │
│                                                                     │
│  示例:                                                             │
│                                                                     │
│  语音识别 (英语):                                                   │
│  <|startoftranscript|><|en|><|transcribe|><|notimestamps|>         │
│  Hello, how are you today?<|endoftext|>                            │
│                                                                     │
│  语音翻译 (中文→英语):                                              │
│  <|startoftranscript|><|zh|><|translate|><|notimestamps|>          │
│  Hello, how are you today?<|endoftext|>                            │
│                                                                     │
│  带时间戳的转录:                                                    │
│  <|startoftranscript|><|en|><|transcribe|><|0.00|>                 │
│  Hello<|2.40|><|2.40|>how are you<|4.00|>...<|endoftext|>         │
│                                                                     │
└─────────────────────────────────────────────────────────────────────┘
3.3 Whisper 的实战应用
3.3.1 使用 OpenAI Whisper API
python
import whisper
import torch
import numpy as np
from typing import Optional, Dict, Any

class WhisperASR:
    """
    基于 Whisper 的语音识别封装类
    """
    def __init__(
        self,
        model_size: str = "base",
        device: Optional[str] = None,
    ):
        """
        初始化 Whisper 模型

        Args:
            model_size: 模型大小 ('tiny', 'base', 'small', 'medium', 'large')
            device: 设备 ('cuda', 'cpu')
        """
        self.device = device or ('cuda' if torch.cuda.is_available() else 'cpu')
        self.model = whisper.load_model(model_size, device=self.device)

        # 模型配置信息
        self.model_config = {
            'tiny':   {'params': '39M',  'english_only': True, 'vram': '~1GB'},
            'base':   {'params': '74M',  'english_only': True, 'vram': '~1GB'},
            'small':  {'params': '244M', 'english_only': True, 'vram': '~2GB'},
            'medium': {'params': '769M', 'english_only': True, 'vram': '~5GB'},
            'large':  {'params': '1550M', 'english_only': False, 'vram': '~10GB'},
        }

    def transcribe(
        self,
        audio_path: str,
        language: Optional[str] = None,
        task: str = "transcribe",
        **kwargs
    ) -> Dict[str, Any]:
        """
        转录音频文件

        Args:
            audio_path: 音频文件路径
            language: 指定语言代码,None 则自动检测
            task: 'transcribe' 或 'translate'
            **kwargs: 其他 whisper.transcribe 参数

        Returns:
            转录结果字典
        """
        result = self.model.transcribe(
            audio_path,
            language=language,
            task=task,
            **kwargs
        )
        return result

    def transcribe_with_timestamps(
        self,
        audio_path: str,
        language: Optional[str] = None,
    ) -> list:
        """
        带时间戳的转录
        """
        result = self.transcribe(
            audio_path,
            language=language,
            word_timestamps=True,
        )

        segments = []
        for segment in result['segments']:
            segments.append({
                'start': segment['start'],
                'end': segment['end'],
                'text': segment['text'],
                'words': segment.get('words', []),
            })

        return segments

    def detect_language(self, audio_path: str) -> tuple:
        """
        检测音频语言

        Returns:
            (语言代码, 置信度概率)
        """
        # 加载音频
        audio = whisper.load_audio(audio_path)
        audio = whisper.pad_or_trim(audio)

        # 计算 log-mel 频谱图
        mel = whisper.log_mel_spectrogram(audio).to(self.device)

        # 检测语言
        _, probs = self.model.detect_language(mel)
        detected_lang = max(probs, key=probs.get)

        return detected_lang, probs[detected_lang]


# 使用示例
def demo_whisper():
    """
    Whisper 使用演示
    """
    # 初始化
    asr = WhisperASR(model_size="base")

    # 基本转录
    result = asr.transcribe("audio.wav")
    print(f"转录结果: {result['text']}")
    print(f"检测语言: {result['language']}")

    # 带时间戳转录
    segments = asr.transcribe_with_timestamps("audio.wav")
    for seg in segments:
        print(f"[{seg['start']:.2f}s - {seg['end']:.2f}s] {seg['text']}")

    # 语音翻译(任意语言 → 英语)
    translation = asr.transcribe(
        "chinese_audio.wav",
        task="translate"
    )
    print(f"翻译结果: {translation['text']}")

    # 语言检测
    lang, prob = asr.detect_language("unknown_audio.wav")
    print(f"检测到语言: {lang}, 置信度: {prob:.2%}")


if __name__ == "__main__":
    demo_whisper()
3.3.2 实时语音识别流水线
python
import torch
import numpy as np
import pyaudio
import threading
import queue
from collections import deque

class RealtimeWhisperASR:
    """
    实时语音识别系统
    使用滑动窗口和 VAD 实现流式处理
    """
    def __init__(
        self,
        model_size: str = "base",
        sample_rate: int = 16000,
        chunk_duration: float = 0.5,  # 每个音频块的时长(秒)
        window_duration: float = 30.0,  # 滑动窗口时长(秒)
    ):
        # 加载模型
        self.device = 'cuda' if torch.cuda.is_available() else 'cpu'
        self.model = whisper.load_model(model_size, device=self.device)

        # 音频参数
        self.sample_rate = sample_rate
        self.chunk_size = int(sample_rate * chunk_duration)
        self.window_size = int(sample_rate * window_duration)

        # 音频缓冲区
        self.audio_buffer = deque(maxlen=self.window_size)

        # 多线程相关
        self.audio_queue = queue.Queue()
        self.result_queue = queue.Queue()
        self.is_running = False

    def start(self, callback=None):
        """
        启动实时识别
        """
        self.is_running = True
        self.callback = callback

        # 启动音频捕获线程
        self.capture_thread = threading.Thread(target=self._capture_audio)
        self.capture_thread.start()

        # 启动识别线程
        self.recognition_thread = threading.Thread(target=self._recognition_loop)
        self.recognition_thread.start()

    def stop(self):
        """
        停止实时识别
        """
        self.is_running = False
        self.capture_thread.join()
        self.recognition_thread.join()

    def _capture_audio(self):
        """
        音频捕获线程
        """
        p = pyaudio.PyAudio()
        stream = p.open(
            format=pyaudio.paFloat32,
            channels=1,
            rate=self.sample_rate,
            input=True,
            frames_per_buffer=self.chunk_size,
        )

        while self.is_running:
            data = stream.read(self.chunk_size)
            audio_chunk = np.frombuffer(data, dtype=np.float32)
            self.audio_queue.put(audio_chunk)

        stream.stop_stream()
        stream.close()
        p.terminate()

    def _recognition_loop(self):
        """
        识别处理线程
        """
        accumulated_audio = []
        last_transcription = ""

        while self.is_running:
            try:
                # 获取音频块
                audio_chunk = self.audio_queue.get(timeout=0.1)
                accumulated_audio.append(audio_chunk)

                # 检查是否需要处理
                total_samples = sum(len(chunk) for chunk in accumulated_audio)

                if total_samples >= self.sample_rate * 2:  # 每2秒处理一次
                    # 合并音频
                    audio = np.concatenate(accumulated_audio)

                    # VAD 检测静音
                    if self._is_speech(audio[-self.sample_rate:]):
                        # 有语音,继续累积
                        continue

                    # 转录
                    result = self._transcribe(audio)

                    # 去重和增量更新
                    if result != last_transcription:
                        new_text = self._get_incremental_text(
                            last_transcription, result
                        )
                        if new_text and self.callback:
                            self.callback(new_text, is_final=True)
                        last_transcription = result

                    # 清空缓冲区,保留最后1秒作为上下文
                    accumulated_audio = [audio[-self.sample_rate:]]

            except queue.Empty:
                continue

    def _is_speech(self, audio: np.ndarray, threshold: float = 0.01) -> bool:
        """
        简单的 VAD:基于能量阈值
        """
        energy = np.sqrt(np.mean(audio ** 2))
        return energy > threshold

    def _transcribe(self, audio: np.ndarray) -> str:
        """
        转录音频
        """
        # Whisper 需要 float32,范围 [-1, 1]
        audio = audio.astype(np.float32)
        if audio.max() > 1.0:
            audio = audio / 32768.0

        # 补齐或截断到 30 秒
        audio = whisper.pad_or_trim(audio)

        # 计算 mel 频谱图
        mel = whisper.log_mel_spectrogram(audio).to(self.device)

        # 解码
        options = whisper.DecodingOptions(
            language="en",
            without_timestamps=True,
        )
        result = whisper.decode(self.model, mel, options)

        return result.text

    def _get_incremental_text(self, old: str, new: str) -> str:
        """
        计算增量文本
        """
        # 简单实现:返回新增的部分
        if new.startswith(old):
            return new[len(old):].strip()
        return new


# 使用示例
def demo_realtime_asr():
    """
    实时语音识别演示
    """
    def on_transcription(text, is_final):
        print(f"{'[Final]' if is_final else '[Partial]'} {text}")

    asr = RealtimeWhisperASR(model_size="base")

    print("开始实时语音识别,按 Ctrl+C 停止...")
    asr.start(callback=on_transcription)

    try:
        while True:
            pass
    except KeyboardInterrupt:
        asr.stop()
        print("\n已停止")
3.4 音频感知的其他模型
除了 Whisper,还有其他优秀的音频感知模型:
┌─────────────────────────────────────────────────────────────────────────────┐
│                        音频感知模型对比                                       │
├───────────────┬──────────────┬───────────────┬──────────────────────────────┤
│    模型        │   开发者     │     特点       │         适用场景             │
├───────────────┼──────────────┼───────────────┼──────────────────────────────┤
│               │              │               │                              │
│ Whisper       │   OpenAI    │ 多语言、多任务 │ 通用语音识别、翻译            │
│               │              │ 鲁棒性强      │                              │
│               │              │               │                              │
├───────────────┼──────────────┼───────────────┼──────────────────────────────┤
│               │              │               │                              │
│ Wav2Vec 2.0   │    Meta     │ 自监督预训练  │ 低资源语言、微调              │
│               │              │ 少样本学习    │                              │
│               │              │               │                              │
├───────────────┼──────────────┼───────────────┼──────────────────────────────┤
│               │              │               │                              │
│ HuBERT        │    Meta     │ 隐藏单元发现  │ 语音表示学习、情感识别        │
│               │              │ 音素建模      │                              │
│               │              │               │                              │
├───────────────┼──────────────┼───────────────┼──────────────────────────────┤
│               │              │               │                              │
│ USM           │   Google    │ 超大规模      │ 100+ 语言支持                │
│ (Universal    │              │ 1000+ 语言   │                              │
│  Speech Model)│              │               │                              │
│               │              │               │                              │
├───────────────┼──────────────┼───────────────┼──────────────────────────────┤
│               │              │               │                              │
│ SeamlessM4T   │    Meta     │ 多模态翻译   │ 语音-语音、语音-文本翻译      │
│               │              │ 端到端       │                              │
│               │              │               │                              │
└───────────────┴──────────────┴───────────────┴──────────────────────────────┘
4. 🔗 多模态融合技术
4.1 融合策略概述
多模态融合是将不同模态(如视觉、音频、文本)的信息整合在一起的过程。根据融合发生的阶段,可以分为以下几种策略:
┌─────────────────────────────────────────────────────────────────────┐
│                     多模态融合策略分类                                │
├─────────────────────────────────────────────────────────────────────┤
│                                                                     │
│  ┌─────────────────────────────────────────────────────────────┐   │
│  │                    1. 早期融合 (Early Fusion)                 │   │
│  │                                                             │   │
│  │   图像 ──┐                                                  │   │
│  │          │    ┌─────────┐    ┌─────────┐    ┌─────────┐    │   │
│  │   音频 ──┼───►│  拼接   │───►│ 编码器  │───►│  输出   │    │   │
│  │          │    └─────────┘    └─────────┘    └─────────┘    │   │
│  │   文本 ──┘                                                  │   │
│  │                                                             │   │
│  │   特点:在输入层融合,联合建模能力强                          │   │
│  └─────────────────────────────────────────────────────────────┘   │
│                                                                     │
│  ┌─────────────────────────────────────────────────────────────┐   │
│  │                    2. 晚期融合 (Late Fusion)                  │   │
│  │                                                             │   │
│  │   图像 ──► [视觉编码器] ──┐                                  │   │
│  │                          │    ┌─────────┐    ┌─────────┐   │   │
│  │   音频 ──► [音频编码器] ──┼───►│  融合   │───►│  输出   │   │   │
│  │                          │    └─────────┘    └─────────┘   │   │
│  │   文本 ──► [文本编码器] ──┘                                  │   │
│  │                                                             │   │
│  │   特点:在特征层融合,各模态独立编码                          │   │
│  └─────────────────────────────────────────────────────────────┘   │
│                                                                     │
│  ┌─────────────────────────────────────────────────────────────┐   │
│  │                   3. 交叉注意力融合 (Cross-Attention)         │   │
│  │                                                             │   │
│  │   图像 ──► [ViT] ──────────────────────┐                    │   │
│  │                                        │                    │   │
│  │                    ┌─────────────────────┼──────────────┐   │   │
│  │   文本 ──► [LLM] ──┤  Cross-Attention    ▼              │   │   │
│  │                    │  每层都与视觉特征交互                │   │   │
│  │                    └────────────────────────────────────┘   │   │
│  │                                                             │   │
│  │   特点:深度交互,动态融合                                   │   │
│  └─────────────────────────────────────────────────────────────┘   │
│                                                                     │
└─────────────────────────────────────────────────────────────────────┘
4.2 早期融合 vs 晚期融合
💡 思考:什么时候选择早期融合,什么时候选择晚期融合?
🤔 解答:
| 方面 | 早期融合 | 晚期融合 |
|---|---|---|
| 优势 | 模态交互充分、信息损失小 | 模块化设计、各模态可独立优化 |
| 劣势 | 需要对齐的输入、计算量大 | 交互深度有限 |
| 适用场景 | 模态高度相关(如视频理解) | 模态相对独立(如多源数据融合) |
| 代表模型 | ViLT, Unified-IO | CLIP, ImageBind |
python
import torch
import torch.nn as nn

class EarlyFusion(nn.Module):
    """
    早期融合:在输入层拼接不同模态的特征
    """
    def __init__(
        self,
        image_dim=768,
        text_dim=768,
        audio_dim=512,
        hidden_dim=1024,
        num_layers=6,
    ):
        super().__init__()

        # 投影到统一维度
        self.image_proj = nn.Linear(image_dim, hidden_dim)
        self.text_proj = nn.Linear(text_dim, hidden_dim)
        self.audio_proj = nn.Linear(audio_dim, hidden_dim)

        # 模态类型编码
        self.modal_embedding = nn.Embedding(3, hidden_dim)  # 3种模态

        # 统一的 Transformer 编码器
        encoder_layer = nn.TransformerEncoderLayer(
            d_model=hidden_dim,
            nhead=8,
            dim_feedforward=hidden_dim * 4,
            batch_first=True,
        )
        self.transformer = nn.TransformerEncoder(encoder_layer, num_layers=num_layers)

    def forward(self, image_features, text_features, audio_features):
        """
        Args:
            image_features: (batch, n_img, image_dim)
            text_features: (batch, n_txt, text_dim)
            audio_features: (batch, n_audio, audio_dim)
        """
        batch_size = image_features.shape[0]

        # 投影并添加模态编码
        img = self.image_proj(image_features) + self.modal_embedding(
            torch.zeros(image_features.shape[:2], dtype=torch.long, device=image_features.device)
        )
        txt = self.text_proj(text_features) + self.modal_embedding(
            torch.ones(text_features.shape[:2], dtype=torch.long, device=text_features.device)
        )
        aud = self.audio_proj(audio_features) + self.modal_embedding(
            torch.full(audio_features.shape[:2], 2, dtype=torch.long, device=audio_features.device)
        )

        # 拼接所有模态
        combined = torch.cat([img, txt, aud], dim=1)

        # 统一编码
        output = self.transformer(combined)

        return output


class LateFusion(nn.Module):
    """
    晚期融合:各模态独立编码后融合
    """
    def __init__(
        self,
        image_encoder,
        text_encoder,
        audio_encoder,
        hidden_dim=1024,
        output_dim=512,
    ):
        super().__init__()

        self.image_encoder = image_encoder
        self.text_encoder = text_encoder
        self.audio_encoder = audio_encoder

        # 融合层
        self.fusion = nn.Sequential(
            nn.Linear(hidden_dim * 3, hidden_dim),
            nn.ReLU(),
            nn.Linear(hidden_dim, output_dim),
        )

        # 注意力权重学习
        self.attention_weights = nn.Sequential(
            nn.Linear(hidden_dim * 3, 3),
            nn.Softmax(dim=-1),
        )

    def forward(self, images, texts, audios):
        # 各模态独立编码
        img_feat = self.image_encoder(images)  # (batch, hidden_dim)
        txt_feat = self.text_encoder(texts)    # (batch, hidden_dim)
        aud_feat = self.audio_encoder(audios)  # (batch, hidden_dim)

        # 拼接
        combined = torch.cat([img_feat, txt_feat, aud_feat], dim=-1)

        # 计算注意力权重
        weights = self.attention_weights(combined)  # (batch, 3)

        # 加权融合
        stacked = torch.stack([img_feat, txt_feat, aud_feat], dim=1)  # (batch, 3, hidden_dim)
        weighted = (stacked * weights.unsqueeze(-1)).sum(dim=1)

        # 最终融合
        output = self.fusion(combined) + weighted

        return output, weights
4.3 交叉注意力融合机制
交叉注意力是多模态融合的核心机制,它允许一个模态"关注"另一个模态的相关信息:
python
class MultiHeadCrossAttention(nn.Module):
"""
多头交叉注意力模块
"""
def __init__(self, dim, num_heads=8, dropout=0.1):
super().__init__()
self.num_heads = num_heads
self.head_dim = dim // num_heads
self.scale = self.head_dim ** -0.5
self.q_proj = nn.Linear(dim, dim)
self.k_proj = nn.Linear(dim, dim)
self.v_proj = nn.Linear(dim, dim)
self.out_proj = nn.Linear(dim, dim)
self.dropout = nn.Dropout(dropout)
def forward(self, query, key_value, attention_mask=None):
"""
Args:
query: (batch, seq_q, dim) - 查询模态
key_value: (batch, seq_kv, dim) - 被查询模态
attention_mask: (batch, seq_q, seq_kv) - 注意力掩码
"""
batch_size, seq_q, dim = query.shape
seq_kv = key_value.shape[1]
# 线性投影
q = self.q_proj(query).view(batch_size, seq_q, self.num_heads, self.head_dim)
k = self.k_proj(key_value).view(batch_size, seq_kv, self.num_heads, self.head_dim)
v = self.v_proj(key_value).view(batch_size, seq_kv, self.num_heads, self.head_dim)
# 转置为 (batch, heads, seq, head_dim)
q = q.transpose(1, 2)
k = k.transpose(1, 2)
v = v.transpose(1, 2)
# 计算注意力分数
attn_scores = torch.matmul(q, k.transpose(-2, -1)) * self.scale
if attention_mask is not None:
attn_scores = attn_scores.masked_fill(
attention_mask.unsqueeze(1) == 0,
float('-inf')
)
attn_probs = F.softmax(attn_scores, dim=-1)
attn_probs = self.dropout(attn_probs)
# 加权求和
output = torch.matmul(attn_probs, v)
# 合并多头
output = output.transpose(1, 2).contiguous().view(batch_size, seq_q, dim)
output = self.out_proj(output)
return output, attn_probs
class CrossModalTransformerLayer(nn.Module):
"""
跨模态 Transformer 层
实现双向交叉注意力
"""
def __init__(self, dim, num_heads=8, ff_dim=2048, dropout=0.1):
super().__init__()
# 自注意力
self.self_attn_1 = nn.MultiheadAttention(dim, num_heads, dropout, batch_first=True)
self.self_attn_2 = nn.MultiheadAttention(dim, num_heads, dropout, batch_first=True)
# 交叉注意力 (模态1 → 模态2)
self.cross_attn_1to2 = MultiHeadCrossAttention(dim, num_heads, dropout)
# 交叉注意力 (模态2 → 模态1)
self.cross_attn_2to1 = MultiHeadCrossAttention(dim, num_heads, dropout)
# 前馈网络
self.ffn_1 = nn.Sequential(
nn.Linear(dim, ff_dim),
nn.GELU(),
nn.Dropout(dropout),
nn.Linear(ff_dim, dim),
nn.Dropout(dropout),
)
self.ffn_2 = nn.Sequential(
nn.Linear(dim, ff_dim),
nn.GELU(),
nn.Dropout(dropout),
nn.Linear(ff_dim, dim),
nn.Dropout(dropout),
)
# 层归一化
self.norm1_1 = nn.LayerNorm(dim)
self.norm1_2 = nn.LayerNorm(dim)
self.norm2_1 = nn.LayerNorm(dim)
self.norm2_2 = nn.LayerNorm(dim)
self.norm3_1 = nn.LayerNorm(dim)
self.norm3_2 = nn.LayerNorm(dim)
def forward(self, x1, x2, mask1=None, mask2=None):
"""
双向交叉注意力
Args:
x1: 模态1特征 (batch, seq1, dim)
x2: 模态2特征 (batch, seq2, dim)
"""
# 自注意力
x1 = x1 + self.self_attn_1(self.norm1_1(x1), self.norm1_1(x1), self.norm1_1(x1))[0]
x2 = x2 + self.self_attn_2(self.norm1_2(x2), self.norm1_2(x2), self.norm1_2(x2))[0]
# 交叉注意力
x1_cross, _ = self.cross_attn_2to1(self.norm2_1(x1), self.norm2_2(x2))
x2_cross, _ = self.cross_attn_1to2(self.norm2_2(x2), self.norm2_1(x1))
x1 = x1 + x1_cross
x2 = x2 + x2_cross
# 前馈网络
x1 = x1 + self.ffn_1(self.norm3_1(x1))
x2 = x2 + self.ffn_2(self.norm3_2(x2))
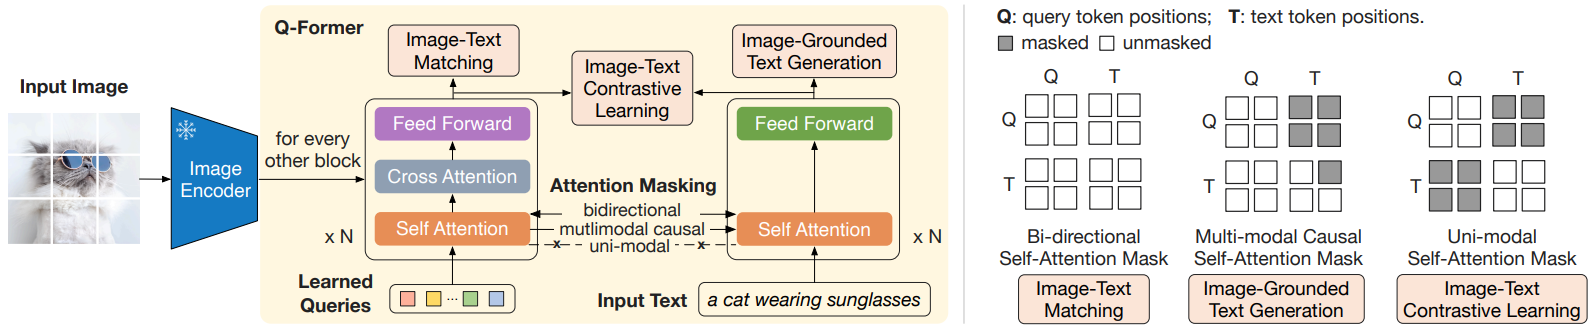
return x1, x24.4 Q-Former:桥接视觉与语言的艺术
Q-Former 是 BLIP-2 中的核心组件,它代表了一种高效的模态桥接方法:
┌─────────────────────────────────────────────────────────────────────┐
│                       Q-Former 工作原理                              │
├─────────────────────────────────────────────────────────────────────┤
│                                                                     │
│   ┌─────────────────────────────────────────────────────────────┐  │
│   │                     Q-Former 结构                            │  │
│   │                                                             │  │
│   │   ┌─────────────────┐                                       │  │
│   │   │  Learned Queries│  32 个可学习的 query tokens            │  │
│   │   │   (32 × 768)    │  随机初始化,通过训练学习              │  │
│   │   └────────┬────────┘                                       │  │
│   │            │                                                │  │
│   │            ▼                                                │  │
│   │   ┌─────────────────────────────────────────┐              │  │
│   │   │         Self-Attention Layer            │              │  │
│   │   │  Queries 之间相互交互                    │              │  │
│   │   └─────────────────┬───────────────────────┘              │  │
│   │                     │                                       │  │
│   │                     ▼                                       │  │
│   │   ┌─────────────────────────────────────────┐              │  │
│   │   │        Cross-Attention Layer            │              │  │
│   │   │  Queries attend to Image Features       │              │  │
│   │   │                                         │◄── 图像特征   │  │
│   │   │  Q: Queries                             │    (257×1408) │  │
│   │   │  K,V: Image Features                    │              │  │
│   │   └─────────────────┬───────────────────────┘              │  │
│   │                     │                                       │  │
│   │                     ▼                                       │  │
│   │   ┌─────────────────────────────────────────┐              │  │
│   │   │          Feed Forward Network           │              │  │
│   │   └─────────────────┬───────────────────────┘              │  │
│   │                     │                                       │  │
│   │                     │  × N layers (交叉注意力每2层出现1次)   │  │
│   │                     │                                       │  │
│   │                     ▼                                       │  │
│   │            输出: 32 × 768                                   │  │
│   │            (压缩后的视觉语义表示)                             │  │
│   └─────────────────────────────────────────────────────────────┘  │
│                                                                     │
│   关键创新:                                                        │
│   1. 固定数量的 queries 实现信息压缩 (257 → 32)                     │
│   2. 通过对比学习使 queries 学会提取语言相关的视觉信息               │
│   3. 轻量级设计,仅需训练 188M 参数                                 │
│                                                                     │
└─────────────────────────────────────────────────────────────────────┘
python
class QFormerBlock(nn.Module):
    """
    Q-Former 的单个 block
    每两层有一个交叉注意力层
    """
    def __init__(
        self,
        dim=768,
        num_heads=12,
        ff_mult=4,
        cross_attention=True,
    ):
        super().__init__()

        # 自注意力
        self.self_attn = nn.MultiheadAttention(
            dim, num_heads, batch_first=True
        )
        self.norm1 = nn.LayerNorm(dim)

        # 交叉注意力(可选)
        self.has_cross_attention = cross_attention
        if cross_attention:
            self.cross_attn = nn.MultiheadAttention(
                dim, num_heads, batch_first=True
            )
            self.norm2 = nn.LayerNorm(dim)

        # 前馈网络
        self.ffn = nn.Sequential(
            nn.Linear(dim, dim * ff_mult),
            nn.GELU(),
            nn.Linear(dim * ff_mult, dim),
        )
        self.norm3 = nn.LayerNorm(dim)

    def forward(self, queries, image_features=None):
        """
        Args:
            queries: (batch, num_queries, dim)
            image_features: (batch, num_image_tokens, dim)
        """
        # 自注意力
        residual = queries
        queries = self.norm1(queries)
        queries = residual + self.self_attn(queries, queries, queries)[0]

        # 交叉注意力
        if self.has_cross_attention and image_features is not None:
            residual = queries
            queries = self.norm2(queries)
            queries = residual + self.cross_attn(
                queries, image_features, image_features
            )[0]

        # 前馈
        residual = queries
        queries = self.norm3(queries)
        queries = residual + self.ffn(queries)

        return queries


class FullQFormer(nn.Module):
    """
    完整的 Q-Former 实现
    """
    def __init__(
        self,
        num_queries=32,
        dim=768,
        num_layers=12,
        num_heads=12,
        cross_attention_freq=2,  # 每 N 层有一个交叉注意力
        image_feature_dim=1408,
    ):
        super().__init__()

        # 可学习的 query tokens
        self.query_tokens = nn.Parameter(torch.randn(1, num_queries, dim) * 0.02)

        # 图像特征投影
        self.image_proj = nn.Linear(image_feature_dim, dim)

        # Q-Former layers
        self.layers = nn.ModuleList()
        for i in range(num_layers):
            has_cross_attn = (i % cross_attention_freq) == 0
            self.layers.append(
                QFormerBlock(
                    dim=dim,
                    num_heads=num_heads,
                    cross_attention=has_cross_attn,
                )
            )

        self.norm = nn.LayerNorm(dim)

    def forward(self, image_features):
        """
        Args:
            image_features: 视觉编码器输出 (batch, seq_len, image_feature_dim)

        Returns:
            queries: 压缩后的视觉表示 (batch, num_queries, dim)
        """
        batch_size = image_features.shape[0]

        # 投影图像特征
        image_features = self.image_proj(image_features)

        # 扩展 queries
        queries = self.query_tokens.expand(batch_size, -1, -1)

        # 通过所有层
        for layer in self.layers:
            queries = layer(queries, image_features)

        queries = self.norm(queries)

        return queries
5. 🧠 视觉语言模型(VLM)深度解析
5.1 VLM 的发展脉络
视觉语言模型(Vision-Language Model, VLM)是多模态 AI 的核心,它能够同时理解图像和文本:
┌─────────────────────────────────────────────────────────────────────┐
│                       VLM 发展时间线                                 │
├─────────────────────────────────────────────────────────────────────┤
│                                                                     │
│  2019 ────────────────────────────────────────────────────────────  │
│    │                                                                │
│    ├── ViLBERT: 双流架构,分离的视觉/语言处理                        │
│    ├── LXMERT: 跨模态编码器                                         │
│                                                                     │
│  2020 ────────────────────────────────────────────────────────────  │
│    │                                                                │
│    ├── UNITER: 统一的图文表示学习                                   │
│    ├── Oscar: 使用检测到的物体标签作为锚点                          │
│                                                                     │
│  2021 ────────────────────────────────────────────────────────────  │
│    │                                                                │
│    ├── CLIP: 对比学习,开放域理解                                   │
│    ├── ViLT: 轻量级,无需物体检测器                                 │
│    ├── ALBEF: 对齐-融合框架                                         │
│                                                                     │
│  2022 ────────────────────────────────────────────────────────────  │
│    │                                                                │
│    ├── Flamingo: 少样本多模态学习                                   │
│    ├── BLIP: 统一理解与生成                                         │
│    ├── CoCa: 对比学习 + 语言建模                                    │
│                                                                     │
│  2023 ────────────────────────────────────────────────────────────  │
│    │                                                                │
│    ├── BLIP-2: Q-Former 桥接冻结模型                                │
│    ├── GPT-4V: 商业级多模态能力                                     │
│    ├── LLaVA: 视觉指令微调                                          │
│    ├── InternLM-XComposer: 图文创作                                │
│                                                                     │
│  2024 ────────────────────────────────────────────────────────────  │
│    │                                                                │
│    ├── GPT-4o: 原生多模态                                           │
│    ├── Claude 3: 强大的视觉理解                                     │
│    ├── Gemini 1.5: 超长上下文多模态                                 │
│    ├── LLaVA-NeXT: 高分辨率理解                                     │
│                                                                     │
└─────────────────────────────────────────────────────────────────────┘
5.2 主流 VLM 架构对比
┌─────────────────────────────────────────────────────────────────────────────────┐
│                              主流 VLM 架构对比                                   │
├─────────────┬────────────────┬────────────────┬──────────────────────────────────┤
│    模型      │   视觉编码器   │    融合方式    │              特点                 │
├─────────────┼────────────────┼────────────────┼──────────────────────────────────┤
│             │                │                │                                  │
│ LLaVA       │ CLIP ViT-L    │ MLP 投影       │ 简单高效,开源友好                │
│             │ (336×336)     │ + Token 拼接   │ 视觉指令微调                      │
│             │                │                │                                  │
├─────────────┼────────────────┼────────────────┼──────────────────────────────────┤
│             │                │                │                                  │
│ BLIP-2      │ EVA-CLIP      │ Q-Former       │ 参数高效,冻结大模型              │
│             │ ViT-G         │ 桥接模块       │ 两阶段训练                        │
│             │                │                │                                  │
├─────────────┼────────────────┼────────────────┼──────────────────────────────────┤
│             │                │                │                                  │
│ Flamingo    │ NFNet-F6      │ Perceiver      │ 少样本学习强                      │
│             │               │ + 门控交叉注意力│ 支持视频                          │
│             │                │                │                                  │
├─────────────┼────────────────┼────────────────┼──────────────────────────────────┤
│             │                │                │                                  │
│ InternVL    │ InternViT-6B  │ QLLaMA        │ 大规模视觉编码器                  │
│             │               │ 动态分辨率     │ 中文能力强                        │
│             │                │                │                                  │
├─────────────┼────────────────┼────────────────┼──────────────────────────────────┤
│             │                │                │                                  │
│ Qwen-VL     │ ViT-bigG     │ 单塔结构       │ 细粒度理解                        │
│             │ (448×448)     │ 位置感知       │ Grounding 能力                    │
│             │                │                │                                  │
├─────────────┼────────────────┼────────────────┼──────────────────────────────────┤
│             │                │                │                                  │
│ CogVLM      │ EVA2-E       │ 视觉专家       │ 独立的视觉 FFN                    │
│             │               │ 深度融合       │ 避免视觉信息稀释                  │
│             │                │                │                                  │
└─────────────┴────────────────┴────────────────┴──────────────────────────────────┘
5.3 GPT-4V/GPT-4o 的多模态能力
GPT-4V (GPT-4 with Vision) 和 GPT-4o 是目前最强大的商业多模态模型:
💡 思考:GPT-4V/GPT-4o 有哪些独特的多模态能力?
🤔 解答:
- 高精度 OCR:能够准确识别图像中的文字,包括手写体
- 复杂推理:可以基于图像内容进行多步推理
- 空间理解:理解物体的空间关系和布局
- 图表解读:分析图表、流程图等结构化视觉信息
- 创意描述:提供丰富、有创意的图像描述
python
import openai
import base64
from pathlib import Path

class GPT4VisionAgent:
    """
    基于 GPT-4V 的视觉感知 Agent
    """
    def __init__(self, api_key: str):
        self.client = openai.OpenAI(api_key=api_key)

    def encode_image(self, image_path: str) -> str:
        """将图像编码为 base64"""
        with open(image_path, "rb") as f:
            return base64.b64encode(f.read()).decode('utf-8')

    def analyze_image(
        self,
        image_path: str,
        prompt: str = "What's in this image?",
        detail: str = "high",  # "low", "high", "auto"
    ) -> str:
        """
        分析单张图像
        """
        base64_image = self.encode_image(image_path)

        response = self.client.chat.completions.create(
            model="gpt-4-vision-preview",
            messages=[
                {
                    "role": "user",
                    "content": [
                        {"type": "text", "text": prompt},
                        {
                            "type": "image_url",
                            "image_url": {
                                "url": f"data:image/jpeg;base64,{base64_image}",
                                "detail": detail,
                            },
                        },
                    ],
                }
            ],
            max_tokens=1000,
        )

        return response.choices[0].message.content

    def compare_images(
        self,
        image_paths: list,
        prompt: str = "Compare these images and describe the differences.",
    ) -> str:
        """
        比较多张图像
        """
        content = [{"type": "text", "text": prompt}]

        for path in image_paths:
            base64_image = self.encode_image(path)
            content.append({
                "type": "image_url",
                "image_url": {
                    "url": f"data:image/jpeg;base64,{base64_image}",
                },
            })

        response = self.client.chat.completions.create(
            model="gpt-4-vision-preview",
            messages=[{"role": "user", "content": content}],
            max_tokens=1500,
        )

        return response.choices[0].message.content

    def extract_structured_info(
        self,
        image_path: str,
        schema: dict,
    ) -> dict:
        """
        从图像中提取结构化信息
        """
        import json

        prompt = f"""
        Analyze this image and extract information according to this schema:
        {json.dumps(schema, indent=2)}

        Return ONLY valid JSON matching the schema.
        """

        result = self.analyze_image(image_path, prompt)

        # 解析 JSON
        try:
            # 提取 JSON 部分
            json_str = result
            if "```json" in result:
                json_str = result.split("```json")[1].split("```")[0]
            elif "```" in result:
                json_str = result.split("```")[1].split("```")[0]

            return json.loads(json_str)
        except json.JSONDecodeError:
            return {"raw_response": result, "error": "Failed to parse JSON"}


# 使用示例
def demo_gpt4v():
    agent = GPT4VisionAgent(api_key="your-api-key")

    # 基本图像分析
    description = agent.analyze_image(
        "photo.jpg",
        "Describe this image in detail, including colors, objects, and mood."
    )
    print(description)

    # 结构化信息提取
    receipt_schema = {
        "store_name": "string",
        "date": "string",
        "items": [{"name": "string", "price": "number"}],
        "total": "number",
    }
    receipt_info = agent.extract_structured_info("receipt.jpg", receipt_schema)
    print(receipt_info)
5.4 开源 VLM 生态
开源社区贡献了许多优秀的 VLM,以下是一些代表性模型的实现方式:
5.4.1 LLaVA (Large Language and Vision Assistant)
LLaVA 是最流行的开源 VLM 之一,其架构简洁高效:
python
import torch
import torch.nn as nn
from transformers import CLIPVisionModel, LlamaForCausalLM, LlamaTokenizer

class LLaVA(nn.Module):
    """
    LLaVA: Large Language and Vision Assistant

    架构:CLIP ViT + MLP Projector + LLaMA
    """
    def __init__(
        self,
        vision_encoder_path: str = "openai/clip-vit-large-patch14-336",
        llm_path: str = "meta-llama/Llama-2-7b-hf",
        freeze_vision: bool = True,
        freeze_llm: bool = False,
    ):
        super().__init__()

        # 加载视觉编码器
        self.vision_encoder = CLIPVisionModel.from_pretrained(vision_encoder_path)
        vision_hidden_size = self.vision_encoder.config.hidden_size

        # 冻结视觉编码器
        if freeze_vision:
            for param in self.vision_encoder.parameters():
                param.requires_grad = False

        # 加载语言模型
        self.llm = LlamaForCausalLM.from_pretrained(llm_path)
        llm_hidden_size = self.llm.config.hidden_size

        # 冻结 LLM(可选)
        if freeze_llm:
            for param in self.llm.parameters():
                param.requires_grad = False

        # MLP 投影器:将视觉特征映射到语言空间
        self.mm_projector = nn.Sequential(
            nn.Linear(vision_hidden_size, llm_hidden_size),
            nn.GELU(),
            nn.Linear(llm_hidden_size, llm_hidden_size),
        )

        # Tokenizer
        self.tokenizer = LlamaTokenizer.from_pretrained(llm_path)

    def encode_images(self, images):
        """
        编码图像为语言模型可用的 embeddings

        Args:
            images: (batch, 3, 336, 336)

        Returns:
            image_features: (batch, num_patches, llm_hidden_size)
        """
        with torch.no_grad() if not self.vision_encoder.training else torch.enable_grad():
            vision_outputs = self.vision_encoder(images, output_hidden_states=True)
            # 使用倒数第二层的特征(经验上效果更好)
            image_features = vision_outputs.hidden_states[-2][:, 1:]  # 去掉 CLS token

        # 投影到语言空间
        image_features = self.mm_projector(image_features)

        return image_features

    def prepare_inputs_for_generation(
        self,
        images,
        text_input_ids,
        image_token_id=-200,  # 特殊的图像占位符 token
    ):
        """
        准备生成所需的输入
        将图像 embeddings 插入到文本序列中
        """
        batch_size = images.shape[0]

        # 编码图像
        image_features = self.encode_images(images)  # (batch, num_patches, hidden)
        num_image_tokens = image_features.shape[1]

        # 获取文本 embeddings
        text_embeddings = self.llm.model.embed_tokens(text_input_ids)

        # 找到图像占位符的位置并替换
        new_embeddings = []
        for b in range(batch_size):
            # 找到 image_token_id 的位置
            image_positions = (text_input_ids[b] == image_token_id).nonzero(as_tuple=True)[0]

            if len(image_positions) == 0:
                # 没有图像占位符,直接使用文本
                new_embeddings.append(text_embeddings[b])
            else:
                # 替换图像占位符
                pos = image_positions[0].item()
                new_emb = torch.cat([
                    text_embeddings[b, :pos],
                    image_features[b],
                    text_embeddings[b, pos+1:],
                ], dim=0)
                new_embeddings.append(new_emb)

        # Padding 到相同长度
        max_len = max(emb.shape[0] for emb in new_embeddings)
        padded_embeddings = torch.zeros(
            batch_size, max_len, text_embeddings.shape[-1],
            device=text_embeddings.device, dtype=text_embeddings.dtype
        )
        attention_mask = torch.zeros(batch_size, max_len, device=text_embeddings.device)

        for b, emb in enumerate(new_embeddings):
            padded_embeddings[b, :emb.shape[0]] = emb
            attention_mask[b, :emb.shape[0]] = 1

        return padded_embeddings, attention_mask

    def forward(
        self,
        images,
        input_ids,
        attention_mask=None,
        labels=None,
    ):
        """
        训练时的前向传播
        """
        inputs_embeds, attention_mask = self.prepare_inputs_for_generation(
            images, input_ids
        )

        outputs = self.llm(
            inputs_embeds=inputs_embeds,
            attention_mask=attention_mask,
            labels=labels,
            return_dict=True,
        )

        return outputs

    @torch.no_grad()
    def generate(
        self,
        images,
        prompt: str,
        max_new_tokens: int = 256,
        temperature: float = 0.2,
        top_p: float = 0.9,
    ):
        """
        生成回复
        """
        # 构建输入(包含图像占位符)
        full_prompt = f"<image>\nUSER: {prompt}\nASSISTANT:"
        input_ids = self.tokenizer.encode(full_prompt, return_tensors="pt")
        input_ids = input_ids.to(images.device)

        # 准备输入
        inputs_embeds, attention_mask = self.prepare_inputs_for_generation(
            images, input_ids
        )

        # 生成
        outputs = self.llm.generate(
            inputs_embeds=inputs_embeds,
            attention_mask=attention_mask,
            max_new_tokens=max_new_tokens,
            temperature=temperature,
            top_p=top_p,
            do_sample=temperature > 0,
        )

        # 解码
        response = self.tokenizer.decode(outputs[0], skip_special_tokens=True)

        # 提取 ASSISTANT 的回复
        if "ASSISTANT:" in response:
            response = response.split("ASSISTANT:")[-1].strip()

        return response
5.4.2 InstructBLIP
InstructBLIP 在 BLIP-2 基础上增加了指令微调能力:
python
class InstructBLIP(nn.Module):
    """
    InstructBLIP: 指令微调的视觉语言模型
    基于 BLIP-2 架构,增加指令遵循能力
    """
    def __init__(
        self,
        blip2_model,  # 预训练的 BLIP-2 模型
        instruction_templates: dict = None,
    ):
        super().__init__()
        self.blip2 = blip2_model

        # 指令模板
        self.templates = instruction_templates or {
            "caption": "Write a short description for the image.",
            "detailed_caption": "Describe the image in detail.",
            "vqa": "Question: {question} Answer:",
            "reasoning": "Based on the image, {question} Let's think step by step.",
        }

    def format_instruction(self, task: str, **kwargs) -> str:
        """格式化指令"""
        template = self.templates.get(task, task)
        return template.format(**kwargs)

    def forward(self, images, instructions, labels=None):
        """
        前向传播
        """
        # BLIP-2 处理
        return self.blip2(images, instructions, labels)

    @torch.no_grad()
    def answer(
        self,
        image,
        question: str,
        task: str = "vqa",
        max_length: int = 50,
    ):
        """
        回答问题
        """
        instruction = self.format_instruction(task, question=question)
        return self.blip2.generate(image, instruction, max_length=max_length)
6. 🏗️ Agent 感知模块的工程实现
6.1 感知模块架构设计
一个完整的 Agent 感知模块需要支持多种输入模态,并提供统一的接口:
┌─────────────────────────────────────────────────────────────────────┐
│                    Agent 感知模块架构                                │
├─────────────────────────────────────────────────────────────────────┤
│                                                                     │
│   ┌────────────────────────────────────────────────────────────┐   │
│   │                       输入层                                │   │
│   │  ┌─────────┐  ┌─────────┐  ┌─────────┐  ┌─────────┐       │   │
│   │  │  图像   │  │  视频   │  │  音频   │  │  文本   │       │   │
│   │  └────┬────┘  └────┬────┘  └────┬────┘  └────┬────┘       │   │
│   └───────┼────────────┼────────────┼────────────┼────────────┘   │
│           │            │            │            │                 │
│   ┌───────▼────────────▼────────────▼────────────▼────────────┐   │
│   │                      预处理层                              │   │
│   │  • 图像: 缩放、裁剪、归一化                                 │   │
│   │  • 视频: 帧采样、时序处理                                   │   │
│   │  • 音频: 重采样、Mel频谱图                                  │   │
│   │  • 文本: 分词、编码                                         │   │
│   └───────────────────────┬───────────────────────────────────┘   │
│                           │                                        │
│   ┌───────────────────────▼───────────────────────────────────┐   │
│   │                      编码器层                              │   │
│   │  ┌─────────┐  ┌─────────┐  ┌─────────┐  ┌─────────┐       │   │
│   │  │ Vision  │  │ Video   │  │ Audio   │  │ Text    │       │   │
│   │  │ Encoder │  │ Encoder │  │ Encoder │  │ Encoder │       │   │
│   │  │(CLIP/   │  │(Video-  │  │(Whisper)│  │(BERT/   │       │   │
│   │  │ SigLIP) │  │ LLaVA)  │  │         │  │ T5)     │       │   │
│   │  └────┬────┘  └────┬────┘  └────┬────┘  └────┬────┘       │   │
│   └───────┼────────────┼────────────┼────────────┼────────────┘   │
│           │            │            │            │                 │
│   ┌───────▼────────────▼────────────▼────────────▼────────────┐   │
│   │                      融合层                                │   │
│   │                                                            │   │
│   │  选项1: Q-Former (BLIP-2 风格)                             │   │
│   │  选项2: Cross-Attention (Flamingo 风格)                    │   │
│   │  选项3: MLP Projection (LLaVA 风格)                        │   │
│   │  选项4: Perceiver Resampler                                │   │
│   │                                                            │   │
│   └───────────────────────┬───────────────────────────────────┘   │
│                           │                                        │
│   ┌───────────────────────▼───────────────────────────────────┐   │
│   │                      输出层                                │   │
│   │                                                            │   │
│   │  统一的多模态表示 → 送入 LLM 进行推理                       │   │
│   │                                                            │   │
│   └───────────────────────────────────────────────────────────┘   │
│                                                                     │
└─────────────────────────────────────────────────────────────────────┘
6.2 完整代码实现
以下是一个完整的多模态感知模块实现:
python
import torch
import torch.nn as nn
from typing import Dict, List, Optional, Union
from dataclasses import dataclass
from enum import Enum
import numpy as np
from PIL import Image
import torchaudio

class ModalityType(Enum):
    """模态类型枚举"""
    IMAGE = "image"
    VIDEO = "video"
    AUDIO = "audio"
    TEXT = "text"


@dataclass
class PerceptionOutput:
    """感知模块输出"""
    features: torch.Tensor           # 融合后的特征
    modality_features: Dict[str, torch.Tensor]  # 各模态特征
    attention_weights: Optional[torch.Tensor] = None  # 注意力权重
    metadata: Optional[Dict] = None  # 元信息


class ImagePreprocessor:
    """图像预处理器"""
    def __init__(
        self,
        image_size: int = 336,
        mean: tuple = (0.48145466, 0.4578275, 0.40821073),
        std: tuple = (0.26862954, 0.26130258, 0.27577711),
    ):
        self.image_size = image_size
        self.mean = torch.tensor(mean).view(3, 1, 1)
        self.std = torch.tensor(std).view(3, 1, 1)

    def __call__(self, image: Union[Image.Image, np.ndarray, torch.Tensor]) -> torch.Tensor:
        """预处理图像"""
        # 转换为 PIL Image
        if isinstance(image, np.ndarray):
            image = Image.fromarray(image)
        elif isinstance(image, torch.Tensor):
            image = Image.fromarray(image.numpy().astype(np.uint8))

        # 缩放
        image = image.resize((self.image_size, self.image_size), Image.BICUBIC)

        # 转换为 tensor
        image = torch.tensor(np.array(image)).permute(2, 0, 1).float() / 255.0

        # 归一化
        image = (image - self.mean) / self.std

        return image


class AudioPreprocessor:
    """音频预处理器"""
    def __init__(
        self,
        sample_rate: int = 16000,
        n_mels: int = 80,
        n_fft: int = 400,
        hop_length: int = 160,
    ):
        self.sample_rate = sample_rate
        self.n_mels = n_mels
        self.n_fft = n_fft
        self.hop_length = hop_length

        self.mel_transform = torchaudio.transforms.MelSpectrogram(
            sample_rate=sample_rate,
            n_fft=n_fft,
            hop_length=hop_length,
            n_mels=n_mels,
        )

    def __call__(self, audio: torch.Tensor, sr: int = None) -> torch.Tensor:
        """预处理音频"""
        # 重采样
        if sr is not None and sr != self.sample_rate:
            resampler = torchaudio.transforms.Resample(sr, self.sample_rate)
            audio = resampler(audio)

        # 转换为 Mel 频谱图
        mel = self.mel_transform(audio)

        # Log Mel
        mel = torch.log(mel + 1e-6)

        return mel


class MultiModalPerception(nn.Module):
    """
    多模态感知模块

    支持图像、视频、音频、文本的统一处理
    """
    def __init__(
        self,
        vision_encoder: nn.Module,
        audio_encoder: nn.Module,
        text_encoder: nn.Module,
        fusion_type: str = "qformer",  # "qformer", "cross_attention", "mlp", "concat"
        output_dim: int = 4096,
        num_query_tokens: int = 32,
    ):
        super().__init__()

        # 编码器
        self.vision_encoder = vision_encoder
        self.audio_encoder = audio_encoder
        self.text_encoder = text_encoder

        # 预处理器
        self.image_preprocessor = ImagePreprocessor()
        self.audio_preprocessor = AudioPreprocessor()

        # 获取各编码器的输出维度
        self.vision_dim = getattr(vision_encoder, 'embed_dim', 1024)
        self.audio_dim = getattr(audio_encoder, 'embed_dim', 512)
        self.text_dim = getattr(text_encoder, 'embed_dim', 768)

        # 融合模块
        self.fusion_type = fusion_type
        if fusion_type == "qformer":
            self.fusion = self._build_qformer(output_dim, num_query_tokens)
        elif fusion_type == "cross_attention":
            self.fusion = self._build_cross_attention(output_dim)
        elif fusion_type == "mlp":
            self.fusion = self._build_mlp_fusion(output_dim)
        else:
            self.fusion = self._build_concat_fusion(output_dim)

        # 输出投影
        self.output_proj = nn.Linear(output_dim, output_dim)

    def _build_qformer(self, output_dim: int, num_queries: int):
        """构建 Q-Former 融合模块"""
        return nn.ModuleDict({
            'query_tokens': nn.Parameter(torch.randn(1, num_queries, output_dim) * 0.02),
            'vision_proj': nn.Linear(self.vision_dim, output_dim),
            'audio_proj': nn.Linear(self.audio_dim, output_dim),
            'text_proj': nn.Linear(self.text_dim, output_dim),
            'cross_attn': nn.MultiheadAttention(output_dim, 8, batch_first=True),
            'ffn': nn.Sequential(
                nn.Linear(output_dim, output_dim * 4),
                nn.GELU(),
                nn.Linear(output_dim * 4, output_dim),
            ),
            'norm1': nn.LayerNorm(output_dim),
            'norm2': nn.LayerNorm(output_dim),
        })

    def _build_cross_attention(self, output_dim: int):
        """构建交叉注意力融合模块"""
        return nn.ModuleDict({
            'vision_proj': nn.Linear(self.vision_dim, output_dim),
            'audio_proj': nn.Linear(self.audio_dim, output_dim),
            'text_proj': nn.Linear(self.text_dim, output_dim),
            'cross_attn_layers': nn.ModuleList([
                nn.MultiheadAttention(output_dim, 8, batch_first=True)
                for _ in range(4)
            ]),
            'norm_layers': nn.ModuleList([
                nn.LayerNorm(output_dim) for _ in range(4)
            ]),
        })

    def _build_mlp_fusion(self, output_dim: int):
        """构建 MLP 融合模块(LLaVA 风格)"""
        total_dim = self.vision_dim + self.audio_dim + self.text_dim
        return nn.Sequential(
            nn.Linear(total_dim, output_dim),
            nn.GELU(),
            nn.Linear(output_dim, output_dim),
        )

    def _build_concat_fusion(self, output_dim: int):
        """构建简单拼接融合"""
        return nn.ModuleDict({
            'vision_proj': nn.Linear(self.vision_dim, output_dim),
            'audio_proj': nn.Linear(self.audio_dim, output_dim),
            'text_proj': nn.Linear(self.text_dim, output_dim),
        })

    def encode_image(self, images: torch.Tensor) -> torch.Tensor:
        """编码图像"""
        with torch.no_grad():
            features = self.vision_encoder(images, return_features=True)
        return features

    def encode_audio(self, audios: torch.Tensor) -> torch.Tensor:
        """编码音频"""
        with torch.no_grad():
            features = self.audio_encoder(audios)
        return features

    def encode_text(self, text_ids: torch.Tensor) -> torch.Tensor:
        """编码文本"""
        with torch.no_grad():
            features = self.text_encoder(text_ids)
        return features

    def fuse_qformer(
        self,
        vision_features: Optional[torch.Tensor],
        audio_features: Optional[torch.Tensor],
        text_features: Optional[torch.Tensor],
    ) -> torch.Tensor:
        """Q-Former 融合"""
        batch_size = next(
            f.shape[0] for f in [vision_features, audio_features, text_features]
            if f is not None
        )

        # 收集所有模态特征
        all_features = []

        if vision_features is not None:
            v_feat = self.fusion['vision_proj'](vision_features)
            all_features.append(v_feat)

        if audio_features is not None:
            a_feat = self.fusion['audio_proj'](audio_features)
            all_features.append(a_feat)

        if text_features is not None:
            t_feat = self.fusion['text_proj'](text_features)
            all_features.append(t_feat)

        # 拼接所有特征
        context = torch.cat(all_features, dim=1)

        # Query tokens
        queries = self.fusion['query_tokens'].expand(batch_size, -1, -1)

        # 交叉注意力
        queries = self.fusion['norm1'](queries)
        attn_out, _ = self.fusion['cross_attn'](queries, context, context)
        queries = queries + attn_out

        # FFN
        queries = queries + self.fusion['ffn'](self.fusion['norm2'](queries))

        return queries

    def forward(
        self,
        images: Optional[torch.Tensor] = None,
        audios: Optional[torch.Tensor] = None,
        text_ids: Optional[torch.Tensor] = None,
        return_modality_features: bool = False,
    ) -> PerceptionOutput:
        """
        前向传播

        Args:
            images: 图像输入 (batch, 3, H, W)
            audios: 音频输入 (batch, n_mels, time)
            text_ids: 文本 token ids (batch, seq_len)
            return_modality_features: 是否返回各模态特征

        Returns:
            PerceptionOutput: 感知输出
        """
        modality_features = {}

        # 编码各模态
        vision_features = None
        if images is not None:
            vision_features = self.encode_image(images)
            modality_features['vision'] = vision_features

        audio_features = None
        if audios is not None:
            audio_features = self.encode_audio(audios)
            modality_features['audio'] = audio_features

        text_features = None
        if text_ids is not None:
            text_features = self.encode_text(text_ids)
            modality_features['text'] = text_features

        # 融合
        if self.fusion_type == "qformer":
            fused = self.fuse_qformer(vision_features, audio_features, text_features)
        else:
            # 其他融合方式...
            fused = self._simple_fusion(vision_features, audio_features, text_features)

        # 输出投影
        output_features = self.output_proj(fused)

        return PerceptionOutput(
            features=output_features,
            modality_features=modality_features if return_modality_features else {},
            metadata={'fusion_type': self.fusion_type},
        )

    def _simple_fusion(self, v, a, t):
        """简单融合(用于非 Q-Former 模式)"""
        features = []
        if v is not None:
            features.append(v.mean(dim=1))
        if a is not None:
            features.append(a.mean(dim=1))
        if t is not None:
            features.append(t.mean(dim=1))

        if self.fusion_type == "mlp":
            combined = torch.cat(features, dim=-1)
            return self.fusion(combined).unsqueeze(1)
        else:
            # concat
            projected = []
            if v is not None:
                projected.append(self.fusion['vision_proj'](v))
            if a is not None:
                projected.append(self.fusion['audio_proj'](a))
            if t is not None:
                projected.append(self.fusion['text_proj'](t))
            return torch.cat(projected, dim=1)
6.3 性能优化策略
💡 思考:如何优化多模态感知模块的性能?
🤔 解答:
6.3.1 模型量化
python
import torch
from torch.quantization import quantize_dynamic

class OptimizedPerception:
    """
    优化的感知模块
    """
    @staticmethod
    def quantize_model(model: nn.Module, dtype=torch.qint8) -> nn.Module:
        """
        动态量化模型
        """
        # 量化线性层和 LSTM
        quantized_model = quantize_dynamic(
            model,
            {nn.Linear, nn.LSTM},
            dtype=dtype
        )
        return quantized_model

    @staticmethod
    def half_precision(model: nn.Module) -> nn.Module:
        """
        转换为半精度
        """
        return model.half()
6.3.2 批处理优化
python
class BatchedPerception:
    """
    支持批处理的感知模块
    """
    def __init__(self, perception_model: MultiModalPerception, max_batch_size: int = 32):
        self.model = perception_model
        self.max_batch_size = max_batch_size
        self.image_buffer = []
        self.audio_buffer = []

    def add_image(self, image: torch.Tensor):
        """添加图像到缓冲区"""
        self.image_buffer.append(image)

        if len(self.image_buffer) >= self.max_batch_size:
            return self.flush_images()
        return None

    def flush_images(self) -> List[PerceptionOutput]:
        """处理缓冲区中的所有图像"""
        if not self.image_buffer:
            return []

        # 批量处理
        batch = torch.stack(self.image_buffer)
        outputs = self.model(images=batch)

        # 清空缓冲区
        self.image_buffer = []

        return outputs
6.3.3 缓存机制
python
from functools import lru_cache
import hashlib

class CachedPerception:
    """
    带缓存的感知模块
    """
    def __init__(self, perception_model: MultiModalPerception, cache_size: int = 1000):
        self.model = perception_model
        self.cache = {}
        self.cache_size = cache_size

    def _compute_hash(self, tensor: torch.Tensor) -> str:
        """计算张量的哈希值"""
        return hashlib.md5(tensor.numpy().tobytes()).hexdigest()

    def encode_image_cached(self, image: torch.Tensor) -> torch.Tensor:
        """带缓存的图像编码"""
        hash_key = self._compute_hash(image)

        if hash_key in self.cache:
            return self.cache[hash_key]

        # 计算特征
        features = self.model.encode_image(image.unsqueeze(0))

        # 缓存管理
        if len(self.cache) >= self.cache_size:
            # 移除最旧的缓存项
            oldest_key = next(iter(self.cache))
            del self.cache[oldest_key]

        self.cache[hash_key] = features
        return features
7. 🚀 实战案例:构建多模态 Agent
7.1 多模态对话 Agent
python
from typing import List, Dict, Any
from dataclasses import dataclass
from enum import Enum

class MessageRole(Enum):
    USER = "user"
    ASSISTANT = "assistant"
    SYSTEM = "system"


@dataclass
class MultiModalMessage:
    """多模态消息"""
    role: MessageRole
    content: str
    images: List[torch.Tensor] = None
    audios: List[torch.Tensor] = None


class MultiModalConversationAgent:
    """
    多模态对话 Agent

    支持图像、音频和文本的混合输入
    """
    def __init__(
        self,
        perception: MultiModalPerception,
        llm: nn.Module,
        tokenizer,
        max_history: int = 10,
    ):
        self.perception = perception
        self.llm = llm
        self.tokenizer = tokenizer
        self.max_history = max_history
        self.conversation_history: List[MultiModalMessage] = []

        # 系统提示词
        self.system_prompt = """You are a helpful multimodal AI assistant.
You can understand and analyze images, audio, and text.
Always provide detailed and accurate responses based on the multimodal inputs."""

    def reset_conversation(self):
        """重置对话历史"""
        self.conversation_history = []

    def add_message(self, message: MultiModalMessage):
        """添加消息到历史"""
        self.conversation_history.append(message)

        # 保持历史长度
        if len(self.conversation_history) > self.max_history:
            self.conversation_history = self.conversation_history[-self.max_history:]

    def _prepare_multimodal_input(
        self,
        text: str,
        images: List[torch.Tensor] = None,
        audios: List[torch.Tensor] = None,
    ) -> Dict[str, torch.Tensor]:
        """准备多模态输入"""
        inputs = {}

        # 处理图像
        if images:
            image_batch = torch.stack(images)
            inputs['images'] = image_batch

        # 处理音频
        if audios:
            # 将音频填充到相同长度
            max_len = max(a.shape[-1] for a in audios)
            padded_audios = []
            for audio in audios:
                if audio.shape[-1] < max_len:
                    padding = torch.zeros(*audio.shape[:-1], max_len - audio.shape[-1])
                    audio = torch.cat([audio, padding], dim=-1)
                padded_audios.append(audio)
            inputs['audios'] = torch.stack(padded_audios)

        # 处理文本
        text_ids = self.tokenizer.encode(text, return_tensors='pt')
        inputs['text_ids'] = text_ids

        return inputs

    def _build_prompt(self) -> str:
        """构建完整提示词"""
        prompt_parts = [self.system_prompt]

        for msg in self.conversation_history:
            role = msg.role.value.upper()
            content = msg.content

            # 添加多模态标记
            if msg.images:
                content = f"[{len(msg.images)} image(s) provided]\n{content}"
            if msg.audios:
                content = f"[{len(msg.audios)} audio(s) provided]\n{content}"

            prompt_parts.append(f"{role}: {content}")

        return "\n\n".join(prompt_parts)

    @torch.no_grad()
    def chat(
        self,
        text: str,
        images: List[torch.Tensor] = None,
        audios: List[torch.Tensor] = None,
        max_new_tokens: int = 512,
        temperature: float = 0.7,
    ) -> str:
        """
        进行多模态对话

        Args:
            text: 用户文本输入
            images: 用户图像输入列表
            audios: 用户音频输入列表
            max_new_tokens: 最大生成 token 数
            temperature: 生成温度

        Returns:
            助手的回复文本
        """
        # 添加用户消息到历史
        user_message = MultiModalMessage(
            role=MessageRole.USER,
            content=text,
            images=images,
            audios=audios,
        )
        self.add_message(user_message)

        # 准备输入
        inputs = self._prepare_multimodal_input(text, images, audios)

        # 感知处理
        perception_output = self.perception(**inputs)

        # 构建 LLM 输入
        prompt = self._build_prompt()
        prompt_ids = self.tokenizer.encode(prompt, return_tensors='pt')

        # 将感知特征与文本 embeddings 融合
        text_embeds = self.llm.get_input_embeddings()(prompt_ids)

        # 在适当位置插入多模态特征
        # (这里简化处理,实际需要更复杂的位置管理)
        if perception_output.features is not None:
            combined_embeds = torch.cat([
                perception_output.features,
                text_embeds
            ], dim=1)
        else:
            combined_embeds = text_embeds

        # 生成回复
        outputs = self.llm.generate(
            inputs_embeds=combined_embeds,
            max_new_tokens=max_new_tokens,
            temperature=temperature,
            do_sample=temperature > 0,
            pad_token_id=self.tokenizer.pad_token_id,
        )

        # 解码
        response = self.tokenizer.decode(outputs[0], skip_special_tokens=True)

        # 提取助手回复
        if "ASSISTANT:" in response:
            response = response.split("ASSISTANT:")[-1].strip()

        # 添加助手消息到历史
        assistant_message = MultiModalMessage(
            role=MessageRole.ASSISTANT,
            content=response,
        )
        self.add_message(assistant_message)

        return response

    def describe_image(self, image: torch.Tensor, detail_level: str = "detailed") -> str:
        """
        描述图像
        """
        prompts = {
            "brief": "Briefly describe this image in one sentence.",
            "detailed": "Describe this image in detail, including objects, colors, actions, and atmosphere.",
            "technical": "Provide a technical analysis of this image, including composition, lighting, and visual elements.",
        }

        prompt = prompts.get(detail_level, prompts["detailed"])
        return self.chat(prompt, images=[image])

    def transcribe_audio(self, audio: torch.Tensor) -> str:
        """
        转录音频
        """
        return self.chat(
            "Please transcribe the speech in this audio.",
            audios=[audio]
        )

    def answer_visual_question(self, image: torch.Tensor, question: str) -> str:
        """
        视觉问答
        """
        return self.chat(question, images=[image])


# 使用示例
def demo_multimodal_agent():
    """
    演示多模态 Agent 的使用
    """
    # 初始化组件(这里使用占位符)
    # perception = MultiModalPerception(...)
    # llm = LlamaForCausalLM.from_pretrained(...)
    # tokenizer = LlamaTokenizer.from_pretrained(...)

    # agent = MultiModalConversationAgent(perception, llm, tokenizer)

    # 示例对话
    print("=== 多模态对话 Agent 演示 ===\n")

    # 图像理解
    # image = load_image("photo.jpg")
    # response = agent.chat("What's happening in this image?", images=[image])
    # print(f"Agent: {response}\n")

    # 音频转录
    # audio = load_audio("speech.wav")
    # transcript = agent.transcribe_audio(audio)
    # print(f"转录结果: {transcript}\n")

    # 多模态融合
    # response = agent.chat(
    #     "Compare what you see in the image with what you hear in the audio.",
    #     images=[image],
    #     audios=[audio]
    # )
    # print(f"Agent: {response}")

    pass


if __name__ == "__main__":
    demo_multimodal_agent()
7.2 视觉 Grounding Agent
python
from dataclasses import dataclass
from typing import List, Tuple

@dataclass
class BoundingBox:
    """边界框"""
    x1: float
    y1: float
    x2: float
    y2: float
    label: str
    confidence: float


class VisualGroundingAgent:
    """
    视觉定位 Agent

    能够根据文本描述定位图像中的对象
    """
    def __init__(
        self,
        vlm: nn.Module,  # 视觉语言模型
        detection_head: nn.Module = None,
    ):
        self.vlm = vlm
        self.detection_head = detection_head

    def ground_text(
        self,
        image: torch.Tensor,
        text: str,
    ) -> List[BoundingBox]:
        """
        根据文本描述定位图像中的区域

        Args:
            image: 输入图像
            text: 描述文本(如 "the red car on the left")

        Returns:
            匹配的边界框列表
        """
        # 构建定位提示词
        prompt = f"""Given the image, locate the region that matches: "{text}"
Output the bounding box coordinates in format: [x1, y1, x2, y2]
where coordinates are normalized to [0, 1]."""

        # VLM 推理
        response = self.vlm.generate(image, prompt)

        # 解析边界框
        boxes = self._parse_boxes(response, text)

        return boxes

    def _parse_boxes(self, response: str, label: str) -> List[BoundingBox]:
        """解析 VLM 输出的边界框"""
        import re

        boxes = []
        # 匹配 [x1, y1, x2, y2] 格式
        pattern = r'\[([\d.]+),\s*([\d.]+),\s*([\d.]+),\s*([\d.]+)\]'
        matches = re.findall(pattern, response)

        for match in matches:
            x1, y1, x2, y2 = map(float, match)
            boxes.append(BoundingBox(
                x1=x1, y1=y1, x2=x2, y2=y2,
                label=label,
                confidence=0.9  # 简化处理
            ))

        return boxes

    def segment_object(
        self,
        image: torch.Tensor,
        text: str,
    ) -> torch.Tensor:
        """
        根据文本描述分割对象

        Returns:
            分割掩码 (H, W)
        """
        # 首先定位
        boxes = self.ground_text(image, text)

        if not boxes:
            return torch.zeros(image.shape[-2:])

        # 使用 SAM 或其他分割模型
        # 这里简化为基于边界框的粗略掩码
        mask = torch.zeros(image.shape[-2:])
        for box in boxes:
            h, w = image.shape[-2:]
            x1, y1 = int(box.x1 * w), int(box.y1 * h)
            x2, y2 = int(box.x2 * w), int(box.y2 * h)
            mask[y1:y2, x1:x2] = 1

        return mask
7.3 文档理解 Agent
python
class DocumentUnderstandingAgent:
    """
    文档理解 Agent

    能够分析包含文字、图表、表格的复杂文档
    """
    def __init__(
        self,
        vlm: nn.Module,
        ocr_engine = None,
        table_detector = None,
    ):
        self.vlm = vlm
        self.ocr_engine = ocr_engine
        self.table_detector = table_detector

    def analyze_document(
        self,
        document_image: torch.Tensor,
        questions: List[str] = None,
    ) -> Dict[str, Any]:
        """
        分析文档图像
        """
        result = {
            'text_content': '',
            'tables': [],
            'charts': [],
            'layout': {},
            'answers': {},
        }

        # 1. 布局分析
        layout_prompt = """Analyze this document image and identify:
1. Document type (report, form, article, etc.)
2. Main sections and their positions
3. Any tables, charts, or figures present
Provide a structured description."""

        layout_description = self.vlm.generate(document_image, layout_prompt)
        result['layout'] = {'description': layout_description}

        # 2. OCR(如果有独立的 OCR 引擎)
        if self.ocr_engine:
            result['text_content'] = self.ocr_engine(document_image)
        else:
            # 使用 VLM 进行 OCR
            ocr_prompt = "Extract all visible text from this document image."
            result['text_content'] = self.vlm.generate(document_image, ocr_prompt)

        # 3. 表格提取
        table_prompt = """If there are any tables in this document, extract them.
Format each table as a list of rows, where each row is a list of cell values.
Use | to separate columns."""

        table_response = self.vlm.generate(document_image, table_prompt)
        result['tables'] = self._parse_tables(table_response)

        # 4. 回答问题
        if questions:
            for question in questions:
                qa_prompt = f"""Based on this document, answer the following question:
Question: {question}
Provide a concise and accurate answer based only on the information visible in the document."""

                answer = self.vlm.generate(document_image, qa_prompt)
                result['answers'][question] = answer

        return result

    def _parse_tables(self, table_text: str) -> List[List[List[str]]]:
        """解析表格文本"""
        tables = []
        current_table = []

        for line in table_text.strip().split('\n'):
            if '|' in line:
                cells = [cell.strip() for cell in line.split('|')]
                cells = [c for c in cells if c]  # 移除空单元格
                if cells:
                    current_table.append(cells)
            elif current_table:
                tables.append(current_table)
                current_table = []

        if current_table:
            tables.append(current_table)

        return tables

    def extract_key_value_pairs(
        self,
        form_image: torch.Tensor,
    ) -> Dict[str, str]:
        """
        从表单中提取键值对
        """
        prompt = """This is a form document. Extract all field labels and their values.
Format as:
field_name: value
...
Only include fields that have visible values."""

        response = self.vlm.generate(form_image, prompt)

        # 解析键值对
        pairs = {}
        for line in response.strip().split('\n'):
            if ':' in line:
                key, value = line.split(':', 1)
                pairs[key.strip()] = value.strip()

        return pairs
8. 🔮 未来展望与挑战
8.1 技术趋势
┌─────────────────────────────────────────────────────────────────────┐
│                     多模态感知的未来趋势                             │
├─────────────────────────────────────────────────────────────────────┤
│                                                                     │
│  1. 原生多模态 (Native Multimodal)                                  │
│  ┌─────────────────────────────────────────────────────────────┐   │
│  │  • 从预训练阶段就联合处理多种模态                             │   │
│  │  • 代表:GPT-4o, Gemini 1.5                                  │   │
│  │  • 优势:更自然的模态理解和生成                               │   │
│  └─────────────────────────────────────────────────────────────┘   │
│                                                                     │
│  2. 任意到任意 (Any-to-Any)                                         │
│  ┌─────────────────────────────────────────────────────────────┐   │
│  │  • 支持任意模态输入,任意模态输出                             │   │
│  │  • 代表:NExT-GPT, CoDi-2                                    │   │
│  │  • 应用:多模态创作、跨模态翻译                               │   │
│  └─────────────────────────────────────────────────────────────┘   │
│                                                                     │
│  3. 高分辨率理解 (High-Resolution Understanding)                    │
│  ┌─────────────────────────────────────────────────────────────┐   │
│  │  • 处理更高分辨率的图像和更长的视频                           │   │
│  │  • 代表:LLaVA-NeXT, InternLM-XComposer2-4KHD                │   │
│  │  • 挑战:计算效率、内存管理                                   │   │
│  └─────────────────────────────────────────────────────────────┘   │
│                                                                     │
│  4. 实时多模态 (Real-time Multimodal)                               │
│  ┌─────────────────────────────────────────────────────────────┐   │
│  │  • 低延迟的流式处理                                           │   │
│  │  • 应用:实时翻译、AR/VR、机器人                              │   │
│  │  • 关键:模型轻量化、边缘部署                                 │   │
│  └─────────────────────────────────────────────────────────────┘   │
│                                                                     │
│  5. 具身多模态 (Embodied Multimodal)                                │
│  ┌─────────────────────────────────────────────────────────────┐   │
│  │  • 与物理世界交互的 Agent                                     │   │
│  │  • 模态:视觉、触觉、本体感知、力反馈                         │   │
│  │  • 应用:机器人操作、自动驾驶                                 │   │
│  └─────────────────────────────────────────────────────────────┘   │
│                                                                     │
└─────────────────────────────────────────────────────────────────────┘
8.2 面临的挑战
💡 思考:多模态感知技术面临哪些关键挑战?
🤔 解答:
-
模态对齐问题
- 不同模态的语义空间差异
- 时序对齐(如音视频同步)
- 跨模态的一致性保证
-
计算效率
- 多模态模型参数量巨大
- 实时处理的延迟要求
- 边缘设备的资源限制
-
数据质量
- 高质量多模态配对数据稀缺
- 数据标注成本高
- 数据偏见和噪声
-
评估困难
- 缺乏统一的多模态评估基准
- 主观质量难以量化
- 跨模态能力的综合评估
-
安全与伦理
- 深度伪造(Deepfake)检测
- 隐私保护
- 内容审核的复杂性
8.3 研究方向展望
python
# 未来研究方向的概念性代码

class FutureMultimodalAgent:
    """
    未来多模态 Agent 的概念设计
    """
    def __init__(self):
        # 统一的多模态表示空间
        self.unified_representation = UnifiedModalitySpace()

        # 动态模态选择
        self.modality_selector = DynamicModalitySelector()

        # 持续学习模块
        self.continual_learner = ContinualLearningModule()

        # 安全检查模块
        self.safety_checker = MultimodalSafetyChecker()

    def perceive(self, inputs: Dict[str, Any]) -> UnifiedRepresentation:
        """
        统一感知接口
        支持任意模态组合的输入
        """
        # 自动选择最优的处理策略
        strategy = self.modality_selector.select(inputs)

        # 处理并融合
        representation = self.unified_representation.encode(inputs, strategy)

        # 安全检查
        if not self.safety_checker.is_safe(representation):
            raise SafetyViolationError("Unsafe content detected")

        return representation

    def generate(
        self,
        prompt: str,
        target_modalities: List[str],
    ) -> Dict[str, Any]:
        """
        多模态生成
        支持任意模态组合的输出
        """
        # 理解生成意图
        intent = self.understand_intent(prompt)

        # 按目标模态生成
        outputs = {}
        for modality in target_modalities:
            outputs[modality] = self.generate_modality(intent, modality)

        return outputs

    def learn_from_interaction(self, feedback: Dict[str, Any]):
        """
        从交互中持续学习
        """
        self.continual_learner.update(feedback)
9. 📚 参考文献
核心论文
-
BLIP-2: Bootstrapping Language-Image Pre-training with Frozen Image Encoders and Large Language Models
- Li, Junnan, et al. (2023)
- arXiv: https://arxiv.org/abs/2301.12597
- GitHub: https://github.com/salesforce/LAVIS
-
Flamingo: a Visual Language Model for Few-Shot Learning
- Alayrac, Jean-Baptiste, et al. (2022)
- arXiv: https://arxiv.org/abs/2204.14198
- DeepMind
-
Robust Speech Recognition via Large-Scale Weak Supervision (Whisper)
- Radford, Alec, et al. (2022)
- arXiv: https://arxiv.org/abs/2212.04356
- GitHub: https://github.com/openai/whisper
-
Learning Transferable Visual Models From Natural Language Supervision (CLIP)
- Radford, Alec, et al. (2021)
- arXiv: https://arxiv.org/abs/2103.00020
- GitHub: https://github.com/openai/CLIP
-
Visual Instruction Tuning (LLaVA)
- Liu, Haotian, et al. (2023)
- arXiv: https://arxiv.org/abs/2304.08485
- GitHub: https://github.com/haotian-liu/LLaVA
-
An Image is Worth 16x16 Words: Transformers for Image Recognition at Scale (ViT)
- Dosovitskiy, Alexey, et al. (2020)
- arXiv: https://arxiv.org/abs/2010.11929
-
Perceiver: General Perception with Iterative Attention
- Jaegle, Andrew, et al. (2021)
- arXiv: https://arxiv.org/abs/2103.03206
-
CogVLM: Visual Expert for Pretrained Language Models
- Wang, Weihan, et al. (2023)
- arXiv: https://arxiv.org/abs/2311.03079
- GitHub: https://github.com/THUDM/CogVLM
-
Qwen-VL: A Versatile Vision-Language Model for Understanding, Localization, Text Reading, and Beyond
- Bai, Jinze, et al. (2023)
- arXiv: https://arxiv.org/abs/2308.12966
- GitHub: https://github.com/QwenLM/Qwen-VL
-
InternLM-XComposer2: Mastering Free-form Text-Image Composition and Comprehension
- Dong, Xiaoyi, et al. (2024)
- arXiv: https://arxiv.org/abs/2401.16420
- GitHub: https://github.com/InternLM/InternLM-XComposer
开源项目
| 项目 | 描述 | 链接 |
|---|---|---|
| LAVIS | Salesforce 多模态库 | https://github.com/salesforce/LAVIS |
| LLaVA | 视觉指令微调 | https://github.com/haotian-liu/LLaVA |
| OpenFlamingo | Flamingo 开源复现 | https://github.com/mlfoundations/open_flamingo |
| Whisper | OpenAI 语音识别 | https://github.com/openai/whisper |
| CLIP | 视觉-语言对比学习 | https://github.com/openai/CLIP |
| InternVL | 大规模视觉语言模型 | https://github.com/OpenGVLab/InternVL |
| MiniGPT-4 | 小型多模态模型 | https://github.com/Vision-CAIR/MiniGPT-4 |
| mPLUG-Owl | 模块化多模态 | https://github.com/X-PLUG/mPLUG-Owl |
| Qwen-VL | 通义千问视觉版 | https://github.com/QwenLM/Qwen-VL |
| CogVLM | 视觉专家模型 | https://github.com/THUDM/CogVLM |
推荐学习资源
-
课程
- Stanford CS231n: Convolutional Neural Networks for Visual Recognition
- CMU 11-777: Multimodal Machine Learning
-
教程
- Hugging Face Transformers 官方文档
- PyTorch 官方视觉教程
-
博客
- Lilian Weng's Blog (OpenAI)
- Jay Alammar's Visualizations
📝 总结
本文深入探讨了 Agent 感知模块的核心技术,包括:
-
视觉感知:从 CLIP 到 BLIP-2,从 Flamingo 到 LLaVA,视觉编码器和视觉语言模型不断演进,使 Agent 具备了强大的视觉理解能力。
-
音频感知:Whisper 代表了语音识别的新范式,支持多语言、多任务,为 Agent 提供了可靠的听觉能力。
-
多模态融合:Q-Former、交叉注意力等技术实现了不同模态信息的有效整合,是构建多模态 Agent 的关键。
-
工程实践:通过完整的代码示例,展示了如何构建实用的多模态感知系统。
多模态感知是 Agent 理解真实世界的基础。随着技术的发展,我们期待看到更加智能、更加自然的多模态 Agent 出现,为人类提供更好的服务。