
🎬 那我掉的头发算什么 :个人主页
🔥 个人专栏 : 《javaSE》《数据结构》《数据库》《javaEE》
⛺️待到苦尽甘来日

文章目录
- 动态SQL
-
- <if>标签
- [< trim >标签](#< trim >标签)
- [< where >标签](#< where >标签)
- [< set>标签](#< set>标签)
- [< foreach>标签](#< foreach>标签)
- [< include>标签](#< include>标签)
- 实战演练:留言板(连接数据库版)
动态SQL
标签
在注册用户时,有些属性是必填的,有些是不必须的,一般不强制要求的都有自己的默认值,这个时候:
如果传入的是空值,我们原先设置的默认值就会无意义,并且对于有些属性来说,null值本身就无意义。
这个时候就可以使用动态标签了,让非必填字段传入默认值而不是null。
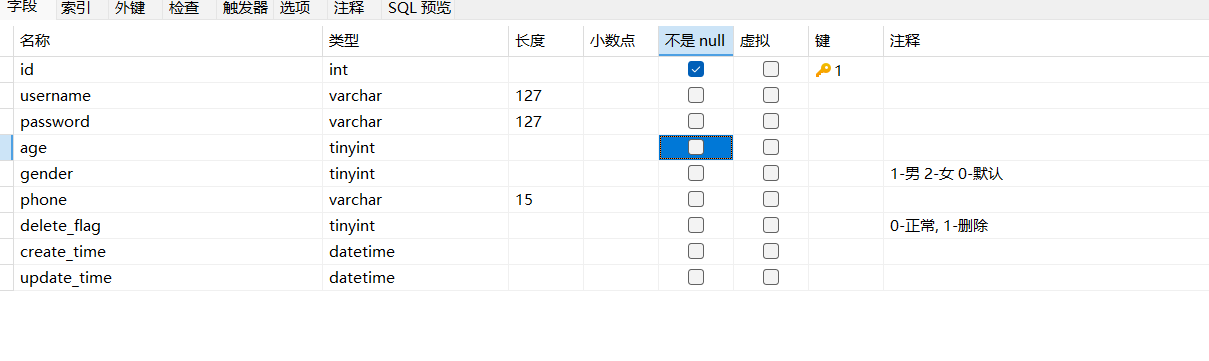
咱们为了更好的演示,先来到数据库这里把所有的属性设置成可以为空。
java
Integer insertUserByIf(UserInfo userInfo);
java
<insert id="insertUserByIf">
        insert into user_info
            (username,password,age
        <if test="gender!=null">
            ,gender
        </if>
        )
        values
            (#{username},#{password},#{age}
        <if test="gender!=null">
        ,#{gender}
        </if>
        )
    </insert>
java
@Test
void insertUserByIf() {
UserInfo userInfo = new UserInfo();
userInfo.setUsername("username5");
userInfo.setPassword("password5");
userInfo.setAge(18);
userInfo.setGender(1);
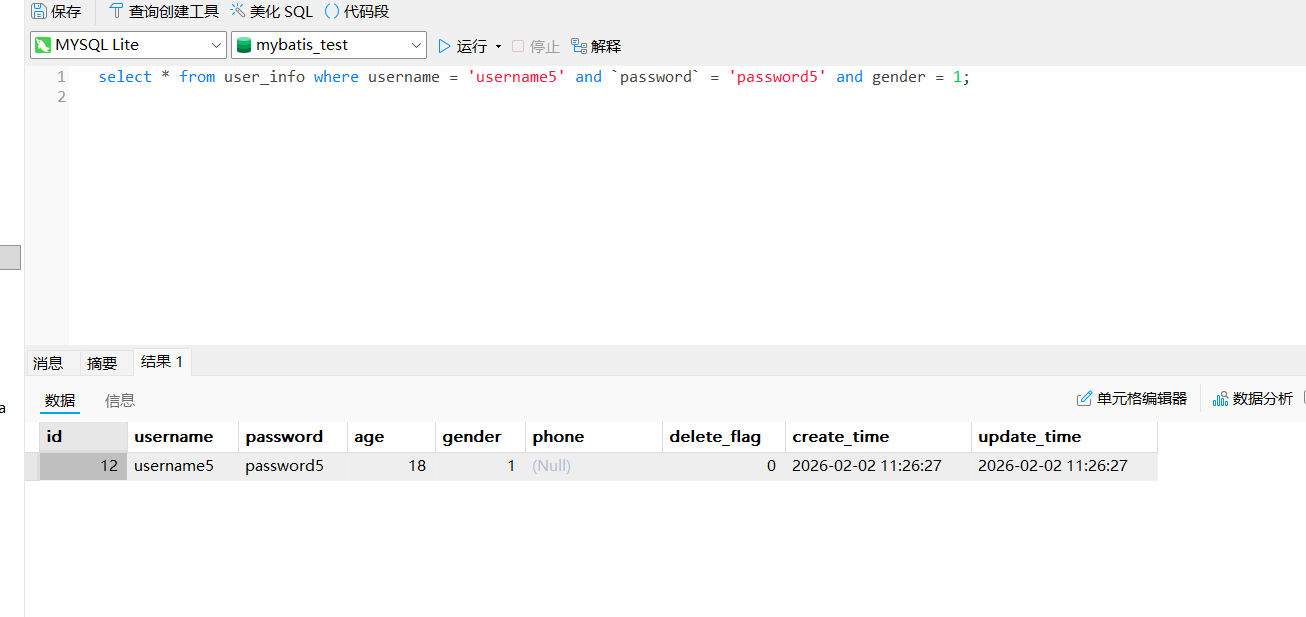
userInfoMapperXml.insertUserByIf(userInfo);
}
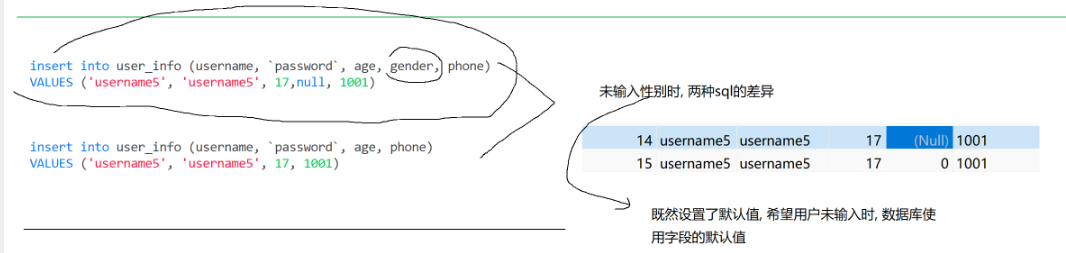
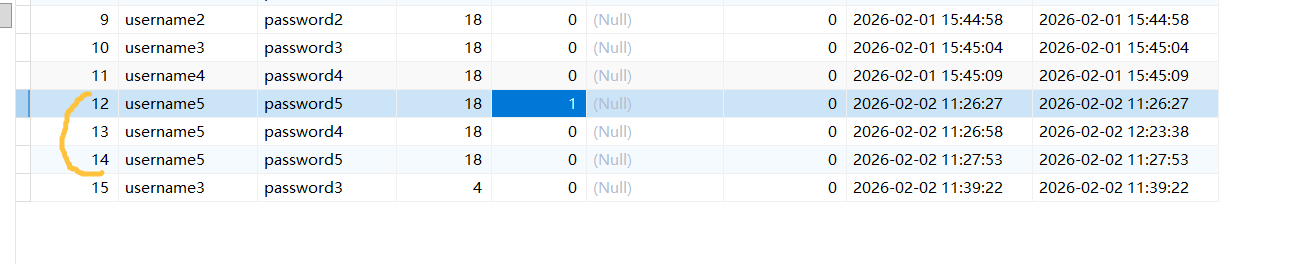
当传递了gender的值之后,数据库中属性会被设置成1,不传参则为0。
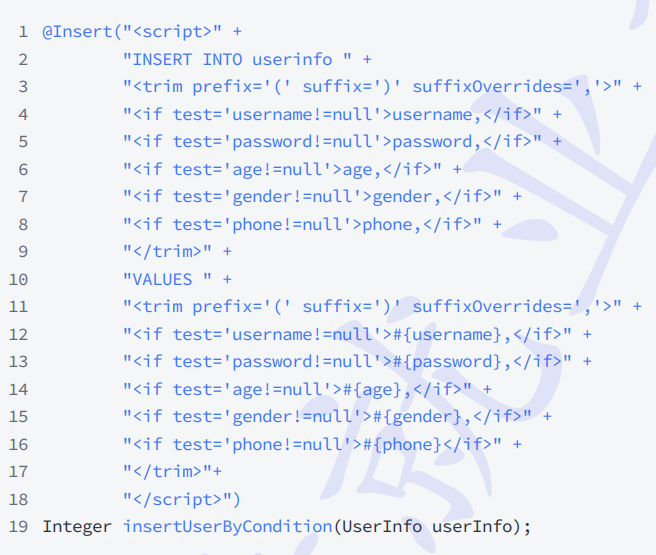
除了使用xml之外,我们也可以使用注解的方法实现动态SQL,只不过代码会很麻烦,大家看了就会明白的:
java
@Insert("<script>" +
            "INSERT INTO user_info (username,`password`,age" +
            "<if test='gender!=null'>,gender</if>" + ")" +
            "VALUES(#{username},#{password},#{age}" +
            "<if test='gender!=null'>,#{gender}</if>" +")" +
            "</script>")
    Integer insertUserByCondition(UserInfo userInfo);
其实就是xml的代码加上 < script > 标签,而且还是用字符串拼接的,写的时候会很麻烦。。。
所以SQL注入这一块的代码还是xml的方式实现更加便捷。
< trim >标签
如果,我们传入的所有属性都是非必需属性的话。。。。。
java
<insert id="insertUserByIf2">
        insert into user_info
        (
        <if test="username!=null">
            username
        </if>
        <if test="password!=null">
            ,password
        </if>
        <if test="age!=null">
            ,age
        </if>
        <if test="gender!=null">
            ,gender
        </if>
        )
        values
        (
        <if test="username!=null">
            #{username}
        </if>
        <if test="password!=null">
            ,#{password}
        </if>
        <if test="age!=null">
            ,#{age}
        </if>
        <if test="gender!=null">
            ,#{gender}
        </if>
        )
    </insert>
那就是上面的代码这种情况了。
这个代码看上去确实没啥问题,但是,如果传入的username属性为null的话,此时sql语句会变成:
java
@Test
    void insertUserByIf2() {
        UserInfo userInfo = new UserInfo();
//        userInfo.setUsername("username6");
        userInfo.setPassword("password6");
        userInfo.setAge(18);
        userInfo.setGender(1);
        userInfoMapperXml.insertUserByIf2(userInfo);
    }
这个输出格式确实有点丑哈,咱们可以看到,这里多出了俩",",当第一个属性被去除,后面的逗号就多余了。这时候聪明的你肯定会说,那把逗号都放到后面不就可以了吗?这样的话username不传参确实没问题,但是最后一个属性不传参也会出现","遗留问题。。
这个时候就可以使用《trim》标签了!
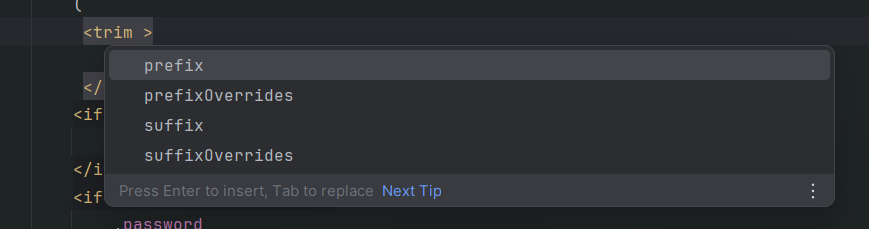
prefix:表示整个语句块,以 prefix 的值作为前缀
suffix:表示整个语句块,以 suffix 的值作为后缀
prefixOverrides:表示整个语句块要去除掉的前缀
suffixOverrides:表示整个语句块要去除掉的后缀
java
<insert id="insertUserByIf2">
        insert into user_info
        (
         <trim prefixOverrides=",">
             <if test="username!=null">
                 username
             </if>
             <if test="password!=null">
                 ,password
             </if>
             <if test="age!=null">
                 ,age
             </if>
             <if test="gender!=null">
                 ,gender
             </if>
             )
             values
             (
             <if test="username!=null">
                 #{username}
             </if>
             <if test="password!=null">
                 ,#{password}
             </if>
             <if test="age!=null">
                 ,#{age}
             </if>
             <if test="gender!=null">
                 ,#{gender}
             </if>
         </trim>

        )
    </insert>
把原来的代码放到标签里面,这时候就会自动识别多余的","并且删除啦!
注解的方式就不展示了大概是这样:
这样写不仅麻烦,而且字符串写错了是不会报错的哦😁
< where >标签
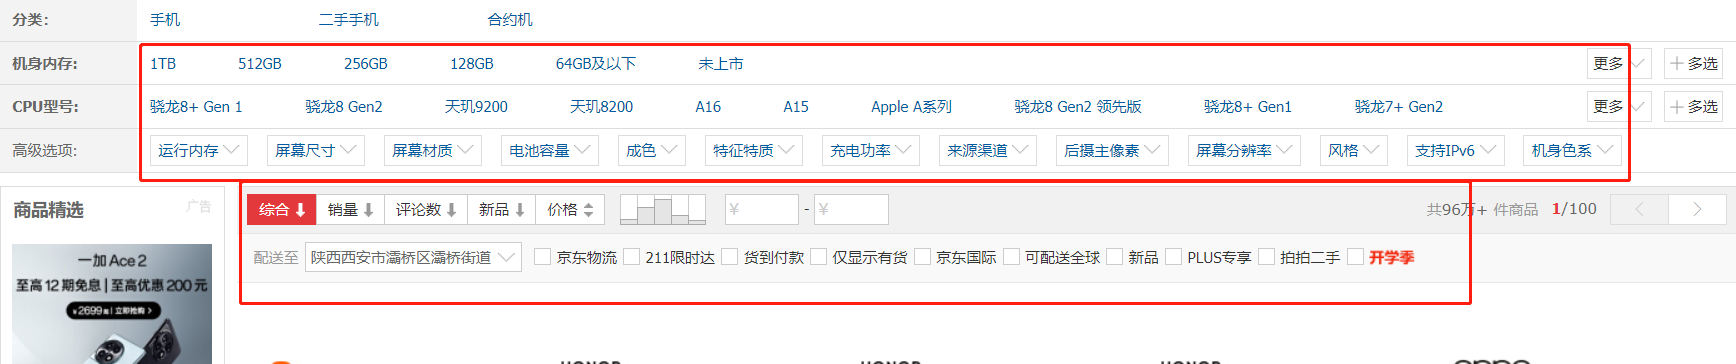
像京东的这种分类标签该如何实现呢?
当用户选了这个分类相当于where语句中就加上了这个筛选条件,不选这个分类就相当于去除了,如果啥都不选就是展示所有商品。
就比如咱们这个代码,查询条件也是循序渐进的。
java
<select id="selectByIf" resultType="com.hbu.springmybatisdemo.model.UserInfo">
        select * from user_info
        where
        <if test="username!=null">
            username = #{username}
        </if>
        <if test="password!=null">
            and `password` = 'password5'
        </if>
        <if test="username!=null">
            and gender = 1
        </if>
    </select>
这个代码相信大家一眼就能看出破绽,第一个参数不传,and会多余出来。没错,这个时候使用《trim》就可以解决了。
但是,如果是一个参数都不传的场景下,此时多出一个"where"怎么办呢???
这个时候我们可以使用< where>标签!
java
<select id="selectByIf" resultType="com.hbu.springmybatisdemo.model.UserInfo">
        select * from user_info
        <where>
            <if test="username!=null">
                username = #{username}
            </if>
            <if test="password!=null">
                and `password` = 'password5'
            </if>
            <if test="username!=null">
                and gender = 1
            </if>
        </where>>
    </select>
< where> 只会在子元素有内容的情况下才插⼊where⼦句,⽽且会自动去除子句的开头的AND或OR或","
也就是说它还包含了< trim>标签的功能!
< set>标签
set关键字是更新操作特有的,至于应用场景,我就直接上代码吧:
java
<update id="updateByIf">
        update user_info
        <set>
            <if test="username!=null">
                username = #{username},
            </if>
            <if test="password!=null">
                password = #{password},
            </if>
            <if test="age!=null">
                age = #{age}
            </if>
        </set>
        where id = #{id}

    </update>
需要注意的是,这里我们的where语句不可以用where标签,因为这是一个必传的字段!
假如忘记传where,这里就会把所有的数据都修改!造成严重的后果。

改完之后数据库中也确实体现出来了。
< foreach>标签

当涉及到集合的传参时,我们没法直接把数据传过去,这个时候就需要借助< foreach>标签了。
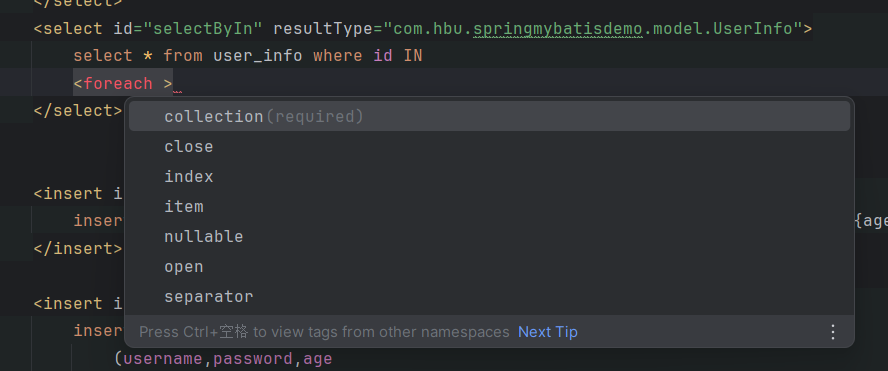
collection:绑定方法参数中的集合,如 List、Set、Map 或数组对象
item:遍历时的每一个对象
open:语句块开头的字符串
close:语句块结束的字符串
separator:每次遍历之间间隔的字符串
java
<select id="selectByIn" resultType="com.hbu.springmybatisdemo.model.UserInfo">
        select * from user_info where id IN
        <foreach collection="ids" open="(" close=")" separator="," item="id">
            #{id}
        </foreach>
    </select>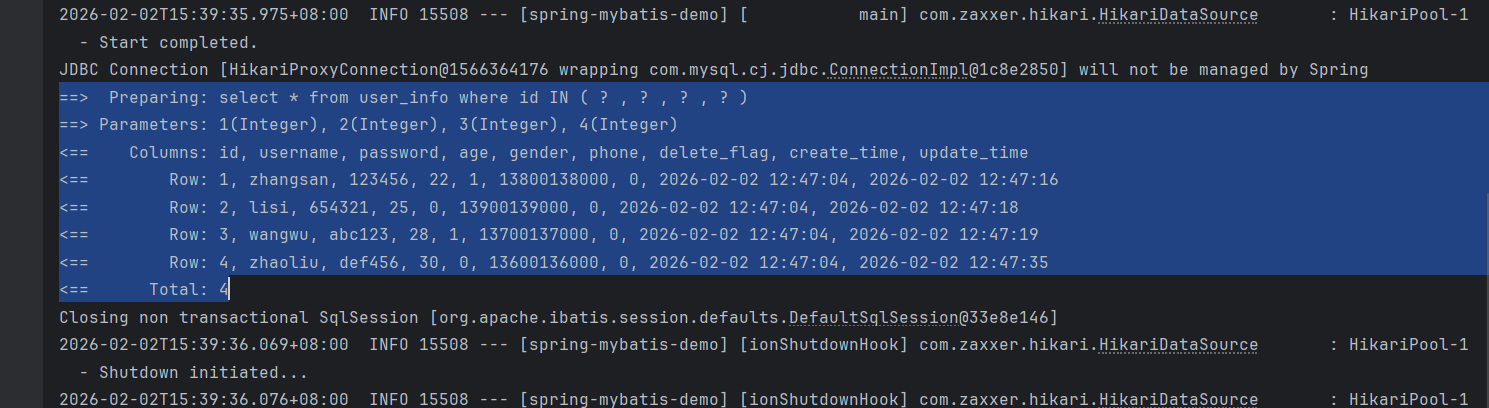
第二个删除的代码也很简单了:
java
<delete id="deleteByIn">
        delete from user_info where
        <foreach collection="ids" item="id" separator="or">
            id = #{id}
        </foreach>
    </delete>
< include>标签
问题分析:在xml中配置的SQL,很多时候代码会存在重复的片段,也就是存在一些冗余的代码。我们可以对代码片段进行抽取,通过< sql>标签封装起来,然后通过< include>标签进行引用。
java
<sql id="selectAll">
        select * from user_info
    </sql>
    <select id="selectAll" resultType="com.hbu.springmybatisdemo.model.UserInfo" resultMap="selectMap">
        <include refid="selectAll"> </include>
    </select>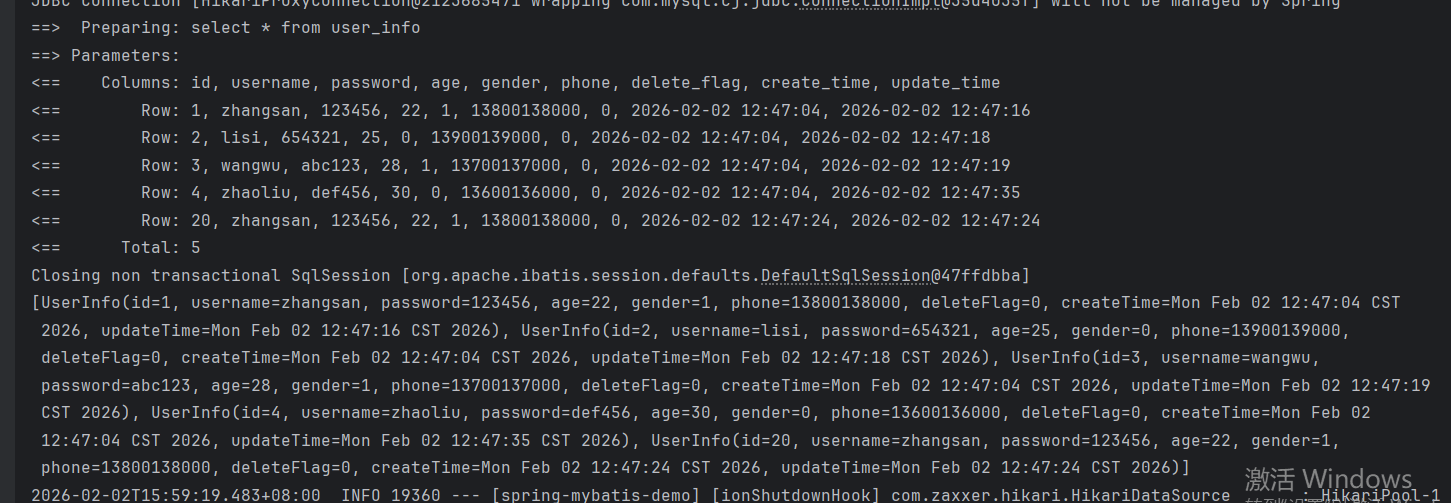
java
<select id="selectAllById" resultType="com.hbu.springmybatisdemo.model.UserInfo">
         <include refid="selectAll"> </include> where id = ${id}
    </select>
注意,我们说的是代码片段,零散的代码块也是可以封装起来的哦!
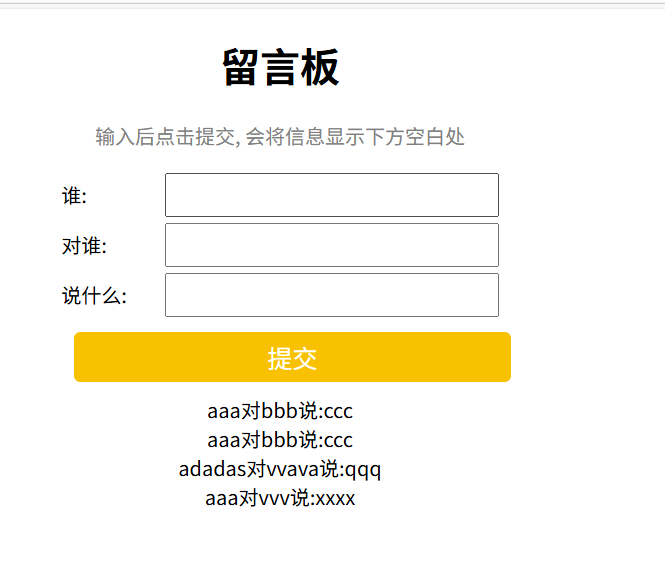
实战演练:留言板(连接数据库版)
咱们在刚开始做留言板小项目的时候曾经遇到一个问题:
发布过的留言没法保存,只能使用一个集合来存储在内存中,只要程序一重启,发布过的留言也没了。
但是,咱们学了Mybatis就可以与数据库连接,把这些消息存储在数据库中,实现持久化保存信息了!
model层
java
package com.bite.spring.demo.model;

import lombok.Data;

@Data
public class MessageInfo {
    private String from;
    private String to;
    private String message;
}
存储留言的属性
Controller层
负责前后端交互
java
package com.bite.spring.demo.Controller;

import com.bite.spring.demo.model.MessageInfo;
import com.bite.spring.demo.service.MessageService;
import org.springframework.beans.factory.annotation.Autowired;
import org.springframework.util.StringUtils;
import org.springframework.web.bind.annotation.*;

import java.util.ArrayList;
import java.util.List;

@RestController
@RequestMapping("/message")
public class MessageController {

    @Autowired
    private MessageService messageService;

    @PostMapping(value = "/publish")
//    @PostMapping(value = "/publish", produces = "application/json")
    public String publish(@RequestBody MessageInfo messageInfo){
        System.out.println("前端传递的参数:" + messageInfo.getFrom() + "," + messageInfo.getTo() + "," + messageInfo.getMessage());
        if (!StringUtils.hasLength(messageInfo.getFrom())
                || !StringUtils.hasLength(messageInfo.getTo())
                || !StringUtils.hasLength(messageInfo.getMessage())) {
            return "{\"ok\": 0}";
        }
        //存储留言
        messageService.insertInfo(messageInfo);
//        messageInfoList.add(messageInfo);
        return "{\"ok\": 1}";
    }

    @GetMapping("/getList")
    public List<MessageInfo> getList(){
        List<MessageInfo> messageInfoList = messageService.getList();
        return messageInfoList;
    }

}
Service层
java
package com.bite.spring.demo.service;

import com.bite.spring.demo.mapper.MessageMapper;
import com.bite.spring.demo.model.MessageInfo;
import org.springframework.beans.factory.annotation.Autowired;
import org.springframework.stereotype.Service;

import java.util.List;

@Service
public class MessageService {
    @Autowired
    private MessageMapper messageMapper;

    public List<MessageInfo> getList(){
        return messageMapper.selectAll();
    }

    public void insertInfo(MessageInfo messageInfo) {
        System.out.println("前端传递的参数:" + messageInfo.getFrom() + "," + messageInfo.getTo() + "," + messageInfo.getMessage());
        messageMapper.insertInfo(messageInfo);
    }
}
Mapper层
封装数据库操作接口
java
package com.bite.spring.demo.mapper;

import com.bite.spring.demo.model.MessageInfo;
import org.apache.ibatis.annotations.Insert;
import org.apache.ibatis.annotations.Mapper;
import org.apache.ibatis.annotations.Select;

import java.util.List;

@Mapper
public interface MessageMapper {

    @Select("select * from message_info")
    List<MessageInfo> selectAll();

    @Insert("insert into message_info (`from`,`to`,message ) values (#{from},#{to},#{message}) ")
    Integer insertInfo(MessageInfo messageInfo);
}
前端代码
java
<!DOCTYPE html>
<html lang="en">

<head>
    <meta charset="UTF-8">
    <meta name="viewport" content="width=device-width, initial-scale=1.0">
    <title>留言板</title>
    <style>
        .container {
            width: 350px;
            height: 300px;
            margin: 0 auto;
            /* border: 1px black solid; */
            text-align: center;
        }

        .grey {
            color: grey;
        }

        .container .row {
            width: 350px;
            height: 40px;

            display: flex;
            justify-content: space-between;
            align-items: center;
        }

        .container .row input {
            width: 260px;
            height: 30px;
        }

        #submit {
            width: 350px;
            height: 40px;
            background-color: #f8c203;
            color: white;
            border: none;
            margin: 10px;
            border-radius: 5px;
            font-size: 20px;
        }
    </style>
</head>

<body>
<div class="container">
    <h1>留言板</h1>
    <p class="grey">输入后点击提交, 会将信息显示下方空白处</p>
    <div class="row">
        <span>谁:</span> <input type="text" name="" id="from">
    </div>
    <div class="row">
        <span>对谁:</span> <input type="text" name="" id="to">
    </div>
    <div class="row">
        <span>说什么:</span> <input type="text" name="" id="say">
    </div>
    <input type="button" value="提交" id="submit" onclick="submit()">
    <!-- <div>A 对 B 说: hello</div> -->
</div>

<script src="jquery-3.7.1.min.js"></script>
<script>
    load();

    function load() {
        $.ajax({
            type: "get",
            url: "/message/getList",
            success: function (messages) {
                if (messages != null && messages.length > 0) {
                    var finalHtml = "";
                    for (var m of messages) {
                        finalHtml += "<div>" + m.from + "对" + m.to + "说:" + m.message + "</div>";
                    }
                    $(".container").append(finalHtml);
                }

            }
        });
    }

    function submit() {
        //1. 获取留言的内容
        var from = $('#from').val();
        var to = $('#to').val();
        var say = $('#say').val();
        if (from == '' || to == '' || say == '') {
            return;
        }
        var data = {
            from: from,
            to: to,
            message: say
        };

        $.ajax({
            type: "post",
            url: "/message/publish",
            contentType: "application/json",
            data: JSON.stringify(data),
            success: function (result) {

                var jsonObj = JSON.parse(result);

                if (jsonObj.ok == 1) {
                    //成功
                    //2. 构造节点
                    var divE = "<div>" + from + "对" + to + "说:" + say + "</div>";
                    //3. 把节点添加到页面上
                    $(".container").append(divE);

                    //4. 清空输入框的值
                    $('#from').val("");
                    $('#to').val("");
                    $('#say').val("");
                } else {
                    //失败
                    alert("留言发布失败");
                }
            }

        });


    }

</script>
</body>

</html>
配置信息
java
spring:
  application:
    name: springboot-demo
  datasource:
    url: jdbc:mysql://127.0.0.1:3306/mybatis_test?characterEncoding=utf8&useSSL=false
    username: root
    password: hjk050723
    driver-class-name: com.mysql.cj.jdbc.Driver
mybatis:
  configuration: # ???? MyBatis??
    log-impl: org.apache.ibatis.logging.stdout.StdOutImpl
    map-underscore-to-camel-case: true #????????
项目演示
刚进入网页,会直接显示getList接口的查询结果,把之前所有的留言都加载出来,并且刷新之后留言不会消失。
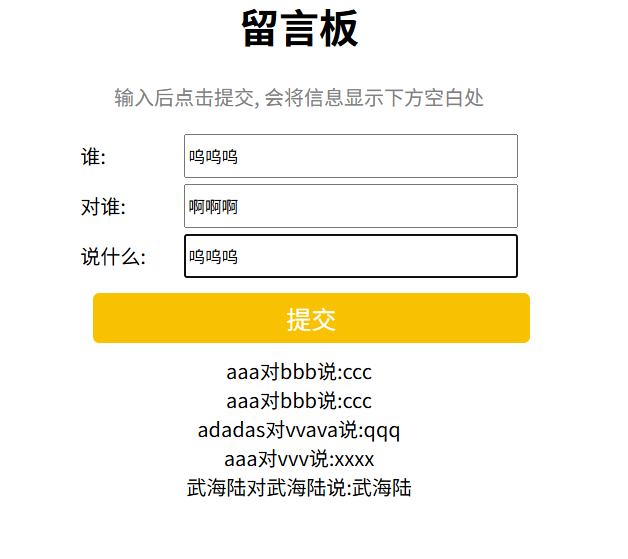
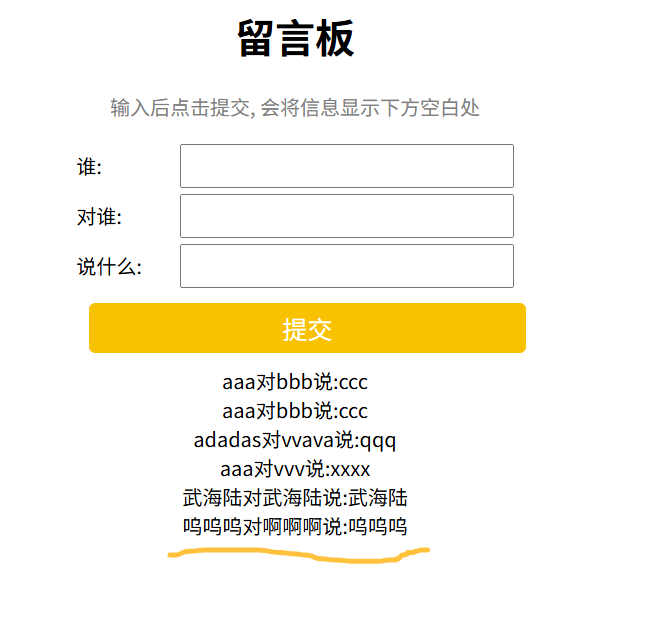
输入数据之后,添加的一条留言确实添加成功了。
以上就是本篇博客全部内容!