文章目录
-
- 1、preface
- 2、V4L2框架
- 3、UVC设备驱动
- 4、基于MIPI-CSI-2设备驱动
- 5、V4L2基础源码分析
-
- 1)源码目录
- 2)数据结构
- 3)源码分析
-
- [1. V4L2 core初始化](#1. V4L2 core初始化)
- 2、V4L2设备驱动程序注册流程
- 3、ioctl调用流程
- 4、buffer管理内核实现
- [7、 V4L2-Subdev子系统](#7、 V4L2-Subdev子系统)
- 8、厂商改进的V4L2
- 9、v4l2-util调试工具
1、preface
1、术语
v4l2 : Video for Linux two, 是V4L1的改进版

2、V4L2属于哪种类型的驱动?与ALSA类似,是用户空间应用程序和设备驱动的中间层,属于字符设备驱动

3、现代V4L2框架支持多种广泛的设备(不单单是摄像头设备),可以有以下几种接口
1)video capture interface, 视频采集-即摄像头
2) video output interface,视频输出-将图像编码为模拟视频信号
3) video overlay interface, 将采集的视频数据直接传输到现实设备,不需要cpu参与

4、对于视频采集,V4L2支持三种方式来采集图像:
1)内存映射方式(mmap),内存映射的方式采集速度较快,一般用于连续视频数据的采集,实际工作中的应用概率更高;
2)直接读取方式(read),直接读取的方式相对速度慢一些,所以常用于静态图片数据的采集;
3)用户指针。用户指针使用较少;
2、V4L2框架
1)总体框架
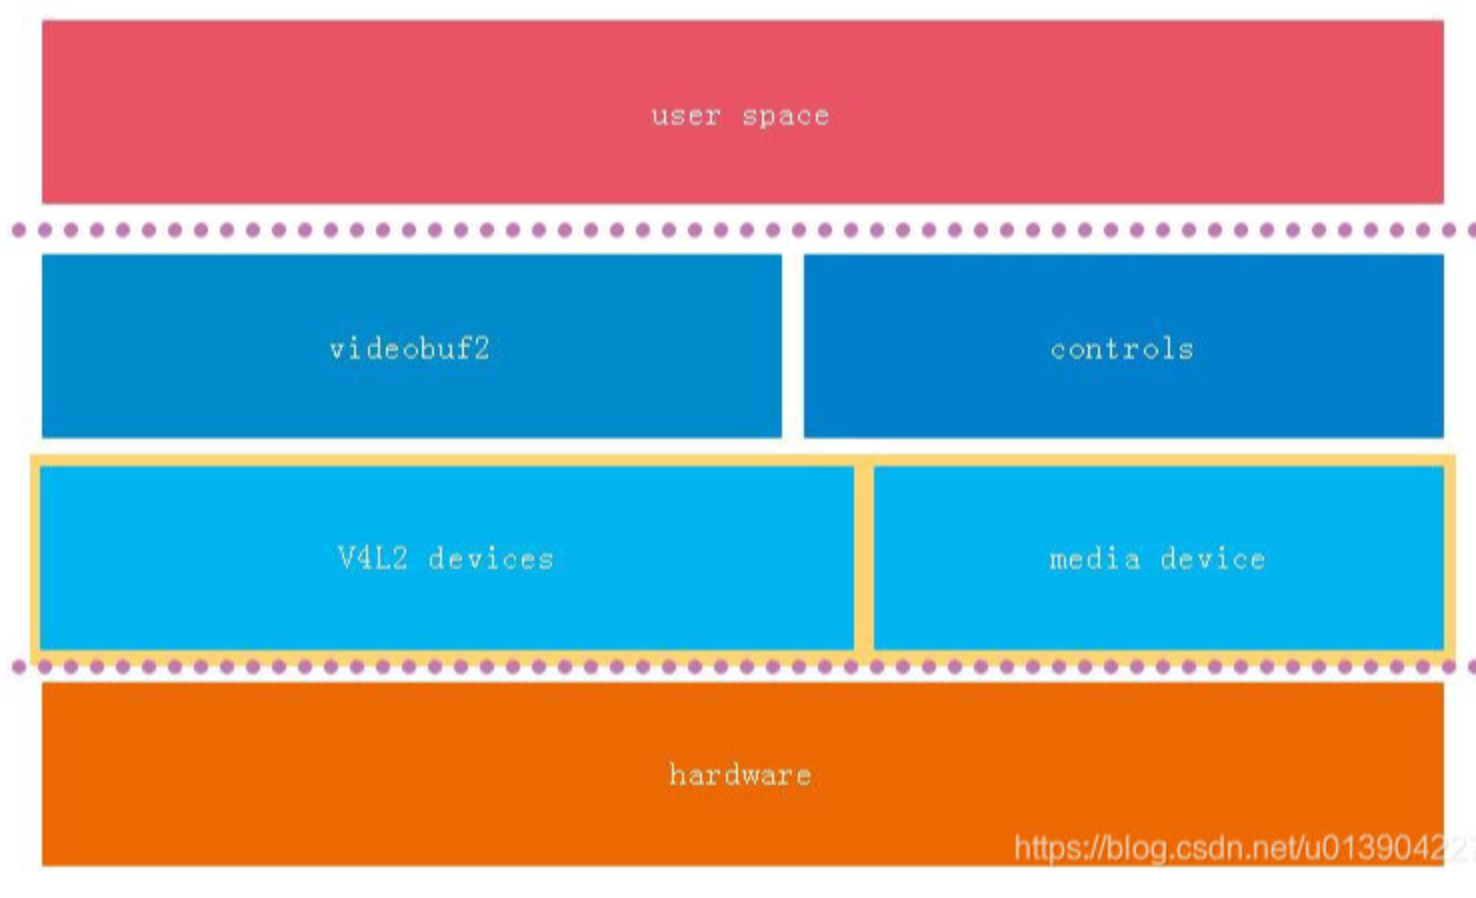
1、与ALSA套路是一样的,V4L2实现了驱动框架(不变部分),设备驱动则实现变化的部分;
2、videobuf2这一块是重点,也是难点;
3、总的来说V4L2作为一个内核库,向上提供稳定接口,向下提供通用接口给设备驱动使用;
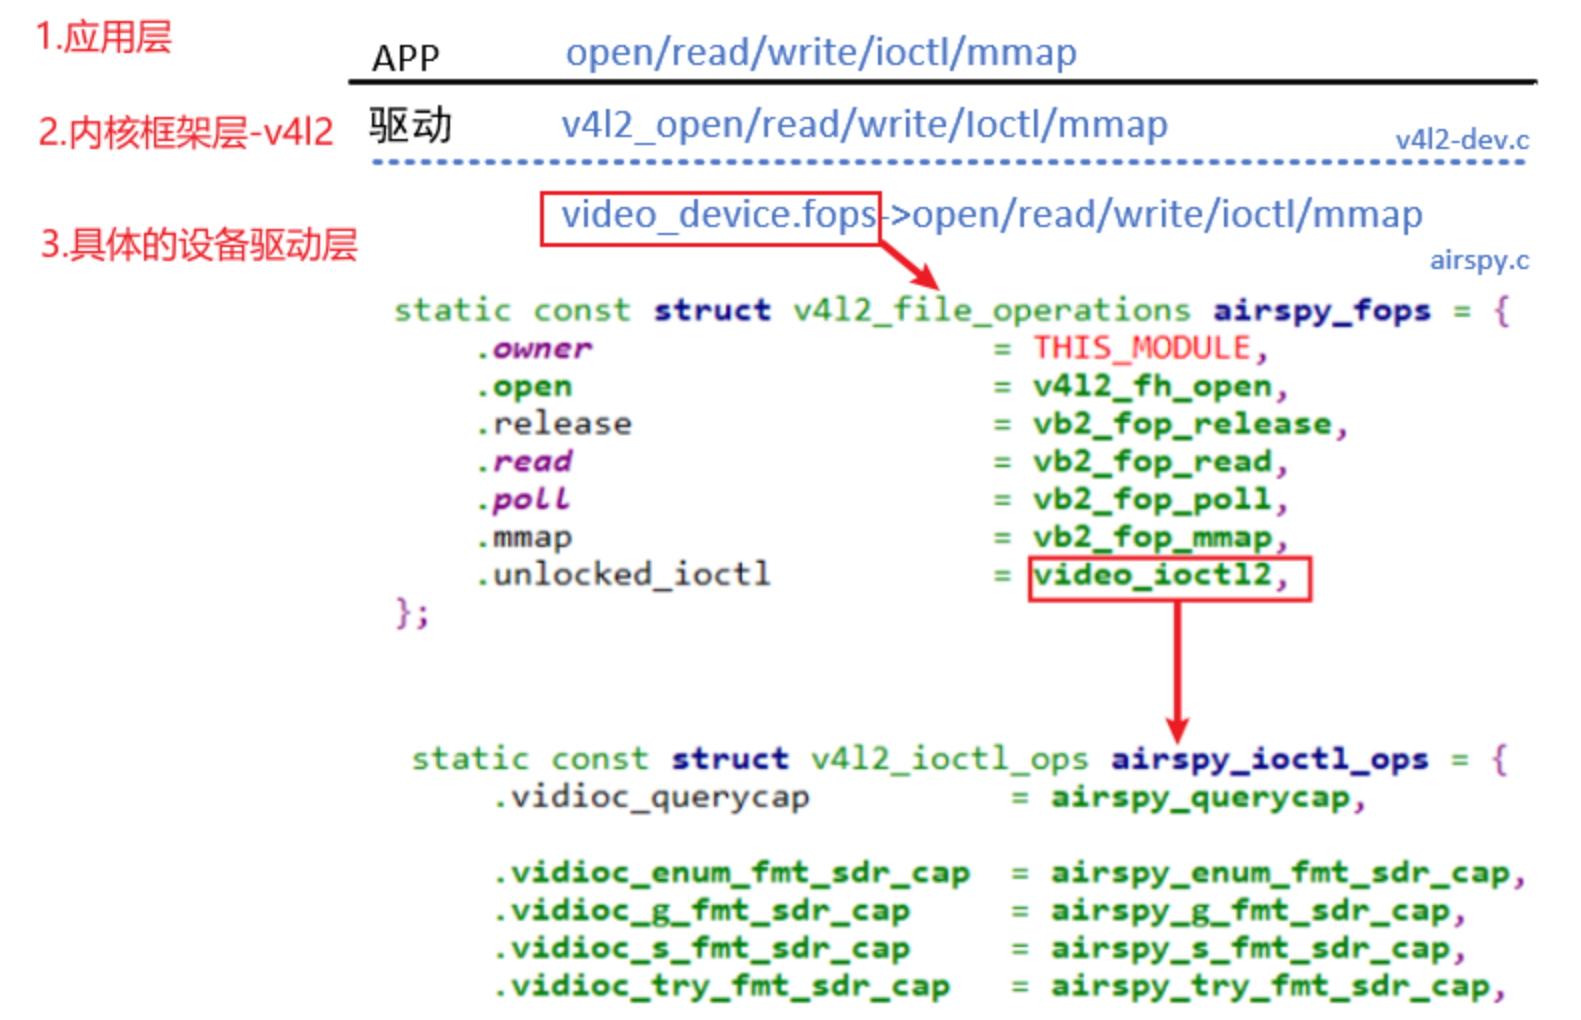
2)从调用流程来看V4L2框架
3、UVC设备驱动
1.UVC : usb video class,一个基于V4L2框架的通用USB摄像头设备驱动,旨在让USB摄像头等视频设备能像USB键盘、鼠标一样,在不同的操作系统上免驱使用,相对MIPI摄像头而言,复杂度低一些(MIPI使用更多的子系统),了解UVC也有助于理解MIPI驱动程序;

2.绝大多数现代USB摄像头都是UVC设备,一个符合UVC标准的USB摄像头,其硬件和通信协议都遵循了公开的规范,可以直接使用UVC设备驱动,不需要重新编写特定的USB摄像头设备驱动(免驱的原理)

3.源码目录
/android/kernel/fusion/4.19/drivers/media/usb/uvc

4.USB摄像头如何适配?厂家可以自行实现,或者直接使用内核标准的UVC设备驱动,直接打开UVC编译选项即可

5.由于UVC是通用驱动,会有很多兼容性代码,导致复杂度高,也可以参照其它厂家的usb摄像头驱动实现(代码量少一些)
/android/vendor/amlogic/common/kernel/common_5.4/drivers/media/usb/airspy
/android/vendor/amlogic/common/kernel/common_5.4/drivers/media/usb/cpia2
4、基于MIPI-CSI-2设备驱动
1.参照0v5640实现 :
/android/vendor/amlogic/common/kernel/common_5.4/drivers/media/i2c/ov5640.c
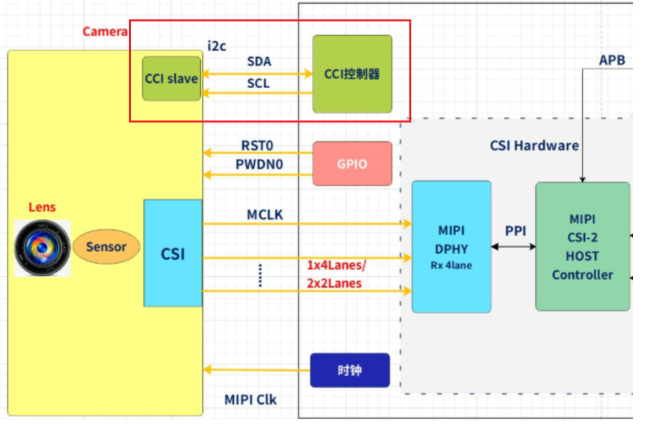
2.MIPI-CSI-2与HDMI类似,是一类复合接口(驱动包含I2C/MIPI驱动);
3. MIPI如何适配?配置设备树(设置多少lane、时钟)、寄存器配置;5、V4L2基础源码分析
1)源码目录
1.v4l2核心
/android/vendor/amlogic/common/kernel/common_5.4/drivers/media/v4l2-core
/android/vendor/amlogic/common/kernel/common_5.4/drivers/media/v4l2-core/v4l2-ioctl.c
2)数据结构
1. video_device - 视频设备
/android/vendor/amlogic/common/kernel/common_5.4/include/media/v4l2-dev.h
struct video_device {
#if defined(CONFIG_MEDIA_CONTROLLER)  //meida子系统
    struct media_entity entity;
    struct media_intf_devnode *intf_devnode;
    struct media_pipeline pipe;
#endif
    struct v4l2_file_operations *fops;
    struct v4l2_device *v4l2_dev;  //v4l2设备
    struct v4l2_ctrl_handler *ctrl_handler;
    struct vb2_queue *queue;

    struct v4l2_ioctl_ops *ioctl_ops;
}

2.v4l2_file_operations
/android/vendor/amlogic/common/kernel/common_5.4/include/media/v4l2-dev.h
struct v4l2_file_operations {
    int (*read)();
    int (*mmap)();
}


3.v4l2_ioctl_ops
/android/vendor/amlogic/common/kernel/common_5.4/include/media/v4l2-ioctl.h
struct v4l2_ioctl_ops {
    int (*vidioc_querycap)(struct file *file, void *fh, struct v4l2_capability *cap);
    int (*vidioc_enum_fmt_vid_cap)(struct file *file, void *fh, struct v4l2_fmtdesc *f);
    int (*vidioc_reqbufs)(struct file *file, void *fh, struct v4l2_requestbuffers *b);
    int (*vidioc_streamon)(struct file *file, void *fh, enum v4l2_buf_type i);
    int (*vidioc_g_std)(struct file *file, void *fh, v4l2_std_id *norm);
    int (*vidioc_queryctrl)(struct file *file, void *fh, struct v4l2_queryctrl *a);
    ...
}

4.v4l2_device - V4L2设备
/android/vendor/amlogic/common/kernel/common_5.4/include/media/v4l2-device.h
struct v4l2_device {
	struct device *dev;
	struct media_device *mdev; //存放media device
	struct list_head subdevs;  //存放subdev
	spinlock_t lock;
	char name[V4L2_DEVICE_NAME_SIZE];
	struct v4l2_ctrl_handler *ctrl_handler;
	struct v4l2_prio_state prio;
	struct kref ref;
	void (*release)(struct v4l2_device *v4l2_dev);
};
3)源码分析
1. V4L2 core初始化
#define VIDEO_MAJOR	81

1. V4L2 core初始化很简单,仅仅将自己注册为字符设备驱动
/android/vendor/amlogic/common/kernel/common_5.4/drivers/media/v4l2-core/v4l2-dev.c
videodev_init()
--register_chrdev_region(dev, VIDEO_NUM_DEVICES, VIDEO_NAME);
--class_register(&video_class);
2、V4L2设备驱动程序注册流程
以UVC设备驱动为例

1.uvc_init
/android/vendor/amlogic/common/kernel/common_5.4/drivers/media/usb/uvc/uvc_driver.c
uvc_init()
--usb_register(&uvc_driver.driver);

2.uvc_probe
/android/vendor/amlogic/common/kernel/common_5.4/drivers/media/usb/uvc/uvc_driver.c
uvc_probe()
/android/vendor/amlogic/common/kernel/common_5.4/drivers/media/mc/mc-device.c
--media_device_init(&dev->mdev); //Initialize the media device. 后面会涉及,先mark
/android/vendor/amlogic/common/kernel/common_5.4/drivers/media/v4l2-core/v4l2-device.c
--v4l2_device_register(&intf->dev, &dev->vdev)
----__video_register_device
------// 根据次设备号把video_device结构体放入数组
------video_device[vdev->minor] = vdev;
------// 注册字符设备驱动程序
------vdev->cdev->ops = &v4l2_fops;
------vdev->cdev->owner = owner;
------ret = cdev_add(vdev->cdev, MKDEV(VIDEO_MAJOR, vdev->minor), 1);
----uvc_ctrl_init_device(dev)
----uvc_scan_device(dev)
----uvc_register_chains()
------uvc_register_terms(dev, chain);
--------uvc_register_video(dev, stream);
----------uvc_register_video_device(dev, stream, &stream->vdev,&stream->queue, stream->type,&uvc_fops, &uvc_ioctl_ops);
------------vdev->v4l2_dev = &dev->vdev; //video_device和4l2_device建立联系
------------vdev->fops = fops;
------------vdev->ioctl_ops = ioctl_ops;

3.注册后,用户调用V4L2对应接口,然后由V4L2转发到具体的设备驱动
3、ioctl调用流程
1)两类ioctl
static const struct v4l2_ioctl_info v4l2_ioctls[] = {
IOCTL_INFO(VIDIOC_QUERYCAP, v4l_querycap, v4l_print_querycap, 0),
IOCTL_INFO(VIDIOC_ENUM_FMT, v4l_enum_fmt, v4l_print_fmtdesc, INFO_FL_CLEAR(v4l2_fmtdesc, type)),
IOCTL_INFO(VIDIOC_G_FMT, v4l_g_fmt, v4l_print_format, 0),
IOCTL_INFO(VIDIOC_S_FMT, v4l_s_fmt, v4l_print_format, INFO_FL_PRIO),
}
1)一类是无需特殊的代码来处理,APP的调用可以直达这些处理函数,这类ioctl使用宏DEFINE_V4L_STUB_FUNC来修饰
DEFINE_V4L_STUB_FUNC(g_fbuf)
DEFINE_V4L_STUB_FUNC(s_fbuf)
DEFINE_V4L_STUB_FUNC(expbuf)
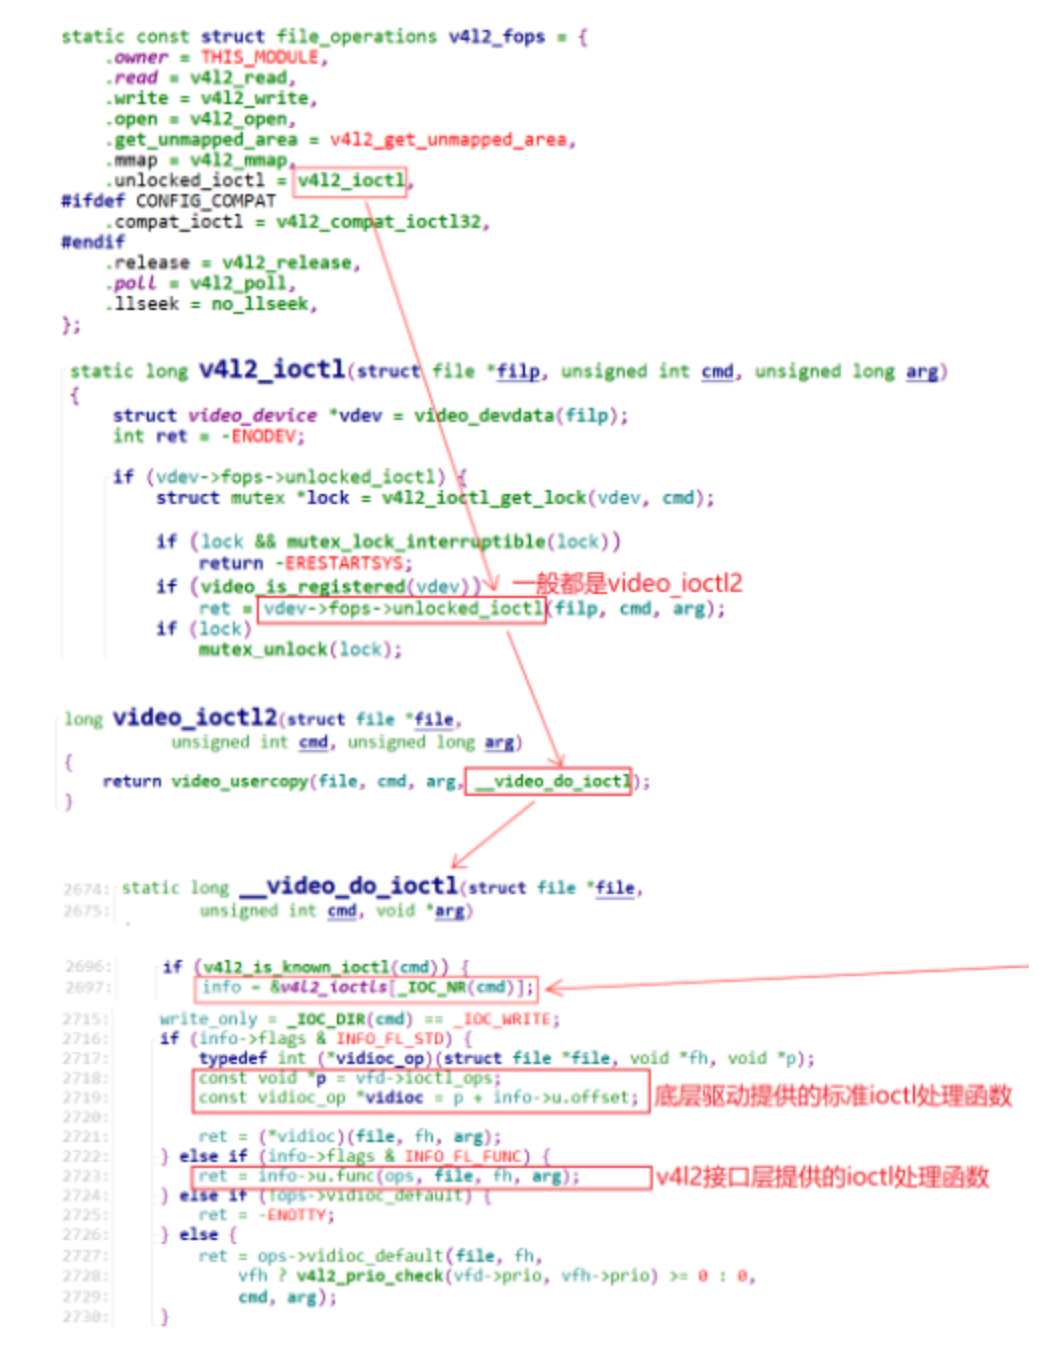
2)其它ioctl需要特殊处理,比如对于`VIDIOC_ENUM_FMT`,它需要根据设备的类型分别枚举:2)APP调用ioctl流程
4、buffer管理内核实现
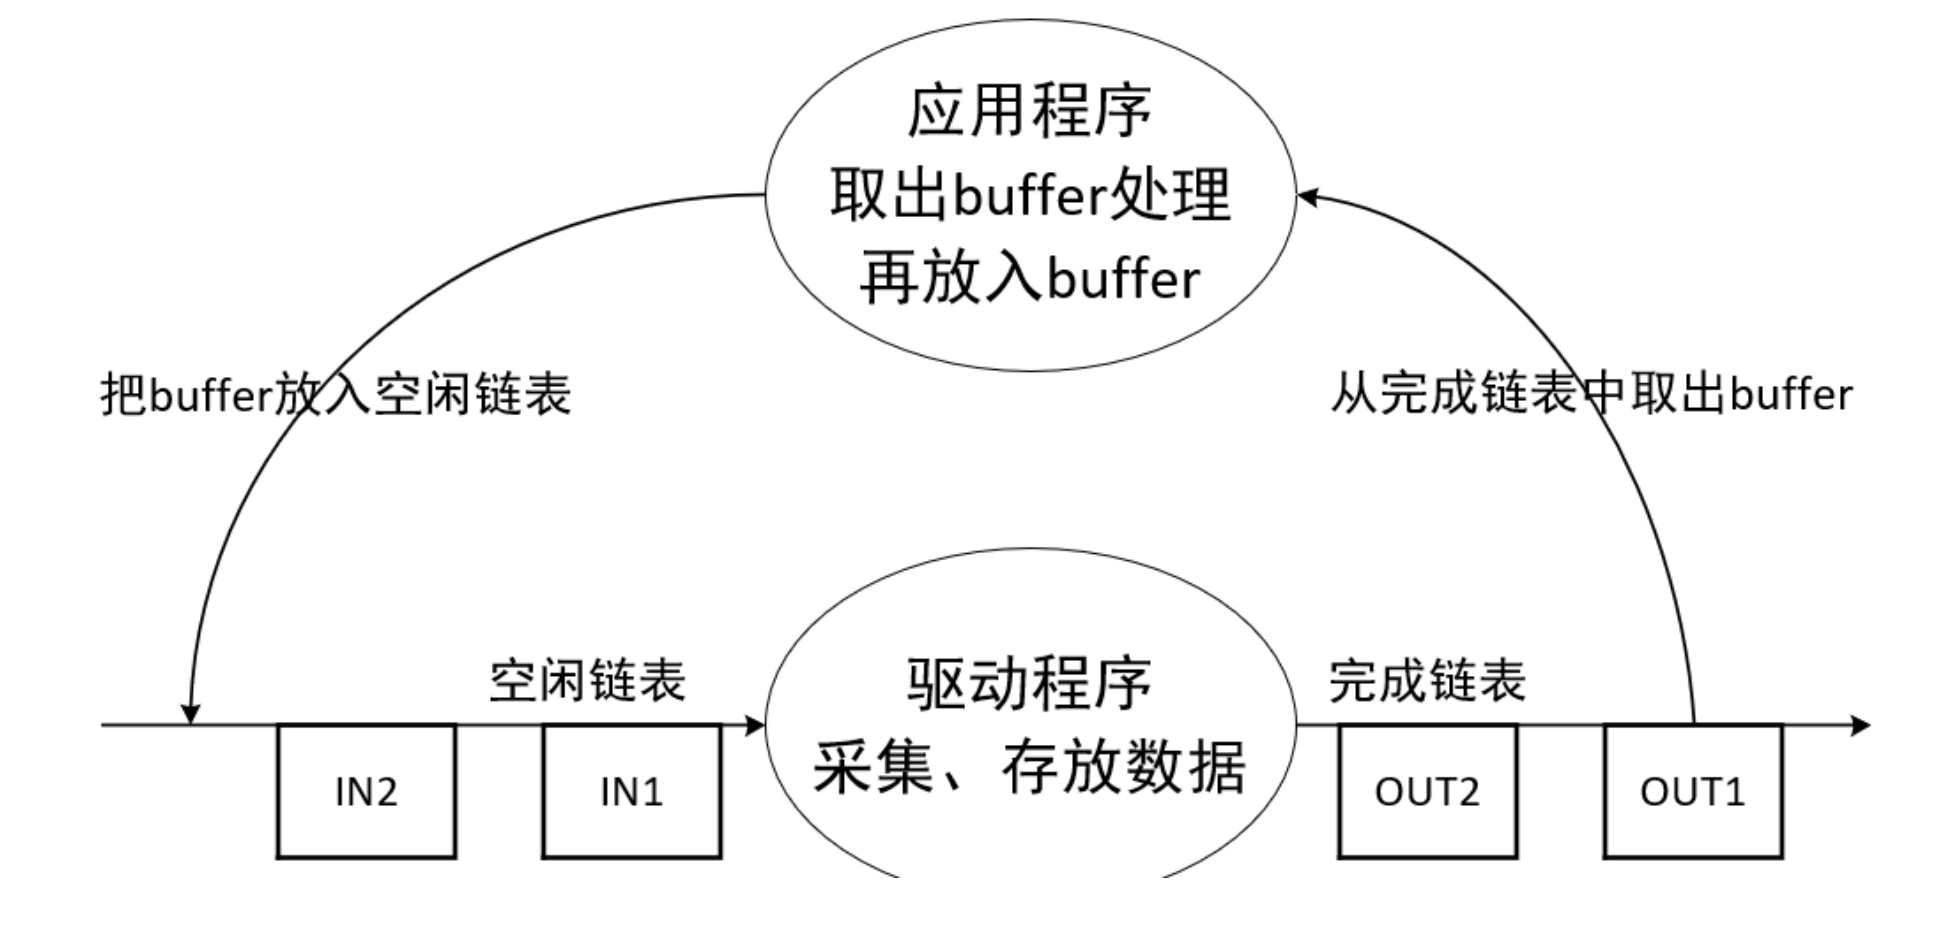
1)buffer的操作流程
2)两套buffer
1.V4L2框架-videobuf2
https://blog.csdn.net/u013904227/article/details/81054611

2.videobuf2用于连接V4L2驱动层与用户空间层,提供数据交流的通道,它可以分配并管理视频帧数据。videobuf 层实现了很多 ioctl 函数,包括 buffer 分配、入队、出队和数据流控制。

3.两套buffer管理
vb2_buffer 是 videobuf_buffer的改进,修复vb1的一些缺陷,支持更强大更灵活的内存管理
vb1:/android/vendor/amlogic/common/kernel/common_5.4/include/media/videobuf-core.h
vb2:/android/vendor/amlogic/common/kernel/common_5.4/include/media/videobuf2-core.h
3)数据结构
1.vb2_v4l2_buffer
/android/vendor/amlogic/common/kernel/common_5.4/include/media/videobuf2-v4l2.h
struct vb2_v4l2_buffer {
struct vb2_buffer vb2_buf;
struct vb2_plane planes[VB2_MAX_PLANES];
}
2.vb2_buffer
/android/vendor/amlogic/common/kernel/common_5.4/include/media/videobuf2-core.h
struct vb2_buffer {
struct vb2_queue *vb2_queue;
unsigned int index;
unsigned int type;
unsigned int memory;
unsigned int num_planes;
u64 timestamp; //时间戳
struct media_request *request;
struct media_request_object req_obj;
struct vb2_plane planes[VB2_MAX_PLANES]; //平面(现在摄像头技术,多个平面组成一个更加立体的平面效果)
struct list_head queued_entry; //待处理队列
struct list_head done_entry; //已处理队列
}
3.vb2_plane
/android/vendor/amlogic/common/kernel/common_5.4/include/media/videobuf2-core.h
struct vb2_plane {
void *mem_priv; //用于存放图像数据的内存块
struct dma_buf *dbuf;
};
4.vb2_queue
/android/vendor/amlogic/common/kernel/common_5.4/include/media/videobuf2-core.hs
struct vb2_queue {
struct device *dev;
struct vb2_ops *ops;
struct vb2_mem_ops *mem_ops;
struct vb2_buf_ops *buf_ops;
struct device *alloc_devs[VB2_MAX_PLANES];
struct vb2_buffer *bufs[VB2_MAX_FRAME];
}
5.vb2_mem_ops
/android/vendor/amlogic/common/kernel/common_5.4/include/media/videobuf2-core.h
struct vb2_mem_ops {
void (*alloc)(struct device *dev,...);
void (*put)(void *buf_priv);
void (*prepare)(void *buf_priv);
void (*finish)(void *buf_priv);
int (*mmap)(void *buf_priv);
}
6.vb2_ops
/android/vendor/amlogic/common/kernel/common_5.4/include/media/videobuf2-core.h
struct vb2_ops {
int (*queue_setup)(struct vb2_queue *q,
unsigned int *num_buffers, unsigned int *num_planes,
unsigned int sizes[], struct device *alloc_devs[]);
void (*wait_prepare)(struct vb2_queue *q);
void (*wait_finish)(struct vb2_queue *q);
int (*start_streaming)(struct vb2_queue *q, unsigned int count);
void (*stop_streaming)(struct vb2_queue *q);
void (*buf_queue)(struct vb2_buffer *vb);
void (*buf_request_complete)(struct vb2_buffer *vb);
};
7.vb2_buf_ops
/android/vendor/amlogic/common/kernel/common_5.4/include/media/videobuf2-core.h
struct vb2_buf_ops {
int (*verify_planes_array)(struct vb2_buffer *vb, const void *pb);
void (*init_buffer)(struct vb2_buffer *vb);
void (*fill_user_buffer)(struct vb2_buffer *vb, void *pb);
int (*fill_vb2_buffer)(struct vb2_buffer *vb, struct vb2_plane *planes);
void (*copy_timestamp)(struct vb2_buffer *vb, const void *pb);
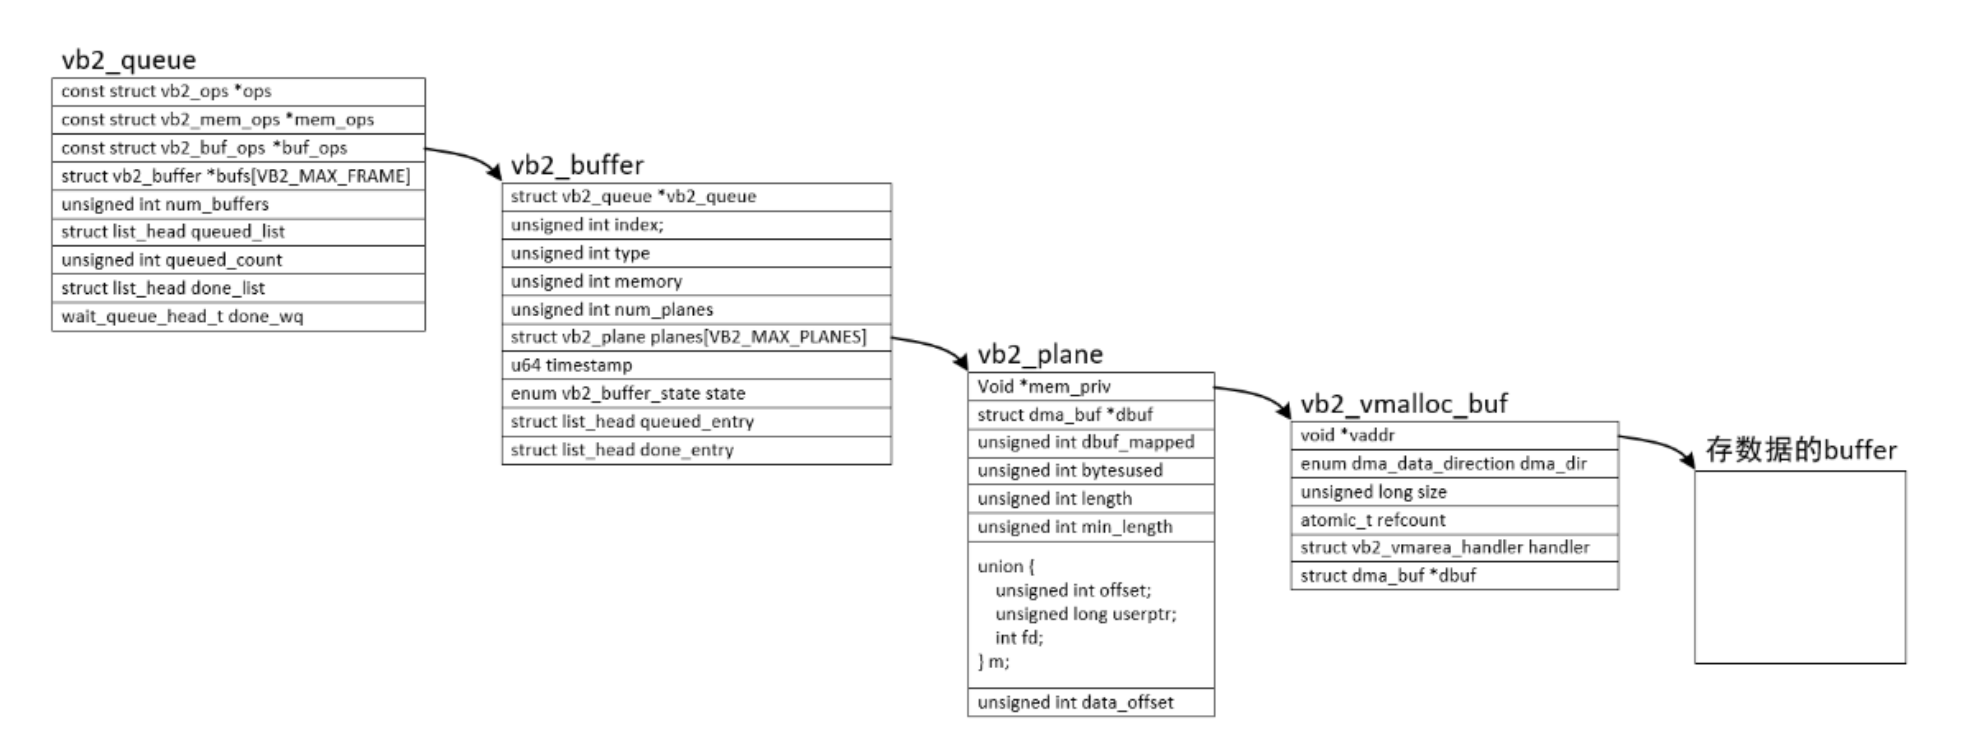
};结构体"类图"
4)videobuffer2的3个ops
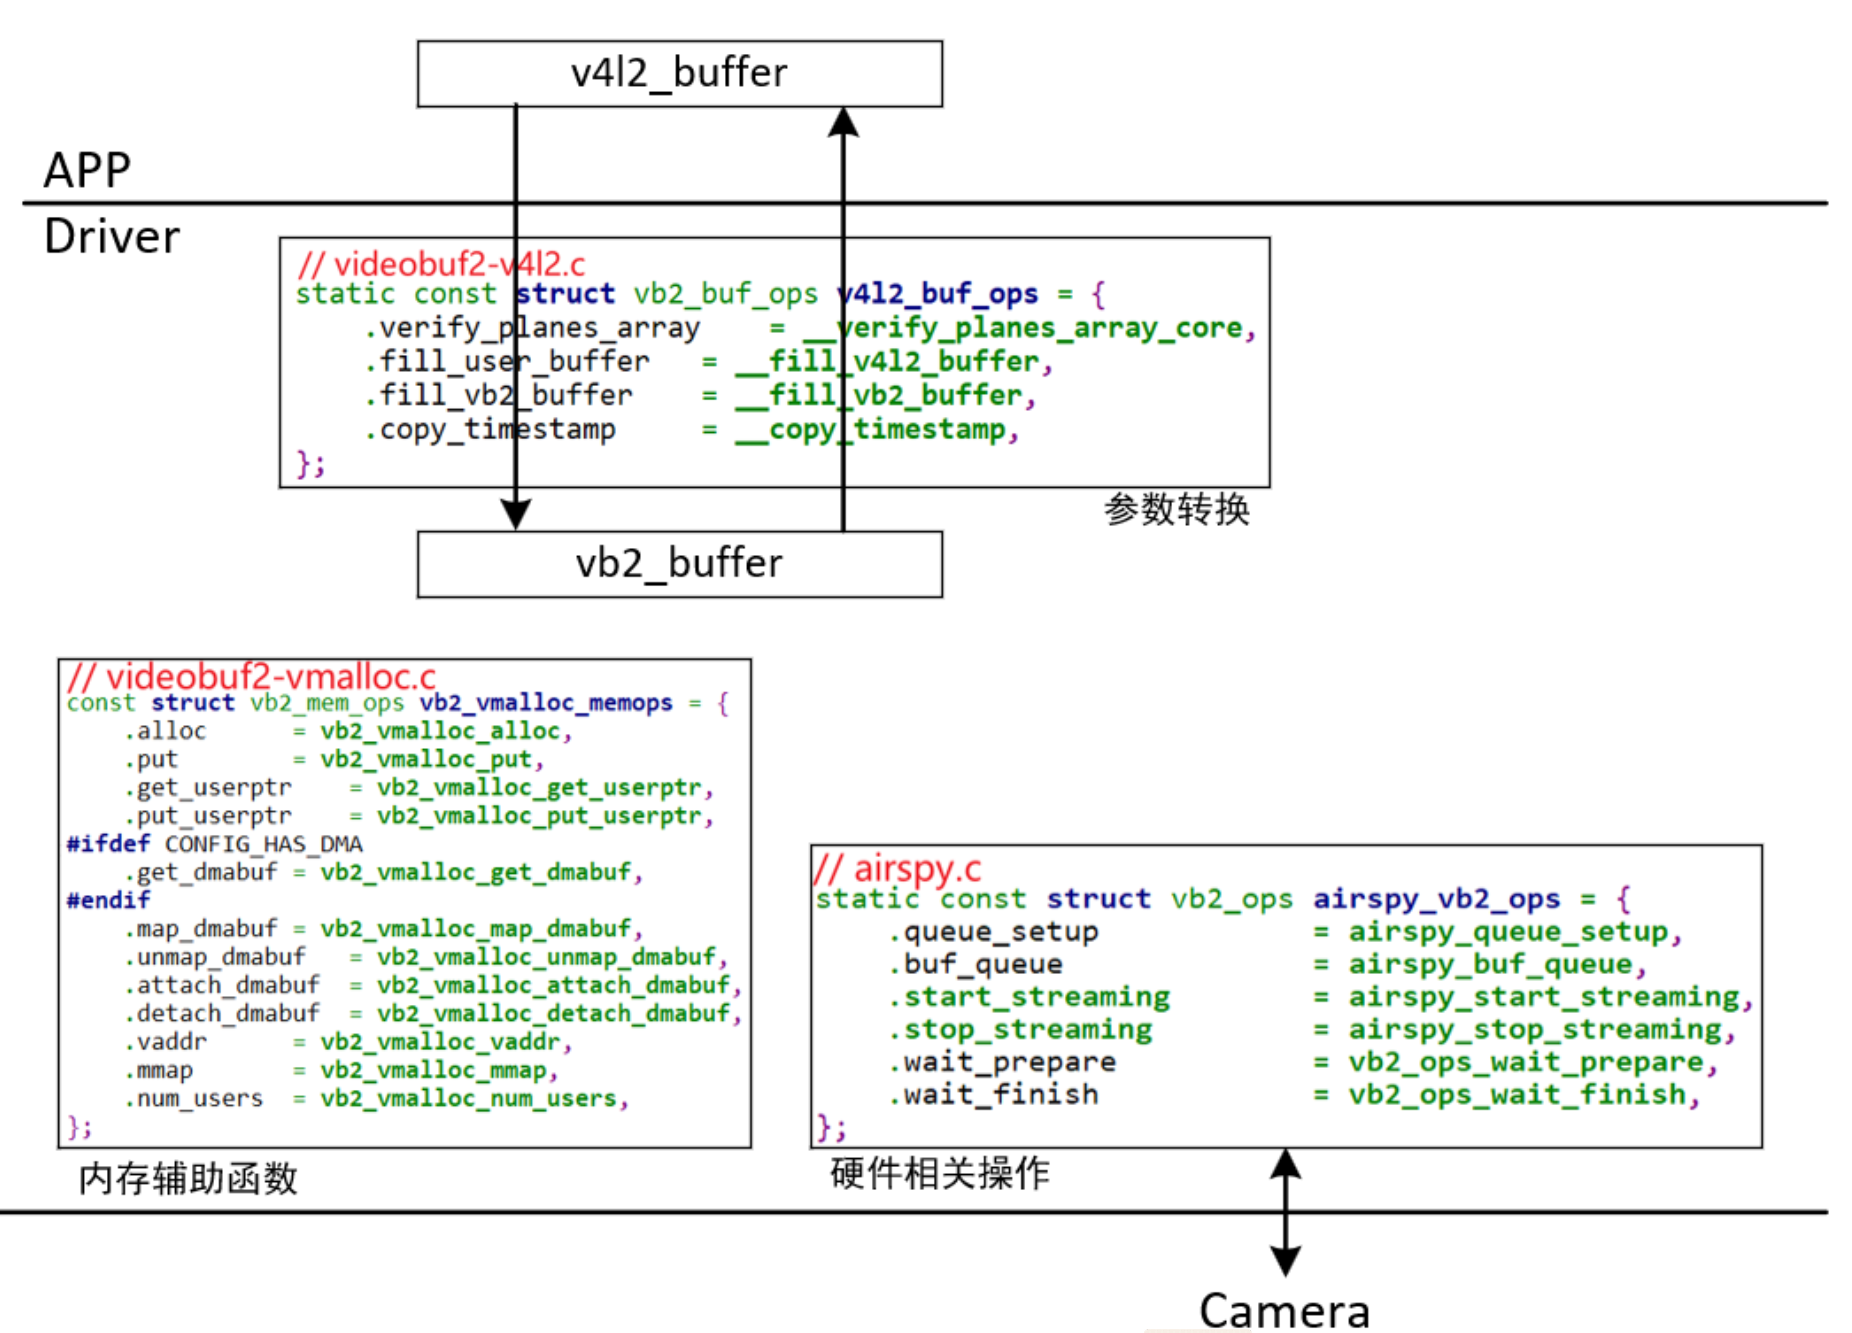
1.vb2_queue
/android/vendor/amlogic/common/kernel/common_5.4/include/media/videobuf2-core.h
struct vb2_queue {
    struct vb2_buf_ops *buf_ops:在用户空间、内核空间之间传递buffer信息
    struct vb2_mem_ops *mem_ops:分配内存用的回调函数
    struct vb2_ops *ops:硬件相关的回调函数
}

2.vb2_ops
/android/vendor/amlogic/common/kernel/common_5.4/include/media/videobuf2-core.h
struct vb2_ops {
    1.APP调用ioctl VIDIOC_REQBUFS或VIDIOC_CREATE_BUFS时,驱动程序在分配内存之前,会调用此函数。
	int (*queue_setup)(struct vb2_queue *q,...);
    2.APP调用ioctl VIDIOC_QBUF或VIDIOC_PREPARE_BUF时,驱动程序会在执行硬件操作前,调用此函数进行必要的初始化。
	int (*buf_prepare)(struct vb2_buffer *vb);
    3.APP调用ioctl VIDIOC_DQBUF后,在驱动程序返回用户空间之前,会调用此函数,可以在这个函数里修改buffer。或者驱动程序内部停止或暂停streaming时,也会调用此函数。
    void (*buf_finish)(struct vb2_buffer *vb);
	int (*start_streaming)(struct vb2_queue *q, unsigned int count); //驱动相关的"启动streaming"函数
	void (*stop_streaming)(struct vb2_queue *q); //驱动相关的"停止streaming"函数
    4.把buffer传送给驱动,驱动获得数据、填充好buffer后会调用vb2_buffer_done函数返还buffer。
	void (*buf_queue)(struct vb2_buffer *vb);
};

3.vb2_buf_ops
/android/vendor/amlogic/common/kernel/common_5.4/include/media/videobuf2-core.h
struct vb2_buf_ops {
    1.APP调用ioctl VIDIOC_DQBUF时,在驱动内部会调用此函数,用来验证这个buffer含有足够多的plane。
	int (*verify_planes_array)(struct vb2_buffer *vb, const void *pb);
	void (*init_buffer)(struct vb2_buffer *vb);
	2.APP调用ioctl VIDIOC_QUERYBUF、VIDIOC_PREPARE_BUF、VIDIOC_QBUF、VIDIOC_DQBUF,都会传入一个v4l2_buffer结构体
	void (*fill_user_buffer)(struct vb2_buffer *vb, void *pb);
	3.APP调用ioctl VIDIOC_QBUF时,传入一个v4l2_buffer结构体,驱动里会用它来填充vb2_buffer结构体。
	int (*fill_vb2_buffer)(struct vb2_buffer *vb, struct vb2_plane *planes);
};

4.vb2_mem_ops
/android/vendor/amlogic/common/kernel/common_5.4/include/media/videobuf2-core.h
struct vb2_mem_ops {
    1.分配真正用于存储视频数据的buffer,可能还分配私有数据
	void		*(*alloc)(struct device *dev, unsigned long attrs,...);
    2.返回这块内存的内核空间地址
	void		*(*vaddr)(void *buf_priv);
    3.把这块内存,映射到用户空间
	int		(*mmap)(void *buf_priv, struct vm_area_struct *vma);
};
5)vb2初始化
uvc_queue_init(){
    queue->queue.type = type;
	queue->queue.io_modes = VB2_MMAP | VB2_USERPTR;
	queue->queue.drv_priv = queue;
	queue->queue.buf_struct_size = sizeof(struct uvc_buffer);
	/android/vendor/amlogic/common/kernel/common_5.4/drivers/media/common/videobuf2/videobuf2-vmalloc.c
	queue->queue.mem_ops = &vb2_vmalloc_memops; //使用videobuf2提供的内存分配方法
	queue->queue.ops = &uvc_queue_qops; //硬件相关操作
}

static const struct vb2_ops uvc_queue_qops = {
	.queue_setup = uvc_queue_setup,
	.buf_prepare = uvc_buffer_prepare,
	.buf_queue = uvc_buffer_queue,
	.buf_finish = uvc_buffer_finish,
	.wait_prepare = vb2_ops_wait_prepare,
	.wait_finish = vb2_ops_wait_finish,
	.start_streaming = uvc_start_streaming,
	.stop_streaming = uvc_stop_streaming,
};
6)videobuffer2情景分析
1.申请buffer
APP ioctl VIDIOC_REQBUFS
------------------------------
	v4l_reqbufs // v4l2-ioctl.c
    	ops->vidioc_reqbufs(file, fh, p);
			vb2_ioctl_reqbufs // videobuf2-v4l2.c
    			vb2_core_reqbufs
    			    call_qop(q, queue_setup, q, &num_buffers, &num_planes,plane_sizes, q->alloc_devs);
    			        __vb2_queue_alloc()
    			            __vb2_buf_mem_alloc(vb);

2.把buffer放入队列
APP ioctl VIDIOC_QBUF
------------------------------
	v4l_qbuf // v4l2-ioctl.c
    	ops->vidioc_qbuf(file, fh, p);
			vb2_ioctl_qbuf // videobuf2-v4l2.c
                vb2_qbuf(vdev->queue, p);  // videobuf2-v4l2.c
					vb2_core_qbuf(q, b->index, b); // videobuf2-core.c
						ret = __buf_prepare(vb, pb);
								ret = __qbuf_mmap(vb, pb);  // videobuf2-core.c

3.把buffer取出队列
APP ioctl VIDIOC_DQBUF
------------------------------
	v4l_dqbuf // v4l2-ioctl.c
    	ops->vidioc_dqbuf(file, fh, p);
			vb2_ioctl_dqbuf // videobuf2-v4l2.c
				vb2_dqbuf(vdev->queue, p, file->f_flags & O_NONBLOCK);
					ret = vb2_core_dqbuf(q, NULL, b, nonblocking);

4)小结
1、分配流程:
* 驱动程序初始化时,就构造了vb2_queue,这是"buffer的队列",一开始里面没有"buffer"
* APP调用ioctl VIDIOC_REQBUFS向驱动申请N个buffer
* 驱动程序分配n(n<=N)个vb2_buffer结构体,然后
  * 对于普通摄像头,还分配一个vb2_plane结构体、vb2_vmalloc_buf结构体,最后分配存数据的buffer
  * 对于多平面摄像头,给每个vb2_buffer分配多个"vb2_plane结构体、vb2_vmalloc_buf结构体、存数据的buffer"


2、入队列流程:
* APP调用ioctl VIDIOC_QBUF
* 驱动程序根据其index找到vb2_buffer
* 把这个vb2_buffer放入链表vb2_queue.queued_list

硬件驱动接收到数据后,比如URB传输完成后:

* 从链表vb2_queue.queued_list找到(但是不移除)vb2_buffer
* 把硬件数据存入vb2_buffer
* 把vb2_buffer放入链表vb2_queue.done_list

3、出队列流程:
* APP调用ioctl VIDIOC_DQBUF
* 驱动程序从链表vb2_queue.done_list取出并移除第1个vb2_buffer
* 驱动程序也把这个vb2_buffer从链表vb2_queue.queued_list移除
7、 V4L2-Subdev子系统
1)preface
1、V4L2-subdev - 用于抽象V4L2模块下的子模块;
2、如果当前平台涉及的模块众多,可以利用V4L2的Subdev子系统接口来拆分各个模块,使其变得易管理和扩展!
3、试想一下,假如将十几个模块都写在一个驱动里面,将会变得无比庞大且混乱,这就是引入V4L2-subdev的原因!
4、UVC框架也用到Subdev,但是没有具体实现,只是预留(因为UVC的模块相对固定,已经有规范约束,因此没有复杂变化拓扑结构)
2)subdev子系统源码分析
1、源码目录
/android/vendor/amlogic/common/kernel/common_5.4/include/media/v4l2-subdev.h
/android/vendor/amlogic/common/kernel/common_5.4/drivers/media/v4l2-core/v4l2-subdev.c
2、数据结构
1.v4l2_subdev
/android/vendor/amlogic/common/kernel/common_5.4/include/media/v4l2-subdev.h
struct v4l2_subdev {
#if defined(CONFIG_MEDIA_CONTROLLER)
  	struct media_entity entity;
#endif
  	struct list_head list;
  	struct module *owner;
  	bool owner_v4l2_dev;
  	u32 flags;
  	struct v4l2_device *v4l2_dev;
  	const struct v4l2_subdev_ops *ops;
  	const struct v4l2_subdev_internal_ops *internal_ops;
  	struct v4l2_ctrl_handler *ctrl_handler;
  	char name[V4L2_SUBDEV_NAME_SIZE];
  	u32 grp_id;
  	void *dev_priv;
  	void *host_priv;
  	struct video_device *devnode;
  	struct device *dev;
  	struct fwnode_handle *fwnode;
  	struct v4l2_subdev_platform_data *pdata;
}

2.v4l2_subdev_ops - v4l2下支持的subdev设备
/android/vendor/amlogic/common/kernel/common_5.4/include/media/v4l2-subdev.h
struct v4l2_subdev_ops {
	const struct v4l2_subdev_core_ops	*core;
	const struct v4l2_subdev_tuner_ops	*tuner;
	const struct v4l2_subdev_audio_ops	*audio;
	const struct v4l2_subdev_video_ops	*video; //摄像头重点关注
	const struct v4l2_subdev_vbi_ops	*vbi;
	const struct v4l2_subdev_ir_ops		*ir;
	const struct v4l2_subdev_sensor_ops	*sensor;
	const struct v4l2_subdev_pad_ops	*pad;
};

3.v4l2_subdev_internal_ops
/android/vendor/amlogic/common/kernel/common_5.4/include/media/v4l2-subdev.h
struct v4l2_subdev_internal_ops {
	int (*registered)(struct v4l2_subdev *sd);
	void (*unregistered)(struct v4l2_subdev *sd);
	int (*open)(struct v4l2_subdev *sd, struct v4l2_subdev_fh *fh);
	int (*close)(struct v4l2_subdev *sd, struct v4l2_subdev_fh *fh);
	void (*release)(struct v4l2_subdev *sd);
};

4.从media_entity中提取v4l2_subdev
/android/vendor/amlogic/common/kernel/common_5.4/include/media/v4l2-subdev.h
#define media_entity_to_v4l2_subdev(ent)				\
({									\
	typeof(ent) __me_sd_ent = (ent);				\
									\
	__me_sd_ent ?							\
		container_of(__me_sd_ent, struct v4l2_subdev, entity) :	\
		NULL;							\
})

5.调用v4l2_subdev的内部方法
#define v4l2_subdev_call(sd, o, f, args...)				\
({								\
	struct v4l2_subdev *__sd = (sd);			\
	int __result;						\
	if (!__sd)						\
		__result = -ENODEV;				\
	else if (!(__sd->ops->o && __sd->ops->o->f))		\
		__result = -ENOIOCTLCMD;			\
	else if (v4l2_subdev_call_wrappers.o &&			\
		 v4l2_subdev_call_wrappers.o->f)		\
		__result = v4l2_subdev_call_wrappers.o->f(	\
						__sd, ##args);	\
	else							\
		__result = __sd->ops->o->f(__sd, ##args);	\
	__result;						\
})
3、源码分析
1、subdev比较好理解,一个模块对应一个subdev,ov5640摄像头的CCI就可以划分为一个subdev(I2C驱动),对于CSI接口,只需要配置使能MIPI控制器即可工作,后续无需用户介入,因此不需要抽象出subdev;
1. ov5640_dev
struct ov5640_dev {
	struct i2c_client *i2c_client;
	struct v4l2_subdev sd;
	struct media_pad pad;
	...
}

2.subdev相关ops实现
static const struct v4l2_subdev_ops ov5640_subdev_ops = {
	.core = &ov5640_core_ops, //MIPI电源
	.video = &ov5640_video_ops,
	.pad = &ov5640_pad_ops,
};

static const struct v4l2_subdev_core_ops ov5640_core_ops = {
	.s_power = ov5640_s_power,
	.log_status = v4l2_ctrl_subdev_log_status,
	.subscribe_event = v4l2_ctrl_subdev_subscribe_event,
	.unsubscribe_event = v4l2_event_subdev_unsubscribe,
};

static const struct v4l2_subdev_video_ops ov5640_video_ops = {
	.g_frame_interval = ov5640_g_frame_interval,
	.s_frame_interval = ov5640_s_frame_interval,
	.s_stream = ov5640_s_stream,
};

static const struct v4l2_subdev_pad_ops ov5640_pad_ops = {
	.enum_mbus_code = ov5640_enum_mbus_code,
	.get_fmt = ov5640_get_fmt,
	.set_fmt = ov5640_set_fmt,
	.enum_frame_size = ov5640_enum_frame_size,
	.enum_frame_interval = ov5640_enum_frame_interval,
};

3. ov5640_probe
/android/vendor/amlogic/common/kernel/common_5.4/drivers/media/i2c/ov5640.c
static int ov5640_probe(struct i2c_client *client)
/android/vendor/amlogic/common/kernel/common_5.4/drivers/media/v4l2-core/v4l2-i2c.c
--v4l2_i2c_subdev_init(&sensor->sd, client, &ov5640_subdev_ops); //注册subdev
/android/vendor/amlogic/common/kernel/common_5.4/drivers/media/v4l2-core/v4l2-subdev.c
----v4l2_subdev_init(sd, ops);
/android/vendor/amlogic/common/kernel/common_5.4/drivers/media/mc/mc-entity.c
--media_entity_pads_init(&sensor->sd.entity, 1, &sensor->pad);

4.挂进v4l2_device链表
/android/vendor/amlogic/common/kernel/common_5.4/include/media/v4l2-device.h
struct v4l2_device {
	struct device *dev;
	struct media_device *mdev; //存放media device
	struct list_head subdevs;  //存放subdev
}
3)subdev的注册与使用
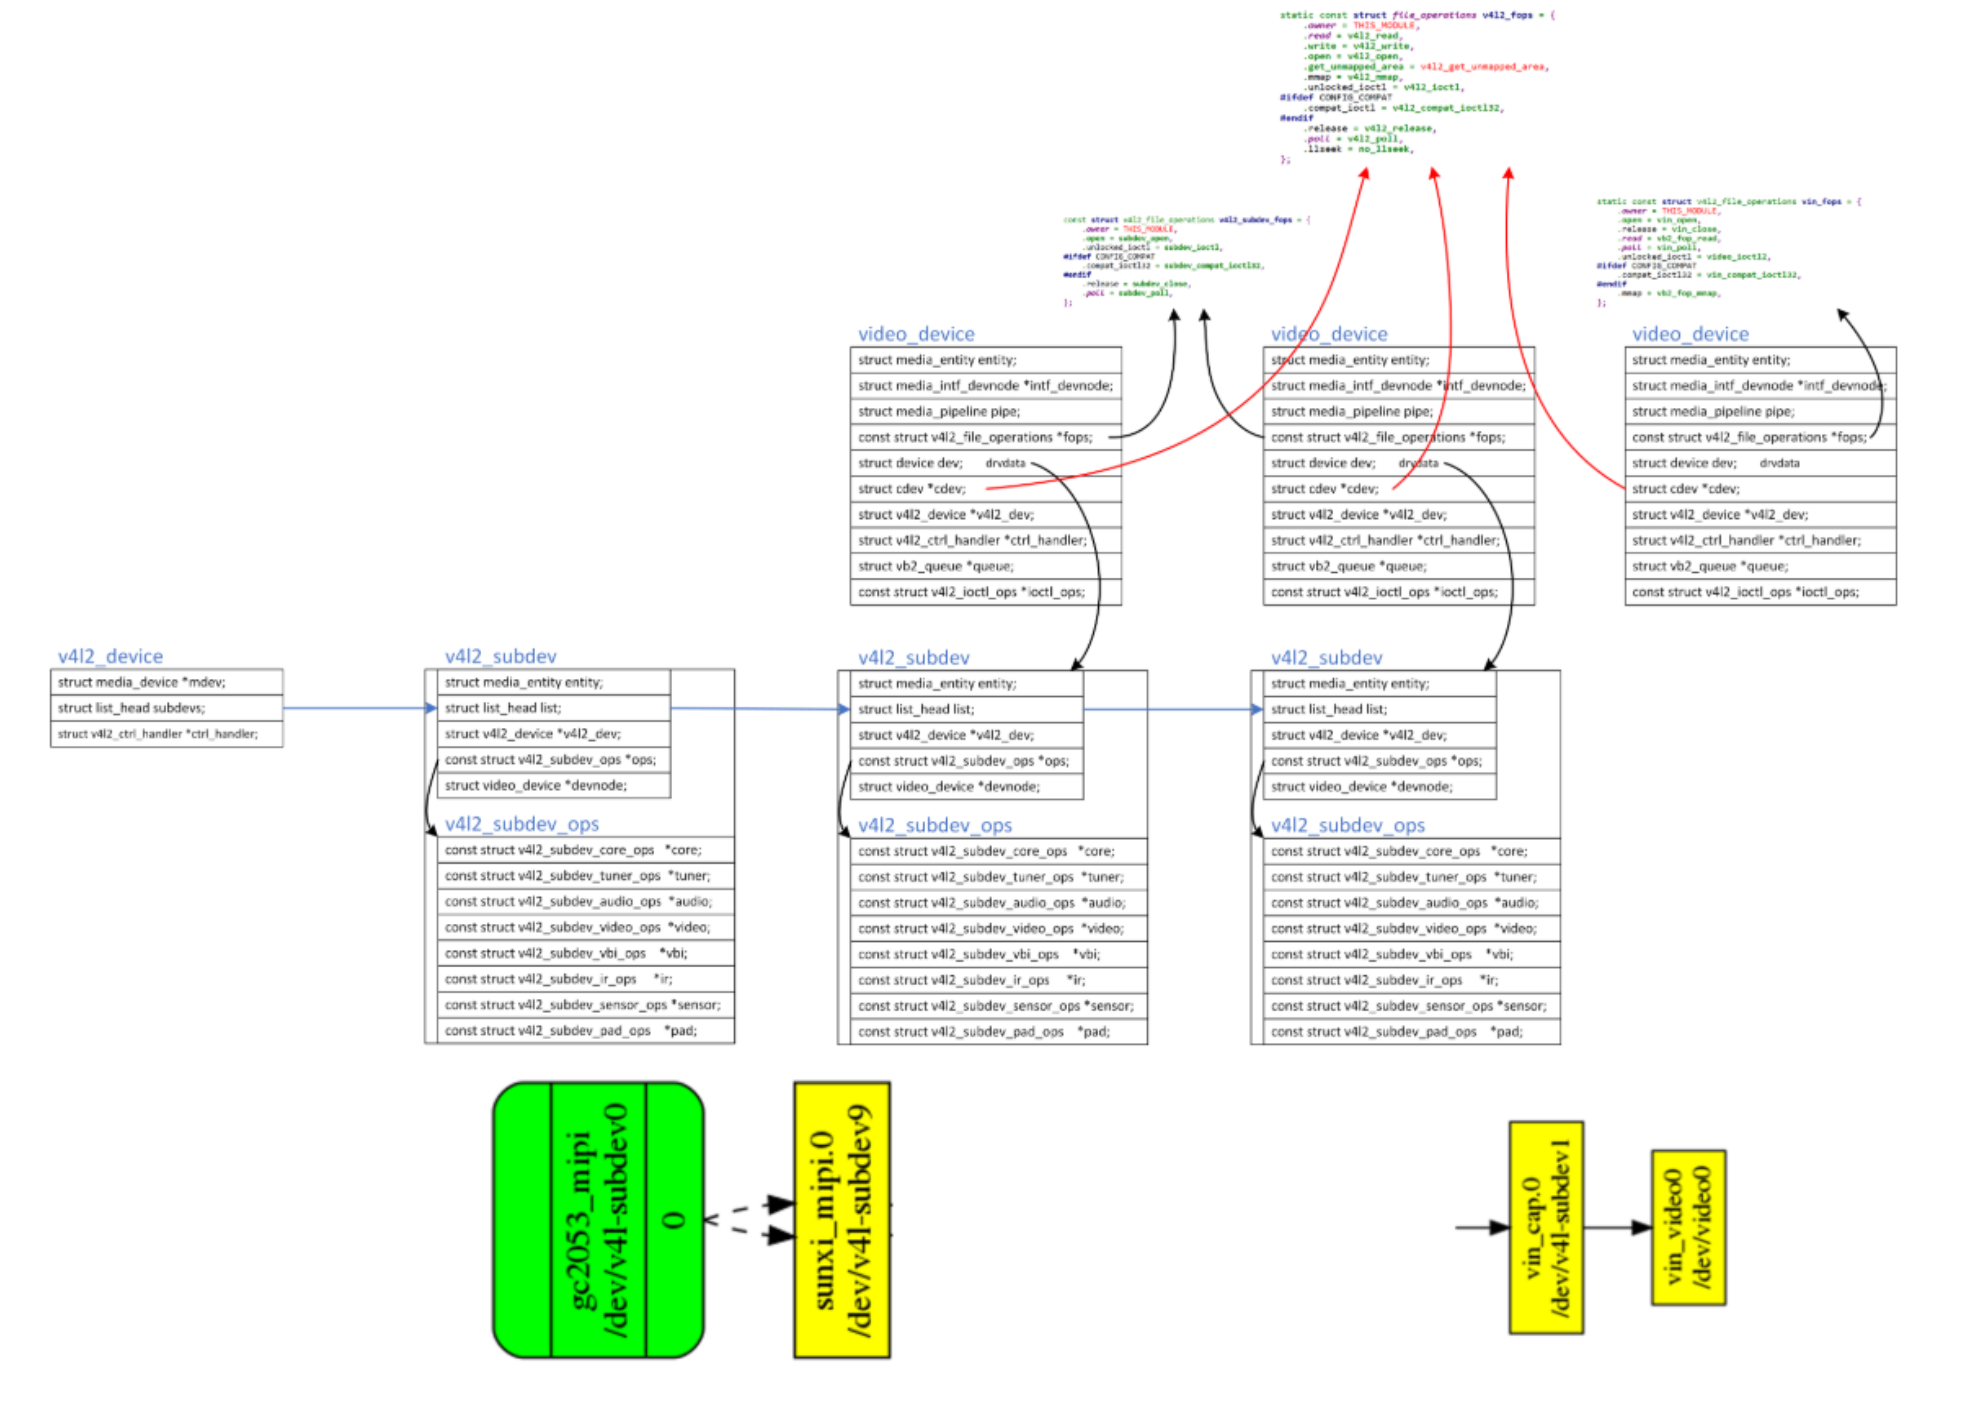
1.v4l2_device_register_subdev
/android/vendor/amlogic/common/kernel/common_5.4/drivers/media/v4l2-core/v4l2-device.c
int v4l2_device_register_subdev(struct v4l2_device *v4l2_dev, struct v4l2_subdev *sd);
--media_device_register_entity(v4l2_dev->mdev, entity);
--list_add_tail(&sd->list, &v4l2_dev->subdevs); // 核心代码

2.v4l2_device_register_subdev_nodes - 遍历v4l2_device链表里各个subdev,如果它想暴露给APP,就把它注册为普通字符设备
/android/vendor/amlogic/common/kernel/common_5.4/drivers/media/v4l2-core/v4l2-device.c
v4l2_device_register_subdev_nodes()
    struct video_device *vdev;
	vdev->fops = &v4l2_subdev_fops;
	err = __video_register_device(vdev, VFL_TYPE_SUBDEV, -1, 1,
					      sd->owner);
		name_base = "v4l-subdev";
		vdev->cdev->ops = &v4l2_fops;
		ret = cdev_add(vdev->cdev, MKDEV(VIDEO_MAJOR, vdev->minor), 1);

3.subdev就是一个标准设备驱动,因此有需要的时候也可以直接给APP通过设备节点调用,比如ISP驱动,厂家不开源,因此内核调不到ISP的接口,此时可以通过APP来调用;


4. 内核态使用subdev
可以直接调用subdev里的操作函数,也可以使用下面的宏:
#define v4l2_subdev_call(sd, o, f, args...)				\
	(!(sd) ? -ENODEV : (((sd)->ops->o && (sd)->ops->o->f) ?	\
		(sd)->ops->o->f((sd), ##args) : -ENOIOCTLCMD))

5.用户态使用subdev
/android/vendor/amlogic/common/arm_isp/test/v4l2_test_media/media-v4l2/libv4l2subdev.c
App:   ioctl(fd, cmd, arg)
--------------
kernel:
v4l2_fops.unlocked_ioctl, 即v4l2_ioctl
	ret = vdev->fops->unlocked_ioctl(filp, cmd, arg);
		v4l2_subdev_fops.unlocked_ioctl, 即subdev_ioctl
			video_usercopy(file, cmd, arg, subdev_do_ioctl);
注册subdev后,内核里结构体如下:
8、厂商改进的V4L2
1)V4L2提供了通用基础框架,厂商可以根据自家产品开进一步发自己的多媒体框架,比如
1、全志基于linux 内核v4l2 框架实现自己Soc的camera 驱动框架 - VIN。
https://v853.docs.aw-ol.com/soft/soft_camera/
linux-4.9/drivers/media/platform/sunxi-vin

2、AML - VIN/VOUT
/android/vendor/amlogic/common/kernel/common_5.4/drivers/amlogic/media/vout
/android/vendor/amlogic/common/kernel/common_5.4/drivers/amlogic/media/vin
9、v4l2-util调试工具
1.v4l2-ctl --help
General/Common options:
  --all              display all information available
  -C, --get-ctrl <ctrl>[,<ctrl>...]  get the value of the controls [VIDIOC_G_EXT_CTRLS]
  -c, --set-ctrl <ctrl>=<val>[,<ctrl>=<val>...]

2.查询指定V4L2设备的详细信息
v4l2-ctl -D -d /dev/v4l-subdev0