文章目录
一、概述
本文档详细介绍了如何使用训练好的MNIST CNN模型进行手写数字预测。我们将从模型加载、数据预处理、预测执行到结果可视化,提供完整的代码示例和详细说明。
二、环境准备
2.1 必需库安装
bash
# 基础依赖
pip install tensorflow numpy matplotlib

# 可选依赖(用于更高级功能)
pip install opencv-python pillow seaborn
2.2 文件结构
project/
├── models/
│   ├── mnist_cnn_final.h5          # 训练好的模型
│   └── best_model.h5              # 训练过程中的最佳模型
├── data/
│   ├── t10k-images-idx3-ubyte.gz  # 测试图像
│   └── t10k-labels-idx1-ubyte.gz  # 测试标签
├── predict_basic.py               # 基础预测脚本
├── predict_interactive.py         # 交互式预测脚本
└── requirements.txt               # 依赖列表
三、基础预测示例
3.1 完整预测脚本
python
"""
基本预测示例:使用训练好的MNIST CNN模型
文件名: predict_basic.py
"""

import numpy as np
import matplotlib.pyplot as plt
from tensorflow import keras
import gzip


class BasicMNISTPredictor:
    """基本MNIST预测器"""

    def __init__(self, model_path='models/mnist_cnn_final.h5'):
        """初始化预测器"""
        print(f"正在加载模型: {model_path}")
        self.model = keras.models.load_model(model_path)
        print("✅ 模型加载成功")
        print(f"模型输入形状: {self.model.input_shape}")
        print(f"模型输出形状: {self.model.output_shape}")

    def load_test_data(self):
        """加载测试数据"""
        print("\n正在加载测试数据...")

        # 加载测试图像
        with gzip.open('../data/t10k-images-idx3-ubyte.gz', 'rb') as f:
            test_images = np.frombuffer(f.read(), np.uint8, offset=16)
            test_images = test_images.reshape(-1, 28, 28)

        # 加载测试标签
        with gzip.open('../data/t10k-labels-idx1-ubyte.gz', 'rb') as f:
            test_labels = np.frombuffer(f.read(), np.uint8, offset=8)

        print(f"测试数据: {test_images.shape}")
        return test_images, test_labels

    def preprocess_image(self, image):
        """预处理单张图像"""
        # 确保图像是28x28
        if image.shape != (28, 28):
            raise ValueError(f"图像形状应为(28, 28),但得到{image.shape}")

        # 添加批处理和通道维度,并归一化
        image_processed = image.reshape(1, 28, 28, 1).astype('float32') / 255.0
        return image_processed

    def predict_single(self, image):
        """预测单张图像"""
        # 预处理
        image_processed = self.preprocess_image(image)

        # 预测
        predictions = self.model.predict(image_processed, verbose=0)

        # 获取预测结果
        predicted_class = np.argmax(predictions[0])
        confidence = np.max(predictions[0])

        return predicted_class, confidence, predictions[0]

    def predict_batch(self, images):
        """批量预测"""
        # 预处理
        images_processed = images.reshape(-1, 28, 28, 1).astype('float32') / 255.0

        # 预测
        predictions = self.model.predict(images_processed, verbose=0)

        # 获取预测结果
        predicted_classes = np.argmax(predictions, axis=1)
        confidences = np.max(predictions, axis=1)

        return predicted_classes, confidences, predictions

    def visualize_single_prediction(self, image, true_label=None):
        """可视化单张图像的预测结果"""
        # 预测
        predicted_class, confidence, all_probs = self.predict_single(image)

        # 创建可视化
        fig, axes = plt.subplots(1, 2, figsize=(12, 5))

        # 左侧:图像
        axes[0].imshow(image, cmap='gray')
        if true_label is not None:
            title = f'预测: {predicted_class} (置信度: {confidence:.2%})'
            title += f'\n实际: {true_label}'
            color = 'green' if predicted_class == true_label else 'red'
            axes[0].set_title(title, color=color, fontsize=14)
        else:
            axes[0].set_title(f'预测: {predicted_class} (置信度: {confidence:.2%})', fontsize=14)
        axes[0].axis('off')

        # 右侧:概率分布
        bars = axes[1].bar(range(10), all_probs, color='lightblue')
        axes[1].set_xlabel('数字', fontsize=12)
        axes[1].set_ylabel('概率', fontsize=12)
        axes[1].set_title('预测概率分布', fontsize=14)
        axes[1].set_xticks(range(10))
        axes[1].set_ylim([0, 1])
        axes[1].grid(True, alpha=0.3)

        # 高亮预测的类别
        bars[predicted_class].set_color('red')

        # 在每个柱子上添加概率值
        for i, (bar, prob) in enumerate(zip(bars, all_probs)):
            height = bar.get_height()
            axes[1].text(bar.get_x() + bar.get_width() / 2., height,
                         f'{prob:.3f}',
                         ha='center', va='bottom', fontsize=9)

        plt.tight_layout()
        plt.show()

        # 打印详细信息
        print(f"\n预测结果: 数字 {predicted_class}")
        print(f"置信度: {confidence:.2%}")
        print("\n所有类别的概率:")
        for i, prob in enumerate(all_probs):
            print(f"  数字 {i}: {prob:.4f}")

        return predicted_class, confidence

    def evaluate_on_test_set(self, num_samples=None):
        """在测试集上评估模型"""
        print("\n正在测试集上评估模型...")

        # 加载测试数据
        test_images, test_labels = self.load_test_data()

        # 限制样本数量(如果指定)
        if num_samples is not None:
            test_images = test_images[:num_samples]
            test_labels = test_labels[:num_samples]

        # 批量预测
        predicted_classes, confidences, _ = self.predict_batch(test_images)

        # 计算准确率
        accuracy = np.mean(predicted_classes == test_labels)

        print(f"\n评估结果:")
        print(f"样本数量: {len(test_images)}")
        print(f"准确率: {accuracy:.2%}")
        print(f"预测错误数: {np.sum(predicted_classes != test_labels)}")

        # 显示错误分类的样本
        self.show_misclassifications(test_images, test_labels, predicted_classes, max_samples=5)

        return accuracy

    def show_misclassifications(self, images, true_labels, predicted_labels, max_samples=5):
        """显示错误分类的样本"""
        misclassified = np.where(true_labels != predicted_labels)[0]

        if len(misclassified) == 0:
            print("✅ 所有样本都分类正确!")
            return

        print(f"\n发现 {len(misclassified)} 个错误分类的样本")
        print("前几个错误分类:")

        for i, idx in enumerate(misclassified[:max_samples]):
            print(f"  样本 {idx}: 预测={predicted_labels[idx]}, 实际={true_labels[idx]}")

        # 可视化错误分类
        self.visualize_misclassifications(images, true_labels, predicted_labels, misclassified[:max_samples])

    def visualize_misclassifications(self, images, true_labels, predicted_labels, misclassified_indices):
        """可视化错误分类的样本"""
        num_samples = min(len(misclassified_indices), 10)

        if num_samples == 0:
            return

        fig, axes = plt.subplots(2, 5, figsize=(15, 6))
        axes = axes.ravel()

        for i, idx in enumerate(misclassified_indices[:10]):
            axes[i].imshow(images[idx], cmap='gray')
            axes[i].set_title(f'预测: {predicted_labels[idx]}\n实际: {true_labels[idx]}',
                              color='red', fontsize=11)
            axes[i].axis('off')

        # 隐藏多余的子图
        for i in range(num_samples, 10):
            axes[i].axis('off')

        plt.suptitle('错误分类的样本', fontsize=16, color='red')
        plt.tight_layout()
        plt.show()


# 使用示例
if __name__ == "__main__":
    # 1. 初始化预测器
    predictor = BasicMNISTPredictor('models/mnist_cnn_final.h5')

    # 2. 加载测试数据
    test_images, test_labels = predictor.load_test_data()

    # 3. 测试单张图像预测
    print("\n" + "=" * 50)
    print("单张图像预测测试")
    print("=" * 50)

    for i in range(3):  # 测试前3个样本
        print(f"\n测试样本 {i}:")
        predictor.visualize_single_prediction(test_images[i], test_labels[i])

    # 4. 批量预测评估
    print("\n" + "=" * 50)
    print("批量预测评估")
    print("=" * 50)

    accuracy = predictor.evaluate_on_test_set(num_samples=100)
3.2 运行示例
3.2.1 基本运行
bash
# 确保模型文件存在
python predict_basic.py
3.2.2 预期输出
✅ 模型加载成功
模型输入形状: (None, 28, 28, 1)
模型输出形状: (None, 10)
正在加载测试数据...
测试数据: (10000, 28, 28)
==================================================
单张图像预测测试
==================================================
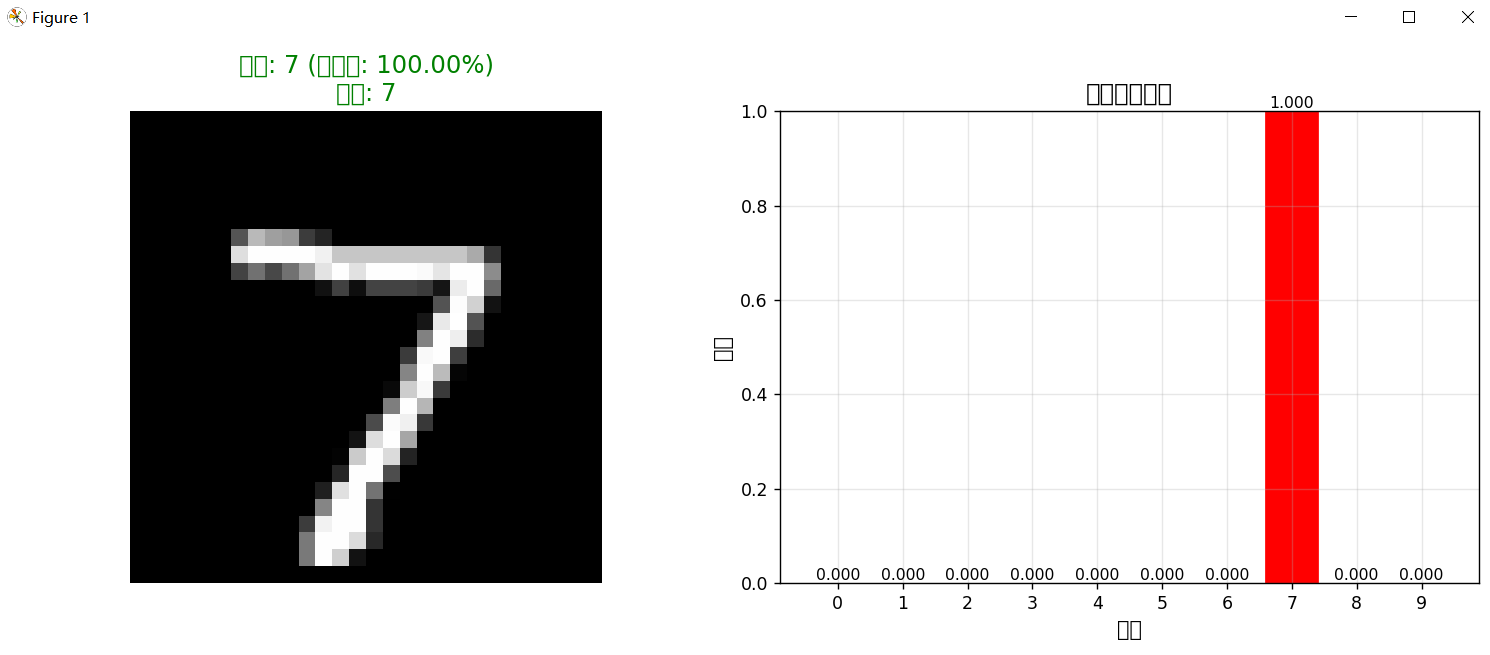
测试样本 0:
预测结果: 数字 7
置信度: 100.00%
所有类别的概率:
数字 0: 0.0000
数字 1: 0.0000
数字 2: 0.0000
数字 3: 0.0000
数字 4: 0.0000
数字 5: 0.0000
数字 6: 0.0000
数字 7: 1.0000
数字 8: 0.0000
数字 9: 0.0000
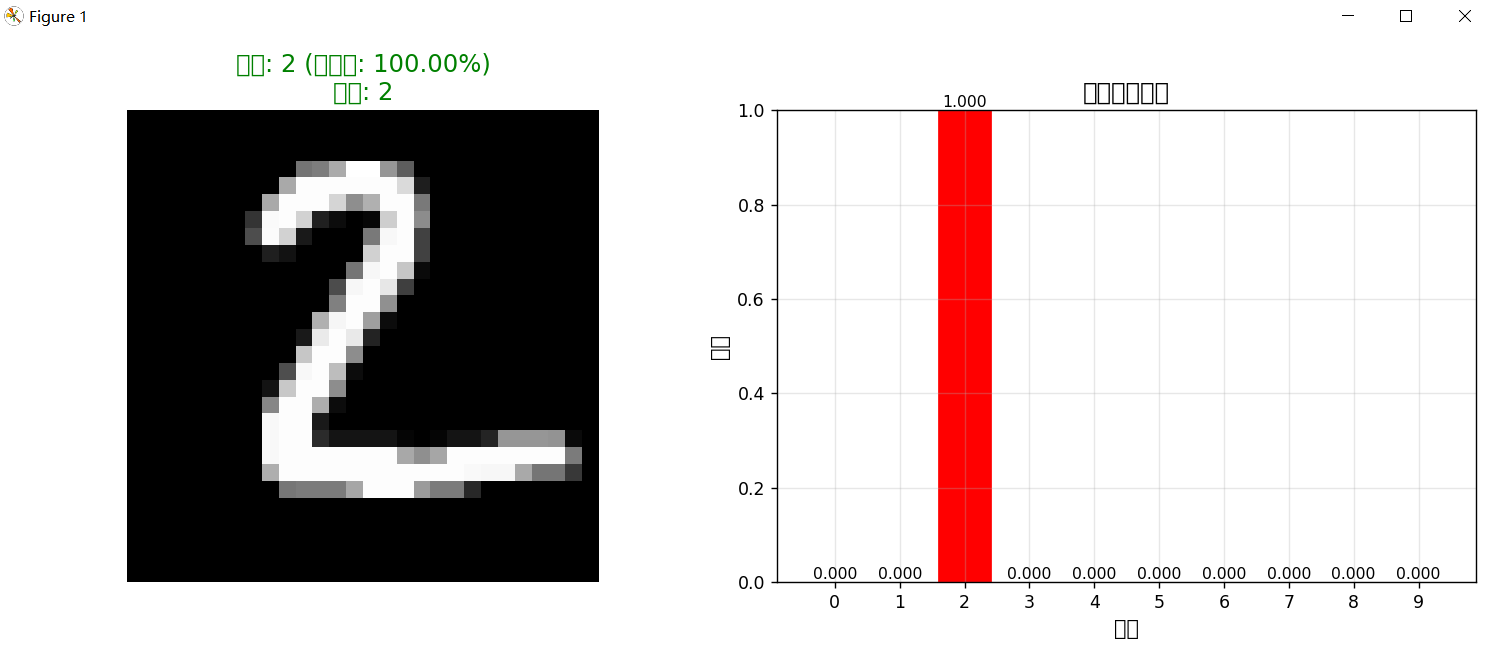
测试样本 1:
预测结果: 数字 2
置信度: 100.00%
所有类别的概率:
数字 0: 0.0000
数字 1: 0.0000
数字 2: 1.0000
数字 3: 0.0000
数字 4: 0.0000
数字 5: 0.0000
数字 6: 0.0000
数字 7: 0.0000
数字 8: 0.0000
数字 9: 0.0000
测试样本 2:
预测结果: 数字 1
置信度: 100.00%
所有类别的概率:
数字 0: 0.0000
数字 1: 1.0000
数字 2: 0.0000
数字 3: 0.0000
数字 4: 0.0000
数字 5: 0.0000
数字 6: 0.0000
数字 7: 0.0000
数字 8: 0.0000
数字 9: 0.0000
==================================================
批量预测评估
==================================================
正在测试集上评估模型...
正在加载测试数据...
测试数据: (10000, 28, 28)
评估结果:
样本数量: 100
准确率: 100.00%
预测错误数: 0
✅ 所有样本都分类正确!四、关键技术详解
4.1 模型加载机制
4.1.1 TensorFlow模型格式
python
# HDF5格式模型文件结构
model = keras.models.load_model('mnist_cnn_final.h5')

# 加载的内容包括:
# 1. 模型架构(层结构)
# 2. 权重参数(W和b)
# 3. 优化器状态
# 4. 训练配置
# 5. 损失函数和评估指标
4.1.2 模型验证
python
def validate_model(model):
    """验证加载的模型是否有效"""

    # 1. 检查输入输出形状
    assert model.input_shape == (None, 28, 28, 1), "输入形状不正确"
    assert model.output_shape == (None, 10), "输出形状不正确"

    # 2. 测试随机输入
    test_input = np.random.randn(1, 28, 28, 1).astype('float32')
    output = model.predict(test_input)

    # 3. 检查输出格式
    assert output.shape == (1, 10), "输出格式不正确"
    assert np.allclose(np.sum(output), 1.0, atol=1e-5), "输出概率和不为1"

    print("✅ 模型验证通过")
效果截图