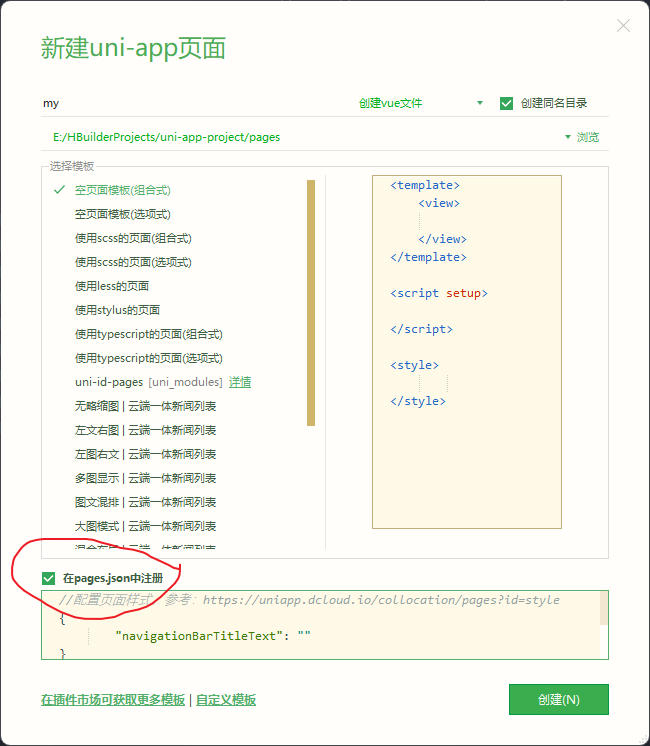
创建uni-app 项目
uni-app 支持两种方式创建项目:
- 通过HBuilderX 创建 2. 通过命令行创建
pages.json 和 tabBar 案例
静态资源(static)尽量不超过2MB,不方便打包
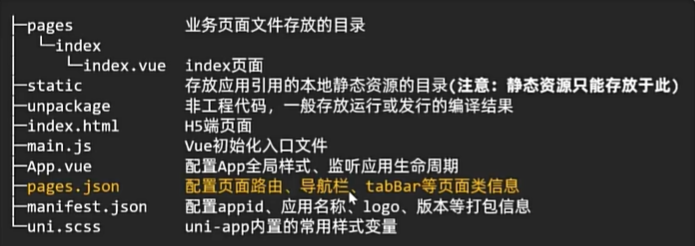
pages.json
- pages 页面路由及窗口表现
- globalstyle 默认窗口表现
- tabBar 至少两个才显示
TypeScript
"pages": [ //pages数组中第一项表示应用启动页,参考:https://uniapp.dcloud.io/collocation/pages
		{
			"path": "pages/index/index",
			"style": {
				"navigationBarTitleText": "uni-app"
			}
		},

		{
			"path": "pages/my/my",
			"style": {
				"navigationBarTitleText": "my"
			}
		}
	],
	"globalStyle": {
		"navigationBarTextStyle": "white",
		"navigationBarTitleText": "uni-app",
		"navigationBarBackgroundColor": "#00ced1",
		"backgroundColor": "#F8F8F8"
	},
	"tabBar": {
		"selectedColor": "#00ced1",
		"list": [
			{
				"pagePath": "pages/index/index",
				"text": "首页",
				"iconPath": "/static/tabs/home_default.png",
				"selectedIconPath": "/static/tabs/home_selected.png"
			},
			{
				"pagePath": "pages/my/my",
				"text": "我的",
				"iconPath": "/static/tabs/user_default.png",
				"selectedIconPath": "/static/tabs/user_selected.png"

			}
uni-app 和 原生小程序开发区别
每个页面是一个.vue 文件,数据绑定及事件处理同Vue.js 规范:
-
属性绑定 src="{{ url }}" 升级成 :src="url"
-
事件绑定 bindtap="eventName" 升级成 @tap="eventName",支持()传参
-
支持Vue 常用指令 v-for、v-if、v-show、v-model 等
调用接口能力,建议前缀wx 替换为uni,养成好习惯,这样支持多端开发。
一、项目模板拉取与基础架构搭建
1. 拉取小兔鲜儿项目模板
TypeScript
# 克隆项目模板代码
git clone http://git.itcast.cn/heimaqianduan/erabbit-uni-app-vue3-ts.git heima-shop

# 进入项目目录
cd heima-shop

# 安装依赖(需提前安装pnpm)
pnpm install

# 编译为微信小程序代码
pnpm dev:mp-weixin
关键配置
- 在
manifest.json中添加微信小程序appid(登录微信公众平台获取) - 编译完成后,打开微信开发者工具,导入
unpackage/dist/dev/mp-weixin目录即可预览
2. 集成 uni-ui 组件库(自动引入)
安装依赖
TypeScript
# 安装uni-ui组件库
pnpm i @dcloudio/uni-ui

# 安装组件类型声明(TS项目必备)
pnpm i -D @uni-helper/uni-ui-types
配置自动引入(pages.json)
TypeScript
{
  "easycom": {
    "autoscan": true,
    "custom": {
      // 匹配uni-ui组件,无需手动import
      "^uni-(.*)": "@dcloudio/uni-ui/lib/uni-$1/uni-$1.vue"
    }
  },
  "pages": [/* 原有页面配置 */]
}
配置 TS 类型(tsconfig.json)
TypeScript
{
  "compilerOptions": {
    "types": [
      "@dcloudio/types",
      "@types/wechat-miniprogram",
      "@uni-helper/uni-app-types",
      "@uni-helper/uni-ui-types" // 新增uni-ui类型声明
    ]
  }
}
3. Pinia 状态持久化
核心差异
- 小程序不支持浏览器的
localStorage,需使用uni.setStorageSync()/uni.getStorageSync()替代 - 通过 Pinia 的
persist配置自定义存储逻辑,实现多端兼容
代码示例(stores/modules/member.ts)
TypeScript
import { defineStore } from 'pinia'

// 用户信息状态管理
export const useMemberStore = defineStore('member', {
  state: () => ({
    profile: null // 存储用户登录信息
  }),
  persist: {
    // 自定义持久化存储方式
    storage: {
      // 存储数据:使用uni-app多端兼容API
      setItem(key: string, value: string) {
        uni.setStorageSync(key, value)
      },
      // 读取数据:对应读取API
      getItem(key: string) {
        return uni.getStorageSync(key)
      }
    }
  },
  actions: {
    // 清空用户信息(退出登录时调用)
    clearProfile() {
      this.profile = null
    }
  }
})
二、核心工具封装:uni.request 请求封装
1. 封装思路
- 统一基础地址、超时时间、请求头
- 拦截请求添加身份标识(source-client)和 Token
- 统一响应处理(状态码判断、错误提示、401 跳转登录)
- 支持 TypeScript 类型推导,返回结构化数据
2. 完整封装代码(utils/http.ts)
TypeScript
import { useMemberStore } from '@/stores/modules/member'

// 定义响应数据结构
interface Data<T> {
  code: string
  msg: string
  result: T
}

// 基础地址(首选+备用)
const baseURL = 'https://pcapi-xiaotuxian-front-devtest.itheima.net'
// const baseURL = 'https://pcapi-xiaotuxian-front.itheima.net' // 备用地址

// 请求拦截器配置
const httpInterceptor = {
  // 拦截前触发
  invoke(options: UniApp.RequestOptions) {
    // 1. 拼接基础地址(非http开头需拼接)
    if (!options.url.startsWith('http')) {
      options.url = baseURL + options.url
    }
    // 2. 设置超时时间(10秒)
    options.timeout = 10000
    // 3. 添加小程序端请求头标识
    options.header = {
      ...options.header,
      'source-client': 'miniapp' // 服务端识别客户端类型
    }
    // 4. 添加Token(登录后获取)
    const memberStore = useMemberStore()
    const token = memberStore.profile?.token
    if (token) {
      options.header.Authorization = token
    }
  }
}

// 注册请求拦截器(拦截request和uploadFile)
uni.addInterceptor('request', httpInterceptor)
uni.addInterceptor('uploadFile', httpInterceptor)

// 封装Promise请求函数
export const http = <T>(options: UniApp.RequestOptions) => {
  return new Promise<Data<T>>((resolve, reject) => {
    uni.request({
      ...options,
      // 响应成功处理
      success(res) {
        // 2xx状态码:获取数据成功
        if (res.statusCode >= 200 && res.statusCode < 300) {
          resolve(res.data as Data<T>)
        }
        // 401状态码:Token失效,跳转登录页
        else if (res.statusCode === 401) {
          const memberStore = useMemberStore()
          memberStore.clearProfile() // 清空用户信息
          uni.navigateTo({ url: '/pages/login/login' }) // 跳转登录
          reject(res)
        }
        // 其他状态码:通用错误提示
        else {
          uni.showToast({
            icon: 'none',
            title: (res.data as Data<T>).msg || '数据获取失败'
          })
          reject(res)
        }
      },
      // 响应失败处理(网络错误)
      fail(err) {
        uni.showToast({
          icon: 'none',
          title: '网络错误,换个网络试试'
        })
        reject(err)
      }
    })
  })
}
3. 使用示例
TypeScript
// 定义数据类型(TS类型推导)
interface BannerItem {
  id: number
  imageUrl: string
  link: string
}

// 调用请求函数
const getBannerList = async () => {
  const res = await http<BannerItem[]>({
    method: 'GET',
    url: '/home/banner' // 无需拼接基础地址
  })
  console.log('首页轮播图数据:', res.result)
}

// 执行请求
getBannerList()
三、首页核心功能:自定义导航栏(适配多机型)
1. 配置隐藏默认导航栏(pages.json)
TypeScript
{
  "pages": [
    {
      "path": "pages/index/index",
      "style": {
        "navigationStyle": "custom", // 隐藏默认导航栏
        "navigationBarTextStyle": "white", // 文字颜色(隐藏后仍需配置,影响状态栏)
        "navigationBarTitleText": "首页"
      }
    }
  ]
}
2. 自定义导航栏组件(适配安全区域)
TypeScript
<template>
  <!-- 自定义导航栏:适配不同机型安全区域 -->
  <view class="navbar" :style="{ paddingTop: safeAreaInsets?.top + 'px' }">
    <view class="navbar-title">小兔鲜儿 | 新鲜·亲民·快捷</view>
    <view class="search-bar">
      <uni-icons type="search" size="16" color="#999"></uni-icons>
      <text class="search-text">搜索商品</text>
    </view>
  </view>
</template>

<script setup>
// 获取系统信息:安全区域距离(适配iPhone刘海屏等)
const { safeAreaInsets } = uni.getSystemInfoSync()
</script>

<style scoped>
.navbar {
  background-color: #27BA9B;
  padding-bottom: 12rpx;
}
.navbar-title {
  color: white;
  font-size: 18px;
  font-weight: bold;
  text-align: center;
  margin-bottom: 8rpx;
}
.search-bar {
  display: flex;
  align-items: center;
  background-color: white;
  border-radius: 30rpx;
  padding: 8rpx 16rpx;
  margin: 0 16rpx;
}
.search-text {
  margin-left: 8rpx;
  font-size: 14px;
  color: #999;
}
</style>
3. 核心适配逻辑
safeAreaInsets.top:获取状态栏到安全区域的距离,避免内容被刘海屏遮挡- 导航栏背景色与全局样式统一(
#27BA9B),保持视觉一致性 - 搜索栏使用
uni-icons组件(uni-ui 内置),无需额外引入
四、关键注意事项
- 接口请求必须添加
source-client: miniapp请求头,否则服务端可能拒绝响应 - Token 失效(401 状态码)时,需清空用户信息并强制跳转登录页
- 静态资源必须放在
static目录下,否则 uni-app 无法正确识别 - 开发 TS 项目时,务必安装对应的类型声明文件,避免类型报错
- 微信开发者工具需开启「服务端口」,否则 HBuilderX/VS Code 无法编译预览