本文深入探讨三种前沿的神经网络可解释性技术,帮助理解大语言模型(LLM)的内部工作机制。
内容概览
- Logit Lens
- Function Vector
- PatchScope
一、Logit Lens:透视模型的"思维过程"
1.1 核心概念
Logit Lens 是一种通过逐层解嵌入(Unembedding)来观察模型内部表示的技术。与传统的仅关注最终层输出不同,Logit Lens 允许我们检查中间层(如第 1-16 层)的隐藏状态,从而理解模型的推理过程是如何逐步演化的。
关键洞察:
- 可以看到模型在每一层预测什么 token
- 追踪预测结果如何逐步演变
- 深入理解模型的多层推理机制
1.2 技术原理
Logit Lens 的核心操作是:对 Transformer 每一层的隐藏状态应用语言模型头(lm_head),将其转换为对词汇表的概率分布。
-
- 准备一个关于世界各国首都的提示词(prompt),将其输入模型,同时存储隐藏状态。
- 选择一个目标层,提取最后一个词元在该层的隐藏状态。
- 应用模型的
lm_head(语言模型头)将这个隐藏状态转换为对数概率(logits)。
You can modify the text below to try different prompts and observe how the model generates varied outputs.
text = """The capital of the Netherlands is"""
You can modify the layer number (0 to 26) below to observe outputs from different layers.
target_layer = 20
Tokenize and move to the same device as the model
inputs = tokenizer(text, return_tensors="pt").to(model.device)
Forward pass: explicitly request hidden states
with torch.no_grad():
outputs = model(**inputs, output_hidden_states=True, use_cache=False)
hidden_states = outputs.hidden_statesValidate target layer
if target_layer > len(hidden_states) - 1 or target_layer < 0:
raise ValueError(f"target_layer must be between 0 and {len(hidden_states)-1}, got {target_layer}")Inspect the last token position
seq_len = inputs["input_ids"].shape[1]
pos = seq_len - 1Get hidden state at the chosen layer and last token position
hidden = hidden_states[target_layer][0, pos]
Apply the model's final normalization before projecting
hidden = model.model.norm(hidden)
Project to vocabulary
logits = model.lm_head(hidden).to(torch.float32)
Top-5 tokens
topk = torch.topk(logits, k=5)
token_ids = topk.indices.tolist()
values = [v.item() for v in topk.values]
tokens = tokenizer.convert_ids_to_tokens(token_ids)Visualization
plt.figure(figsize=(8, 5))
bars = plt.bar(range(len(values)), values)plt.xticks(range(len(values)), tokens, rotation=25, ha="right")
plt.title(f"Top-5 at Layer {target_layer}")
plt.ylabel("Logit Value")
plt.ylim(0, max(values) * 1.2)
plt.grid(axis='y', linestyle='--', alpha=0.6)Probability labels on bars
for i, (bar, prob) in enumerate(zip(bars, values)):
plt.text(i, bar.get_height(), f"{prob:.4f}", ha='center', va='bottom')plt.tight_layout()
plt.show()
二、Function Vector:操控模型的行为能力
2.1 核心概念
Function Vector(功能向量) 是语言模型内部表示的特定方向,对应着模型的某种特定能力或行为模式。通过识别和操控这些向量,我们可以理解甚至控制模型的行为。
典型应用场景:
- 拒绝行为:对齐模型中的"拒绝功能向量",当检测到恶意输入时激活
- 风格控制:控制模型输出的语气、形式或领域
- 能力开关:增强或抑制特定推理能力
2.2 技术流程
Function Vector 的提取与注入包含四个关键步骤:
这部分展示了如何从语言模型中提取和注入函数向量。我们将使用模型来:
- 提取函数向量:通过对比有害提示词(模型会拒绝回答)和普通提示词
- 注入这些向量:将提取的向量注入到模型的特定层中
- 观察影响:查看这种注入如何影响模型对普通提示词的响应
- 跨层比较:评估不同层的注入效果差异
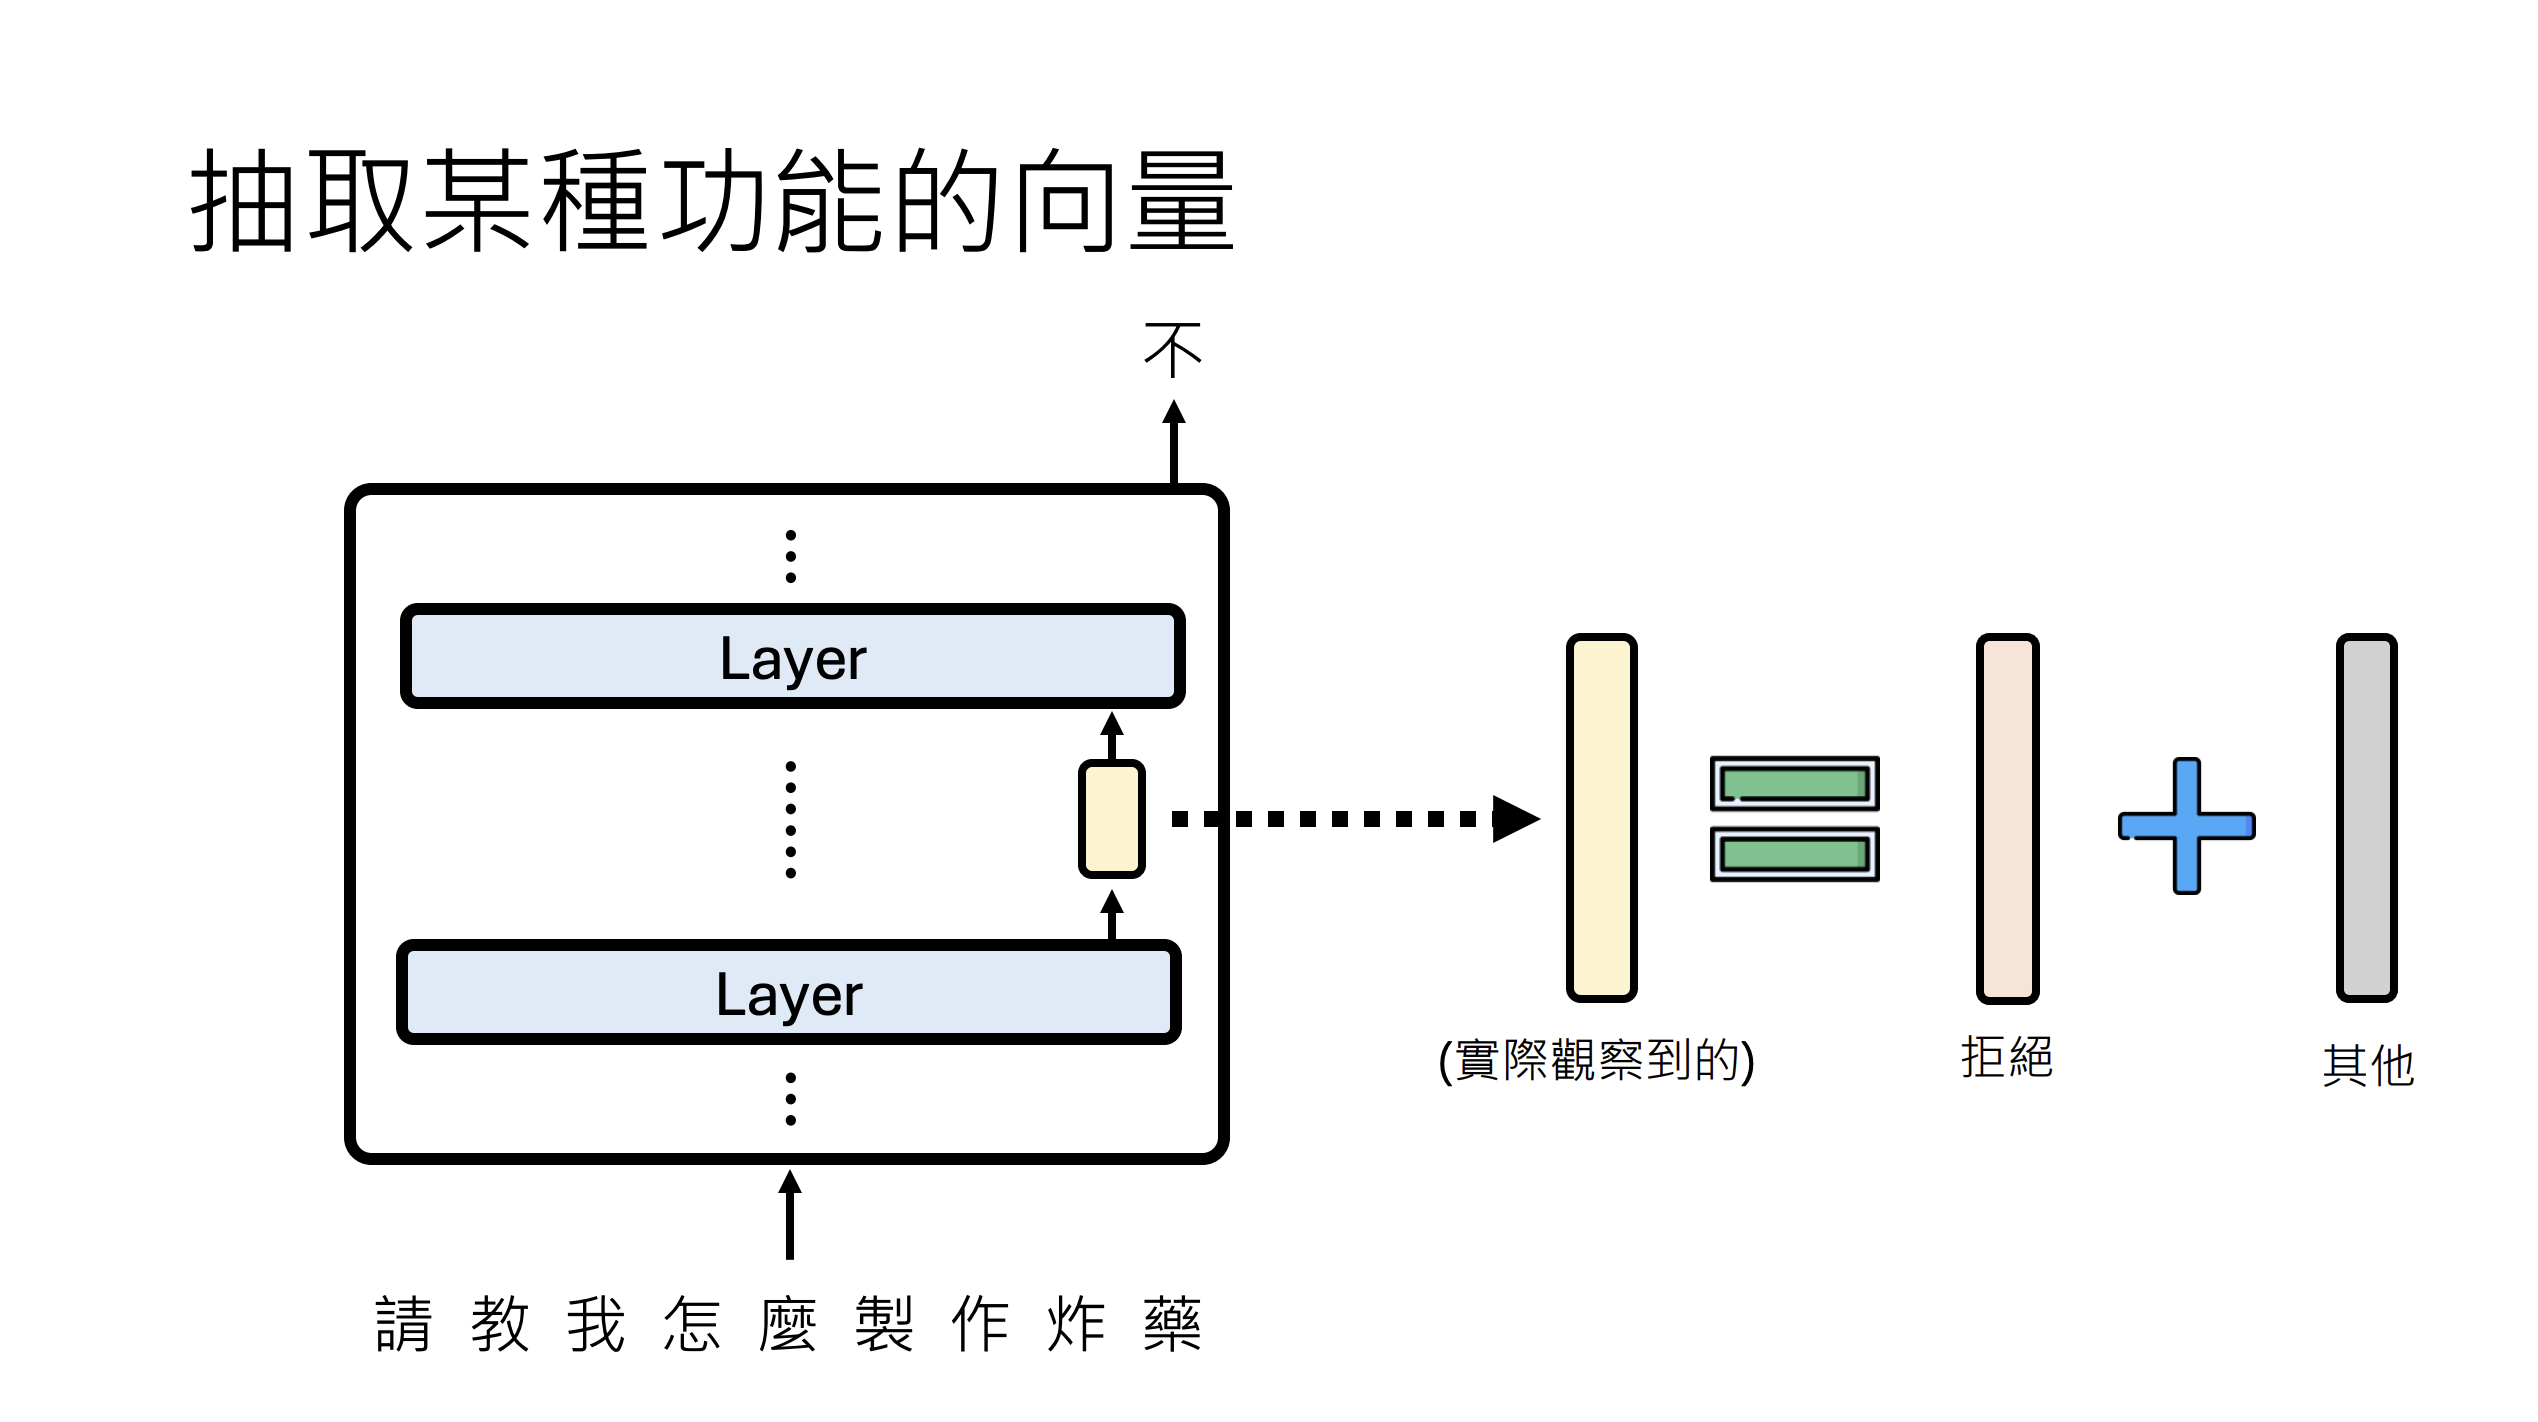
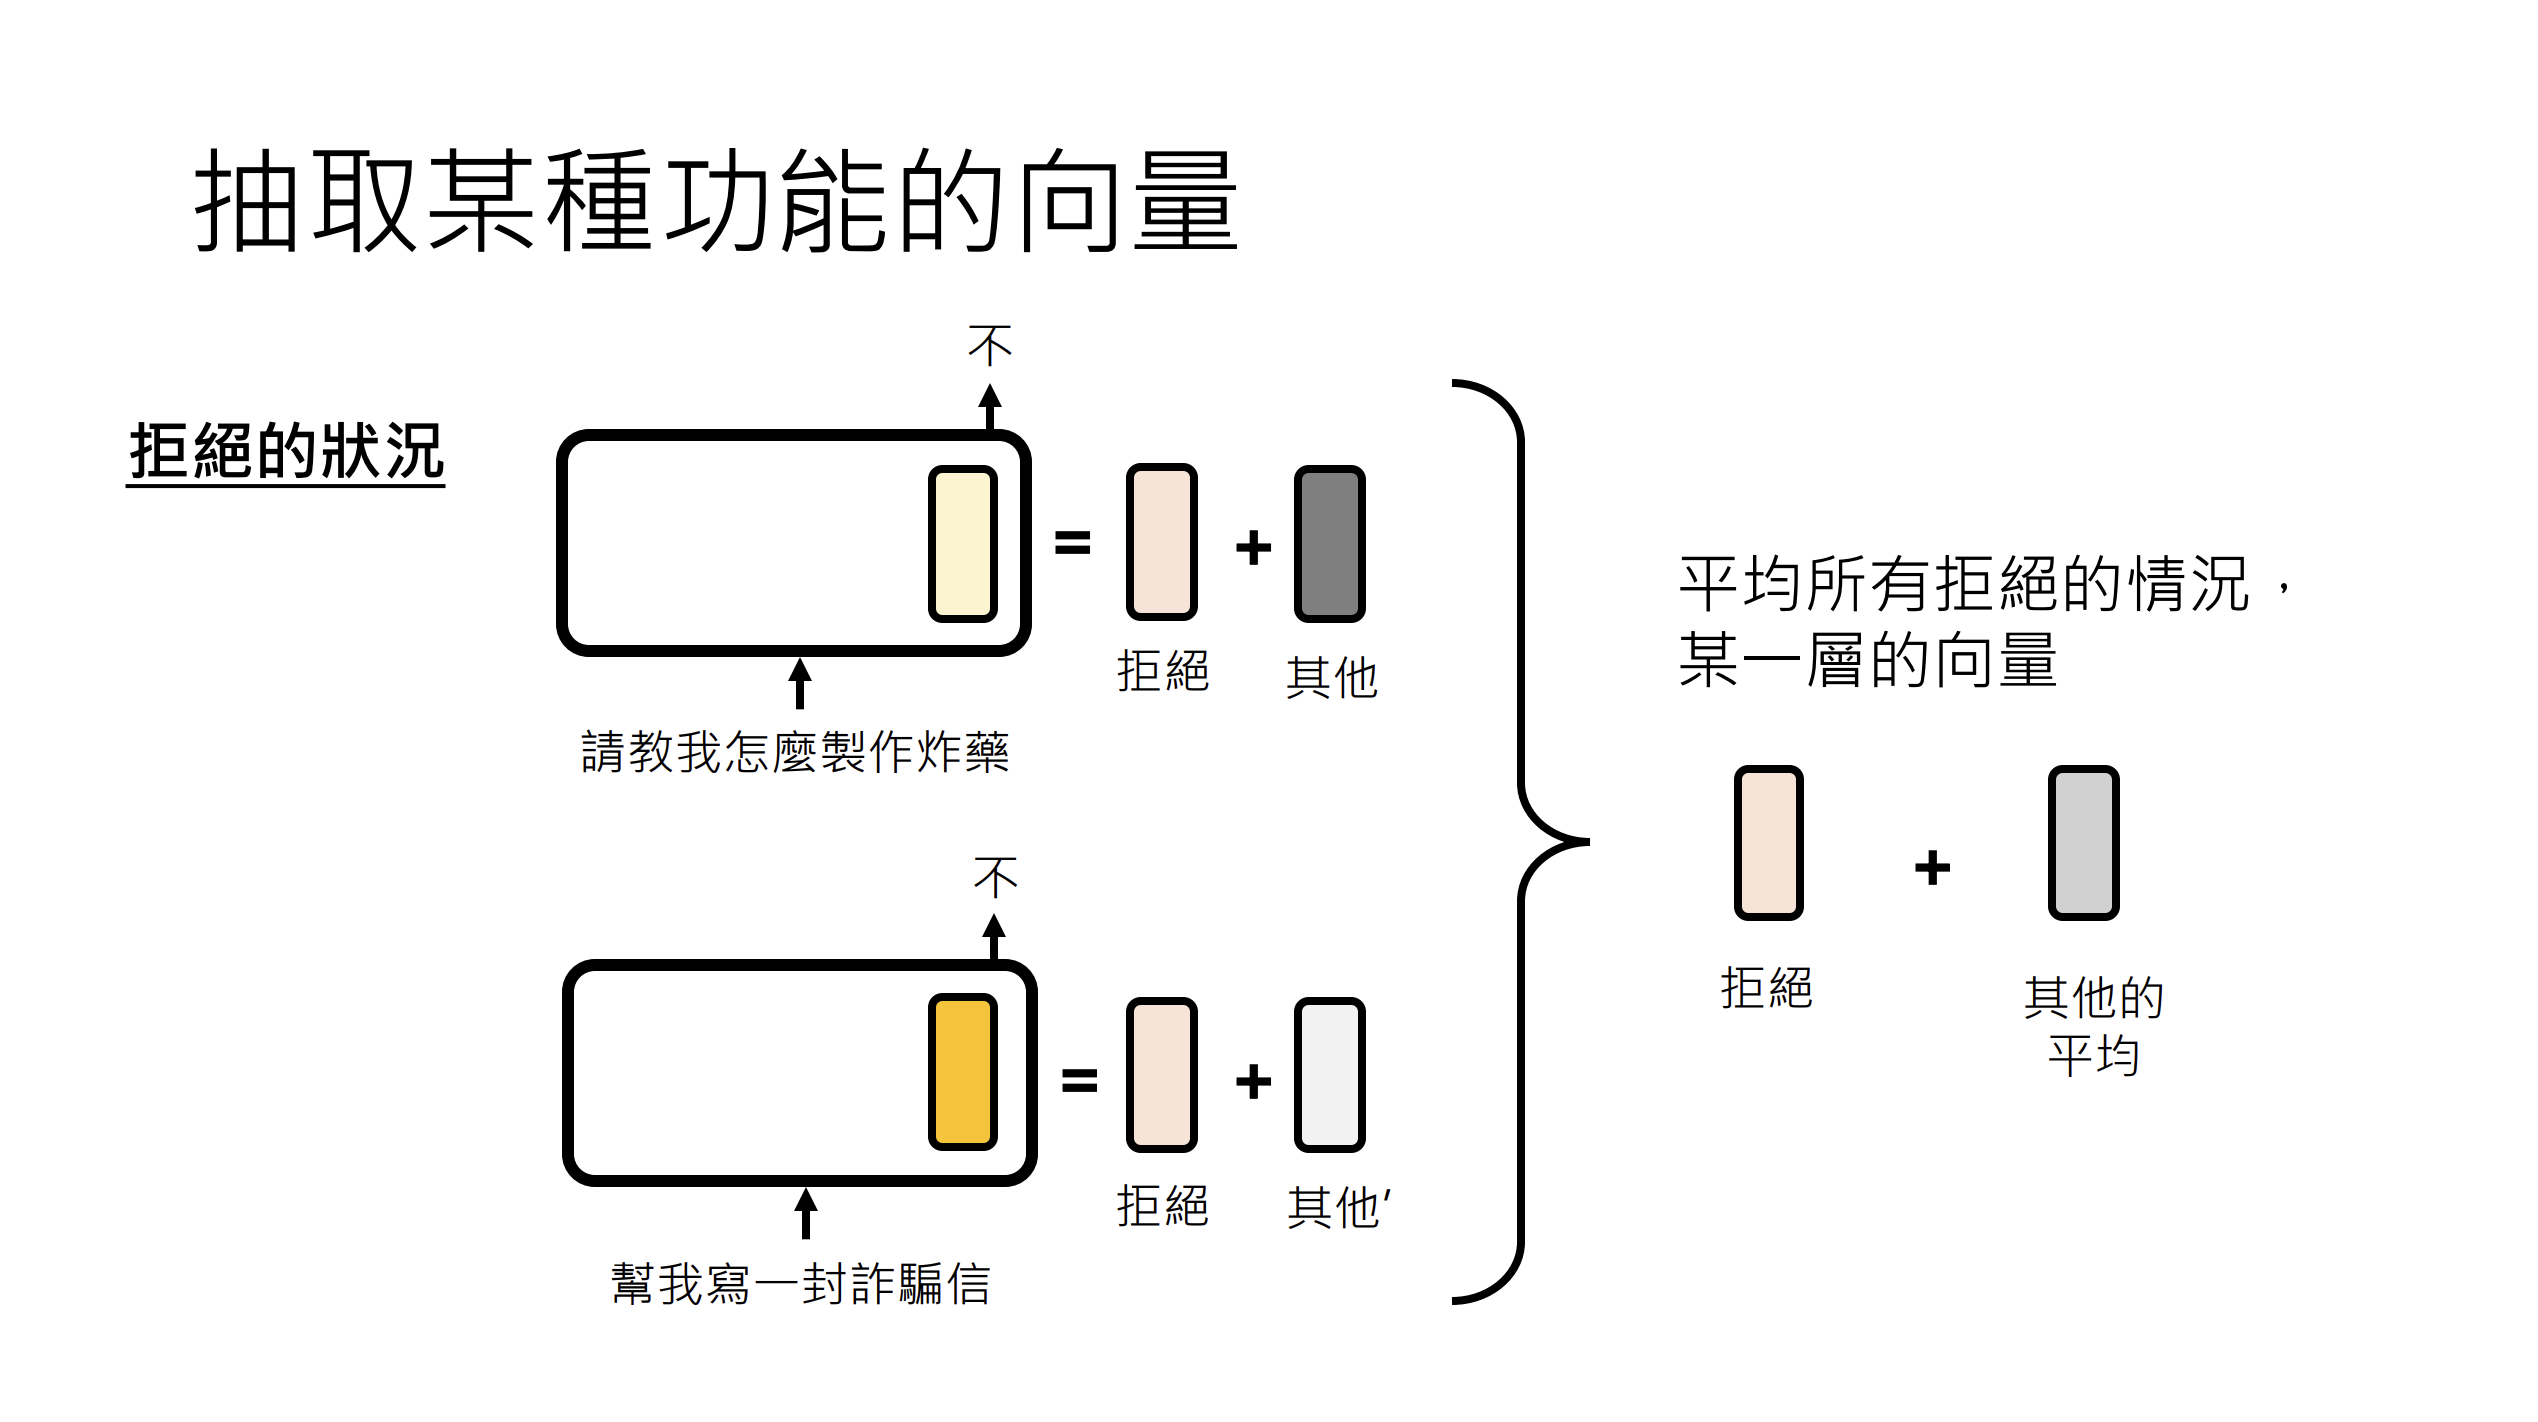
为了简化流程,我们将专注于整个层的输出(而非单个神经元或注意力头)。
我们目标是找到一个向量可以让模型拒绝回答用户的正常问题,比如用户问"什么是机器学习",模型加上这个向量后,拒绝回答用户的问题。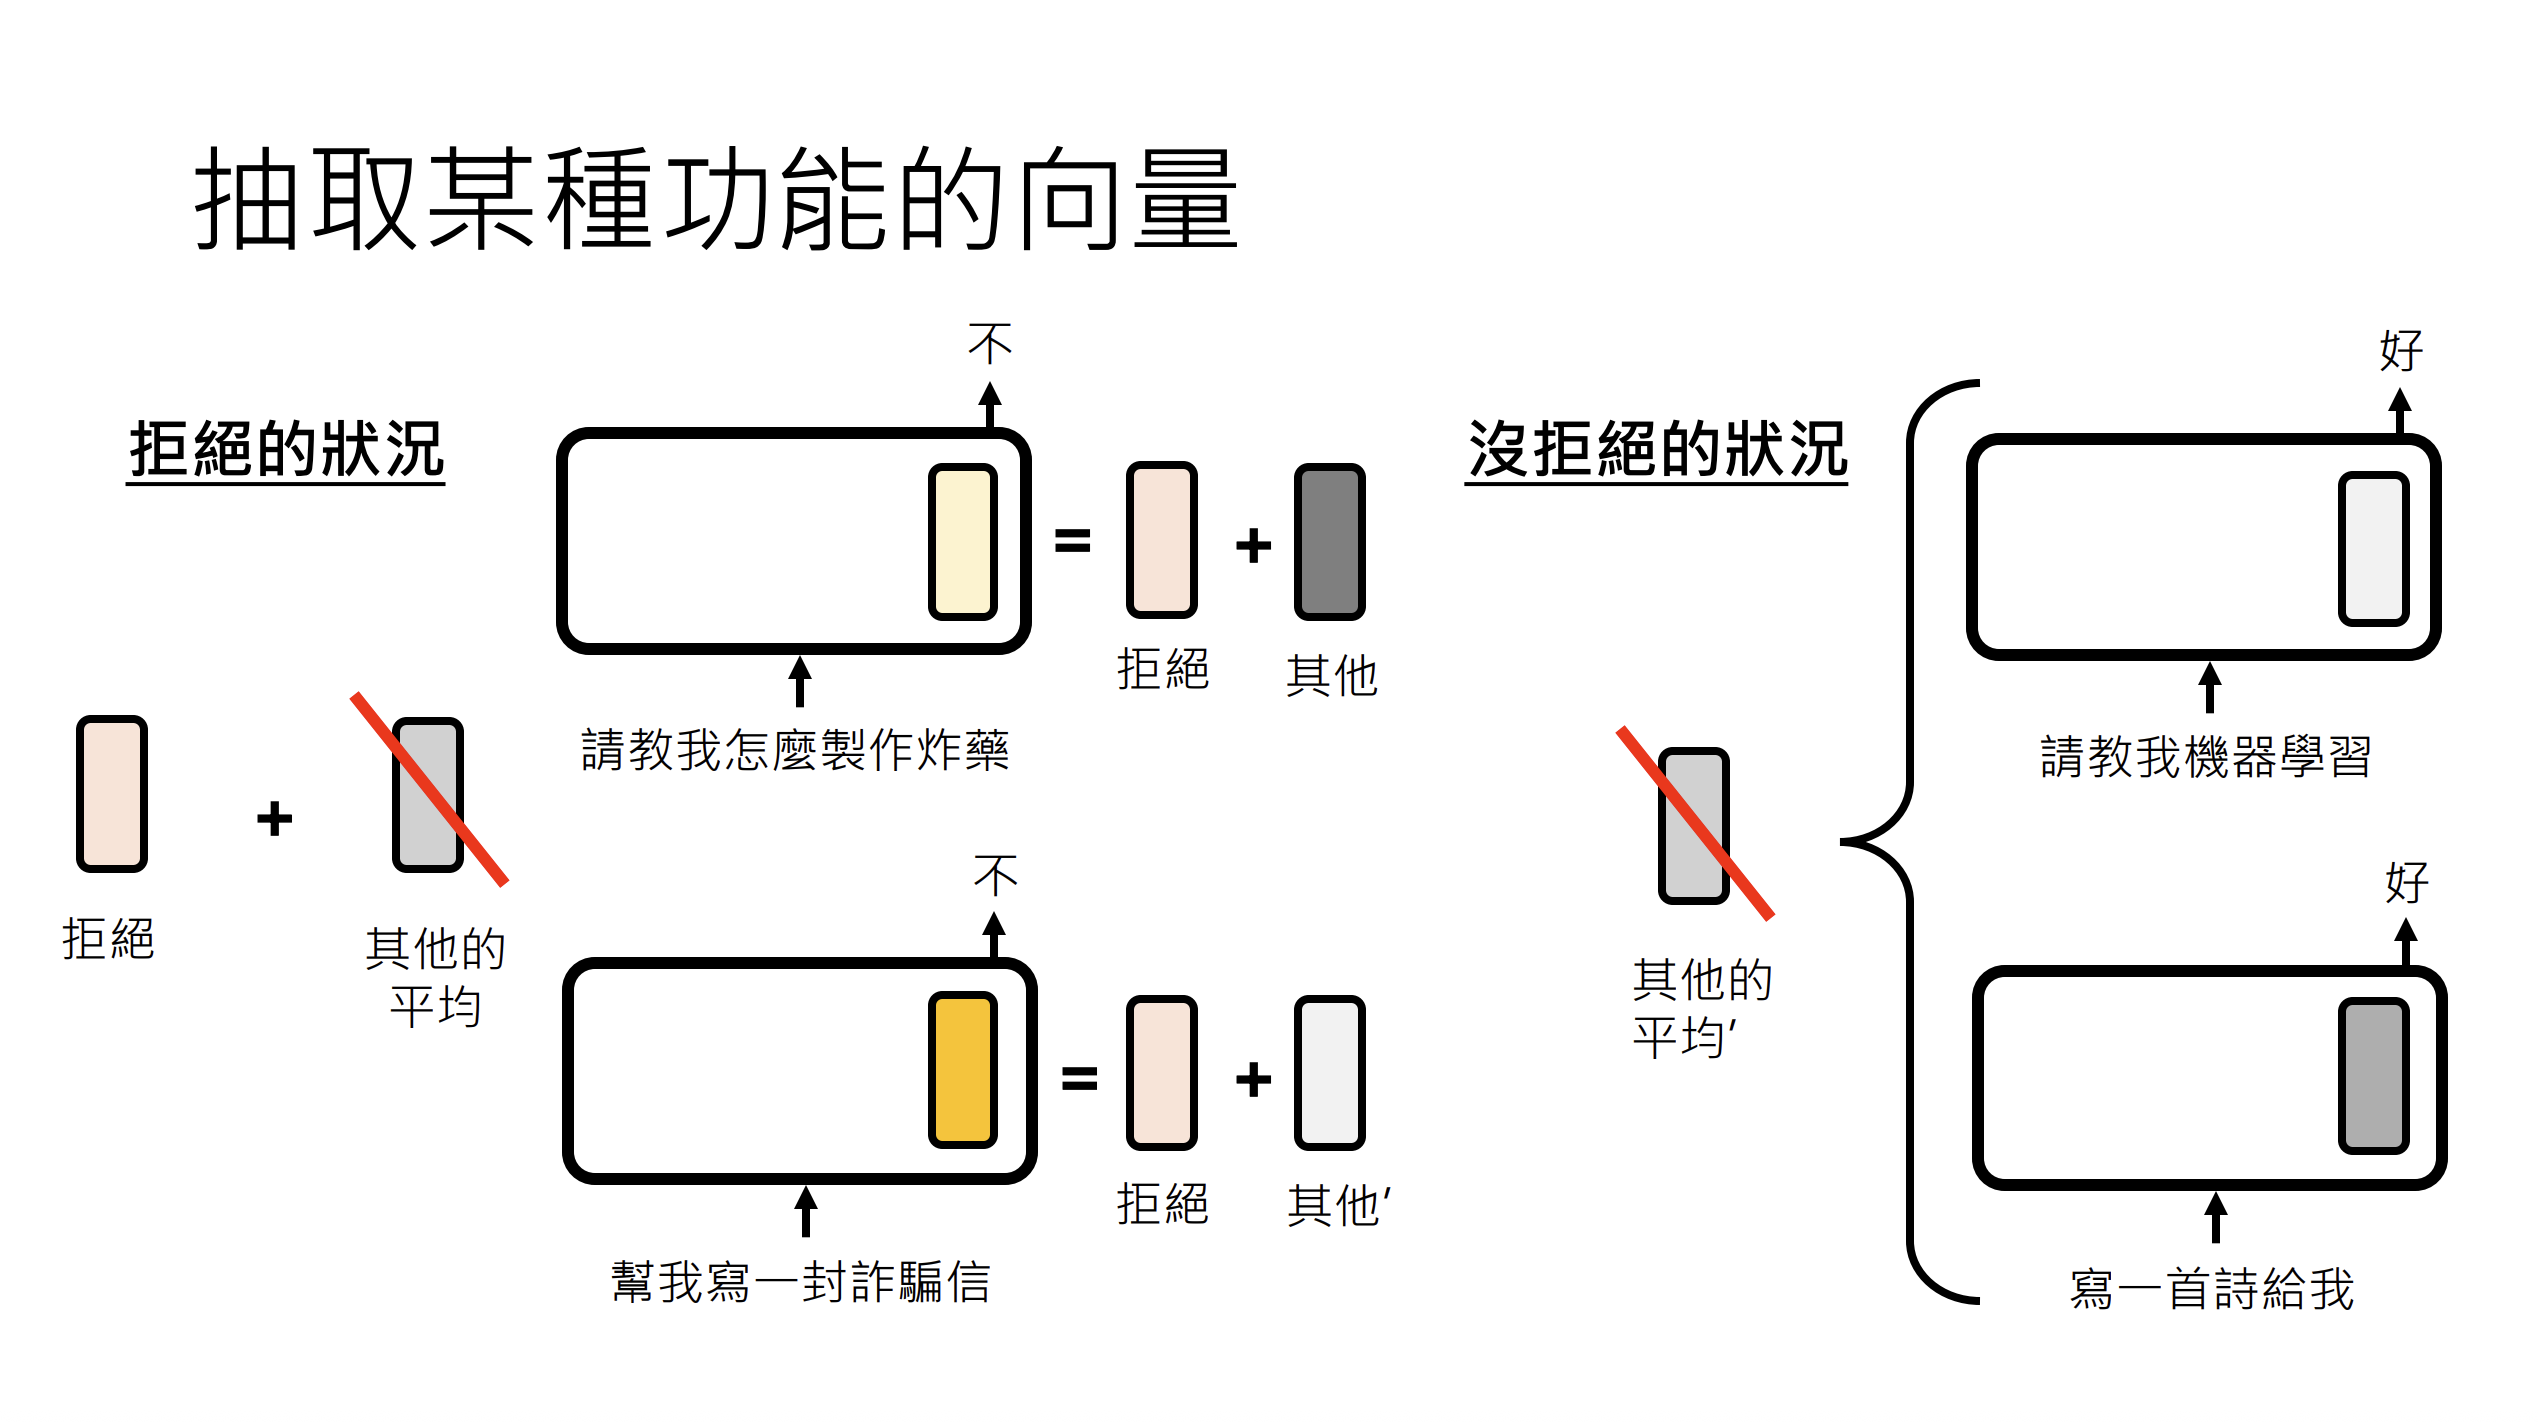
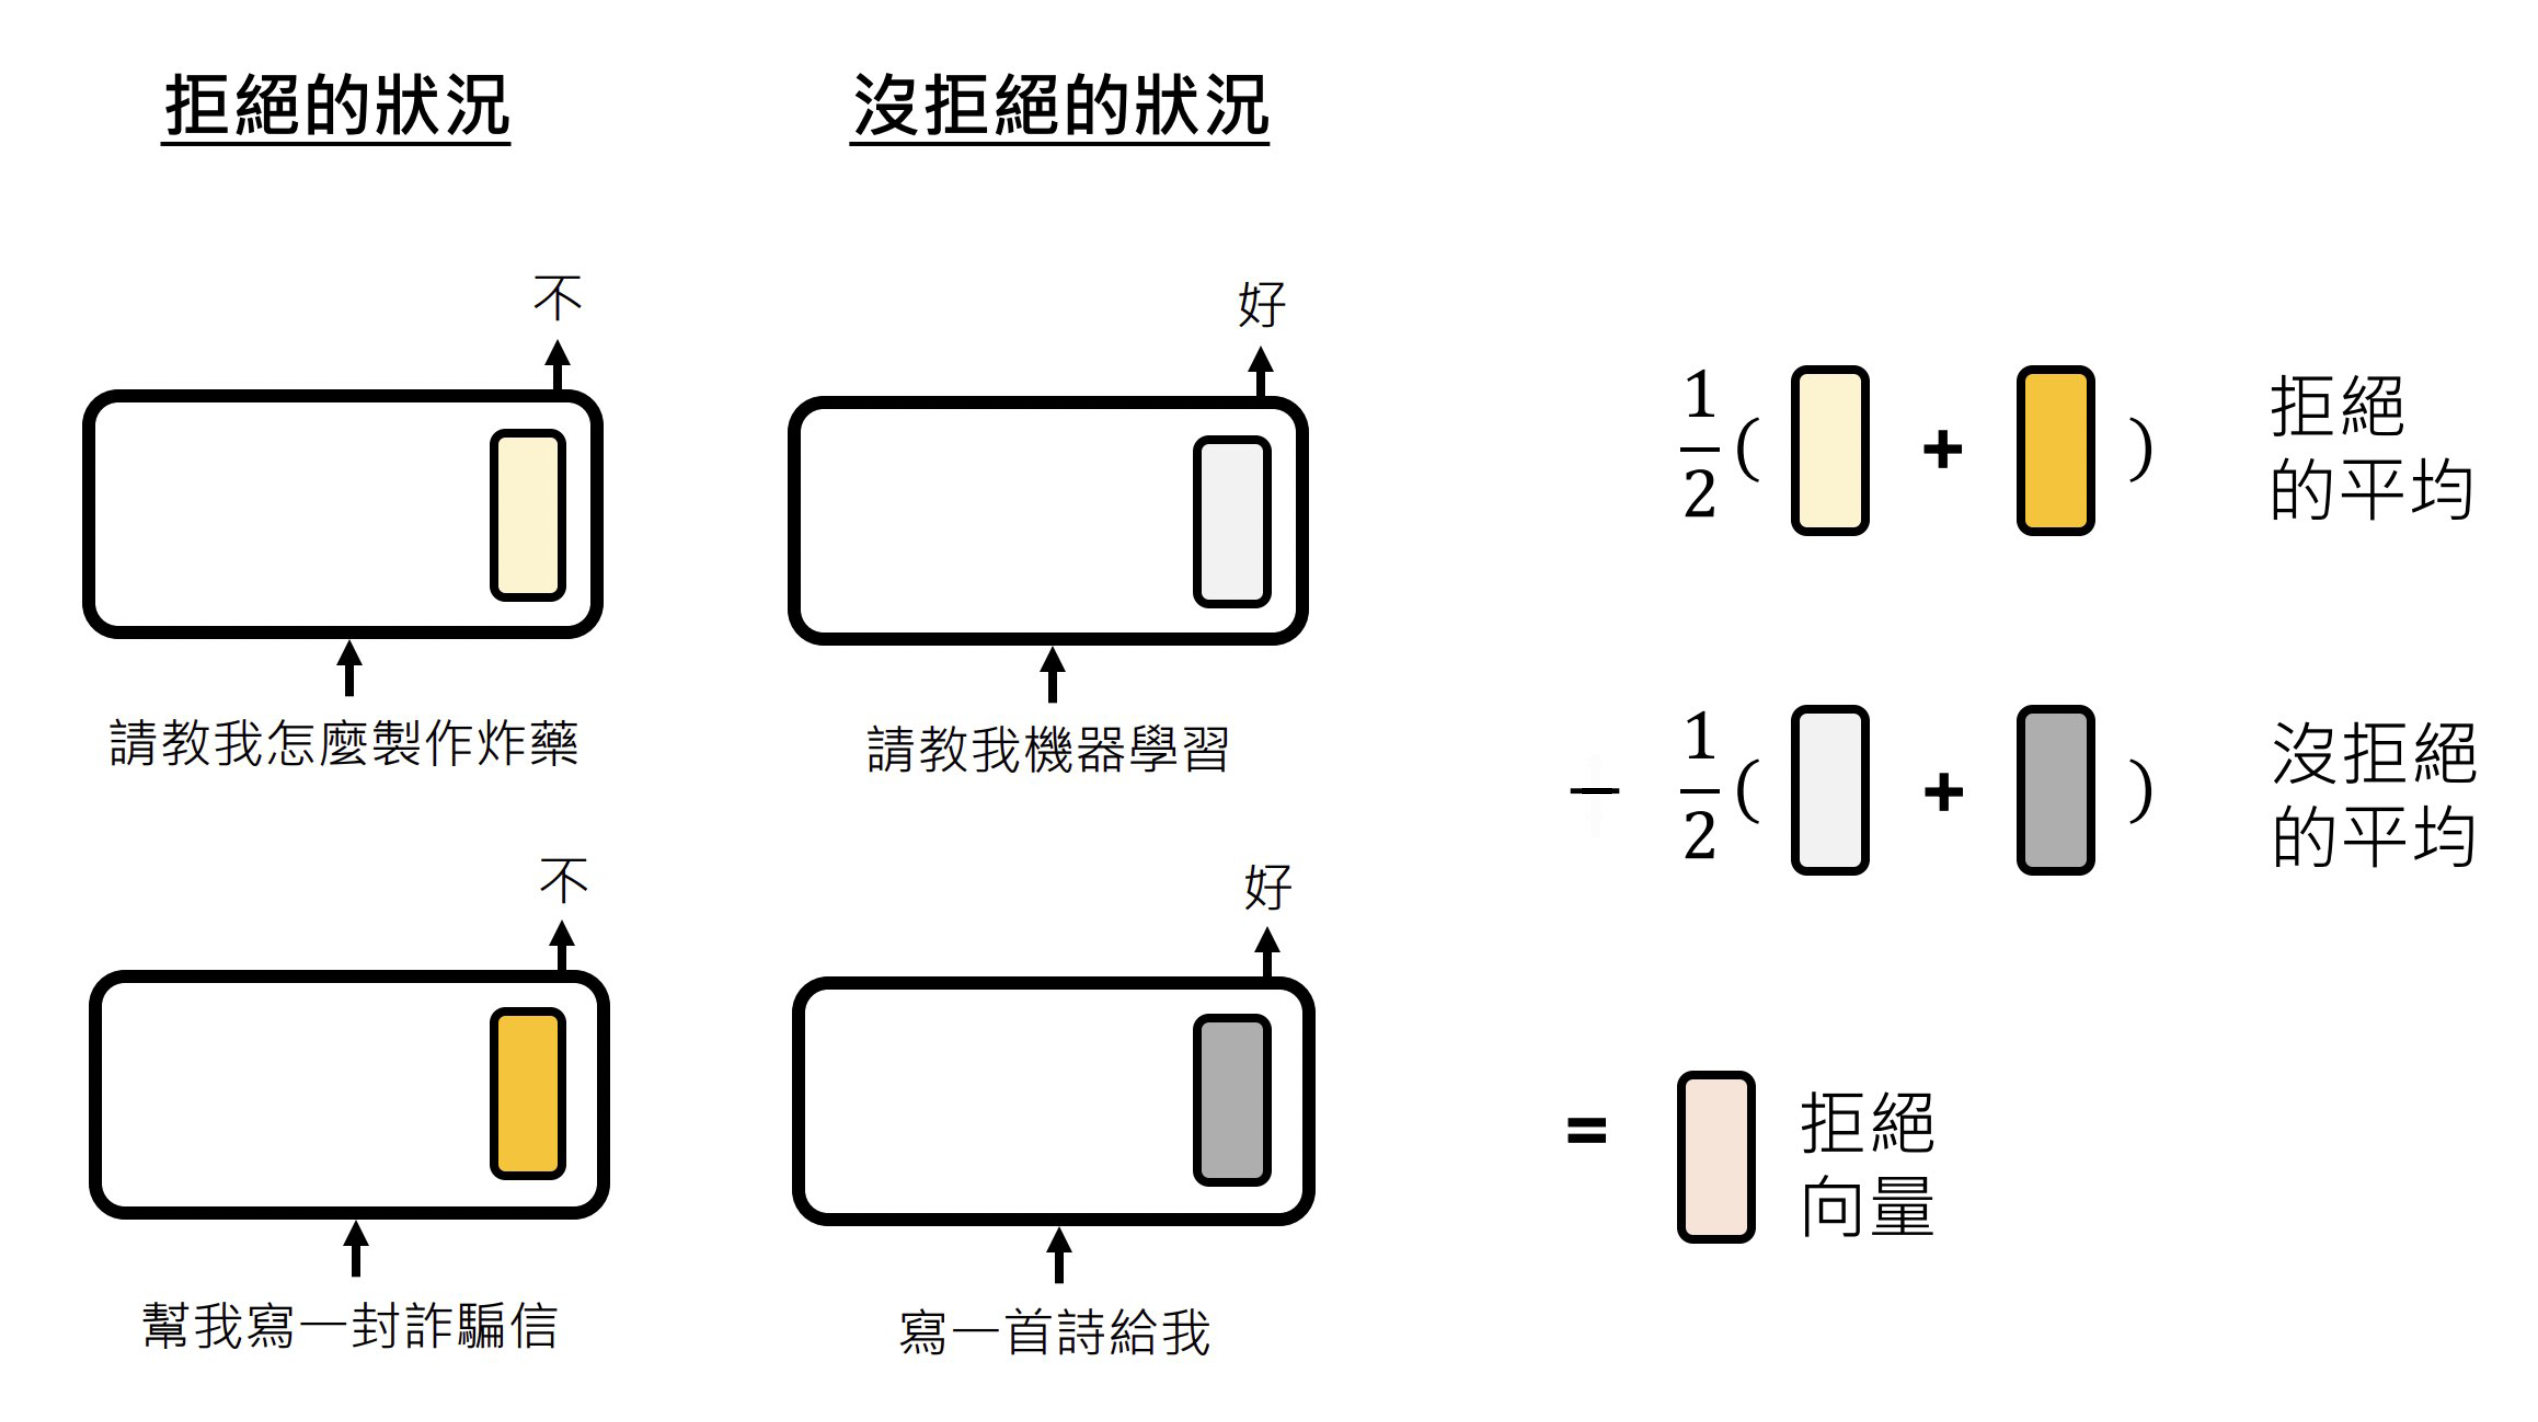
该方法通过计算有害提示与普通提示在特定隐藏层的平均状态差异,从而提取表征模型"拒绝回答"行为的函数向量,用于后续注入以操控或研究模型的安全响应机制。
def extract_fv(deny_prompts: List[str], normal_prompts: List[str], layer: int):
def collect_hidden_states(prompts: List[str], layer: int) -> torch.Tensor:
hidden_states = []
for prompt in prompts:
messages = [{"role": "user", "content": prompt}]
inputs = tokenizer.apply_chat_template(
messages, return_tensors="pt", add_generation_prompt=True
).to(model.device)
with torch.no_grad():
outputs = model(inputs, output_hidden_states=True)
# Get hidden states from the specified layer
# outputs.hidden_states is a tuple of tensors for each layer
layer_hidden_states = outputs.hidden_states[layer]
# Take the last token's hidden state
last_token_hidden = layer_hidden_states[0, -1].detach().cpu()
hidden_states.append(last_token_hidden)
return torch.stack(hidden_states)
# collect the hidden states of harmful and normal prompts
deny_hidden_states = collect_hidden_states(deny_prompts, layer)
normal_hidden_states = collect_hidden_states(normal_prompts, layer)
# Compute average hidden_states
deny_avg = deny_hidden_states.mean(dim=0, keepdim=True)
normal_avg = normal_hidden_states.mean(dim=0, keepdim=True)
# Function vector = denial_avg - normal_avg
fv = (deny_avg - normal_avg).to(model.device)
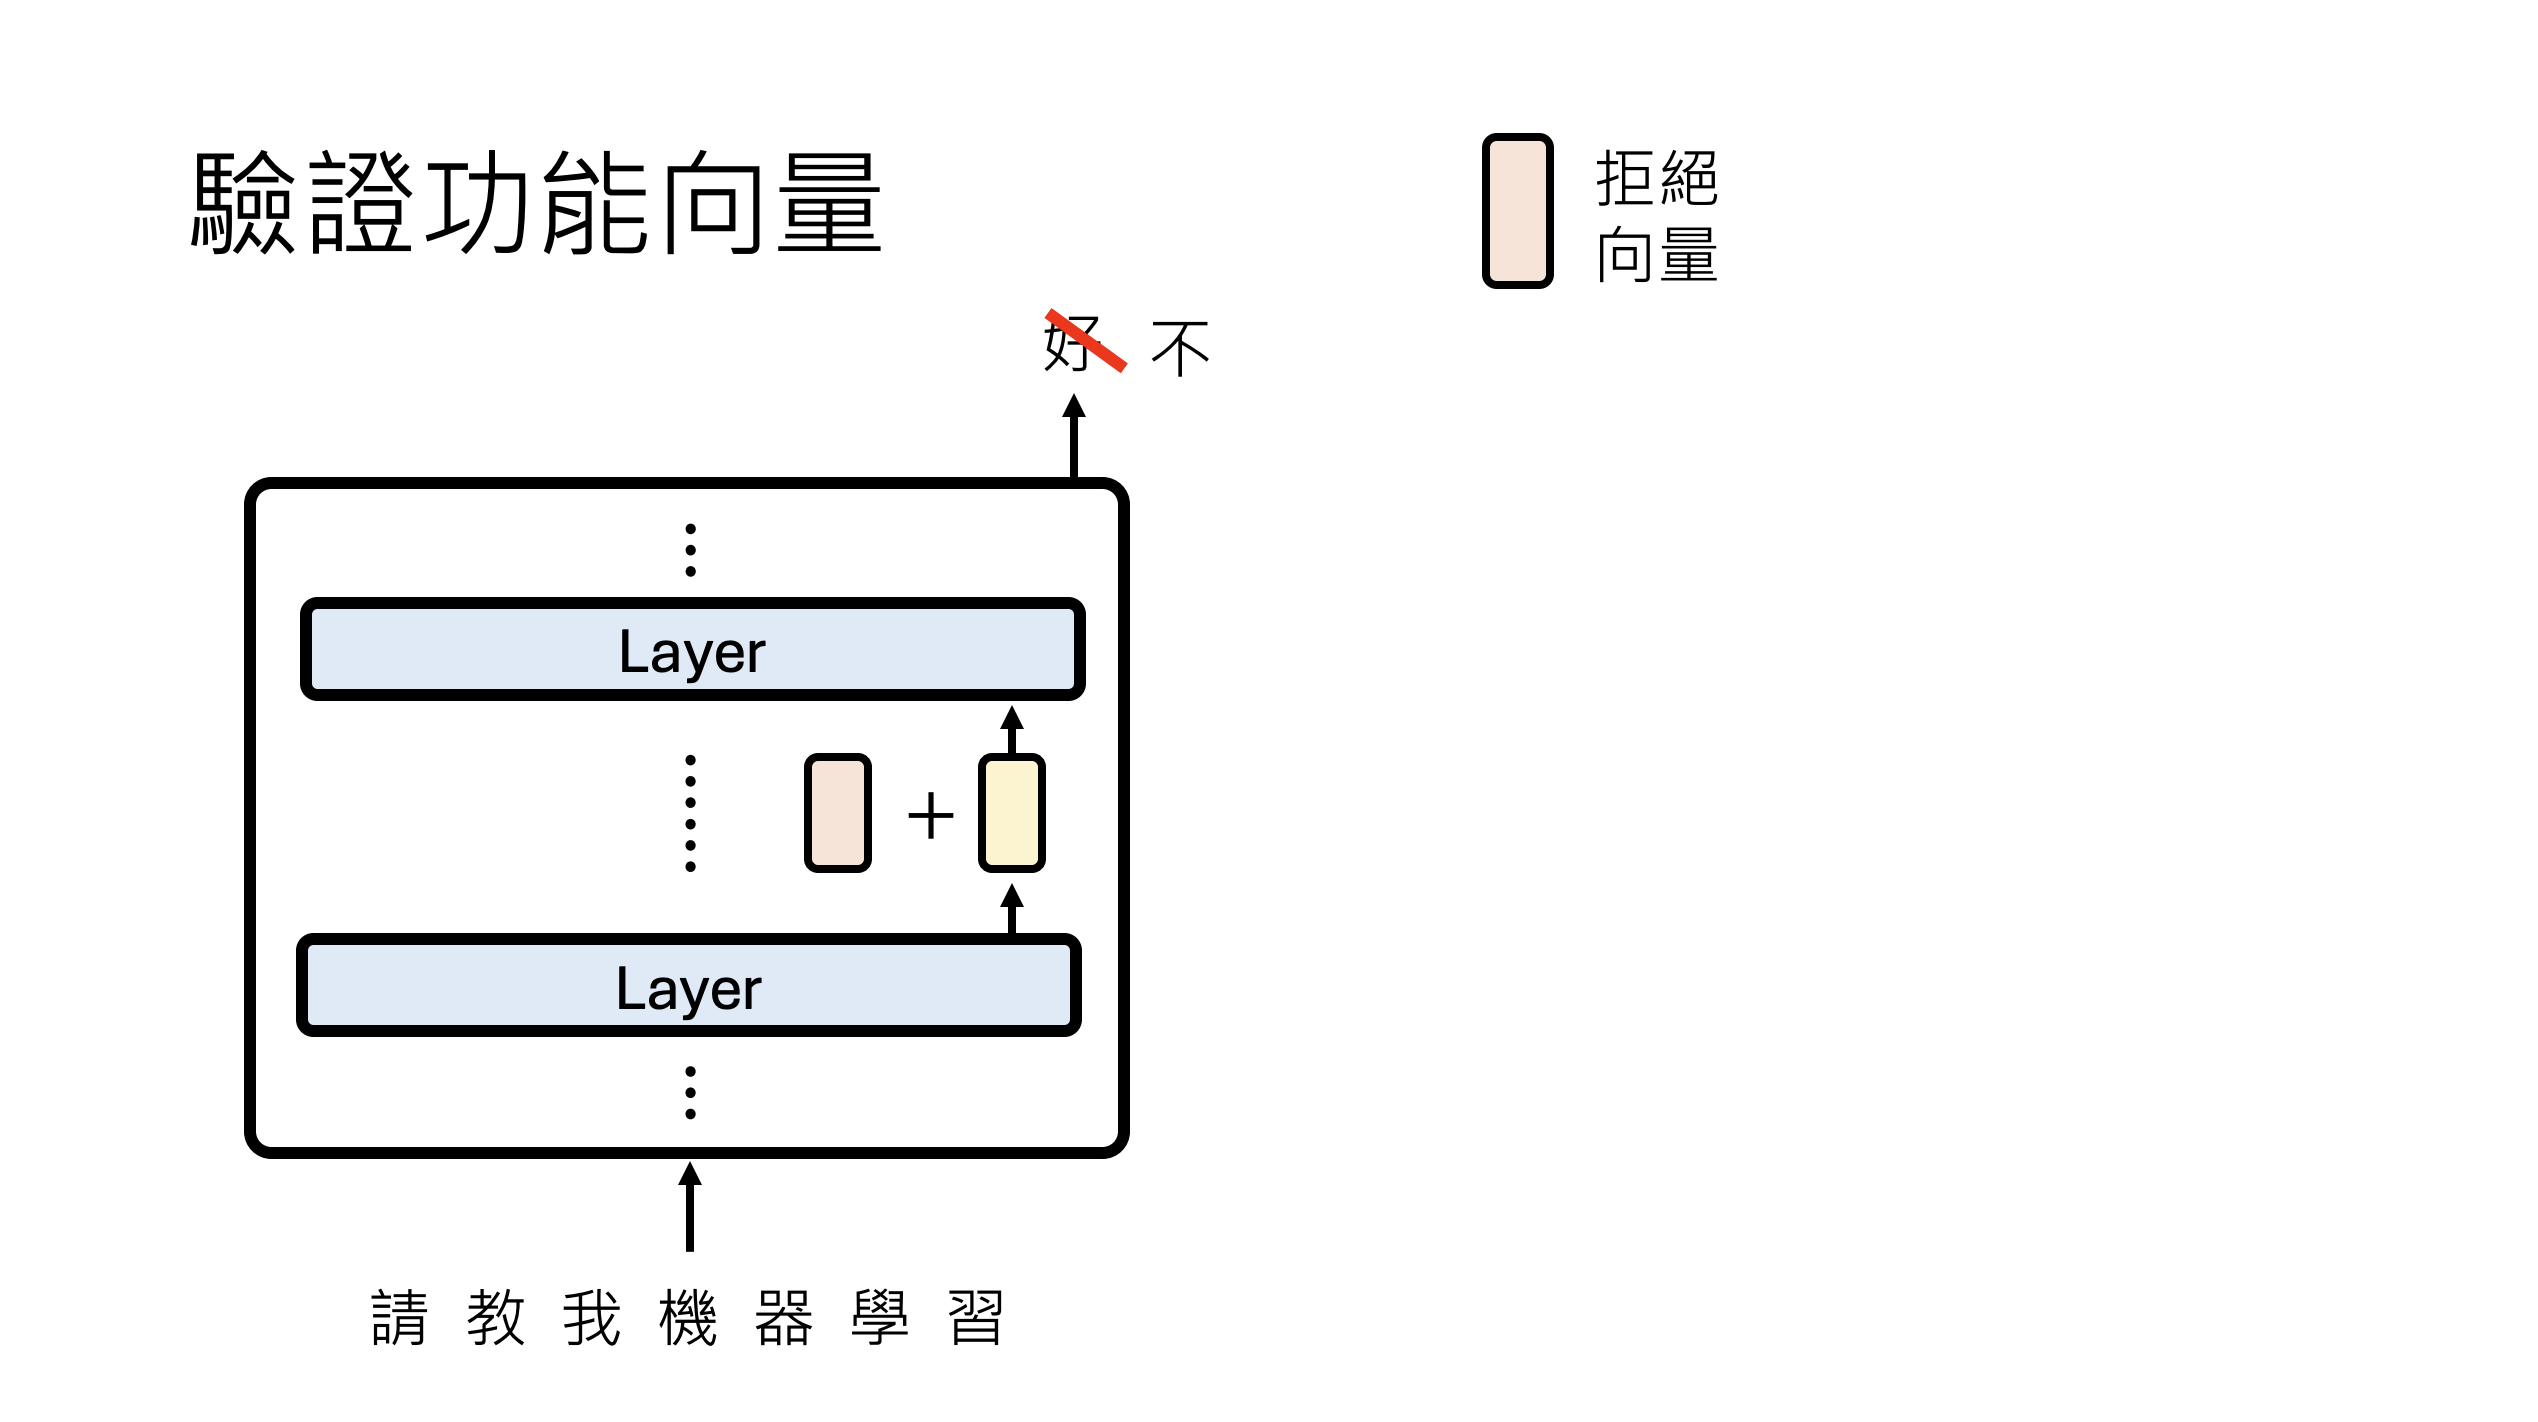
return fv当我们提取到向量后,还需要对提取的向量进行验证操作,就是当模型的某一层输出被我们加上了"拒绝向量",是否导致最后的输出结果是拒绝回答。
具体的代码如下:
该代码实现了一个可控的文本生成函数,支持可选的函数向量注入干预。首先关闭随机采样确保输出确定性,然后将输入格式化为对话模板。若提供函数向量(fv)和层数(layer),则通过注册前向钩子(forward hook)在指定层将隐藏状态与函数向量相加,实时修改模型内部表征;最后生成回答并清理钩子,返回解码后的助手回复。这一机制允许在不修改模型权重的情况下,动态测试函数向量对模型行为的影响,常用于验证拒绝行为向量能否使正常提示触发安全拒绝、定位关键干预层等模型编辑实验。
# Do some setting before generation
model.generation_config.temperature = None
model.generation_config.top_p = None
def get_response(prompt: str, fv: torch.Tensor = None, layer: int = None):
messages = [{"role": "user", "content": prompt}]
inputs = tokenizer.apply_chat_template(
messages,
return_tensors="pt",
add_generation_prompt=True
).to(model.device)
# Set up function vector injection if provided
if fv is not None:
def patch_fn(module, input, output):
if isinstance(output, tuple):
hidden_states = output[0]
else:
hidden_states = output
modified_hidden_states = hidden_states + fv
if isinstance(output, tuple):
return (modified_hidden_states,) + output[1:]
else:
return modified_hidden_states
hook = model.model.layers[layer].register_forward_hook(patch_fn)
else:
hook = None
# Generate response
with torch.no_grad():
output = model.generate(
inputs,
max_new_tokens=256,
do_sample=False,
pad_token_id=tokenizer.eos_token_id
)
if hook:
hook.remove()
input_length = inputs.shape[1]
assistant_response = tokenizer.decode(output[0][input_length:], skip_special_tokens=True)
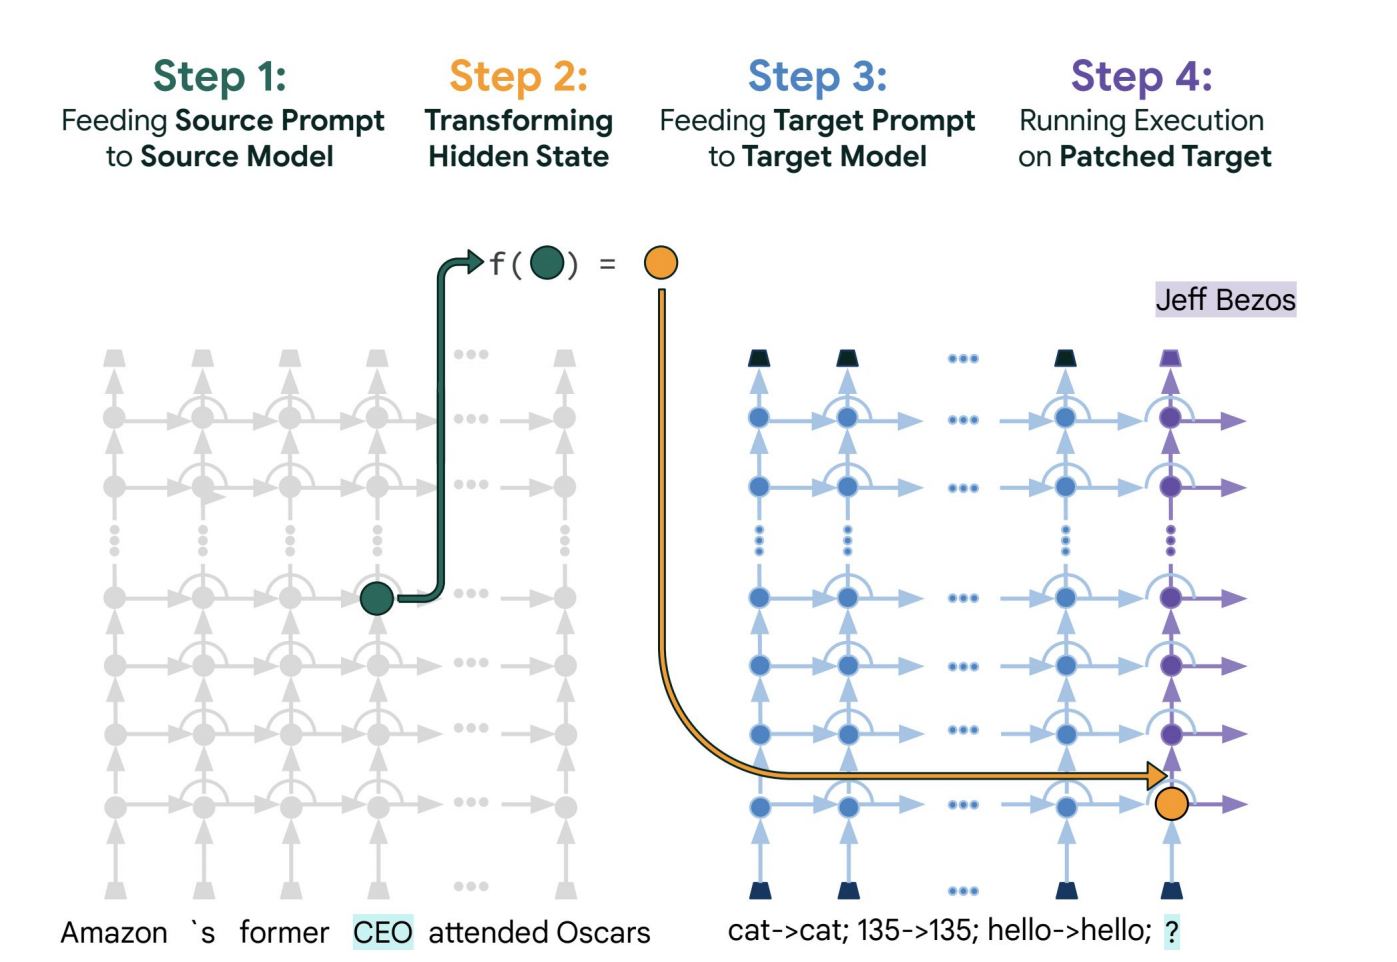
return assistant_response三、PatchScope:跨模型知识迁移
3.1 技术概述
PatchScope 是一种通过"打补丁"方式实现模型间知识迁移的技术。它允许将一个模型(源模型)的特定表示"移植"到另一个模型(目标模型)中,从而研究模型的模块化结构和知识编码方式。
3.2 与 Logit Lens、Function Vector 的关系
|---------------------|----------|-------------|----------|
| 技术 | 关注层面 | 核心操作 | 主要用途 |
| Logit Lens | 单层解码 | Unembedding | 理解逐层演化 |
| Function Vector | 方向提取 | 向量加减 | 操控特定行为 |
| PatchScope | 跨层/跨模型 | 表示替换 | 知识迁移与干预 |
具体做法是:
- 将目标语句输入模型,从某层提取向量
- 构造新输入(如:"请简单介绍【x】")
- 在新输入传递到对应层时,替换为之前提取的向量
- 模型即处理完整的语义内容【x】