1、声明一个 MyInputDevice
cs
using UnityEngine.InputSystem;
using UnityEngine.InputSystem.Layouts;
using UnityEngine.InputSystem.LowLevel;
using UnityEngine.InputSystem.Utilities;

[InputControlLayout(stateType = typeof(MyInputDeviceState))] //关联上 MyInputDeviceState
public class MyInputDevice : InputDevice
{

}
public struct MyInputDeviceState : IInputStateTypeInfo //写一个继承自"IInputStateTypeInfo接口"的结构体
{
    public FourCC format => new FourCC('T', 'E', 'S', 'T'); //这里的四个字符可以自定义,表示设备识别符(ID)
    [InputControl(name = "button", layout = "Button")] //这里的layout = 是必填项,表示是个按钮
    public bool button;
}
2、通过按键盘的空格键,模拟MyInputDevice的按钮的输入
cs
using UnityEngine;
using UnityEngine.InputSystem;

/// <summary>
/// 通过键盘的空格键,模拟MyInputDevice的按钮的输入
/// </summary>
public class MyInputDevice_MoNi : MonoBehaviour
{
    private MyInputDevice myInputDevice;

    private void Start()
    {
        //注册 + 增加,这两步是必须的
        InputSystem.RegisterLayout<MyInputDevice>();
        myInputDevice = InputSystem.AddDevice<MyInputDevice>();
    }
    private void Update()
    {
        if (Input.GetKeyDown(KeyCode.Space))
        {
            //按下空格键,模拟设备按钮的按下
            InputSystem.QueueStateEvent(myInputDevice, new MyInputDeviceState() { button = true });
        }
        else if (Input.GetKeyUp(KeyCode.Space))
        {
            //松开空格键,模拟设备按钮的松开
            InputSystem.QueueStateEvent(myInputDevice, new MyInputDeviceState() { button = false });
        }
    }
}
3、构造相关的 InputAction,测试:
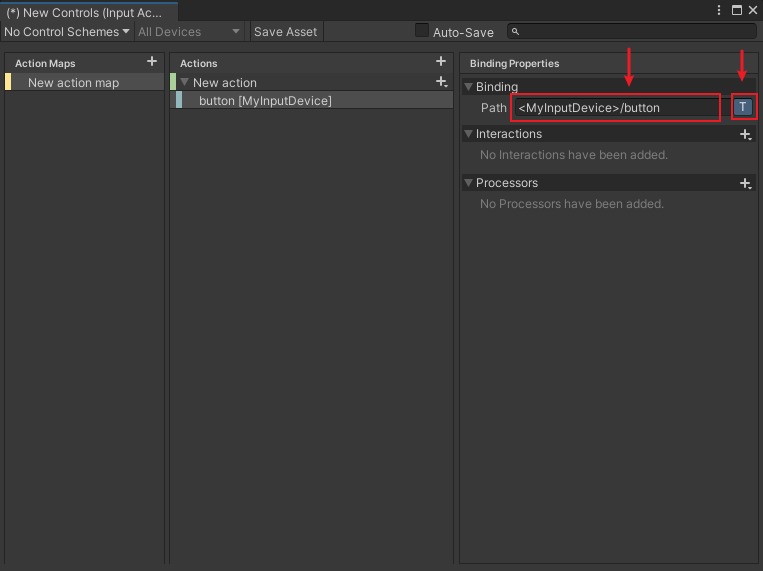
① 新建一个UnityActions的Asset文件,(Action Type是Button),Binding的Path填入:<MyInputDevice>/button ,按回车键确认
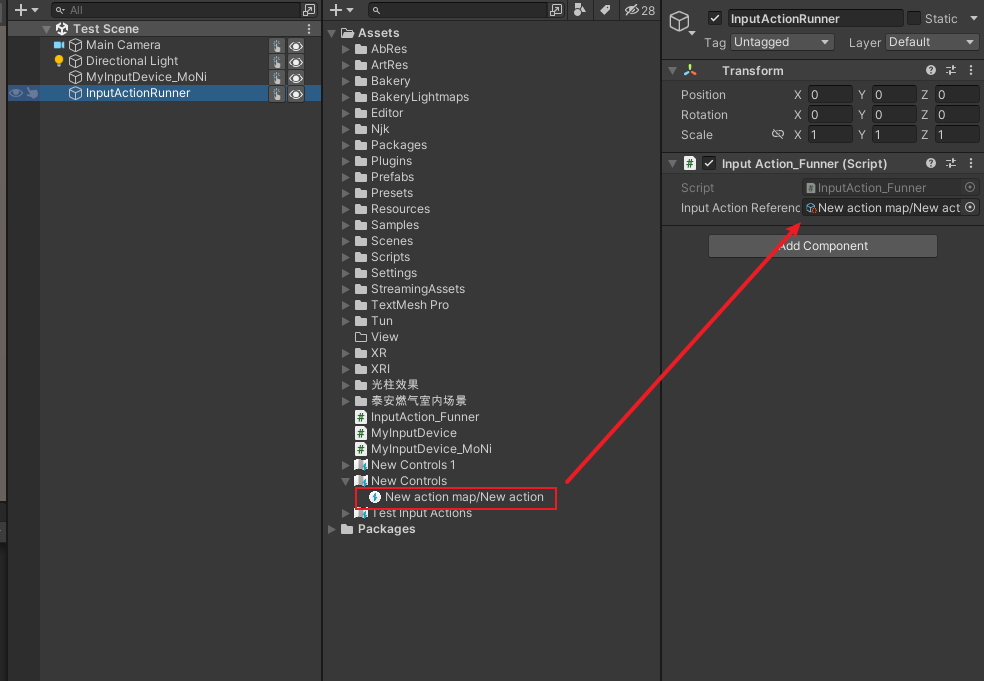
② 写测试代码:
cs
using UnityEngine;
using UnityEngine.InputSystem;
public class InputAction_Funner : MonoBehaviour
{
public InputActionReference inputActionReference;
private InputAction inputAction;
void Start()
{
inputAction = inputActionReference.action;
inputAction.Enable();
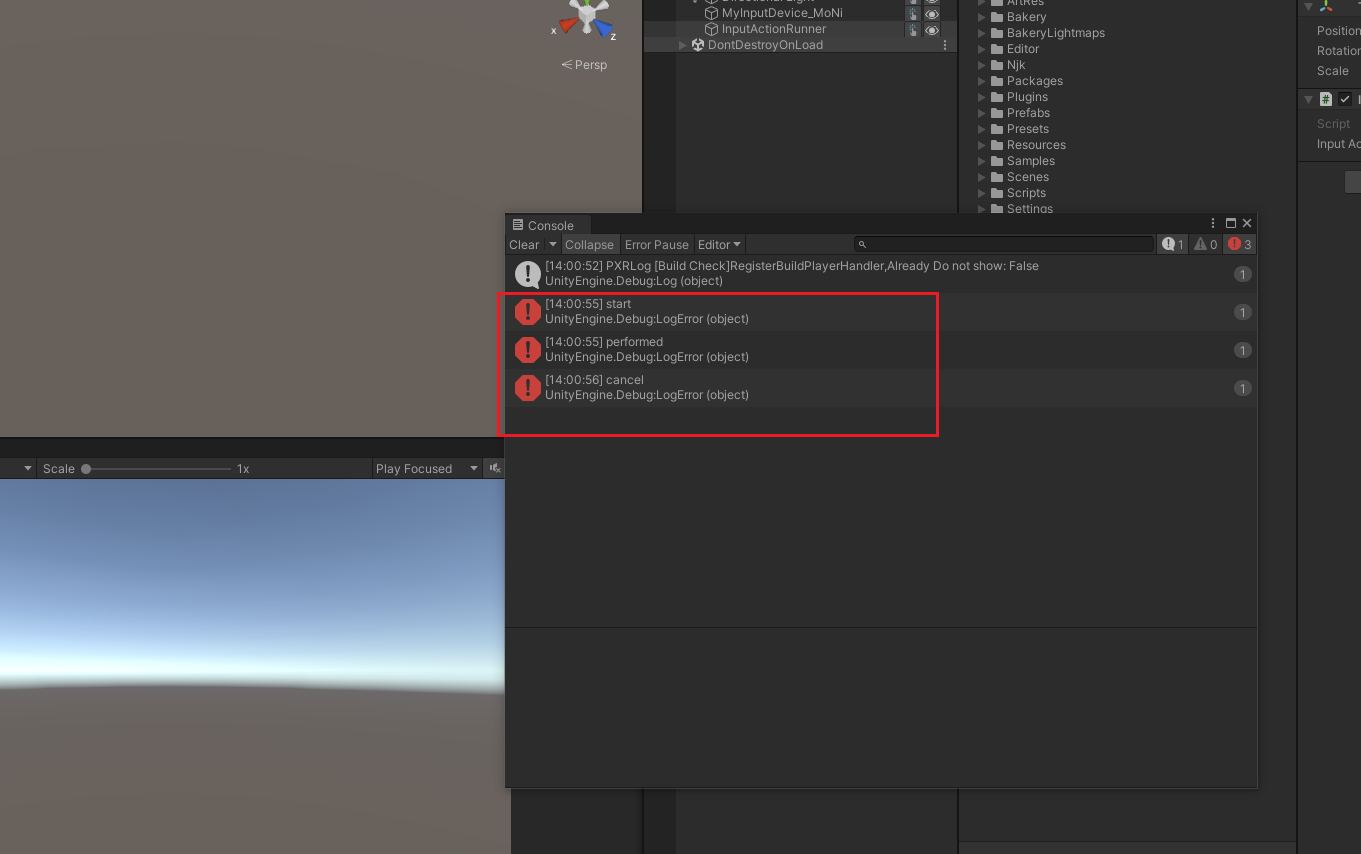
inputAction.started += (v) =>
{
Debug.LogError("start");
};
inputAction.performed += (v) =>
{
Debug.LogError("performed");
};
inputAction.canceled += (v) =>
{
Debug.LogError("cancel");
};
}
}
运行,按空格键,即可看到效果:
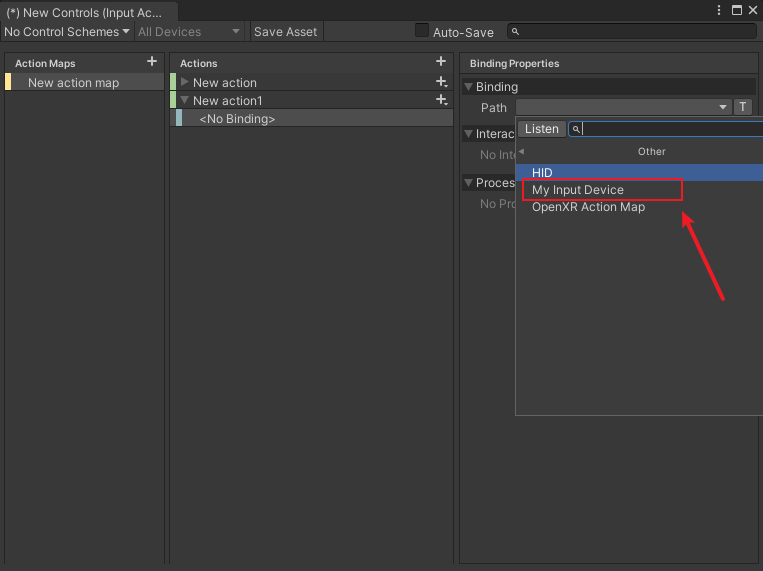
 在第一次运行后,下次绑定Path,可直接找到Path的 Other 选项中的 MyInputDevice:
方式二:
cs
using UnityEngine.InputSystem;
using UnityEngine.InputSystem.Controls;
using UnityEngine.InputSystem.Layouts;


public class MyInputDevice : InputDevice
{
    [InputControl]
    public ButtonControl button { get; private set; }

    protected override void FinishSetup()
    {
        base.FinishSetup();
        button = GetChildControl<ButtonControl>(nameof(button));
    }
}
cs
using UnityEngine;
using UnityEngine.InputSystem;

/// <summary>
/// 通过键盘的空格键,模拟MyInputDevice的按钮的输入
/// </summary>
public class MyInputDevice_MoNi : MonoBehaviour
{
    private MyInputDevice myInputDevice;

    private void Start()
    {
        //注册 + 增加,这两步是必须的
        InputSystem.RegisterLayout<MyInputDevice>();
        myInputDevice = InputSystem.AddDevice<MyInputDevice>();
    }
    private void Update()
    {
        if (Input.GetKeyDown(KeyCode.Space))
        {
            //按下空格键,模拟设备按钮的按下
            //InputSystem.QueueStateEvent(myInputDevice, new MyInputDeviceState() { button = true });
            InputSystem.QueueDeltaStateEvent(myInputDevice.button, true);
        }
        else if (Input.GetKeyUp(KeyCode.Space))
        {
            //松开空格键,模拟设备按钮的松开
            //InputSystem.QueueStateEvent(myInputDevice, new MyInputDeviceState() { button = false });
            InputSystem.QueueDeltaStateEvent(myInputDevice.button, false);
        }
    }
}
cs
using UnityEngine;
using UnityEngine.InputSystem;

public class InputAction_Funner : MonoBehaviour
{
    public InputActionReference inputActionReference;
    private InputAction inputAction;

    void Start()
    {
        inputAction = inputActionReference.action;
        inputAction.Enable();

        inputAction.started += (v) =>
        {
            Debug.LogError("start");
        };
        inputAction.performed += (v) =>
        {
            Debug.LogError("performed");
        };
        inputAction.canceled += (v) =>
        {
            Debug.LogError("cancel");
        };
    }
}