一、基于istio安装灰度发布(金丝雀发布)
| 发布策略 | 核心目标 | Istio 核心实现 | 应用场景 |
|---|---|---|---|
| 蓝绿发布 | 零停机、快速回滚 | VirtualService 路由规则 | 版本切换、重大升级 |
| A/B测试 | 根据规则分流用户 | VirtualService + 请求头/URI匹配 | 功能试验、用户体验优化 |
| 镜像发布 | 生产流量复制测试 | VirtualService 的 mirror 字段 | 新版本压力/稳定性测试 |
| 金丝雀/灰度 | 风险可控的渐进发布 | VirtualService 的权重分流 | 新功能逐步上线 |
| 故障注入 | 主动测试系统韧性 | VirtualService 的 fault 字段 | 混沌工程、健壮性测试 |
追求零风险和快速回滚 -> 蓝绿发布
需要根据用户属性测试功能 -> A/B测试
想用真实流量验证新版本性能 -> 镜像发布
需要可控、渐进式地推出新版本 -> 灰度发布
主动验证系统健壮性 -> 故障注入
1、二进制安装Istio
bash
## 下载安装
wget https://github.com/istio/istio/releases/download/1.20.0/istio-1.20.0-linux-amd64.tar.gz

tar -xzf istio-1.20.0-linux-amd64.tar.gz
cd istio-1.20.0


# 1. 安装 istio-base (包含CRD)
helm install istio-base manifests/charts/base \
  -n istio-system \
  --create-namespace \
  --wait

# 2. 安装 istiod (控制平面)
helm install istiod manifests/charts/istio-control/istio-discovery \
  -n istio-system \
  --wait

# 3. 安装 istio-ingressgateway (入口网关)
helm install istio-ingressgateway manifests/charts/gateways/istio-ingress \
  -n istio-system \
  --set service.type=NodePort \
  --wait
2、 安装Isito查看
bash
[root@mster isito]# helm list -n istio-system
NAME                    NAMESPACE       REVISION        UPDATED                                 STATUS          CHART                   APP VERSION
istio-base              istio-system    1               2026-02-04 01:12:00.470351762 -0800 PST deployed        base-1.20.0             1.20.0
istio-ingressgateway    istio-system    1               2026-02-04 01:16:24.240675604 -0800 PST failed          istio-ingress-1.20.0    1.20.0
istiod                  istio-system    1               2026-02-04 01:12:14.260723994 -0800 PST deployed        istiod-1.20.0           1.20.0

[root@mster isito]# # 查看Pod运行状态(所有Pod应为Running)
[root@mster isito]# kubectl get pods -n istio-system -w
NAME                                    READY   STATUS    RESTARTS       AGE
istio-ingressgateway-54cb8b478b-5n946   1/1     Running   3 (114m ago)   5d23h
istiod-999d56b9f-7pt8j                  1/1     Running   3 (114m ago)   5d23h
^C[root@mster isito]# 查看安装的服务
[root@mster isito]# kubectl get svc -n istio-system
NAME                   TYPE           CLUSTER-IP       EXTERNAL-IP   PORT(S)                                      AGE
istio-ingressgateway   LoadBalancer   10.104.4.238     <pending>     15021:32253/TCP,80:30881/TCP,443:30677/TCP   5d23h
istiod                 ClusterIP      10.110.103.147   <none>        15010/TCP,15012/TCP,443/TCP,15014/TCP        5d23h
3、创建流量管理配置
这是最关键的一步,你需要按顺序创建以下3个YAML文件,它们共同定义了完整的灰度规则。
bash
cat  << EOF destinationrule.yaml
#apiVersion: networking.istio.io/v1
apiVersion: networking.istio.io/v1beta1
kind: DestinationRule
metadata:
  name: demo-service
spec:
  host: demo-service.default.svc.cluster.local # K8s Service的完整域名
  subsets:
  - name: v1
    labels:
      version: v1 # 必须匹配v1 Pod的标签
  - name: v2
    labels:
      version: v2 # 必须匹配v2 Pod的标签
EOF
bash
cat  << EOF gateway.yaml
#apiVersion: networking.istio.io/v1
apiVersion: networking.istio.io/v1beta1
kind: Gateway
metadata:
  name: demo-gateway
spec:
  selector:
    istio: ingressgateway # 使用已安装的入口网关
  servers:
  - port:
      number: 80
      name: http
      protocol: HTTP
    hosts:
    - "*" # 允许所有主机访问,生产环境请替换为你的域名,如 demo.example.com


EOF
bash
cat   << EOF virtualservice.yaml
#apiVersion: networking.istio.io/v1
apiVersion: networking.istio.io/v1beta1
kind: VirtualService
metadata:
  name: demo-service
spec:
  hosts:
  - "*" # 匹配的域名,与Gateway中的hosts对应,生产环境请用具体域名
  gateways:
  - demo-gateway # 绑定上面创建的网关
  http:
  - route:
    - destination:
        host: demo-service.default.svc.cluster.local # 目标服务
        subset: v1 # 全部流量指向v1
      weight: 80
    - destination:
        host: demo-service.default.svc.cluster.local
        subset: v2 # 0%流量指向v2,初始状态
      weight: 20

EOF
bash
# 按顺序应用配置
kubectl apply -f destinationrule.yaml
kubectl apply -f gateway.yaml
kubectl apply -f virtualservice.yaml
4、注意事项
bash
执行kubectl apply -f destinationrule.yaml报以下错误:
error: resource mapping not found for name: "demo-service" namespace: "" from "destinationrule.yaml": no matches for kind "DestinationRule" in version "networking.istio.io/v1"
ensure CRDs are installed first- 查看以下模板是否安装
bash
[root@mster isito]# kubectl get crd | grep istio
authorizationpolicies.security.istio.io               2026-02-04T09:11:58Z
destinationrules.networking.istio.io                  2026-02-04T09:11:58Z
envoyfilters.networking.istio.io                      2026-02-04T09:11:58Z
gateways.networking.istio.io                          2026-02-04T09:11:58Z
istiooperators.install.istio.io                       2026-02-04T09:11:58Z
peerauthentications.security.istio.io                 2026-02-04T09:11:58Z
proxyconfigs.networking.istio.io                      2026-02-04T09:11:58Z
requestauthentications.security.istio.io              2026-02-04T09:11:58Z
serviceentries.networking.istio.io                    2026-02-04T09:11:58Z
sidecars.networking.istio.io                          2026-02-04T09:11:58Z
telemetries.telemetry.istio.io                        2026-02-04T09:11:58Z
virtualservices.networking.istio.io                   2026-02-04T09:11:58Z
wasmplugins.extensions.istio.io                       2026-02-04T09:11:58Z
workloadentries.networking.istio.io                   2026-02-04T09:11:58Z
workloadgroups.networking.istio.io                    2026-02-04T09:11:58Z

[root@mster isito]# kubectl  get crd | grep -E 'destinationrule|virtualservice|gateway|serviceentries' | head -5
destinationrules.networking.istio.io                  2026-02-04T09:11:58Z
gateways.networking.istio.io                          2026-02-04T09:11:58Z
serviceentries.networking.istio.io                    2026-02-04T09:11:58Z
virtualservices.networking.istio.io                   2026-02-04T09:11:58Z
bash
 # 查询 DestinationRule 支持的所有 API 版本
[root@mster isito]# kubectl api-resources | grep -i destinationrule
destinationrules                    dr           networking.istio.io/v1beta1       true         DestinationRule
[root@mster isito]# - 修改apiVersion
bash
#apiVersion: networking.istio.io/v1
apiVersion: networking.istio.io/v1beta1

# 按顺序应用配置
kubectl apply -f destinationrule.yaml
kubectl apply -f gateway.yaml
kubectl apply -f virtualservice.yaml
5、创建service和deployment
bash
cat  << EOF demo-service.yaml
apiVersion: v1
kind: Service
metadata:
  name: demo-service
  namespace: default
spec:
  selector:
    app: demo-service  # 这个标签必须匹配你的Deployment中Pod的标签
  ports:
  - port: 80          # Service端口
    targetPort: 80    # Pod容器端口
    protocol: TCP
EOF
bash
cat  << EOF demo-deployment.yaml
apiVersion: apps/v1
kind: Deployment
metadata:
  name: demo-service-v1
  labels:
    app: demo-service
    version: v1
spec:
  replicas: 2
  selector:
    matchLabels:
      app: demo-service
      version: v1
  template:
    metadata:
      labels:
        app: demo-service
        version: v1
    spec:
      containers:
      - name: nginx
        image: nginx:alpine
        ports:
        - containerPort: 80
        env:
        - name: NGINX_VERSION_TAG
          value: "v1"
        lifecycle:
          postStart:
            exec:
              command: ["/bin/sh", "-c", "echo 'Demo Service Version: v1' > /usr/share/nginx/html/index.html"]
---
apiVersion: apps/v1
kind: Deployment
metadata:
  name: demo-service-v2
  labels:
    app: demo-service
    version: v2
spec:
  replicas: 1
  selector:
    matchLabels:
      app: demo-service
      version: v2
  template:
    metadata:
      labels:
        app: demo-service
        version: v2
    spec:
      containers:
      - name: nginx
        image: nginx:alpine
        ports:
        - containerPort: 80
        env:
        - name: NGINX_VERSION_TAG
          value: "v2"
        lifecycle:
          postStart:
            exec:
              command: ["/bin/sh", "-c", "echo 'Demo Service Version: v2' > /usr/share/nginx/html/index.html"]

EOF
bash
## 按照顺序执行
kubectl apply -f demo-service.yaml
kubectl apply -f demo-deployment.yaml
6、测试与验证
1、修改权重比
bash
cat << EOF virtualservice.yaml
#apiVersion: networking.istio.io/v1
apiVersion: networking.istio.io/v1beta1
kind: VirtualService
metadata:
  name: demo-service
spec:
  hosts:
  - "*" # 匹配的域名,与Gateway中的hosts对应,生产环境请用具体域名
  gateways:
  - demo-gateway # 绑定上面创建的网关
  http:
  - route:
    - destination:
        host: demo-service.default.svc.cluster.local # 目标服务
        subset: v1 # 全部流量指向v1
      weight: 80
    - destination:
        host: demo-service.default.svc.cluster.local
        subset: v2 # 0%流量指向v2,初始状态
      weight: 20

EOF
bash
kubectl apply -f virtualservice.yaml2、测试联通性
bash
 kubectl run test-curl --image=curlimages/curl --rm -it --restart=Never -- sh -c 'curl -s http://demo-service.default.svc.cluster.local'

Demo Service Version: v1
pod "test-curl" deleted
预期输出:Demo Service Version: v1 或 Demo Service Version: v2(根据你的VirtualService权重分配)。
3、通过网关进行外部测试:
bash
export GATEWAY_URL=http://192.168.1.100:30881

# 发送多个请求,观察版本分布
for i in {1..10}; do
    curl -s $GATEWAY_URL
done

# 或者统计版本
for i in {1..20}; do
    curl -s $GATEWAY_URL | grep -o "v[12]"
done | sort | uniq -c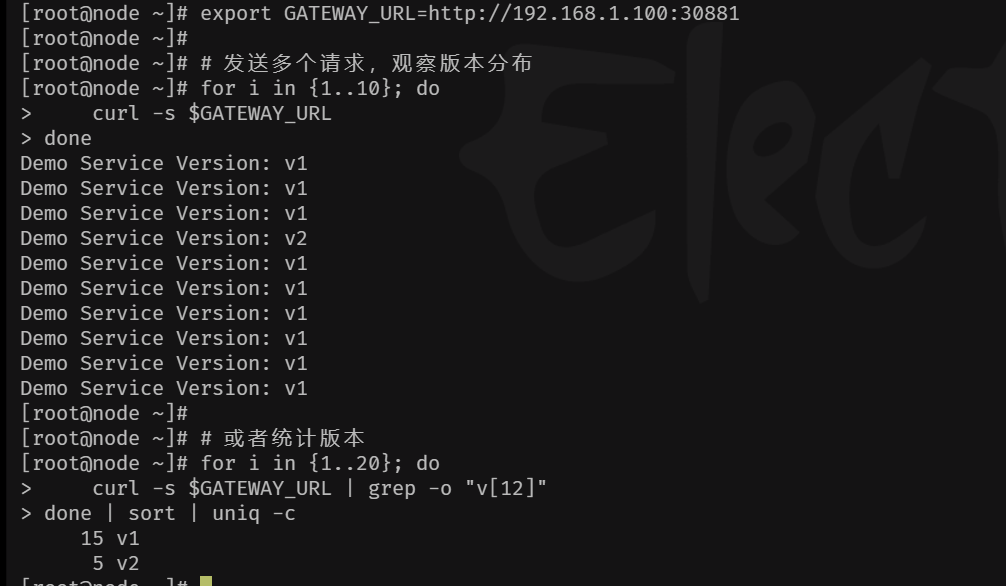
预期结果:根据你VirtualService中配置的权重(v1:80, v2:20),你可能会看到大约80%的请求返回"v1",20%返回"v2"。
4、再次调整权重比例
bash
 cat << EOF  virtualservice.yaml
#apiVersion: networking.istio.io/v1
apiVersion: networking.istio.io/v1beta1
kind: VirtualService
metadata:
  name: demo-service
spec:
  hosts:
  - "*" # 匹配的域名,与Gateway中的hosts对应,生产环境请用具体域名
  gateways:
  - demo-gateway # 绑定上面创建的网关
  http:
  - route:
    - destination:
        host: demo-service.default.svc.cluster.local # 目标服务
        subset: v1 # 全部流量指向v1
      weight: 10
    - destination:
        host: demo-service.default.svc.cluster.local
        subset: v2 # 0%流量指向v2,初始状态
      weight: 90

EOF
bash
kubectl apply -f virtualservice.yaml
bash
kubectl run test-curl --image=curlimages/curl --rm -it --restart=Never -- sh -c 'curl -s http://demo-service.default.svc.cluster.local'
If you don't see a command prompt, try pressing enter.
Demo Service Version: v1
pod "test-curl" deleted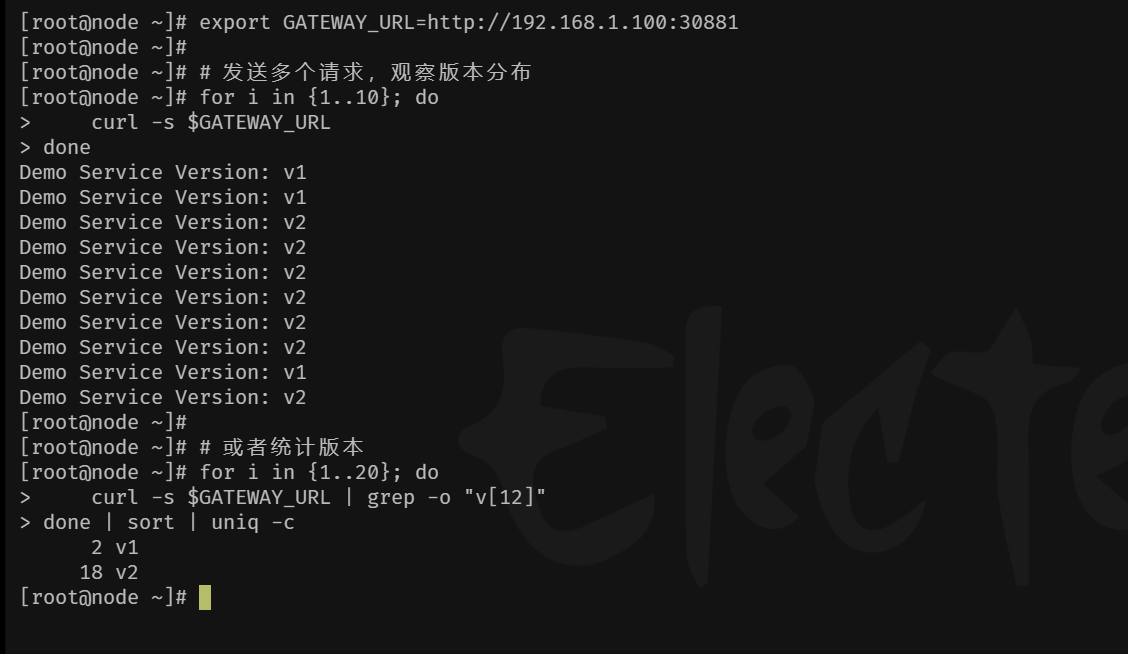
二、基于Isito的蓝绿发布
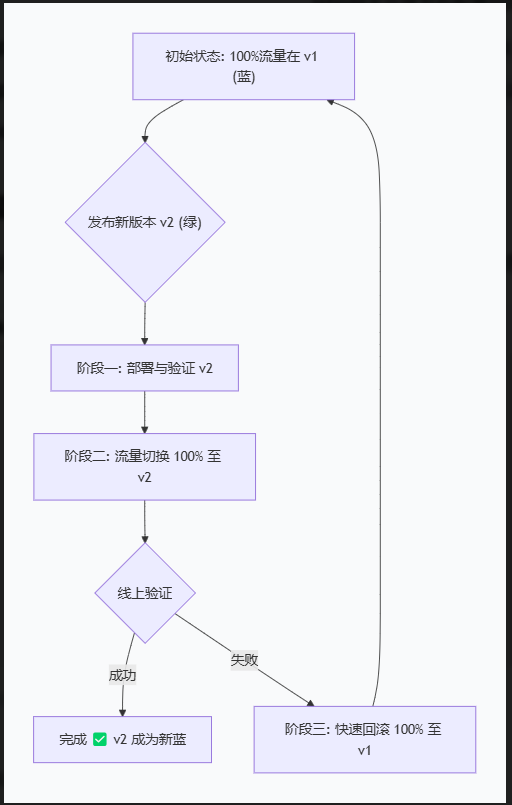
蓝绿发布与灰度发布的区别
- 蓝绿发布
text
状态 A(切换前):[🔵🔵🔵🔵🔵] 100% v1  +  🟢🟢🟢 0% v2(待机)
                ↓ 执行 kubectl apply(瞬间切换)
状态 B(切换后):[🔵🔵🔵] 0% v1 + 🟢🟢🟢🟢🟢 100% v2- 灰度发布
text
阶段 1: [🔵🔵🔵🔵🔵🔵🔵🔵🔵🔵] 100% v1  +  🟢 0% v2
                ↓ 调整权重
阶段 2: [🔵🔵🔵🔵🔵🔵🔵🔵🔵] 90% v1   +  🟢🟢 10% v2(观察1小时)
                ↓ 调整权重
阶段 3: [🔵🔵🔵🔵🔵] 50% v1          +  🟢🟢🟢🟢🟢 50% v2(观察1小时)
                ↓ 调整权重
阶段 4: [🔵] 0% v1                 +  🟢🟢🟢🟢🟢🟢🟢🟢🟢🟢 100% v2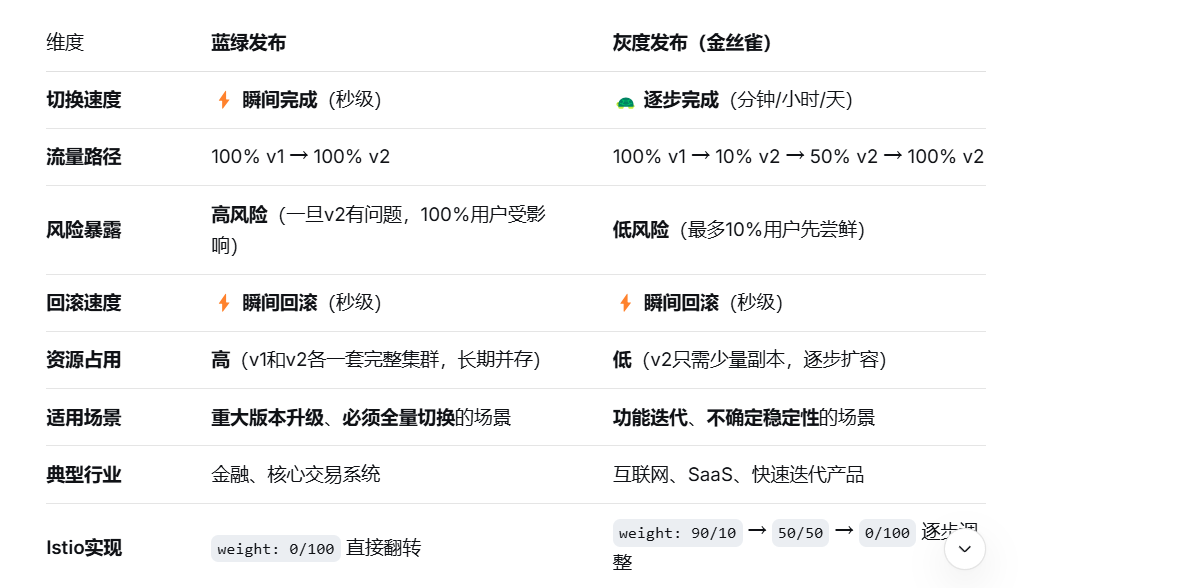
✅ 选蓝绿发布的情况:
必须全量:法规要求或业务特性,不允许新旧版本并存(如支付接口)
依赖强一致性:数据库Schema不兼容,不能同时写两个版本
资源充足:你有两套完整的生产环境资源
追求极简操作:不想分阶段放量,就想一键切换、一键回滚
真实案例:银行核心系统升级。周日凌晨2点,100%流量从旧系统瞬间切换到新系统,验证5分钟没问题就收工,有问题立刻切回。
✅ 选灰度发布的情况:
功能迭代:每周/每天发布新功能,风险逐步释放
用户体验优先:不想让100%用户同时遇到bug
资源受限:没有两套完整环境的资源预算
需要真实反馈:想收集一小部分用户的真实使用数据
真实案例:某App改版首页。先让5%的用户体验新界面,观察3天,点击率提升10%后,扩大到50%,没问题再全量。
1、创建流量配置
bash
cat << EOF  destinationrule.yaml
# destinationrule.yaml
apiVersion: networking.istio.io/v1beta1
kind: DestinationRule
metadata:
  name: demo-service
  namespace: default
spec:
  host: demo-service.default.svc.cluster.local
  subsets:
  - name: blue  # 蓝组 = v1
    labels:
      version: v1
  - name: green # 绿组 = v2
    labels:
      version: v2
EOF
bash
cat  << EOF gateway.yaml
#apiVersion: networking.istio.io/v1
apiVersion: networking.istio.io/v1beta1
kind: Gateway
metadata:
  name: demo-gateway
spec:
  selector:
    istio: ingressgateway # 使用已安装的入口网关
  servers:
  - port:
      number: 80
      name: http
      protocol: HTTP
    hosts:
    - "*" # 允许所有主机访问,生产环境请替换为你的域名,如 demo.example.com

EOF
bash
cat  << EOF virtualservice.yaml
# virtualservice-bluegreen.yaml
apiVersion: networking.istio.io/v1beta1
kind: VirtualService
metadata:
  name: demo-service
  namespace: default
spec:
  hosts:
  - "*"  # 与Gateway保持一致
  gateways:
  - demo-gateway
  - mesh   # 添加这一行,使规则对网格内 sidecar 也生效
  http:
  - route:
    # 🔵 蓝组 (当前生产环境 - v1)
    - destination:
        host: demo-service.default.svc.cluster.local
        subset: blue
      weight: 100  # 蓝组流量百分比
    # 🟢 绿组 (待发布版本 - v2)
    - destination:
        host: demo-service.default.svc.cluster.local
        subset: green
      weight: 0    # 绿组流量百分比
EOF
bash
cat  << EOF demo-service.yaml
apiVersion: v1
kind: Service
metadata:
  name: demo-service
  namespace: default
spec:
  selector:
    app: demo-service  # 这个标签必须匹配你的Deployment中Pod的标签
  ports:
  - port: 80          # Service端口
    targetPort: 80    # Pod容器端口
    protocol: TCP

EOF
bash
cat  << EOF deployment-gree-blue-v1.yaml
apiVersion: apps/v1
kind: Deployment
metadata:
  name: demo-service-v1
  namespace: default
  labels:
    app: demo-service
    version: v1
spec:
  replicas: 2
  selector:
    matchLabels:
      app: demo-service
      version: v1
  template:
    metadata:
      labels:
        app: demo-service
        version: v1
    spec:
      containers:
      - name: nginx
        image: nginx:alpine
        ports:
        - containerPort: 80
        command: ["/bin/sh"]
        args: ["-c", "echo 'Version: v1 - $(date)' > /usr/share/nginx/html/index.html; nginx -g 'daemon off;'"]

EOF
bash
cat << EOF  deployment-gree-blue-v2.yaml
apiVersion: apps/v1
kind: Deployment
metadata:
  name: demo-service-v2
  namespace: default
  labels:
    app: demo-service
    version: v2
spec:
  replicas: 2
  selector:
    matchLabels:
      app: demo-service
      version: v2
  template:
    metadata:
      labels:
        app: demo-service
        version: v2
    spec:
      containers:
      - name: nginx
        image: nginx:alpine
        ports:
        - containerPort: 80
        command: ["/bin/sh"]
        args: ["-c", "echo 'Version: v2 - $(date)' > /usr/share/nginx/html/index.html; nginx -g 'daemon off;'"]


EOF
2、测试与验证
1、容器内存测试(有错误后续分析原因)
- 安装测试pod (istio是由二进制安装)
bash
kubectl apply -f ~/istio-1.20.0/samples/sleep/sleep.yaml
bash
kubectl exec deploy/sleep -- sh -c '
  for i in $(seq 1 100); do
    curl -s http://demo-service.default.svc.cluster.local | grep -o "v[12]"
  done' | sort | uniq -c
     45 v1
     55 v2
2、主机测试
bash
[root@node ~]# export GATEWAY_URL=http://192.168.1.100:30881
[root@node ~]# for i in {1..100}; do curl -s $GATEWAY_URL; done | grep -o "v[12]" | sort | uniq -c
    100 v1
3、pod内部无法安装全流量注入的原因以及修复方案
1、为 default 命名空间开启自动注入
bash
kubectl label namespace default istio-injection=enabled --overwrite
kubectl get namespace default -L istio-injection- default 命名空间没有启用 Istio sidecar 自动注入(ISTIO-INJECTION 列为空),这是导致 sleep Pod 没有 sidecar 的根本原因。
bash
# 删除已存在的 sleep 部署
kubectl delete deploy,sa,svc -l app=sleep

# 重新应用 sleep.yaml(推荐使用 Istio 官方示例)
kubectl apply -f istio-1.20.0/samples/sleep/sleep.yaml
# 如果您没有离线包,也可以使用以下命令在线获取:
# kubectl apply -f https://raw.githubusercontent.com/istio/istio/release-1.20/samples/sleep/sleep.yaml
bash
kubectl get pod -l app=sleep -w
text
NAME                     READY   STATUS    RESTARTS   AGE
sleep-xxx-xxx            2/2     Running   0          30s
- 这样操作下来。pod 内部流量还是会打到v2上
2、 修改pod 无法全部打到v1版本上
- 现有的 demo-service VirtualService 仅用于网关(demo-gateway),hosts: "\*" 不变。
新建一个 VirtualService 专门用于网格内部(mesh),hosts 设置为您的服务全名
bash
cat  << EOF vs-internal.yaml


apiVersion: networking.istio.io/v1beta1
kind: VirtualService
metadata:
  name: demo-service-internal
  namespace: default
spec:
  hosts:
  - demo-service.default.svc.cluster.local  # 必须指定确切的服务 FQDN
  gateways:
  - mesh                                    # 仅作用于网格内部
  http:
  - route:
    - destination:
        host: demo-service.default.svc.cluster.local
        subset: blue
      weight: 100
    - destination:
        host: demo-service.default.svc.cluster.local
        subset: green
      weight: 0

EOF 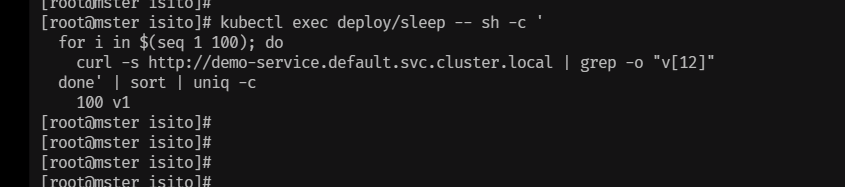
- pod 内部流量无法打打v1版本上,在实际生产中,如果pod 无法打到同一个版本中,就会导致,接口调用报错
4、撤换流量测试
1、为两个vs进行打标签
bash
# 给 demo-service 打标签
kubectl label vs demo-service release-group=bluegreen

# 给 demo-service-internal 打标签
kubectl label vs demo-service-internal release-group=bluegreen
2、查看标签
bash
## 打标签前
[root@mster isito]# kubectl get virtualservices.networking.istio.io --show-labels
NAME                    GATEWAYS           HOSTS                                        AGE     LABELS
demo-service            ["demo-gateway"]   ["*"]                                        3d17h   <none>
demo-service-internal   ["mesh"]           ["demo-service.default.svc.cluster.local"]   30h     <none>


## 打标签后
[root@mster isito]# kubectl get virtualservices.networking.istio.io --show-labels
NAME                    GATEWAYS           HOSTS                                        AGE     LABELS
demo-service            ["demo-gateway"]   ["*"]                                        3d17h   release-group=bluegreen
demo-service-internal   ["mesh"]           ["demo-service.default.svc.cluster.local"]   30h     release-group=bluegreen
3、设计流量切换
通过更改配置文件
bash
# 获取所有带有标签 release-group=bluegreen 的 VirtualService 名称
for vs in $(kubectl get vs -n default -l release-group=bluegreen -o name); do
  echo "Patching $vs ..."
  kubectl patch $vs -n default --type='json' \
    -p='[
      {"op": "replace", "path": "/spec/http/0/route/0/weight", "value": 100},
      {"op": "replace", "path": "/spec/http/0/route/1/weight", "value": 0}
    ]'
done
通过脚本形式进行替换
bash
cat << EOF switch.sh
#!/bin/bash
# 用法: ./switch.sh blue 100   # 将两个 VS 的 blue 权重设为 100, green 为 0
#       ./switch.sh green 100  # 将两个 VS 的 green 权重设为 100, blue 为 0

TARGET=$1
WEIGHT=$2

if [ "$TARGET" == "blue" ]; then
  BLUE_WEIGHT=$WEIGHT
  GREEN_WEIGHT=$((100 - WEIGHT))
elif [ "$TARGET" == "green" ]; then
  BLUE_WEIGHT=$((100 - WEIGHT))
  GREEN_WEIGHT=$WEIGHT
else
  echo "Usage: $0 [blue|green] weight"
  exit 1
fi

for vs in demo-service demo-service-internal; do
  echo "Patching $vs to blue=$BLUE_WEIGHT, green=$GREEN_WEIGHT"
  kubectl patch vs $vs -n default --type='json' -p="[
    {\"op\": \"replace\", \"path\": \"/spec/http/0/route/0/weight\", \"value\": $BLUE_WEIGHT},
    {\"op\": \"replace\", \"path\": \"/spec/http/0/route/1/weight\", \"value\": $GREEN_WEIGHT}
  ]"
done

EOF
4、查看权重信息
bash
kubectl get vs -l release-group=bluegreen -o jsonpath='{range .items[*]}{.metadata.name}: {.spec.http[0].route}{"\n"}{end}'
5、测试版本切换
bash
./switch.sh blue 100
./switch.sh green 100
## 容器测试
kubectl exec deploy/sleep -- sh -c '
for i in $(seq 1 100); do
curl -s http://demo-service.default.svc.cluster.local | grep -o "v[12]"
done' | sort | uniq -c
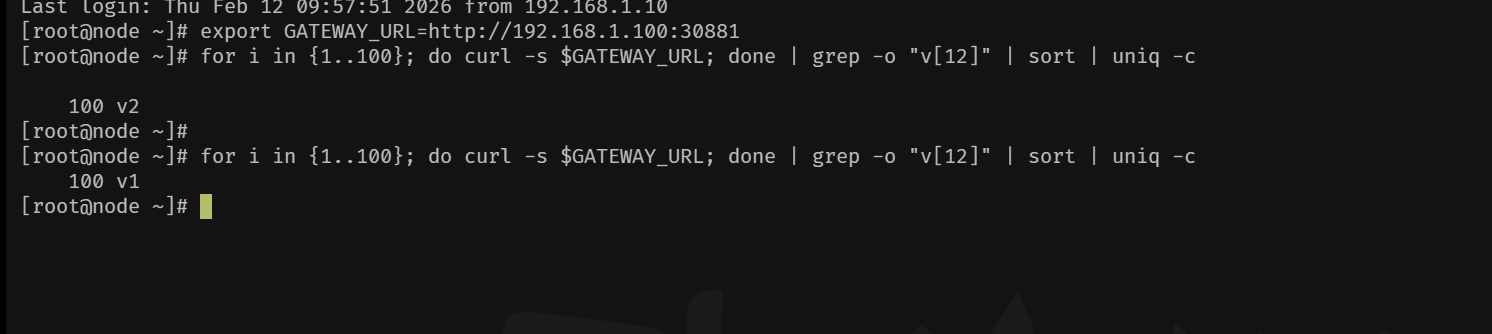
## 主机测试
export GATEWAY_URL=http://192.168.1.100:30881
for i in {1..100}; do curl -s $GATEWAY_URL; done | grep -o "v[12]" | sort | uniq -c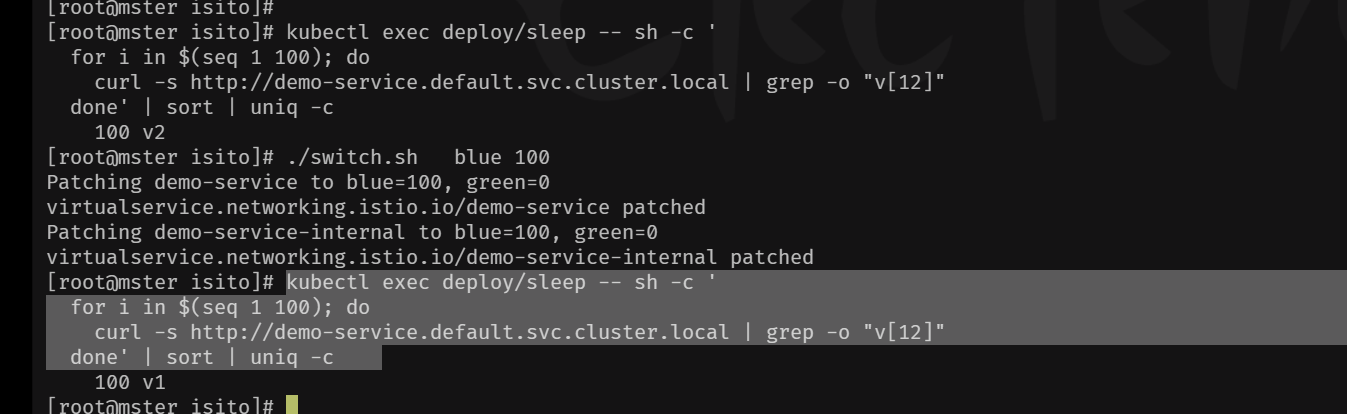
三、基于Istio的A\B测试发布方案
1、内部网关
bash
cat << EOF vs-ab-testing.yaml
apiVersion: networking.istio.io/v1beta1
kind: VirtualService
metadata:
  name: demo-service-ab-internal
  namespace: default
spec:
  hosts:
  - "demo-service.default.svc.cluster.local"
  gateways:
  - mesh
  http:
  - match:
    - headers:
        x-experiment:
          exact: "beta"
    route:
    - destination:
        host: demo-service.default.svc.cluster.local
        subset: v2
  - match:
    - headers:
        user-agent:
          regex: ".*Mobile.*"
    route:
    - destination:
        host: demo-service.default.svc.cluster.local
        subset: v2
  - route:
    - destination:
        host: demo-service.default.svc.cluster.local
        subset: v1

EOF
2、外部网关
bash
 cat  <<  EOF vs-ab-gateway.yaml
 apiVersion: networking.istio.io/v1beta1
kind: VirtualService
metadata:
  name: demo-service-ab-gateway
  namespace: default
spec:
  hosts:
  - '*'
  gateways:
  - demo-gateway
  http:
  - match:
    - headers:
        cookie:
          regex: .*experiment=beta.*
    route:
    - destination:
        host: demo-service.default.svc.cluster.local
        subset: v2
  - match:
    - headers:
        user-agent:
          regex: .*(iPhone|Android|Mobile).*
    route:
    - destination:
        host: demo-service.default.svc.cluster.local
        subset: v2
  - route:
    - destination:
        host: demo-service.default.svc.cluster.local
        subset: v1

EOF
3、路由策略
bash
cat  << EOF destinationrule.yaml
# destinationrule.yaml
apiVersion: networking.istio.io/v1beta1
kind: DestinationRule
metadata:
  name: demo-service
  namespace: default
spec:
  host: demo-service.default.svc.cluster.local
  subsets:
  - name: v1
    labels:
      version: v1
  - name: v1
    labels:
      version: v2

EOF
4、deployment
bash
cat  << EOF demo-service-v1.yaml
apiVersion: apps/v1
kind: Deployment
metadata:
  annotations:
    deployment.kubernetes.io/revision: "1"
    kubectl.kubernetes.io/last-applied-configuration: |
      {"apiVersion":"apps/v1","kind":"Deployment","metadata":{"annotations":{},"labels":{"app":"demo-service","version":"v1"},"name":"demo-service-v1","namespace":"default"},"spec":{"replicas":2,"selector":{"matchLabels":{"app":"demo-service","version":"v1"}},"template":{"metadata":{"labels":{"app":"demo-service","version":"v1"}},"spec":{"containers":[{"args":["-c","echo 'Version: v1 - $(date)' \u003e /usr/share/nginx/html/index.html; nginx -g 'daemon off;'"],"command":["/bin/sh"],"image":"nginx:alpine","name":"nginx","ports":[{"containerPort":80}]}]}}}}
  creationTimestamp: "2026-02-12T16:45:43Z"
  generation: 1
  labels:
    app: demo-service
    version: v1
  name: demo-service-v1
  namespace: default
  resourceVersion: "89185"
  uid: 09f554fb-e447-4bf2-9338-71556d0cfab1
spec:
  progressDeadlineSeconds: 600
  replicas: 2
  revisionHistoryLimit: 10
  selector:
    matchLabels:
      app: demo-service
      version: v1
  strategy:
    rollingUpdate:
      maxSurge: 25%
      maxUnavailable: 25%
    type: RollingUpdate
  template:
    metadata:
      creationTimestamp: null
      labels:
        app: demo-service
        version: v1
    spec:
      containers:
      - args:
        - -c
        - 'echo ''Version: v1 - $(date)'' > /usr/share/nginx/html/index.html; nginx
          -g ''daemon off;'''
        command:
        - /bin/sh
        image: nginx:alpine
        imagePullPolicy: IfNotPresent
        name: nginx
        ports:
        - containerPort: 80
          protocol: TCP
        resources: {}
        terminationMessagePath: /dev/termination-log
        terminationMessagePolicy: File
      dnsPolicy: ClusterFirst
      restartPolicy: Always
      schedulerName: default-scheduler
      securityContext: {}
      terminationGracePeriodSeconds: 30
status:
  availableReplicas: 2
  conditions:
  - lastTransitionTime: "2026-02-12T16:45:43Z"
    lastUpdateTime: "2026-02-12T16:45:46Z"
    message: ReplicaSet "demo-service-v1-8689c65f4" has successfully progressed.
    reason: NewReplicaSetAvailable
    status: "True"
    type: Progressing
  - lastTransitionTime: "2026-02-14T01:32:53Z"
    lastUpdateTime: "2026-02-14T01:32:53Z"
    message: Deployment has minimum availability.
    reason: MinimumReplicasAvailable
    status: "True"
    type: Available
  observedGeneration: 1
  readyReplicas: 2
  replicas: 2
  updatedReplicas: 2

EOF
bash
cat   << EOF  demo-service-v2.yaml
apiVersion: apps/v1
kind: Deployment
metadata:
  annotations:
    deployment.kubernetes.io/revision: "1"
    kubectl.kubernetes.io/last-applied-configuration: |
      {"apiVersion":"apps/v1","kind":"Deployment","metadata":{"annotations":{},"labels":{"app":"demo-service","version":"v2"},"name":"demo-service-v2","namespace":"default"},"spec":{"replicas":2,"selector":{"matchLabels":{"app":"demo-service","version":"v2"}},"template":{"metadata":{"labels":{"app":"demo-service","version":"v2"}},"spec":{"containers":[{"args":["-c","echo 'Version: v2 - $(date)' \u003e /usr/share/nginx/html/index.html; nginx -g 'daemon off;'"],"command":["/bin/sh"],"image":"nginx:alpine","name":"nginx","ports":[{"containerPort":80}]}]}}}}
  creationTimestamp: "2026-02-12T16:47:06Z"
  generation: 1
  labels:
    app: demo-service
    version: v2
  name: demo-service-v2
  namespace: default
  resourceVersion: "89242"
  uid: 1a27302b-6367-4961-a403-76b98fba7725
spec:
  progressDeadlineSeconds: 600
  replicas: 2
  revisionHistoryLimit: 10
  selector:
    matchLabels:
      app: demo-service
      version: v2
  strategy:
    rollingUpdate:
      maxSurge: 25%
      maxUnavailable: 25%
    type: RollingUpdate
  template:
    metadata:
      creationTimestamp: null
      labels:
        app: demo-service
        version: v2
    spec:
      containers:
      - args:
        - -c
        - 'echo ''Version: v2 - $(date)'' > /usr/share/nginx/html/index.html; nginx
          -g ''daemon off;'''
        command:
        - /bin/sh
        image: nginx:alpine
        imagePullPolicy: IfNotPresent
        name: nginx
        ports:
        - containerPort: 80
          protocol: TCP
        resources: {}
        terminationMessagePath: /dev/termination-log
        terminationMessagePolicy: File
      dnsPolicy: ClusterFirst
      restartPolicy: Always
      schedulerName: default-scheduler
      securityContext: {}
      terminationGracePeriodSeconds: 30
status:
  availableReplicas: 2
  conditions:
  - lastTransitionTime: "2026-02-12T16:47:06Z"
    lastUpdateTime: "2026-02-12T16:47:09Z"
    message: ReplicaSet "demo-service-v2-6698597ff4" has successfully progressed.
    reason: NewReplicaSetAvailable
    status: "True"
    type: Progressing
  - lastTransitionTime: "2026-02-14T01:32:56Z"
    lastUpdateTime: "2026-02-14T01:32:56Z"
    message: Deployment has minimum availability.
    reason: MinimumReplicasAvailable
    status: "True"
    type: Available
  observedGeneration: 1
  readyReplicas: 2
  replicas: 2
  updatedReplicas: 2

EOF
5、service
bash
cat << EOF demo-service.yaml
apiVersion: v1
kind: Service
metadata:
  annotations:
    kubectl.kubernetes.io/last-applied-configuration: |
      {"apiVersion":"v1","kind":"Service","metadata":{"annotations":{},"name":"demo-service","namespace":"default"},"spec":{"ports":[{"port":80,"protocol":"TCP","targetPort":80}],"selector":{"app":"demo-service"}}}
  creationTimestamp: "2026-02-10T07:58:49Z"
  name: demo-service
  namespace: default
  resourceVersion: "39883"
  uid: ad840115-cc2c-4e89-bac5-158d94c524ff
spec:
  clusterIP: 10.97.68.36
  clusterIPs:
  - 10.97.68.36
  internalTrafficPolicy: Cluster
  ipFamilies:
  - IPv4
  ipFamilyPolicy: SingleStack
  ports:
  - port: 80
    protocol: TCP
    targetPort: 80
  selector:
    app: demo-service
  sessionAffinity: None
  type: ClusterIP
status:
  loadBalancer: {}

EOF
6、执行以上所有资源配置文件
7、测试验证
bash
##集群pod内部应用
[root@mster isito]# kubectl exec deploy/sleep -- curl -s http://demo-service.default.svc.cluster.local
Version: v1 - $(date)
[root@mster isito]# kubectl exec deploy/sleep -- curl -s -H "X-Experiment: beta" http://demo-service.default.svc.cluster.local
Version: v2 - $(date)
[root@mster isito]# kubectl exec deploy/sleep -- curl -s -A "Mobile" http://demo-service.default.svc.cluster.local
Version: v2 - $(date)
[root@mster isito]# kubectl exec deploy/sleep -- curl -s -A "Mozilla/5.0 (iPhone; CPU iPhone OS 14_0 like Mac OS X)" http://demo-service.default.svc.cluster.local
Version: v2 - $(date)

### 外部链条访问
[root@node ~]# export GATEWAY_URL=http://192.168.1.100:30881
[root@node ~]# curl -s $GATEWAY_URL
Version: v1 - $(date)
[root@node ~]# curl -s --cookie "experiment=beta" $GATEWAY_URL
Version: v2 - $(date)
[root@node ~]# curl -s -A "Mozilla/5.0 (iPhone; CPU iPhone OS 14_0 like Mac OS X)" $GATEWAY_URL
Version: v2 - $(date)
[root@node ~]#
四、基于Istio的镜像发布方案
🧩 为什么镜像发布不属于发布流程?
目的不同:发布流程的核心是让用户访问新版本(如蓝绿、灰度)。镜像发布的目的是在不影响用户的前提下,用真实流量测试新版本,新版本的响应被丢弃,用户完全无感知。
阶段不同:镜像发布通常发生在发布之前,作为"预发布"验证环节。只有当镜像验证通过后,才会进入真正的发布流程(如灰度或蓝绿发布),将流量切换到新版本。
用户无变化:发布流程一定会改变用户所见的服务版本或行为。镜像发布则完全不改变用户体验,仅用于后端评估。
1、镜像发布与A\B测试的区别
| 策略 | 镜像发布 | A/B测试 |
|---|---|---|
| 本质 | 流量复制(影子流量) | 流量分流(真实用户) |
| 目标 | 在不影响生产的情况下... | 对比两个版本的业务效果... |
| 用户感知 | 无感知(响应仍来自原版本) | 有感知(部分用户直接使用新版本) |
镜像发布:主请求 → v1(响应返回客户端),同时复制一份 → v2(响应被丢弃)。用户无感知,仅用于后端测试。
权重路由(蓝绿/灰度发布):根据权重将真实用户请求直接发送到 v1 或 v2,客户端会直接收到对应版本的响应。
2、内部网关
bash
cat   << EOF vs-mirror-internal.yaml
apiVersion: networking.istio.io/v1beta1
kind: VirtualService
metadata:
  name: demo-service-mirror-internal
  namespace: default
spec:
  hosts:
  - "demo-service.default.svc.cluster.local"
  gateways:
  - mesh
  http:
  - route:
    - destination:
        host: demo-service.default.svc.cluster.local
        subset: v1
      weight: 100
    mirror:
      host: demo-service.default.svc.cluster.local
      subset: v2
    mirrorPercentage:
      value: 50.0
EOF
3、外部网关
bash
cat  << EOF vs-mirror-gateway.yaml
apiVersion: networking.istio.io/v1beta1
kind: VirtualService
metadata:
  name: demo-service-mirror-gateway
  namespace: default
spec:
  hosts:
  - "*"
  gateways:
  - demo-gateway
  http:
  - route:
    - destination:
        host: demo-service.default.svc.cluster.local
        subset: v1
      weight: 100
    mirror:
      host: demo-service.default.svc.cluster.local
      subset: v2
    mirrorPercentage:
      value: 50.0   # 镜像 50% 的请求,可调整

EOF
4、应用资源
bash
## 应用以上两个资源文件
## 关闭所有多余的vs资源
[root@mster isito]# kubectl get vs
NAME                           GATEWAYS           HOSTS                                        AGE
demo-service-mirror-gateway    ["demo-gateway"]   ["*"]                                        82m
demo-service-mirror-internal   ["mesh"]           ["demo-service.default.svc.cluster.local"]   82m
5、查看dr资源
bash
[root@mster isito]# kubectl get dr
NAME           HOST                                     AGE
demo-service   demo-service.default.svc.cluster.local   3d22h
[root@mster isito]# kubectl get dr demo-service  -o yaml
apiVersion: networking.istio.io/v1beta1
kind: DestinationRule
metadata:
  annotations:
    kubectl.kubernetes.io/last-applied-configuration: |
      {"apiVersion":"networking.istio.io/v1beta1","kind":"DestinationRule","metadata":{"annotations":{},"name":"demo-service","namespace":"default"},"spec":{"host":"demo-service.default.svc.cluster.local","subsets":[{"labels":{"version":"v1"},"name":"v1"},{"labels":{"version":"v2"},"name":"v1"}]}}
  creationTimestamp: "2026-02-10T07:42:57Z"
  generation: 4
  name: demo-service
  namespace: default
  resourceVersion: "99440"
  uid: b5222fb0-6371-4bfc-bc84-c3ad991afc1d
spec:
  host: demo-service.default.svc.cluster.local
  subsets:
  - labels:
      version: v1
    name: v1
  - labels:
      version: v2
    name: v2
6、测试验证
bash
## 查看deployment资源
[root@mster isito]# kubectl get deployment
NAME              READY   UP-TO-DATE   AVAILABLE   AGE
demo-service-v1   2/2     2            2           37h
demo-service-v2   2/2     2            2           37h
sleep             1/1     1            1           36h
[root@mster isito]# kubectl get deployment --show-labels
NAME              READY   UP-TO-DATE   AVAILABLE   AGE   LABELS
demo-service-v1   2/2     2            2           37h   app=demo-service,version=v1
demo-service-v2   2/2     2            2           37h   app=demo-service,version=v2
sleep 1/1 1 1 36h <none>- 内部pod测试
bash
[root@mster isito]# for i in {1..10}; do   kubectl exec $SLEEP_POD -- curl -s http://demo-service.default.svc.cluster.local  ; done
Version: v1 - $(date)
Version: v1 - $(date)
Version: v1 - $(date)
Version: v1 - $(date)
Version: v1 - $(date)
Version: v1 - $(date)
Version: v1 - $(date)
Version: v1 - $(date)
Version: v1 - $(date)
Version: v1 - $(date)
[root@mster isito]# kubectl logs -l version=v2 -c istio-proxy --tail=20
error: container istio-proxy is not valid for pod demo-service-v2-6698597ff4-qqbpm
[root@mster isito]# kubectl logs -l version=v2 --tail=10
10.244.167.186 - - [14/Feb/2026:02:09:03 +0000] "GET / HTTP/1.1" 200 22 "-" "curl/8.18.0" "-"
10.244.167.184 - - [14/Feb/2026:02:59:06 +0000] "GET / HTTP/1.1" 200 22 "-" "curl/7.29.0" "10.244.219.64"
10.244.167.184 - - [14/Feb/2026:03:01:37 +0000] "GET / HTTP/1.1" 200 22 "-" "Mozilla/5.0 (iPhone; CPU iPhone OS 14_0 like Mac OS X)" "10.244.219.64"
10.244.167.184 - - [14/Feb/2026:03:22:14 +0000] "GET / HTTP/1.1" 200 22 "-" "Mozilla/5.0 (iPhone; CPU iPhone OS 14_0 like Mac OS X)" "10.244.219.64"
10.244.167.186 - - [14/Feb/2026:03:25:35 +0000] "GET / HTTP/1.1" 200 22 "-" "Mobile" "-"
10.244.167.186 - - [14/Feb/2026:03:25:44 +0000] "GET / HTTP/1.1" 200 22 "-" "Mozilla/5.0 (iPhone; CPU iPhone OS 14_0 like Mac OS X)" "-"
10.244.167.186 - - [14/Feb/2026:04:45:45 +0000] "GET / HTTP/1.1" 200 22 "-" "curl/8.18.0" "10.244.167.186"
10.244.167.184 - - [14/Feb/2026:04:50:27 +0000] "GET / HTTP/1.1" 200 22 "-" "curl/7.29.0" "10.244.219.64,10.244.167.184"
10.244.167.186 - - [14/Feb/2026:04:53:25 +0000] "GET / HTTP/1.1" 200 22 "-" "curl/8.18.0" "10.244.167.186"
10.244.167.186 - - [14/Feb/2026:04:56:48 +0000] "GET / HTTP/1.1" 200 22 "-" "curl/8.18.0" "10.244.167.186"
10.244.167.186 - - [14/Feb/2026:03:21:41 +0000] "GET / HTTP/1.1" 200 22 "-" "Mobile" "-"
10.244.167.184 - - [14/Feb/2026:03:22:06 +0000] "GET / HTTP/1.1" 200 22 "-" "curl/7.29.0" "10.244.219.64"
10.244.167.186 - - [14/Feb/2026:03:25:27 +0000] "GET / HTTP/1.1" 200 22 "-" "curl/8.18.0" "-"
10.244.167.186 - - [14/Feb/2026:04:45:45 +0000] "GET / HTTP/1.1" 200 22 "-" "curl/8.18.0" "10.244.167.186"
10.244.167.186 - - [14/Feb/2026:04:45:46 +0000] "GET / HTTP/1.1" 200 22 "-" "curl/8.18.0" "10.244.167.186"
10.244.167.184 - - [14/Feb/2026:04:51:07 +0000] "GET / HTTP/1.1" 200 22 "-" "curl/7.29.0" "10.244.219.64,10.244.167.184"
10.244.167.186 - - [14/Feb/2026:04:56:47 +0000] "GET / HTTP/1.1" 200 22 "-" "curl/8.18.0" "10.244.167.186"
10.244.167.186 - - [14/Feb/2026:04:56:47 +0000] "GET / HTTP/1.1" 200 22 "-" "curl/8.18.0" "10.244.167.186"
10.244.167.186 - - [14/Feb/2026:04:56:48 +0000] "GET / HTTP/1.1" 200 22 "-" "curl/8.18.0" "10.244.167.186"
10.244.167.186 - - [14/Feb/2026:04:58:18 +0000] "GET / HTTP/1.1" 200 22 "-" "curl/8.18.0" "10.244.167.186"
[root@mster isito]# date
Fri Feb 13 20:58:39 PST 2026
[root@mster isito]# kubectl logs -l version=v1 --tail=10
10.244.167.186 - - [14/Feb/2026:04:58:10 +0000] "GET / HTTP/1.1" 200 22 "-" "curl/8.18.0" "-"
10.244.167.186 - - [14/Feb/2026:04:58:10 +0000] "GET / HTTP/1.1" 200 22 "-" "curl/8.18.0" "-"
10.244.167.186 - - [14/Feb/2026:04:58:11 +0000] "GET / HTTP/1.1" 200 22 "-" "curl/8.18.0" "-"
10.244.167.186 - - [14/Feb/2026:04:58:11 +0000] "GET / HTTP/1.1" 200 22 "-" "curl/8.18.0" "-"
10.244.167.186 - - [14/Feb/2026:04:58:16 +0000] "GET / HTTP/1.1" 200 22 "-" "curl/8.18.0" "-"
10.244.167.186 - - [14/Feb/2026:04:58:17 +0000] "GET / HTTP/1.1" 200 22 "-" "curl/8.18.0" "-"
10.244.167.186 - - [14/Feb/2026:04:58:17 +0000] "GET / HTTP/1.1" 200 22 "-" "curl/8.18.0" "-"
10.244.167.186 - - [14/Feb/2026:04:58:18 +0000] "GET / HTTP/1.1" 200 22 "-" "curl/8.18.0" "-"
10.244.167.186 - - [14/Feb/2026:04:58:18 +0000] "GET / HTTP/1.1" 200 22 "-" "curl/8.18.0" "-"
10.244.167.186 - - [14/Feb/2026:04:58:18 +0000] "GET / HTTP/1.1" 200 22 "-" "curl/8.18.0" "-"
10.244.167.186 - - [14/Feb/2026:04:56:47 +0000] "GET / HTTP/1.1" 200 22 "-" "curl/8.18.0" "-"
10.244.167.186 - - [14/Feb/2026:04:56:47 +0000] "GET / HTTP/1.1" 200 22 "-" "curl/8.18.0" "-"
10.244.167.186 - - [14/Feb/2026:04:56:49 +0000] "GET / HTTP/1.1" 200 22 "-" "curl/8.18.0" "-"
10.244.167.186 - - [14/Feb/2026:04:58:07 +0000] "GET / HTTP/1.1" 200 22 "-" "curl/8.18.0" "-"
10.244.167.186 - - [14/Feb/2026:04:58:10 +0000] "GET / HTTP/1.1" 200 22 "-" "curl/8.18.0" "-"
10.244.167.186 - - [14/Feb/2026:04:58:10 +0000] "GET / HTTP/1.1" 200 22 "-" "curl/8.18.0" "-"
10.244.167.186 - - [14/Feb/2026:04:58:17 +0000] "GET / HTTP/1.1" 200 22 "-" "curl/8.18.0" "-"
10.244.167.186 - - [14/Feb/2026:04:58:17 +0000] "GET / HTTP/1.1" 200 22 "-" "curl/8.18.0" "-"
10.244.167.186 - - [14/Feb/2026:04:58:17 +0000] "GET / HTTP/1.1" 200 22 "-" "curl/8.18.0" "-"
10.244.167.186 - - [14/Feb/2026:04:58:18 +0000] "GET / HTTP/1.1" 200 22 "-" "curl/8.18.0" "-"
You have new mail in /var/spool/mail/root- 外部主机测试
bash
root@node ~]# for i in {1..10}; do   curl  $GATEWAY_URL ; done
Version: v1 - $(date)
Version: v1 - $(date)
Version: v1 - $(date)
Version: v1 - $(date)
Version: v1 - $(date)
Version: v1 - $(date)
Version: v1 - $(date)
Version: v1 - $(date)
Version: v1 - $(date)
Version: v1 - $(date)
[root@node ~]# date
Fri Feb 13 20:58:01 PST 2026
执行 curl 命令返回的都是 Version: v1
这是因为镜像发布中,主请求仍然由 v1 处理并返回响应,用户只能看到 v1 的结果。这是镜像发布的核心设计:让用户无感知,只将流量复制到 v2 进行后端验证。
v2 Pod 的日志中出现了最新的请求记录
您通过 kubectl logs -l version=v2 --tail=10 看到了来自 sleep Pod IP(10.244.167.186)的请求,例如 04:58:18 的日志。这些请求的时间与您测试的时间(PST 20:58)匹配,证明v2 确实收到了镜像流量。
7、版本切换
1、 切换脚本
bash
cat    << EOF  adjust-traffic.sh
#!/bin/bash
#
# 智能流量调整脚本 (适用于 Istio VirtualService)
# 用法:
#   ./adjust-traffic.sh [--create] <v1-weight> <v2-weight>
#   ./adjust-traffic.sh --target <version> <weight>
#   ./adjust-traffic.sh --step <target-version> <target-weight> [--interval <秒>]
#
# 示例:
#   ./adjust-traffic.sh 90 10                # 将两个 VS 的权重设置为 v1=90, v2=10
#   ./adjust-traffic.sh --target v2 50        # 将 v2 权重设为 50,v1 自动为 50
#   ./adjust-traffic.sh --create 80 20        # 创建网关和内部 VS (如果不存在),并设权重
#   ./adjust-traffic.sh --step v2 100 --interval 10  # 每10秒增加 10% 直到 v2=100

set -e

# 默认配置
NAMESPACE=${NAMESPACE:-default}
GW_VS_NAME=${GW_VS_NAME:-demo-service-canary-gateway}
INTERNAL_VS_NAME=${INTERNAL_VS_NAME:-demo-service-canary-internal}
GATEWAY_NAME=${GATEWAY_NAME:-demo-gateway}
SERVICE_FQDN=${SERVICE_FQDN:-demo-service.default.svc.cluster.local}
DR_NAME=${DR_NAME:-demo-service}

# 检查依赖命令
for cmd in kubectl jq; do
    if ! command -v $cmd &> /dev/null; then
        echo "错误: 未找到命令 '$cmd',请先安装。"
        exit 1
    fi
done

# 显示帮助
usage() {
    echo "用法: $0 [选项] <v1权重> <v2权重>"
    echo "  或: $0 --target <版本> <权重>"
    echo "  或: $0 --step <目标版本> <目标权重> [--interval <秒>]"
    echo ""
    echo "选项:"
    echo "  --create         如果 VirtualService 不存在则创建 (默认使用模板)"
    echo "  --target <ver>   指定目标版本 (v1 或 v2),权重将设为给定值,另一版本自动补全"
    echo "  --step           逐步调整模式,需指定目标版本和目标权重"
    echo "  --interval <秒>  逐步调整时的间隔 (默认 10 秒)"
    echo "  --help           显示此帮助"
    exit 0
}

# 检查参数
if [ $# -eq 0 ]; then usage; fi

# 解析参数
CREATE=false
STEP=false
INTERVAL=10
TARGET=""
TARGET_WEIGHT=""

while [[ $# -gt 0 ]]; do
    case $1 in
        --help) usage ;;
        --create) CREATE=true; shift ;;
        --step) STEP=true; shift ;;
        --interval) INTERVAL=$2; shift 2 ;;
        --target) TARGET=$2; TARGET_WEIGHT=$3; shift 3 ;;
        *) break ;;
    esac
done

# 权重处理
if [ -n "$TARGET" ]; then
    if [[ ! "$TARGET" =~ ^(v1|v2)$ ]]; then
        echo "错误: --target 必须是 v1 或 v2"
        exit 1
    fi
    if ! [[ "$TARGET_WEIGHT" =~ ^[0-9]+$ ]] || [ "$TARGET_WEIGHT" -lt 0 ] || [ "$TARGET_WEIGHT" -gt 100 ]; then
        echo "错误: 权重必须是 0-100 的整数"
        exit 1
    fi
    if [ "$TARGET" == "v1" ]; then
        V1_WEIGHT=$TARGET_WEIGHT
        V2_WEIGHT=$((100 - TARGET_WEIGHT))
    else
        V2_WEIGHT=$TARGET_WEIGHT
        V1_WEIGHT=$((100 - TARGET_WEIGHT))
    fi
else
    if [ $# -ne 2 ]; then
        echo "错误: 需要指定 v1 和 v2 权重"
        usage
    fi
    V1_WEIGHT=$1
    V2_WEIGHT=$2
    if ! [[ "$V1_WEIGHT" =~ ^[0-9]+$ ]] || ! [[ "$V2_WEIGHT" =~ ^[0-9]+$ ]] || [ $((V1_WEIGHT + V2_WEIGHT)) -ne 100 ]; then
        echo "错误: 权重必须为 0-100 的整数,且总和为 100"
        exit 1
    fi
fi

# 逐步调整模式
if [ "$STEP" = true ]; then
    if [ -z "$TARGET" ] || [ -z "$TARGET_WEIGHT" ]; then
        echo "错误: --step 需要指定 --target <版本> <目标权重>"
        exit 1
    fi
    # 获取当前权重
    if ! kubectl get vs $GW_VS_NAME -n $NAMESPACE &>/dev/null; then
        echo "错误: VirtualService $GW_VS_NAME 不存在,无法逐步调整"
        exit 1
    fi
    # 解析当前权重
    CUR_V1=$(kubectl get vs $GW_VS_NAME -n $NAMESPACE -o jsonpath='{.spec.http[0].route[?(@.destination.subset=="v1")].weight}')
    CUR_V2=$(kubectl get vs $GW_VS_NAME -n $NAMESPACE -o jsonpath='{.spec.http[0].route[?(@.destination.subset=="v2")].weight}')
    if [ -z "$CUR_V1" ] || [ -z "$CUR_V2" ]; then
        echo "错误: 无法从 $GW_VS_NAME 中获取当前权重"
        exit 1
    fi
    CURRENT_V1=$CUR_V1
    CURRENT_V2=$CUR_V2
    echo "当前权重: v1=$CURRENT_V1, v2=$CURRENT_V2"
    # 计算增量
    if [ "$TARGET" == "v1" ]; then
        TARGET_V1=$TARGET_WEIGHT
        TARGET_V2=$((100 - TARGET_WEIGHT))
        DIFF_V1=$((TARGET_V1 - CURRENT_V1))
        DIFF_V2=$(( - DIFF_V1 ))
    else
        TARGET_V2=$TARGET_WEIGHT
        TARGET_V1=$((100 - TARGET_WEIGHT))
        DIFF_V2=$((TARGET_V2 - CURRENT_V2))
        DIFF_V1=$(( - DIFF_V2 ))
    fi
    if [ $DIFF_V1 -eq 0 ] && [ $DIFF_V2 -eq 0 ]; then
        echo "当前已是目标权重,无需调整。"
        exit 0
    fi
    # 确定步长(每次调整 10% 或 5%,视差值而定,至少 1%)
    STEP_SIZE=10
    if [ ${DIFF_V1#-} -lt $STEP_SIZE ]; then
        STEP_SIZE=${DIFF_V1#-}
    fi
    if [ ${DIFF_V2#-} -lt $STEP_SIZE ]; then
        STEP_SIZE=${DIFF_V2#-}
    fi
    if [ $STEP_SIZE -eq 0 ]; then STEP_SIZE=1; fi
    echo "将逐步调整,每 $INTERVAL 秒调整 $STEP_SIZE% ..."
    while true; do
        # 计算下一步权重
        NEXT_V1=$CURRENT_V1
        NEXT_V2=$CURRENT_V2
        if [ $DIFF_V1 -gt 0 ]; then
            NEXT_V1=$((CURRENT_V1 + STEP_SIZE > TARGET_V1 ? TARGET_V1 : CURRENT_V1 + STEP_SIZE))
            NEXT_V2=$((100 - NEXT_V1))
        elif [ $DIFF_V1 -lt 0 ]; then
            NEXT_V1=$((CURRENT_V1 - STEP_SIZE < TARGET_V1 ? TARGET_V1 : CURRENT_V1 - STEP_SIZE))
            NEXT_V2=$((100 - NEXT_V1))
        fi
        echo "调整至: v1=$NEXT_V1, v2=$NEXT_V2"
        # 执行更新
        update_vs "$NEXT_V1" "$NEXT_V2"
        CURRENT_V1=$NEXT_V1
        CURRENT_V2=$NEXT_V2
        if [ $CURRENT_V1 -eq $TARGET_V1 ] && [ $CURRENT_V2 -eq $TARGET_V2 ]; then
            echo "已达到目标权重。"
            break
        fi
        sleep $INTERVAL
    done
    exit 0
fi

# 更新 VirtualService 的函数
update_vs() {
    local v1=$1
    local v2=$2
    echo "更新网关 VirtualService $GW_VS_NAME 为 v1=$v1, v2=$v2"
    kubectl patch vs $GW_VS_NAME -n $NAMESPACE --type='json' -p="[
        {\"op\": \"replace\", \"path\": \"/spec/http/0/route/0/weight\", \"value\": $v1},
        {\"op\": \"replace\", \"path\": \"/spec/http/0/route/1/weight\", \"value\": $v2}
    ]" 2>/dev/null || {
        if [ "$CREATE" = true ]; then
            echo "VirtualService $GW_VS_NAME 不存在,正在创建..."
            create_gateway_vs "$v1" "$v2"
        else
            echo "错误: 网关 VirtualService $GW_VS_NAME 不存在。请先创建或使用 --create 选项。"
            exit 1
        fi
    }
    echo "更新内部 VirtualService $INTERNAL_VS_NAME 为 v1=$v1, v2=$v2"
    kubectl patch vs $INTERNAL_VS_NAME -n $NAMESPACE --type='json' -p="[
        {\"op\": \"replace\", \"path\": \"/spec/http/0/route/0/weight\", \"value\": $v1},
        {\"op\": \"replace\", \"path\": \"/spec/http/0/route/1/weight\", \"value\": $v2}
    ]" 2>/dev/null || {
        if [ "$CREATE" = true ]; then
            echo "内部 VirtualService $INTERNAL_VS_NAME 不存在,正在创建..."
            create_internal_vs "$v1" "$v2"
        else
            echo "错误: 内部 VirtualService $INTERNAL_VS_NAME 不存在。请先创建或使用 --create 选项。"
            exit 1
        fi
    }
    echo "权重更新成功。"
}

# 创建网关 VirtualService 的模板
create_gateway_vs() {
    local v1=$1
    local v2=$2
    cat <<EOF | kubectl apply -f -
apiVersion: networking.istio.io/v1beta1
kind: VirtualService
metadata:
  name: $GW_VS_NAME
  namespace: $NAMESPACE
spec:
  hosts:
  - "*"
  gateways:
  - $GATEWAY_NAME
  http:
  - route:
    - destination:
        host: $SERVICE_FQDN
        subset: v1
      weight: $v1
    - destination:
        host: $SERVICE_FQDN
        subset: v2
      weight: $v2
EOF
}

create_internal_vs() {
    local v1=$1
    local v2=$2
    cat <<EOF | kubectl apply -f -
apiVersion: networking.istio.io/v1beta1
kind: VirtualService
metadata:
  name: $INTERNAL_VS_NAME
  namespace: $NAMESPACE
spec:
  hosts:
  - "$SERVICE_FQDN"
  gateways:
  - mesh
  http:
  - route:
    - destination:
        host: $SERVICE_FQDN
        subset: v1
      weight: $v1
    - destination:
        host: $SERVICE_FQDN
        subset: v2
      weight: $v2
EOF
}

# 主流程:执行更新
update_vs $V1_WEIGHT $V2_WEIGHT

# 验证 DestinationRule 是否存在
if ! kubectl get dr $DR_NAME -n $NAMESPACE &>/dev/null; then
    echo "警告: DestinationRule $DR_NAME 不存在,请确保已定义 v1 和 v2 子集。"
else
    echo "DestinationRule 检查通过。"
fi

# 可选:显示更新后的权重
echo "当前权重:"
kubectl get vs $GW_VS_NAME -n $NAMESPACE -o jsonpath='{.spec.http[0].route}' | jq .

EOF
2、脚本执行情况
bash
./adjust-traffic.sh --create 90 10
更新网关 VirtualService demo-service-mirror-gateway 为 v1=90, v2=10
VirtualService demo-service-mirror-gateway 不存在,正在创建...
virtualservice.networking.istio.io/demo-service-mirror-gateway configured
更新内部 VirtualService demo-service-mirror-internal 为 v1=90, v2=10
内部 VirtualService demo-service-mirror-internal 不存在,正在创建...
virtualservice.networking.istio.io/demo-service-mirror-internal configured
权重更新成功。
DestinationRule 检查通过。
当前权重:
[
  {
    "destination": {
      "host": "demo-service.default.svc.cluster.local",
      "subset": "v1"
    },
    "weight": 90
  },
  {
    "destination": {
      "host": "demo-service.default.svc.cluster.local",
      "subset": "v2"
    },
    "weight": 10
  }
]
[root@mster isito]# kubectl get vs
NAME                           GATEWAYS           HOSTS                                        AGE
demo-service-mirror-gateway    ["demo-gateway"]   ["*"]                                        99m
demo-service-mirror-internal   ["mesh"]           ["demo-service.default.svc.cluster.local"]   99m
[root@mster isito]# kubectl get vs -o yaml
apiVersion: v1
items:
- apiVersion: networking.istio.io/v1beta1
  kind: VirtualService
  metadata:
    annotations:
      kubectl.kubernetes.io/last-applied-configuration: |
        {"apiVersion":"networking.istio.io/v1beta1","kind":"VirtualService","metadata":{"annotations":{},"name":"demo-service-mirror-gateway","namespace":"default"},"spec":{"gateways":["demo-gateway"],"hosts":["*"],"http":[{"route":[{"destination":{"host":"demo-service.default.svc.cluster.local","subset":"v1"},"weight":90},{"destination":{"host":"demo-service.default.svc.cluster.local","subset":"v2"},"weight":10}]}]}}
    creationTimestamp: "2026-02-14T04:38:04Z"
    generation: 3
    name: demo-service-mirror-gateway
    namespace: default
    resourceVersion: "120217"
    uid: ca642410-f291-4ba3-ad7b-86a9db409e1a
  spec:
    gateways:
    - demo-gateway
    hosts:
    - '*'
    http:
    - route:
      - destination:
          host: demo-service.default.svc.cluster.local
          subset: v1
        weight: 90
      - destination:
          host: demo-service.default.svc.cluster.local
          subset: v2
        weight: 10
- apiVersion: networking.istio.io/v1beta1
  kind: VirtualService
  metadata:
    annotations:
      kubectl.kubernetes.io/last-applied-configuration: |
        {"apiVersion":"networking.istio.io/v1beta1","kind":"VirtualService","metadata":{"annotations":{},"name":"demo-service-mirror-internal","namespace":"default"},"spec":{"gateways":["mesh"],"hosts":["demo-service.default.svc.cluster.local"],"http":[{"route":[{"destination":{"host":"demo-service.default.svc.cluster.local","subset":"v1"},"weight":90},{"destination":{"host":"demo-service.default.svc.cluster.local","subset":"v2"},"weight":10}]}]}}
    creationTimestamp: "2026-02-14T04:37:49Z"
    generation: 3
    name: demo-service-mirror-internal
    namespace: default
    resourceVersion: "120219"
    uid: 37e9474c-5128-4eef-9e57-f3e24db95cc4
  spec:
    gateways:
    - mesh
    hosts:
    - demo-service.default.svc.cluster.local
    http:
    - route:
      - destination:
          host: demo-service.default.svc.cluster.local
          subset: v1
        weight: 90
      - destination:
          host: demo-service.default.svc.cluster.local
          subset: v2
        weight: 10
kind: List
metadata:
  resourceVersion: ""
[root@mster isito]# ./adjust-traffic.sh --create 50 50
更新网关 VirtualService demo-service-mirror-gateway 为 v1=50, v2=50
virtualservice.networking.istio.io/demo-service-mirror-gateway patched
更新内部 VirtualService demo-service-mirror-internal 为 v1=50, v2=50
virtualservice.networking.istio.io/demo-service-mirror-internal patched
权重更新成功。
DestinationRule 检查通过。
当前权重:
[
  {
    "destination": {
      "host": "demo-service.default.svc.cluster.local",
      "subset": "v1"
    },
    "weight": 50
  },
  {
    "destination": {
      "host": "demo-service.default.svc.cluster.local",
      "subset": "v2"
    },
    "weight": 50
  }
]
[root@mster isito]# kubectl get vs -o yaml
apiVersion: v1
items:
- apiVersion: networking.istio.io/v1beta1
  kind: VirtualService
  metadata:
    annotations:
      kubectl.kubernetes.io/last-applied-configuration: |
        {"apiVersion":"networking.istio.io/v1beta1","kind":"VirtualService","metadata":{"annotations":{},"name":"demo-service-mirror-gateway","namespace":"default"},"spec":{"gateways":["demo-gateway"],"hosts":["*"],"http":[{"route":[{"destination":{"host":"demo-service.default.svc.cluster.local","subset":"v1"},"weight":90},{"destination":{"host":"demo-service.default.svc.cluster.local","subset":"v2"},"weight":10}]}]}}
    creationTimestamp: "2026-02-14T04:38:04Z"
    generation: 4
    name: demo-service-mirror-gateway
    namespace: default
    resourceVersion: "120709"
    uid: ca642410-f291-4ba3-ad7b-86a9db409e1a
  spec:
    gateways:
    - demo-gateway
    hosts:
    - '*'
    http:
    - route:
      - destination:
          host: demo-service.default.svc.cluster.local
          subset: v1
        weight: 50
      - destination:
          host: demo-service.default.svc.cluster.local
          subset: v2
        weight: 50
- apiVersion: networking.istio.io/v1beta1
  kind: VirtualService
  metadata:
    annotations:
      kubectl.kubernetes.io/last-applied-configuration: |
        {"apiVersion":"networking.istio.io/v1beta1","kind":"VirtualService","metadata":{"annotations":{},"name":"demo-service-mirror-internal","namespace":"default"},"spec":{"gateways":["mesh"],"hosts":["demo-service.default.svc.cluster.local"],"http":[{"route":[{"destination":{"host":"demo-service.default.svc.cluster.local","subset":"v1"},"weight":90},{"destination":{"host":"demo-service.default.svc.cluster.local","subset":"v2"},"weight":10}]}]}}
    creationTimestamp: "2026-02-14T04:37:49Z"
    generation: 4
    name: demo-service-mirror-internal
    namespace: default
    resourceVersion: "120710"
    uid: 37e9474c-5128-4eef-9e57-f3e24db95cc4
  spec:
    gateways:
    - mesh
    hosts:
    - demo-service.default.svc.cluster.local
    http:
    - route:
      - destination:
          host: demo-service.default.svc.cluster.local
          subset: v1
        weight: 50
      - destination:
          host: demo-service.default.svc.cluster.local
          subset: v2
        weight: 50
kind: List
metadata:
  resourceVersion: ""
3、测试情况
- pod内部测试
bash
[root@mster isito]# SLEEP_POD=$(kubectl get pod -l app=sleep -o jsonpath='{.items[0].metadata.name}')
[root@mster isito]# kubectl exec $SLEEP_POD -- sh -c 'i=1; while [ $i -le 100 ]; do curl -s http://demo-service.default.svc.cluster.local; i=$((i+1)); done' | grep -o "v[12]" | sort | uniq -c
     44 v1
56 v2- 外部主机测试
bash
[root@node ~]# export GATEWAY_URL=http://192.168.1.100:30881
[root@node ~]# for i in {1..100}; do curl -s $GATEWAY_URL; done | grep -o "v[12]" | sort | uniq -c
     87 v1
     13 v2
[root@node ~]# for i in {1..100}; do curl -s $GATEWAY_URL; done | grep -o "v[12]" | sort | uniq -c
     46 v1
     54 v2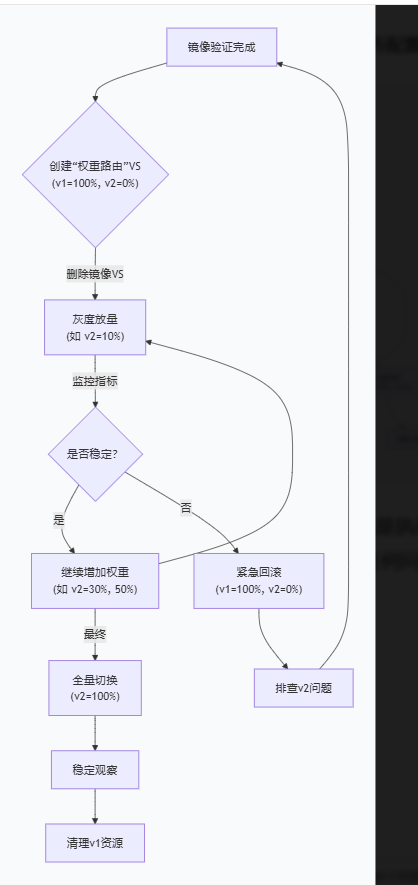
五、基于Istio的故障注入
故障注入是一种主动向系统中引入故障(如延迟、错误响应)以测试系统弹性和容错能力的测试手段。它并不是一种发布流程(如灰度或蓝绿),而是混沌工程的核心实践,旨在验证系统在面对真实故障时的表现。
🎯 典型使用场景
- 验证超时与重试策略
假设你的服务设置了超时2秒、重试2次。通过注入3秒延迟,可以验证:
请求是否在2秒后超时?
超时后是否触发重试?
重试是否超过了总次数限制?
这能确保配置的合理性,避免因超时设置不当导致连锁故障。
- 测试熔断与降级机制
当你注入高比例的故障(如50%的503错误),可以验证:
服务熔断器是否会在错误率达到阈值时打开?
降级逻辑(如返回缓存数据或空结果)是否被正确触发?
熔断半开后恢复试探是否正常?
- 模拟依赖服务故障
微服务架构中,一个服务的故障可能传播到上游。通过向下游服务注入故障,可以测试:
上游服务的容错逻辑(如快速失败、回退)。
全链路的监控告警是否能准确捕捉到故障源头。
-
验证监控与告警系统
故障注入可以主动触发错误,验证监控系统是否能够准确记录、告警规则是否合理,确保在生产真的出问题时,团队能第一时间感知。
-
混沌工程实验
在生产或类生产环境中,定期进行故障注入演练,提前发现系统弱点,提升整体韧性。例如:
"五一"大促前,模拟下游支付服务延迟,验证订单系统的处理能力。
随机注入实例故障,验证负载均衡是否重新分发流量。
📌 为什么它不属于"发布流程"?
与灰度发布、蓝绿发布等不同,故障注入的目的不是发布新功能,而是验证现有系统在异常情况下的行为。它通常发生在:
系统上线前:作为压力测试的一部分。
配置变更后:验证新设置(如超时、重试)是否生效。
定期演练:持续保证系统弹性。
1、内部网关
bash
cat << EOF vs-fault-internal.yaml
apiVersion: networking.istio.io/v1beta1
kind: VirtualService
metadata:
  name: demo-service-fault-internal
  namespace: default
spec:
  hosts:
  - "demo-service.default.svc.cluster.local"   # 必须为具体FQDN
  gateways:
  - mesh
  http:
  - fault:
      delay:
        percentage:
          value: 50.0
        fixedDelay: 3s
      abort:
        percentage:
          value: 10.0
        httpStatus: 503
    route:
    - destination:
        host: demo-service.default.svc.cluster.local
        subset: v1
      weight: 100

EOF
2、外部网关
bash
cat  << EOF vs-fault-gateway.yaml
apiVersion: networking.istio.io/v1beta1
kind: VirtualService
metadata:
  name: demo-service-fault-gateway
  namespace: default
spec:
  hosts:
  - "*"                     # 外部网关允许通配符
  gateways:
  - demo-gateway
  http:
  - fault:
      # 延迟注入:对50%的请求注入3秒延迟
      delay:
        percentage:
          value: 50.0
        fixedDelay: 3s
      # 中断注入:对10%的请求返回503错误
      abort:
        percentage:
          value: 10.0
        httpStatus: 503
    route:
    - destination:
        host: demo-service.default.svc.cluster.local
        subset: v1           # 所有流量仍去v1(故障注入发生在路由前)
      weight: 100

EOF
3 、应用资源
bash
删除之前的vs
[root@mster isito]# kubectl get vs
NAME                          GATEWAYS           HOSTS                                        AGE
demo-service-fault-gateway    ["demo-gateway"]   ["*"]                                        8m11s
demo-service-fault-internal   ["mesh"]           ["demo-service.default.svc.cluster.local"]   8m20s
4、 验证测试
1、内部pod 测试
bash
SLEEP_POD=$(kubectl get pod -l app=sleep -o jsonpath='{.items[0].metadata.name}')
 for i in {1..20}; do   kubectl exec $SLEEP_POD -- time curl -s -o /dev/null -w "请求 $i: HTTP %{http_code}, 耗时 %{time_total}s\n" http://demo-service.default.svc.cluster.local; done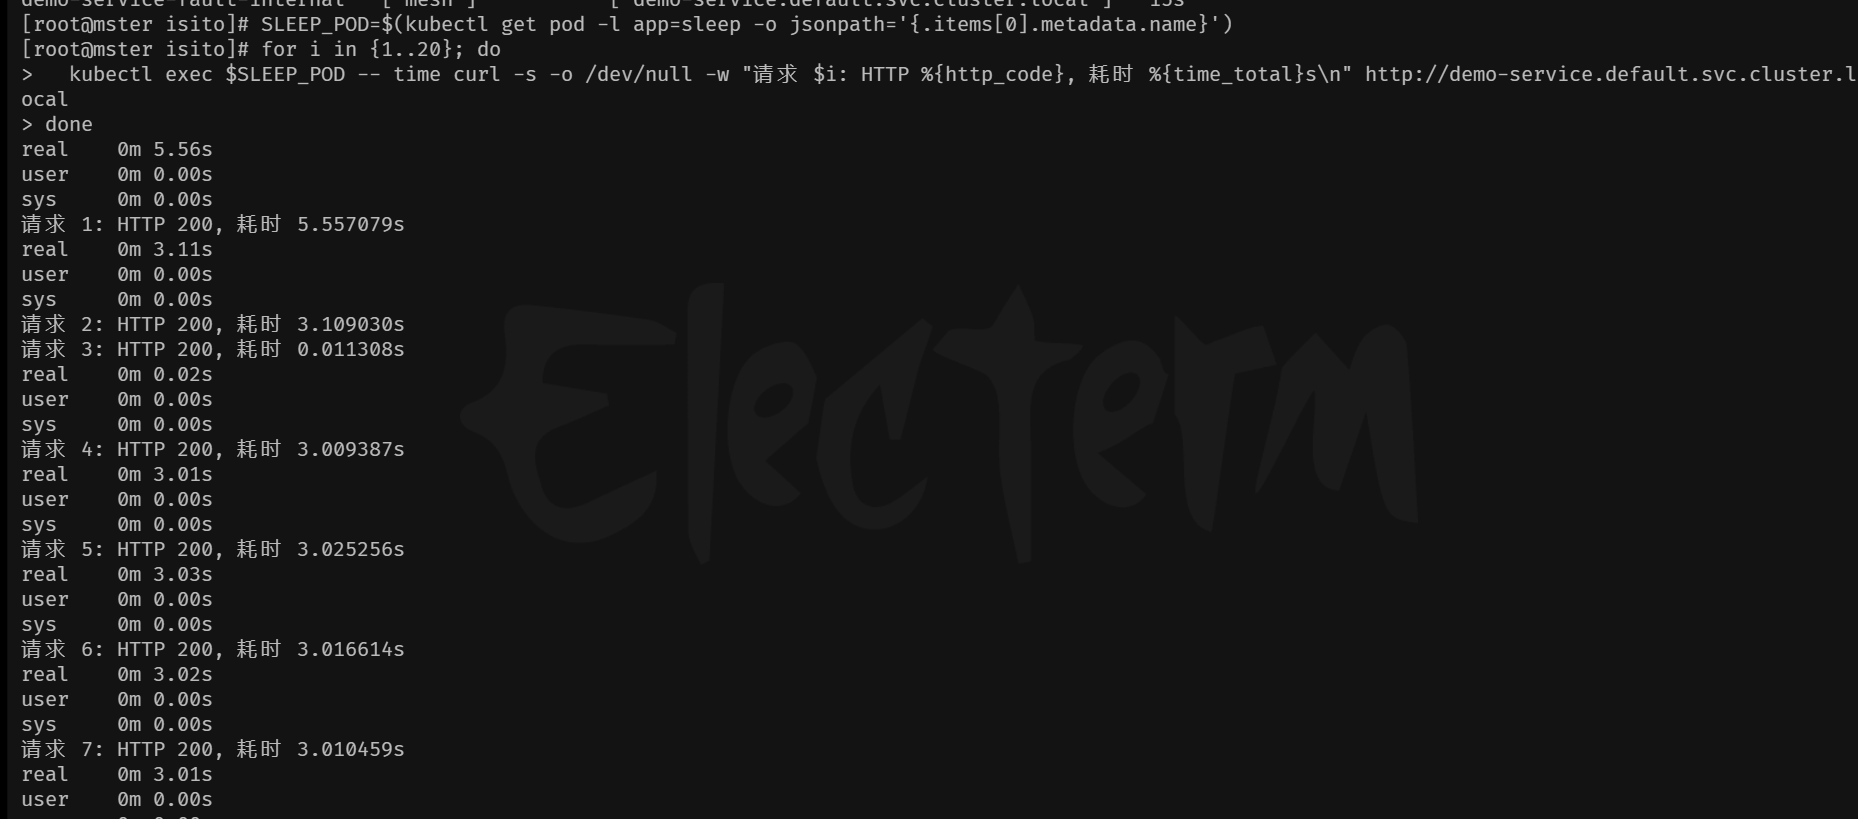
2、外部主机测试
bash
 export GATEWAY_URL=http://192.168.1.100:30881
 for i in {1..20}; do   time curl -s -o /dev/null -w "请求 $i: HTTP %{http_code}, 耗时 %{time_total}s\n" $GATEWAY_URL; done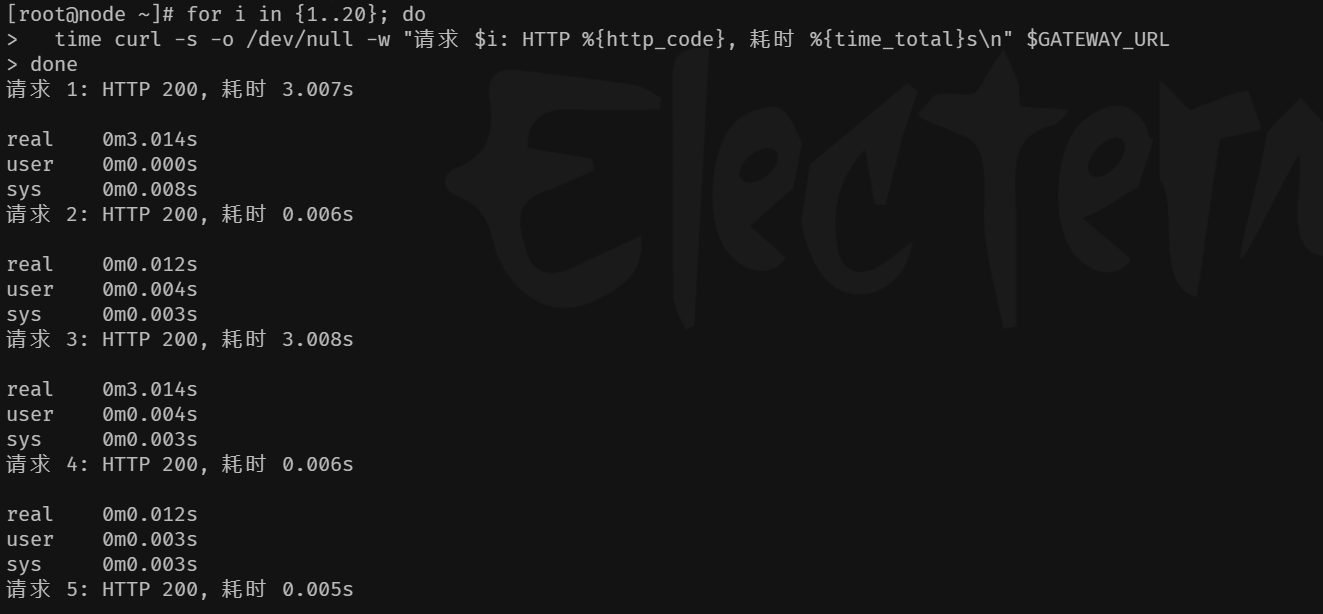
六、大成之作
1、架构图
混沌工程
发布流水线
金丝雀
蓝绿
A/B测试
代码提交
镜像构建
镜像发布验证
发布策略选择
逐步放量
瞬时切换
按条件分流
全量发布
故障注入实验
系统韧性验证
生产稳定运行
外部客户端
curl -H 'Host: gray.example.com'
curl -H 'Host: canary.example.com'
curl -H 'Host: bluegreen.example.com'
curl -H 'Host: mirror.example.com'
curl -H 'Host: fault.example.com'
Ingress Gateway
istio-ingressgateway
VirtualService gray
VirtualService canary
VirtualService bluegreen
VirtualService mirror
VirtualService fault
gray命名空间
nginx服务
canary命名空间
tomcat服务
bluegreen命名空间
alpine服务
mirror命名空间
nginx-alpine服务
fault命名空间
nginx-slim服务
2、通用网关配置(已存在)
bash
cat  << EOF gateway.yaml
#apiVersion: networking.istio.io/v1
apiVersion: networking.istio.io/v1beta1
kind: Gateway
metadata:
  name: demo-gateway
spec:
  selector:
    istio: ingressgateway # 使用已安装的入口网关
  servers:
  - port:
      number: 80
      name: http
      protocol: HTTP
    hosts:
    - "*" # 允许所有主机访问,生产环境请替换为你的域名,如 demo.example.com

EOF
2、 灰度发布(gray 命名空间)
bash
kubectl create namespace gray
kubectl label namespace gray istio-injection=enabled  ## 允许自动注入

kubectl get namespace gray -L istio-injection  ## 查看标签情况,默认为空