本篇技术博文摘要 🌟
- 文章开篇首先阐明图像作为二维矩阵数据 的本质及其在计算机视觉任务中进行预处理的必要性 。核心部分聚焦于TensorFlow提供的官方工具集,详细拆解了
tf.image模块 的丰富功能,并对其操作进行了清晰分类。- 随后,文章深入探讨了图像标准化 与数据增强两大关键技术,阐释其原理、常用方法(如翻转、旋转、裁剪等)及对模型泛化能力的提升作用。
- 进而,文章通过完整的代码示例,演示了从单张图像加载、批处理到构建高效数据管道 的端到端流程。在高级技巧部分,文章介绍了Keras预处理层 的便捷用法与自定义图像处理层的构建方法。
- 最后,文章不仅提供了可动手的练习题 (如观察不同标准化方法的效果、对比数据增强结果),还集中解答了处理不同尺寸图像、CPU/GPU设备选择、避免信息丢失、处理超大图像等工程实践中的常见痛点,旨在帮助读者建立坚实且可落地的图像处理能力。
引言 📘
- 在这个变幻莫测、快速发展的技术时代,与时俱进是每个IT工程师的必修课。
- 我是盛透侧视攻城狮,一个"什么都会一丢丢"的网络安全工程师,目前正全力转向AI大模型安全开发新战场。作为活跃于各大技术社区的探索者与布道者,期待与大家交流碰撞,一起应对智能时代的安全挑战和机遇潮流。

上节回顾
目录
[本篇技术博文摘要 🌟](#本篇技术博文摘要 🌟)
[引言 📘](#引言 📘)
[1.TensorFlow 图像数据处理](#1.TensorFlow 图像数据处理)
[2.TensorFlow图像处理核心 API](#2.TensorFlow图像处理核心 API)
[2.1tf.image 模块](#2.1tf.image 模块)
[6.TensorFlow 图像数据处理练习](#6.TensorFlow 图像数据处理练习)

1.TensorFlow 图像数据处理
1.1什么是图像数据
图像数据是由像素组成的二维矩阵(灰度图像)或三维张量(彩色图像)。
在TensorFlow中,图像通常表示为:
- 灰度图像:高度, 宽度 或 高度, 宽度, 1
- 彩色图像:高度, 宽度, 3(RGB通道)
1.2为什么需要图像处理
- 数据标准化:统一图像尺寸和数值范围
- 数据增强:通过变换增加训练样本多样性
- 特征提取:突出图像中的关键信息
- 预处理:为模型输入准备合适的数据格式

2.TensorFlow图像处理核心 API
2.1tf.image 模块
- TensorFlow提供的专门用于图像处理的API集合
python
import tensorflow as tf
from tensorflow import image as tf_image
2.1.1常用功能分类
| 功能类别 | 主要方法示例 |
|---|---|
| 色彩调整 | adjust_brightness, adjust_contrast |
| 几何变换 | flip, rotate, crop_to_bounding_box |
| 图像合成 | blend, draw_bounding_boxes |
| 格式转换 | encode_jpeg, decode_image |
| 统计操作 | total_variation, per_image_standardization |

3.图像预处理技术详解
3.1标准化处理
- 将像素值归一化到固定范围(通常是0,1或-1,1)
python
def normalize(image):
    """将uint8图像归一化到[0,1]范围"""
    image = tf.cast(image, tf.float32)  # 转换为float32
    return image / 255.0  # 除以最大值

# 使用示例
image = tf.random.uniform([256,256,3], 0, 255, dtype=tf.uint8)
normalized_image = normalize(image)
3.2数据增强技术
- 通过随机变换增加数据多样性
python
def augment_image(image, label):
    """应用随机增强的图像处理流水线"""
    # 随机左右翻转
    image = tf_image.random_flip_left_right(image)

    # 随机亮度调整
    image = tf_image.random_brightness(image, max_delta=0.2)

    # 随机对比度调整
    image = tf_image.random_contrast(image, lower=0.8, upper=1.2)

    # 随机旋转(-15°到+15°)
    angle = tf.random.uniform([], -15, 15) * (3.1415/180)
    image = tf_image.rotate(image, angle)

    return image, label
4.图像加载与批处理流程
4.1完整处理流程
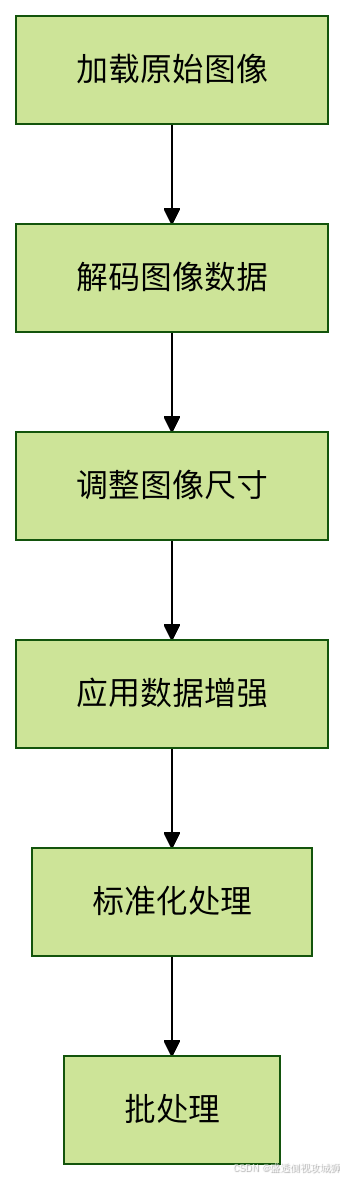

4.2代码实现
python
def preprocess_dataset(dataset, batch_size=32, is_training=False):
    """构建图像预处理流水线"""

    # 定义预处理函数
    def _preprocess(image, label):
        # 解码JPEG图像
        image = tf_image.decode_jpeg(image, channels=3)
        # 调整大小到统一尺寸
        image = tf_image.resize(image, [224, 224])
        # 训练时应用数据增强
        if is_training:
            image = augment_image(image)
        # 标准化处理
        image = normalize(image)
        return image, label

    # 应用预处理并创建批次
    dataset = dataset.map(_preprocess, num_parallel_calls=tf.data.AUTOTUNE)
    dataset = dataset.batch(batch_size)
    dataset = dataset.prefetch(tf.data.AUTOTUNE)

    return dataset
5.高级图像处理技巧
5.1使用Keras预处理层
- TensorFlow 2.x提供了更高级的预处理API
python
from tensorflow.keras.layers.experimental import preprocessing

# 创建预处理模型
augmenter = tf.keras.Sequential([
    preprocessing.RandomFlip("horizontal"),
    preprocessing.RandomRotation(0.1),
    preprocessing.RandomZoom(0.1),
    preprocessing.Rescaling(1./255)  # 标准化
])

# 在模型中使用
model = tf.keras.Sequential([
    augmenter,  # 数据增强层
    tf.keras.layers.Conv2D(32, 3, activation='relu'),
    # 其他层...
])
5.2自定义图像处理层
- 实现自定义预处理操作
python
class RandomColorDistortion(tf.keras.layers.Layer):
    def __init__(self, contrast_range=[0.5, 1.5], **kwargs):
        super().__init__(**kwargs)
        self.contrast_range = contrast_range

    def call(self, images, training=None):
        if not training:
            return images

        # 随机对比度调整
        contrast_factor = tf.random.uniform(
            [], self.contrast_range[0], self.contrast_range[1])
        images = tf.image.adjust_contrast(images, contrast_factor)

        # 随机饱和度调整
        images = tf.image.random_saturation(images, 0.5, 1.5)

        return images
6.TensorFlow 图像数据处理练习
6.1图像标准化对比
python
import tensorflow as tf
import numpy as np
import matplotlib.pyplot as plt

def load_and_normalize_images():
    """加载测试图像并应用三种标准化方法"""
    # 加载示例图像(这里使用随机生成的图像模拟)
    tf.random.set_seed(42)
    test_image = tf.random.uniform([224, 224, 3], minval=0, maxval=256, dtype=tf.float32)

    # 方法1:除以255([0,1]范围)
    normalized_1 = test_image / 255.0

    # 方法2:ImageNet均值标准差标准化
    imagenet_mean = tf.constant([0.485, 0.456, 0.406], dtype=tf.float32)
    imagenet_std = tf.constant([0.229, 0.224, 0.225], dtype=tf.float32)
    normalized_2 = (test_image / 255.0 - imagenet_mean) / imagenet_std

    # 方法3:自定义标准化(缩放到[-1,1]范围)
    normalized_3 = (test_image / 127.5) - 1.0

    # 可视化结果
    fig, axes = plt.subplots(1, 4, figsize=(16, 4))

    axes[0].imshow(test_image.numpy().astype(np.uint8))
    axes[0].set_title("原始图像")
    axes[0].axis('off')

    axes[1].imshow(normalized_1.numpy())
    axes[1].set_title("标准化方法1:/[0,1]")
    axes[1].axis('off')

    # 由于ImageNet标准化可能导致像素值超出[0,1],需要调整显示
    normalized_2_display = tf.clip_by_value(
        (normalized_2 - tf.reduce_min(normalized_2)) /
        (tf.reduce_max(normalized_2) - tf.reduce_min(normalized_2)),
        0, 1
    )
    axes[2].imshow(normalized_2_display.numpy())
    axes[2].set_title("标准化方法2:ImageNet")
    axes[2].axis('off')

    # [-1,1]范围需要调整到[0,1]显示
    normalized_3_display = (normalized_3 + 1) / 2.0
    axes[3].imshow(normalized_3_display.numpy())
    axes[3].set_title("标准化方法3:[-1,1]")
    axes[3].axis('off')

    plt.tight_layout()
    plt.show()

    # 打印统计信息
    print("统计信息:")
    print(f"原始图像: min={test_image.numpy().min():.2f}, max={test_image.numpy().max():.2f}")
    print(f"方法1: min={normalized_1.numpy().min():.2f}, max={normalized_1.numpy().max():.2f}")
    print(f"方法2: min={normalized_2.numpy().min():.2f}, max={normalized_2.numpy().max():.2f}")
    print(f"方法3: min={normalized_3.numpy().min():.2f}, max={normalized_3.numpy().max():.2f}")

    return test_image, normalized_1, normalized_2, normalized_3

# 执行练习1
print("练习1:图像标准化对比")
print("=" * 50)
original, norm1, norm2, norm3 = load_and_normalize_images()

6.2数据增强效果观察
python
def data_augmentation_demo():
    """展示不同的数据增强技术组合效果"""
    # 创建示例图像
    tf.random.set_seed(42)
    base_image = tf.random.uniform([256, 256, 3], minval=0, maxval=256, dtype=tf.float32)
    base_image = tf.cast(base_image, tf.uint8)

    # 定义增强函数
    def augment_image(image, seed):
        """应用增强技术组合"""
        # 固定随机种子以确保每次运行结果一致
        sub_seeds = tf.random.experimental.stateless_split(seed, num=3)

        # 随机水平翻转 (50%概率)
        if tf.random.stateless_uniform([], seed=sub_seeds[0]) > 0.5:
            image = tf.image.flip_left_right(image)

        # 随机旋转 (±15度)
        angle = tf.random.stateless_uniform([], minval=-0.26, maxval=0.26, seed=sub_seeds[1])  # ±15度
        image = tf.keras.preprocessing.image.apply_affine_transform(
            image.numpy(),
            theta=angle * 180 / np.pi,
            row_axis=0,
            col_axis=1,
            channel_axis=2
        )
        image = tf.convert_to_tensor(image, dtype=tf.float32)

        # 色彩调整
        image = tf.image.stateless_random_brightness(image, max_delta=0.2, seed=sub_seeds[2])
        image = tf.image.stateless_random_contrast(image, lower=0.8, upper=1.2, seed=sub_seeds[2])
        image = tf.image.stateless_random_saturation(image, lower=0.8, upper=1.2, seed=sub_seeds[2])

        # 确保图像在有效范围内
        image = tf.clip_by_value(image, 0, 255)
        return tf.cast(image, tf.uint8)

    # 生成10个增强版本
    augmented_images = []
    seeds = tf.random.experimental.stateless_split([42, 24], num=10)

    for i in range(10):
        augmented = augment_image(base_image, seeds[i])
        augmented_images.append(augmented)

    # 可视化结果
    fig, axes = plt.subplots(2, 6, figsize=(18, 6))

    # 显示原始图像
    axes[0, 0].imshow(base_image.numpy())
    axes[0, 0].set_title("原始图像")
    axes[0, 0].axis('off')

    # 显示增强版本
    for i in range(5):
        axes[0, i+1].imshow(augmented_images[i].numpy())
        axes[0, i+1].set_title(f"增强 {i+1}")
        axes[0, i+1].axis('off')

    for i in range(5):
        axes[1, i+1].imshow(augmented_images[i+5].numpy())
        axes[1, i+1].set_title(f"增强 {i+6}")
        axes[1, i+1].axis('off')

    # 隐藏多余的子图
    axes[1, 0].axis('off')

    plt.suptitle("数据增强效果观察(10个增强版本)", fontsize=16)
    plt.tight_layout()
    plt.show()

    return base_image, augmented_images

# 执行练习2
print("\n\n练习2:数据增强效果观察")
print("=" * 50)
original_img, augmented_imgs = data_augmentation_demo()
6.3完整预处理流水线
python
def create_preprocessing_pipeline():
    """构建完整的图像预处理流水线"""

    # 1. 创建模拟的TFRecord数据集
    def create_mock_tfrecord(num_samples=100):
        """创建模拟的TFRecord数据用于演示"""
        import tempfile
        import os

        tfrecord_dir = tempfile.mkdtemp()
        tfrecord_path = os.path.join(tfrecord_dir, "images.tfrecord")

        # 创建模拟数据
        with tf.io.TFRecordWriter(tfrecord_path) as writer:
            for i in range(num_samples):
                # 创建随机图像数据
                image = tf.random.uniform([300, 300, 3], minval=0, maxval=256, dtype=tf.uint8)

                # 编码为JPEG
                image_encoded = tf.image.encode_jpeg(image)

                # 创建TFRecord示例
                feature = {
                    'image/encoded': tf.train.Feature(
                        bytes_list=tf.train.BytesList(value=[image_encoded.numpy()])
                    ),
                    'image/height': tf.train.Feature(
                        int64_list=tf.train.Int64List(value=[300])
                    ),
                    'image/width': tf.train.Feature(
                        int64_list=tf.train.Int64List(value=[300])
                    ),
                    'image/label': tf.train.Feature(
                        int64_list=tf.train.Int64List(value=[i % 10])
                    )
                }

                example = tf.train.Example(features=tf.train.Features(feature=feature))
                writer.write(example.SerializeToString())

        return tfrecord_path

    # 2. 定义TFRecord解析函数
    def parse_tfrecord_fn(example_proto):
        """解析TFRecord示例"""
        feature_description = {
            'image/encoded': tf.io.FixedLenFeature([], tf.string),
            'image/height': tf.io.FixedLenFeature([], tf.int64),
            'image/width': tf.io.FixedLenFeature([], tf.int64),
            'image/label': tf.io.FixedLenFeature([], tf.int64),
        }

        parsed_features = tf.io.parse_single_example(example_proto, feature_description)

        # 解码图像
        image = tf.image.decode_jpeg(parsed_features['image/encoded'], channels=3)

        # 确保图像形状正确
        image = tf.ensure_shape(image, [300, 300, 3])

        return image, parsed_features['image/label']

    # 3. 定义预处理函数
    def preprocess_image(image, label, is_training=True):
        """应用预处理流水线"""
        # 转换为float32
        image = tf.cast(image, tf.float32)

        if is_training:
            # 随机裁剪到256x256
            image = tf.image.random_crop(image, size=[256, 256, 3])

            # 随机水平翻转 (50%概率)
            image = tf.image.random_flip_left_right(image)
        else:
            # 对于验证/测试,使用中心裁剪
            image = tf.image.resize_with_crop_or_pad(image, 256, 256)

        # 标准化到[-1,1]范围
        image = (image / 127.5) - 1.0

        return image, label

    # 4. 构建完整数据集
    def build_dataset(tfrecord_path, batch_size=32, is_training=True):
        """构建完整的数据集流水线"""
        # 从TFRecord加载
        dataset = tf.data.TFRecordDataset(tfrecord_path)

        # 解析TFRecord
        dataset = dataset.map(parse_tfrecord_fn, num_parallel_calls=tf.data.AUTOTUNE)

        # 应用预处理
        dataset = dataset.map(
            lambda img, lbl: preprocess_image(img, lbl, is_training),
            num_parallel_calls=tf.data.AUTOTUNE
        )

        # 缓存、打乱、批处理
        if is_training:
            dataset = dataset.cache()
            dataset = dataset.shuffle(buffer_size=100)

        dataset = dataset.batch(batch_size)
        dataset = dataset.prefetch(buffer_size=tf.data.AUTOTUNE)

        return dataset

    # 5. 演示流水线
    print("构建完整预处理流水线...")

    # 创建模拟TFRecord文件
    tfrecord_path = create_mock_tfrecord(num_samples=100)
    print(f"✓ 创建模拟TFRecord文件: {tfrecord_path}")

    # 构建训练数据集
    train_dataset = build_dataset(tfrecord_path, batch_size=32, is_training=True)
    print("✓ 构建训练数据集流水线")

    # 构建验证数据集
    val_dataset = build_dataset(tfrecord_path, batch_size=32, is_training=False)
    print("✓ 构建验证数据集流水线")

    # 测试流水线
    print("\n测试流水线输出:")
    for batch_images, batch_labels in train_dataset.take(1):
        print(f"批处理图像形状: {batch_images.shape}")  # 应为 (32, 256, 256, 3)
        print(f"批处理标签形状: {batch_labels.shape}")  # 应为 (32,)
        print(f"图像值范围: [{batch_images.numpy().min():.3f}, {batch_images.numpy().max():.3f}]")
        print(f"标签示例: {batch_labels.numpy()[:5]}")  # 显示前5个标签

    # 可视化一个批次中的前4张图像
    fig, axes = plt.subplots(2, 2, figsize=(10, 10))
    axes = axes.flatten()

    for i in range(4):
        # 将图像从[-1,1]转换回[0,1]以便显示
        display_img = (batch_images[i] + 1) / 2.0
        axes[i].imshow(display_img.numpy())
        axes[i].set_title(f"标签: {batch_labels[i].numpy()}")
        axes[i].axis('off')

    plt.suptitle("预处理流水线输出示例(批次中的前4张图像)", fontsize=14)
    plt.tight_layout()
    plt.show()

    return train_dataset, val_dataset

# 执行练习3
print("\n\n练习3:完整预处理流水线")
print("=" * 50)
train_ds, val_ds = create_preprocessing_pipeline()

print("\n✅ 所有练习已完成!")
print("=" * 50)
print("总结:")
print("1. 练习1:对比了三种图像标准化方法")
print("2. 练习2:展示了10种数据增强效果")
print("3. 练习3:构建了完整的预处理流水线(含TFRecord加载)")
7.常见问题解答
7.1如何处理不同尺寸的图像
- 使用
tf.image.resize统一尺寸,或使用tf.image.resize_with_crop_or_pad保持宽高比的同时进行裁剪/填充
7.2图像处理应该在CPU还是GPU上进行
- 通常建议在CPU上进行图像预处理,使用
tf.data.Dataset.map的num_parallel_calls参数并行化处理
7.3如何避免数据增强导致的信息丢失
- 合理设置增强参数范围,对于关键任务(如医学图像),谨慎使用几何变换,优先考虑色彩空间变换
7.4处理超大图像的最佳实践
- 考虑使用
tf.image.extract_patches将大图像分割为小块,或使用渐进式加载技术

欢迎各位彦祖与热巴畅游本人专栏与技术博客
你的三连是我最大的动力
点击➡️指向的专栏名即可闪现
➡️计算机组成原理****
➡️操作系统
➡️****渗透终极之红队攻击行动********
➡️ 动画可视化数据结构与算法
➡️ 永恒之心蓝队联纵合横防御
➡️****华为高级网络工程师********
➡️****华为高级防火墙防御集成部署********
➡️ 未授权访问漏洞横向渗透利用
➡️****逆向软件破解工程********
➡️****MYSQL REDIS 进阶实操********
➡️****红帽高级工程师
➡️红帽系统管理员********
➡️****HVV 全国各地面试题汇总********