Elasticsearch 是一个开源的分布式搜索和分析引擎,主要用于实时处理海量数据并提供高效的全文搜索、实时分析和可视化功能。
ES单节点部署
下载安装:
https://www.elastic.co/downloads/past-releases/elasticsearch-7-17-5下载到Windows电脑桌面后,上传到linux虚拟机中

通过rpm命令安装
[root@localhost ~]# cd Elasticsearch/
[root@localhost Elasticsearch]# ll
total 301024
-rwx------ 1 root root 308244603 Aug 17 23:57 elasticsearch-7.17.5-x86_64.rpm

[root@localhost Elasticsearch]# rpm -ivh elasticsearch-7.17.5-x86_64.rpm
warning: elasticsearch-7.17.5-x86_64.rpm: Header V4 RSA/SHA512 Signature, key ID d88e42b4: NOKEY
Preparing...                          ################################# [100%]
Creating elasticsearch group... OK
Creating elasticsearch user... OK
Updating / installing...
   1:elasticsearch-0:7.17.5-1         ################################# [100%]
### NOT starting on installation, please execute the following statements to configure elasticsearch service to start automatically using systemd
 sudo systemctl daemon-reload
 sudo systemctl enable elasticsearch.service
### You can start elasticsearch service by executing
 sudo systemctl start elasticsearch.service
Created elasticsearch keystore in /etc/elasticsearch/elasticsearch.keystore
修改配置文件
[root@localhost Elasticsearch]# vim /etc/elasticsearch/elasticsearch.yml
network.host: 0.0.0.0    监听所有网卡
discovery.seed_hosts: ["192.168.15.169"]   启动监听地址,初始种子节点列表,用于发现其他节点
cluster.initial_master_nodes: ["192.168.15.169"]   指定参与master选取的节点(若存在多个网卡ip地址,则需要指定)
启动Elasticsearch服务
[root@localhost ~]#  systemctl start elasticsearch.service
[root@localhost ~]# netstat -lntup
Active Internet connections (only servers)
Proto Recv-Q Send-Q Local Address           Foreign Address         State       PID/Program name
tcp        0      0 127.0.0.1:25            0.0.0.0:*               LISTEN      1500/master
tcp        0      0 0.0.0.0:22              0.0.0.0:*               LISTEN      1058/sshd
tcp6       0      0 ::1:25                  :::*                    LISTEN      1500/master
tcp6       0      0 :::9200                 :::*                    LISTEN      6287/java
tcp6       0      0 :::9300                 :::*                    LISTEN      6287/java
tcp6       0      0 :::22                   :::*                    LISTEN      1058/sshd
udp        0      0 0.0.0.0:68              0.0.0.0:*                           848/dhclient
9200 用于对外提供http/https服务的端口
9300 用于集群内部进行数据通信的传输端口,使用TCP协议
查看日志
[root@localhost ~]# tail -f /var/log/elasticsearch/elasticsearch.log

[2025-08-18T00:31:24,420][INFO ][o.e.n.Node               ] [localhost] initialized
[2025-08-18T00:31:24,421][INFO ][o.e.n.Node               ] [localhost] starting ...
[2025-08-18T00:31:24,458][INFO ][o.e.x.s.c.f.PersistentCache] [localhost] persistent cache index loaded
[2025-08-18T00:31:24,459][INFO ][o.e.x.d.l.DeprecationIndexingComponent] [localhost] deprecation component started
[2025-08-18T00:31:24,618][INFO ][o.e.t.TransportService   ] [localhost] publish_address {192.168.15.169:9300}, bound_addresses {[::]:9300}
[2025-08-18T00:31:24,632][INFO ][o.e.x.m.Monitoring       ] [localhost] creating template [.monitoring-alerts-7] with version [7]
[2025-08-18T00:31:24,655][INFO ][o.e.x.m.Monitoring       ] [localhost] creating template [.monitoring-es] with version [7]
[2025-08-18T00:31:24,656][INFO ][o.e.x.m.Monitoring       ] [localhost] creating template [.monitoring-kibana] with version [7]
[2025-08-18T00:31:24,658][INFO ][o.e.x.m.Monitoring       ] [localhost] creating template [.monitoring-logstash] with version [7]
[2025-08-18T00:31:24,663][INFO ][o.e.x.m.Monitoring       ] [localhost] creating template [.monitoring-beats] with version [7]
[2025-08-18T00:31:24,884][INFO ][o.e.b.BootstrapChecks    ] [localhost] bound or publishing to a non-loopback address, enforcing bootstrap checks
[2025-08-18T00:31:24,912][INFO ][o.e.c.c.Coordinator      ] [localhost] setting initial configuration to VotingConfiguration{VBchHu7dR4ipwd3Sg3gpeQ}
[2025-08-18T00:31:25,185][INFO ][o.e.c.s.MasterService    ] [localhost] elected-as-master ([1] nodes joined)[{localhost}{VBchHu7dR4ipwd3Sg3gpeQ}{FrOU281YSIiX6rccx8ZB1Q}{192.168.15.169}{192.168.15.169:9300}{cdfhilmrstw} elect leader, _BECOME_MASTER_TASK_, _FINISH_ELECTION_], term: 1, version: 1, delta: master node changed {previous [], current [{localhost}{VBchHu7dR4ipwd3Sg3gpeQ}{FrOU281YSIiX6rccx8ZB1Q}{192.168.15.169}{192.168.15.169:9300}{cdfhilmrstw}]}      #将本机选为master节点
[2025-08-18T00:31:25,314][INFO ][o.e.c.c.CoordinationState] [localhost] cluster UUID set to [tC82rRsvSUmf7b5x4sy1vg]
[2025-08-18T00:31:25,421][INFO ][o.e.c.s.ClusterApplierService] [localhost] master node changed {previous [], current [{localhost}{VBchHu7dR4ipwd3Sg3gpeQ}{FrOU281YSIiX6rccx8ZB1Q}{192.168.15.169}{192.168.15.169:9300}{cdfhilmrstw}]}, term: 1, version: 1, reason: Publication{term=1, version=1}
[2025-08-18T00:31:25,538][INFO ][o.e.h.AbstractHttpServerTransport] [localhost] publish_address {192.168.15.169:9200}, bound_addresses {[::]:9200}
访问测试
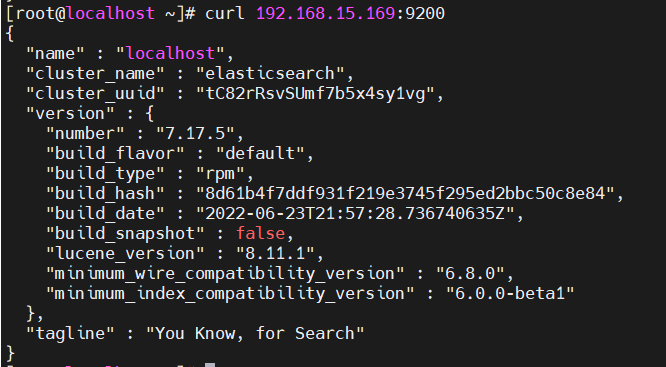
[root@localhost ~]# curl 192.168.15.169:9200
{
  "name" : "localhost",
  "cluster_name" : "elasticsearch",
  "cluster_uuid" : "tC82rRsvSUmf7b5x4sy1vg",    若此处为"na"说明集群搭建失败,需排查处理
  "version" : {
    "number" : "7.17.5",
    "build_flavor" : "default",
    "build_type" : "rpm",
    "build_hash" : "8d61b4f7ddf931f219e3745f295ed2bbc50c8e84",
    "build_date" : "2022-06-23T21:57:28.736740635Z",
    "build_snapshot" : false,
    "lucene_version" : "8.11.1",
    "minimum_wire_compatibility_version" : "6.8.0",
    "minimum_index_compatibility_version" : "6.0.0-beta1"
  },
  "tagline" : "You Know, for Search"
}
部署ES集群
设置三个节点的ES集群
192.168.15.169
192.168.15.166
192.168.15.164
三个集群都安装ES
 169节点已经安装部署了,将rpm包分别传输到166和164上
 scp elasticsearch-7.17.5-x86_64.rpm root@192.168.15.164:/root/Elasticsearch/
 scp elasticsearch-7.17.5-x86_64.rpm root@192.168.15.166:/root/Elasticsearch/
 在166和164节点上安装
 rmp -ivh elasticsearch-7.17.5-x86_64.rpm
修改配置文件
[root@169 Elasticsearch]# egrep -v '^#|^$' /etc/elasticsearch/elasticsearch.yml
cluster.name: Elastricsearch-ES     #ES集群名字
path.data: /var/lib/elasticsearch   #数据存储目录
path.logs: /var/log/elasticsearch   #日志存储目录
network.host: 0.0.0.0				#监听所有网卡
discovery.seed_hosts: ["192.168.15.169","192.168.15.166","192.168.15.164"]  #定义发现机制使用的节点列表
cluster.initial_master_nodes: ["192.168.15.169",,"192.168.15.166","192.168.15.164"]  #参与选举master的节点ip

将该配置文件传输到所有节点
[root@169 Elasticsearch]# scp /etc/elasticsearch/elasticsearch.yml root@192.168.15.164:/etc/elasticsearch/
[root@169 Elasticsearch]# scp /etc/elasticsearch/elasticsearch.yml  root@192.168.15.166:/etc/elasticsearch/
启动所有节点的ES服务
systemctl enable --now elasticsearch查看集群(*代表该节点是master)
[root@169 ~]# curl 192.168.15.169:9200/_cat/nodes?v
ip             heap.percent ram.percent cpu load_1m load_5m load_15m node.role   master name
192.168.15.169           23          90   1    0.11    0.20     0.20 cdfhilmrstw *      169
192.168.15.164           14          97  83    9.07    8.37     5.01 cdfhilmrstw -      164
192.168.15.166           18          92  68    8.02    6.79     4.8 cdfhilmrstw -      164
注意: ES需要半数以上的节点存活,才会提供集群服务
测试:
关掉192.168.15.169
[root@169 ~]# init 0
[root@166 ~]# curl 192.168.15.166:9200/_cat/nodes?v
192.168.15.164           14          97  83    9.07    8.37     5.01 cdfhilmrstw *       164
192.168.15.166 18 92 68 8.02 6.79 4.8 cdfhilmrstw - 164二进制方式安装Elastricsearch(每个节点都安装部署)
下载ES二进制安装包
elasticsearch-7.17.5-linux-x86_64.tar.gz 创建数据、日志、软件目录
mkdir /Elasticsearch/{data,logs,software}
chown  -R Elasticsearch:Elasticsearch /Elasticsearch/{data,logs,software}
解压软件包
tar xf elasticsearch-7.17.5-linux-x86_64.tar.gz -C /Elasticsearch/software修改配置文件
[root@166 Elasticsearch]# egrep -v '^#|^$' /elasticsearch/software/elasticsearch-7.17.5/config/elasticsearch.yml
cluster.name: Elastricsearch-ES-binary     #ES集群名字
path.data: /elasticsearch/data   #数据存储目录
path.logs: /elasticsearch/logs   #日志存储目录
network.host: 0.0.0.0				#监听所有网卡
discovery.seed_hosts: ["192.168.15.169","192.168.15.166","192.168.15.164"]  #定义发现机制使用的节点列表(也可以各个主机之间配置免密登录和域名解析后,定义域名)
cluster.initial_master_nodes: ["192.168.15.169",,"192.168.15.166","192.168.15.164"]  #参与选举master的节点ip/域名
启动ES
需要先切换到Elasticsearch用户去执行启动脚本
[root@166 Elasticsearch]# su - Elasticsearch -C /elasticsearch/software/elasticsearch-7.17.5/bin/elasticsearch
启动报错:
①程序默认的文件打开数量上限过低
②

解决方案:
1、调大文件打开数量上限
查看内核的软硬限制
ulimit -a
查看最大的虚拟内存参数
[root@166 Elasticsearch]# sysctl -q vm.max_map_count

vm.max_map_count = 65530
修改参数
/etc/security/limits.conf
可参考的样本文件
cat /etc/security/limits.d/20-nproc.conf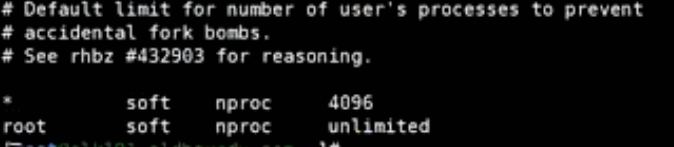
vim /etc/security/limits.d/Elasticsearch.conf
soft       nofile        65535       #设置软限制
hard       nofile        131070		 #设置硬限制