在将算法模型部署至 征程 6 芯片平台的实际应用中,由于算法设计与硬件架构特性存在差异,可能会出现部分算子适配度有待提升、运行效率有待优化以及量化精度可进一步优化等情况。解决好这些问题有助于模型更快更好的运行,充分发挥硬件性能。
本文聚焦于算法模型在 征程 6 芯片上部署时的算子支持问题,包括算子不支持、算子运行效率低、算子量化精度差问题的解决和优化建议。重点阐述解决上述问题的优化思路给出优化案例,使模型在 征程 6 芯片平台实现更快速、更稳定的运行,为算法高效落地提供实用的技术路径。
1.算子替换
算子替换主要解决模型中存在 BPU 不支持的算子问题。当遇到无法支持的算子时,为提升执行性能需要使用 BPU 支持的算子对不支持的算子做替换,使尽可能多的运行在 BPU 中。
1.1 Scatternd 的产生和消除
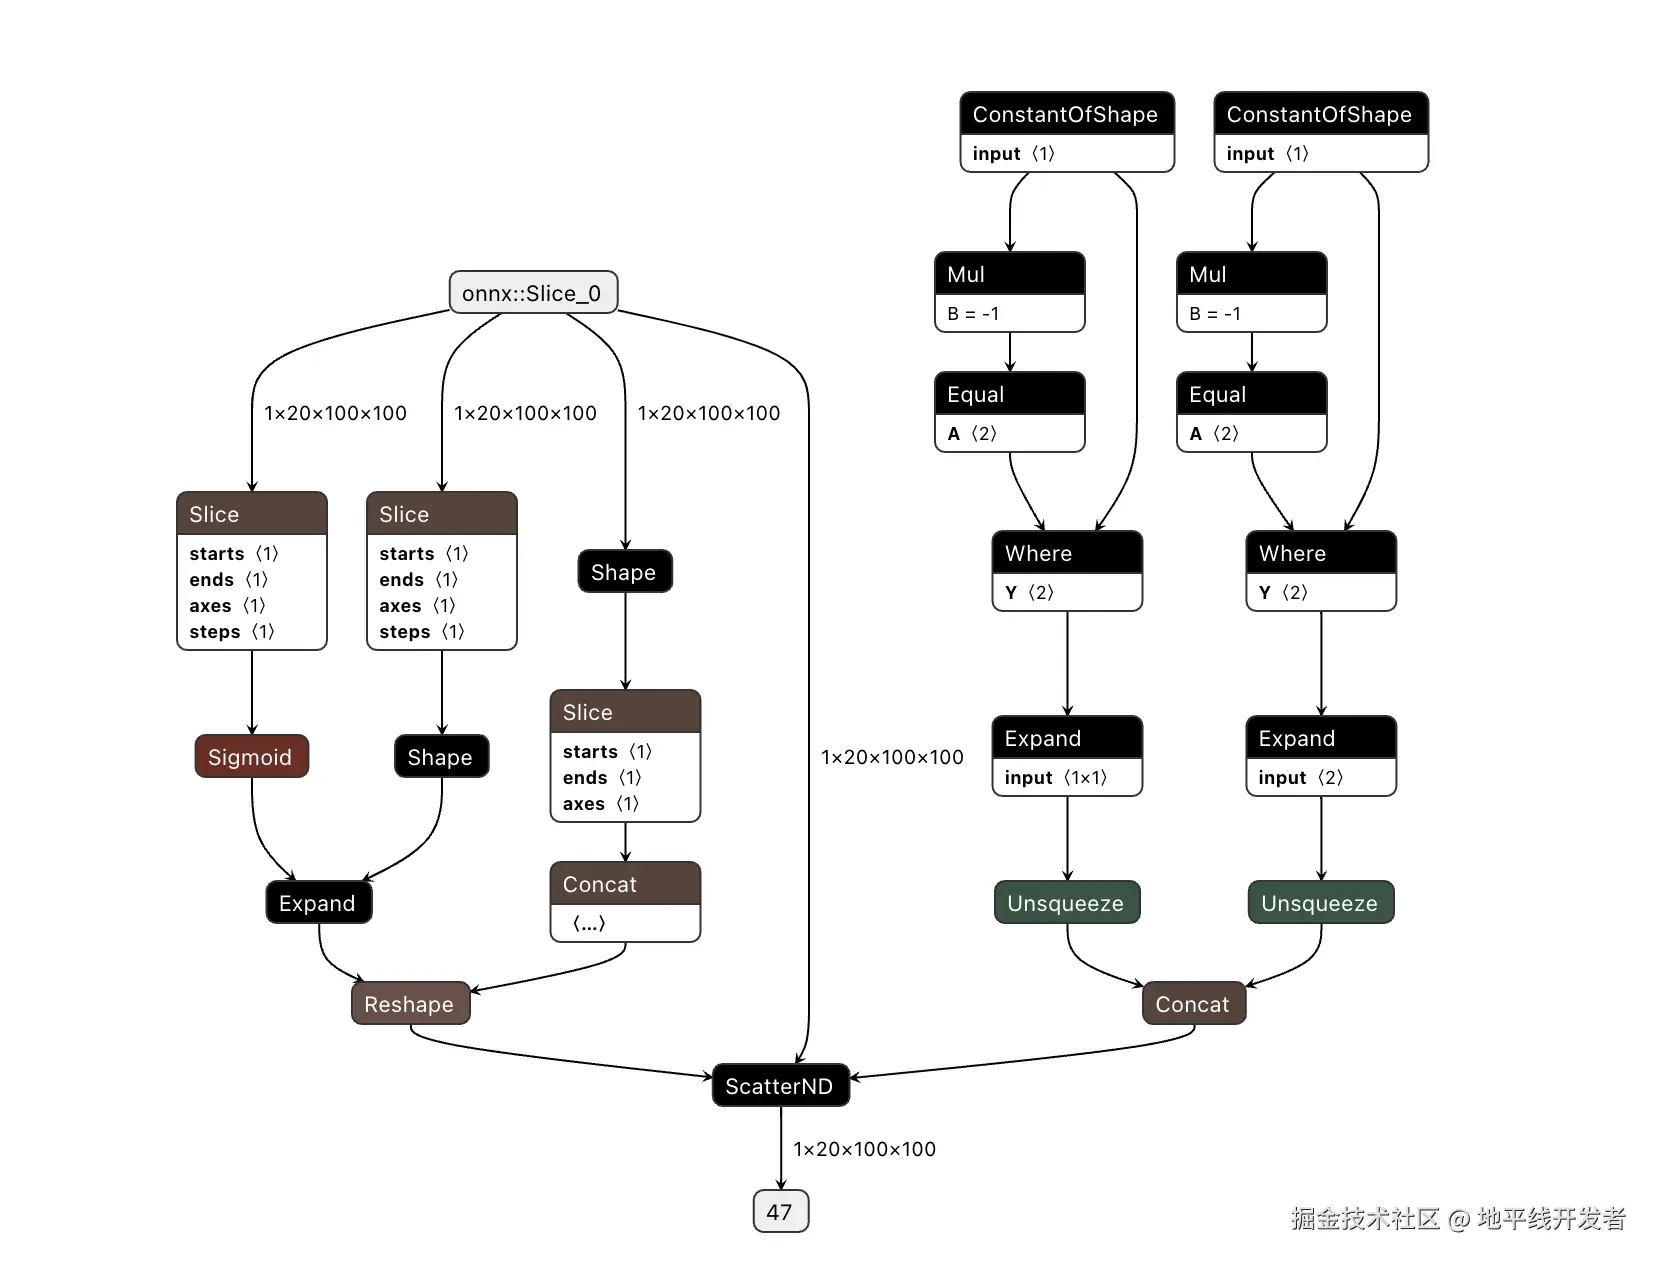
ScatterND 算子由 op 做了 slice 操作 之后 又进行 inplace 产生,因此会引入 CPU 算子。若导出的 onnx 中均存在大量 ScatterND,希望从算法侧进行移除, 等价替换相关操作即可。以下给出几种使用场景:
场景 1:
Plain
# dummy code to generate ScatterND
import torch
from torch import nn

class DummyModel(nn.Module):
    def __init__(self):
        super().__init__()


    def forward(self, x):
将模型导出后会发现存在 scatternd 算子:
修改后不带 ScatterND 的代码与模型结构
Plain
import torch
from torch import nn

class DummyModel(nn.Module):
    def __init__(self):
        super().__init__()

    def forward(self, x):
        tmp1 = x[:, :2]
        tmp2 = x[:, 2:]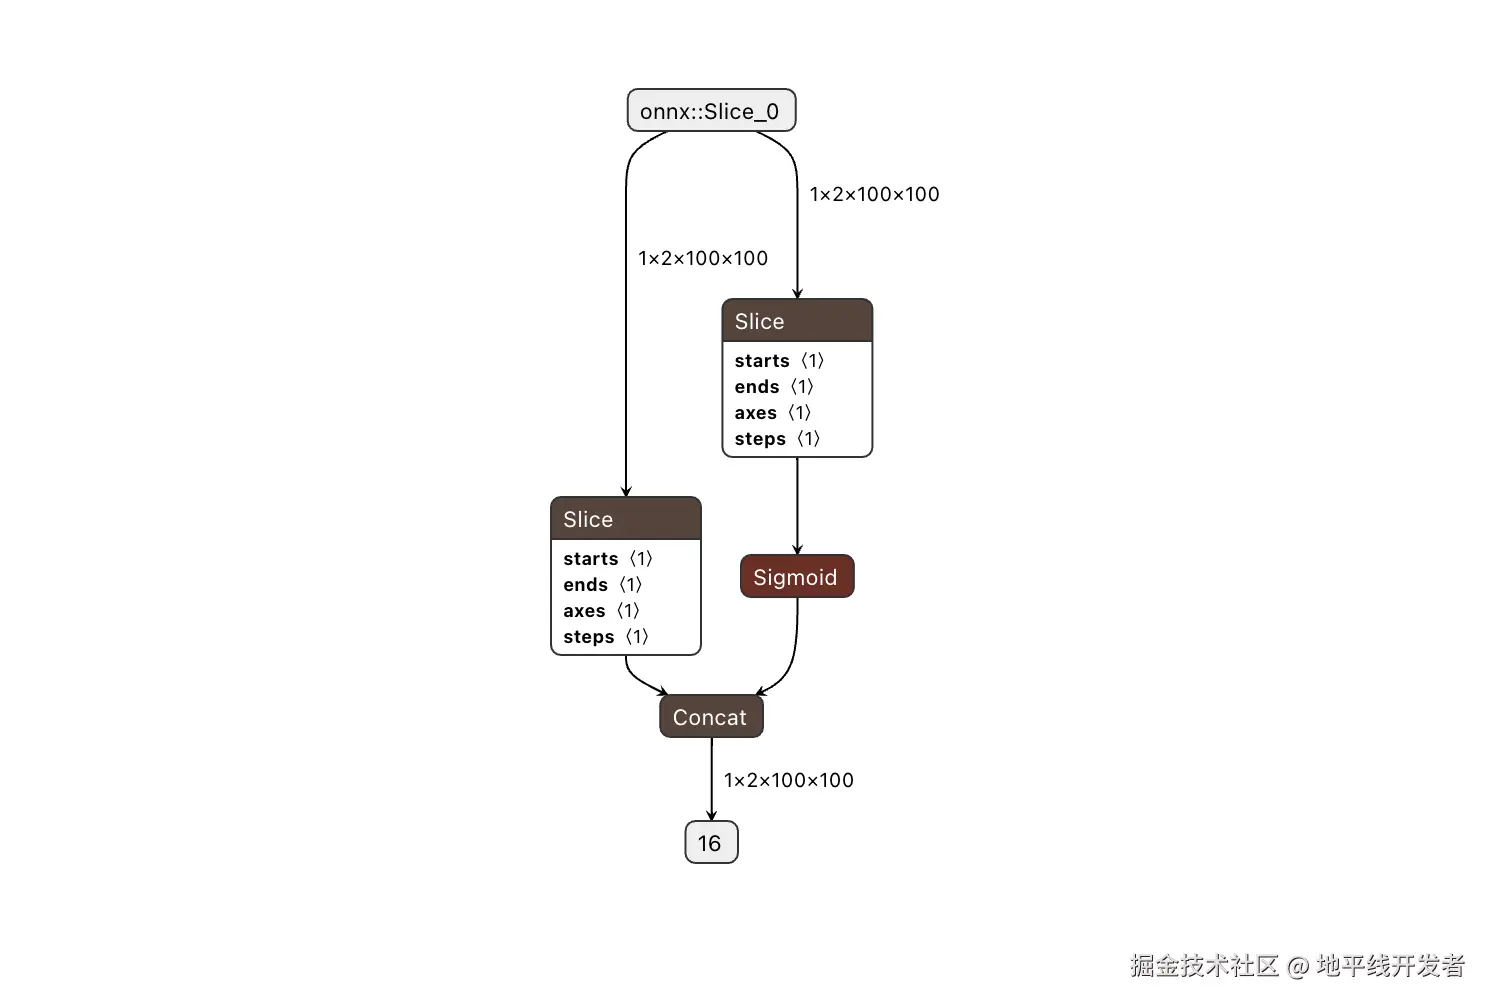
查看 onnx,scatternd 算子不存在,已被替换。
场景 2:
修改前 onnx 中带有 ScatterND 算子的代码示例
Plain
###### 修改前onnx中带有ScatterND算子的代码 ######
block_warp_offset = torch.clone(
    offset[
        :,
        pad_u : self.height - pad_b,
        pad_l : self.width - pad_r,
        :,
    ]
)
block_warp_offset[:, :, :, 0] += pad_l
修改后 onnx 中不带 ScatterND 算子的代码示例
Plain
###### 修改后onnx中不带ScatterND算子的代码 ######
block_warp_offset = torch.clone(
    offset[
        :,
        pad_u : self.height - pad_b,
        pad_l : self.width - pad_r,
        :,
    ]
)
a = block_warp_offset[:, :, :, :1] + pad_l
场景 3:
如下代码会引入 scatterND
Plain
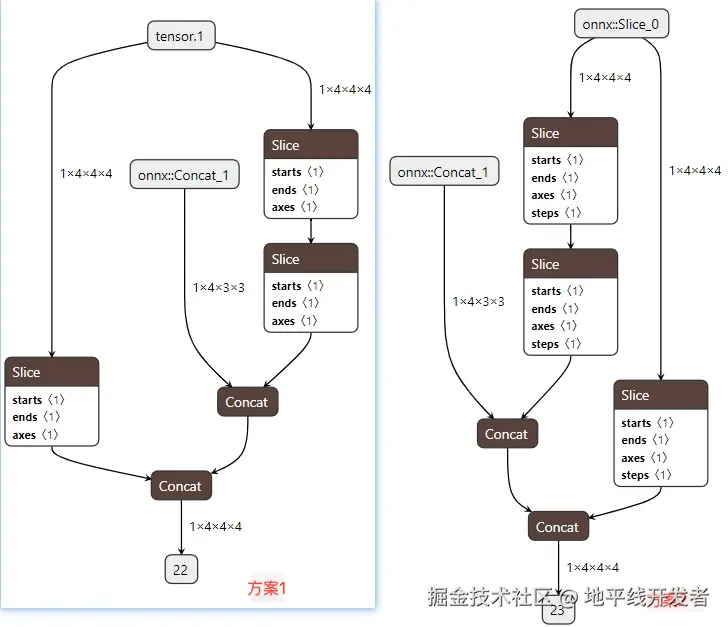
# intri_mat shape为(1,4,4,4), intrinsic shape为(1,4,3,3)
intri_mat = torch.eye(4).unsqueeze(0).repeat(1, 4, 1, 1)
intri_mat[:, :, :3, :3] = intrinsic
修改与验证代码如下:
Plain
import torch
from torch import nn

class DummyModel(nn.Module):
    def __init__(self):
        super().__init__()

    def forward(self, intri_mat,intrinsic):
        ## ============方案1 =============
        # tmp1 = intri_mat[:, :, :3, :3]
方案 1 与方案 2 思想一样
场景 4:
原包含 scatternd 算子的代码:
Plain
key_points = self.scale_mul.mul(scale, self.exp.exp(anchor[1][..., None, 0:3])
rotation_mat[:, :, 0, 0] = anchor[2][:, :, 1] # cos
rotation_mat[:, :, 0, 1] = -anchor[2][:, :, 0] # sin
rotation_mat[:, :, 1, 0] = anchor[2][:, :, 0]
rotation mat[:. :, 1, 1] = anchor[2][:, :,1]
修改之后:
Plain
key_points = self.scale_mul.mul(scale, self.exp.exp(anchor[1][..., None, 0:3]))
temp_cos = anchor[2][:, :, 1]
temp_sin = anchor[2][:, :, 0]
temp_zeros = self.rotation_quant(temp_cos.new_zeros([bs, num_anchor]))
temp_ones = self.rotation_quant(temp_cos.new_ones([bs, num_anchor]))
temp1 = self.stack1.stack([temp_cos, -temp_sin, temp_zeros], dim=-1)
temp2 = self.stack2.stack([temp_sin, temp_cos, temp_zeros], dim=-1)
temp3 = self.stack3.stack([temp_zeros, temp_zeros, temp_ones], dim=-1)
rotation_mat = self.stack4.stack([temp1, temp2, temp3], dim=-2)
场景 5:
Swin Transformer 中为滑动注意力窗口计算对应的掩码值,不同区域做标识符区分
原代码为:
Plain
# calculate attention mask for SW-MSA
# +-----------+-----------+-----------+
# | Region 0  | Region 1  | Region 2  |
# +-----------+-----------+-----------+
# | Region 3  | Region 4  | Region 5  |
# +-----------+-----------+-----------+
# | Region 6  | Region 7  | Region 8  |
# +-----------+-----------+-----------+
img_mask = torch.zeros((1, H_pad, W_pad, 1), device=query.device)
h_slices = (
修改之后:
主要思路,把对原 tensor 划区域的赋值方式修改为划区域的拼接,先对 w 维度进行拼接,再对 h 维度拼接
Plain
cnt = 0
img_mask_patches = []
for h in [
    H_pad - self.window_size,
    self.window_size - self.shift_size,
    self.shift_size,
]:
    img_mask_patches.append([])
    for w in [
        W_pad - self.window_size,
1.2 Bool 赋值和 Mask 替换
对于 PNC 以及静态目标检测模型,模型中较多逻辑判断涉及到 bool 数据类型的赋值和 mask 操作,这一类操作可以考虑替换为 torch.where 算子,可以消除潜在的 cpu 算子并提升模型性能,例如
Plain
tfl_mask[valid == 0] = float("-65504")该操作在 E/M 会引入 cast 和 equal 算子 cpu,如下
可以修改为:
Plain
x = torch.where(valid_mask == 0, torch.tensor(float("-65504"), device=x.device), x)此外,此处 -65504 的极大值会影响模型中该算子输入的数据分布,影响量化参数统计从而影响量化精度,相同场景还有 attn 结构中对 attn_mask 的填充:attn = torch.where(attn_mask, float("-inf"), attn)。因此考虑到量化精度的话,这里建议进一步将填充值换为量化友好的数值:
Plain
x = torch.where(valid_mask == 0, torch.tensor(-100, device=x.device), x)1.3 Nonzero 等效替换
目前 征程 6 芯片不支持 BPU Nonezero 算子,需要对其做替换使算子跑在 BPU 中:
Plain
# 修改前
key_mask=agent_mask.clone()
key_mask = key_mask.reshape(-1, self.T)
index=torch.nonzero(key_mask[:, -1]
key_mask[index,:] = 0
# 修改后
key_mask=agent_mask.clone()
key_mask = key_mask.reshape(-1, self.T)
mask_filter = ~key_mask[:, -1]
key_mask = mask.logical_and(mask_filter.unsqueeze(1))
1.4 Enisum 等效替换
目前 征程 6 芯片不支持 torch.einsum 算子,可以使用以下两种方式替换:
Plain
import torch
A = torch.randn(2, 3, 4, 5, 6) # 形状为 (a=2, b=3, c=4, i=5, j=6)
B = torch.randn(6, 7, 2, 3) # 形状为 (j=6, k=7, a=2, b=3)
# 使用einsum进行操作
result = torch.einsum('abcij, jkab -> abcik', A, B)
# 直接等价实现
# 扩展张量A和B以对齐维度
A = A.unsqueeze(-1) # 扩展为 (a, b, c, i, j, 1)
B = B.unsqueeze(0).unsqueeze(-1).permute(3, 4, 5, 0, 1, 2) # 扩展为 (a, b, 1, 1, j, k)
# 逐元素相乘并对j维度进行求和
import torch
A = torch.randn(2, 3, 4, 5, 6) # 形状为 (a=2, b=3, c=4, i=5, j=6)
B = torch.randn(6, 7, 2, 3, 4) # 形状为 (j=6, k=7, a=2, b=3, c=4)
# 使用einsum进行操作
result = torch.einsum('abcij, jkabc -> abcik', A, B)
# 替代实现
B = B.permute(2, 3, 4, 0, 1) # tanspose为 (a, b, c, j, k)
result_alt = torch.matmul(A, B)
# 结果比较
compare = torch.allclose(result, result_alt, rtol=0.00001, atol=0.00001)
2.算子优化
算子优化分为执行效率的优化和精度的优化。在部署时可能出现算子引入的其他开销,或者算子的执行效率支持的不够好的情况,同时在部署时我们还需要考虑算子的量化精度友好性。本章节将分别针对算子的效率优化和精度优化,给出部署建议和优化方案,帮助模型更快、更好的运行。
2.1 效率优化
2.1.1 Topk 算子
征程 6E/M 在工具链 OE3.2.0 已支持 topk 算子在 SPU 上运行(征程 6B 在 OE3.5.0 版本支持),在 convert 时配置 enable_spu=True 后算子将会被指定在 SPU 上运行。若 topk 算子后接的 gather、index 算子出现 CPU 的 cast 算子时,建议将 OE 版本升级到 OE-3.5.0(或者将 hbdk 升级到 4.5.5 及以上版本)。
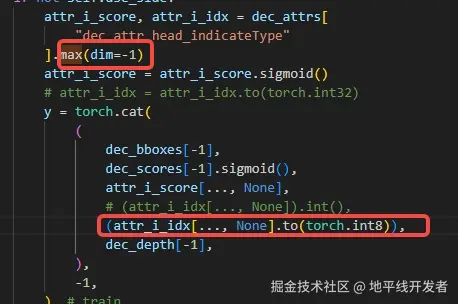
2.1.2 Argmax 后 cast 消除
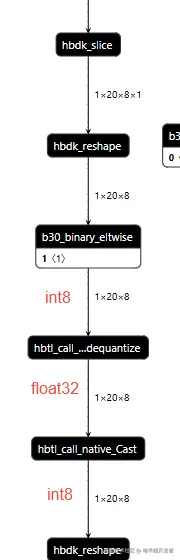
pytorch 的 argmax 输出的 idx 为 int64 类型,若不做改动会导致引入 CPU 算子,可以将 idx 的类型转为 int8/int16(视数值范围而定避免溢出)避免引入的开销,参考下图:
2.1.3 多个 eltwise 操作效率提升
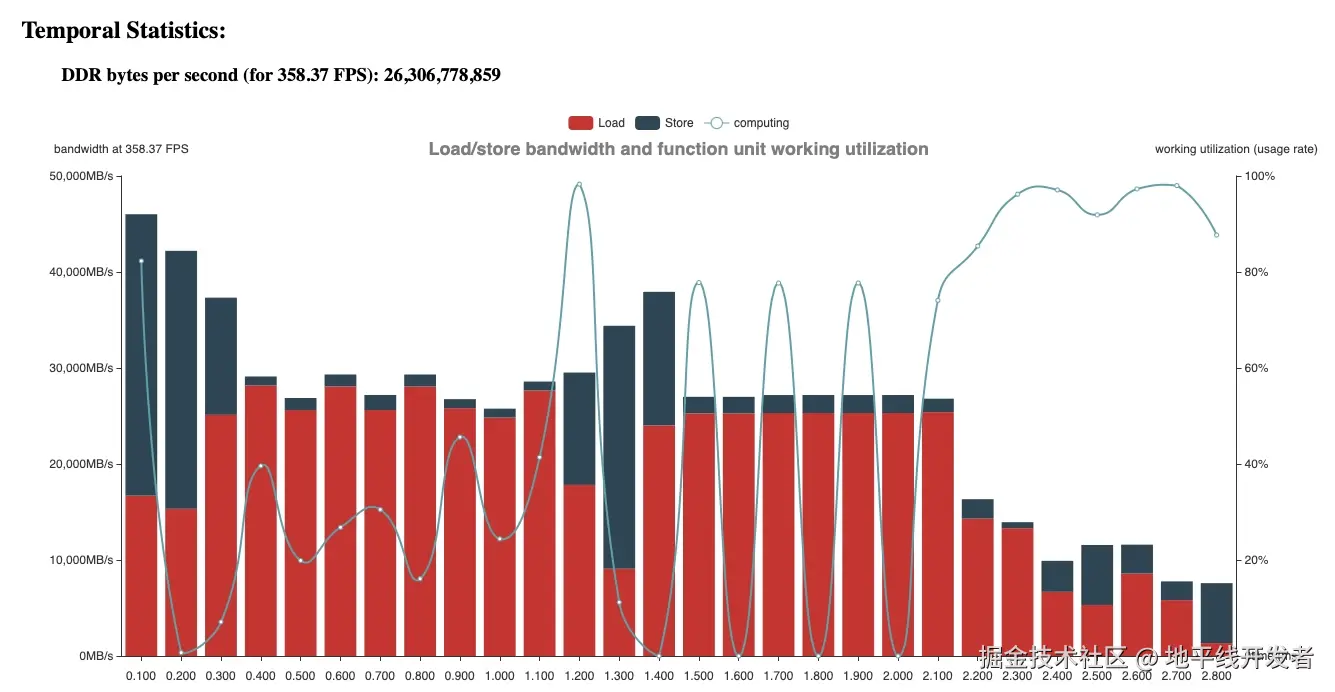
当多个大尺寸的 op 做 add 时,若一次性 add 可能会引入带宽问题。若存在带宽问题,即 load&store 的时间大于计算时间,建议拆为逐个 add 相加,
使用示例
以下提供两个常见的对多个 eltwise 计算的使用示例,方式 1 为多次相加;方式 2 为一次相加。
方式 1:
Plain
        homo_feats = []
        for i in range(12):
            homo_feat = self.grid_sample(
                feat,
                fpoints[i * B : (i + 1) * B],
            )

            homo_dfeat = self.dgrid_sample(
                dfeat,
                dpoints[i * B : (i + 1) * B],
方式 2:
Plain
        for i in range(12):
            homo_feat = self.grid_sample(
                feat,
                fpoints[i * B : (i + 1) * B],
            )

            homo_dfeat = self.dgrid_sample(
                dfeat,
                dpoints[i * B : (i + 1) * B],
            )
性能表现
以如下输入大小来测试性能差异:
Plain
input = {
    "feat": torch.randn(size=(1, 80, 238, 60)).to(torch.device("cuda:0")),
    "dfeat": torch.randn(size=(1, 1, 1260, 2040)).to(torch.device("cuda:0")),
    "fpoints": torch.randn(size=(12, 64, 256, 2)).to(torch.device("cuda:0")),
    "dpoints": torch.randn(size=(12, 64, 256, 2)).to(torch.device("cuda:0")),
    }
Temporal Statistics:
- 方式 1:latency 为 3.267 ms
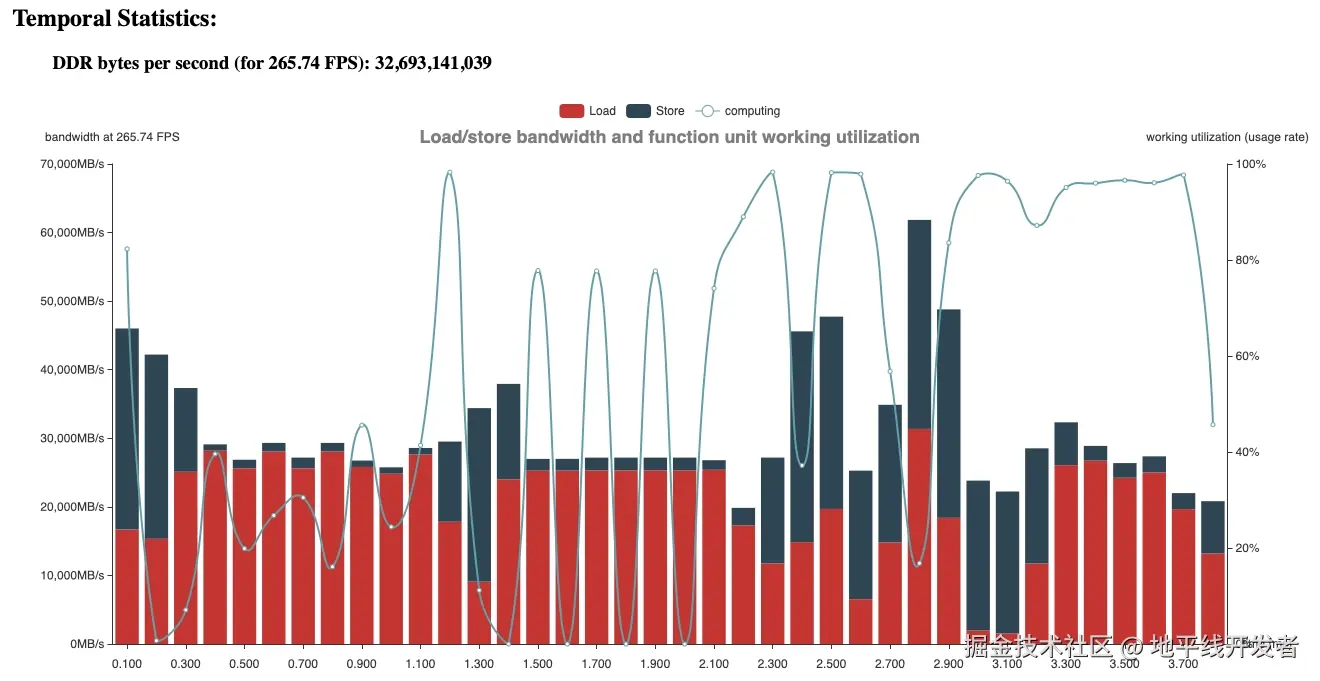
- 方式 2: latency 为 2.321 ms
2.1.4 LayerNorm 优化
cloud.tencent.com/developer/a...
Dynamic Tanh(DyT)是由何恺明、Yarnn LeCun 等研究者提出的新结构,用于替代 Transformer 中的归一化层(如 LayerNorm),原理简单,在于归一化层的 input-output mapping 曲线近似 tanh 函数,可以直接使用 tanh 函数来拟合线性归一化层的效果。其设计简单高效,仅需 9 行代码即可实现,展现出优于或持平传统归一化层的性能,不仅部署性能明显优于 ln,训练速度也会有明显提升:
Plain
class DyT(nn.Module):
def __init__(self, num_features, alpha_init=0.5):
super().__init__()
self.alpha = nn.Parameter(torch.ones(1)*alpha_init)
self.weight = nn.Parameter(torch.ones(num_features))
self.bias = nn.Parameter(torch.zeros(num_features))
def forward(self, x):
x = torch.tanh(self.alpha * x)
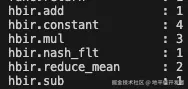
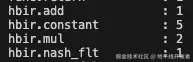
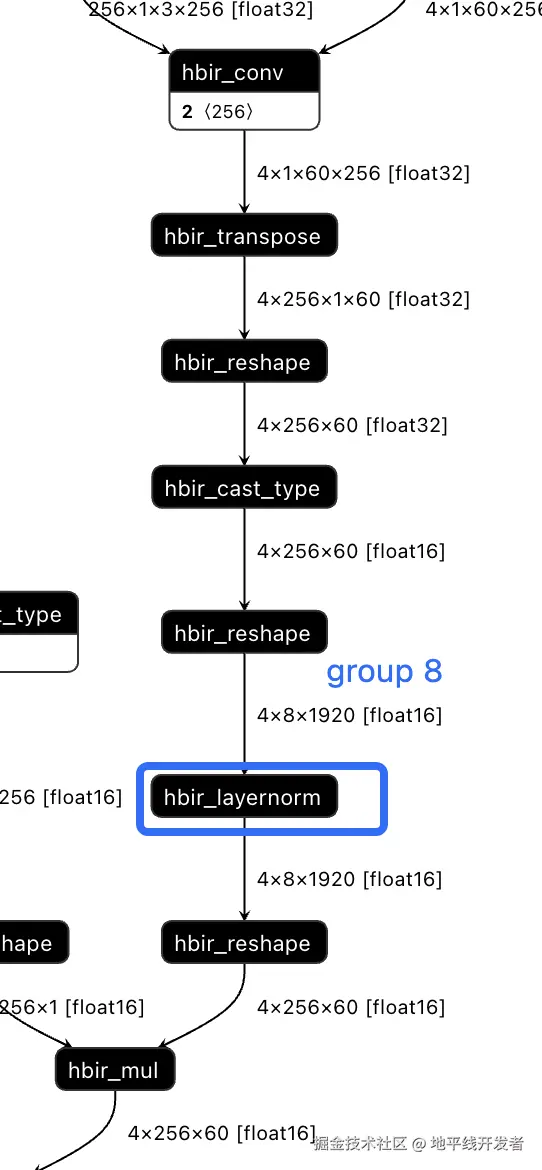
return x * self.weight + self.bias对于 transformer 模型的 征程 6 部署,替换为 dyt 也是一个很高效的选择,layernorm 会被拆分为 8 个算子,而 dyt 只有 4 个算子,且避免了 reducemean 的计算(相对来说不是那么高效,且量化不友好),部署性能以及量化友好度都有提升。
2.1.5 传统 Attention 优化
SimA 针对传统 Transformer Self-Attention 存在的主要问题,例如长序列任务的计算复杂度高;softmax 指数运算导致的梯度爆炸或消失等,完全移除 Softmax,采用线性相似度计算降低计算复杂度,同时保持模型近似表达能力,在主流的 ViT/NLP 模型中取得相当或更好的模型精度同时,有效降低了部署推理的延时,同时减少了训练时间
Plain
import torch
import torch.nn as nn
import torch.nn.functional as F


# SimA实现
class SimAttention(nn.Module):
    """ SimA attention block
    """
    def __init__(self, embed_dim, num_heads=8, qkv_bias=False, proj_drop=0.):
值得注意的是,实际使用中,在多层 attention 的 encoder 结构中,如果使用 SimA 做替换优化,往往保留最后一层为传统 softmax attention 做数值修正来保证模型整体精度效果,避免每层线性归一化带来的累计数值误差从而对 encoder 输出产生影响
2.1.6 Norm 优化
从计算效率从高到低排序:batchnorm > dyt > layernorm/instancenorm > groupnorm
但在实际算法场景中例如 transformer 类的模型,替换 batchnorm 后浮点精度可能无法训回来,因此 layernorm 更常用,此外还有 groupnorm 和 instancenorm
对于 group norm 而言,groups=1 就是 layernorm,groups=channels 就是 instancenorm,所以对于 group norm 的实现:
plugin 导出时通过 transpose+reshape 将 gn 转成 ln
经实验 layernorm 比 group norm 要快(因为可以避免前后 reshape),但是用户手动将 group norm 替换 layernorm1d,需要手动在前后加 permute(因为 ln 从最后一维开始 norm),替换比较麻烦。使用下面的方式对 channel 维度做 norm,同时避免引入前后的 permute:
Plain
from horizon_plugin_pytorch.nn.layer_norm import SplitLayerNorm
SplitLayerNorm(normalized_shape=[c, 1], dim=1)
2.1.7 nn.Embedding 优化
torch.nn.Embedding 要求输入 tensor 为 LongTensor,也就是 int32/int64,对于 E/M 而言会引入 bpu 不支持的 cast 算子从而跑在 cpu 上影响性能,常规的做法是。to(torch.int16).to(torch.int64),但是只对初始权重的模型有效(scale=1)可以融合。但对于真实权重的模型而言,会引入 dequantize+cast:
例如下面结构,让 embedding 的一路维持定点类型可优化
Plain
data = {
    # 定点输入
    "sdnavi_link_tbt_info": torch.ones((2, 20, 8, 7), dtype=torch.int16),
    # 浮点输入
    "sdnavi_link_info": torch.ones((2, 20, 8, 256), dtype=torch.float32),
}

class Encoder(nn.Module):
    def __init__(self,
                 ...
对定点数 tensor 的 quant 需要给 scale=1 的 fix_scale 配置,参考如下
Plain
module_name_qconfig = {
    "quant": QConfig(
        output=FakeQuantize.with_args(
            observer=FixedScaleObserver,
            dtype=qint8,
            scale=1,
        )
    ),
}
优化后可实现 BPU 全一段。
2.2 精度优化
2.2.1 Inverse_sigmoid 部署方案
Inverse sigmoid 容易出现 bc 导出掉点问题,若遇到此问题:
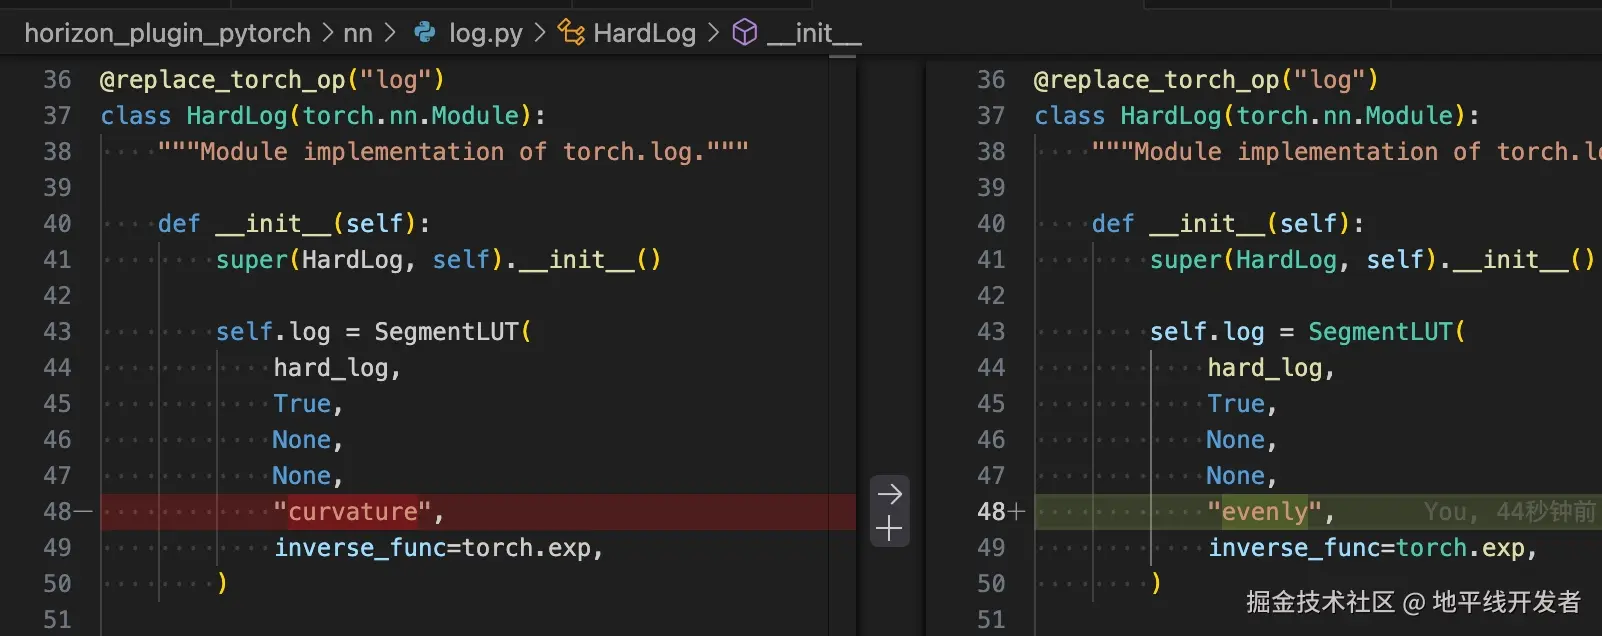
方式一:将 segmentlut 的参数从"curvature"改为"evenly"。
方式二:算法上去除 Inverse sigmoid 算子,对 sigmoid 的输入做 clamp(需重训,此方案需要验证对浮点的影响。)
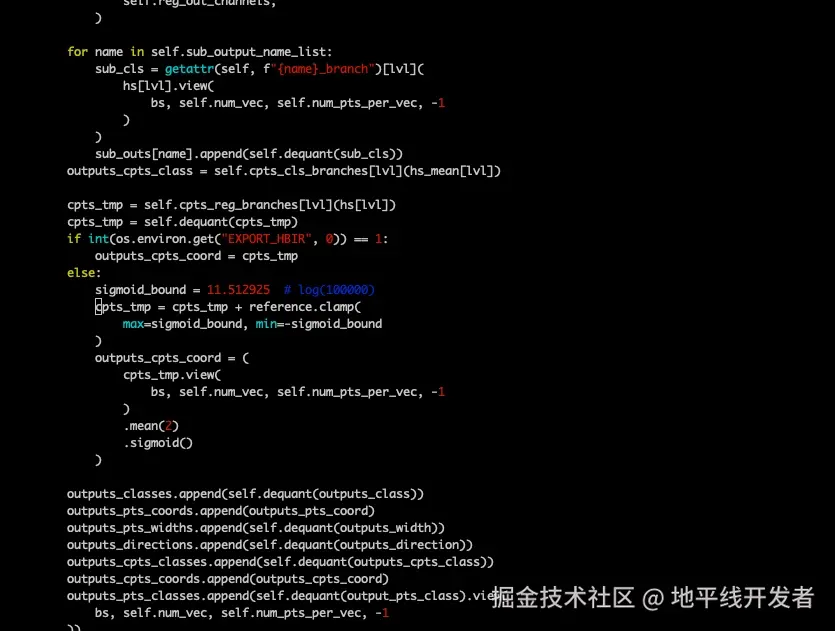
注意:此示例中为提高 torch qat 精度,将+reference sigmoid 放在了 cpu,若 torch qat 并不存在精度问题可以放在 bpu 中。
11.5219 为 inverse_sigmoid 的输出上限
2.2.2 Gridsample 拆分
由于 BPU 采用定点数值计算,grid_sample 算子在处理较大的 W 维度时,受限于硬件位宽精度,量化后的数值无法精确表示原始网格坐标,导致 nearest (最近邻)和 bilinear (双线性插值)两种采样方式均引入一定的精度误差。
示例:
Plain
class OriGridSample(nn.Module):
    def __init__(self):
        super(OriGridSample, self).__init__()
        self.unitconv = nn.Conv2d(1, 1, (1, 1))
        nn.init.constant_(self.unitconv.weight, 1)
        nn.init.constant_(self.unitconv.bias, 0)
        self.gridsample = hnn.GridSample(
            mode='bilinear',
            padding_mode='zeros',
            align_corners=True,
拆分后:
Plain
class SplitGridSample(nn.Module):
    def __init__(self):
        super(SplitGridSample, self).__init__()
        self.unitconv = nn.Conv2d(1, 1, (1, 1))
        nn.init.constant_(self.unitconv.weight, 1)
        nn.init.constant_(self.unitconv.bias, 0)
        self.gridsample1 = hnn.GridSample(
            mode='bilinear',
            padding_mode='zeros',
            align_corners=True,
2.2.3 Sin/Cos 算子去周期
- export 时如果发现敏感度排在前面的是 sin/cos 算子,且输入范围较大(超出-pi~pi 一个周期),可以将 sin/cos 替换为 plugin 的自定义算子,并配置 single_period=True,注意需要重新做量化
Plain
import horizon_plugin_pytorch.nn as hnn
class modelnet(nn.module):
    def __init__(self,):
        ...
        self.sin=hnn.Sin(single_period=True)
        self.cos=hnn.Cos(single_period=True)
- 也可以自行处理 sin/cos 输入,按照周期性将输入处理到[-pi, pi)之间,注意需要重新做量化
Plain
x = x - 2 * torch.floor(x * ( 0.5 / torch.pi) + 0.5) * torch.pi2.2.4 Conv/Linear weight 高低位拆分
该方案为保障 conv 的高精度计算,对 weight 对高低位的拆分。在用户不重训浮点的情况下,量化训练前需要对用户的浮点 ckpt 部分 linear weight 进行高低位拆分:
方式 1:通过修改 plugin 源码方式,需要将红框后面的减法去掉
方式 2:对 model 做拆分:
Plain
#=============== 用户原 model =============
self.enc_bbox_head = MLP(hd, hd, 4, num_layers=3)
class MLP(nn.Module):
    """Very simple multi-layer perceptron (also called FFN)"""

    def __init__(self, input_dim, hidden_dim, output_dim, num_layers):
        super().__init__()
        self.num_layers = num_layers
        h = [hidden_dim] * (num_layers - 1)
        self.layers = nn.ModuleList(
Ckpt weight 拆分:
Plain
def update_state_dict_task(state_dict, input_sequence_length=None):
state_dict_new = copy.deepcopy(state_dict)
state_dict_new["sparse_dynamic_vehicle_head.head.sparse_dynamic_head.transformer.decoder.norm1_1.weight"] = copy.deepcopy(state_dict["sparse_dynamic_vehicle_head.head.sparse_dynamic_head.transformer.decoder.norm1.weight"])
state_dict_new["sparse_dynamic_vehicle_head.head.sparse_dynamic_head.transformer.decoder.norm1_1.bias"] = copy.deepcopy(state_dict["sparse_dynamic_vehicle_head.head.sparse_dynamic_head.transformer.decoder.norm1.bias"])
for k, v in state_dict.items():
if "sparse_tl2d_head." in k:
params = copy.deepcopy(v)
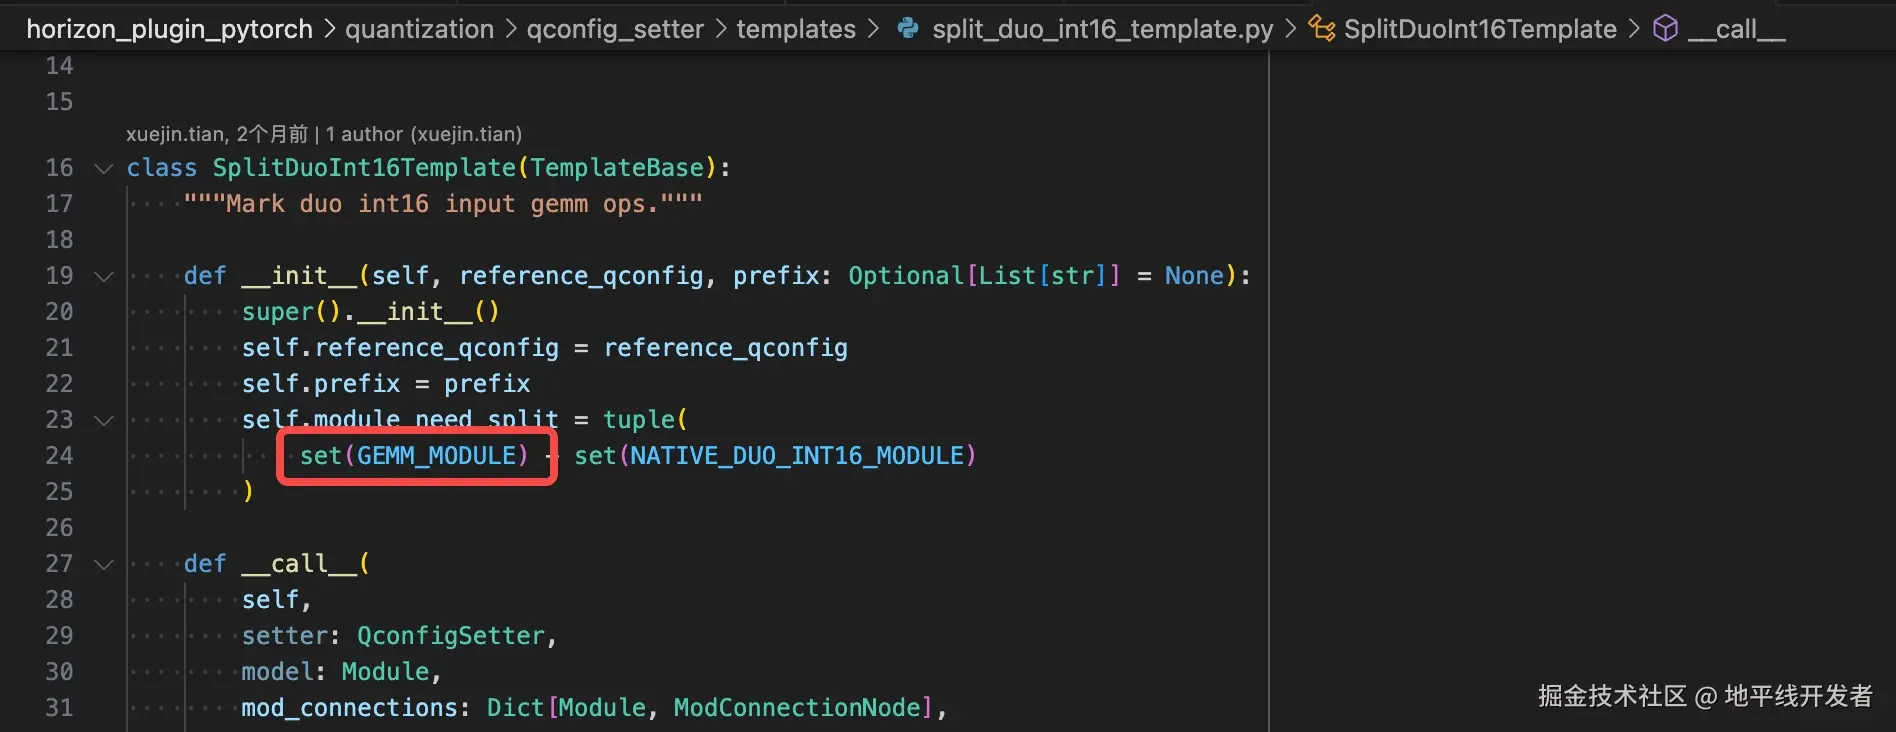
new_key = k.replace("sparse_tl2d_head", "traffic_light_head")2.2.5 Matmul 高低位拆分
OE 3.5.0 已经支持 matmul 双 int16 的量化,如需要双 int16 输入则配置两个输入为 int16 量化即可。若使用时存在 CPU 的 bitshift,可以开启 VPU 使其运行到 VPU 中,若不需要 VPU 或双 int16 存在性能问题时则需要用户在前端手动的对矩阵做拆分,用双 int8 模拟 int15,达到高精度的效果。
拆分思路:A*(B+C)=AB+AC,B 为原 scale 能表示的 int8 的最大部分,C 为剩余部分。
Plain
self.mod = MAX(T_mat) / 128 # MAX-max absolute value
T_mat_high = torch.trunc(torch.div(T_mat, self.mod)) * self.mod
T_mat_low = torch.fmod(T_mat, self.mod)
T_mat_high = self.quant_high(T_mat_high) # int8, fixed-scale with scale==self.mod
T_mat_low = self.quant_low(T_mat_low) # int8, no need fixed-scale
sample_points_pv = torch.matmul(sample_points, T_mat_high) + torch.matmul(sample_points, T_mat_low)
该方案 matmul 为 int15 计算,工具为 int16。实际使用时可根据性能和精度做平衡。
也可以通过修改 plugin 源码方式自动做拆分,需要将红框后面的减法去掉: