🦞 OpenClaw安装部署
概述
OpenClaw 是一个本地 AI 助手框架,让你能在自己的电脑、树莓派或服务器上运行一个智能助手。它支持自动化任务、集成多个消息平台、浏览器自动化、系统监控,以及与飞书、GitHub 等工具的深度集成。你可以定义助手的个性,让它理解你的工作方式,逐步构建属于自己的生产力工具。
GitHub:https://github.com/openclaw/openclaw
文档:https://docs.openclaw.ai/start/getting-started
技能市场:https://clawhub.com
核心特点
多渠道通信:OpenClaw 可以在众多平台上与你交流:
即时通讯:WhatsApp、Telegram、Slack、Discord、Signal、iMessage

工作工具:Google Chat、Microsoft Teams、Feishu

其他:Matrix、Zalo、WebChat
多AI 模型支持:支持任何 OpenAI 兼容的 LLM(Claude、GPT-5、Deepseek 等)
推荐:Anthropic Claude(最强的长上下文和安全性)

可配置模型失效切换(自动备选方案)
强大的工具集
bash
浏览器控制:自动化网络任务

Canvas 画布:可视化工作区

设备连接:iOS/Android/macOS

Cron 任务:定时自动化

Webhook:外部集成触发
隐私与控制
数据留在你的设备上

没有云服务,完全本地

完全控制模型和配置

安全的设备配对机制
安装方式
前置条件
安装OpenClaw的前提是部署机器上有:NodeJs>=22,并且还需要安装 Git
Windows系统:
使用Powershell执行以下命令
bash
powershell -c "irm https://community.chocolatey.org/install.ps1|iex"

choco install nodejs --version="24.14.0"

node -v

npm -v
Linux系统:
bash
curl -o- https://raw.githubusercontent.com/nvm-sh/nvm/v0.40.4/install.sh | bash

\. "$HOME/.nvm/nvm.sh"

nvm install 24

node -v

npm -v
脚本安装
通过 npm 全局安装 openclaw 并运行新手引导。
Linux、Mac:
bash
curl -fsSL https://openclaw.ai/install.sh | bashWindows(PowerShell):
bash
iwr -useb https://openclaw.ai/install.ps1 | iex手动NPM安装
需要系统已安装nodejs,且版本>=22
全局安装openclaw
bash
npm install -g openclaw@latest运行新手引导向导(并安装服务)
bash
openclaw onboard --install-daemon源代码构建安装
bash
git clone https://github.com/openclaw/openclaw.git
cd openclaw
pnpm install
pnpm ui:build # 首次运行时自动安装 UI 依赖
pnpm build
openclaw onboard --install-daemon
Docker安装
在使用云服务基于Docker方式安装时遇到问题不少,特此额外记录下。
基于本地Docker安装可能没什么问题,经过一段时间使用经验来说,OpenClaw就该部署在本地,操作部署机器上的各种资源,充当你的私人助手。
Docker具体安装方式查阅下文。
开始安装与配置引导
选择NPM安装方式
这里使用手动NPM安装方式,也就是执行以下2行命令后将自动开始开配置引导
bash
npm install -g openclaw@latest

openclaw onboard --install-daemon
依赖检测与安装
如果使用脚本安装,在运行脚本后,将会自动检测并安装相关缺失依赖  脚本执行完成后,OpenClaw后会自动打开配置引导
  NPM方式安装后需要执行以下命令进入新手引导向导
bash
openclaw onboard --install-daemon风险提示
选择yes回车,明白相关风险
bash
◆  I understand this is powerful and inherently risky. Continue?
│  ● Yes / ○ No
└
选择操作模式
这里直接选择QuickStart快速启动
bash
◆  Onboarding mode
│  ● QuickStart (Configure details later via openclaw configure.)
│  ○ Manual
└
选择模型供应商
根据需求选择使用那个模型供应商,这里选择的是Qwen 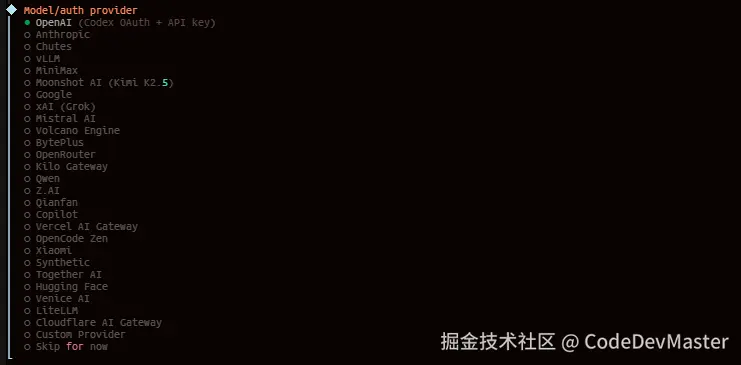
供应商授权或配置API_KEY
这里选择供应商后,复制授权链接到浏览器访问授权
bash
◇  Model/auth provider
│  Qwen
│
◒  Starting Qwen OAuth...│
◇  Qwen OAuth ─────────────────────────────────────────────────────────────────────────╮
│                                                                                      │
│  Open https://chat.qwen.ai/authorize?user_code=XXXT9&client=qwen-code to approve  │
│  access.                                                                             │
│  If prompted, enter the code XXXT9.                                               │
│                                                                                      │
├──────────────────────────────────────────────────────────────────────────────────────╯
◇  Qwen OAuth complete
│
◇  Model configured ─────────────────────────────╮
│                                                │
│  Default model set to qwen-portal/coder-model  │
│                                                │
├────────────────────────────────────────────────╯
│
◇  Provider notes ──────────────────────────────────────────────────────────────────────╮
│                                                                                       │
│  Qwen OAuth tokens auto-refresh. Re-run login if refresh fails or access is revoked.  │
│  Base URL defaults to https://portal.qwen.ai/v1. Override                             │
│  models.providers.qwen-portal.baseUrl if needed.                                      │
│                                                                                       │
├───────────────────────────────────────────────────────────────────────────────────────╯
完成供应商授权后,设置模型
bash
◆  Default model
│  ● Keep current (qwen-portal/coder-model)
│  ○ Enter model manually
│  ○ qwen-portal/coder-model
│  ○ qwen-portal/vision-model
└
选择聊天渠道
如何配置请参考下文
聊天渠道

配置Skill
根据需要决定是否需要配置,这里选择Skip for now
bash
◇  Skills status ─────────────╮
│                             │
│  Eligible: 7                │
│  Missing requirements: 41   │
│  Unsupported on this OS: 7  │
│  Blocked by allowlist: 0    │
│                             │
├─────────────────────────────╯
│
◆  Configure skills now? (recommended)
│  ● Yes / ○ No
└
Hooks配置
根据需要决定是否需要配置,这里选择Skip for now
bash
◇  Hooks ──────────────────────────────────────────────────────────────────╮
│                                                                          │
│  Hooks let you automate actions when agent commands are issued.          │
│  Example: Save session context to memory when you issue /new or /reset.  │
│                                                                          │
│  Learn more: https://docs.openclaw.ai/automation/hooks                   │
│                                                                          │
├──────────────────────────────────────────────────────────────────────────╯
│
◆  Enable hooks?
│  ◻ Skip for now
│  ◻ 🚀 boot-md
│  ◻ 📎 bootstrap-extra-files
│  ◻ 📝 command-logger
│  ◻ 💾 session-memory
└
访问
Hooks配置过后将自动启动OpenClaw服务,且控制台打印很多信息,关键的信息如下,包含访问地址与TOKEN值
bash
o  Control UI -------------------------------------------------------------------------------+
|                                                                                            |
|  Web UI: http://127.0.0.1:18789/                                                           |
|  Web UI (with token):                                                                      |
|  http://127.0.0.1:18789/#token=39c5ba72943aea29463a2dca6230068c7f5fb18fd2bbb234            |
|  Gateway WS: ws://127.0.0.1:18789                                                          |
|  Gateway: not detected (gateway closed (1006 abnormal closure (no close frame)): no close  |
|  reason)                                                                                   |
|  Docs: https://docs.openclaw.ai/web/control-ui                                             |
|                                                                                            |
+--------------------------------------------------------------------------------------------建议复制带Token的URL地址到浏览器访问,例如:http://IP:18789/#token=xxxxx,它会自动配置Token信息  否则需要按如下截图处配置Token
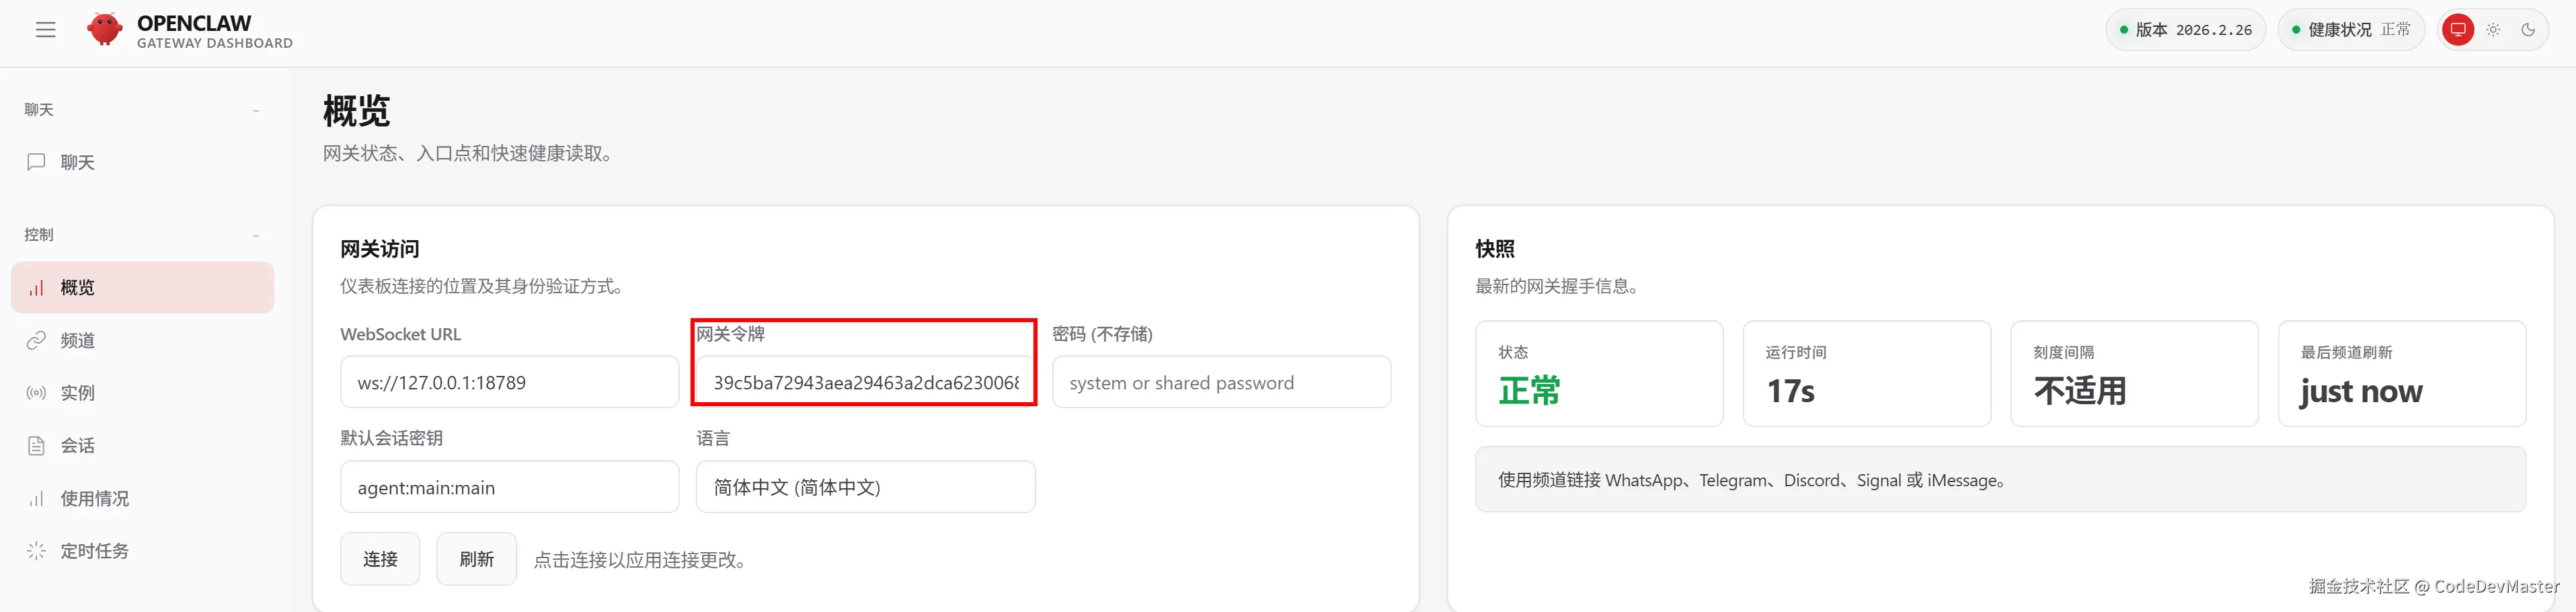
测试
随便发送一个提问,简单测试是否配置成功 
聊天渠道
进入配置
输入以下命令开始配置OpenClaw
bash
openclaw config依次选择Local (本机)、Channels (渠道)、Configure/link (配置链接)、选择渠道
bash
🦞 OpenClaw  2026.2.26 (bc50708) --- WhatsApp automation without the "please accept our new privacy policy".

▄▄▄▄▄▄▄▄▄▄▄▄▄▄▄▄▄▄▄▄▄▄▄▄▄▄▄▄▄▄▄▄▄▄▄▄▄▄▄▄▄▄▄▄▄▄▄▄▄▄▄▄
██░▄▄▄░██░▄▄░██░▄▄▄██░▀██░██░▄▄▀██░████░▄▄▀██░███░██
██░███░██░▀▀░██░▄▄▄██░█░█░██░█████░████░▀▀░██░█░█░██
██░▀▀▀░██░█████░▀▀▀██░██▄░██░▀▀▄██░▀▀░█░██░██▄▀▄▀▄██
▀▀▀▀▀▀▀▀▀▀▀▀▀▀▀▀▀▀▀▀▀▀▀▀▀▀▀▀▀▀▀▀▀▀▀▀▀▀▀▀▀▀▀▀▀▀▀▀▀▀▀▀
                  🦞 OPENCLAW 🦞

T  OpenClaw configure
|
o  Existing config detected ---------+
|                                    |
|  workspace: ~\.openclaw\workspace  |
|  model: qwen-portal/coder-model    |
|  gateway.mode: local               |
|  gateway.port: 18789               |
|  gateway.bind: loopback            |
|                                    |
+------------------------------------+
|
*  Where will the Gateway run?
|  > Local (this machine) (Gateway reachable (ws://127.0.0.1:18789))
|    Remote (info-only)
---
*  Select sections to configure
|    Workspace
|    Model
|    Web tools
|    Gateway
|    Daemon
|  > Channels (Link WhatsApp/Telegram/etc and defaults)
|    Skills
|    Health check
|    Continue
---

*  Channels
|  > Configure/link (Add/update channels; disable unselected accounts)
|    Remove channel config
---
*  Select a channel
|    Telegram (Bot API)
|    WhatsApp (QR link)
|    Discord (Bot API)
|    IRC (Server + Nick)
|    Google Chat (Chat API)
|    Slack (Socket Mode)
|    Signal (signal-cli)
|    iMessage (imsg)
|  > Feishu/Lark (飞书) (plugin · install)
|    Nostr (NIP-04 DMs)
|    Microsoft Teams (Bot Framework)
|    Mattermost (plugin)
|    Nextcloud Talk (self-hosted)
|    Matrix (plugin)
|    BlueBubbles (macOS app)
|    LINE (Messaging API)
|    Zalo (Bot API)
|    Zalo (Personal Account)
|    Synology Chat (Webhook)
|    Tlon (Urbit)
|    Finished
---
飞书
创建飞书应用
访问飞书开放平台创建应用  得到AppID、AppSecrect
  根据使用情况添加对应的权限
  也可以根据后台日志提示开通相关权限
bash
openclaw-gateway-1 | 2026-03-01T05:10:44.646Z [feishu] streaming start failed: Error: Create card failed: Access denied. One of the following scopes is required: [cardkit:card:write].应用尚未开通所需的应用身份权限:[cardkit:card:write],点击链接申请并开通任一权限即可:https://open.feishu.cn/app/xxxx/auth?q=cardkit:card:write&op_from=openapi&token_type=tenant还可以按官方推荐,批量导入以下权限信息:
bash
{
  "scopes": {
    "tenant": [
      "aily:file:read",
      "aily:file:write",
      "application:application.app_message_stats.overview:readonly",
      "application:application:self_manage",
      "application:bot.menu:write",
      "cardkit:card:write",
      "contact:user.employee_id:readonly",
      "corehr:file:download",
      "docs:document.content:read",
      "event:ip_list",
      "im:chat",
      "im:chat.access_event.bot_p2p_chat:read",
      "im:chat.members:bot_access",
      "im:message",
      "im:message.group_at_msg:readonly",
      "im:message.group_msg",
      "im:message.p2p_msg:readonly",
      "im:message:readonly",
      "im:message:send_as_bot",
      "im:resource",
      "sheets:spreadsheet",
      "wiki:wiki:readonly"
    ],
    "user": ["aily:file:read", "aily:file:write", "im:chat.access_event.bot_p2p_chat:read"]
  }
}配置事件回调,选择使用长连接接收事件  添加接收消息事件
 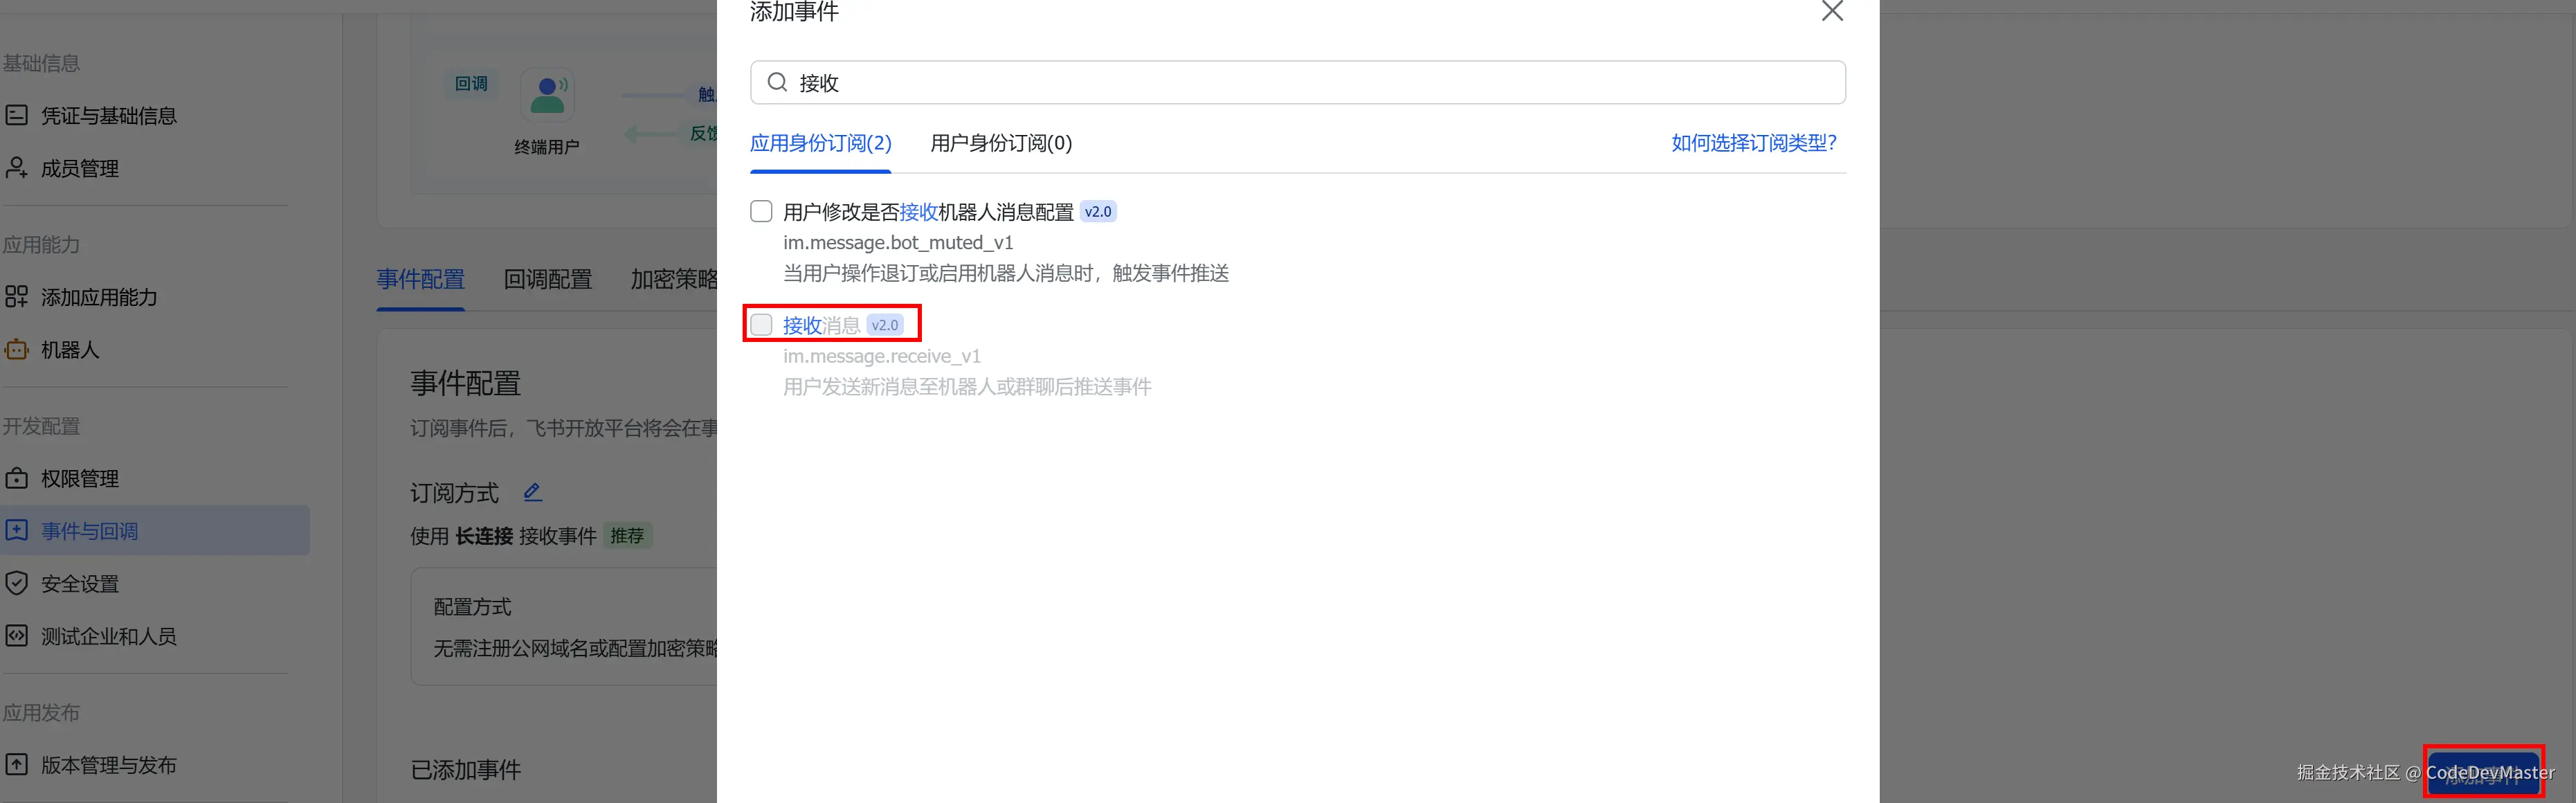 然后发布应用
配置
需要安装一个飞书插件,执行以下命令进行安装或者配置飞书时根据提示安装
bash
openclaw plugins install @m1heng-clawd/feishu依次选择飞书聊天通道,分别进行安装插件、输入AppID+AppSecrect、选择中国域名、接受群组聊天策略、完成配置、然后选择YES配置数据访问策略、选择Open、Continue即可
bash
◇  Select channel (QuickStart)
│  Feishu/Lark (飞书)
│
◇  Install Feishu plugin?
│  Download from npm (@openclaw/feishu)
Downloading @openclaw/feishu...
Extracting /tmp/openclaw-npm-pack-dytHGF/openclaw-feishu-2026.2.24.tgz...
Installing to /home/node/.openclaw/extensions/feishu...
Installing plugin dependencies...
02:15:44 [plugins] plugins.allow is empty; discovered non-bundled plugins may auto-load: feishu (/home/node/.openclaw/extensions/feishu/index.ts). Set plugins.allow to explicit trusted ids.
│
◇  Feishu credentials ──────────────────────────────────────────────────────────────╮
│                                                                                   │
│  1) Go to Feishu Open Platform (open.feishu.cn)                                   │
│  2) Create a self-built app                                                       │
│  3) Get App ID and App Secret from Credentials page                               │
│  4) Enable required permissions: im:message, im:chat, contact:user.base:readonly  │
│  5) Publish the app or add it to a test group                                     │
│  Tip: you can also set FEISHU_APP_ID / FEISHU_APP_SECRET env vars.                │
│  Docs: feishu                 │
│                                                                                   │
├───────────────────────────────────────────────────────────────────────────────────╯
│
◆  Enter Feishu App ID
│  _
│
◇  Enter Feishu App Secret
│   _
│
◇  Feishu connection test ────────────────────────────╮
│                                                     │
│  Connection failed: API error: app do not have bot  │
│                                                     │
├─────────────────────────────────────────────────────╯
│
◆  Which Feishu domain?
│  ● Feishu (feishu.cn) - China
│  ○ Lark (larksuite.com) - International
*  Group chat policy
|    Allowlist - only respond in specific groups
|  > Open - respond in all groups (requires mention)
|    Disabled - don't respond in groups
│
o  Selected channels ------------------------------------------+
|                                                              |
|  Finished      											   |
|                                                              |
+--------------------------------------------------------------+
|
o  Configure DM access policies now? (default: pairing)
|  Yes
o  Feishu DM policy
|  Open (public inbound DMs)
|
o  Select sections to configure
|  Continue
添加设备
第一次对话,从新设备连到Gateway时,需要做一次性设备配对批准  根据提示执行对应命令即可
bash
# 查看所有设备
openclaw devices list

# 批准硬件设备
openclaw devices approve <requestId>

# 批准聊天渠道设备
openclaw pairing approve feishu KZXXX
验证
在飞书客户端搜索到创建的应用 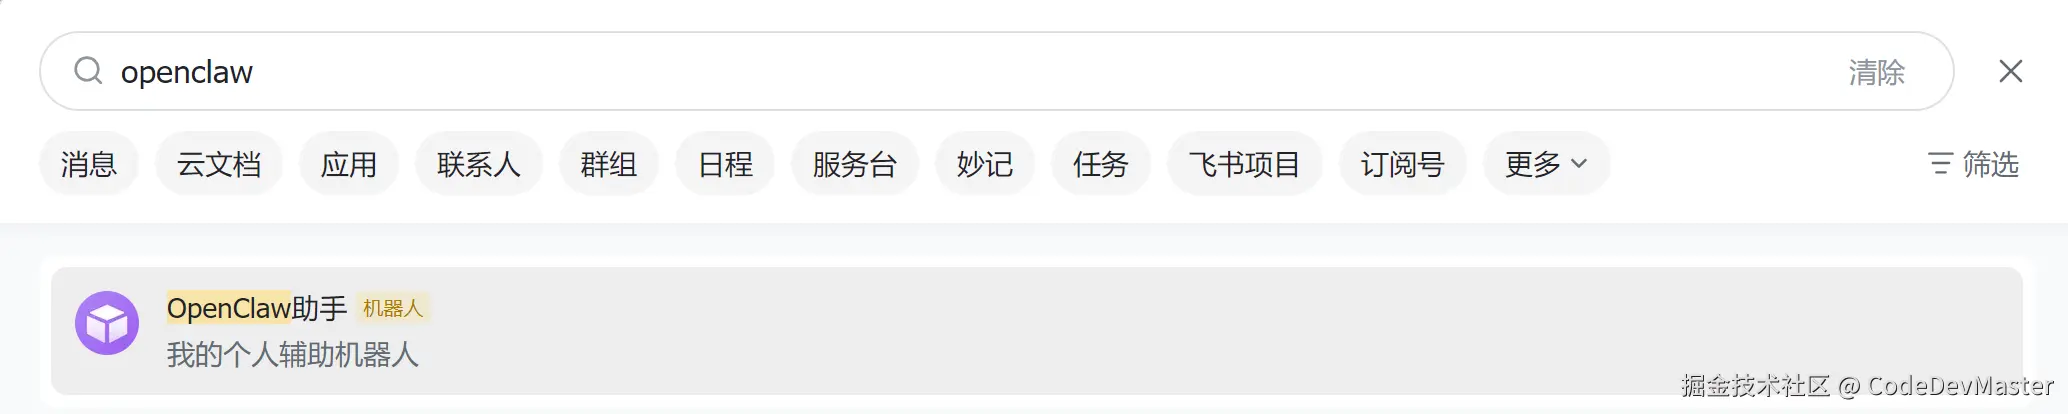 再对话进行验证
异常
注意:在Windows环境下遇到了如下错误
bash
C:\XXXXXX>openclaw plugins install @m1heng-clawd/feishu

🦞 OpenClaw  2026.2.26 (bc50708) --- Claws out, commit in---let's ship something mildly responsible.

Downloading @m1heng-clawd/feishu...
[openclaw] Failed to start CLI: Error: spawn EINVAL
    at ChildProcess.spawn (node:internal/child_process:421:11)
    at spawn (node:child_process:796:9)
    at runCommandWithTimeout (file:///C:/XXXXXX/nodejs/node_global/node_modules/openclaw/dist/exec-BhaMholX.js:196:16)
    at packNpmSpecToArchive (file:///C:/XXXXXX/nodejs/node_global/node_modules/openclaw/dist/npm-registry-spec-U5p9_mZa.js:92:20)
    at file:///C:/XXXXXX/nodejs/node_global/node_modules/openclaw/dist/npm-registry-spec-U5p9_mZa.js:351:30
    at withTempDir (file:///C:/XXXXXX/nodejs/node_global/node_modules/openclaw/dist/npm-registry-spec-U5p9_mZa.js:12:16)
    at async installFromNpmSpecArchive (file:///C:/XXXXXX/nodejs/node_global/node_modules/openclaw/dist/npm-registry-spec-U5p9_mZa.js:350:9)
    at async installFromNpmSpecArchiveWithInstaller (file:///C:/XXXXXX/nodejs/node_global/node_modules/openclaw/dist/npm-registry-spec-U5p9_mZa.js:323:9)
    at async installPluginFromNpmSpec (file:///C:/XXXXXX/nodejs/node_global/node_modules/openclaw/dist/installs-R16yXl3y.js:245:39)
    at async Command.<anonymous> (file:///C:/XXXXXX/nodejs/node_global/node_modules/openclaw/dist/plugins-cli-CVxlcmpu.js:673:18)
根据提示,修改exec-BhaMholX.js文件的runCommandWithTimeout函数,大概196行的位置,使用以下代码替换对应代码片段后重新执行安装
bash
	const isWindows = process.platform === "win32";
	const child = spawn(resolvedCommand, argv.slice(1), {
		stdio,
		cwd,
		env: resolvedEnv,
		shell: isWindows,
		windowsVerbatimArguments: isWindows ? false : windowsVerbatimArguments,
	});
TG
创建Boot
与@BotFather对话,输入/newbot,根据提示操作创建Boot,得到Token
添加配置
1.直接喊OpenClaw配置TG
2.直接修改~/.openclaw/openclaw.json文件添加对应聊天通道
bash
{
  "channels": {
    "telegram": {
      "enabled": true,
      "dmPolicy":  "pairing",
      "botToken": "xxxxxxxxxxx",
      "groupPolicy": "allowlist",
      "streaming":  "off",
      "proxy": "http://127.0.0.1:5555" # 如果环境不允许,需要增加该参数
    },
  },
}
添加设备
在TG机器人输入/start,首次访问会生成配对码
bash
OpenClaw: access not configured.

Your Telegram user id: 123456789

Pairing code: VR6XXX

Ask the bot owner to approve with:
openclaw pairing approve telegram VR6XXX
使用openclaw进行配对
bash
openclaw pairing approve telegram VR6XXX常用命令
| 命令 | 功能 |
|---|---|
| openclaw onboard | 重新进入配置向导 |
| openclaw onboard --install-daemon | 重新进入配置向导并安装服务 |
| openclaw config | 配置 |
| openclaw status | 查看运行状态 |
| openclaw gateway --port 18789 --verbose | 指定端口且前台运行 |
| openclaw health | 健康检查 |
| openclaw gateway start | 启动服务 |
| openclaw gateway restart | 重启服务 |
| openclaw gateway stop | 停止服务 |
| openclaw logs --follow | 查看实时日志 |
| openclaw update | 更新到最新版本 |
| openclaw doctor | 诊断问题 |
| openclaw doctor --fix | 尝试自动修正错误 |
| openclaw uninstall | 卸载 OpenClaw |
| openclaw channels add | 渠道添加 |
| openclaw plugins list | 查看可用插件 |
| openclaw devices list | 查看所有设备 |
| openclaw devices approve | 批准硬件设备 |
| openclaw pairing approve feishu KZXXX | 批准聊天渠道设备 |
Docker安装
克隆项目到本地并进入
bash
git clone https://github.com/openclaw/openclaw.git
cd openclaw
解决网络访问问题
修改docker-compose.yml,让openclaw-cli与openclaw-gateway能正常通信
bash
openclaw-cli:
  depends_on:
    - openclaw-gateway
  environment:
OPENCLAW_GATEWAY_URL: ws://openclaw-gateway:18789修改~/.openclaw/openclaw.json,让openclaw-gateway使用Docker桥接网络
bash
"gateway": {
  "bind": "lan"
}
解决权限问题
在 执行./docker-setup.sh 启动镜像之后,出现一个权限错误:
bash
Error: EACCES: permission denied, open '/home/node/.openclaw/openclaw.json授权容器用户(uid=1000)写入root或其他用户拥有目录的权限
bash
chown -R 1000:1000 "$HOME/.openclaw"启动脚本
执行脚本后会自动启动openclaw容器,参考上文开始安装与配置引导继续后续操作
bash
./docker-setup.sh同步Gateway Token
执行docker-setup.sh时将在.env文件生成一个令牌,确保~/.openclaw/openclaw.json中gateway.auth.token 与 .env文件中的 OPENCLAW_GATEWAY_TOKEN 值一致。
bash
  "gateway": {
    "auth": {
      "mode": "token",
      "token": "8869f81f1b0b75c5d0176xxxxxxeb1b0d22e3fc6737"
    }
bash
OPENCLAW_GATEWAY_BIND=lan
OPENCLAW_GATEWAY_TOKEN=8869f81f1b0b75c5d0176xxxxxxeb1b0d22e3fc6737
OPENCLAW_IMAGE=openclaw:local
重启openclaw-gateway使配置生效
bash
docker compose restart openclaw-gateway浏览器访问
OpenClaw网关会强制要求安全校验,网关默认不允许非本地(non-loopback)的设备访问控制界面(Control UI),以防止恶意网站代表你向网关发送指令,如果需要通过浏览器访问,需要配置访问权限。
1.明确指定允许访问的来源
bash
gateway:
  controlUi:
    allowedOrigins:
      - "https://your-admin-domain.com"
      - "http://192.168.1.100"
2.让网关直接信任任何访问来源
bash
  "gateway": {
    "port": 18789,
    "mode": "local",
    "bind": "lan",
    "controlUi": {
      "dangerouslyAllowHostHeaderOriginFallback": true
    },
配置后虽然能访问了,但是又遇到http无法访问,要求使用HTTPS访问  解决方案:
解决方案:
1.开启 HTTPS,利用Nginx创建一个反向代理站点即可
2.修改网关配置来跳过这个限制,网关将只依赖 Token 进行身份验证 (无效,可能是Docker部署导致)
bash
  "gateway": {
    "port": 18789,
    "mode": "local",
    "bind": "lan",
    "controlUi": {
      "dangerouslyAllowHostHeaderOriginFallback": true,
      "allowInsecureAuth":true
    },
3.使用SSH隧道 在本地终端执行以下命令后,浏览器直接访问127.0.0.1:18789即可
bash
ssh -L 18789:127.0.0.1:18789 <user>@<remote_host>常用命令
| 命令 | 说明 |
|---|---|
| docker compose run --rm openclaw-cli onboard | 重新完成初始化向导 |
| docker compose restart openclaw-gateway | 重启网关 |
| docker compose run --rm openclaw-cli config | 配置 |
| docker compose run --rm openclaw-cli pairing approve feishu KZXXXX | 添加设备 |
| docker compose up -d --force-recreate openclaw-gateway | 当修改过docker-compose.yml时重建容器 |
| docker compose logs -f | 日志查看 |