modbus 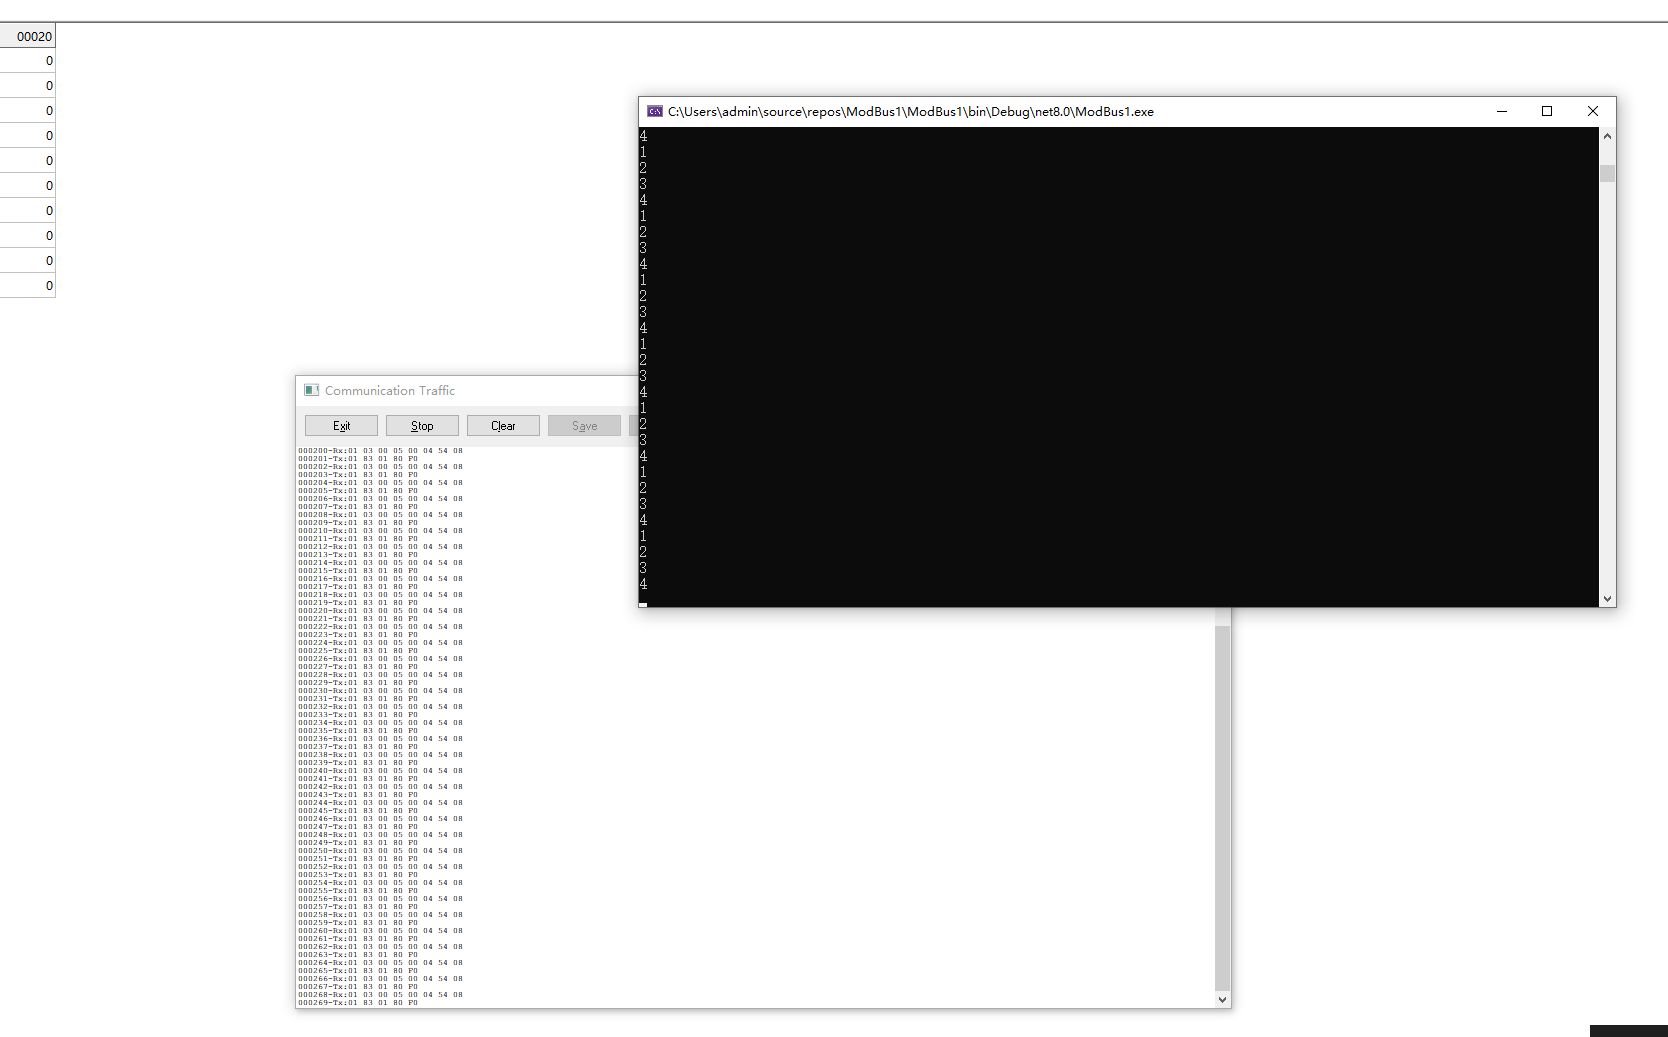
000471-Tx:01 83 01 80 F0
000472-Rx:01 03 00 05 00 04 54 08
000473-Tx:01 83 01 80 F0
000474-Rx:01 03 00 05 00 04 54 08
000475-Tx:01 83 01 80 F0
000476-Rx:01 03 00 05 00 04 54 08
000477-Tx:01 83 01 80 F0
000478-Rx:01 03 00 05 00 04 54 08
000479-Tx:01 83 01 80 F0
000480-Rx:01 03 00 05 00 04 54 08
000481-Tx:01 83 01 80 F0
000482-Rx:01 03 00 05 00 04 54 08
000483-Tx:01 83 01 80 F0
000484-Rx:01 03 00 05 00 04 54 08
000485-Tx:01 83 01 80 F0
000486-Rx:01 03 00 05 00 04 54 08
000487-Tx:01 83 01 80 F0
000488-Rx:01 03 00 05 00 04 54 08
000489-Tx:01 83 01 80 F0
000490-Rx:01 03 00 05 00 04 54 08
000491-Tx:01 83 01 80 F0
000492-Rx:01 03 00 05 00 04 54 08
000493-Tx:01 83 01 80 F0
csharp
#region modbus异常响应
if (flag == 7)
{//"这是一个Modbus RTU主站的监控程序,它像雷达一样不停扫描设备,专门捕捉设备报错时的异常信号。"
List<byte> bytes = new List<byte>();
bytes.Add(1);
bytes.Add(0x03);
ushort addr = 5;
bytes.Add((byte)(addr / 256));
bytes.Add((byte)(addr % 256));
ushort len = 4;
bytes.Add((byte)(len / 256));
bytes.Add((byte)(len % 256));
bytes = CRC16(bytes);
SerialPort serialPort = new SerialPort("COM2", 9600, Parity.None, 8, StopBits.One);
serialPort.Open();
while (true)
{
Thread.Sleep(50);
serialPort.DiscardOutBuffer();
serialPort.Write(bytes.ToArray(), 0, bytes.Count);
List<byte> respBytes = new List<byte>();
while (respBytes.Count < len * 2 + 5)
{
respBytes.Add((byte)serialPort.ReadByte());
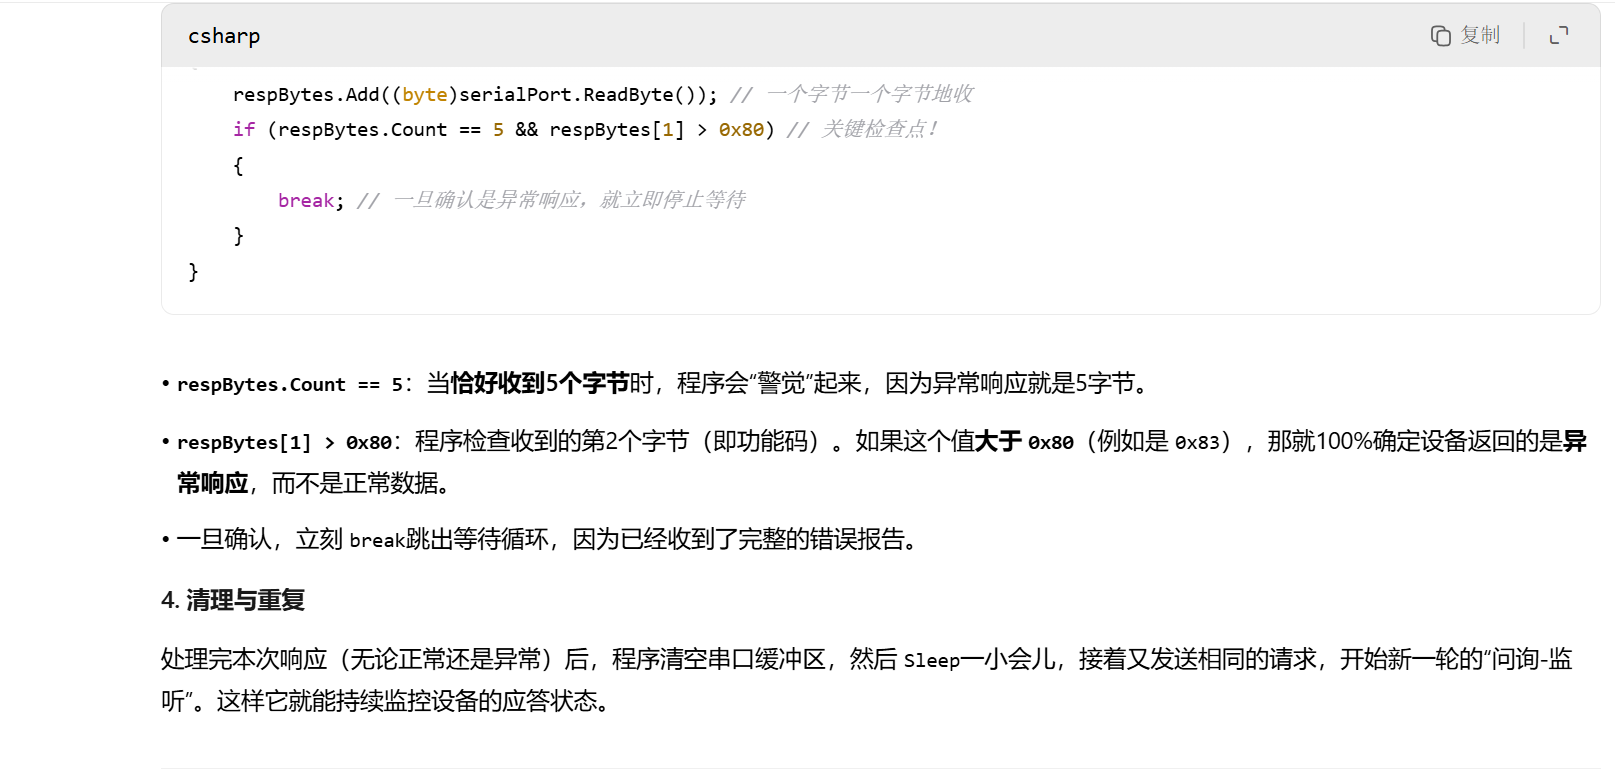
if (respBytes.Count == 5 && respBytes[1] > 0x80)
{//respBytes.Count == 5:收到5个字节时检查(异常响应固定5字节)
//respBytes[1] > 0x80:检查第2个字节(功能码)是否大于 0x80
break;
}
Console.WriteLine(respBytes.Count);
}
serialPort.DiscardInBuffer();
}
}
#endregion
这导致了一个恶性循环:
发送错误请求。
开始接收,收到9个字节后卡住(等第10个字节)。
50ms后,Thread.Sleep(50)结束,执行 serialPort.DiscardInBuffer();把串口缓冲区里已经收到的9个字节全部清空!
然后循环,重新发送同样的错误请求。
这就是你看到完全重复的通信记录的原因。你的程序根本没来得及处理接收到的数据,
就把它们丢弃了。
000443-Tx:01 83 01 80 F0
000444-Rx:01 03 00 05 00 04 54 08
000445-Tx:01 83 01 80 F0
000446-Rx:01 03 00 05 00 04 54 08
000447-Tx:01 83 01 80 F0
000448-Rx:01 03 00 05 00 04 54 08
000449-Tx:01 83 01 80 F0
000450-Rx:01 03 00 05 00 04 54 08
000451-Tx:01 83 01 80 F0
000452-Rx:01 03 00 05 00 04 54 08
000453-Tx:01 83 01 80 F0
000454-Rx:01 03 00 05 00 04 54 08
000455-Tx:01 83 01 80 F0
000456-Rx:01 03 00 05 00 04 54 08
000457-Tx:01 83 01 80 F0
000458-Rx:01 03 00 05 00 04 54 08
000459-Tx:01 83 01 80 F0
000460-Rx:01 03 00 05 00 04 54 08
000461-Tx:01 83 01 80 F0
000462-Rx:01 03 00 05 00 04 54 08
000463-Tx:01 83 01 80 F0
000464-Rx:01 03 00 05 00 04 54 08
000465-Tx:01 83 01 80 F0
000466-Rx:01 03 00 05 00 04 54 08
000467-Tx:01 83 01 80 F0
000468-Rx:01 03 00 05 00 04 54 08
000469-Tx:01 83 01 80 F0
000470-Rx:01 03 00 05 00 04 54 08
000471-Tx:01 83 01 80 F0
000472-Rx:01 03 00 05 00 04 54 08
000473-Tx:01 83 01 80 F0
000474-Rx:01 03 00 05 00 04 54 08
000475-Tx:01 83 01 80 F0
000476-Rx:01 03 00 05 00 04 54 08
000477-Tx:01 83 01 80 F0
000478-Rx:01 03 00 05 00 04 54 08
000479-Tx:01 83 01 80 F0
000480-Rx:01 03 00 05 00 04 54 08
000481-Tx:01 83 01 80 F0
000482-Rx:01 03 00 05 00 04 54 08
000483-Tx:01 83 01 80 F0
000484-Rx:01 03 00 05 00 04 54 08
000485-Tx:01 83 01 80 F0
000486-Rx:01 03 00 05 00 04 54 08
000487-Tx:01 83 01 80 F0
000488-Rx:01 03 00 05 00 04 54 08
000489-Tx:01 83 01 80 F0
000490-Rx:01 03 00 05 00 04 54 08
000491-Tx:01 83 01 80 F0
000492-Rx:01 03 00 05 00 04 54 08
000493-Tx:01 83 01 80 F0
000494-Rx:01 03 00 05 00 04 54 08
000495-Tx:01 83 01 80 F0
000496-Rx:01 03 00 05 00 04 54 08
000497-Tx:01 83 01 80 F0
000498-Rx:01 03 00 05 00 04 54 08
000499-Tx:01 83 01 80 F0
000500-Rx:01 03 00 05 00 04 54 08
000501-Tx:01 83 01 80 F0
000544-Rx:01 03 00 05 00 04 54 08
System.FormatException
HResult=0x80131537
Message=Could not find any recognizable digits.
Source=System.Private.CoreLib
StackTrace:
在 System.ParseNumbers.StringToInt(ReadOnlySpan`1 s, Int32 radix, Int32 flags, Int32& currPos)
在 System.Convert.ToByte(String value, Int32 fromBase)
在 Zhaoxi.CommunicationLib.Program.Main(String\[\] args) 在 D:\BaiduNetdiskDownload\20220514WPF上位机Course082工业协议-Modbus\20220514WPF上位机Course082工业协议-Modbus\Zhaoxi.Communication\Zhaoxi.CommunicationTest\Program.cs 中: 第 487 行

以 000194 - Tx:这行数据为例:
原始字节:3A 30 31 30 33 30 38 30 30 30 30 30 30 30 30 30 30 30 30 30 46 34 0D 0A
按结构拆分:
头3字节:3A可能起始符。
数据头6字节:30 31等(这里用ASCII字符表示,实际对应数字需转换,如"30"是字符'0'的十六进制)。
数据16字节:后续部分,代表寄存器值。
校验码2字节:46 34是LRC结果。
尾3字节:0D 0A结束符。
这整个"数据包"是一条上位机发送的指令,比如"读取1号设备的4个寄存器"。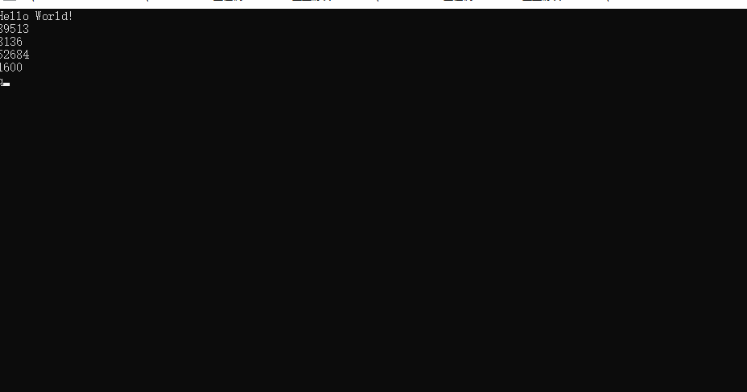
f9f1b1b04e807d447.png)
按帧接收 vs 按长度接收
按帧接收"是Modbus ASCII的天生要求
Modbus ASCII协议的一个根本特征,就是使用特殊的字符来标记一帧数据的开始(:)和结束(\r\n)。正确的做法就是利用这个特征,让串口驱动帮我们识别一帧的完整数据。ReadLine方法就是为此设计的,它持续读取数据,直到遇到行结束符(您设置了NewLine="\r\n"),这样收到的必然是一个完整的、可解析的帧。
"固定长度"为何必然失败?
您猜测的 len * 4 + 11这个公式是不可靠的。响应的长度取决于您要读取的寄存器数量(len)和从站返回的实际数据。Modbus协议规定一次读取的寄存器数量有限制(例如最多125个),但响应帧的长度是变化的。如果您需要读取的寄存器数量导致响应帧长度不等于27字节,或者通信中发生错误导致从站返回一个较短的异常帧,您的代码就会因为读不到27个字节而卡死,或者只读到一部分数据就错误地开始解析。
超时设置是通信的"保险丝"
在串口通信中,设置超时(如 ReadTimeout = 3000)至关重要。它相当于一个保险丝,意思是"我最多等3秒,如果3秒内没收到完整数据或任何数据,就抛出一个超时异常并继续执行"。这能防止程序在设备断电或线路故障时永远卡死。您的旧版代码缺少这个"保险丝",一旦出错,程序就会失去响应。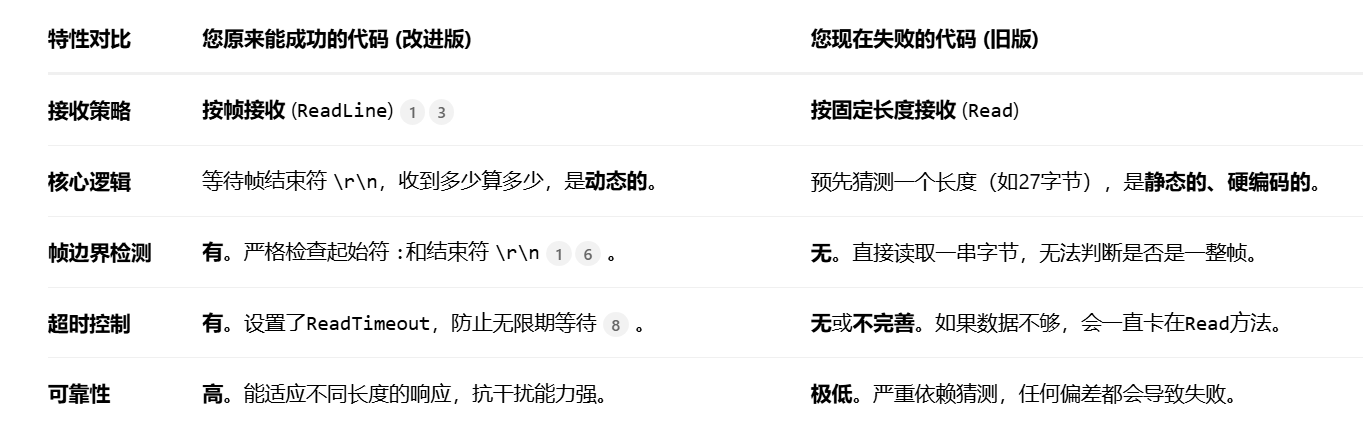
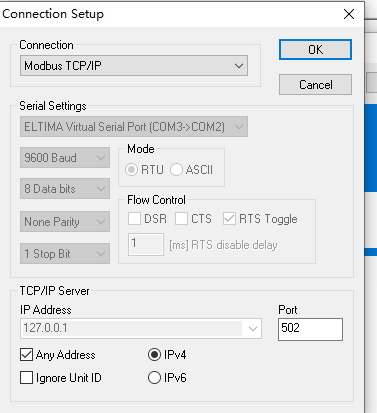
modbus tcp
000537-Tx:00 10 00 00 00 0B 01 03 08 00 00 00 59 00 05 00 00
000538-Rx:00 11 00 00 00 06 01 03 00 05 00 04
000539-Tx:00 11 00 00 00 0B 01 03 08 00 00 00 59 00 05 00 00
000540-Rx:00 12 00 00 00 06 01 03 00 05 00 04
000541-Tx:00 12 00 00 00 0B 01 03 08 00 00 00 59 00 05 00 00
000542-Rx:00 13 00 00 00 06 01 03 00 05 00 04
000543-Tx:00 13 00 00 00 0B 01 03 08 00 00 00 59 00 05 00 00
000544-Rx:00 14 00 00 00 06 01 03 00 05 00 04
000545-Tx:00 14 00 00 00 0B 01 03 08 00 00 00 59 00 05 00 00
000546-Rx:00 15 00 00 00 06 01 03 00 05 00 04
000547-Tx:00 15 00 00 00 0B 01 03 08 00 00 00 59 00 05 00 00
000555-Tx:00 02 00 00 00 0B 01 03 08 00 00 00 59 00 05 00 00
000579-Tx:00 0E 00 00 00 0B 01 03 08 00 00 00 59 00 05 00 00

000590-Rx:01 10 00 00 00 03 06 31 32 33 34 35 36 02 A9
000591-Tx:01 10 00 00 00 03 80 08
000592-Rx:01 03 00 00 00 03 05 CB
000593-Tx:01 03 06 31 32 33 34 35 36 C5 5C
000594-Rx:00 01 00 00 00 06 01 03 00 00 00 08
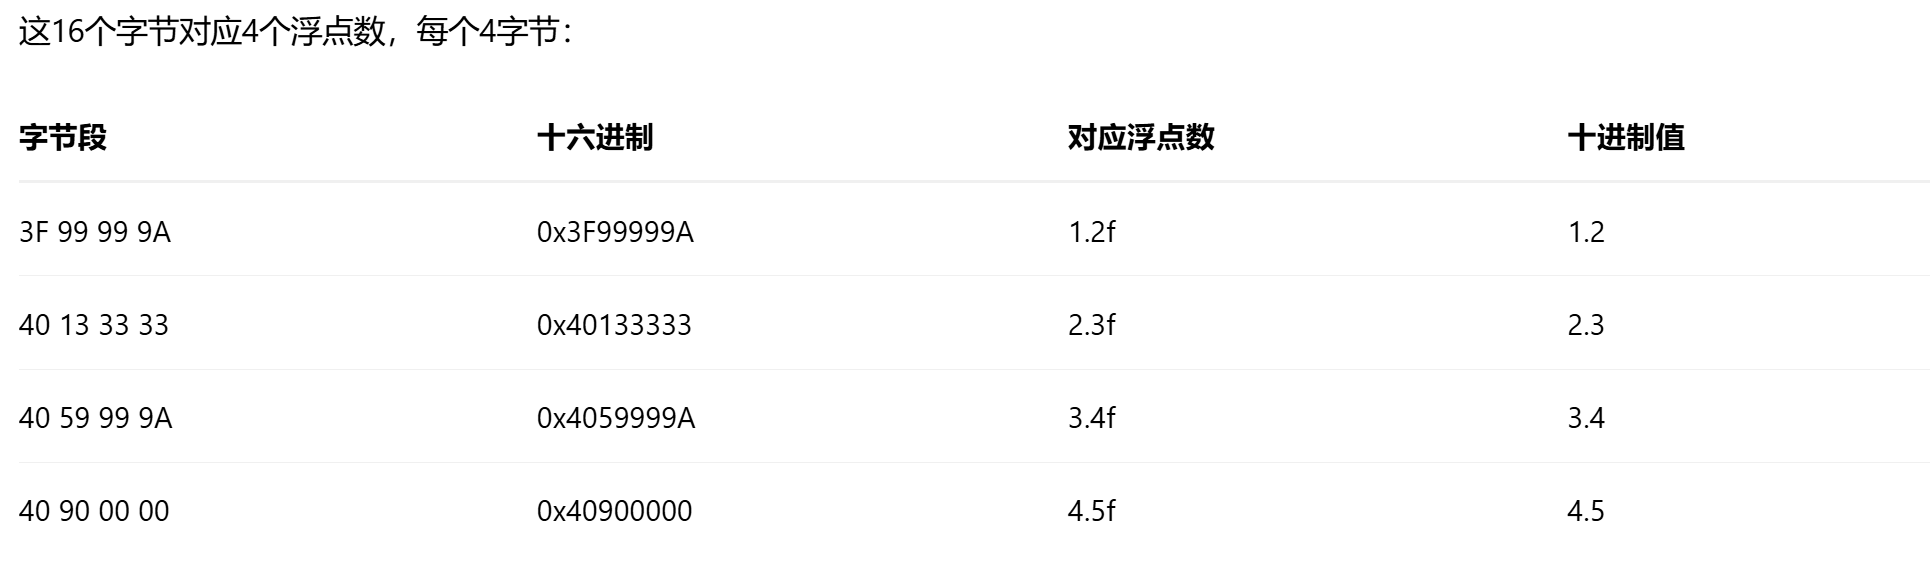
000595-Tx:00 01 00 00 00 13 01 03 10 3F 99 99 9A 40 13 33 33 40 59 99 9A 40 90 00 00
000596-Rx:00 02 00 00 00 06 01 03 00 00 00 08
000597-Tx:00 02 00 00 00 13 01 03 10 3F 99 99 9A 40 13 33 33 40 59 99 9A 40 90 00 00
000598-Rx:00 03 00 00 00 06 01 03 00 00 00 08
000599-Tx:00 03 00 00 00 13 01 03 10 3F 99 99 9A 40 13 33 33 40 59 99 9A 40 90 00 00
000600-Rx:00 04 00 00 00 06 01 03 00 00 00 08
000601-Tx:00 04 00 00 00 13 01 03 10 3F 99 99 9A 40 13 33 33 40 59 99 9A 40 90 00 00
000602-Rx:00 05 00 00 00 06 01 03 00 00 00 08
000603-Tx:00 05 00 00 00 13 01 03 10 3F 99 99 9A 40 13 33 33 40 59 99 9A 40 90 00 00
000604-Rx:00 06 00 00 00 06 01 03 00 00 00 08
000605-Tx:00 06 00 00 00 13 01 03 10 3F 99 99 9A 40 13 33 33 40 59 99 9A 40 90 00 00
000606-Rx:00 07 00 00 00 06 01 03 00 00 00 08
000607-Tx:00 07 00 00 00 13 01 03 10 3F 99 99 9A 40 13 33 33 40 59 99 9A 40 90 00 00
000608-Rx:00 08 00 00 00 06 01 03 00 00 00 08
000609-Tx:00 08 00 00 00 13 01 03 10 3F 99 99 9A 40 13 33 33 40 59 99 9A 40 90 00 00
000610-Rx:00 09 00 00 00 06 01 03 00 00 00 08
000611-Tx:00 09 00 00 00 13 01 03 10 3F 99 99 9A 40 13 33 33 40 59 99 9A 40 90 00 00
000612-Rx:00 0A 00 00 00 06 01 03 00 00 00 08
000613-Tx:00 0A 00 00 00 13 01 03 10 3F 99 99 9A 40 13 33 33 40 59 99 9A 40 90 00 00
wpf
control
csharp
    Line lineScale = new Line();
    lineScale.X1 = radius - (radius - 20) * Math.Cos(interval * step * Math.PI / 180);
    lineScale.Y1 = radius - (radius - 20) * Math.Sin(interval * step * Math.PI / 180);
    lineScale.X2 = radius - (radius - 8) * Math.Cos(interval * step * Math.PI / 180);
lineScale.Y2 = radius - (radius - 8) * Math.Sin(interval * step * Math.PI / 180);
radius(半径):表盘的半径。代码里所有点的计算都从这个"圆心"出发。
interval(间隔):每条刻度线之间的角度(单位是度)。例如,一圈有60条分钟刻度,那么 interval = 360度 / 60 = 6度。
step(步数):当前正在画第几条刻度线。比如 step = 0是第一条(12点钟方向),step = 1是第二条......step * interval就能算出当前刻度的角度。
Math.PI / 180:一个固定换算工具,因为计算机的三角函数(Math.Sin, Math.Cos)需要以"弧度"为单位,我们把"角度"乘以它,就变成了"弧度"。
lineScale:就是我们要画的那一根刻度线对象。它有两个端点:(X1, Y1) 是起点,(X2, Y2) 是终点
(0,0)─────────────────────────────────────────────────────→ X轴
│
│ ● 12点钟方向(100,20)
│ ↑
│ │
│ │
│ ● 9点钟方向(20,100)←─┼─→● 3点钟方向(180,100)
│ │ │
│ │ │圆心(100,100)
│ ● 6点钟方向(100,180)
│ │
│ │
↓ ↓
Y轴
Canvas.SetLeft(txtScale, radius - (radius - 34) * Math.Cos(interval * step * Math.PI / 180) - 17);
Canvas.SetTop(txtScale, radius - (radius - 34) * Math.Sin(interval * step * Math.PI / 180) - 8);
Canvas.SetLeft(txtScale, 100 - (100-34) * Math.Cos(30 * 0*π/180) - 17)
= 100 - 66 * Math.Cos(0) - 17
= 100 - 66 * 1 - 17
= 100 - 66 - 17
= 17
control vs userControl
我来详细解释Control类和UserControl的编写方式,用代码实例展示各种写法。
1. Control类的编写方式(3种)
方式1:标准方式(有默认样式)
// Step 1: 创建控件类
csharp
public class MyCustomControl : Control
{
    static MyCustomControl()
    {
        // 必须的!告诉WPF去Generic.xaml找默认样式
        DefaultStyleKeyProperty.OverrideMetadata(
            typeof(MyCustomControl),
            new FrameworkPropertyMetadata(typeof(MyCustomControl)));
    }
}
// Step 2: 在Themes/Generic.xaml中写样式
csharp
<ResourceDictionary xmlns="http://schemas.microsoft.com/winfx/2006/xaml/presentation"
                    xmlns:x="http://schemas.microsoft.com/winfx/2006/xaml"
                    xmlns:local="clr-namespace:YourNamespace">

    <Style TargetType="{x:Type local:MyCustomControl}">
        <Setter Property="Template">
            <Setter.Value>
                <ControlTemplate TargetType="{x:Type local:MyCustomControl}">
                    <Border Background="{TemplateBinding Background}"
                            BorderBrush="{TemplateBinding BorderBrush}"
                            BorderThickness="{TemplateBinding BorderThickness}">
                        <TextBlock Text="自定义控件"
                                   HorizontalAlignment="Center"
                                   VerticalAlignment="Center"/>
                    </Border>
                </ControlTemplate>
            </Setter.Value>
        </Setter>
    </Style>
</ResourceDictionary>
方式2:内联样式(没有Generic.xaml)
// 控件类
csharp
public class InlineControl : Control
{
    public InlineControl()
    {
        // 直接在代码中设置样式
        this.Style = new Style(typeof(InlineControl));
        this.Style.Setters.Add(new Setter(TemplateProperty,
            new ControlTemplate(typeof(InlineControl))
            {
                VisualTree = new FrameworkElementFactory(typeof(Border))
                {
                    Name = "border",
                    SetValue(Border.BackgroundProperty, Brushes.LightBlue),
                    SetValue(Border.CornerRadiusProperty, new CornerRadius(5))
                }
            }));
    }
}
方式3:通过依赖属性控制外观
csharp
public class DynamicControl : Control
{
    static DynamicControl()
    {
        DefaultStyleKeyProperty.OverrideMetadata(
            typeof(DynamicControl),
            new FrameworkPropertyMetadata(typeof(DynamicControl)));
    }

    // 添加依赖属性
    public string DisplayText
    {
        get { return (string)GetValue(DisplayTextProperty); }
        set { SetValue(DisplayTextProperty, value); }
    }

    public static readonly DependencyProperty DisplayTextProperty =
        DependencyProperty.Register("DisplayText", typeof(string),
        typeof(DynamicControl), new PropertyMetadata("默认文本"));
}
2. UserControl的编写方式(2种)
方式1:标准XAML方式(最常见)
csharp
<UserControl x:Class="YourNamespace.MyUserControl"
             xmlns="http://schemas.microsoft.com/winfx/2006/xaml/presentation"
             xmlns:x="http://schemas.microsoft.com/winfx/2006/xaml">
    <Grid>
        <TextBox x:Name="InputBox" Width="200"/>
        <Button Content="确定" Width="60" Margin="5"/>
    </Grid>
</UserControl>
// MyUserControl.xaml.cs
csharp
public partial class MyUserControl : UserControl
{
    public MyUserControl()
    {
        InitializeComponent();  // 自动加载XAML
    }
}
方式2:纯代码方式(不用XAML)
csharp
public class CodeOnlyUserControl : UserControl
{
    private TextBox textBox;
    private Button button;

    public CodeOnlyUserControl()
    {
        // 手动创建界面
        var stackPanel = new StackPanel
        {
            Orientation = Orientation.Horizontal,
            Margin = new Thickness(10)
        };

        textBox = new TextBox
        {
            Width = 200,
            Margin = new Thickness(0, 0, 5, 0)
        };

        button = new Button
        {
            Content = "确定",
            Width = 60
        };

        button.Click += Button_Click;

        stackPanel.Children.Add(textBox);
        stackPanel.Children.Add(button);

        this.Content = stackPanel;
    }

    private void Button_Click(object sender, RoutedEventArgs e)
    {
        MessageBox.Show($"输入了: {textBox.Text}");
    }
}
3. 完整示例对比
示例1:创建一个按钮控件
用UserControl方式:
// CustomButton.xaml.cs
public partial class CustomButton : UserControl
{
public string ButtonText
{
get { return (string)GetValue(ButtonTextProperty); }
set { SetValue(ButtonTextProperty, value); }
}
public static readonly DependencyProperty ButtonTextProperty =
    DependencyProperty.Register("ButtonText", typeof(string),
    typeof(CustomButton), new PropertyMetadata("按钮"));

public event RoutedEventHandler Click
{
    add { Btn.Click += value; }
    remove { Btn.Click -= value; }
}
}
用Control方式:
// CustomButton.cs
public class CustomButton : Control
{
static CustomButton()
{
DefaultStyleKeyProperty.OverrideMetadata(
typeof(CustomButton),
new FrameworkPropertyMetadata(typeof(CustomButton)));
}
public static readonly RoutedEvent ClickEvent =
    EventManager.RegisterRoutedEvent("Click",
    RoutingStrategy.Bubble, typeof(RoutedEventHandler),
    typeof(CustomButton));

public event RoutedEventHandler Click
{
    add { AddHandler(ClickEvent, value); }
    remove { RemoveHandler(ClickEvent, value); }
}

public string Content
{
    get { return (string)GetValue(ContentProperty); }
    set { SetValue(ContentProperty, value); }
}

public static readonly DependencyProperty ContentProperty =
    DependencyProperty.Register("Content", typeof(string),
    typeof(CustomButton), new PropertyMetadata(""));
}
- 创建步骤总结
Control类的创建步骤:
graph TD
A创建Control类 --> B[在静态构造函数中
设置DefaultStyleKey]
B --> C[添加依赖属性
和路由事件]
C --> D[在Themes/Generic.xaml中
定义ControlTemplate]
D --> E[在App.xaml中
合并Generic.xaml]
E --> F在XAML中使用控件
具体代码:
// 1. 创建MyControl.cs
public class MyControl : Control
{
static MyControl()
{
DefaultStyleKeyProperty.OverrideMetadata(
typeof(MyControl),
new FrameworkPropertyMetadata(typeof(MyControl)));
}
}
<Application.Resources>
<ResourceDictionary.MergedDictionaries>
</ResourceDictionary.MergedDictionaries>
</Application.Resources>
UserControl的创建步骤:
graph TD
A右键项目添加用户控件 --> B自动生成.xaml和.cs文件
B --> C在XAML中设计界面
C --> D在.cs中写逻辑代码
D --> E直接在XAML中使用
具体代码:
// VS自动生成的
public partial class MyUserControl : UserControl
{
public MyUserControl()
{
InitializeComponent(); // 加载XAML
}
}
- 使用方式的对比
编写方式 UserControl Control
创建XAML 有独立的.xaml文件 在Generic.xaml中定义Template
代码文件 有对应的.xaml.cs 只有.cs文件
加载方式 InitializeComponent() DefaultStyleKeyProperty
外观定义 直接在XAML中 在ControlTemplate中
可换肤 ❌ 固定外观 ✅ 可更换Template
创建速度 ✅ 快速 ❌ 较慢
- 实际选择建议
什么时候用UserControl?
// 场景1:快速开发特定功能
public class LoginPanel : UserControl
// 原因:界面固定,不需要换皮肤
// 场景2:组合现有控件
public class DataGridWithButtons : UserControl
// 原因:包含DataGrid、按钮、文本框等组合
// 场景3:不想写ControlTemplate
// 原因:UserControl简单直接
什么时候用Control?
// 场景1:需要主题支持
public class ThemeableButton : Control
// 原因:ControlTemplate可以切换
// 场景2:创建控件库
public class MyControlLibrary.Button : Control
// 原因:使用者可以自定义外观
// 场景3:需要复杂的状态管理
public class ToggleSwitch : Control
// 原因:有Normal、MouseOver、Pressed等状态
- 代码片段参考
UserControl快速模板:
// 在VS中,输入"usercontrol"然后按Tab键
public partial class MyControl : UserControl
{
public MyControl()
{
InitializeComponent();
}
// 添加依赖属性:输入propdp然后按Tab键
public string MyProperty
{
    get { return (string)GetValue(MyPropertyProperty); }
    set { SetValue(MyPropertyProperty, value); }
}

public static readonly DependencyProperty MyPropertyProperty =
    DependencyProperty.Register("MyProperty", typeof(string),
    typeof(MyControl), new PropertyMetadata(""));
}
Control快速模板:
// 手动创建
public class MyCustomControl : Control
{
static MyCustomControl()
{
DefaultStyleKeyProperty.OverrideMetadata(
typeof(MyCustomControl),
new FrameworkPropertyMetadata(typeof(MyCustomControl)));
}
// 依赖属性
public string Text
{
    get { return (string)GetValue(TextProperty); }
    set { SetValue(TextProperty, value); }
}

public static readonly DependencyProperty TextProperty =
    DependencyProperty.Register("Text", typeof(string),
    typeof(MyCustomControl), new PropertyMetadata(""));
}
- 简单总结
UserControl的写法:
- 在VS中添加用户控件
- 在XAML中画界面
- 在.cs中写逻辑
- 使用InitializeComponent()加载界面
Control的写法:
- 创建类继承Control
- 在静态构造函数设置DefaultStyleKey
- 在Generic.xaml中定义ControlTemplate
- 在App.xaml中合并Generic.xaml
- 通过TemplateBinding绑定属性
最简单的选择原则:
• 快速实现、界面固定 → UserControl
• 需要换肤、通用控件 → Control
为什么会有这种颜色这种这种值不匹配的情况呀?那为什么view model不能设置成这种,你前前端是颜色,你后端为啥不能是颜色画刷,而而非要弄成一个布尔型啊?
场景对比:为什么用bool(业务状态)比用Brush(视觉细节)更好?
问题暴露了:
换肤灾难:老板说:"今年流行莫兰迪色,金色太土了,爆款全部换成雾霾蓝。"
你作为设计师,却无权直接修改颜色!你必须去求(或者自己改)后端程序员,让他把 Brushes.Gold改成 Brushes.LightBlue。这破坏了"设计归设计,逻辑归逻辑"的原则。
逻辑污染:ViewModel里掺入了对System.Windows.Media命名空间的引用(Brushes),这让你的核心业务逻辑依赖了具体的UI框架。如果你想用同一套ViewModel去适配一个控制台应用或者Web API,它会因为找不到WPF的画刷而报错。
复用性差:另一个地方想用三角形图标而不是颜色块来表示"爆款",你怎么办?再在ViewModel里加一个StatusIcon属性吗?ViewModel会变得越来越臃肿。
方案二:ViewModel提供bool,View用转换器决定外观(推荐)
优势体现:
自由换肤:老板要换颜色?设计师直接在XAML里改转换器的输出值,或者换一个转换器,完全不需要动后端代码。
灵活多变:另一个页面想用图标表示?再创建一个转换器即可。
职责清晰,易于维护:ViewModel只关心"是什么"(业务状态),View只关心"怎么显示"(视觉效果)。两者通过"转换器"这个标准接口协作,耦合度最低。
可测试性强:测试ViewModel时,你只需要测试IsFeatured这个布尔值的逻辑是否正确,无需关心任何颜色或UI细节。
结论
之所以会出现"类型不匹配"(boolvs Brush),这不是技术限制,而是主动的、精心的设计选择。
bool IsFeatured 代表的是业务领域的核心状态(爆款与否),它是稳定、纯粹的。
Brush 代表的是具体平台的视觉呈现,它是易变、属于表现层的。
让稳定的业务逻辑去依赖易变的视觉细节,是糟糕的设计。 值转换器(IValueConverter)就是连接这两层的完美粘合剂,它保证了:
ViewModel对View一无所知,它只提供原始数据和状态;View则根据这些状态,自由地决定如何渲染。
所以,您在项目里看到的BoolToBrushConverter,正是这种优秀设计哲学的体现:把"是什么"和"怎么显示"优雅地解耦开了。