目录
vscode与wsl的ubuntu系统建立链接构建鸿蒙开发路径
[步骤1:内核启动后,第一个入口函数hi_void app_main(hi_void)](#步骤1:内核启动后,第一个入口函数hi_void app_main(hi_void))
步骤2:调用鸿蒙系统初始化方法:HOS_SystemInit()
[(1)GpioInit,Initializes the GPIO device设备初始化函数](#(1)GpioInit,Initializes the GPIO device设备初始化函数)
[(2)IoSetFunc,Sets the multiplexing function for a GPIO pin设置GPIO功能](#(2)IoSetFunc,Sets the multiplexing function for a GPIO pin设置GPIO功能)
[(3)GpioSetDir,Sets the direction for a GPIO pin设备的方向(输入或者输出)](#(3)GpioSetDir,Sets the direction for a GPIO pin设备的方向(输入或者输出))
[(4)GpioSetOutputVal,Sets the output level value for a GPIO pin](#(4)GpioSetOutputVal,Sets the output level value for a GPIO pin)
[(2)编写应用模块构建脚本 BUILD.gn(app/youdianjike/code2/BUILD.gn)](#(2)编写应用模块构建脚本 BUILD.gn(app/youdianjike/code2/BUILD.gn))
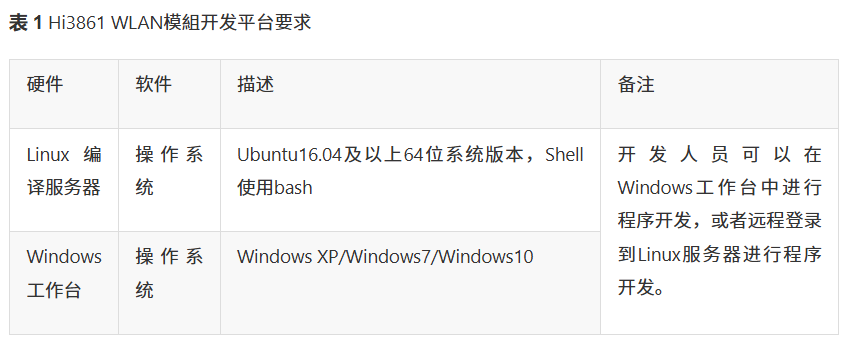
四、windows下开发环境的搭建
使用vscode开发工具建立c的开发环境
需要使用vscode访问Ubuntu系统.并在hmcode目录建立相关开发路径。
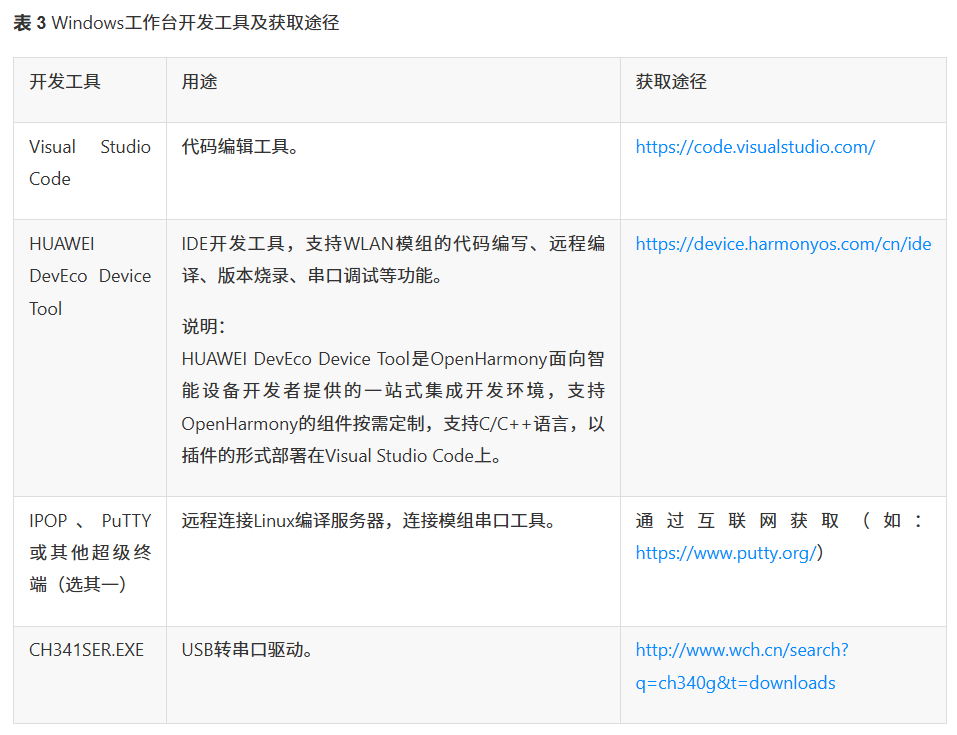
下载地址:https://code.visualstudio.com/
下载完成后进行安装,安装完,双击桌面的vscode图标,进入vscode开发界面
安装插件
需要安装c语言、gn、wsl插件
WSL
C/C++ C/C++ Themes
GN GN Format GN Language
vscode与wsl的ubuntu系统建立链接构建鸿蒙开发路径
view->Command Palette...
输入wsl->WSL:Connect to WSL
打开hmcode鸿蒙的开发目录
/root/hmcode/
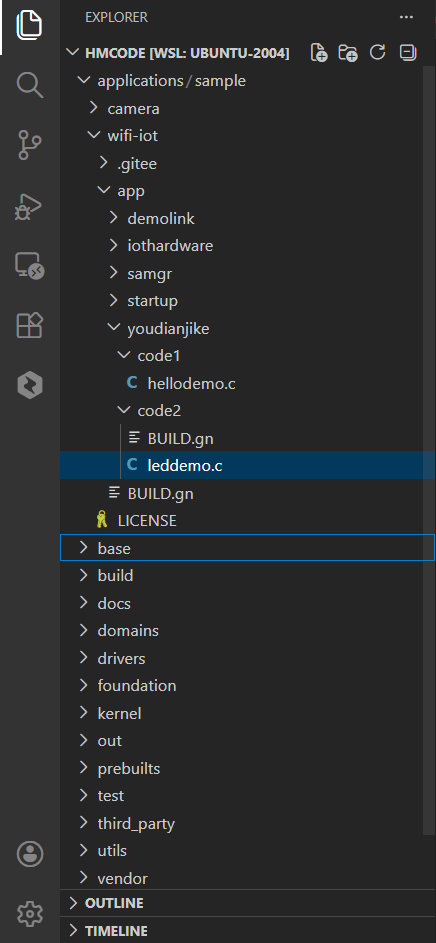
app--项目源代码目录,可以创建文件夹和c的源文件
BUILD.gn---app的构建配置文件
应用模块测试
安装开发板的驱动程序
在安装之前,连接主板到电脑。
双击CH341SER.EXE进行驱动的安装
点击安装直到完成,在设备管理器中查看,端口CH340
在app目录下创建文件夹以及子文件夹进行项目开发
1.步骤1:创建工程目录
在app目录下创建文件夹及子文件夹
2.步骤2:编写业务代码,调用启动功能模块宏执行函数
3.步骤3:编写应用模块构建脚本BUILD.gn
4.步骤4:配置应用模块 helloapp 到应用子系统
进行编译、下载out路径和烧写到板卡
1.编译
进入ubuntu的~/hmcode目录,运行:
python build.py wifiiot
2.下载
将out目录复制到e:的test目录下:e:\test
3.烧写
双击HiBurn.exe运行烧写程序
4.运行测试
双击"IPOP 4.1.EXE",进入主板运行界面,点击"终端工具"
运行流程
启动步骤:
内核启动后,第一个入口函数hi_void app_main(hi_void)
调用鸿蒙系统初始化方法:HOS_SystemInit()
调用MODULE_INIT(run);
调用SYS_RUN(HelloWorld);
步骤1:内核启动后,第一个入口函数hi_void app_main(hi_void)
路径:vendor\hisi\hi3861\hi3861\app\wifiiot_app\src\app_main.c
步骤2:调用鸿蒙系统初始化方法:HOS_SystemInit()
路径:base/startup/services/bootstrap_lite/source/system_init.c
步骤3:调用MODULE_INIT(run);
需要查找app下的BUNILD.gn文件
路径:base/startup/services/bootstrap_lite/source/system_init.c
步骤4:调用SYS_RUN( h ello w orld);
路径:applications/sample/wifi-iot/app/youdianjike/code1/hellodemo.c
核心板Led灯开发

用跳线帽连接 J8 的两个 pin
使用GPIO9
输出低电平点亮
输出高电平熄灭
开发步骤
初始化GPIO设备
设置管脚WIFI_IOT_IO_NAME_GPIO_9功能为IO
设置引脚WIFI_IOT_IO_NAME_GPIO_9方向为输出
给管脚WIFI_IOT_IO_NAME_GPIO_9输出低电平点亮LED灯
给管脚WIFI_IOT_IO_NAME_GPIO_9输出高电平熄灭LED灯
1.GPIO相关的概念
在头文件\\base\iot_hardware\interfaces\kits\wifiiot_lite\wifiiot_gpio.h中,定义了GPIO功能相关枚举:
WifiIotGpioDir,Enumerates GPIO directions
WifiIotGpioValue,numerates GPIO level values.
在头文件\\base\iot_hardware\interfaces\kits\wifiiot_lite\wifiiot_gpio_ex.h中,定义了在Wi-Fi模块上提供专用设备的相关枚举:
WifiIotIoName,Enumerates GPIO hardware pin IDs
WifiIotIoFuncGpio9,Enumerates the functions of GPIO hardware pin 9
WifiIotGpioDir,Enumerates GPIO directions
/**
 * @brief Enumerates GPIO directions.
 */
typedef enum {
    /** Input */
    WIFI_IOT_GPIO_DIR_IN = 0,
    /** Output */
    WIFI_IOT_GPIO_DIR_OUT
} WifiIotGpioDir;
WifiIotGpioValue,Enumerates GPIO level values
/**
 * @brief Enumerates GPIO level values.
 */
typedef enum {
    /** Low GPIO level */
    WIFI_IOT_GPIO_VALUE0 = 0,
    /** High GPIO level */
    WIFI_IOT_GPIO_VALUE1
} WifiIotGpioValue;
WifiIotIoName,Enumerates GPIO hardware pin IDs
/**
 * @brief Enumerates GPIO hardware pin IDs.
 */
typedef enum {
    /** GPIO hardware pin 0 */
    WIFI_IOT_IO_NAME_GPIO_0,
    /** GPIO hardware pin 1 */
    WIFI_IOT_IO_NAME_GPIO_1,
    /** GPIO hardware pin 2 */
    WIFI_IOT_IO_NAME_GPIO_2,
    /** GPIO hardware pin 3 */
    WIFI_IOT_IO_NAME_GPIO_3,
    /** GPIO hardware pin 4 */
    WIFI_IOT_IO_NAME_GPIO_4,
    /** GPIO hardware pin 5 */
    WIFI_IOT_IO_NAME_GPIO_5,
    /** GPIO hardware pin 6 */
    WIFI_IOT_IO_NAME_GPIO_6,
/** GPIO hardware pin 7 */
    WIFI_IOT_IO_NAME_GPIO_7,
    /** GPIO hardware pin 8 */
    WIFI_IOT_IO_NAME_GPIO_8,
    /** GPIO hardware pin 9 */
    WIFI_IOT_IO_NAME_GPIO_9,
    /** GPIO hardware pin 10 */
    WIFI_IOT_IO_NAME_GPIO_10,
    /** GPIO hardware pin 11 */
    WIFI_IOT_IO_NAME_GPIO_11,
    /** GPIO hardware pin 12 */
    WIFI_IOT_IO_NAME_GPIO_12,
    /** GPIO hardware pin 13 */
    WIFI_IOT_IO_NAME_GPIO_13,
    /** GPIO hardware pin 14 */
    WIFI_IOT_IO_NAME_GPIO_14,
    /** Maximum value */
    WIFI_IOT_IO_NAME_MAX,
} WifiIotIoName;
WifiIotIoFuncGpio9,Enumerates the functions of GPIO hardware pin 9.
/**
 * @brief Enumerates the functions of GPIO hardware pin 9.
 */
typedef enum {
    /** GPIO9 function */
    WIFI_IOT_IO_FUNC_GPIO_9_GPIO,
    /** I2C0 SCL function */
    WIFI_IOT_IO_FUNC_GPIO_9_I2C0_SCL,
    /** UART2 RTS function */
    WIFI_IOT_IO_FUNC_GPIO_9_UART2_RTS_N,
    /** SDIO D2 function */
    WIFI_IOT_IO_FUNC_GPIO_9_SDIO_D2,
    /** SPI0 TXD function */
    WIFI_IOT_IO_FUNC_GPIO_9_SPI0_TXD,
    /** PWM0 OUT function */
    WIFI_IOT_IO_FUNC_GPIO_9_PWM0_OUT,
    /** I2S0 MCLK function */
    WIFI_IOT_IO_FUNC_GPIO_9_I2S0_MCLK = 7,
} WifiIotIoFuncGpio9;
2.头文件函数
在头文件\\base\iot_hardware\interfaces\kits\wifiiot_lite\wifiiot_gpio.h中,定义了GPIO功能相关操作函数:
GpioInit,Initializes the GPIO device
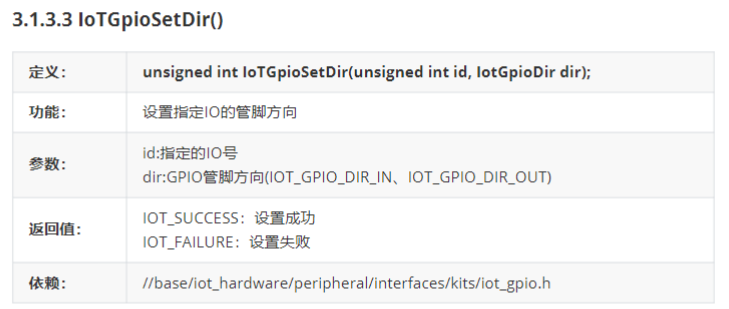
GpioSetDir,Sets the direction for a GPIO pin
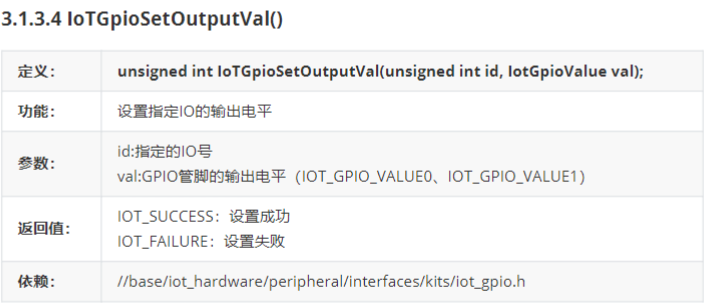
GpioSetOutputVal,Sets the output level value for a GPIO pin
在头文件\\base\iot_hardware\interfaces\kits\wifiiot_lite\wifiiot_gpio_ex.h中,在Wi-Fi模块上提供专用设备操作接口,包括ADC、AT、闪存、GPIO、I2C、I2S、分区、PWM、SDIO、UART和看门狗:
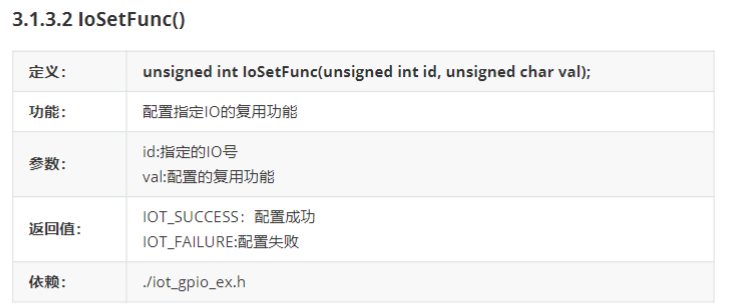
IoSetFunc,Sets the multiplexing function for a GPIO pin
(1)GpioInit,Initializes the GPIO device设备初始化函数
/**
 * @brief Initializes the GPIO device.
 *
 * @return Returns {@link WIFI_IOT_SUCCESS} if the operation is successful;
 * returns an error code defined in {@link wifiiot_errno.h} otherwise.
 * @since 1.0
 * @version 1.0
 */
unsigned int GpioInit(void);
(2)IoSetFunc,Sets the multiplexing function for a GPIO pin设置GPIO功能
/**
 * @brief Sets the multiplexing function for a GPIO pin.
 *
 * @param id Indicates the GPIO pin.
 * @param val Indicates the I/O multiplexing function. For example,
 * if the value of <b>id</b> is {@link WIFI_IOT_IO_NAME_GPIO_0},
 * the value type of <b>val</b> is {@link WifiIotIoFuncGpio0}.
 * If the value of <b>id</b> is {@link WIFI_IOT_IO_NAME_GPIO_1},
 * the value type of <b>val</b> is {@link WifiIotIoFuncGpio1}.
 * The same rule applies to other values.
 * @return Returns {@link WIFI_IOT_SUCCESS} if the operation is successful;
 * returns an error code defined in {@link wifiiot_errno.h} otherwise.
 * @since 1.0
 * @version 1.0
 */
unsigned int IoSetFunc(WifiIotIoName id, unsigned char val);
(3)GpioSetDir,Sets the direction for a GPIO pin设备的方向(输入或者输出)
/**
 * @brief Sets the direction for a GPIO pin.
 *
 * @param id Indicates the GPIO pin ID.
 * @param dir Indicates the GPIO input/output direction.
 * @return Returns {@link WIFI_IOT_SUCCESS} if the operation is successful;
 * returns an error code defined in {@link wifiiot_errno.h} otherwise.
 * @since 1.0
 * @version 1.0
 */
unsigned int GpioSetDir(WifiIotGpioIdx id, WifiIotGpioDir dir);
(4)GpioSetOutputVal,Sets the output level value for a GPIO pin
/**
 * @brief Sets the output level value for a GPIO pin.
 *
 * @param id Indicates the GPIO pin ID.
 * @param val Indicates the output level value.
 * @return Returns {@link WIFI_IOT_SUCCESS} if the operation is successful;
 * returns an error code defined in {@link wifiiot_errno.h} otherwise.
 * @since 1.0
 * @version 1.0
 */
unsigned int GpioSetOutputVal(WifiIotGpioIdx id, WifiIotGpioValue val);
3.实现led灯亮灭的操作
实现Led灯的亮灭操作
(1)编写源代码
新建code2目录,创建文件leddemo.c
|--------------------------------------------------------------------------------------------------------------------------------------------------------------------------------------------------------------------------------------------------------------------------------------------------------------------------------------------------------------------------------------------------------------------------------------------------------------------------------------------------------------------------------------------------------------------------------------------------------------------------------------------------------|
| #include <stdio.h> #include "ohos_init.h" #include <unistd.h> #include "wifiiot_gpio.h" #include "wifiiot_gpio_ex.h" #include "ohos_types.h" void leddemo(void) { GpioInit(); //初始化GPIO设备 IoSetFunc(WIFI_IOT_IO_NAME_GPIO_9, WIFI_IOT_IO_FUNC_GPIO_9_GPIO);//设置设备的功能 GpioSetDir(WIFI_IOT_IO_NAME_GPIO_9, WIFI_IOT_GPIO_DIR_OUT);//设置设备的方向,WIFI_IOT_GPIO_DIR_OUT表示输出方向 GpioSetOutputVal(WIFI_IOT_IO_NAME_GPIO_9, WIFI_IOT_GPIO_VALUE0);//设置设备的输出值,需要指定设备的名称和值,VALUE0低电位 printf("led open \n"); usleep(4000000);//点亮四秒后熄灭 GpioSetOutputVal(WIFI_IOT_IO_NAME_GPIO_9, WIFI_IOT_GPIO_VALUE1);//value1是高电位 printf("led close \n"); } SYS_RUN(leddemo); |
(2)编写应用模块构建脚本 BUILD.gn(app/youdianjike /code2/BUILD.gn )
|-------------------------------------------------------------------------------------------------------------------------------------------------------------------------|
| static_library("ledapp") { sources = "leddemo.c" include_dirs = "//utils/native/lite/include", "//base/iot_hardware/interfaces/kits/wifiiot_lite" } |
(3)编写app目录下的BUILD.gn(/app/BUILD.gn),注册到应用子系统中
|-------------------------------------------------------------------------------------------------------------------------------------------|
| import("//build/lite/config/component/lite_component.gni") lite_component("app") { features = "youdianjike/code2:****ledapp****", } |
(4)编译、下载、烧写、运行
编译:python build.py wifiiot
......